
In this manual, in detail about the ways to run a memory test tool tools, and even in cases where the input into the system is not possible, as well as about possible action options in case the test, the memory diagnostic tool reports that equipment problems were detected. . On a similar topic: Troubleshooting Windows 10.
- Methods for starting memory check tools
- Use means and view results
- Detected equipment problems in the memory diagnostic tool
- Video instruction
How to start a memory verification tool in Windows 10 and previous versions of the system
In case the operating system starts, entering it and work is possible, you can use one of the following options for starting the memory check tool:
- Find the desired item in the Windows Administration Tools section of the Start menu.
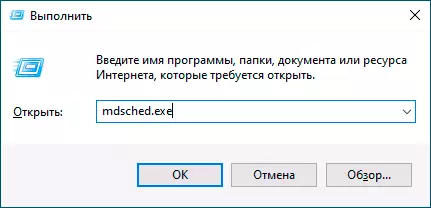
- Press keys Win + R. on the keyboard, enter mdsched.exe. And press ENTER.
- Open the control panel, select the "Administration" item and launch the Windows Memory Tool.
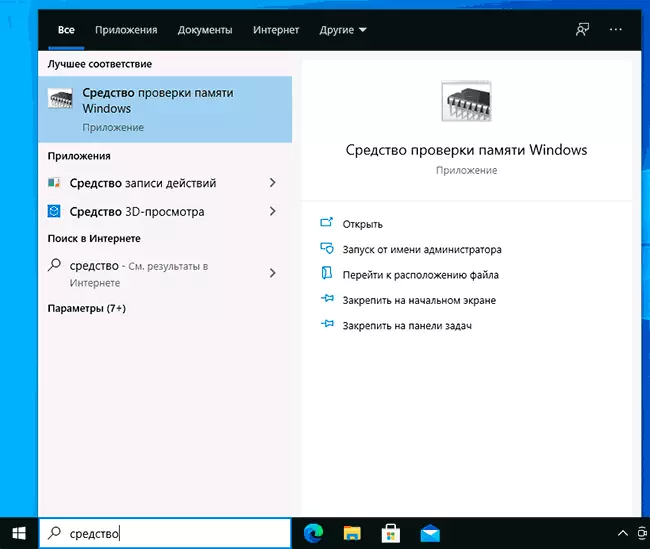
- Use the search in the Windows 10 taskbar by starting to enter a "memory check tool". Or built-in search tools in previous versions of the OS.
- Manually run file C: \ Windows \ System32 \ MdSChed.exe
If the situation is complicated by the fact that Windows does not start, the input to it is impossible, or failures occur immediately after it, you can use the following ways to start the RAM diagnostic tool:
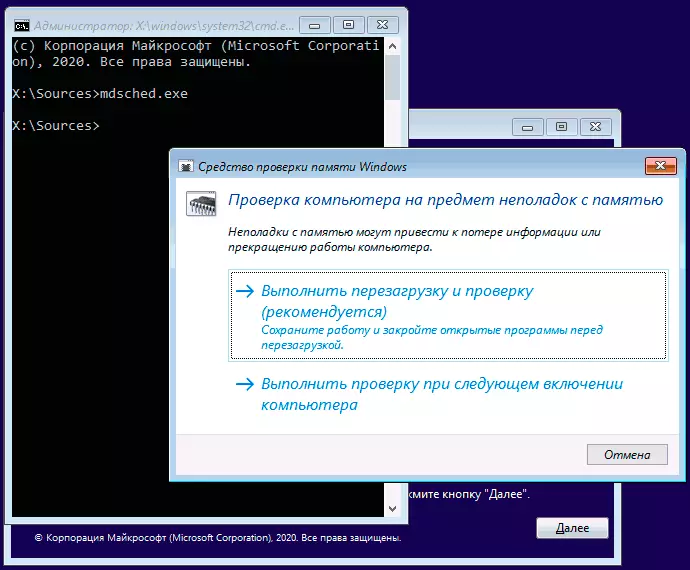
- Download a computer or laptop from a bootable flash drive with Windows 10 or another version of Windows, you can also from the boot disk. Press the keys on the installation program screen. SHIFT + F10. (SHIFT + FN + F10 on some laptops), enter MDSEXE in the command line that opens and press ENTER. After selecting the "Run and Check" checkout, download the computer not from the flash drive, but from the usual bootable HDD or SSD.
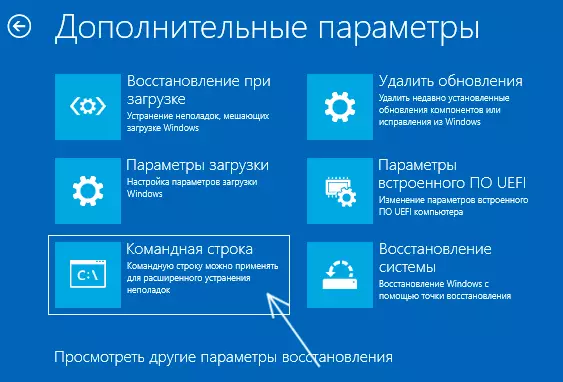
- Memory check can be started from the Windows 10 recovery environment - by clicking the "Advanced Settings" button on the blue screen with an error or, while on the Windows 10 lock screen (with the user name selection), click on the button shown on the right below the "Power" button, and then holding the button Shift, click "Restart". In the recovery environment, select "Troubleshooting" - "Advanced Parameters" - "Command Line". And in it, as in the previous case, use the mdsched.exe command.
- If you have a prepared Windows Recovery disk, you can start, downloading from it.
Using Windows Memory Check and View Results
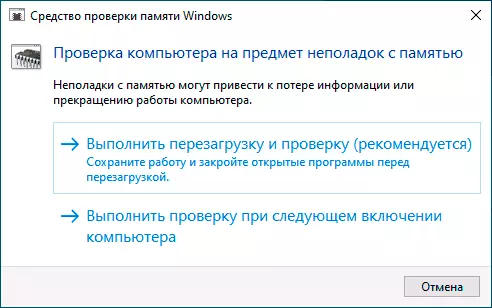
After starting a memory verification tool, you will be prompted to restart the computer, after consent, the process will look like this:
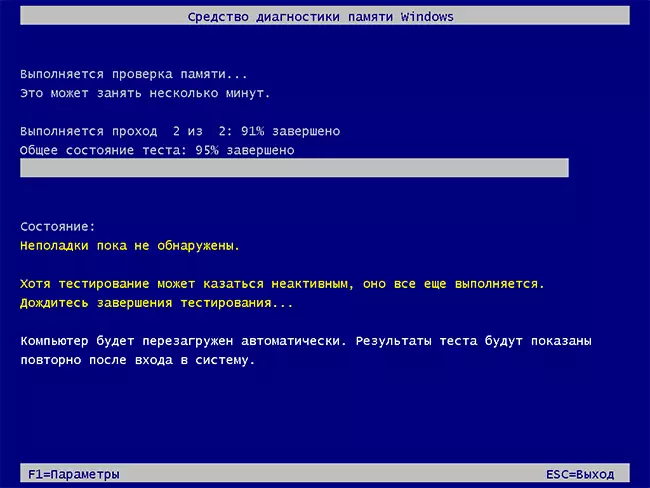
- The RAM is started, which may take a long time. It may seem that the diagnostic tool depended: just in case, wait in such a situation for 5-10 minutes. If it really happened, it happened, it is not excluded that there are problems with equipment, probably with RAM, but not necessarily.
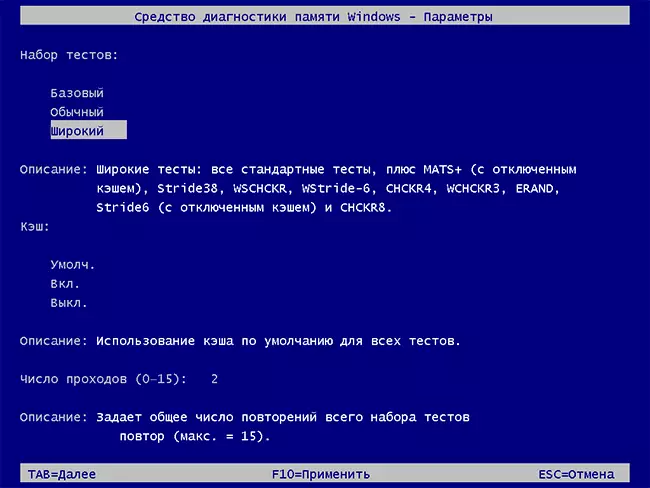
- If you press the key during the check F1. (or Fn + F1, if the F1 does not work), you will fall into the Windows Memory Diagnostic Tools. Here you can select a set of tests (default - normal), using cache, and the number of passes. Switching between the settings sections is performed by key Tab. , change parameters - arrows and entering numbers (for the number of passes), apply the settings - key F10 . After changing the settings, the test is restarted.
- During the check, you will see the problem of "Problems have not yet been detected" or "Equipment problems were found."
After the verification is completed, the computer will be automatically rebooted. Further steps - view results.
- After rebooting in the case of Windows 10, you can see a notification in the notification area that reports on the result of the memory check. But it is not always displayed.
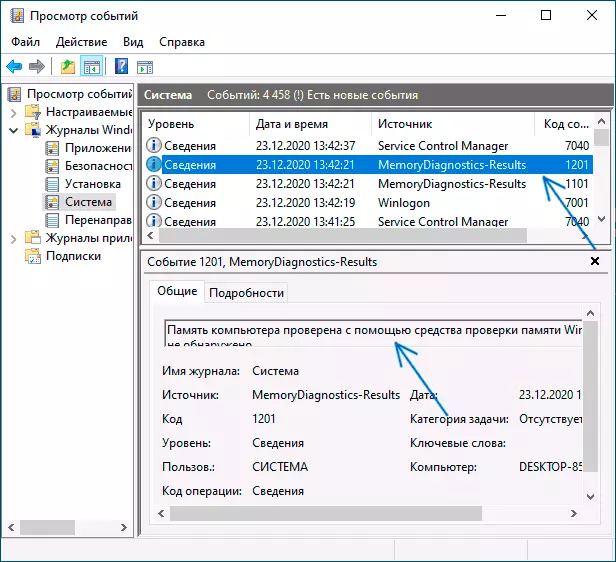
- You can go to view events, for this click Win + R. Introduce eventvwr.msc. And press ENTER. Open the section "Windows" - "System" section, find items where the "Source" column is indicated MemoryDiagnostics-Results. And we look at the results.
Consider that errors, "departures", blue screens and hangs are not always associated with the problems of RAM: If the diagnostic tool shows that everything is in order, there are other possible reasons: a disconnected paging file, problems with HDD or SSD (or from them Connection, for example - faulty cable), third-party antiviruses or, on the contrary, malicious programs, incorrect operation of equipment drivers.
What to do if problems have been found in the memory diagnostic tool
Unfortunately, the diagnostic tool does not report exactly which problems were discovered during the inspection, but only recommends contacting the manufacturer of the equipment. What can be done:- Disable any memory acceleration options (change in frequency, timings and others) in the presence of appropriate options in BIOS or by the manufacturer of the motherboard or laptop.
- Try to check the memory bar on one one, in other slots on the motherboard in order to find out whether problems only with one specific memory module or in one particular connector appear.
- Use other utilities to verify RAM if necessary.
- Read the documentation for the PC motherboard - perhaps it is some kind of memory incompatibility with specific characteristics (if you recently added new memory modules or just yourself collected a computer).
- Sometimes BIOS update can help.
Video instruction
If you figured out what your problem was caused, I will be grateful to the comment on the article: perhaps for someone it will be useful.