Method 1: Windows tools
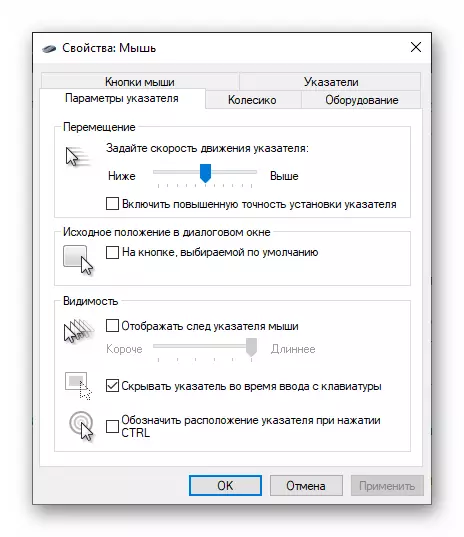
To date, we can say that any computer mouse, and gamer manipulators from the Bloody model range from A4Tech here is no exception, in fact do not require settings to work in the usual (office) mode. All necessary configuration manipulations are made by Windows automatically, it is only worth connecting the device to a PC. At the same time, only some possibilities for changing the behavior of the mouse behavior with system means are available to the user, but in some cases it will be worthwhile.
Read more: How to configure a computer mouse with built-in Windows tools
Method 2: By from the manufacturer of the mouse (Bloody 7)
It is not easy to ensure the health of the bland mouse in the system, and in a wide range to adjust all of its parameters characterizing it and thus accurately adjust the manipulator to implement individual purposes allows the specialized version of the model-provided software provided by the manufacturer. At the time of writing the article, the current version of the Bloody software is assembly with number 7.Installation of software and driver
- Connect the mouse or its wireless controller to a PC / laptop, wait until the manipulator is on the system and starts working.
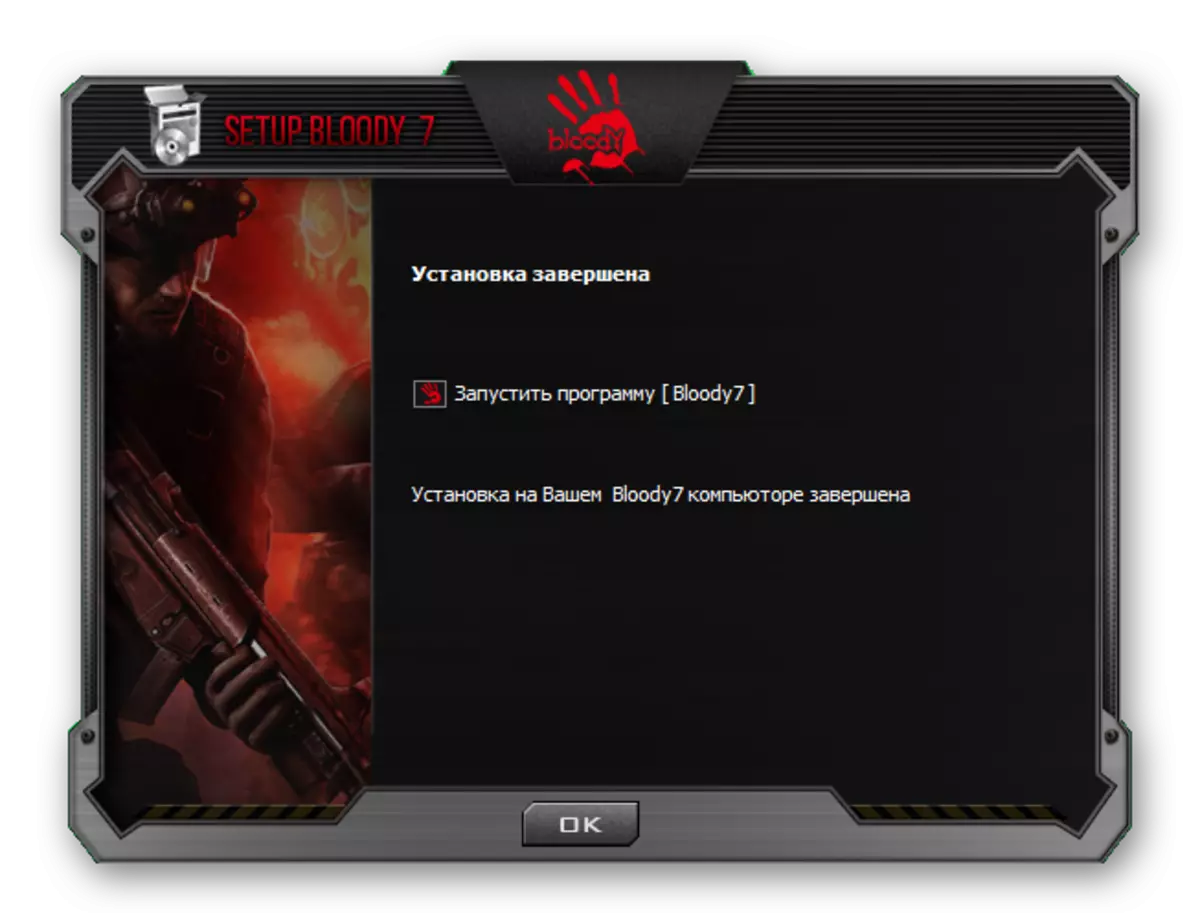
- Go to the official website of the device manufacturer to download the Bloody distribution, and then install the software on the desktop or laptop. Detailed instructions for implementing the specified available in the following article:
Read more: Loading and installing software for configuring computer mice Bloody
Running software, operation modes
By default, the Probe 7 program will start automatically upon completion of its deployment in the system. In the future, you can at any time open the software from the Windows Treara, the main menu of the OS, as well as from the desktop, affecting the label appeared here.
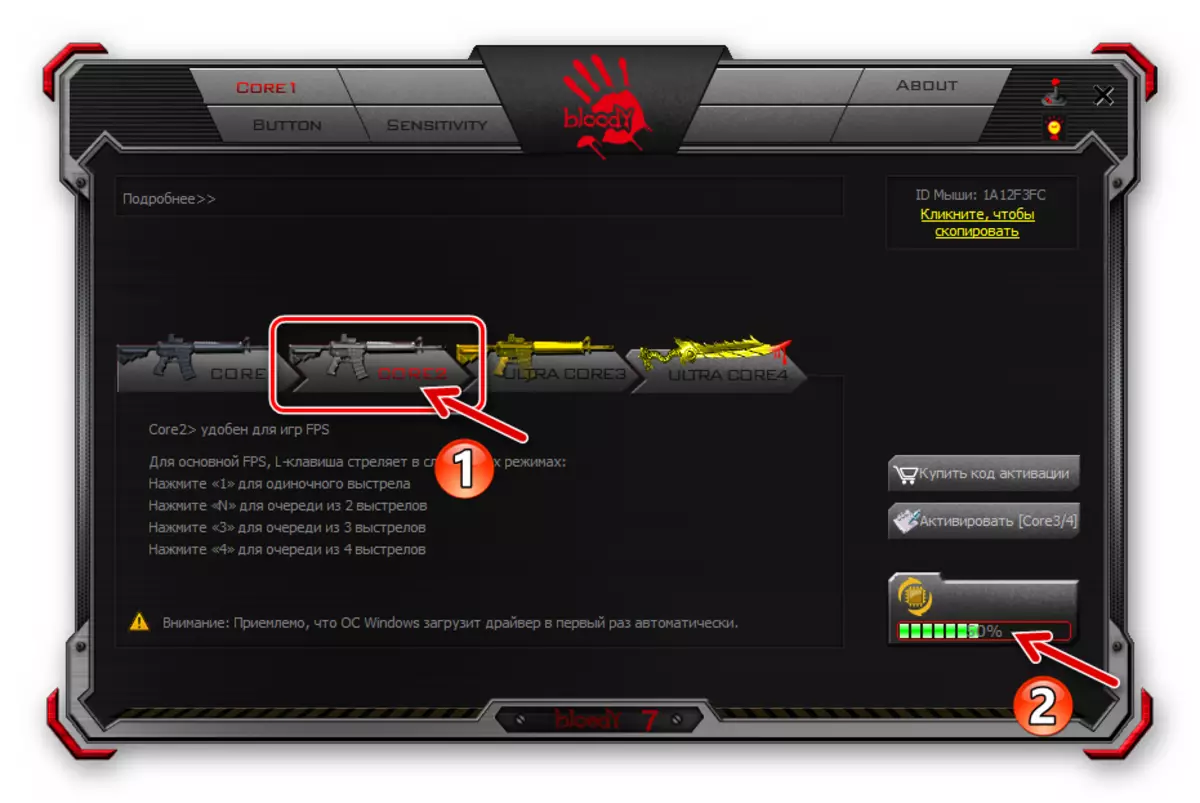
After starting, Bloody 7 shows a window for selecting the mode of operation (set parameters) of the manipulator. There are 4 options for presets: "Core 1" (selected by default), "Core 2", "Ultra Core 3", "Ultra Core 4". Having a cursor to the name of the regime will lead to the display of its description.
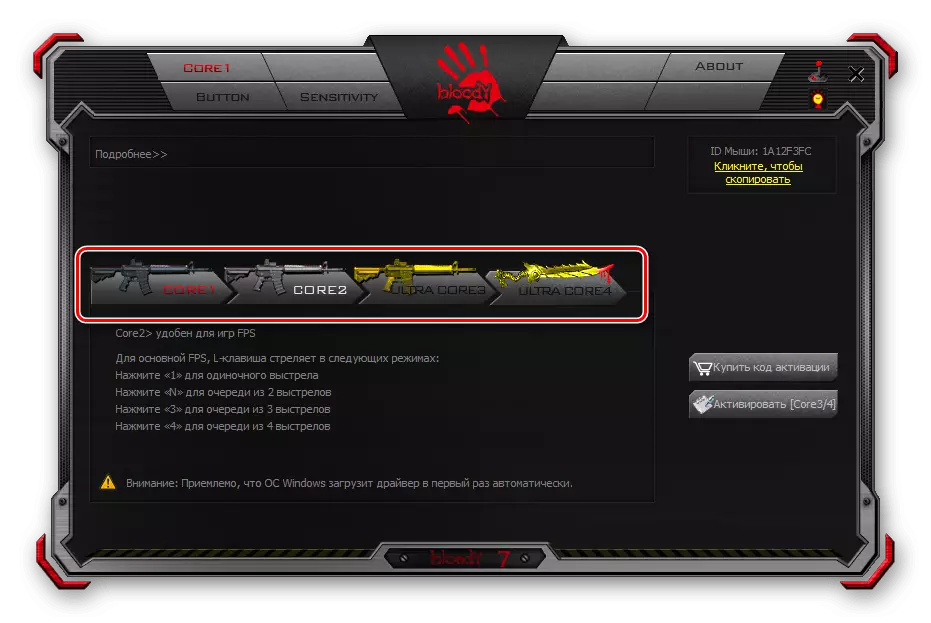
The transition to the installation of the settings provided by one or another mode is carried out by clicking on the corresponding button. Configuration change takes a few seconds during which the mouse does not respond to user actions.
Modes of operation "1" and "2" are functioning without restrictions, and the capabilities provided in their framework by the framework of a rather overwhelming number of users of the device under consideration. Further, the article describes the configuration of the Beldi device in the "Core 1" mode as the most simple in configuration, but it is a completely universal solution.
"Ultra Core 3", "Ultra Core 4", although provide the widest opportunities for programming the behavior of Bloody mice, are not considered within the framework of this material. This is due to the fact that the specified regimes require fees for their use, are used mainly by professional gamers, imply quite deep knowledge about the principles of work of manipulators, as well as an individual approach when configuring, from the point of view of the user's goals and specific software (mainly games), Where these goals need to be implemented.
Reassignment buttons
Conditionally, in the first place of importance in achieving the maximum level of efficiency of use of Ulad, you can put the assignment of the function manipulator called buttons. In the branded software from the manufacturer, a special partition is provided through which you can reassign any buttons other than the main (left), as well as create a slightly easily selected during the operation of the device's devices.
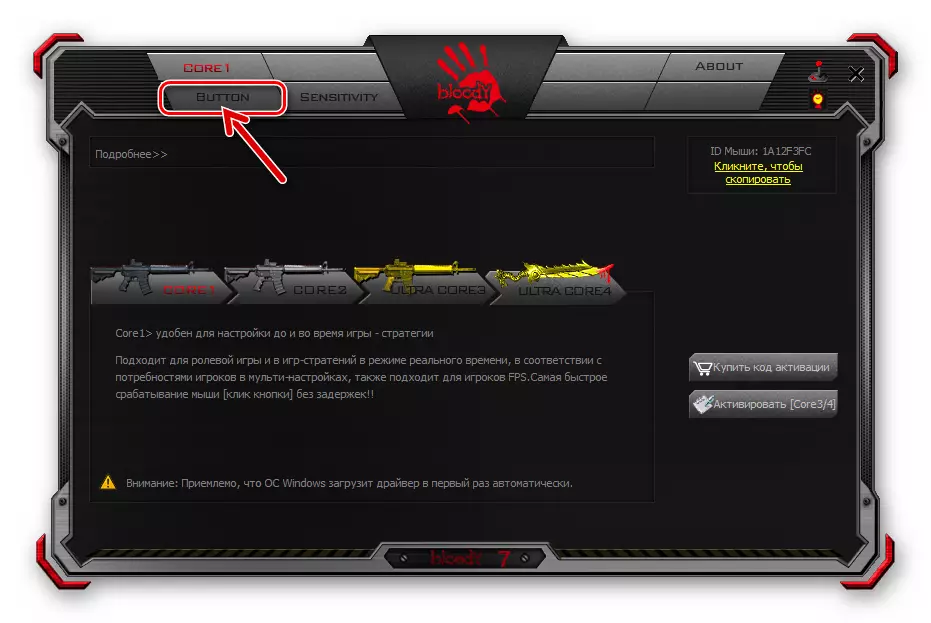
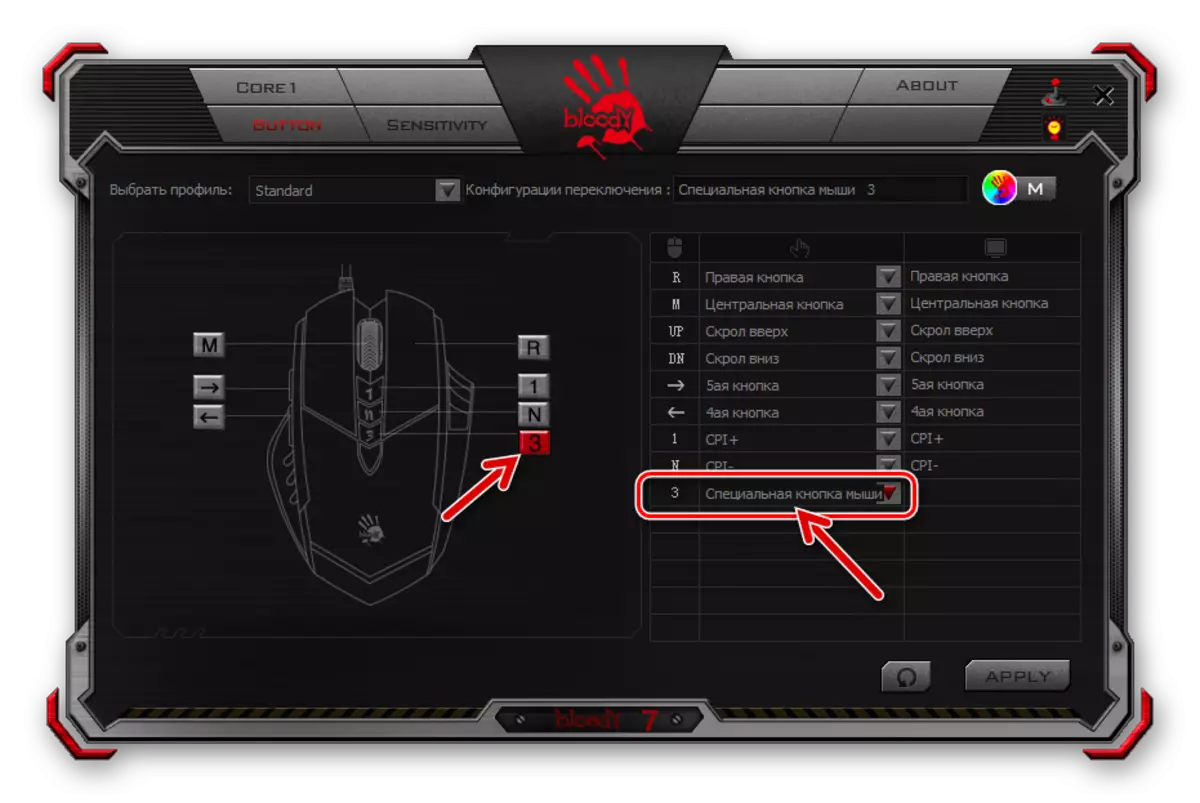
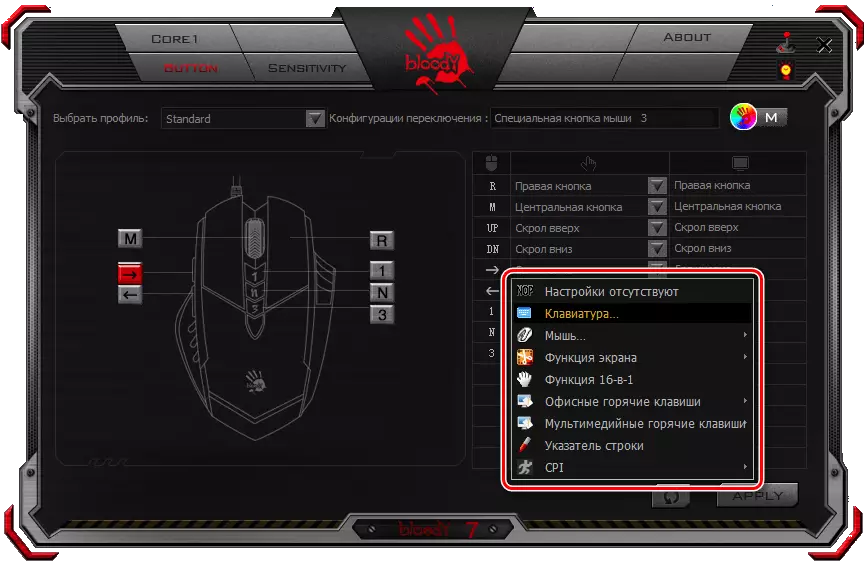
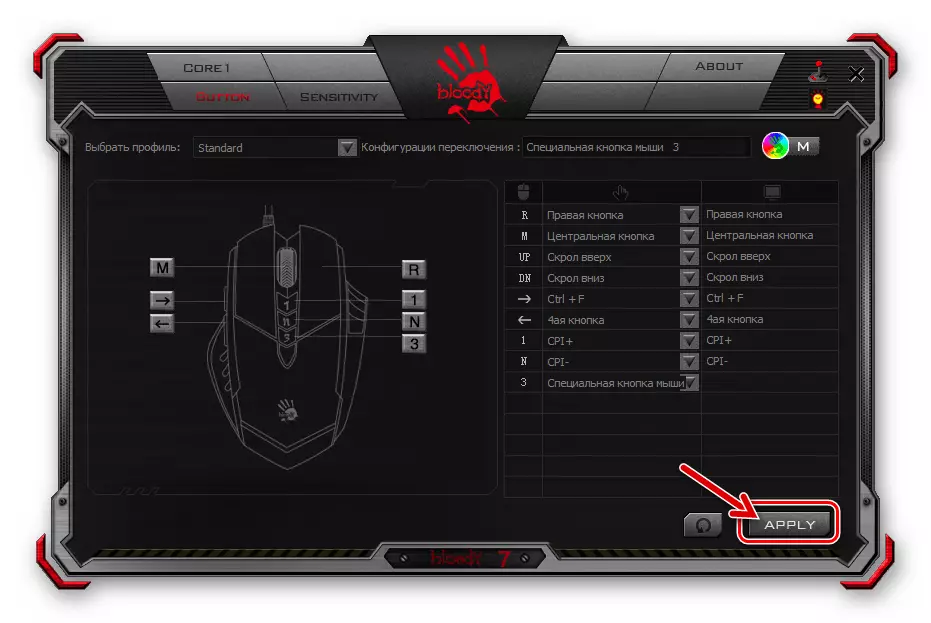
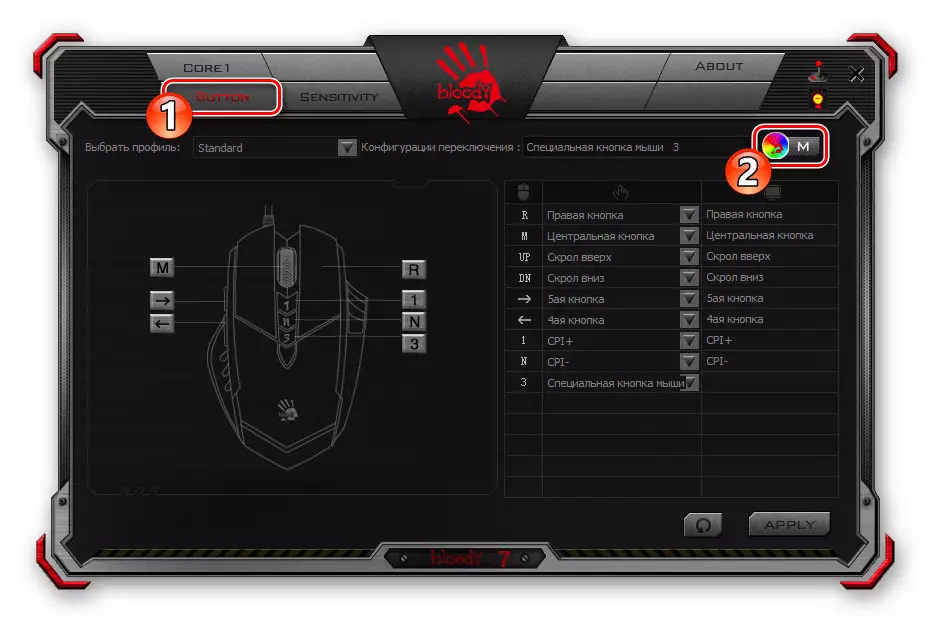
- Click the "Button" tab in the Bloody 7 program.
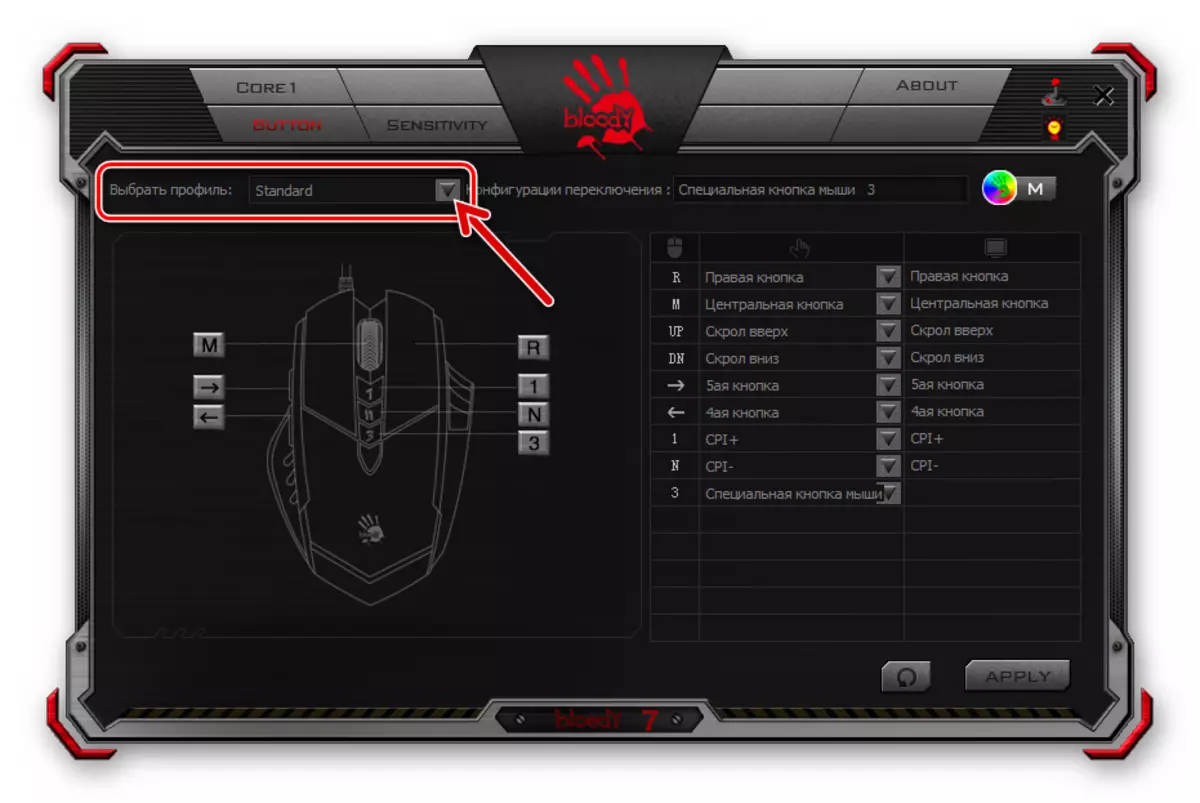
- Open the "Select Profile" list, click on the name of the combination of the mouse buttons and the actions assigned to them that you are going to change. As you can see, six profiles are available (in addition to the "Standart", which is not recommended), which allows you to create several presets and subsequently switch between them "on the fly" selected when performing the next item in this manual.
- Click on the overflowing different colors a round button with the Bloody logo to determine the transition method between the profiles described above.
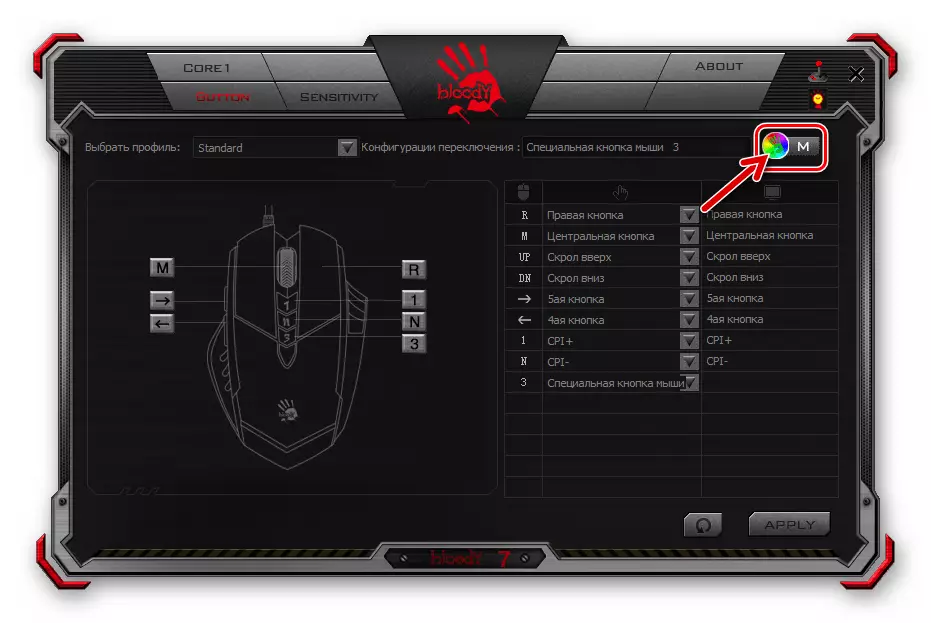
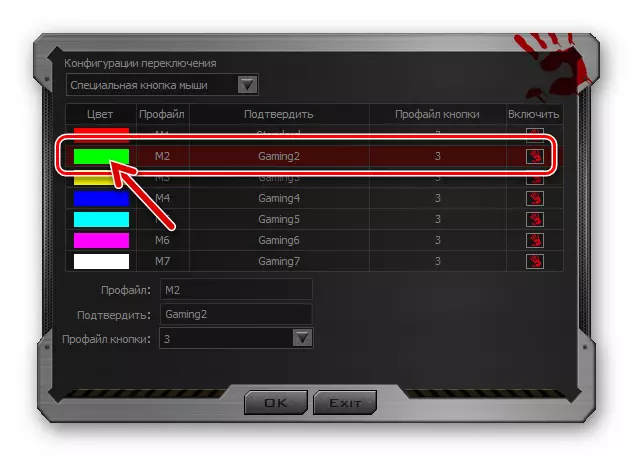
In the window that opens, expand the "Switch Configuration" list.
Select and configure one of the methods of changing the set of functions mouse buttons:
- "Working application". - The profile will be activated when you start a specific PC program. Click on the buttons configuration name, set the checkbox "Enable" to the right.
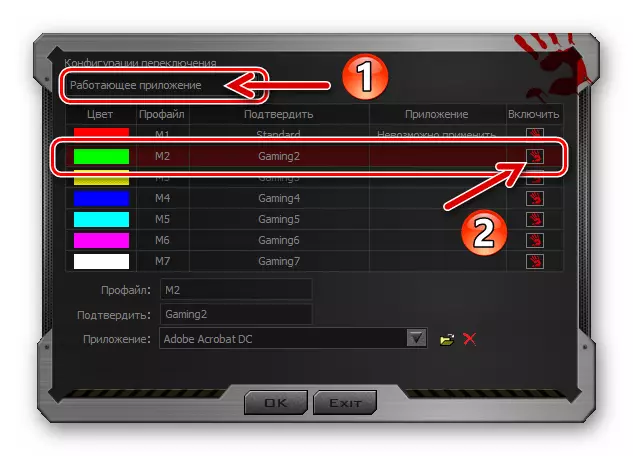
Next click "Overview" at the bottom of the window next to the "Appendix" field,
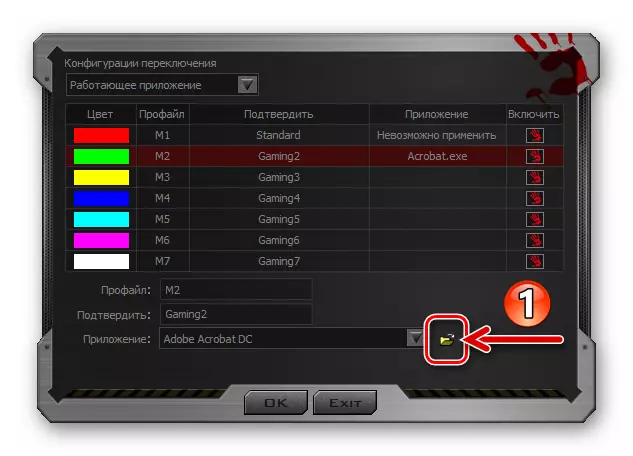
Go along the location of the executable file using the program buttons using the configuration and double-click on the object that opens it.
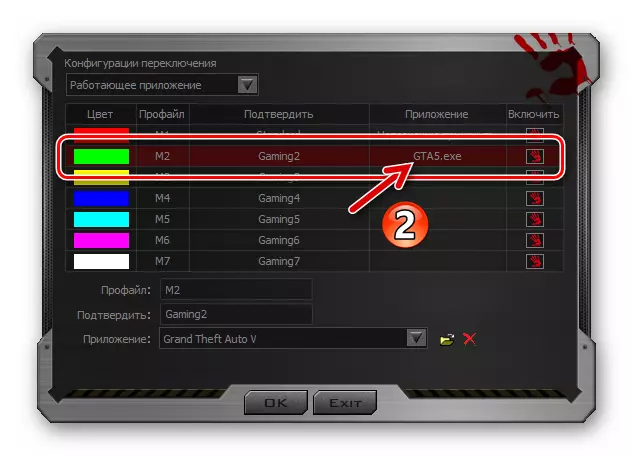
Similar to those described above, select programs tied to other profiles if they are used.
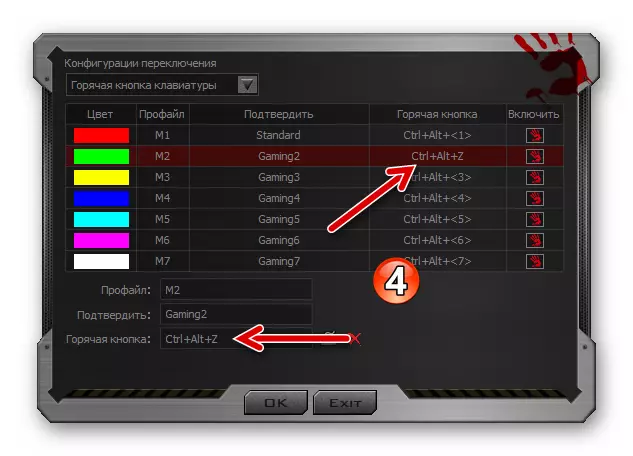
- "Hot keyboard button. In this embodiment, switching pre-configured mouse button configurations is carried out by pressing the keyboard combination on the keyboard. After selecting the option, a completely acceptable action will leave the default key combination ("Ctrl" + "Alt" + "digit") without changes.
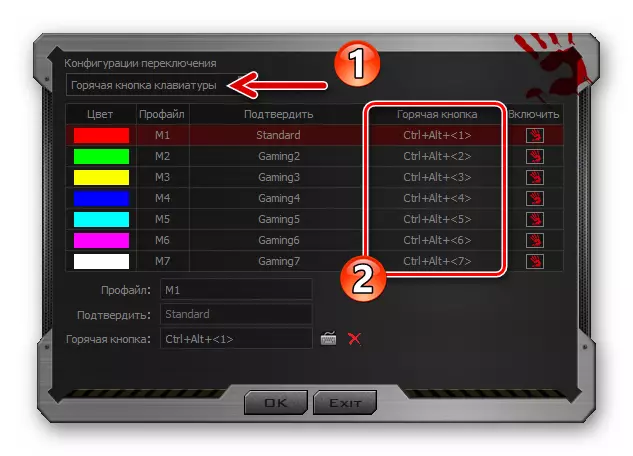
If there is a need to replace the key combination to switch to any profile, highlight it with a click. Next, click on the "Keyboard" icon at the bottom of the window to the right of the "Hot Button" field.
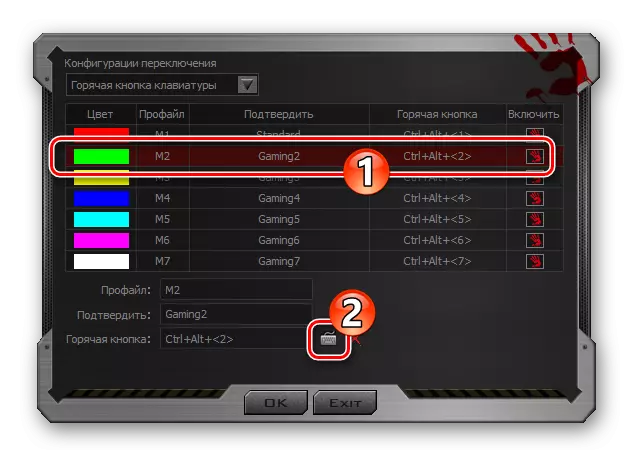
Enter the combination being installed
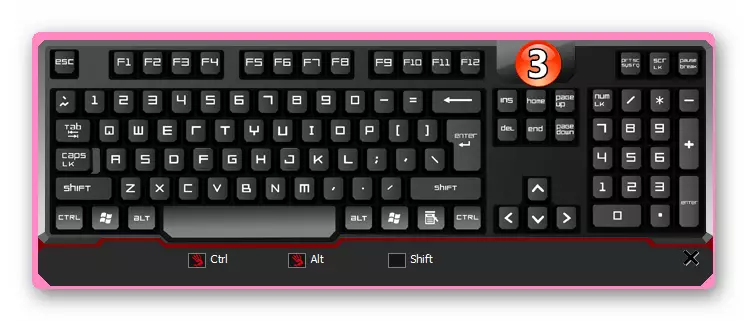
with virtual keyboard.
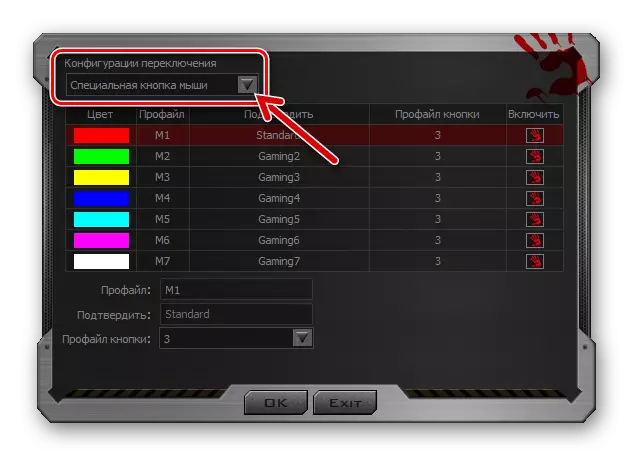
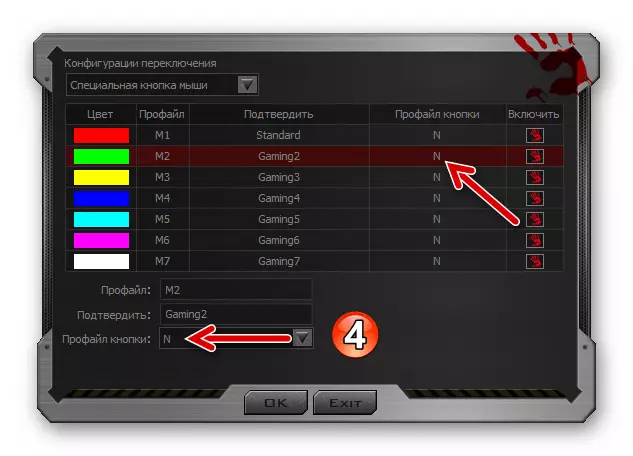
- "Special Mouse Button" is perhaps the most convenient method of switching profiles, but only if one of the control elements of the manipulator are ready to "donate".
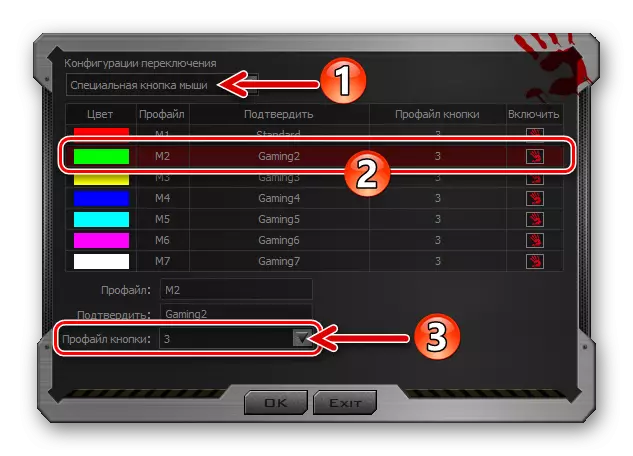
Switching to the specified method of changing the profile, expand the "Profile" list below at the bottom window and select the item intended for changing the configuration.
After completing the selection and setting of the transition method from one set of functions tied to the functions to another, click "OK" in the Switch Configuration window.
- "Working application". - The profile will be activated when you start a specific PC program. Click on the buttons configuration name, set the checkbox "Enable" to the right.
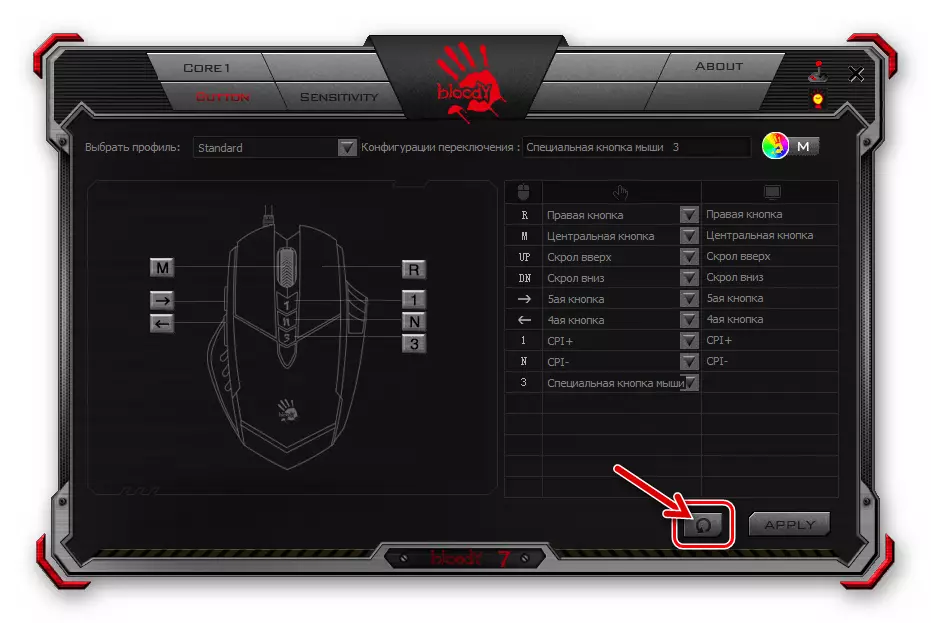
- To configure one separate and selected when executing item 2 of this manual of the manipulator buttons:
- Move to the right side of the window, hover the cursor to any of the button "Buttons" column in the table. As a result, the corresponding mouse button will be highlighted on the picture so that you can make sure that the element is correct, the purpose of which is supposed to be changed.
- Expand the appropriate menu button in the second account of the configuration table column, click on the name of the category available for assigning actions.
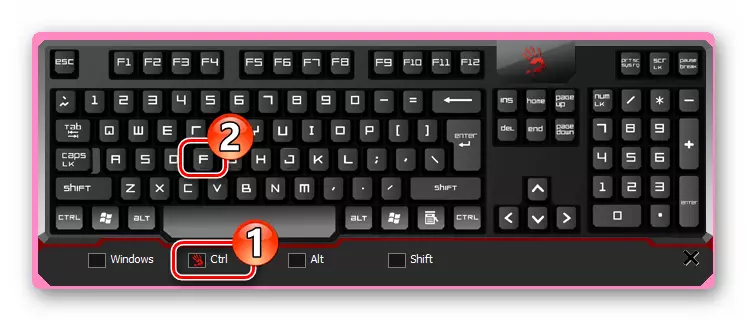
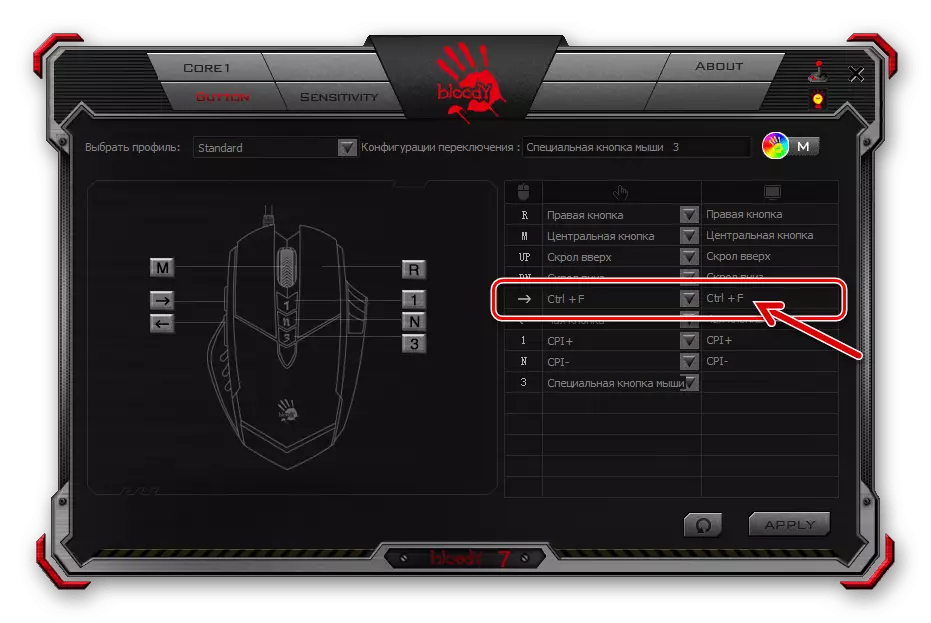
- Select in the drop-down list or, as in the example in the following screenshot, determine using the virtual keyboard the action or a combination of actions caused by the configurable control element.
- By completing the three steps above in relation to other mouse buttons, assign on them to call the functions you need in the system and / or applications.
- After completing the configuration of all the proposed profiles, click "Apply" in the Urals window 7 - it initiates the storage of changes made to the settings.


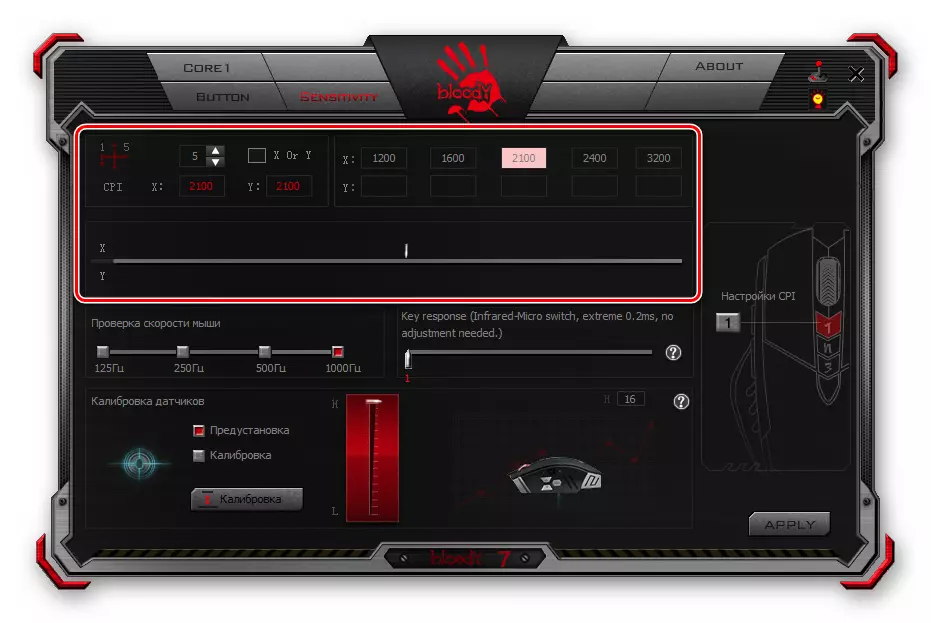
Setting the Sensor Resolution (CPI)
One of the main factors contributing to the effective use of the gameimar mouse is the ability to choose an acceptable point of the reaction of the pointer to the user actions, as well as the quick switching of this parameter if necessary. The specified is adjusted by changing the sensor resolution (CPI) manipulator.
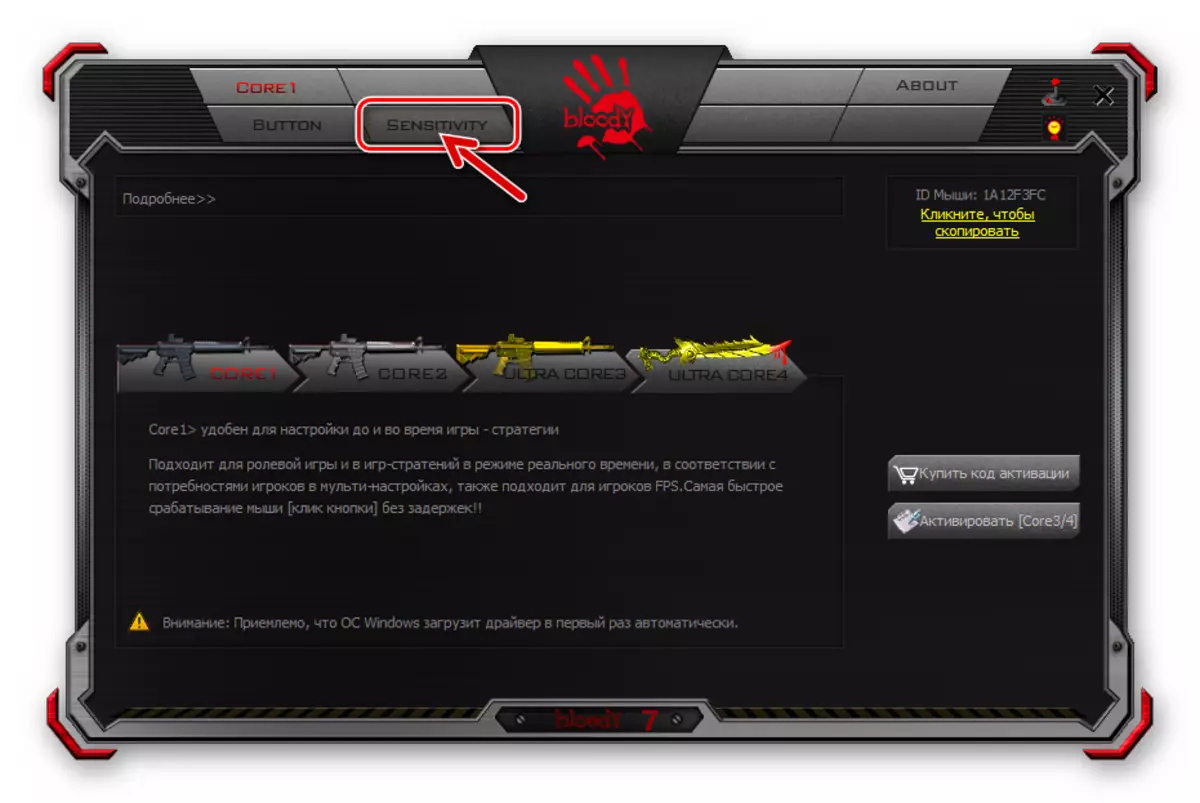
To configure the "CPI", go to the "Sensitivity" tab in Bloody 7 and configure the parameters according to your needs. Detailed recommendations for solving this task are set out in the following article:
Read more: Adjusting DPI (CPI) Computer Mice A4Tech Bloody
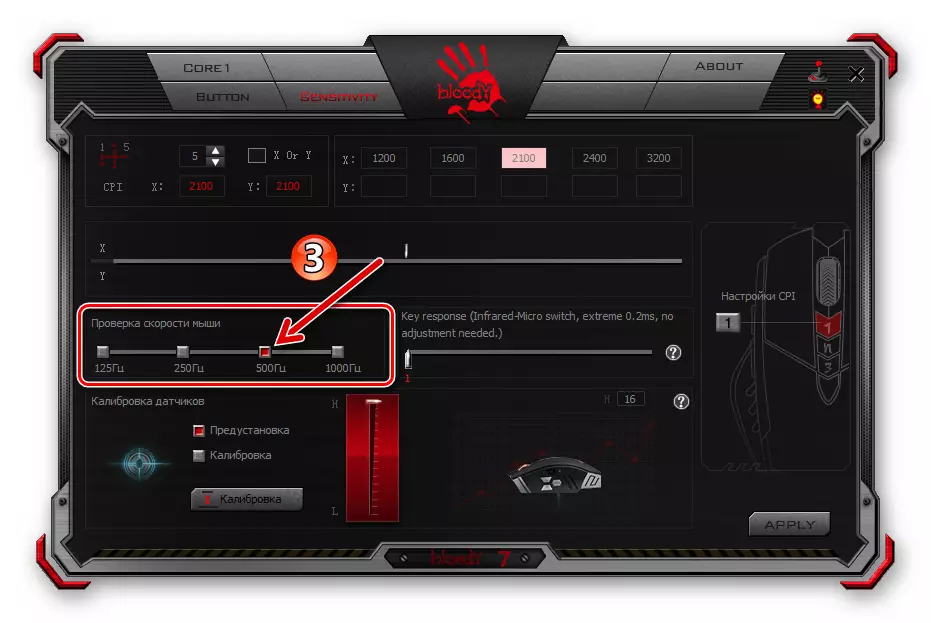
Sensor calibration
In most cases, the factory values of the individual parameters of the bladded mouse sensor and the Calibration performed during production are the most acceptable from the point of view of the efficient operation of the device, but if you want or need to use the Bloody Software 7, you can override these settings by moving to the "Sensitivity" tab.
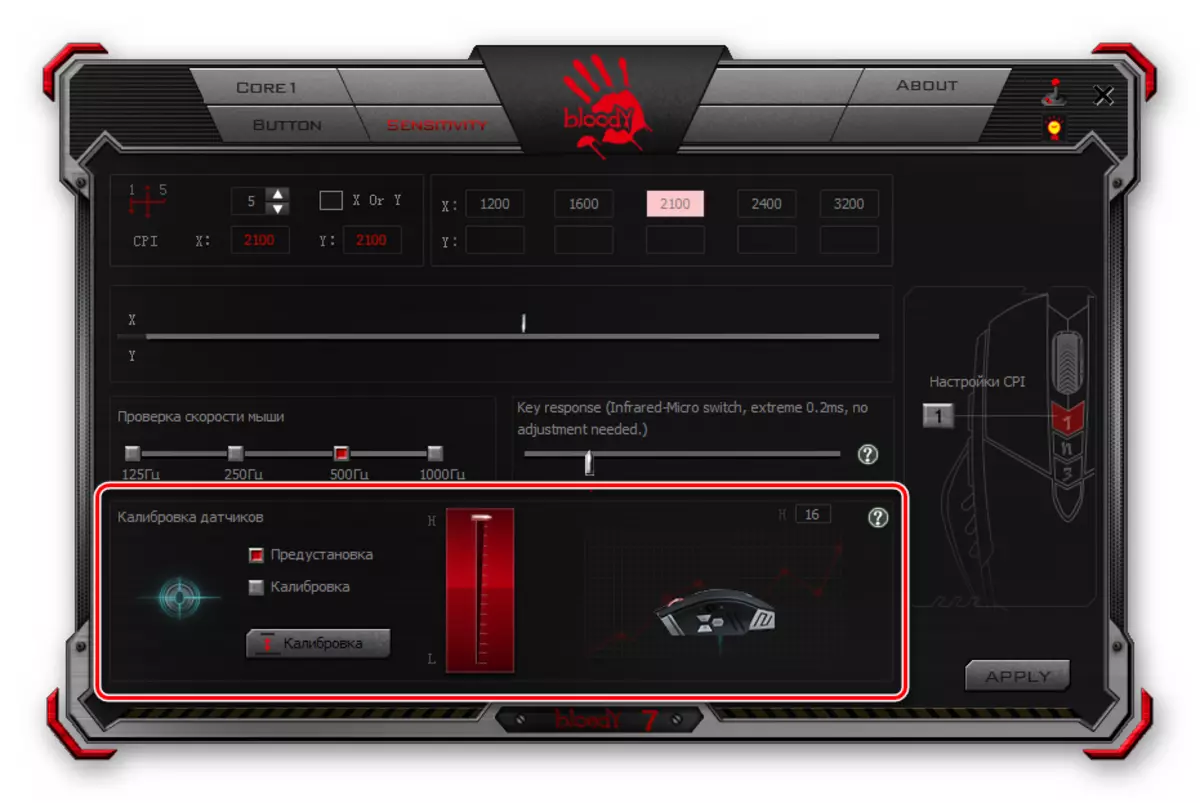
- The area of "Checking the Mouse Speed" received its name, probably, as a result of the incorrect translation of the name of the parameter varied with its help, the "survey frequency".
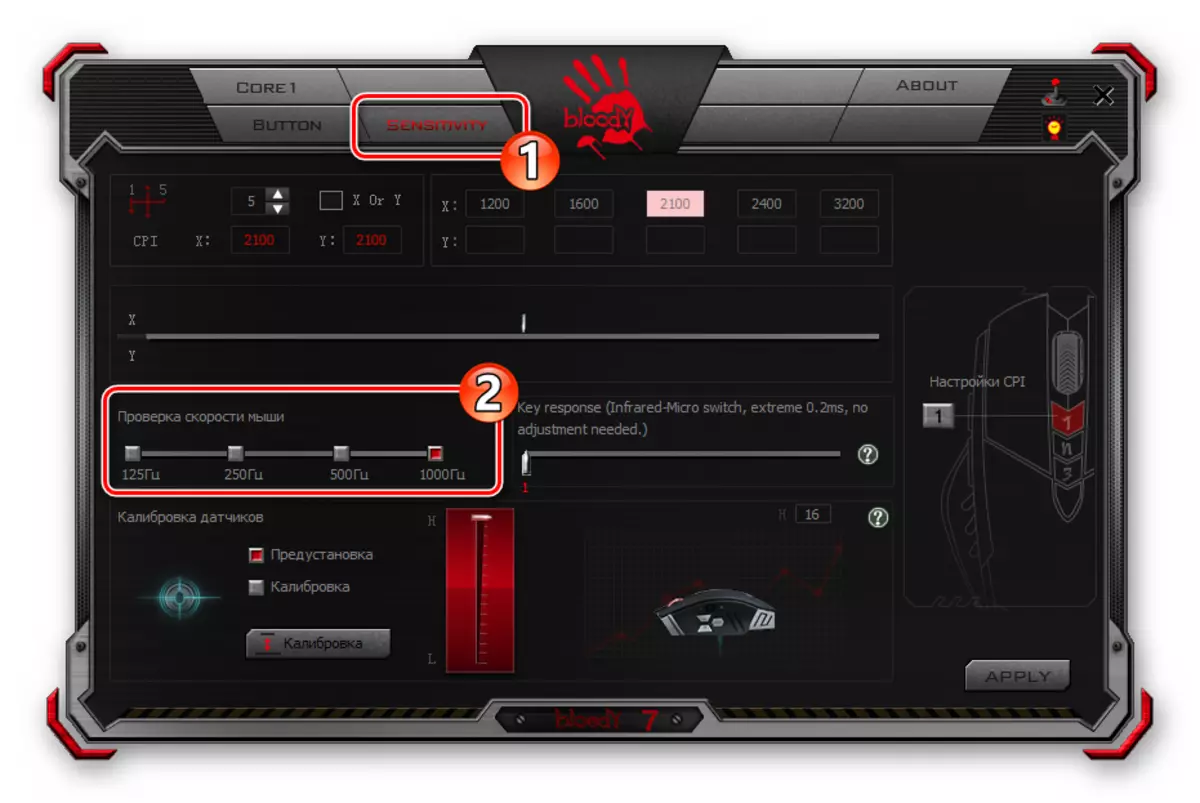
Select here the number of mouse sensor polls per second by clicking on one of the checkboxes above the values. The higher the indicator, the smoker will be the movement of the cursor, but note that a higher number of polls will lead to an increase in the load on the CPU of the computer and the controller of the manipulator. (In most cases, the optimal choice will be "500 Hz").
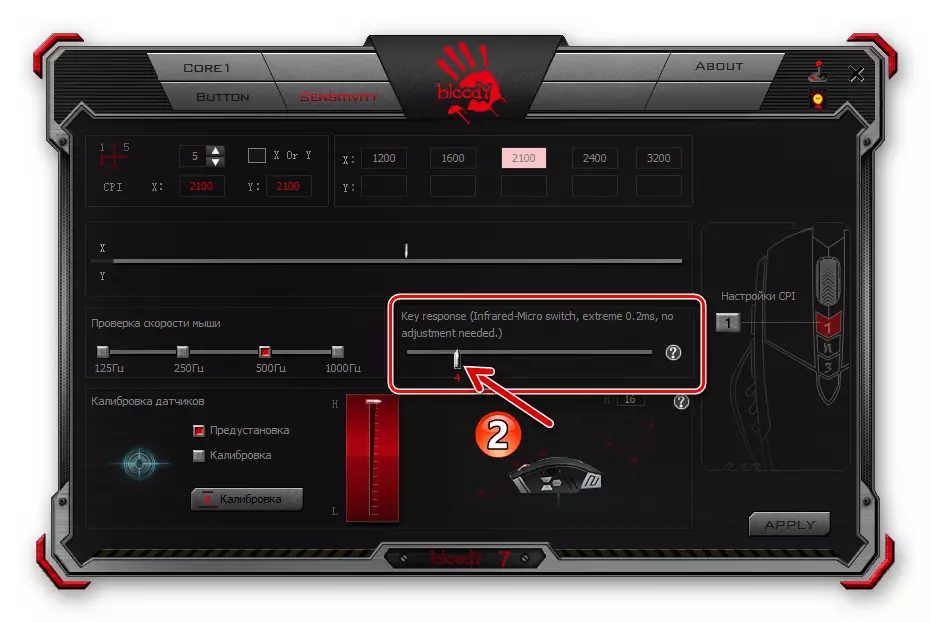
- A block with a "Key Response" runner allows you to adjust the response time of the buttons. Changing the parameter in the direction of increasing its value by shifting the runner to the right can help in troubleshooting the problem of the double click when the manipulator button is pressed.
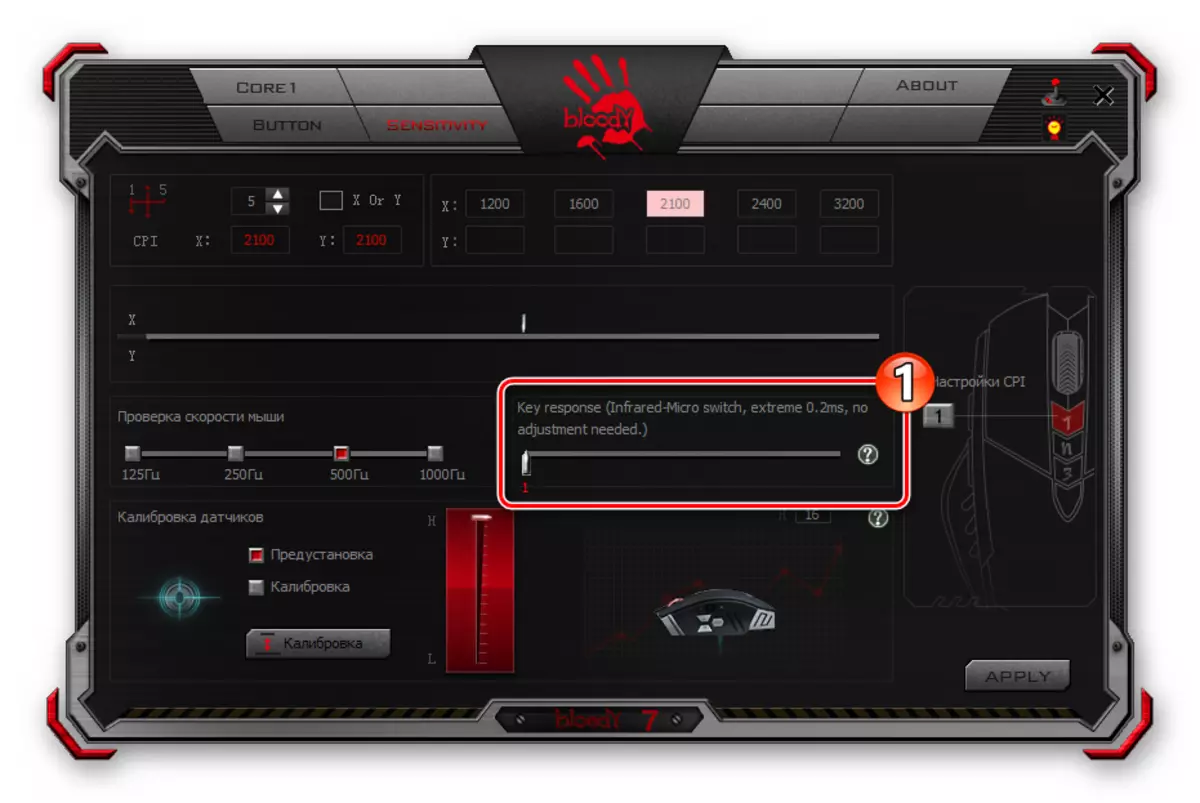
The specified phenomenon may be observed in the intensively operated long-term period of Bloody mice, since over time the mechanical wear of those responsible for transmitting data on the instructions on the instructions of the device of the microswitters are inevitable.
- The "Sensor Calibration" area allows you to manually or semi-automatically the same procedure, which comes down to the selection and setting the height of the height of the mouse from the working surface at which the sensor will stop responding to the manipulator movement.
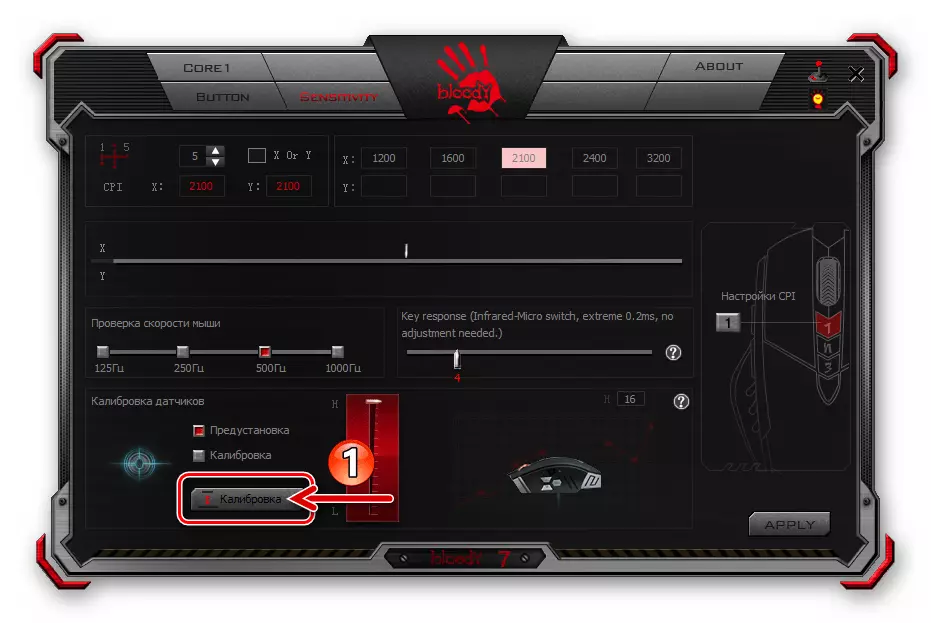
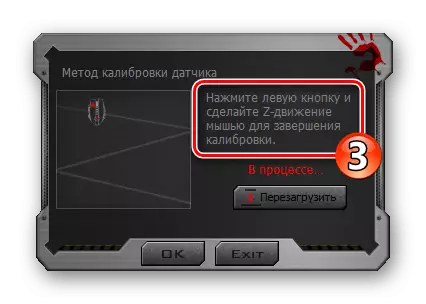
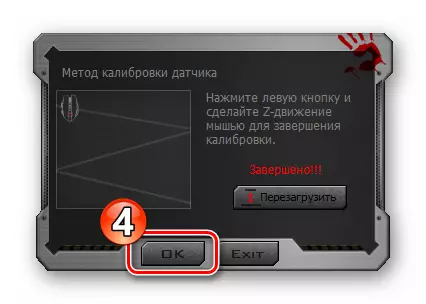
For automatic calibration:
- Click on the button "Calibration";
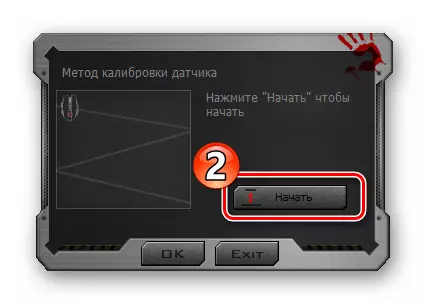
- Click "Start" in the appeared window;
- Follow the program displayed in the instructions in the calibration window;
- Click OK upon completion of the procedure.
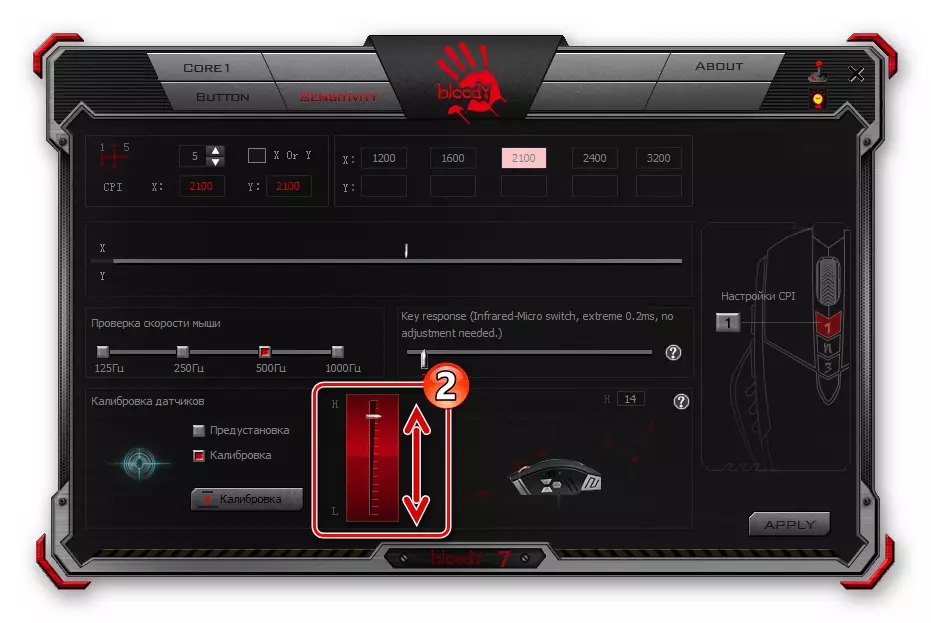
To select the maximum deck altitude manually:
- Click on the Calibration checkbox, the highlight of it in this way in red;
- Moving the location located between the unit with the choice of calibration mode and the image of the vertical slider down / up, select the optimal value of the configurable parameter.
- Click "left" in the runner appearing after the delay in one or another window position.

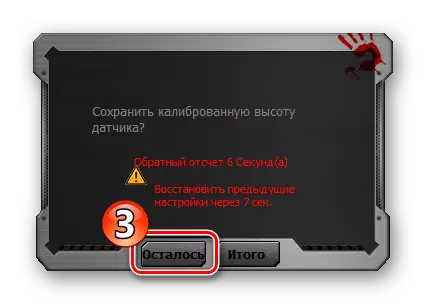
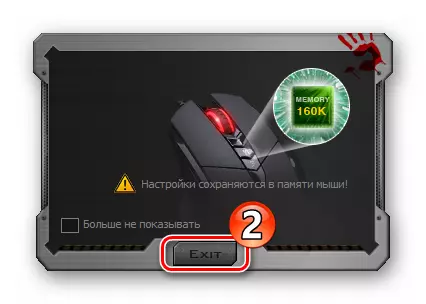
- After completing the definition of settings on the "Sensitivity" tab, click on the "Apply" button,
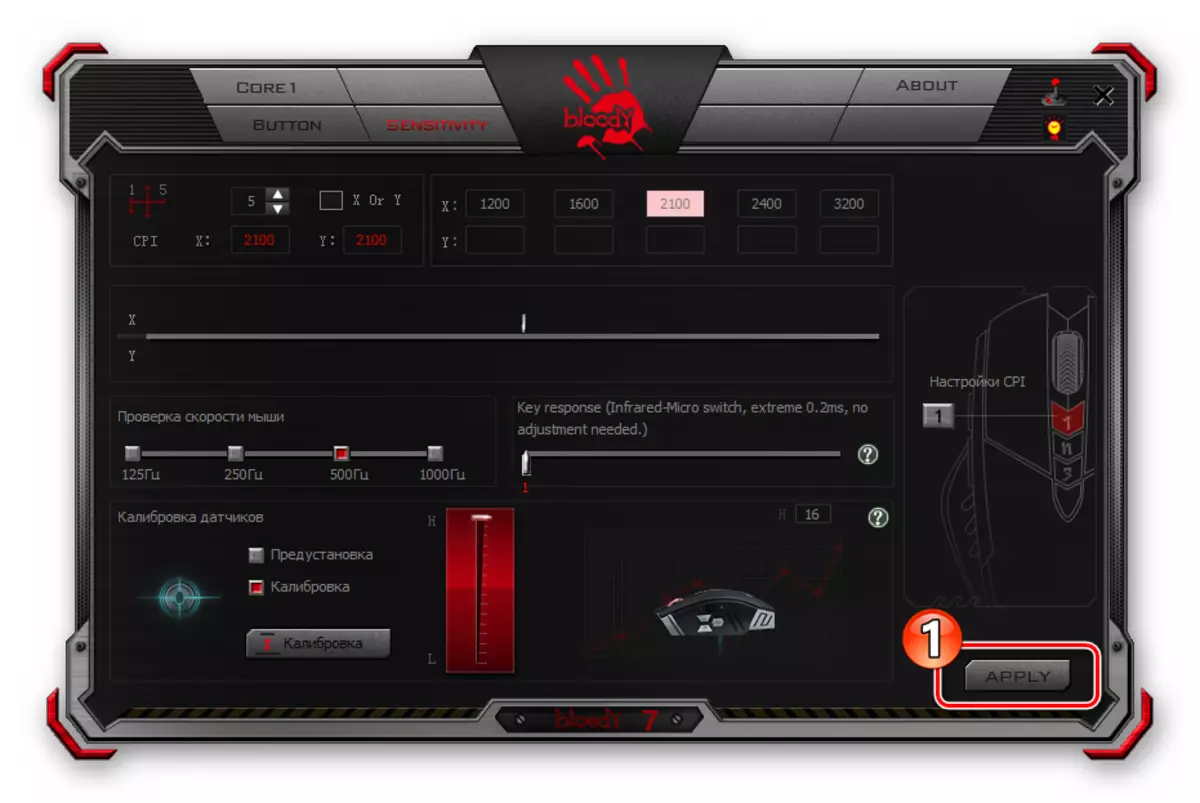
And then "EXIT" in the window that tells you about saving configuration changes in the Bloody mouse memory.
Backlight setting
The illumination of the Bloody mouse and / or its individual structural elements is practically not affecting the main functionality of the manipulator, but from the point of view of its aesthetic perception, of course, an important option. The device under consideration and intended for their setup software represent their users a wide selection of models of behavior hidden in the case of colored LEDs.
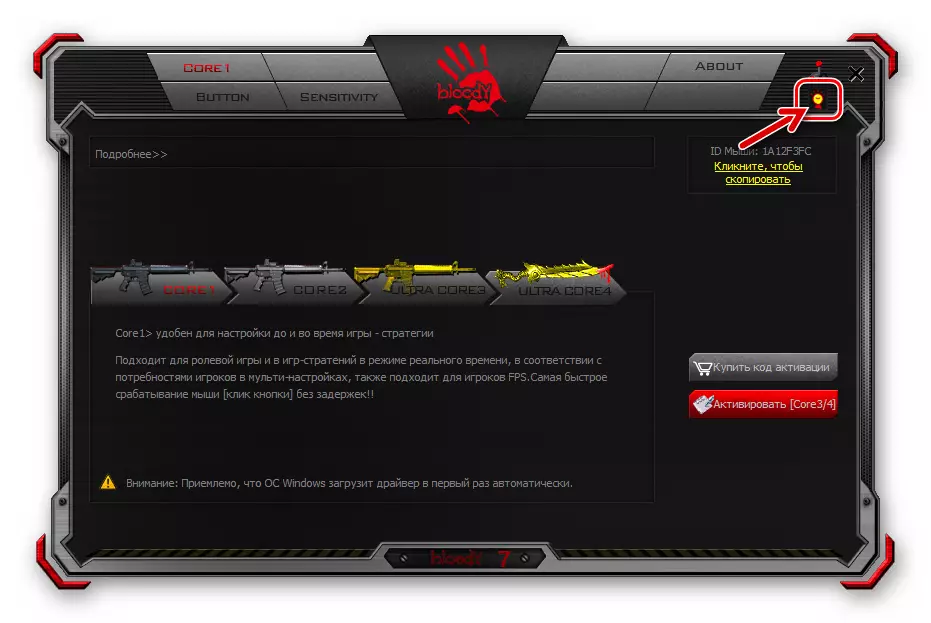
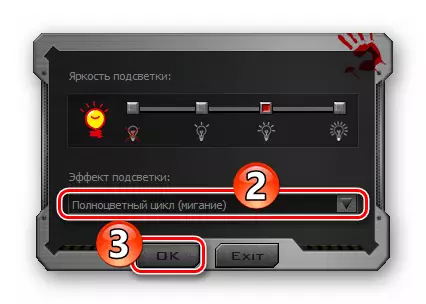
- Regardless of the 7 settings open in the section 7, click on the button with the image of the light bulb in the upper right corner of the window.
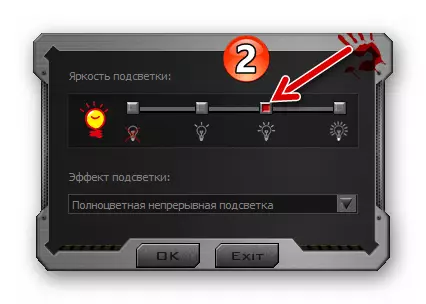
- In the displayed window, by clicking on one of the checkboxes in the backlight brightness area, determine the same parameter.
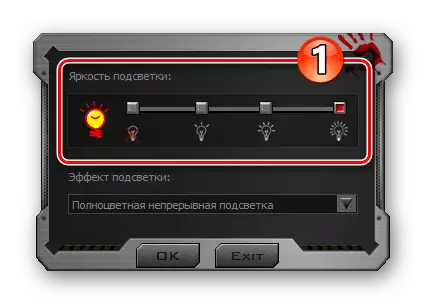
The change in brightness is performed instantly, so it is not possible to choose its importance to the visual perception. It's not difficult to work - just look at the mouse body and evaluate the result of the manipulation you produce.
- Click on the drop-down list "Backlight" and then (perhaps, as in the case of brightness - by sorting)
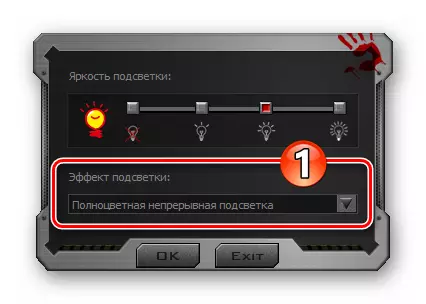
Choose the most acceptable option to work option. To complete the work with the dialog box and save the changes made by using it in the manipulator settings, click OK.
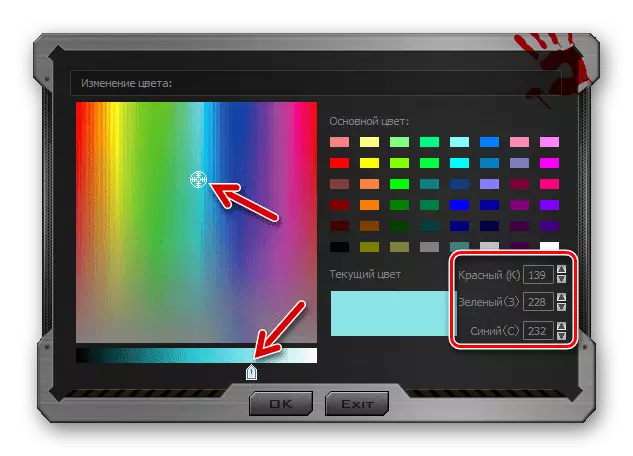
In addition to the above, in Blad 7, an indication of the specific color of the manipulator backlight is available, which will be applied while the one or another configuration profile of its buttons is selected:
- Click the "Button" tab, click on the circular transfusing various colors element with an image of the hand at the top of the window of the window on the right.
- The first column of the mouse buttons profiles on the opened window opened by the currently appointed color. Click on the coloring you want to change.
- Select a new backlight version from the proposed set program, moving the pointer in the spectrum either by entering color encoding in the appropriate fields. The mouse will respond to your actions instantly.
- Having achieved optimal result, double-click "OK" - in the color selection window
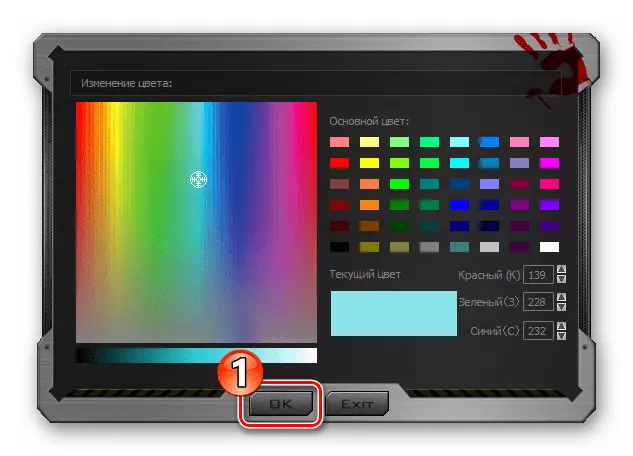
And then in the definitions of the mouse buttons profile method.

Reset
It is likely that ever the need to return the parameter values that affect the behavior of the mouse in the system of parameters to their original state, for example, in order to configure the "from scratch" manipulator or the use of standard settings offered by the manufacturer. To do this, through Bloody 7, you need to do the following:
- Click the Button tab in the program.
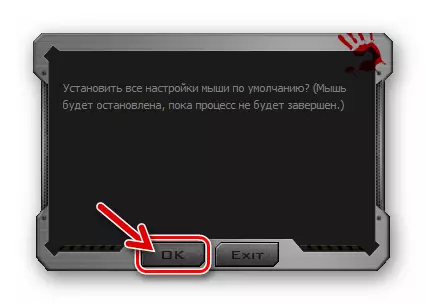
- Click on the left side of the RESET button located in the bottom corner.
- Confirm your intentions to return the values of the parameter manipulator to the "Factory" status, click "OK" in the query window. Then wait a few seconds until the device settings are reset and it will start response to your actions.