

Some users for different manipulations with a computer connected to the computer use third-party programs. Unfortunately, they do not always work out correctly, which can cause serious damage, especially if the operation is performed on the system HDD PC. At the same time, Windows 7 has its own built-in utility to perform the specified tasks. In terms of its functionality, it has little to lose the most advanced software of third-party developers, but at the same time its use is much safer. Let's look at the main features of this tool.
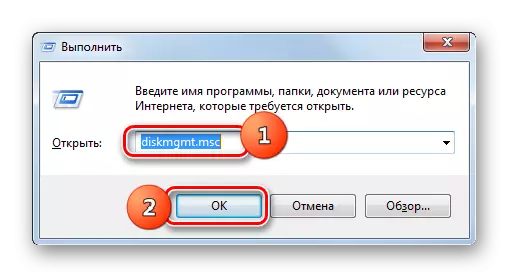
The "Disk Management" utility can be launched a much faster way, but less intuitive. You must enter a command to the "Run" window.
- Dial Win + R - the "Run" shell starts, in which you want to enter the following:
diskmgmt.msc.
After entering the specified expression, press OK.
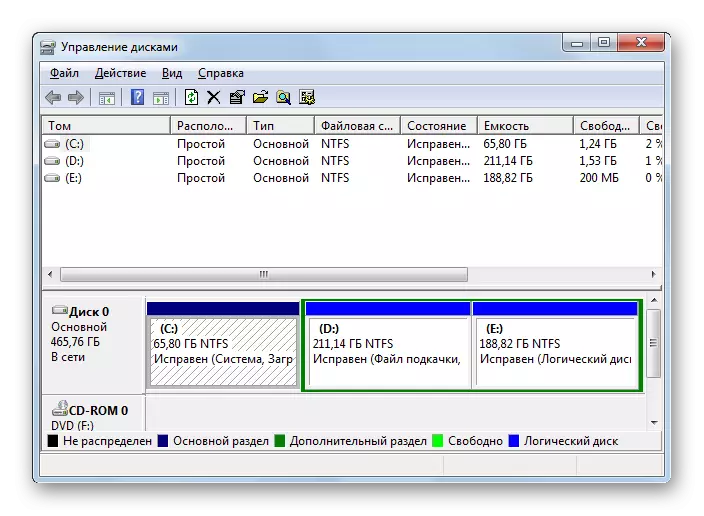
- The "Disk Management" window will be launched. As you can see, in contrast to the previous activation option, it will be open in a separate shell, and not inside the "Computer Management" interface.
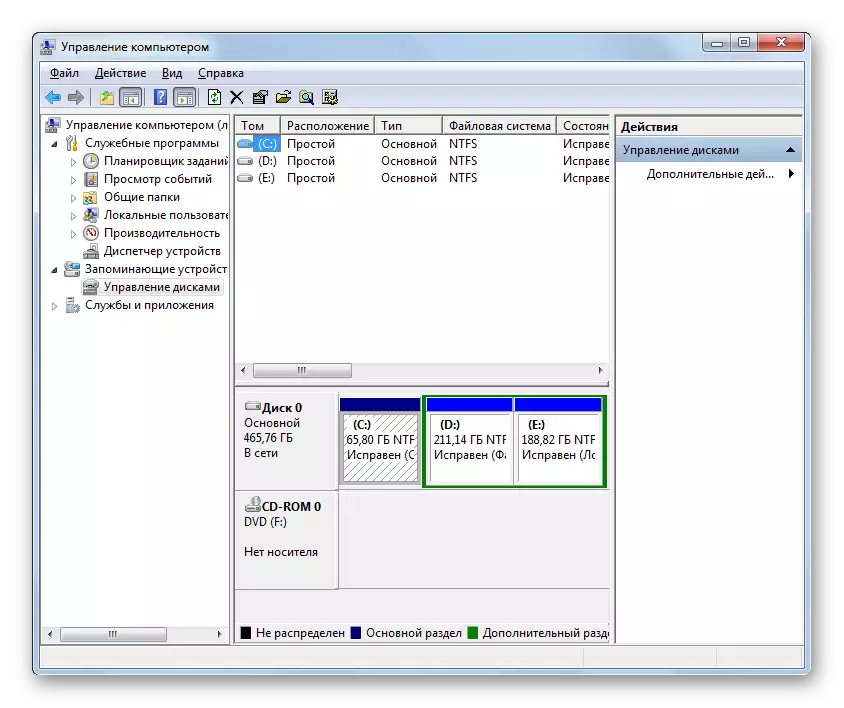
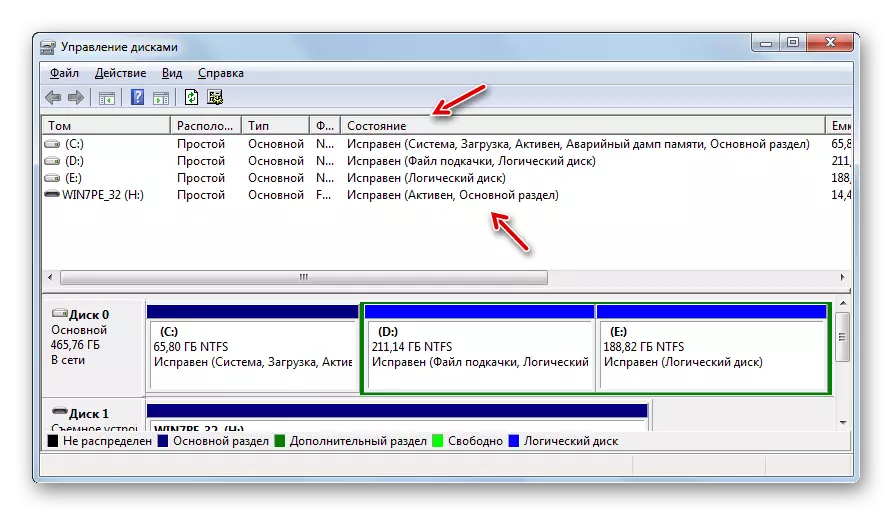
View information about disk drives
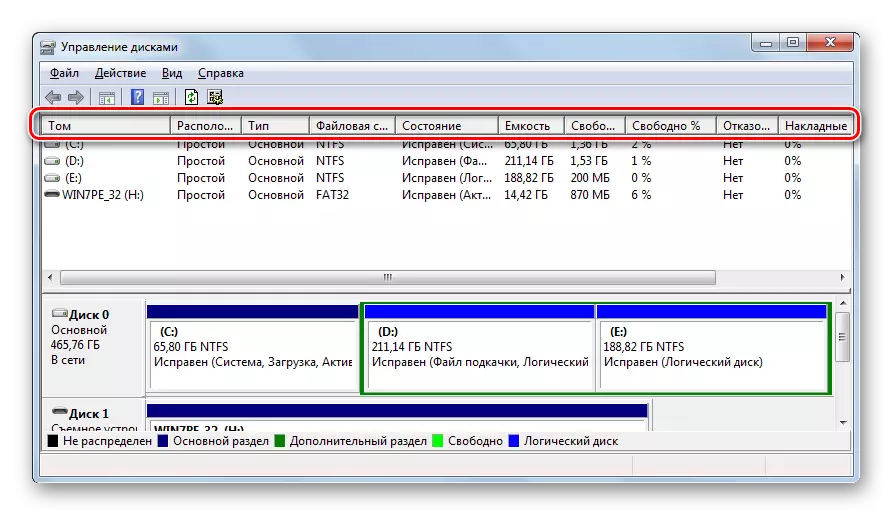
First of all, it is worth saying that with the help of the tool we study, you can view various information about all disk carriers connected to PC. Namely, such data:
- Tom name;
- Type of;
- File system;
- Location;
- State;
- Capacity;
- Free space in absolute indicators and in percentage of the total capacity;
- Overheads;
- Fault tolerance.
In particular, in the "Status" column, you can get information about the health of the disk device. Also, it is displayed that the data is displayed in which it is the section that the OS, the emergency dump of memory, the paging file, etc.
Change letters section
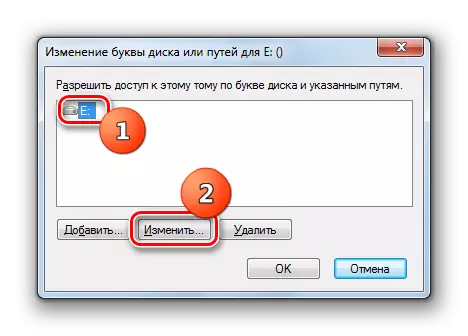
Turning directly to the functions of the studied tool, first of all, consider how it can be changed the letter of the disk drive partition.
- Click PCM by name of that section to be renamed. In the menu that opens, select "Change the letter of the disk ...".
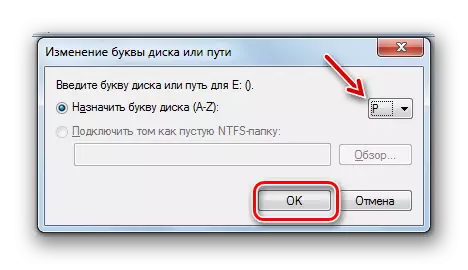
- The window of changing the letter opens. Select the name of the section and click "Change ...".
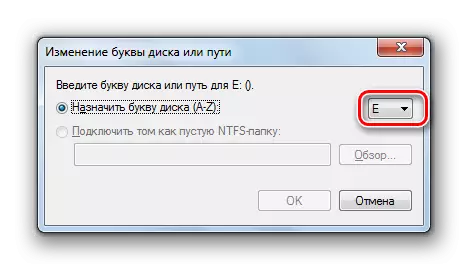
- In the next window, click on the item with the current letter of the selected partition.
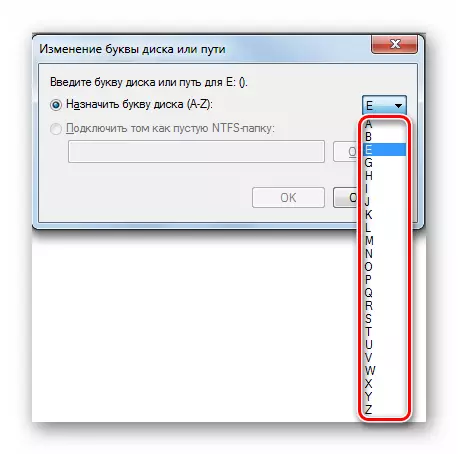
- The drop-down list opens, which contains a list of all free letters that are not present in the name of other sections or disks.
- After you have chosen the desired option, press OK.
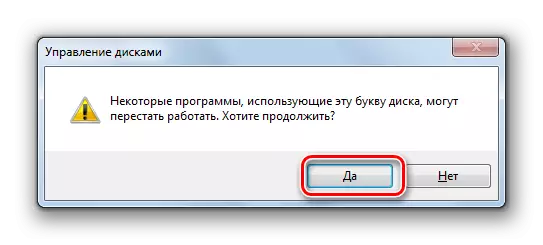
- Next, a dialog box appears with a warning that some programs that are tied to the changing section of the section can stop functioning. But if you firmly decided to change the name, then in this case press "yes."
- Then make a reboot of the computer. After it is re-enabled, the section name will be changed to the selected letter.

Lesson: Change the letter of the section in Windows 7
Creating a virtual disk
Sometimes within a certain physical drive or partition it is required to create a virtual disk (VHD). We study the system tool allows you to do without any problems.
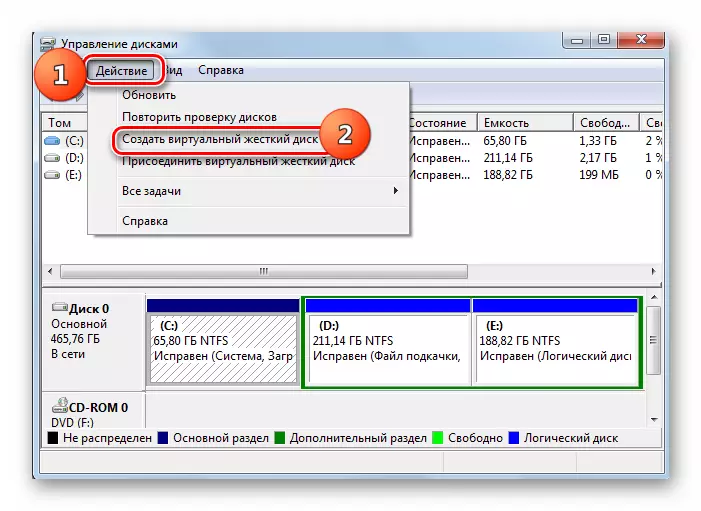
- In the control window, click on the menu item "Action". In the list of the list, select the "Create Virtual Drive ..." position.
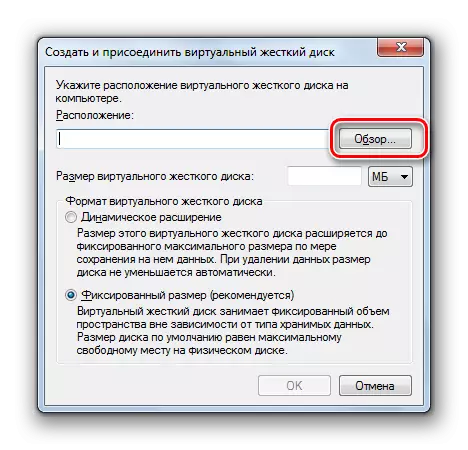
- A virtual drive window opens. First of all, it is necessary to indicate on what logical or physical disk it will be located, and in which directory. To do this, click the "Overview ..." button.
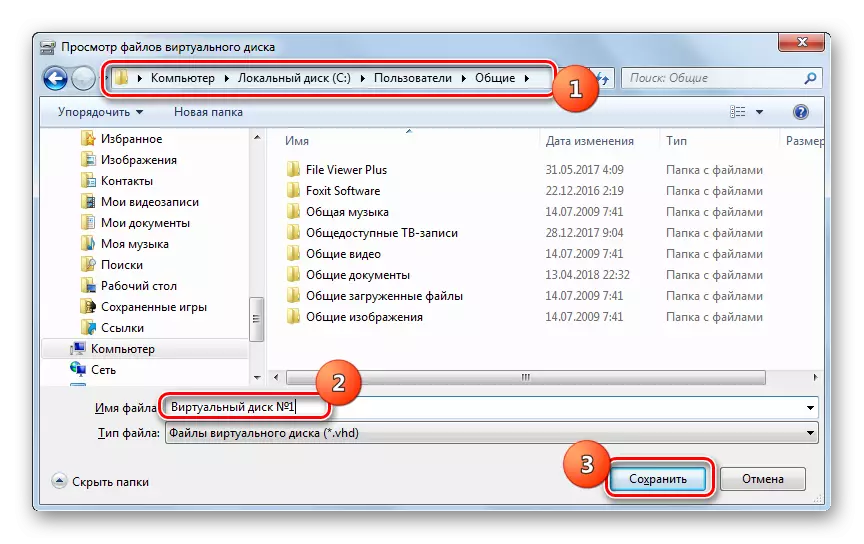
- The standard file viewing window opens. Move to that directory of any connected drive, where you want to create a VHD. Mandatory condition: the volume on which placement will be made should not be compressed or encrypted. Next, in the File Name field, be sure to assign the name to the object being created. After that click on the "Save" element.
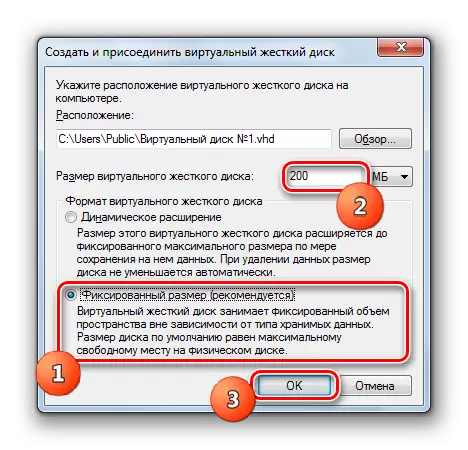
- Next, returns to the main window of creating a virtual drive. The path to the VHD file is already registered in the corresponding field. Now you need to specify its size. There are two options for indication of the volume: "Dynamic Extension" and "Fixed Size". If the first item is selected, the virtual disk will automatically expand as the data is filling down to the specified boundary volume. When the data is deleted, it will be shred to the appropriate value. In order to select this option, set the switch to the "Dynamic Extension" position, in the "Virtual Disc Size" field, specify its container in the corresponding values (megabytes, gigabytes or terabytes) and press "OK".
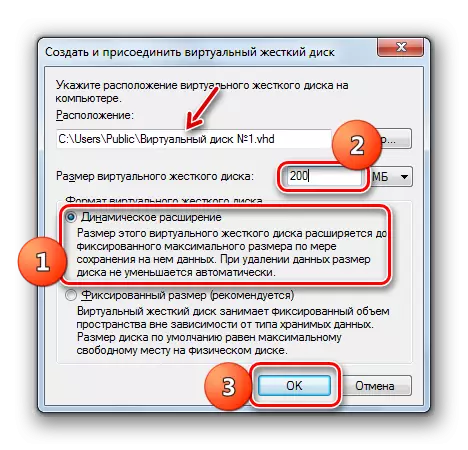
In the second case, you can establish a clearly specified size. In this case, the assigned space will be reserved on HDD regardless of whether it is filled with data or not. You need to put the radio button to the "Fixed Size" position and specify the container. After all the above settings are made, press "OK".
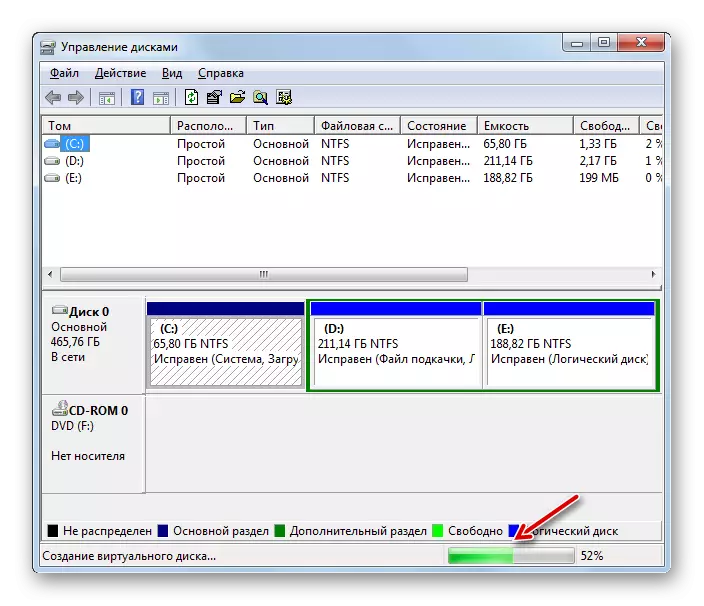
- Then the procedure for creating a VHD will begin, over the dynamics of which can be observed using the indicator at the bottom of the "Disk Management" window.
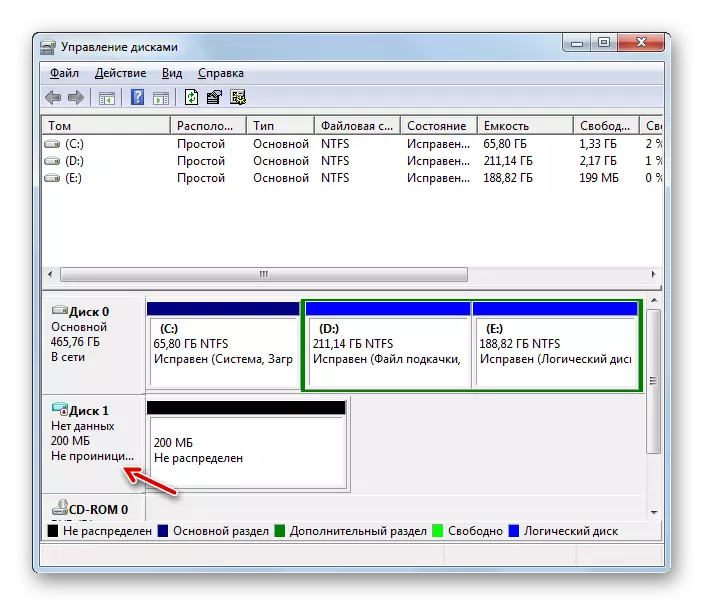
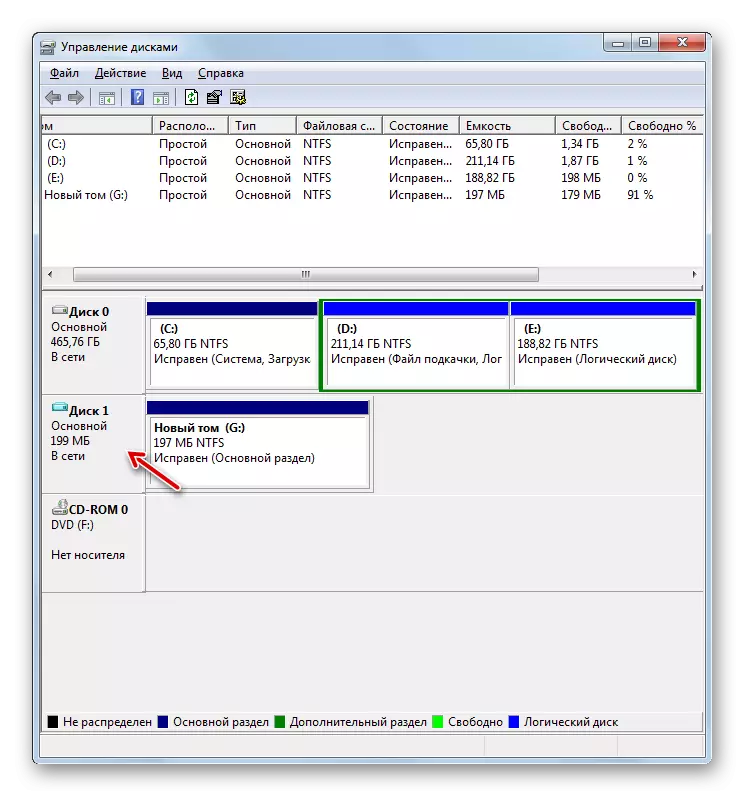
- After completing the specified procedure, a new disk is displayed in the window interface, the new disk with the status is "not initialized".
Lesson: Creating a virtual disk in Windows 7
Disc initialization
Next, we consider the initialization procedure on the example of the VHD previously created by us, but in the same algorithm it can be performed for any other drive.
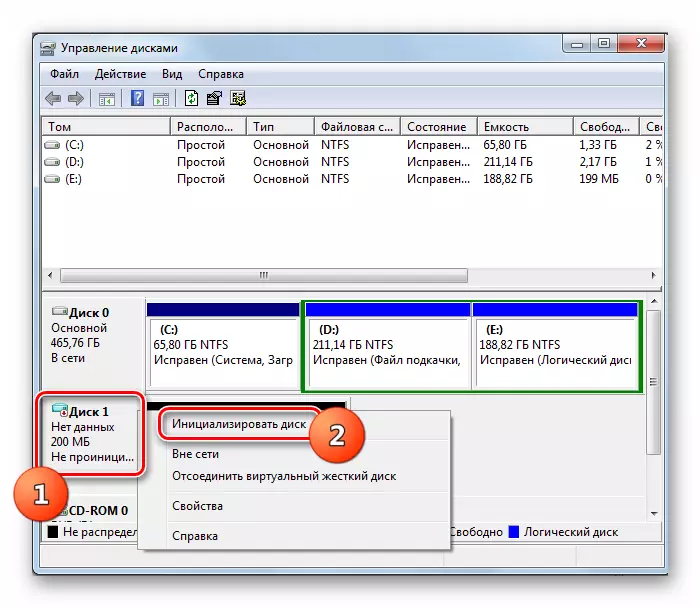
- Click on the name of the PCM media and select "Initialize Disk" from the list.
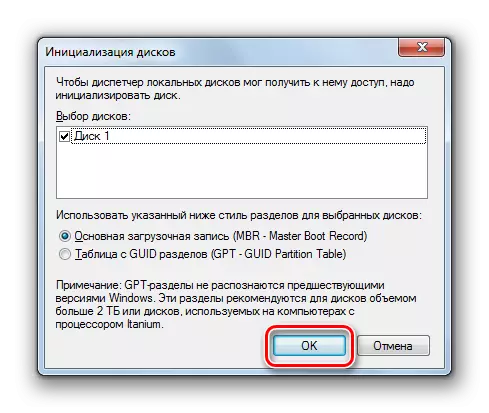
- In the next window, just click on the "OK" button.
- After that, the status of the object being processed will be changed to "on the network". Thus, it will be initialized.
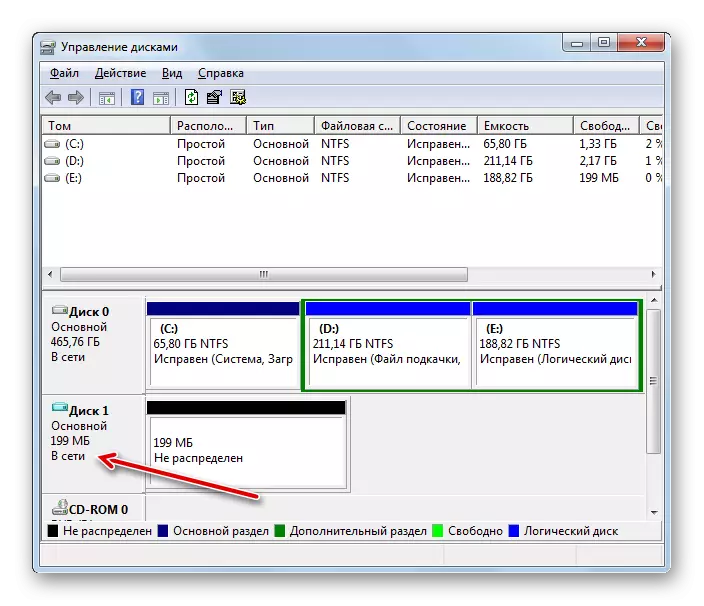
Lesson: Hard Disk Initialization
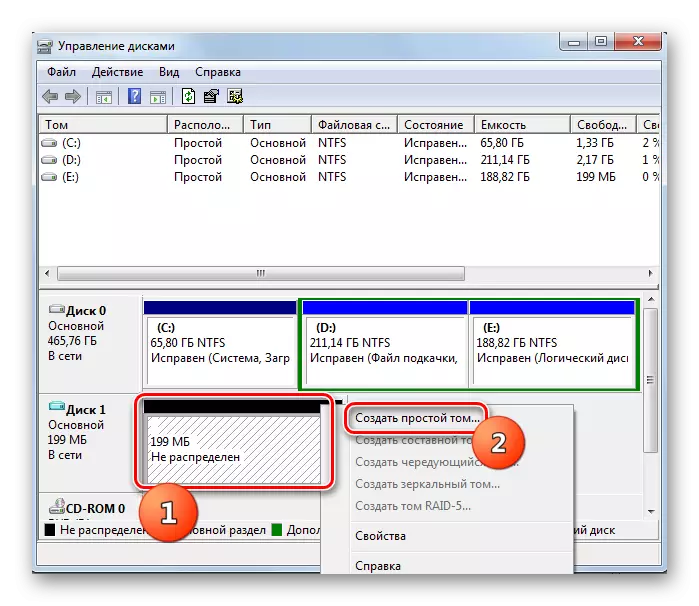
Creating Toma
We now turn to the procedure for creating volume on the example of the same virtual media.
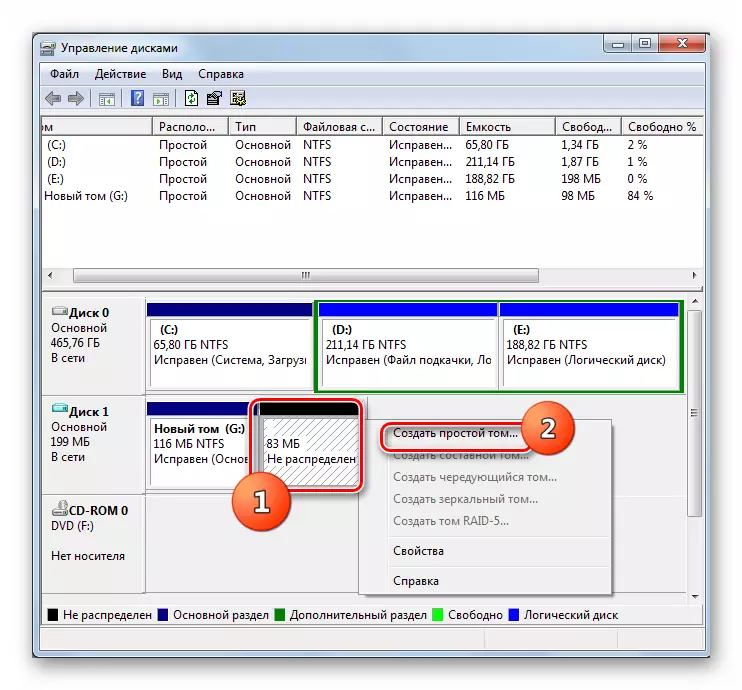
- Click on the block with the inscription "not distributed" to the right of the name of the disk. In the list that opens, select "Create a simple Tom".
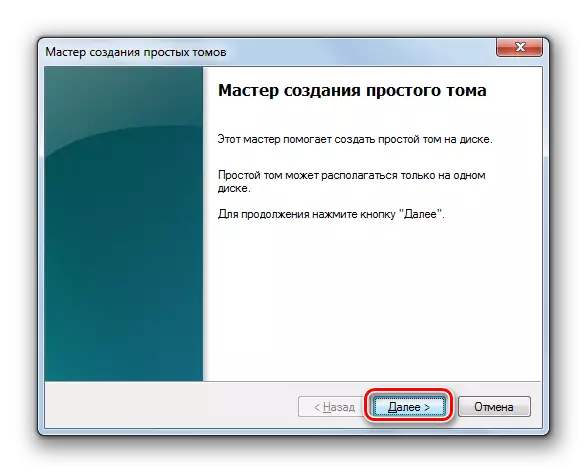
- The "Tom Creation Wizard" is launched. In its starting window, press "Next".
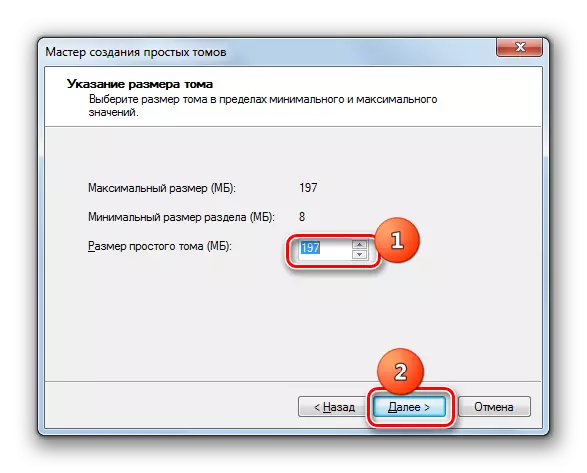
- In the next window you need to specify its size. If you do not plan to split the disk into several volumes, then leave the default value. If you still plan a breakdown, make it less on the required amount of megabytes, then press "Next".
- In the displayed window, you need to assign the letter to this section. It is done almost the same way as we have already considered before changing the name. Select any available character from the drop-down list and press "Next".
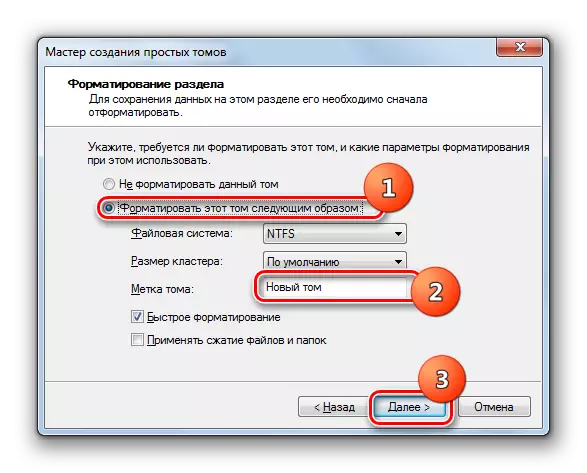
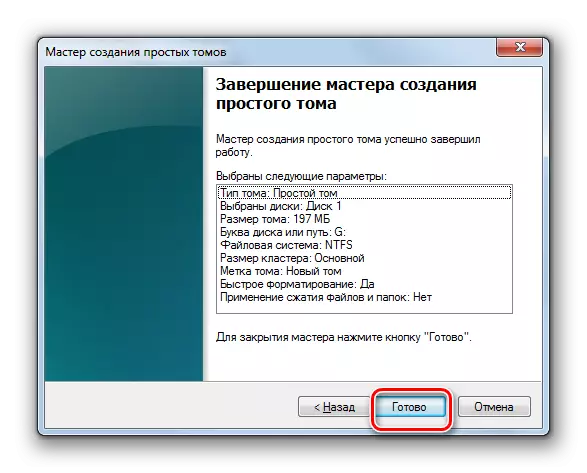
- The volume opens the formatting window. We recommend that it format, if you do not have good reasons for not doing this. Set the switch to the "Format TOM" position. In the Tom Tag field, you can specify the name of the partition as it will be displayed in the computer window. After performing the necessary manipulations, press "Next".
- In the last Wizard window, to complete the creation of Tom, press "ready."
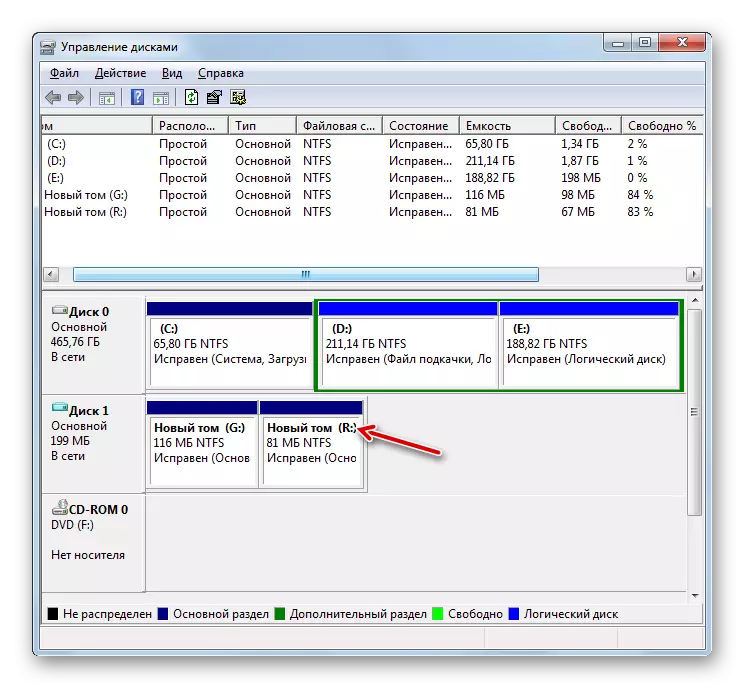
- Simple tom will be created.


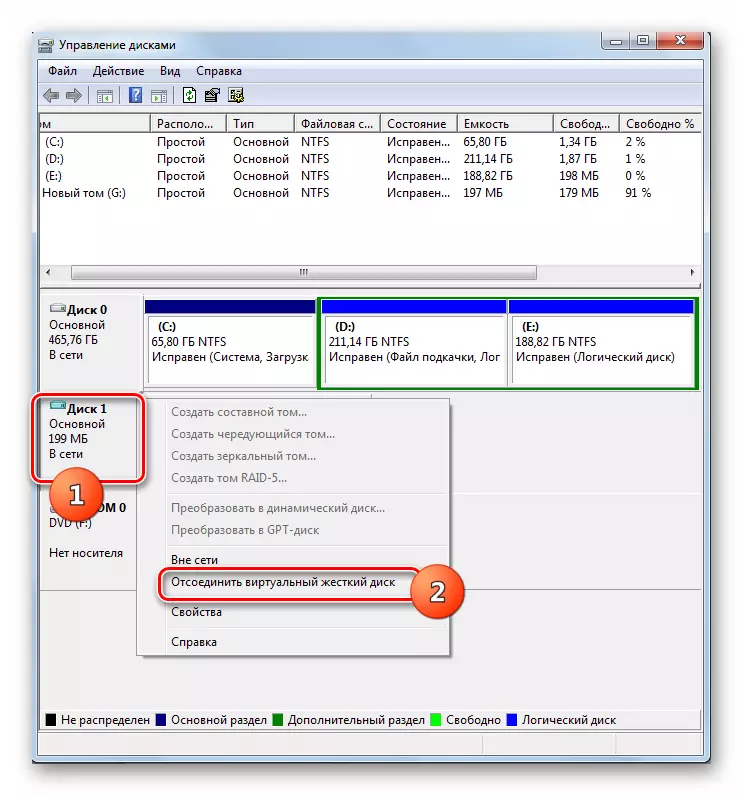
Disconnecting VHD.
In some situations, you must disconnect the virtual disk drive.
- At the bottom of the window, click PCM by the drive name and select "Disconnect the Virtual Hard Disk".
- In the dialog box that opens, confirm your actions by clicking OK.
- The selected object will be disconnected.

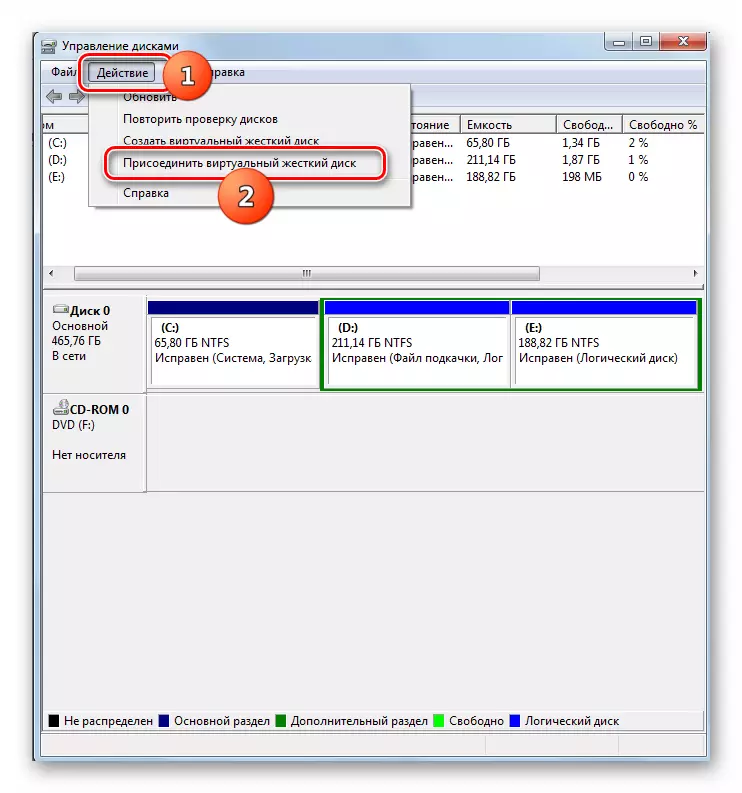
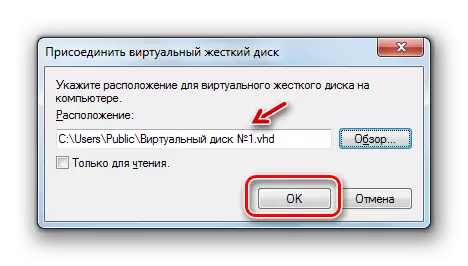
VHD attachment
If you previously disconnected VHD, you may need to attach it again. Also, such a need sometimes occurs after rebooting the computer or immediately after creating a virtual drive when it is not connected.
- Click the drive control utility in the "Action" menu. Select the option "Attach a Virtual Hard Disk".
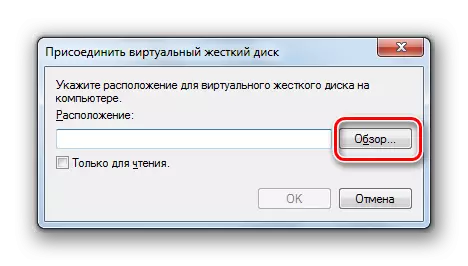
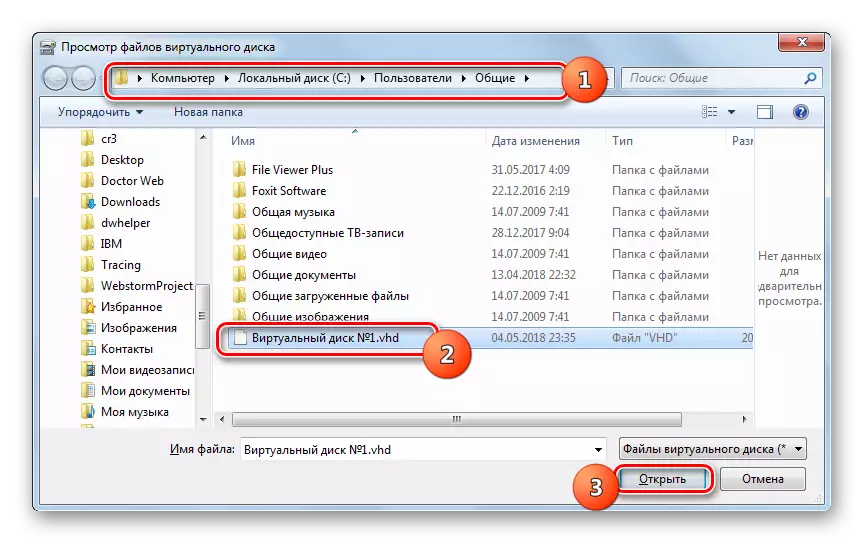
- Opens the joining window. Click in it on the "Review ..." element.
- The following files are launched. Go to the directory where the virtual drive with the VHD extension you want to attach. Highlight it and click "Open".
- After that, the address to the object will be displayed in the attachment window. Here it is necessary to press «OK».
- The virtual drive will be attached to the computer.
Removing virtual media
Sometimes it is required to completely remove the virtual media to free up the place on the physical HDD for other tasks.
- Initiate the procedure for disconnecting the virtual drive, as described above. When the disconnection window opens, check the box in front of the "Delete Virtual Disk" option and click OK.
- Virtual disk drive will be deleted. But it is worth noting that, in contrast to the disconnection procedure, all the information that was stored on it, you will lose irretrievably.

Formatting disk media
Sometimes it is necessary to make a section formatting procedure (full erasing of information that is located on it) or changing the file system. This task also performs the utility we studied.
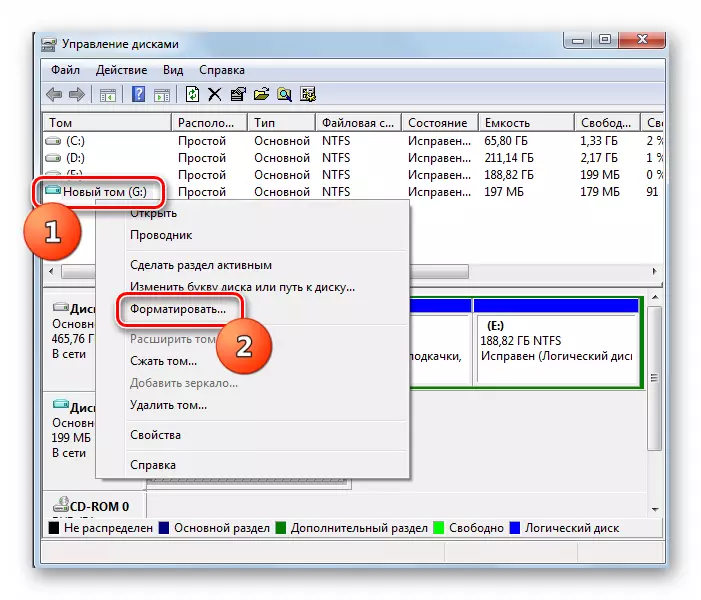
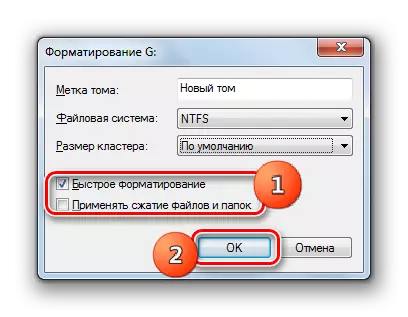
- Click the PCM on the name of the partition to format. In the discontinuity list, choose "format ...".
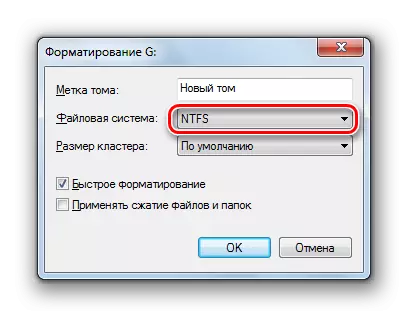
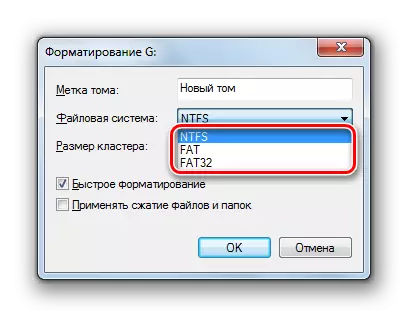
- The formatting window opens. If you want to change the file system type, then click on the appropriate drop-down list.
- The drop-down list is displayed, where you can choose one of the three file system options to choose from:
- FAT32;
- Fat;
- NTFS.
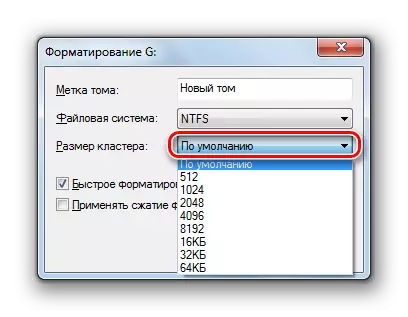
- In the drop-down list, which is located below, you can select the cluster size if necessary, but in most cases it is enough to leave the default value.
- Below by setting the checkbox, you can disable or enable fast formatting mode (the default is on). When formatting is faster mode is activated, but less deep. Also, by setting the checkbox, you can use compression of files and folders. After all formatting settings are specified, click "OK".
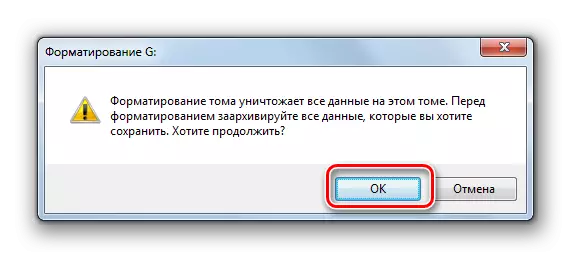
- A dialog box appears with a warning that the formatting process will erase all the data contained in this section. In order to accept and proceed with the operation, click «OK».
- Thereafter, the procedure of formatting the selected partition will be performed.
Lesson: HDD Formatting
Disk Partitioning Setup
Often there is a need to break the physical HDD partitions. This is especially appropriate to do in order to separate the different volumes of the OS directory of accommodation and storage. Thus, even with the collapse of the system user data will be saved. Run partition can be using the system utility.
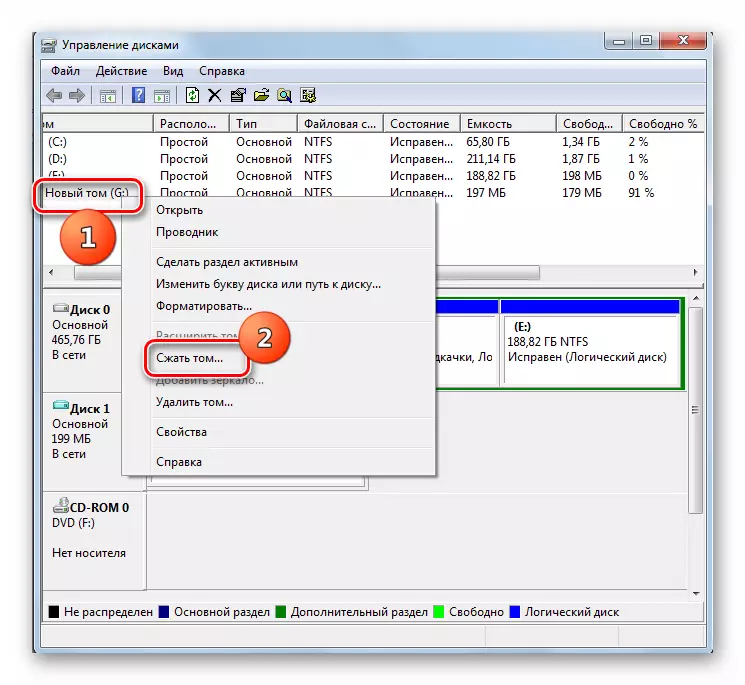
- RMB click the name of the section. In the context menu, select "Shrink Volume ...".
- This opens a window compression volume. Set on top of the current will of its scope, below - the maximum available for the compression volume. In the next field you can specify the amount of space to shrink, but it should not exceed the amount available for compression. Depending on the data entered in this field will display the new partition size after compression. Once you have specified the amount of space to shrink, press «OK».
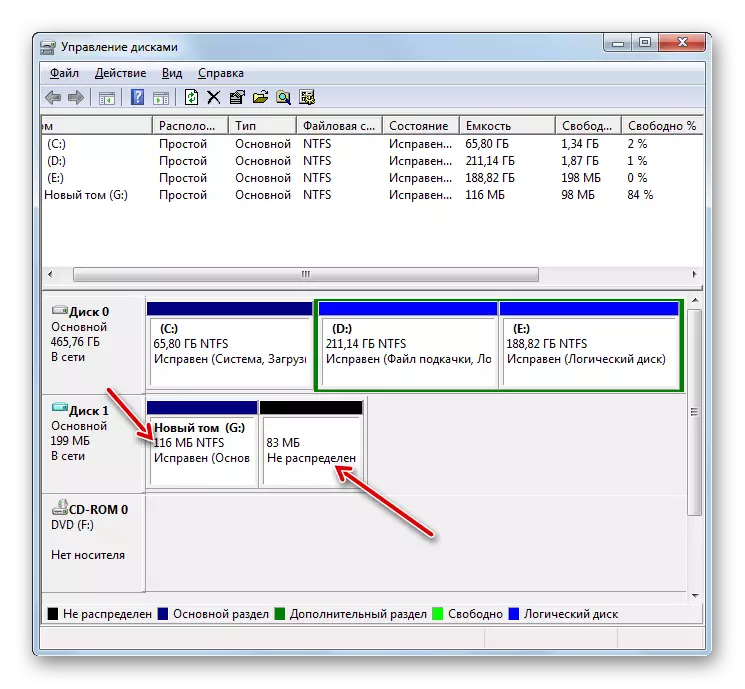
- compression procedure will be performed. The initial section shrinks to said value at the previous stage. At the same time formed another retained fragment, which takes the vacated space on the disk.
- We click on the unallocated fragment PKM and select "New Simple Volume ...". Start "Volume Wizard." All further actions, including the appropriation of that letter, we have already described in a separate section.
- After completion of the work in the "Create Volume Wizard" will create a partition that is assigned to a single letter of the Latin alphabet.

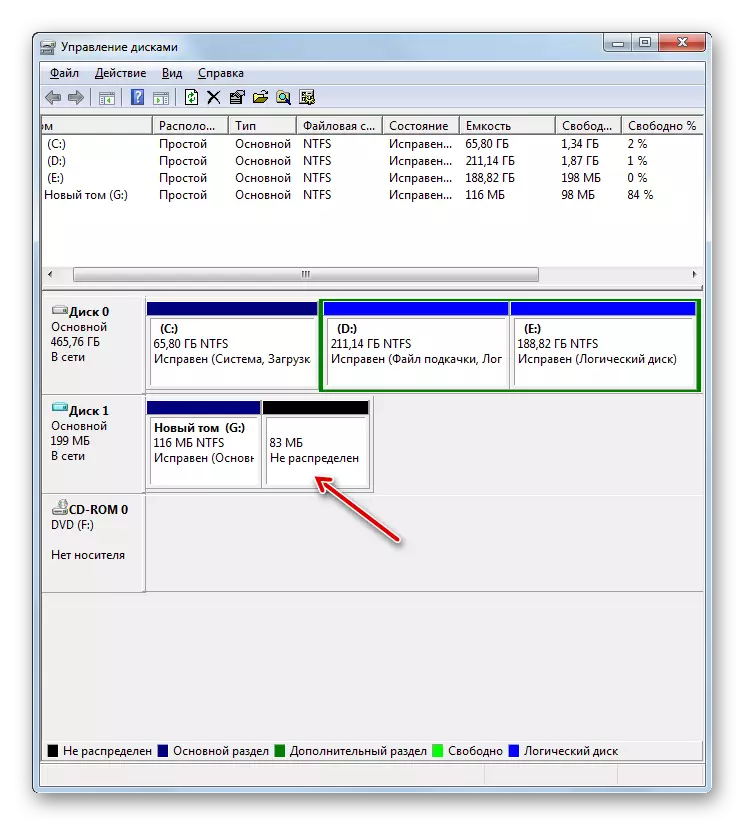
Merging partitions
Sometimes the opposite situation, when you need to combine two or more sections of the data carrier in a single volume. Let us see how this is done via the control system drives the tool.
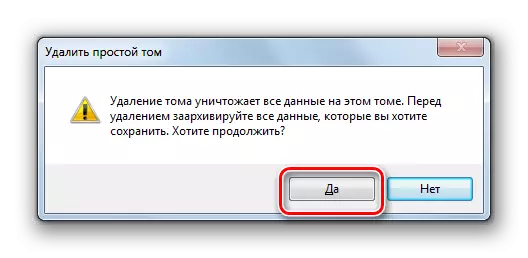
Before starting the procedure, it should be noted that all data in the merged partition will be deleted.
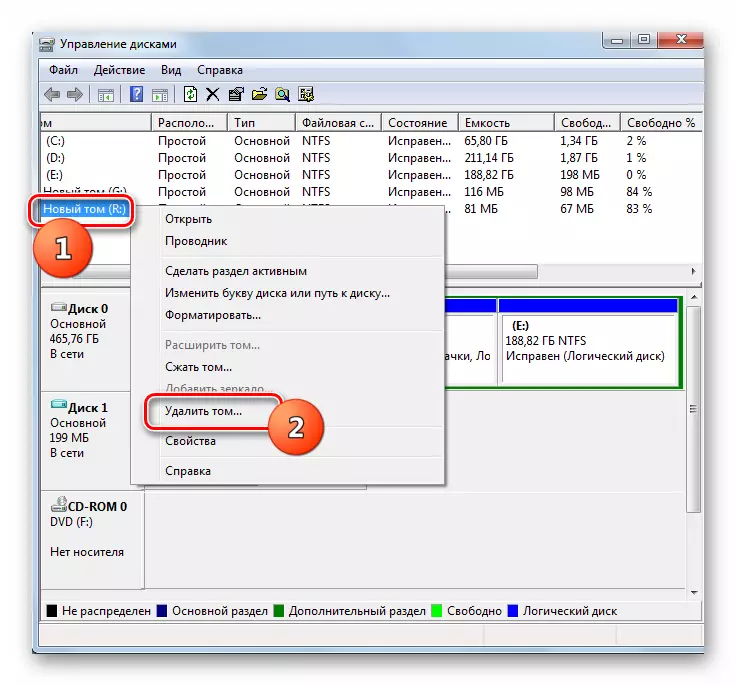
- RMB click the name of the volume that you want to connect to another section. From the context menu choose "Delete Volume ...".
- This will open a window to confirm the deletion of data. Click "Yes".
- After that, the section will be deleted.
- Go to the bottom of the window. Click on the remaining PCM section. In the context menu, choose "Expand the volume ...".
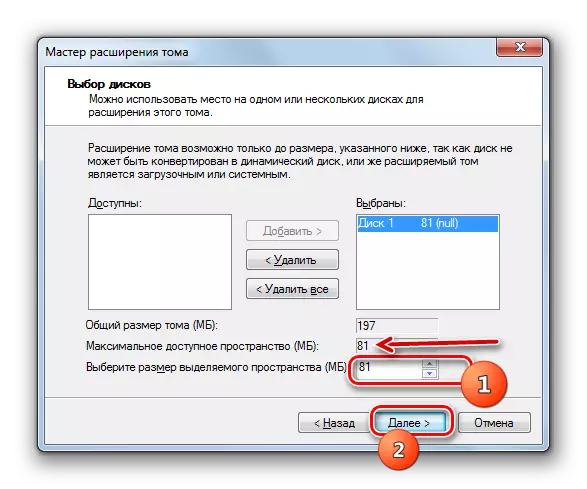
- The starting window "Wizard Expansion Wizard" opens, in which you need to click "Next".
- In the window that opens in the "Select size ..." field, specify the same number that is displayed opposite the "Maximum Available Space" parameter, and then press "Next".
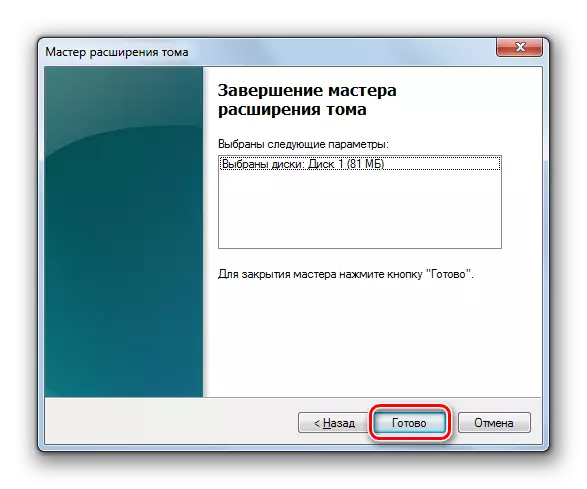
- In the final window "Masters" just press "ready."
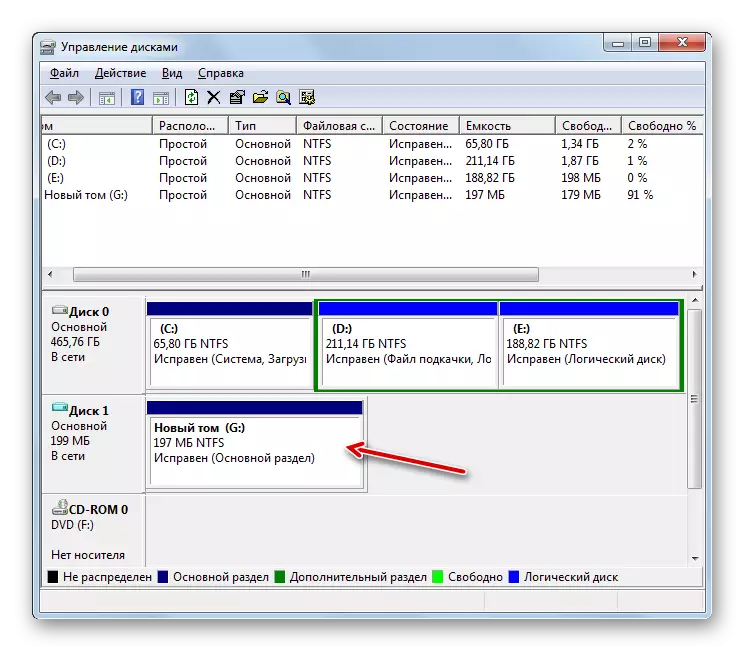
- After that, the section will be expanded due to the previously remote volume.


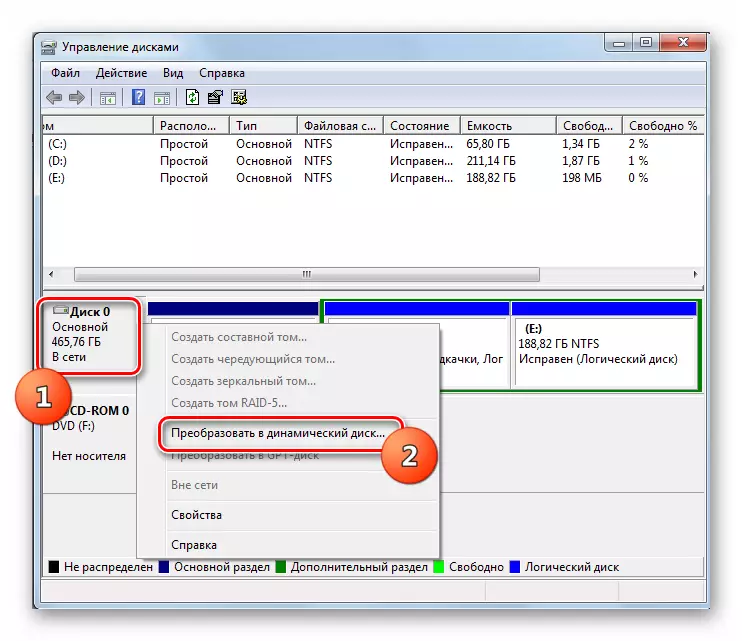
Convert to dynamic HDD
By default, hard disks of PC are static, that is, the dimensions of their partitions are strictly limited by the framework. But you can produce the procedure for converting the media into a dynamic option. In this case, the sizes of sections will automatically change as need.
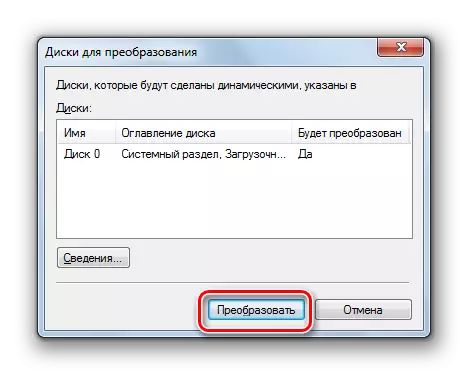
- Click the PCM on the name of the drive. From the list, select "Convert to dynamic disk ...".
- In the window that opens, click "OK".
- In the next shell, click on the "Convert" button.
- The transformation of the static media into the dynamic will be executed.

As we see, the system utility "Disk Management" is a rather powerful and multifunctional tool for performing various manipulations with information attached to the computer. She knows how to do almost all that similar third-party programs perform, but it guarantees a higher level of security. Therefore, before installing third-party software for disk operations, check, and whether the built-in WINDOVS Tool 7 can cope with the task.