

First, we create a completely original bootable DVD with Windows 8.1, including versions for a single language and a professional, and then - on how to make the installer CD from any ISO image with Windows 8.1. See also: How to make a Windows 10 boot disk.
Creating a bootable DVD with the original Windows 8.1 system
Relatively recently Microsoft introduced the Media Creation Tool utility specifically designed to create installation boot drives with Windows 8.1 - using this program you can download the original system in the ISO video and, or immediately write it on USB, or use the way to record the boot disk.
The Media Creation Tool program is available for download from the official site http://windows.microsoft.com/ru-ru/windows-8/create-reset-Refresh-Media. After pressing the "Create Media" button, the utility itself will be loaded, after which you can choose which version of Windows 8.1 you need.
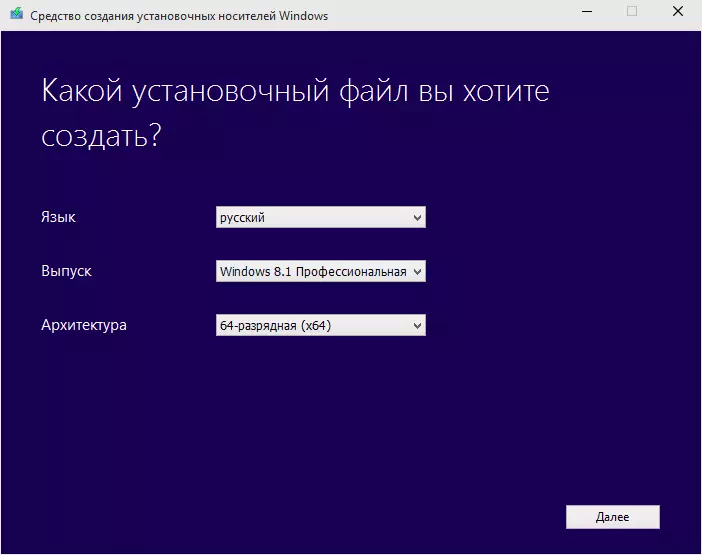
At the next stage, you will need to choose whether we want to record the installation file to the USB flash memory device (on the USB flash drive), or save as an ISO file. To write to the disk, ISO will be required, choose this item.

And finally, specify the place to save the official ISO image from Windows 8.1 on your computer, after which it remains only to wait for the end of its download from the Internet.

All the next steps will be the same, regardless of whether you use the original image or you already have your own distribution in the form of an ISO file.
Record ISO Windows 8.1 on DVD
The essence of the creation of the boot disk to install Windows 8.1 is reduced to the image of the image to the appropriate disk (in our case DVD). It should be understood that it is understood that it is not a simple copying of an image onto a carrier (and it happens, what is done and so), and its "deployment" on the disk.
Record the image on the disk can be either regular tools of Windows 7, 8 and 10, or using third-party programs. Advantages and disadvantages of methods:
- When using OS to write, you do not need to install any additional programs. And if you need to use a disk to install Windows1 on the same computer, you can safely use this method. The disadvantage is the lack of recording settings, which can lead to the inability to read the disk on another drive and the rapid loss of data from it over time (especially if poor-quality disc) is used).
- When utilizing the disc recording, you can adjust the recording parameters (it is recommended to use a minimum speed and high-quality blank disc DVD-R or DVD + R write-once). This increases the likelihood of trouble-free installation of the system on different computers from the distribution created.
In order to create a Windows 8.1 disk using the system using the system, simply click the "Write a disk" or "open using" in the context menu - "Windows Drive Recording Tool" depending on the installed version of the OS.

All other actions will execute the recorder. At the end, you will receive a ready-made boot disk from which you can set the system or make a recovery actions.
From free software with a flexible recording setting, I can recommend Ashampoo Burning Studio FREE. The program in Russian and is very easy to use. See also programs for recording disks.
To write Windows 8.1 to the disc in Burning Studio, select "Write an image" in the program "Disk". After that, specify the path to the loaded mounting image.
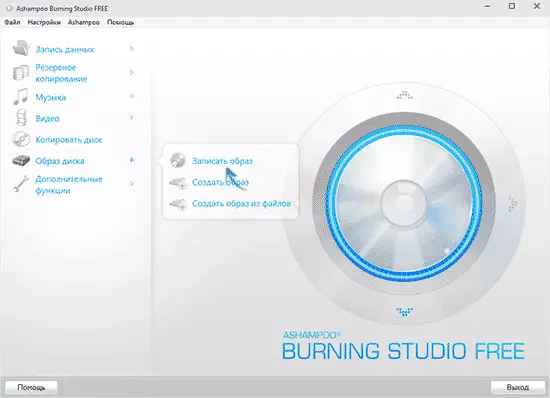
After that, it will only be necessary to set the recording parameters (just put the minimum speed available to select) and wait for the end of the recording process.
Ready. To use the created distribution, it will be enough to download from it to the BIOS (UEFI), or select a disk in Boot Menu when loading a computer (which is even easier).