

The paging file is called a disk volume allocated to work such a system component as virtual memory. It moves part of the data from the RAM required to work as a specific application or OS as a whole. In this article we will talk about how to create and configure this file in Windows 7.
Create a paging file in Windows 7
As we have already written above, the paging file (pagefile.sys) is needed a system for normal operation and running programs. Some software actively uses virtual memory and requires quite a lot of space in the selected area, but in normal mode it usually happens to set a size equal to 150 percent of the volume installed in RAM PC. The location of pageFile.sys also matters. By default, it is located on the system disk, which can lead to "brakes" and errors due to the high load on the drive. In this case, it makes sense to transfer the paging file to another, less loaded disk (not partition).Next, we simulate the situation when you need to turn off the paging on the system disk and turn it on the other. We will do this in three ways - using the graphical interface, the console utility and the registry editor. The instructions below are universal, that is, it does not matter from which drive and where you carry the file.
Method 1: Graphic Interface
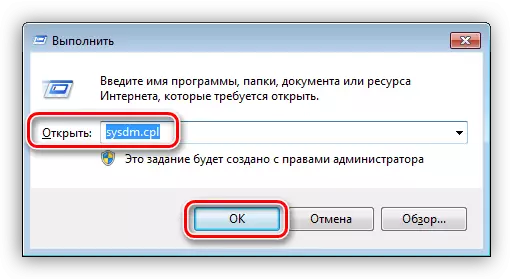
There are several ways to access the desired management element. We will use the fastest of them - to "execute" string.
- Click the Windows + R key combination and write this command:
sysdm.cpl
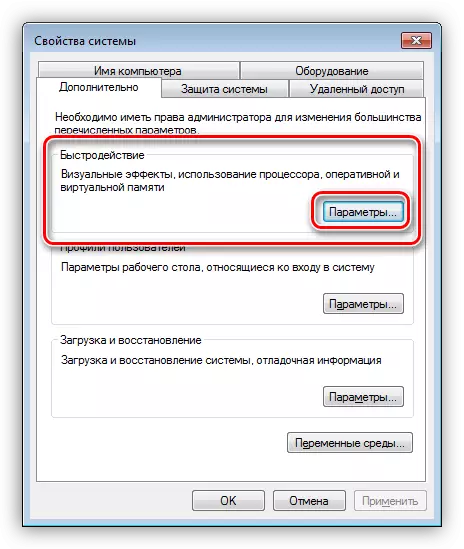
- In the OS properties window, we go to the "Advanced" tab and click on the settings button in the "Speed" block.
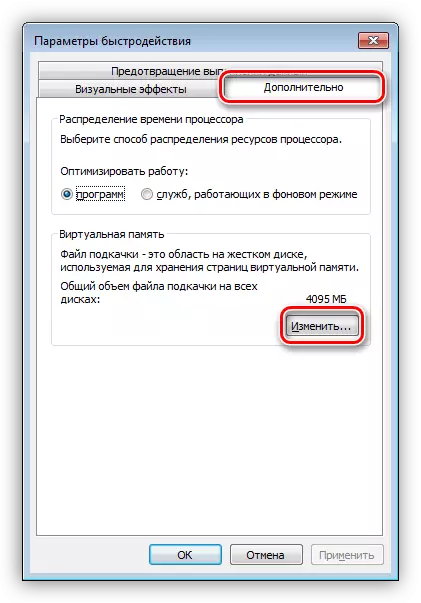
- Next, switch to the tab with the optional properties and click the button specified in the screenshot.
- If you have not previously manipulated virtual memory, the settings window will look like this:
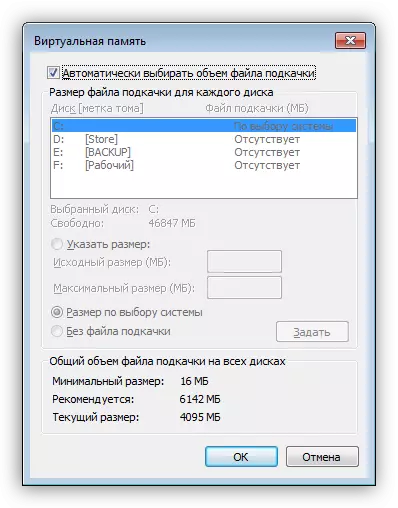
In order to start the setting, you need to turn off the automatic control of the swap, removing the appropriate checkbox.
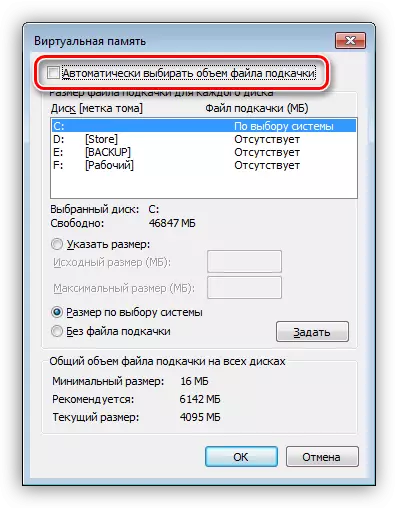
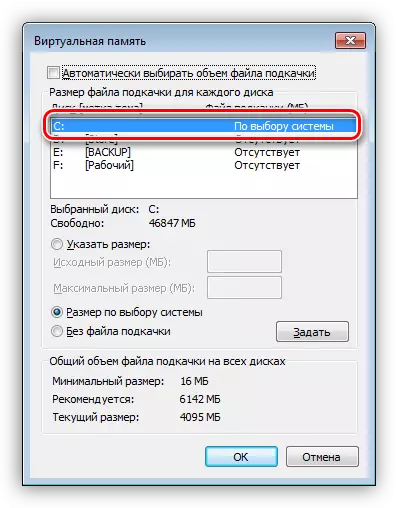
- As you can see, the paging file is currently located on the system disk with the Literary "C:" and has the size "by selecting the system".
We highlight the disk "C:", put the switch to the "without paging file" and click the "Set" button.
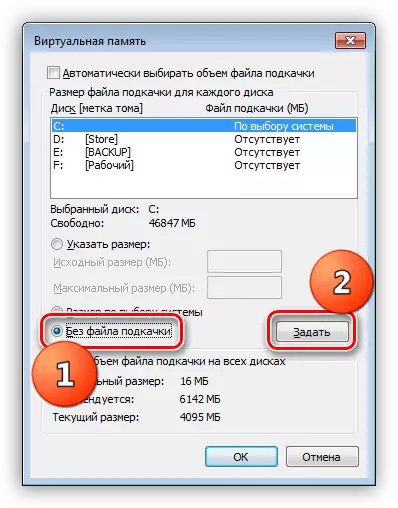
The system will issue a warning that our actions may result in errors. Click "Yes."
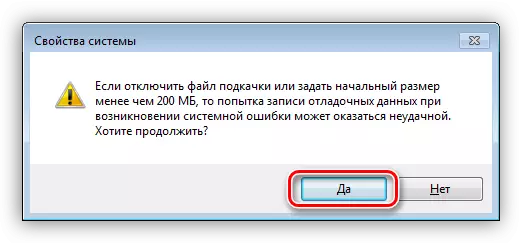
The computer does not reboot!
So we turned off the paging file on the appropriate disk. Now you need to create it on another drive. It is important that it was a physical medium, and the partition not created on it. For example, you have an HDD on which Windows is installed ("C:"), as well as it has created an additional volume for programs or other purposes ("D:" or other letter). In this case, the transfer of pageFile.sys to disk "D:" will not make sense.
Based on all the above, you must select a place for a new file. You can do this by using the Disk Management Settings block.
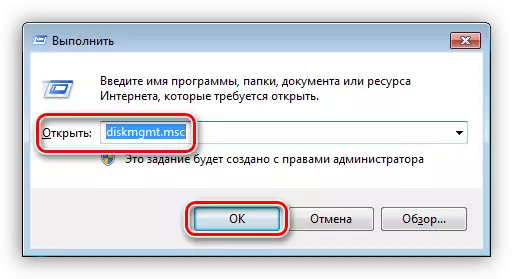
- Run the menu "Run" (Win + R) and call the desired tooling the command
diskmgmt.msc.
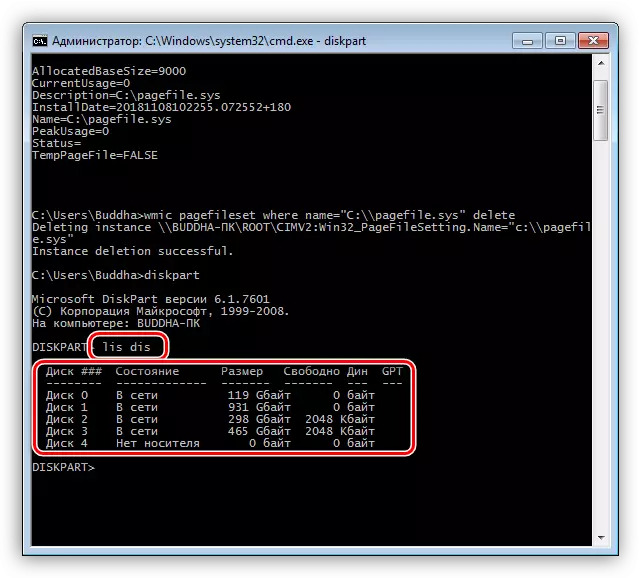
- As we see, on the physical disk with the number 0, sections "C:" and "J:" are located. For our purposes, they are not suitable.
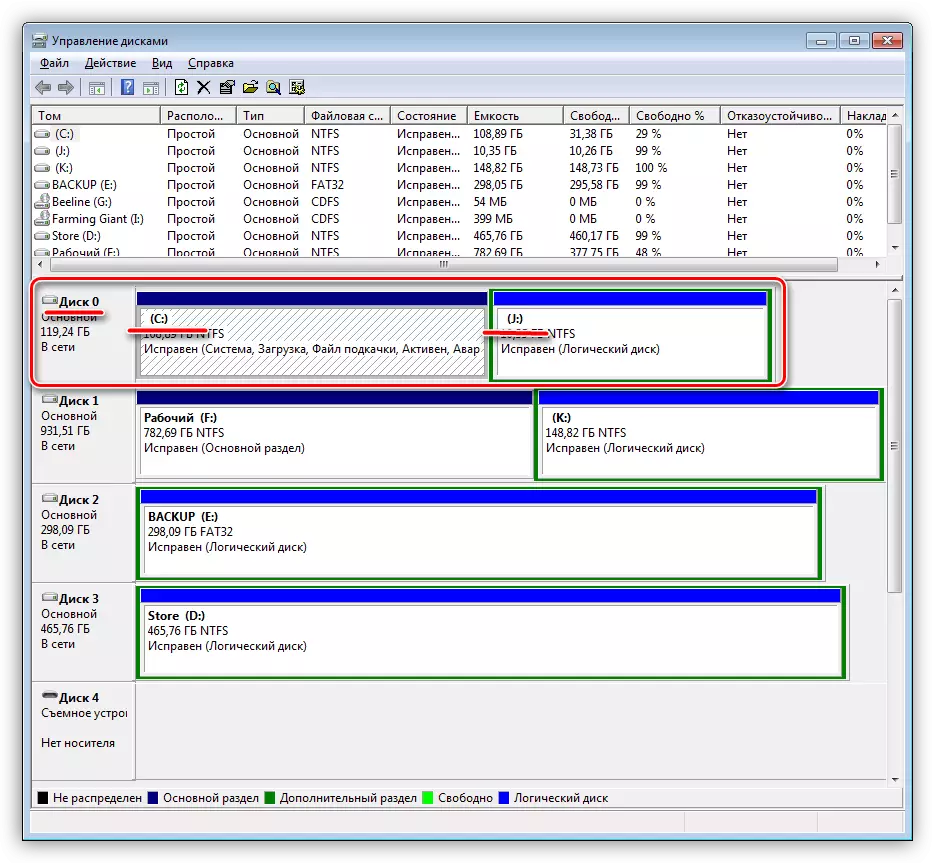
We will transfer to one of the partitions of the disk 1.
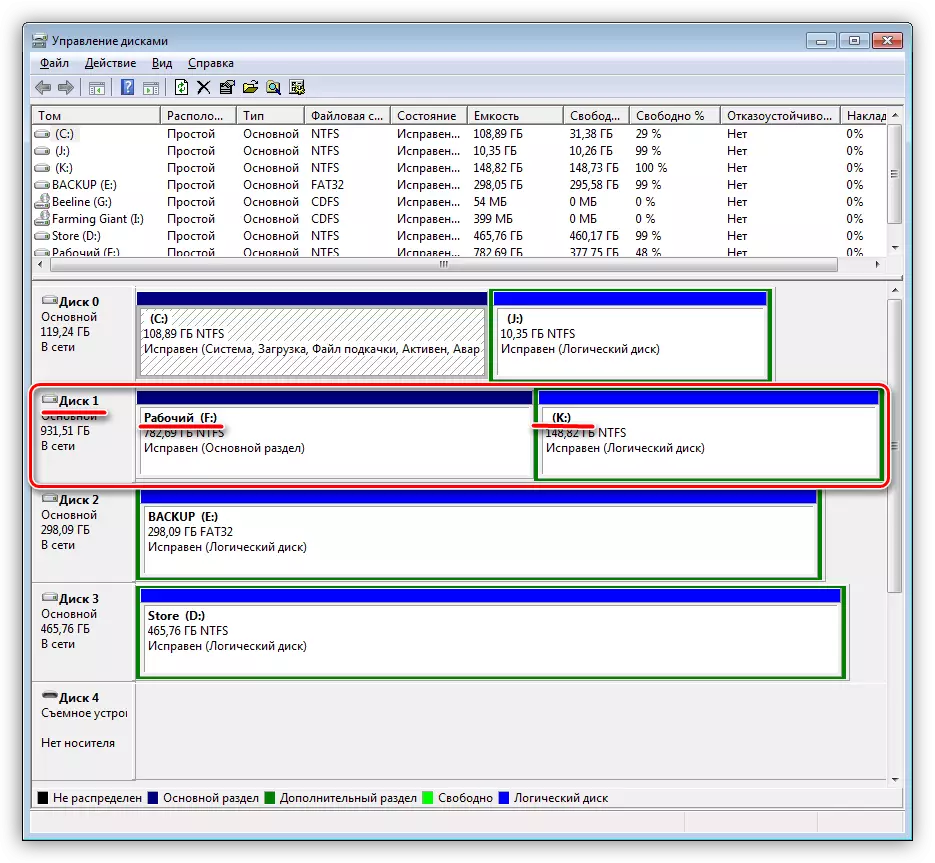
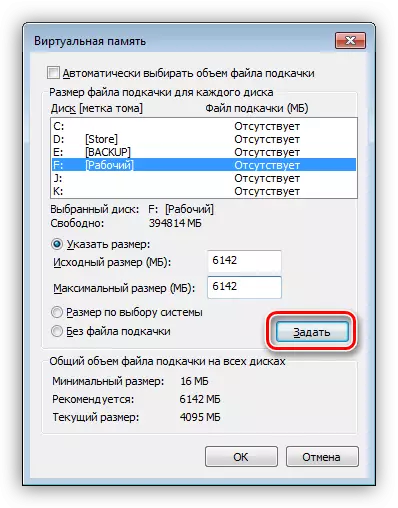
- Open the settings block (see pp 1 - 3 above) and select one of the disks (partitions), for example, "F:". We put the switch to the "Specify Size" position and enter the data in both fields. If you are not sure which numbers indicate, you can use the tip.
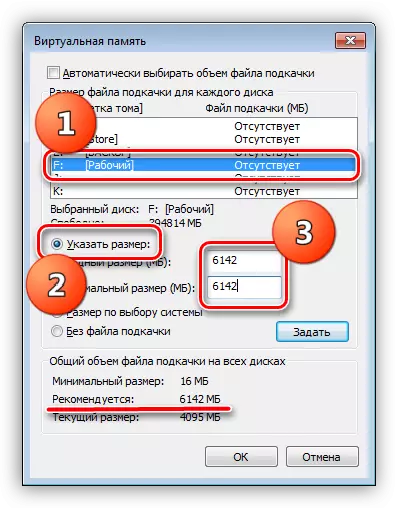
After all settings, click "Set."
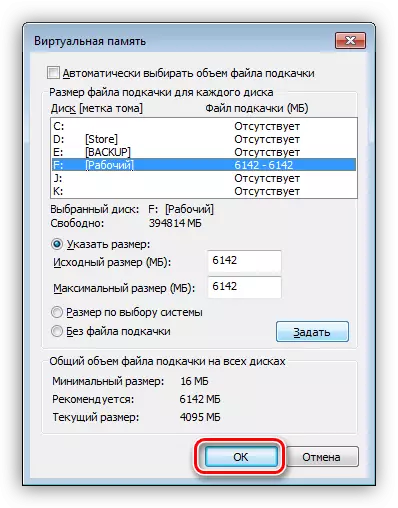
- Next, click OK.
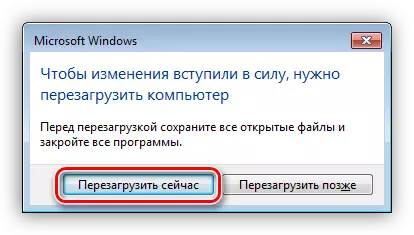
The system will offer to restart the PC. Here we press OK.

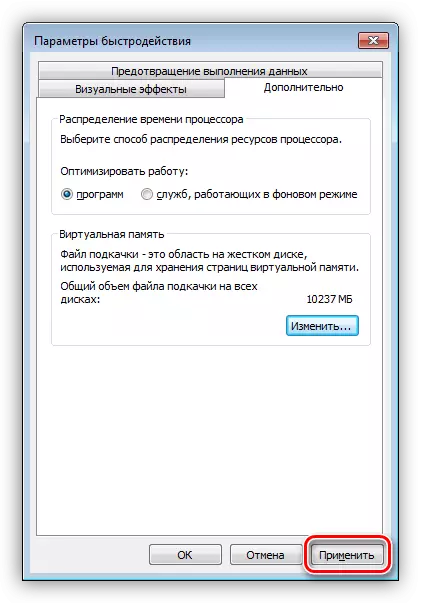
Click "Apply".
- Close the parameters window, after which you can restart Windows manually or use the appeared panel. The next time you started a new pageFile.sys in the selected section.
Method 2: Command String
This method will help us configure the paging file in situations where for some reason it is impossible to do this using a graphical interface. If you are on your desktop, you can open the "command line" from the Start menu. You need to do this on behalf of the administrator.
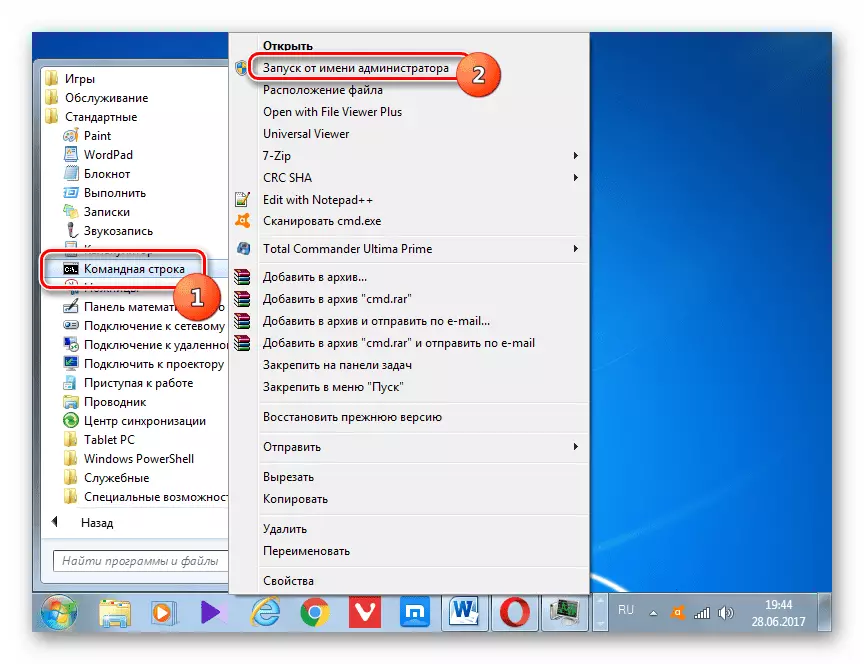
Read more: Call "Command Line" in Windows 7
The console utility wmic.exe will help solve the task.
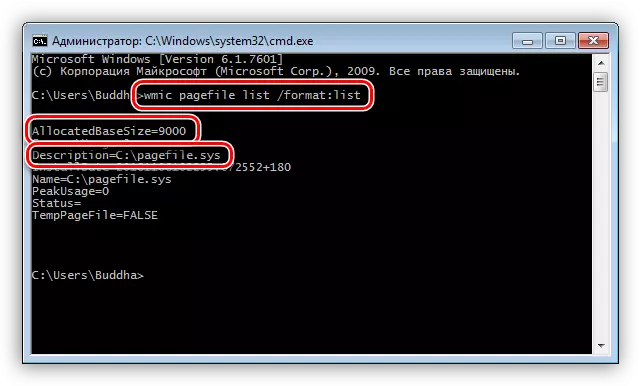
- For a start, let's see where the file is located, and what is its size. Perform (enter and press ENTER) command
WMIC Page File List / Format: List
Here "9000" is the size, and "C: \ pagefile.sys" - location.
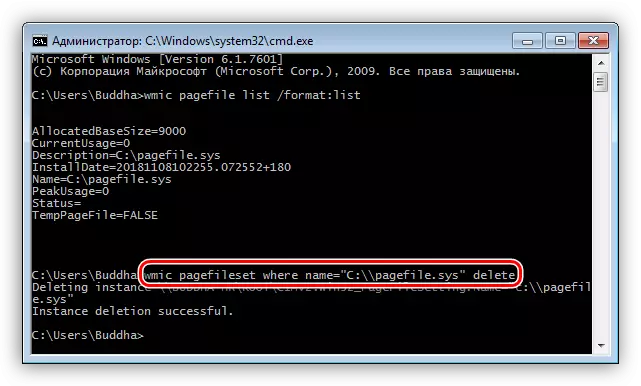
- Turn off the paging on the disk "C:" by the following command:
WMIC pageFileset WHERE NAME = "C: \\ pagefile.sys" Delete
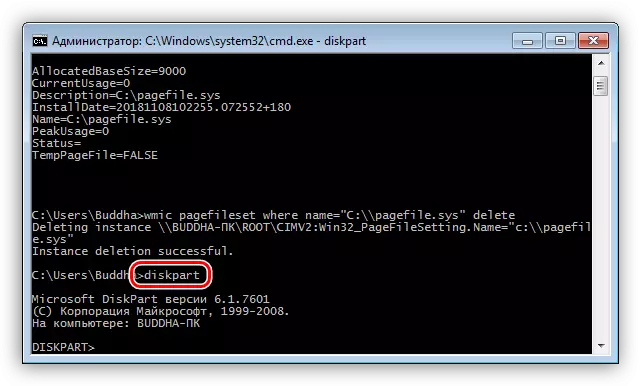
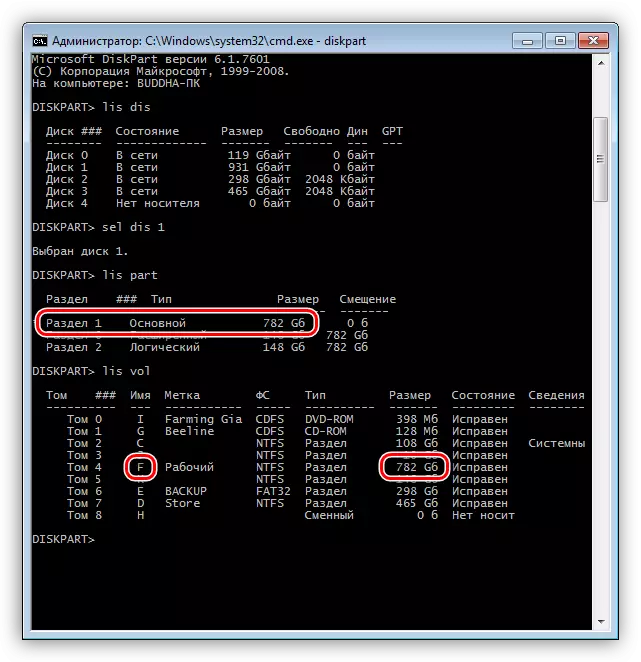
- As in the method with a graphical interface, we need to determine which section to transfer the file. Here, another console utility will come to your aid - diskpart.exe.
diskpart.
- "Please" to the utility show us a list of all physical media by completing the command
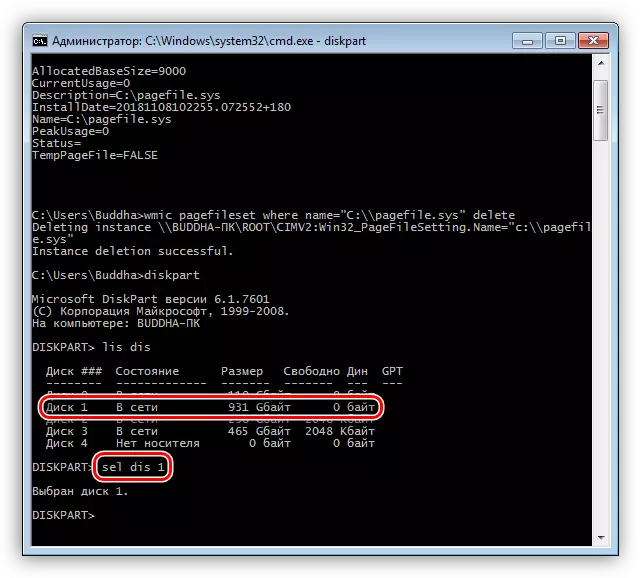
LIS DIS
- Guided by the size, we solve, to which disk (physical) will carry the paging, and choose it with the following command.
SEL DIS 1.
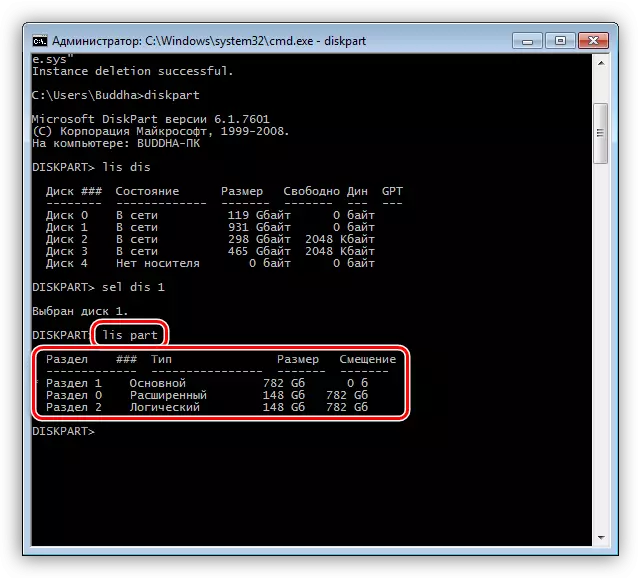
- We receive a list of sections on the selected disk.
LIS PART.
- We will also need information about what letters have all sections on the disks of our PC.
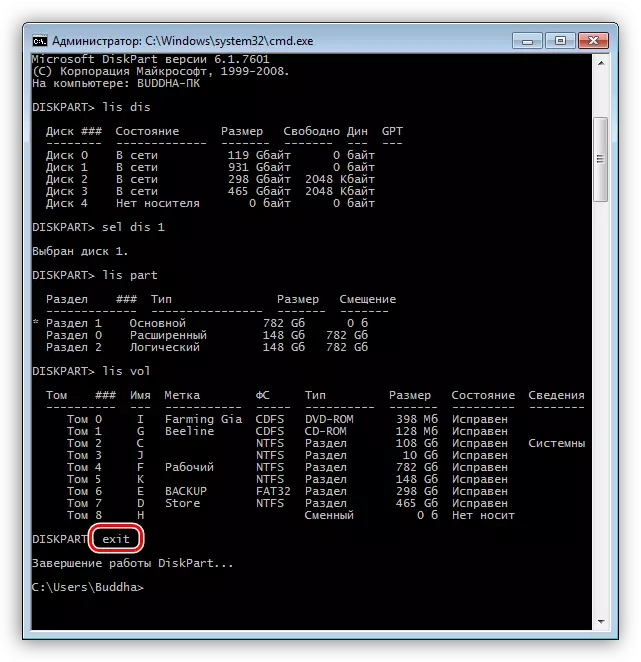
Lis Vol.
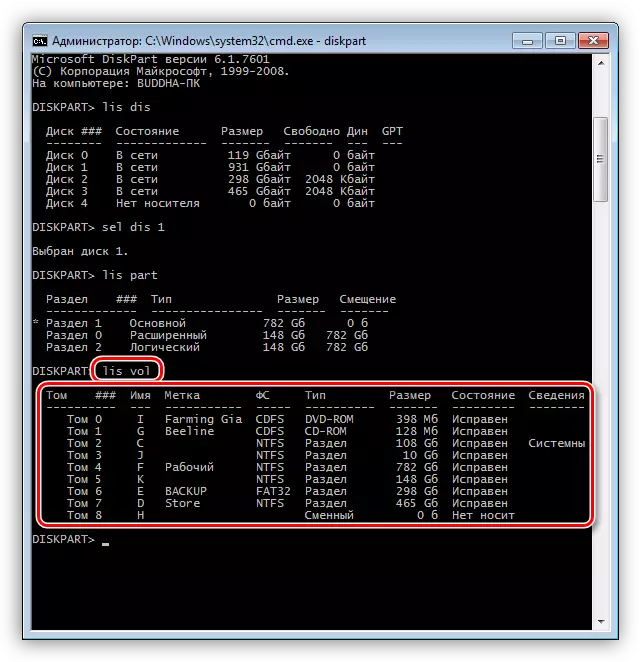
- Now determine the letter of the desired volume. Here we will also help the volume.
- Complete the work of the utility.
EXIT
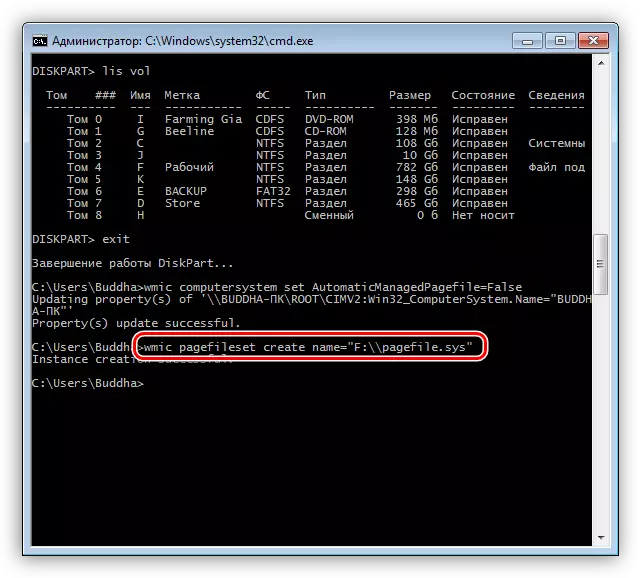
- Disconnect automatic parameters.
WMic Computersystem Set AutomaticManagedPageFile = False

- Create a new paging file on the selected section ("F:").
WMIC pageFileset Create Name = "F: \\ pagefile.sys"
- Reboot.
- After the next launch of the system, you can specify your file size.
WMIC pageFileset WHERE NAME = "F: \\ pagefile.sys" set initialsize = 6142, maximumsize = 6142
Here "6142" - a new size.
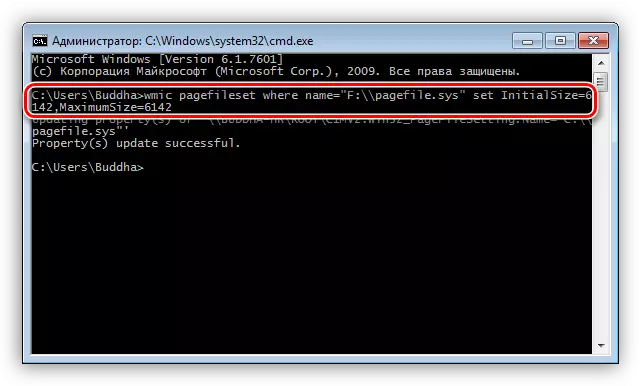
Changes will take effect after restarting the system.
Method 3: System Registry
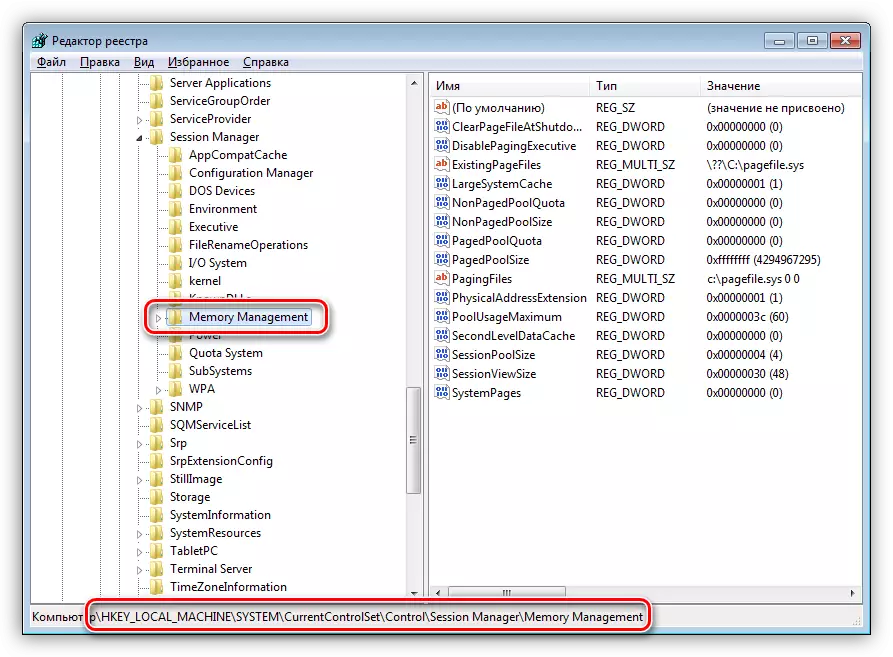
The Windows registry contains the keys responsible for location, size and other parameters of the paging file. They are in the branch
HKEY_LOCAL_MACHINE \ SYSTEM \ CURRENTCONTROLSET \ CONTROL \ SESSION MANAGER \ MEMORY MANAGEMENT
- The first key is called
EXISTINGPAGEFILES.
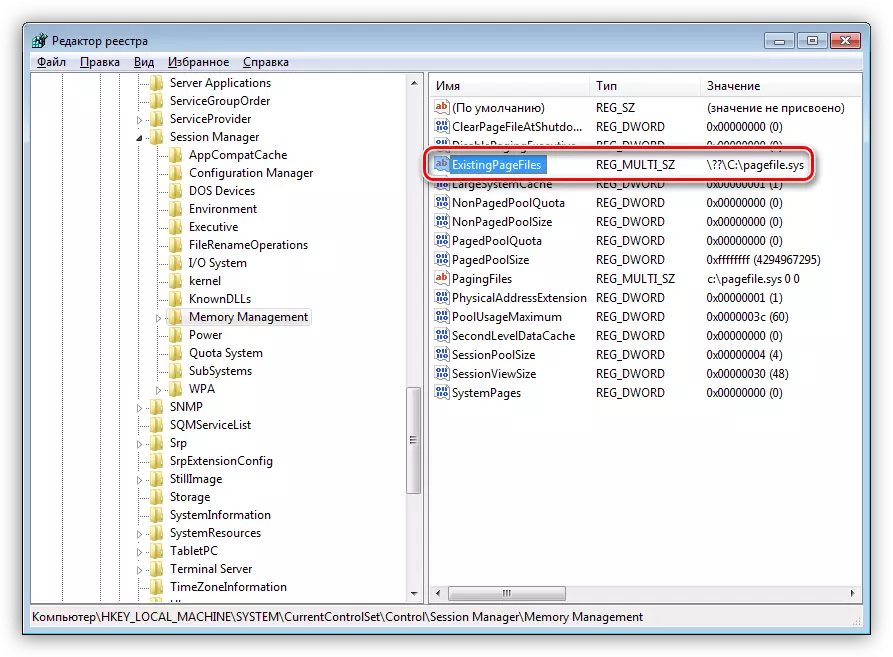
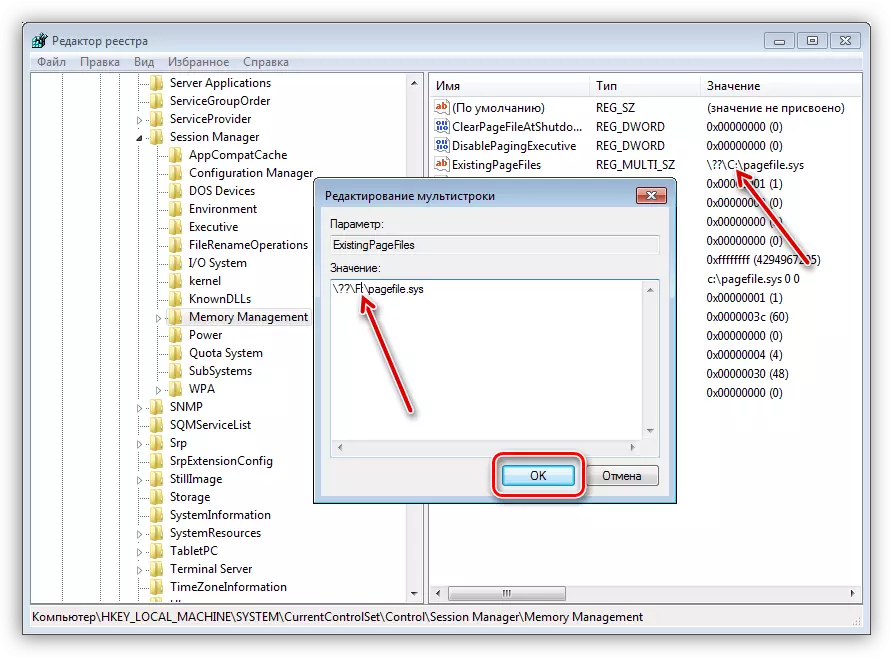
He is responsible for the location. In order to change it, it is enough to enter the desired drive letter, for example, "F:". Click PCM on the key and select the item indicated in the screenshot.
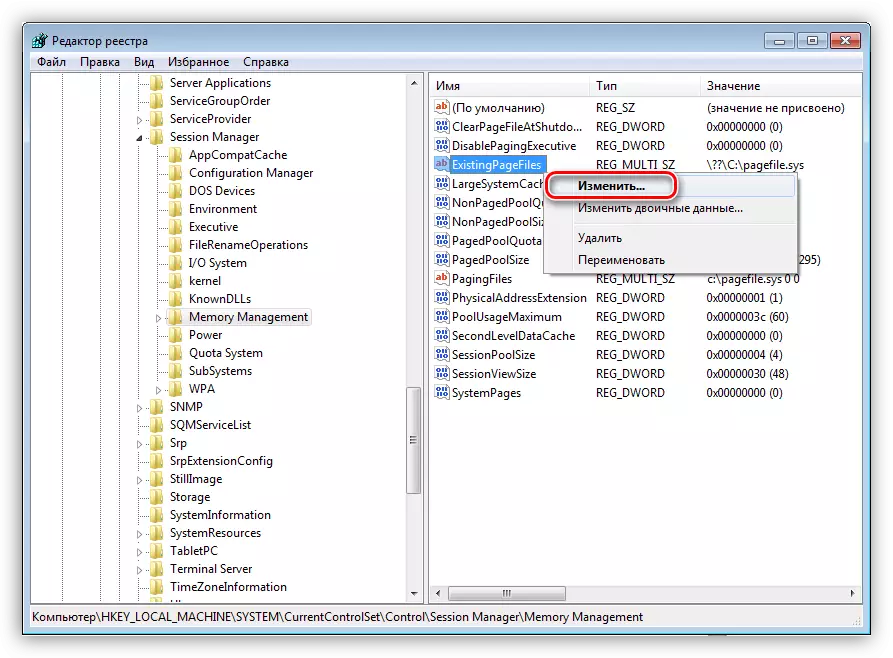
We replace the letter "C" to "F" and click OK.
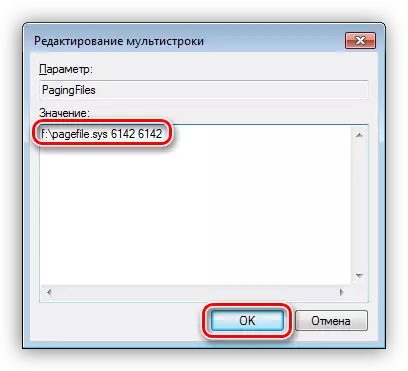
- The following parameter contains data on the size of the paging file.
PagingFiles.
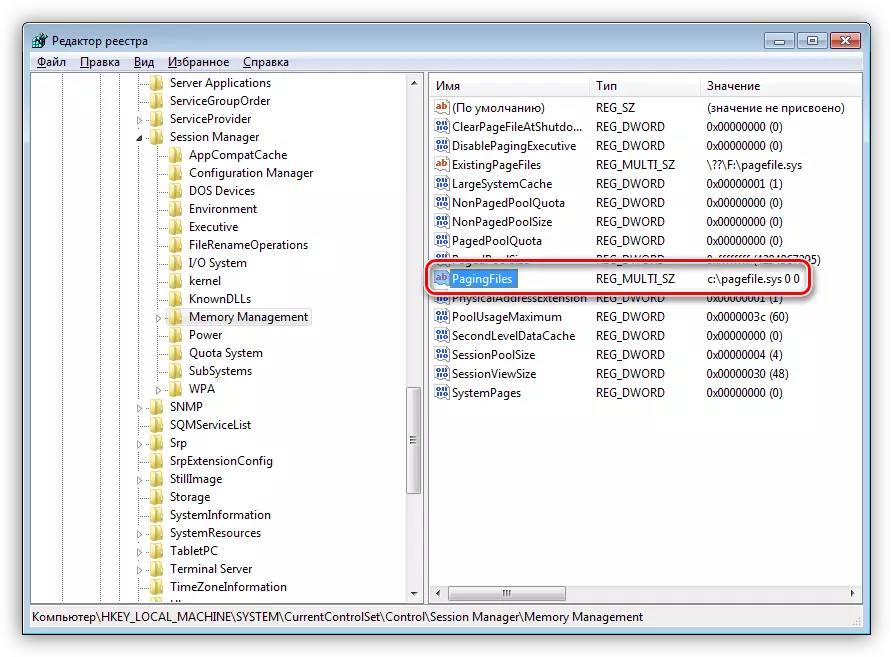
Several options are possible here. If you want to specify a specific volume, you should change the value to
F: \ pagefile.sys 6142 6142
Here is the first number "6142" is the initial size, and the second is the maximum. Do not forget to change the disk log.
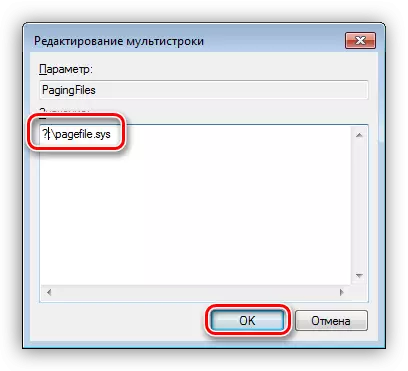
If in the beginning of the row instead of the letter to enter a question mark and omit numbers, the system will enable automatic file management, that is, it is its volume and location.
?: \ pagefile.sys
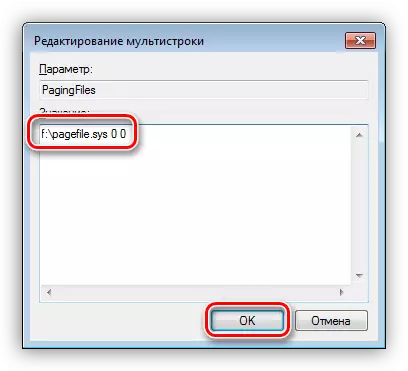
The third option - enter the location manually, and configure the size to trust windows. To do this, simply indicate zero values.
F: \ pagefile.sys 0 0
- After all settings, you should restart the computer.
Conclusion
We dismantled three ways to configure the paging file in Windows 7. All of them are equivalent to the result obtained, but differ in the tools used. The graphical interface is easy to use, "Command Line" will help you configure the parameters in case of problems or need to perform an operation on a remote machine, and the registry editing will allow you to spend less time on this process.