

Due to the fact that the Ubuntu Server operating system does not have a graphical interface. Users face difficulties when trying to configure an Internet connection. This article will tell, which commands you need to use and what files to adjust to achieve the desired result.
According to the result, the configuration file must have the following form:

On this setting the wired network with dynamic IP is complete. If the Internet does not even appear, then restart the computer, in some cases it helps.
There is one more, more likely to establish a connection to the Internet.
Sudo IP Addr Add [Network Card Address] / [Number of Bit In the Prefix Part] DeV [Network Interface Name]

Note: You can get information about the address of the network card by running the ifconfig command. In the results, the required value is after "INET ADDR".

After executing the command on the computer, the Internet immediately should appear, provided that all data was specified correctly. The main minus of such a way is that after rebooting the computer, it will disappear, and you will need to execute this command again.
Static IP.
Setting the static IP from dynamic is characterized by the number of data to be entered into the "Interfaces" file. To perform correct connection to the network, you need to know:
- the name of your network card;
- IP subnet masks;
- gateway address;
- DNS server addresses;
As mentioned above, all this data must provide a provider. If you have all the necessary information, then do the following:
- Open the configuration file.
Sudo Nano / etc / Network / Interfaces
- Recovering paragraph, push all the parameters as follows:
IFACE [Network Interface Name] INET STATIC
ADDRESS [address] (network card address)
NetMask [Address] (Subnet Mask)
Gateway [address] (gateway address)
DNS-NameServers [address] (DNS server address)
AUTO [Network Interface Name]
- Save the changes.
- Close text editor.
As a result, all data in the file should look like this:
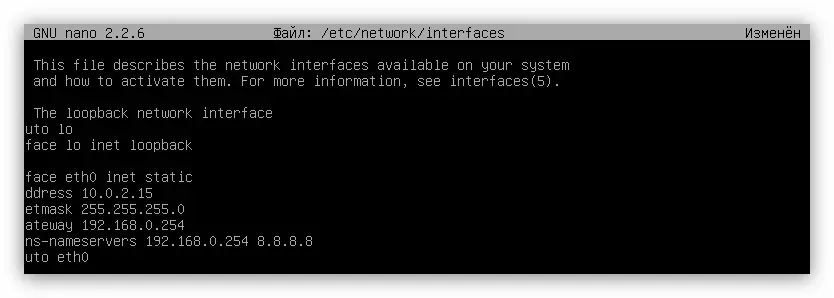
Now the wired network setting with static IP can be finished. Just as with dynamic, it is recommended to restart the computer so that the changes take effect.
PPPoe
If your provider supplies you services via PPPoe, then the setting must be carried out through a special utility that is pre-installed in Ubuntu Server. It is called pppoeconf. To connect the computer to the Internet, do the following:
- Run the command:
Sudo PppoConf.
- In the utility that appears, the utility wait for the end of the network equipment scanning.
- In the list, press ENTER by the network interface that is going to customize.
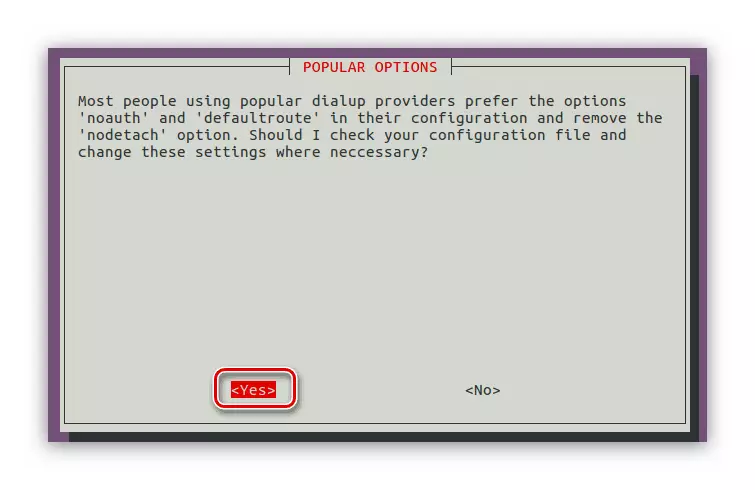
- In the "Popular Options" window, click "Yes".
- In the next window, you will request a login and password - enter them and confirm by clicking "OK". If you do not have the data with you, then call the provider and find out this information from him.
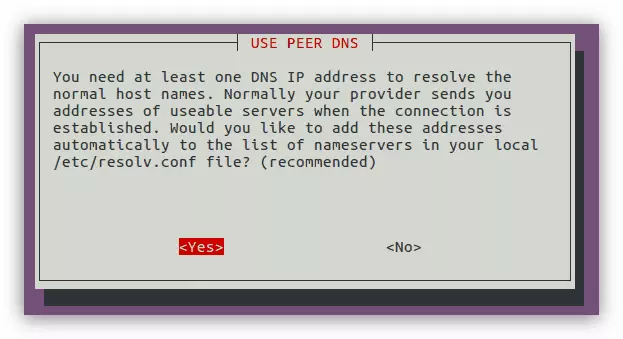
- In the "Use Peer DNS" window, click "NO" if Static IP address, and "YES", if dynamic. In the first case you will be asked to enter the DNS server manually.
- The next step is to limit the size of MSS to 1452 bytes. You need to give permission, it will eliminate the possibility of a critical error when entering some sites.
- Next, select the answer "Yes" if you want the computer automatically connected to the network after starting. "NO" - if you do not want.
- In the "Establish A Connection" window by clicking "Yes", you will give permission to the utility to establish a connection right now.
Note: If you have only one network interface, then this window will be skipped.


If you can select "NO", you can connect to the Internet later by running the command:
Sudo Pon DSL-Provider
You can also break the PPPoE connection at any time if you enter the following command:
Sudo POFF DSL-PROVIDER
Dial-Up.
You can configure Dial-Up in two ways: using the PPPConfig utility and making settings to the configuration file "wvdial.conf". The first way in the article will not be considered in detail, since the instruction is similar to the previous paragraph. All you need to know - how to start the utility. To do this, follow:
Sudo pppconfig
After execution, a pseudographic interface appears. Responding to questions that will be specified in the process, you can establish a Dial-Up connection.
Note: If you find it difficult to answer, it is recommended to contact your provider for advice.
With the second way, everything is a bit more complicated. The fact is that there is no configuration file "wvdial.conf" in the system, and to create it it will be necessary to install a special utility, which in the process of work considers all the necessary information from the modem and enables this file.
- Install the utility by running the command:
Sudo Apt Install Wvdial
- Run the executable file with the command:
Sudo WvdialConf.
At this stage, the utility created a configuration file and made all the necessary parameters to it. Now you need to enter the data from the provider so that the connection is set.
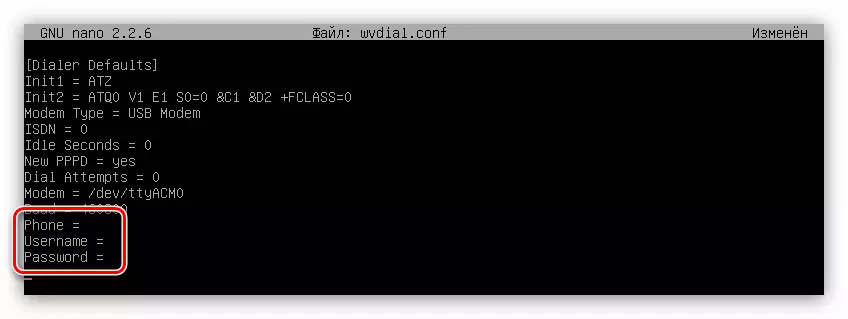
- Open the "wvdial.conf" file via the Nano text editor:
Sudo Nano /etc/wvdial.conf.
- Enter the data in the PHONE, UserName and Password lines. All information can be obtained from the provider.
- Save the changes and exit the text editor.
After the actions have done to connect to the Internet, you can only execute the following command:
sudo wvdial
As you can see, the second method is rather complicated, compared to the first, but it is with it that you can specify all the necessary connection parameters and complement them during the use of the Internet.
Conclusion
Ubuntu Server has all the necessary tools to configure the Internet connection of any type. In some cases, even several ways are offered at once. The main thing is to know all the necessary commands and data that you want to enter into configuration files.