

If you are a user at least one product from Apple, then in any case you need to have a registered Apple ID account, which is your personal account and repository of all your acquisitions. How the creation of this account is performed in various ways, and it will be discussed in the article.
Apple ID is a single account that allows you to store information about available devices, make the purchase of a media system and have access to it, work with services, such as icloud, iMessage, Facetime, etc. In short, there is no account - it is not possible to use Apple products.
Register an Apple ID account
You can register an EPPL IIDE account in three ways: using the Apple device (phone, tablet or player), through the iTunes program and, of course, through the website.Method 1: Creating an Apple ID through the site
So, you want to create an Epple Ayidi through your browser.
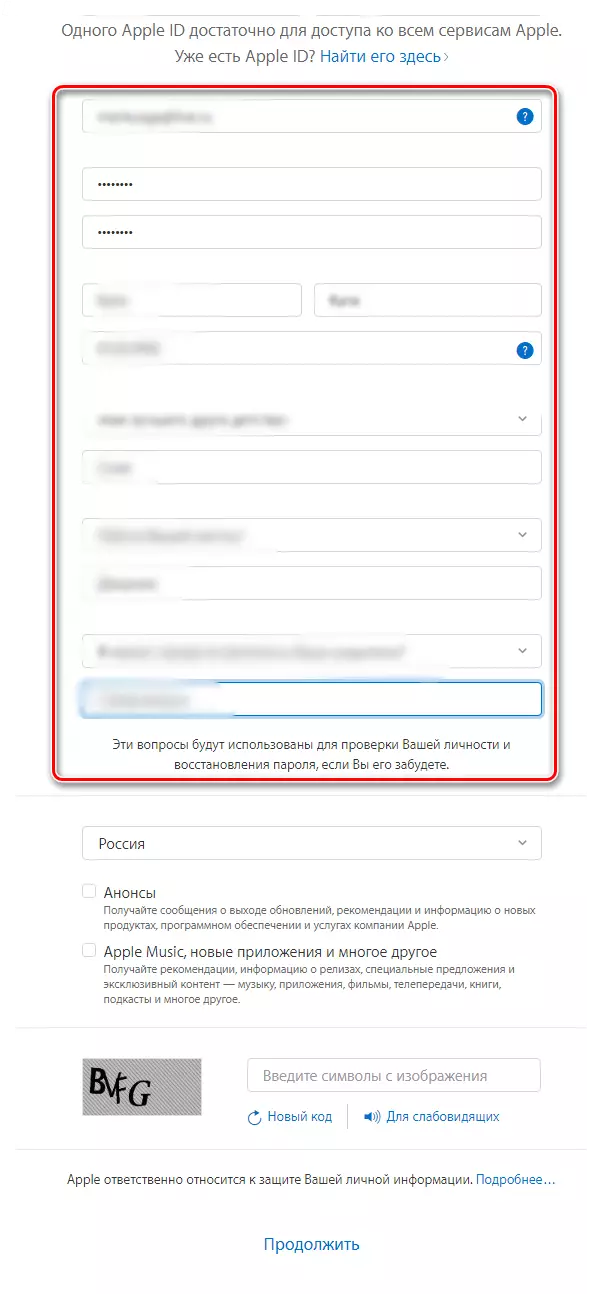
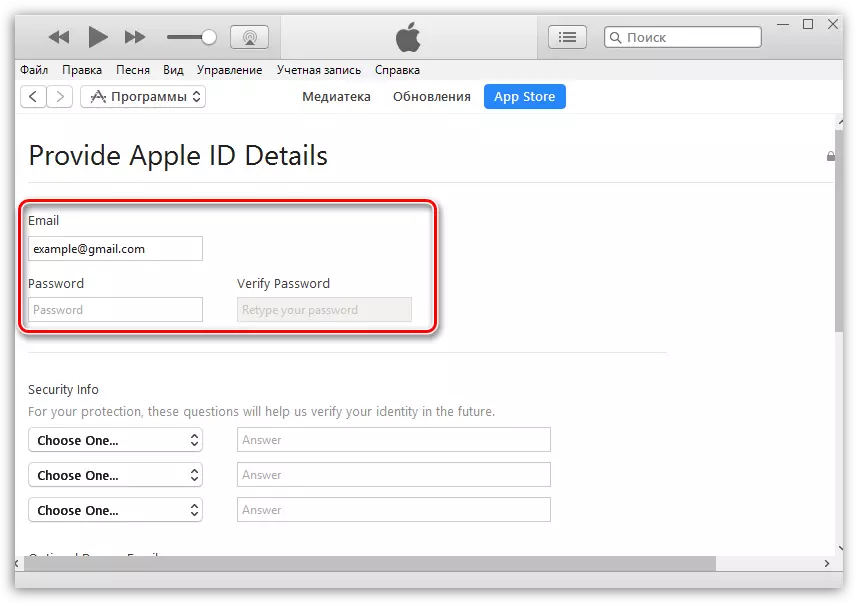
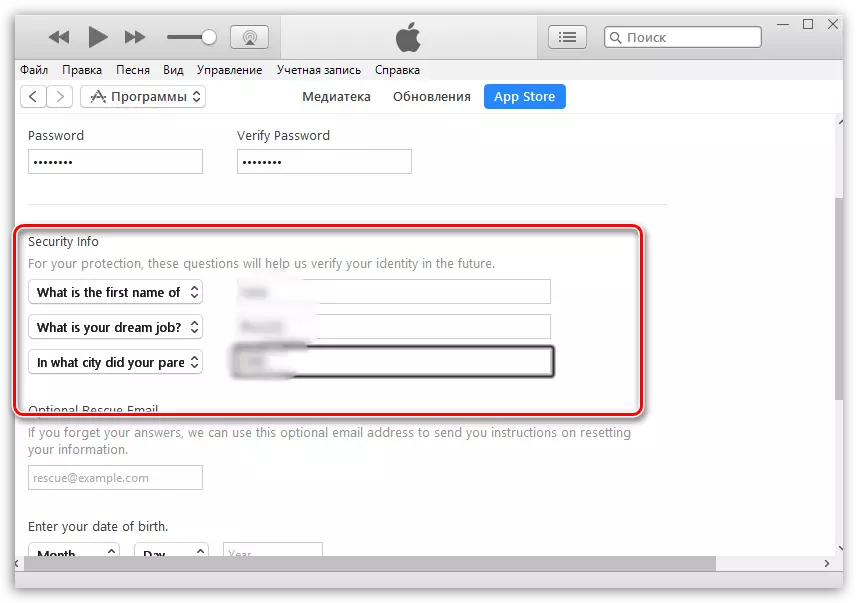
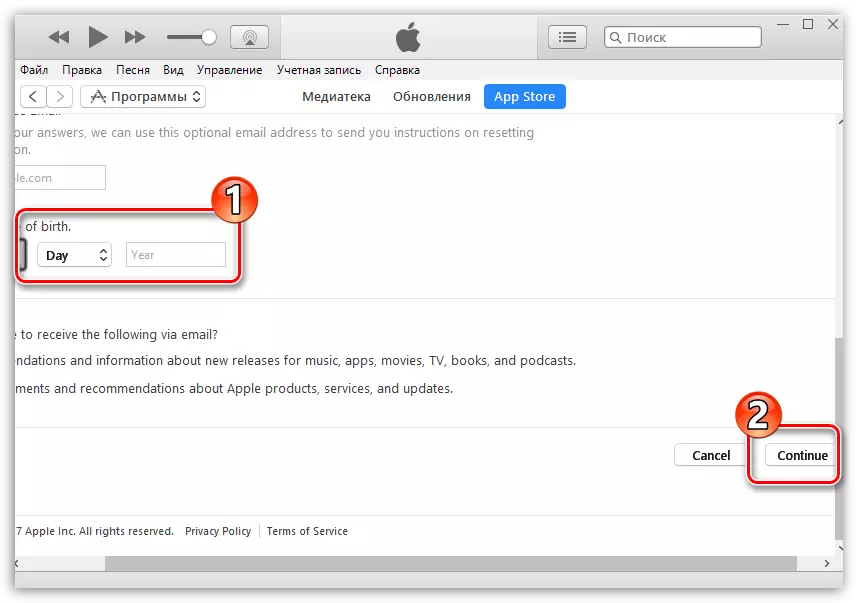
- Scroll through this link to the account creation page and fill in the graphs. Here you will need to enter your existing email address, come up with and write a reliable password twice (it must be consisting of letters of different register and symbols), specify your name, surname, date of birth, and also come up with three reliable control questions that will protect your Account.
- You will need to specify the characters from the picture, and then click on the "Continue" button.
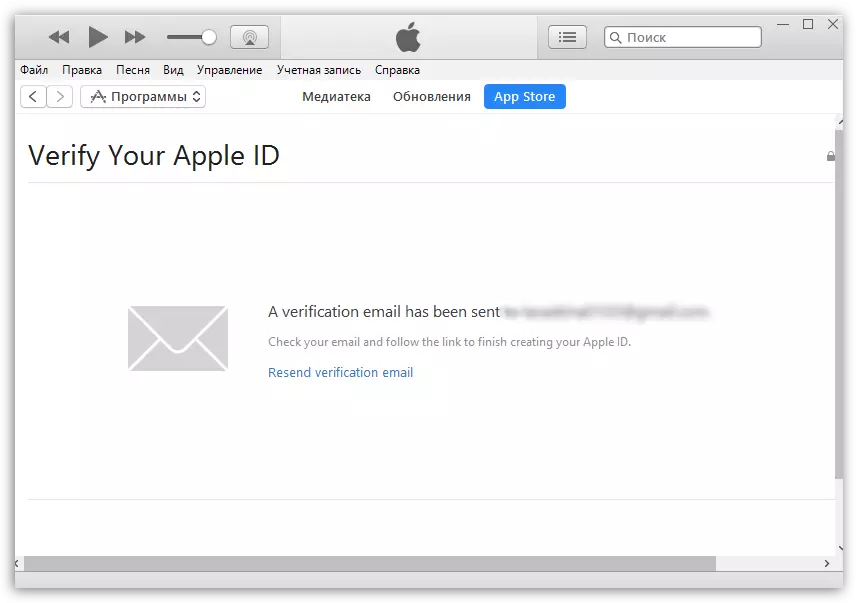
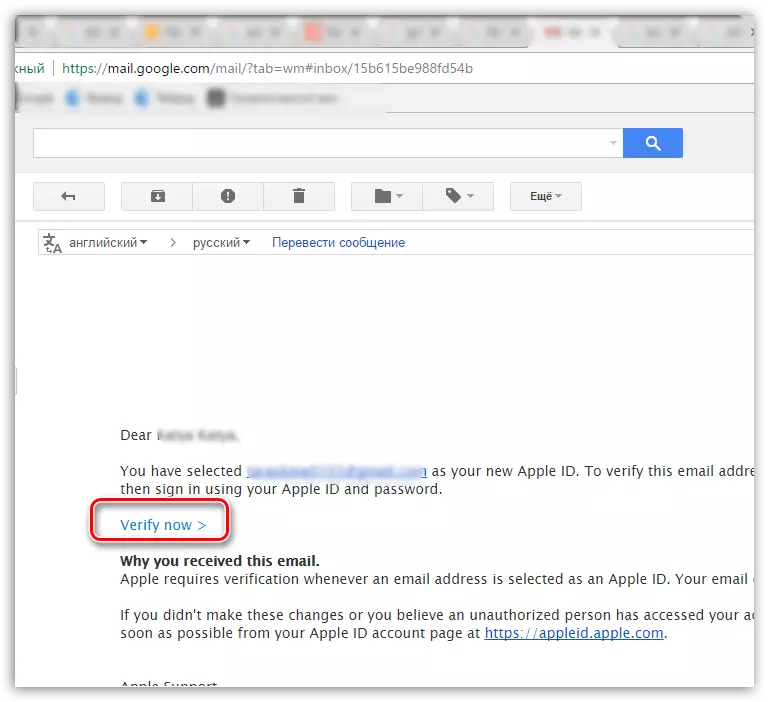
- To continue, you will need to specify the verification code that will enter an email to the specified box.
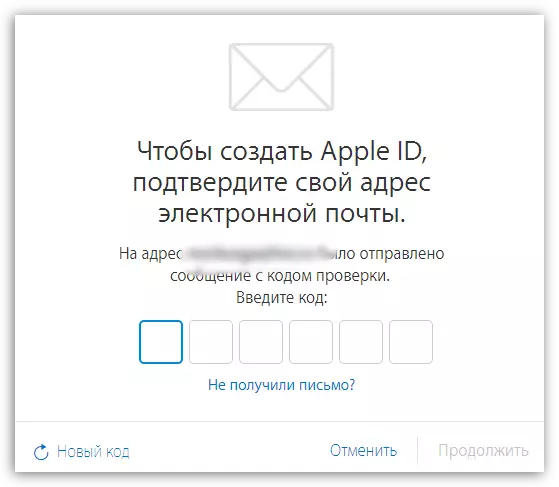
It should be noted that the shelf life of the code is limited to three hours. After the expiration of this time, if you do not have time to confirm the registration, you will need to execute a new code request.
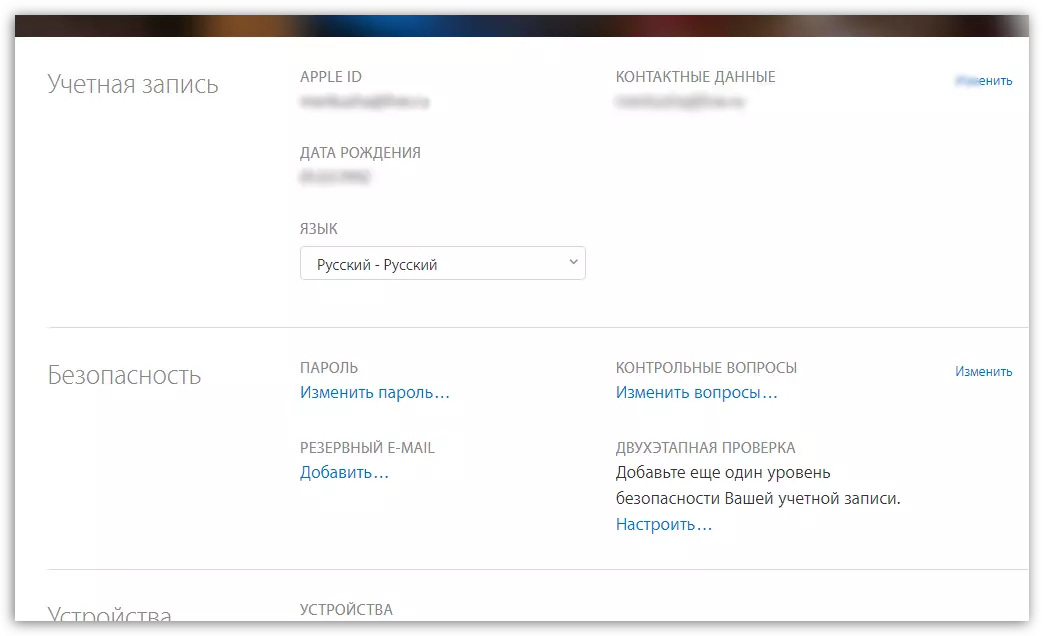
- Actually, this is completed on this process. The page of your account will be booting on your screen, where, if necessary, you can make adjustments: change the password, configure two-stage authentication, add payment method and other.
We draw your attention that the test questions must be inventing such, the answers to which you will know after 5, and after 10 years. This is useful for you if you need to restore access to the account or make serious changes, for example, change the password.


Method 2: Creating an Apple ID through iTunes
Anyone who interacts with Apple products knows about iTunes, which is an effective tool to interact your gadgets with a computer. But, in addition, it is also an excellent media player.Naturally, the account can be created and using this program. Earlier, on our site, the question of registration of the account through this program was already highlighted in detail, so we will not stop on it.
See also: Apple ID account registration instructions via iTunes
Method 3: Registration through Apple Device
If you are the iPhone, iPad or iPod Touch, you can easily register Apple ID and directly from your device.
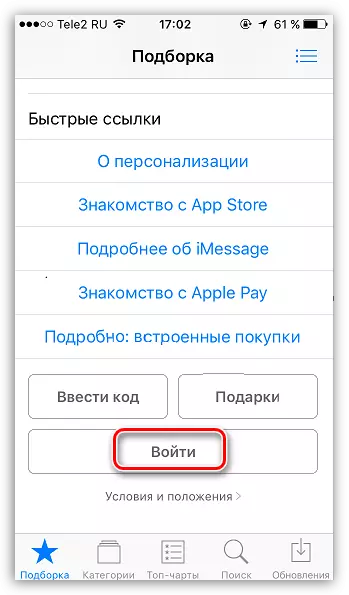
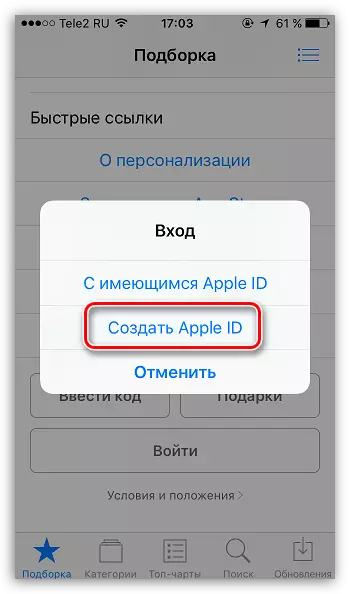
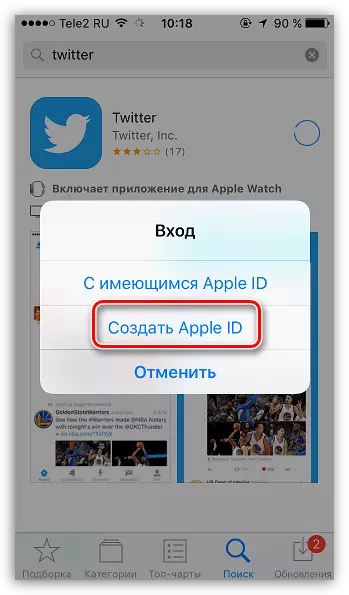
- Run the App Store and scroll down the page to the easiest page and select the Login button.
- In the displayed window, select "Create Apple ID".
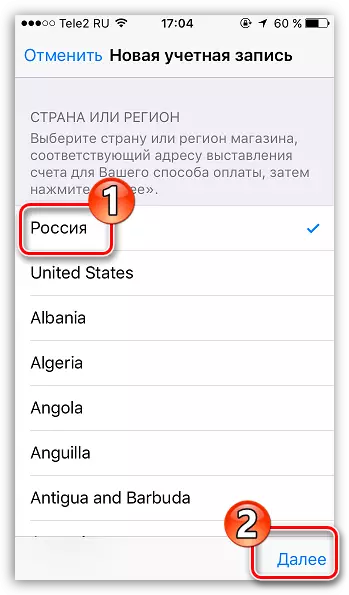
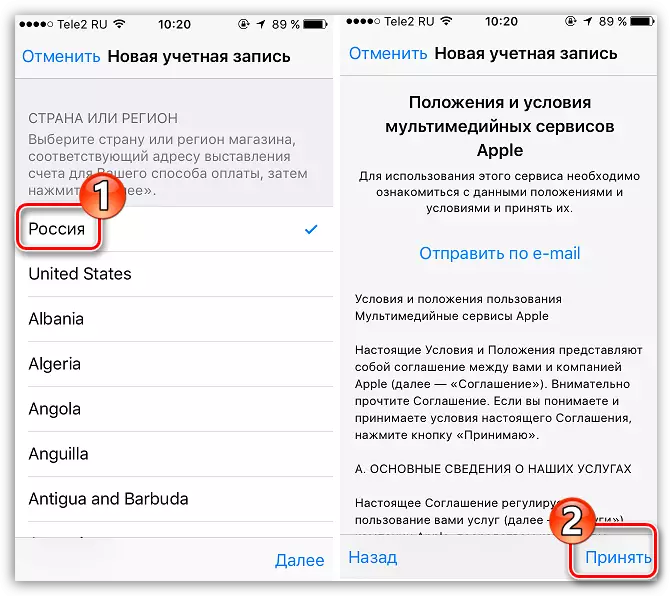
- A window for creating a new account will appear on the screen in which you will need to first select the region, and then go further.
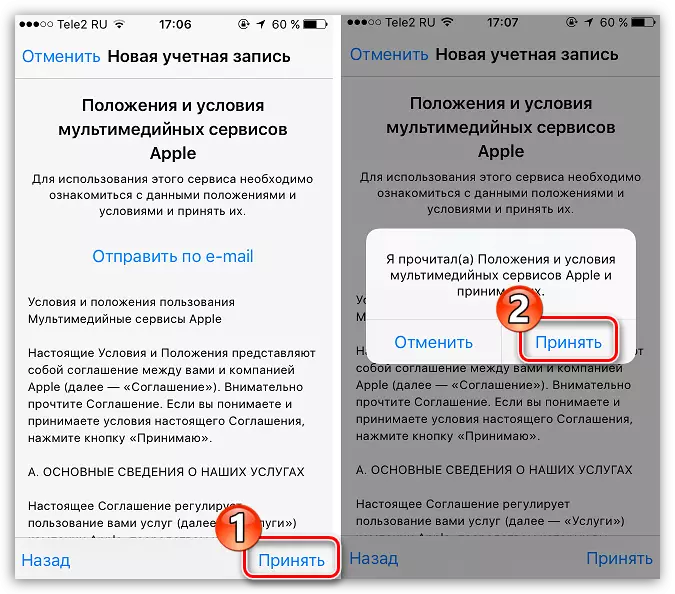
- The "Provisions and Conditions" window will appear on the screen, where you will be asked to explore the information. Agreeing, you will need to choose the "Accept" button, and then "take" again.
- The screen displays the usual registration questionnaire, which completely coincides with the one as described in the first method of this article. You will need to fill out an email in the same way, enter a new password twice, and also specify three control questions and answers to them. Below you should specify a spare email address as well as the date of birth. If necessary, cancel a subscription to the news that will come to your email address.
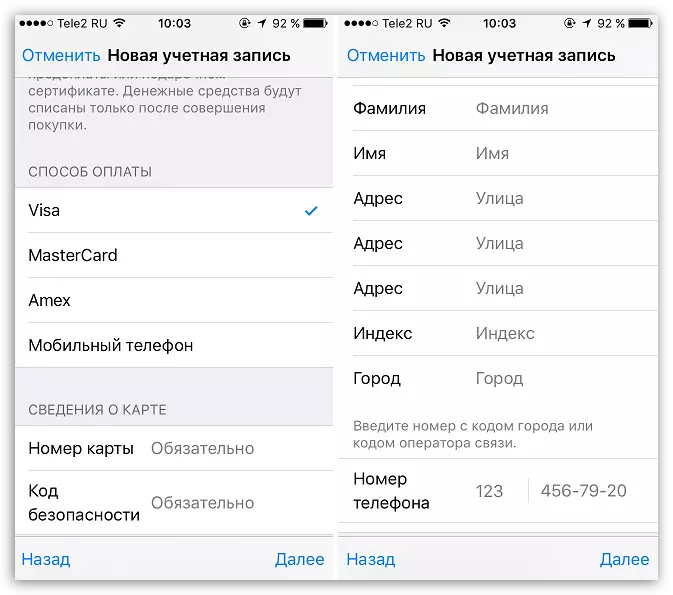
- Going further, you will need to specify the payment method - it can be a bank card or a mobile phone balance. In addition, you should specify the account of the invoice and the phone number.
- Once all the data be listed correctly, registration will be successfully completed, which means you can log in to the new Eppl Aydi on all its devices.

How to register an apple ID without binding a bank card
Not always, the user wants or can, when registering, specify its credit card, however, if, for example, you decided to register from your device, it is clear above that it is clear above that it is impossible to refuse to specify payment method. Fortunately, there are secrets that will allow you to create an account without a credit card.Method 1: Registration through the site
In the view of the author of this article, this is the easiest and most optimal way to register without a bank card.
- Register account, as described in the first method.
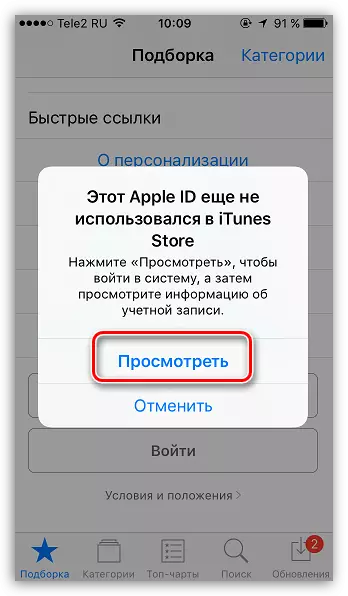
- When you log in, for example, on your Apple gadget, the system will report that this account has not yet been used iTunes Store. Click on the "View" button.
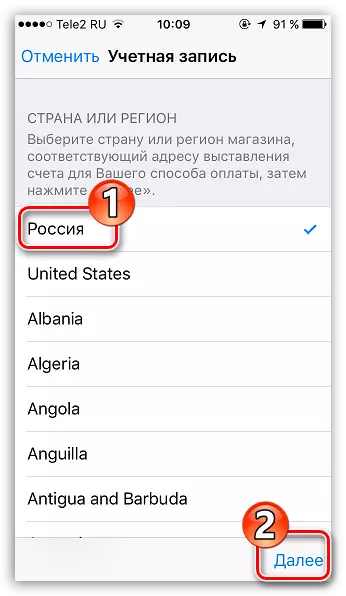
- A window will appear on the screen, where you need to specify your country, and then go further.
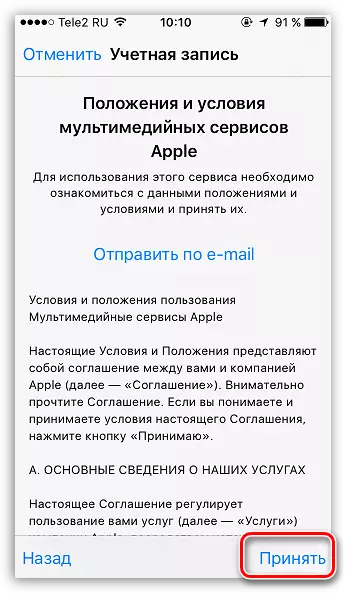
- Take the main positions of the EPLL.
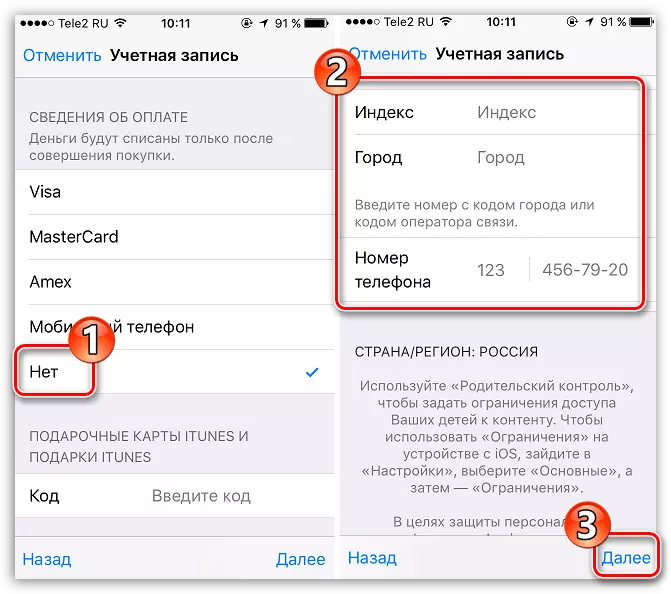
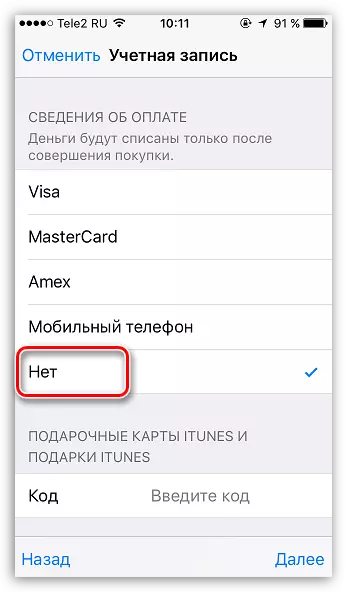
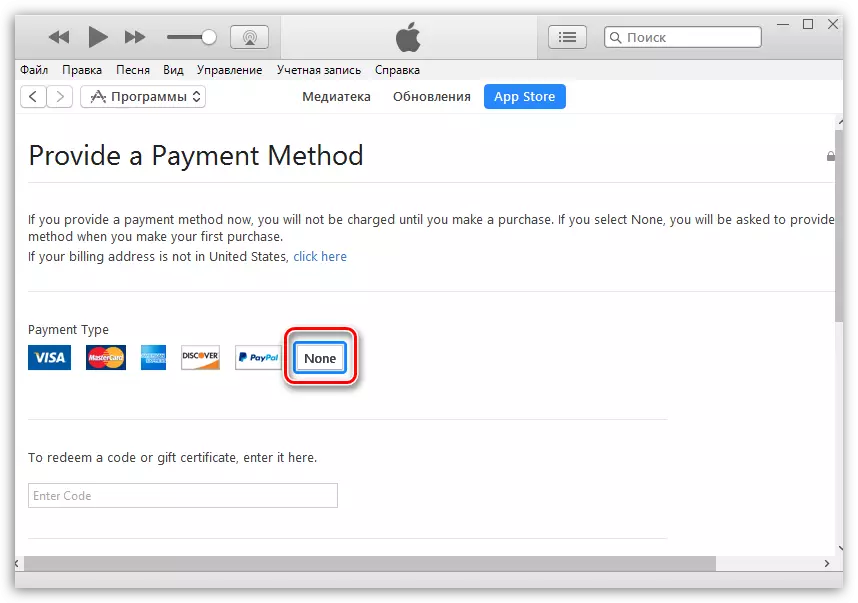
- You will be asked to specify the payment method. As you can see, there is no "no" item, which and should be noted. Below fill out other personal information that includes your name, address (optional), as well as a mobile phone number.
- When you go further, the system will notify the successful completion of the account registration.

Method 2: Registration through iTunes
Registration can easily be performed through the iTunes program installed on your computer, and, if necessary, you can avoid binding a bank card.This process was also discussed in detail on our website all in the same article on registration through iTunes (see the second part of the article).
See also: How to register an Apple ID account via iTunes
Method 3: Registration through Apple Device
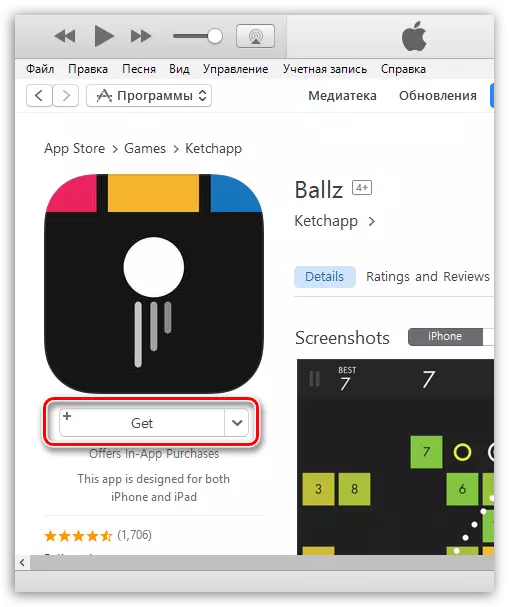
For example, you have an iPhone and you want to register an account without specifying the payment method from it.
- Run on the Apple Store device, and then open any free app in it. Click the "Download" button.
- Since the installation of the application can be performed only after authorization in the system, you will need to click on the Create Apple ID button.
- It will open the already familiar registration in which you will need to perform all the same actions as in the third method of the article, but exactly until the moment the window of the payment method selection window appears on the screen.
- As you can see, this time the "No" button appeared on the screen, which eliminates the indication of the payment source, and therefore calmly complete the registration.
- Once the registration is completed, the selected application will start booting into your device.

How to register an account of another country
Sometimes users can face that some applications are more expensive in their native store than in the store of another country, or are not available at all. It is in such situations that Apple ID of another country may be required.
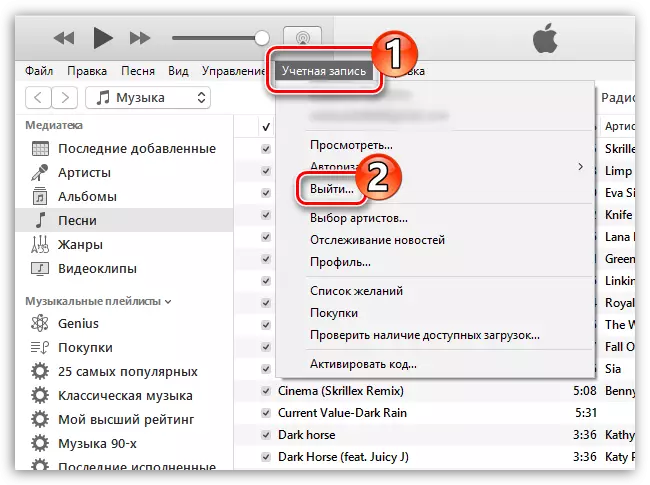
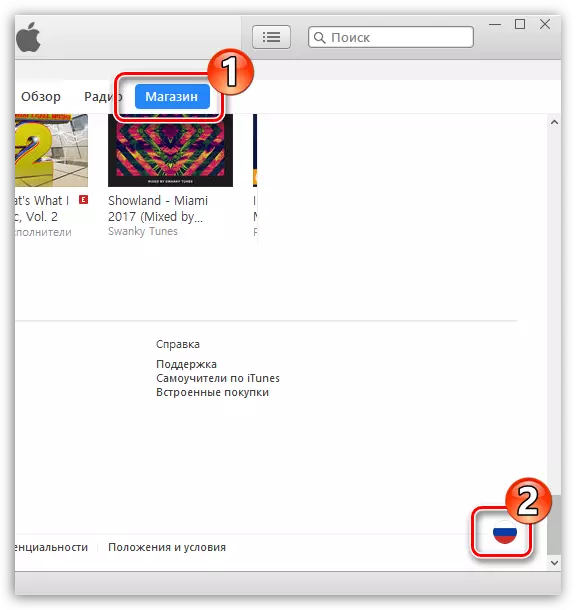
- For example, you want to register American Apple ID. To do this, you will need to run iTunes on the computer and, if necessary, exit your account. Select the Account tab and go to "Exit".
- Go to the "Store" section. Scroll to the very end of the page and click in the lower right corner on the icon with the flag.
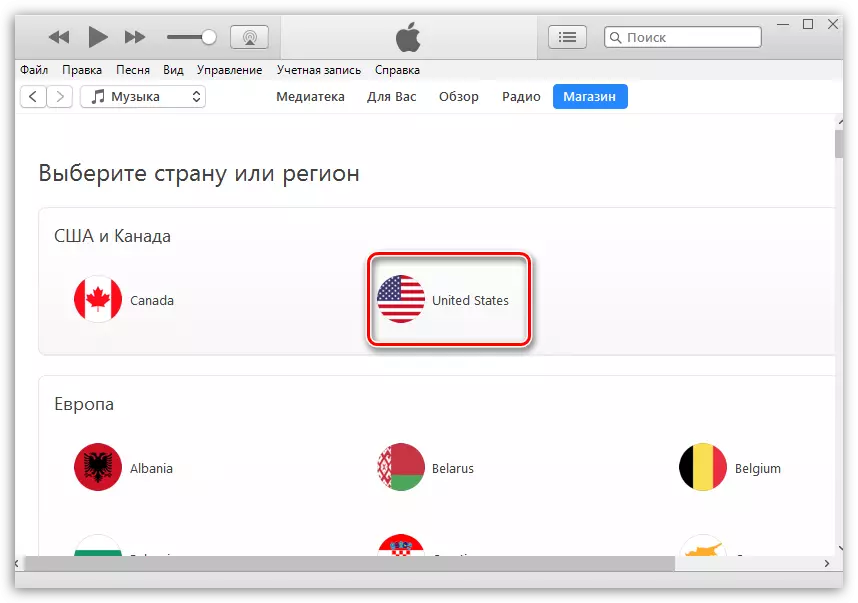
- The screen displays the list of countries, among which we need to select "United States".
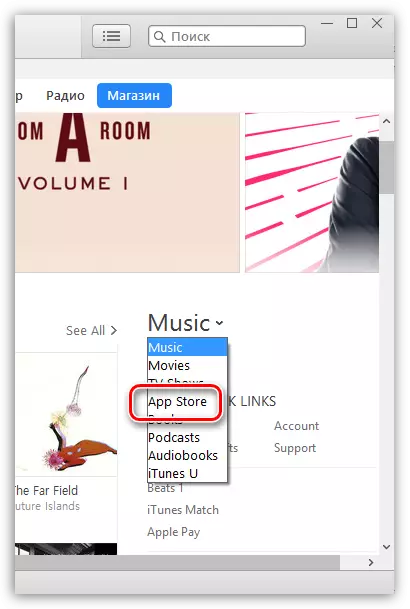
- You will redirect to the American store, where you will need to open the "App Store" in the right window.
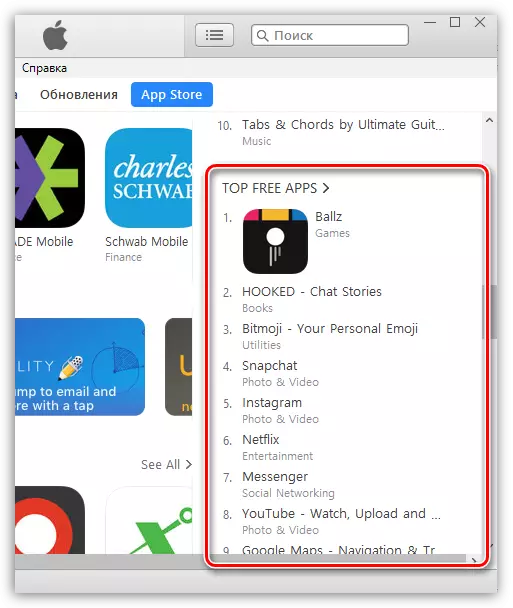
- Again, pay attention to the right window of the window, where the "Top Free Apps" section is located. Among them you will need to open any attachment app.
- Click the "Get" button to start downloading the application.
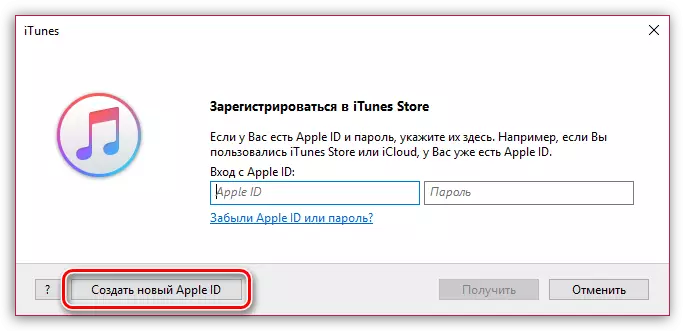
- Since you need to log in to the account, the corresponding window will be displayed on the screen. Click the "Create New Apple ID" button.
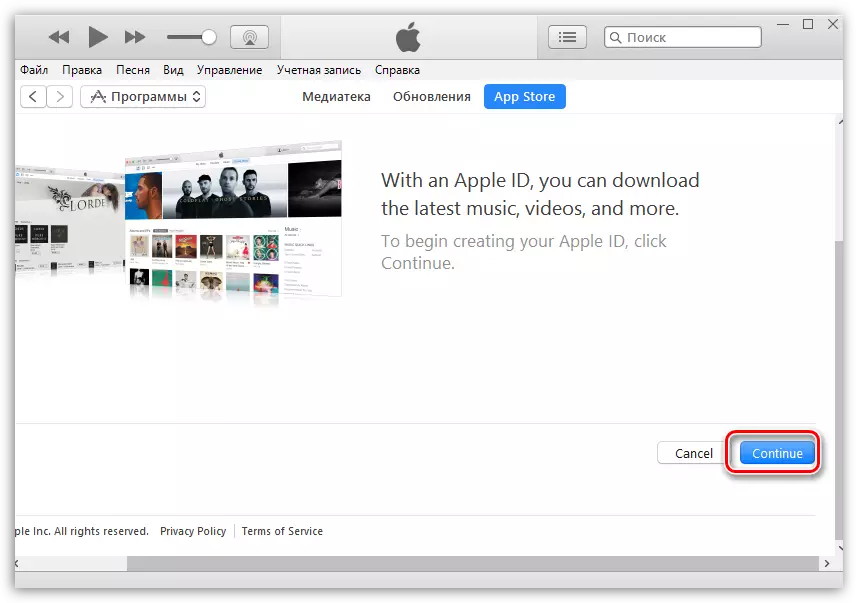
- You will redirect to the registration page where you need to click on the "Continue" button.
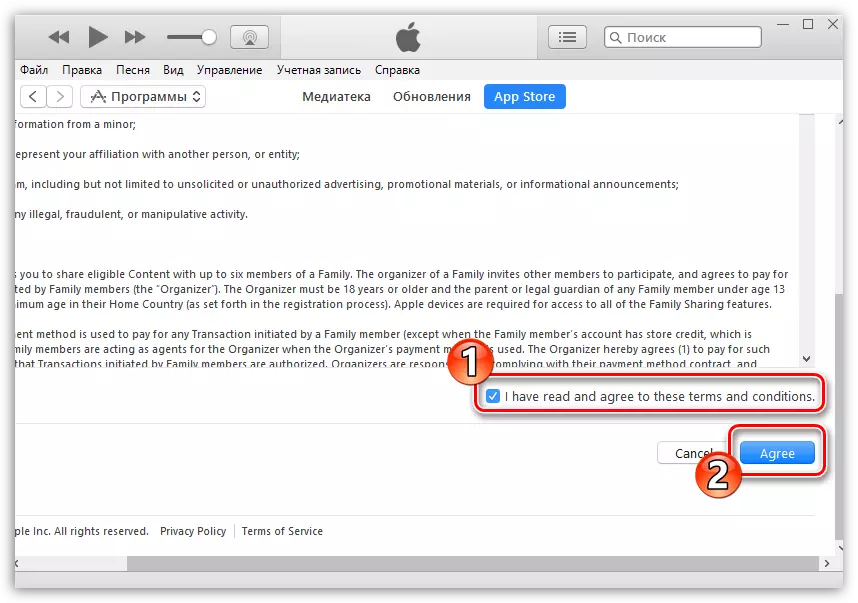
- Put a check mark near the license agreement and click on the "Agree" button.
- On the registration page, first of all, you will need to specify an email address. In this case, it is better not to use the mail account with the Russian domain (RU), and register a profile with the com domain. The optimal solution is to create a Google Mail Account. Row below double-enume a reliable password.
- Below you will need to specify three control questions and give answers (naturally, in English).
- Specify your date of birth, if necessary, remove the checkboxes with the consent to the newsletter, and then click on the "Continue" button.
- You will redirect you to the payment method binding page where you need to set a mark on the "NONE" point (if you give a map of the Russian bank, you can be denied registration).
- On the same page, but just below, you will need to specify the address of accommodation. Naturally, this should not be the Russian address, namely American. It is best to take the address of any institution or hotel. You will need to specify the following information:
See also: How to create a google account
- Street. - Street;
- City. - city;
- State - state;
- Zip Code. - index;
- Area Code. - city code;
- Phone - Phone number (you need to register the last 7 digits).
For example, through the browser, we opened Google maps and made a request for hotels in New York. Opening any likely hotel and see his address.
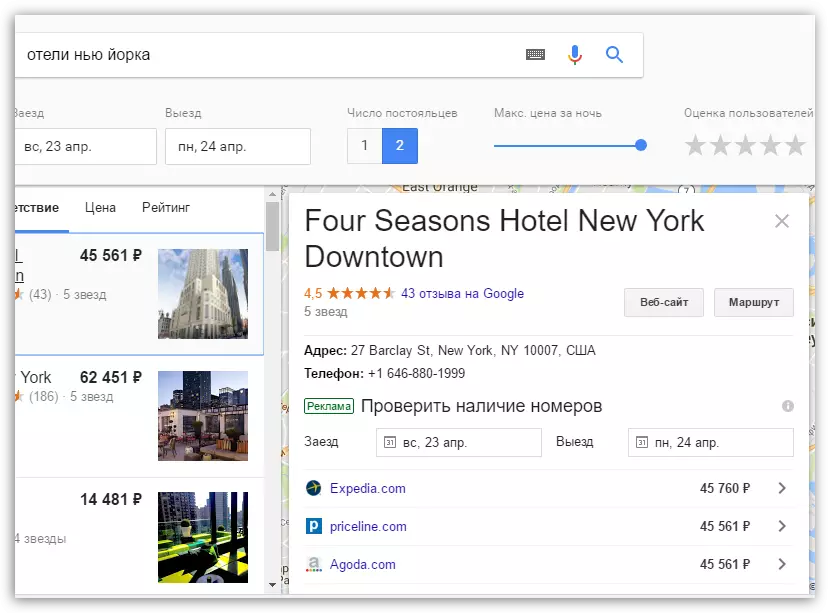
So, in our case, the filled address will look like this:
- Street - 27 Barclay ST;
- City - New York;
- State - NY;
- Zip Code - 10007;
- Area Code - 646;
- Phone - 8801999.


This is all that I would like to tell about the nuances of creating a new Apple ID account.