
Our site already has a material about checking the working capacity of the motherboard. It is quite common, so in today's article we want to stay more on the diagnosis of possible problems of fees.
We carry out diagnostics of motherboard
The need for checking the board appears in suspected fault, and the main of them are listed in the relevant article, so we will not consider them, focus only on the verification methodology.All of the following procedures must be performed only after disassembling the system unit. In some methods, it will be necessary to connect a fee to electricity, so we remind you of the importance of safety of safety. Diagnostics of the motherboard includes a survey of power supply, connectors and connectors, as well as inspection for defects and checking the BIOS settings.
Stage 1: Food
When diagnosing motherboards, it is important to distinguish between the concepts of "inclusion" and "Run". The motherboard is included in the case when the power is applied to it. It starts when the built-in speaker gives a signal, and an image appears on the connected monitor. Therefore, the first thing you need to check is whether electricity is generally on the motherboard. It is quite simple to determine it.
- Disconnect all peripheral devices and cards from the system circuit, leaving only a processor, a processor cooler and a power supply that must be operational.
If the board connected to the power supply does not submit signs of life, most likely, the problem is somewhere in the power chain. The first thing to check is the BP connectors. Inspect the connectors if there are traces of damage, oxidation or contamination on them. Then proceed to capacitors and a BIOS backup battery. If there are defects (bloating or oxidation) item must be replaced.
In some cases, the inclusion seems to be happening, but after a couple of seconds, the power supply stops. This means that the motherboard is shortly closed on the system unit housing. The reason for such a KZ is that the fastening screws are too pressing the board to the body or between the screw, the case and the circuit there are no cardboard or rubber insulating gaskets.

In some cases, the source of the problem may be faulty POWER and RESET buttons. Details of the problem and methods to combat it are covered in the article below.
Lesson: How to turn on the board without a button
Stage 2: Run
After making sure that the fee is applied to the fee normally, it should be checked if it starts.
- Make sure that only the processor, cooler and power supply are connected to it.
- Connect the board to the power grid and turn it on. At this stage, the fee will signal the absence of other necessary components (RAM and video card). Such behavior can be considered the norm in such a situation.
- The signals of the fee of the absence of components or problems are called post-codes, they are fed through a speaker or special control diodes. However, some manufacturers in the "motherboards" of the budget segment saved, removing both diodes and speakers. For such cases, there are special post-cards that we talked about the article on the main problems of motherboards.
Problems that may occur at the start stage include faults with a processor or physical problem of southern or northern bridges of the board. Check them very simple.
- Disconnect the board and remove the cooler from the processor.
- Turn on the board and bring your hand to the processor. If a few minutes passed, and the processor does not generate heat - it is either failed, or is not connected incorrectly.
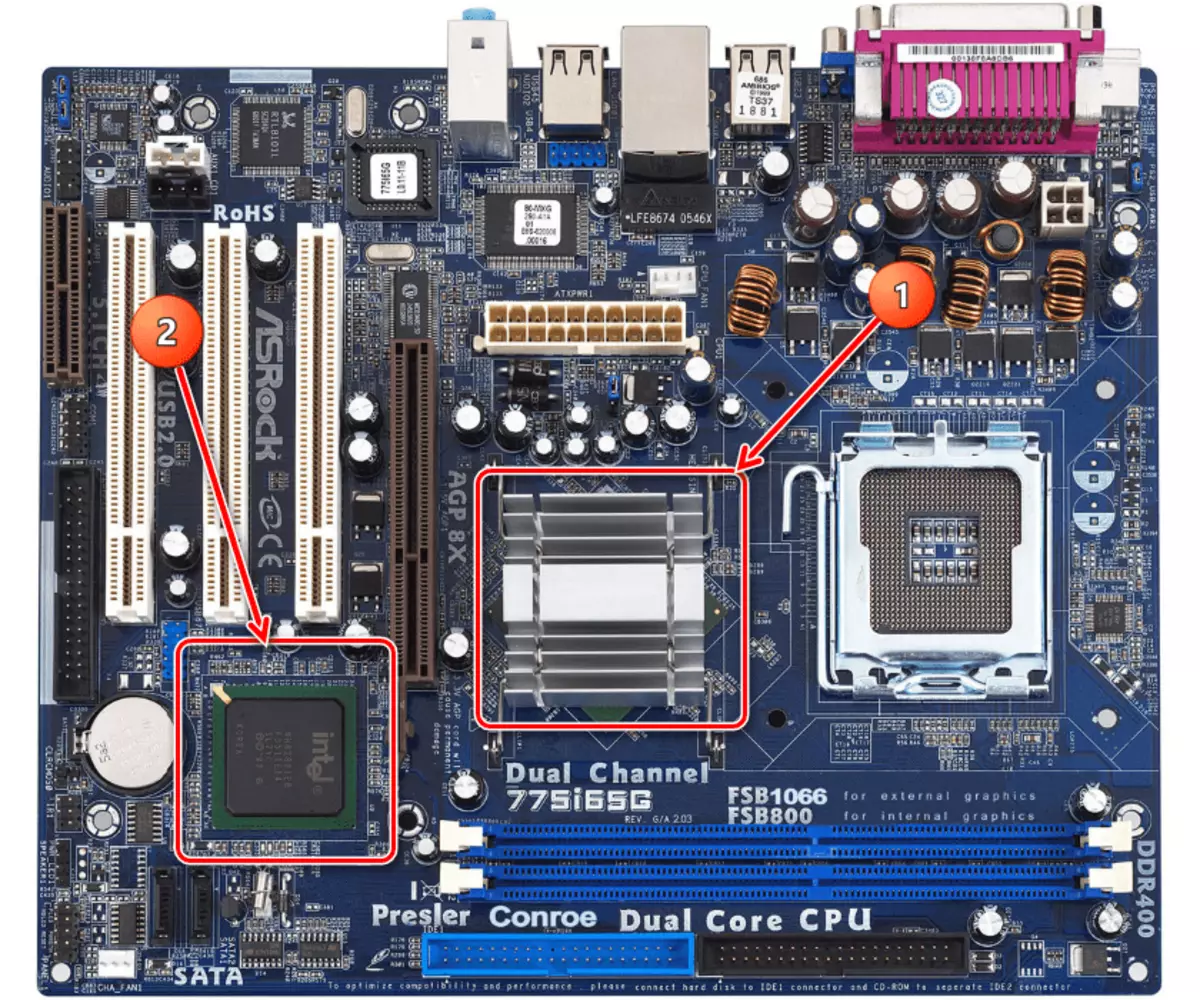
- In the same way, check the bridges. They are on the board two: the northern (the largest chip, often covered with a radiator) and the southern (smaller microcircuit, usually without additional cooling). The approximate location of the bridges is shown in the image below - the north is indicated by the number 1, the southern - digit 2.
Here the situation is exactly opposite to the processor: strong heating of these elements speaks of a malfunction. As a rule, the bridge is not subject to replacement, and you have to change the entire fee.
If there are no problems with the start of the board, proceed to the next stage of check.
Stage 3: Connectors and Peripherals
As practice shows, the most frequent cause of problems is failed hardware. The method of determining the culprit problem is quite simple.- Connect peripheral devices to the board in this order (not forgetting to disconnect and include the board - the connection "on the hot" can output both of the component!):
- RAM;
- Video card;
- Sound card;
- External network card;
- HDD;
- Drives of magnetic and optical disks;
- External peripherals (mouse, keyboard).
If you use a post card, then you first connect it to a free PCI connector.
- At one stage, the board will give a malfunction signal with built-in tools or data on the scoreboard of the diagnostic card. The post codes list for each system boards manufacturer can be found on the Internet.
- Using diagnostic data, determine which particular device fails.
In addition to directly connected hardware components, the problem can create problems with the corresponding connectors on the motherboard. They need to be inspected, and, in case of problems, or replace independently or contact the service center.
At this stage, problems with the BIOS settings are manifested - for example, an incorrect loading medium or a system cannot determine it. In this case, the post map and manifests its utility - according to the information displayed on it, you can understand which setting causes a failure. Any problems with the BIOS parameters are easiest to fix by dropping the settings.
Read more: Reset BIOS settings
On this diagnosis of the motherboard, it is possible to be completed.
Conclusion
Finally, we want to remind you of the importance of timely system maintenance of the motherboard and its components - by checking the regular cleaning of the computer from dust and examining its elements, you significantly reduce the risk of problems.