

Wi-Fi technology has long entered the daily lives of many people. Today, almost in all houses have its own access point to the wireless network. With its help, various mobile devices, stationary computers, as well as laptops are connected to the Internet. It often happens that for a portable PC wireless network is the only way to access the Internet. But what should I do if there have been problems with the network and the laptop simply does not catch it? This article will consider accessible to the unprepared user ways to solve this problem.
Wi-Fi restoration on a laptop
All methods for correcting the wrong work of Wi-Fi on a portable PC can be divided into two types. The first is the test and changing the settings of the computer itself, to the second - associated with the configuration of the distribution device itself. The emphasis will be made at the most common causes of Wi-Fi inoperability, and in terms of methods - on the solutions available for ordinary user.Method 1: Driver Verification
One of the most common reasons, due to which a portable PC cannot connect to a wireless network, is the lack of Wi-Fi adapter drivers. It happens that the user reinstalled or updated the current Windows OS, but forgot to install drivers for devices.
Read more: find out which drivers need to be installed on a computer
Drivers for Windows XP, for example, very often incompatible with newer versions of Windows. Therefore, when updating this OC, you must first make sure that the necessary software for the Wi-Fi of the adapter.
If we talk about laptops, it should be stopped here at an important point: it is recommended to download and install the manufacturer appropriate only from the official website (or the included disk). Using third-party applications to search for network drivers often leads to improper Wi-Fi operation.
Read more: The best programs for installing drivers
To check the status of the network adapter, we carry out the following:
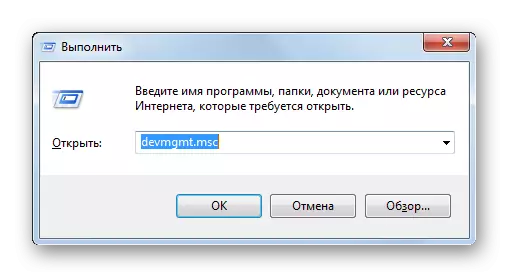
- To call the "Device Manager" click "Win" + "R".
- Drive the command "Devmgmt.msc" there.
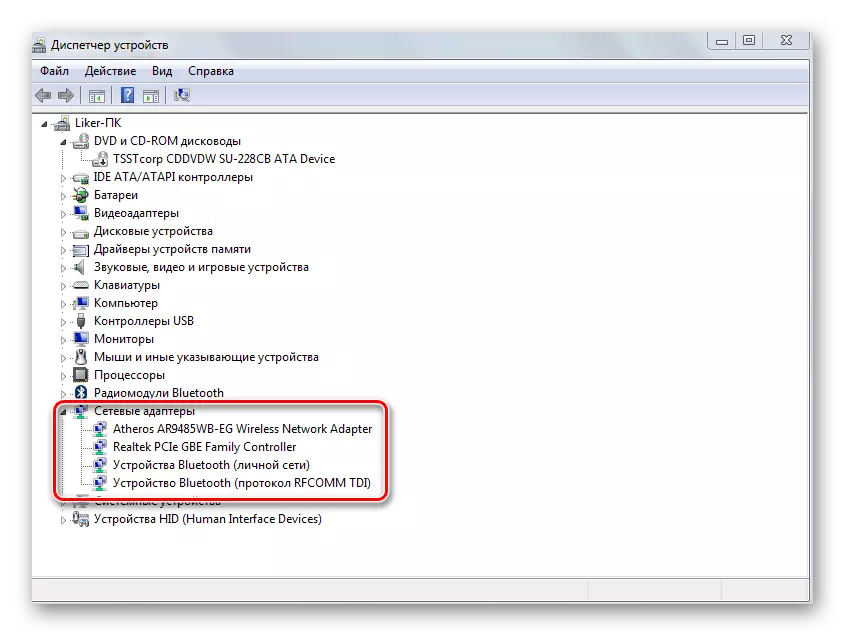
- Next, we find the item responsible for network adapters, and click on it with LKM.
- A list of network devices available on a laptop computer will appear.
- As a rule, the name of the desired device will contain the words like "Wireless", "Network", "Adapter". This item should not be marked by any icons (yellow with an exclamation mark, arrows, etc.).
Read more: How to open Device Manager in Windows XP, Windows 7.

If you do not have it, then the problem lies in the adapter drivers. There is an easy way recommended first:
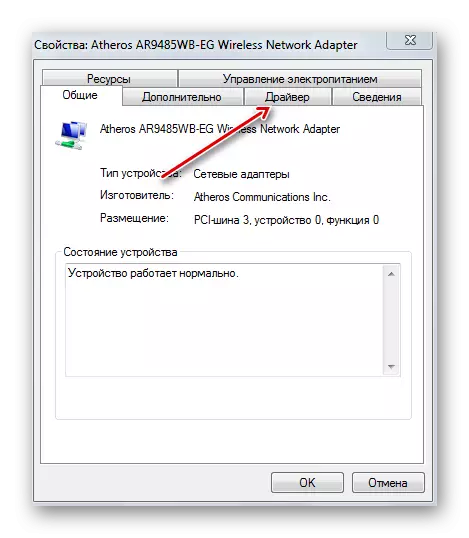
- In the same window of the Device Manager window, we make a click on the name of our Wi-Fi adapter and select "Properties".
- Next, go to the tab that is responsible for the device driver.
- Click at the bottom of the window to "delete".
- Restart the system.

If such actions do not bring the result (or the adapter is simply not displayed in the Device Manager), it means that you need to install the appropriate driver. The main idea is that to look for software for the adapter follows from the name of the specific model of the laptop. To search for official drivers, we will use Google's search engine (you can use any other).
Go to Google
- Going on the specified link to the search engine, take the name of the model of the portable PC + "Driver".
- The search for issuance will display a list of resources. It is best to choose the official website of the manufacturer of a laptop (in our case asus.com).
- Since we have entered the specific name of the computer, we can immediately go to the corresponding page on this model.
- Click on the "Drivers and Utilities" link.
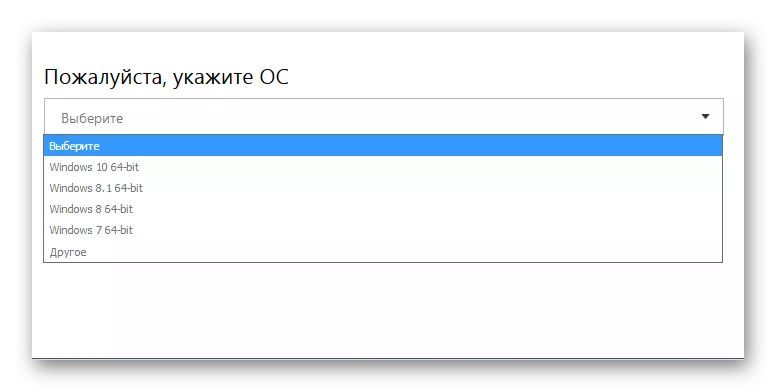
- The next step is the choice of the operating system.
- The site displays a list with drivers under the selected version of Windows.
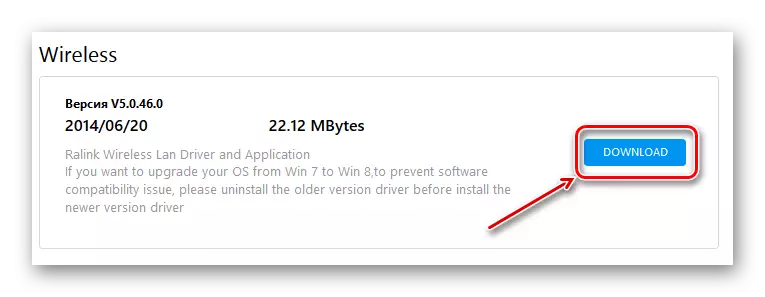
- Go to the Wi-Fi Drive of the adapter. As a rule, in the title of such a word of type: "Wireless", "WLAN", "Wi-Fi", etc.
- Click on the "download" button (or "download").
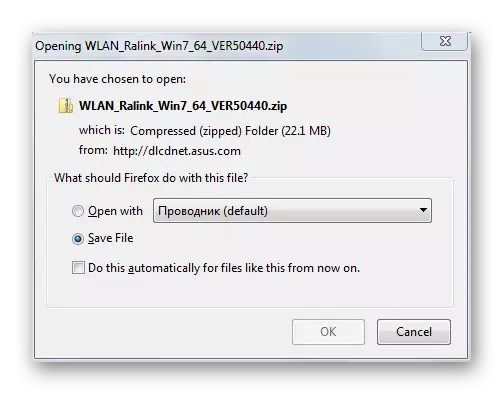
- Save the file to the disk.
- Next, by connecting the archive, set the driver to the system.


Read more:
Download and install driver for Wi-Fi adapter
Search for hardware drivers
Installing Drivers Standard Windows
Method 2: Enabling the adapter
Another pretty obvious cause of the disability of Wi-Fi communication on a laptop is to disconnect the Wi-Fi itself. This can occur both as a result of user actions and in the process of operation of applications. The ban on using an adapter can be installed in the BIOS and in the operating system settings. The Trey icon appears in Windows, indicating the impossibility of using Wi-Fi.
Checking the BIOS parameters
As a rule, on new laptops by default, the Wi-Fi adapter is enabled. But if the user entered the BIOS settings, the wireless communication can be disabled. In such cases, no action in the operating system itself will be able to launch Wi-Fi. Therefore, you must first make sure that the laptop is not a ban on the use of a network adapter.

Properties of a wireless connection
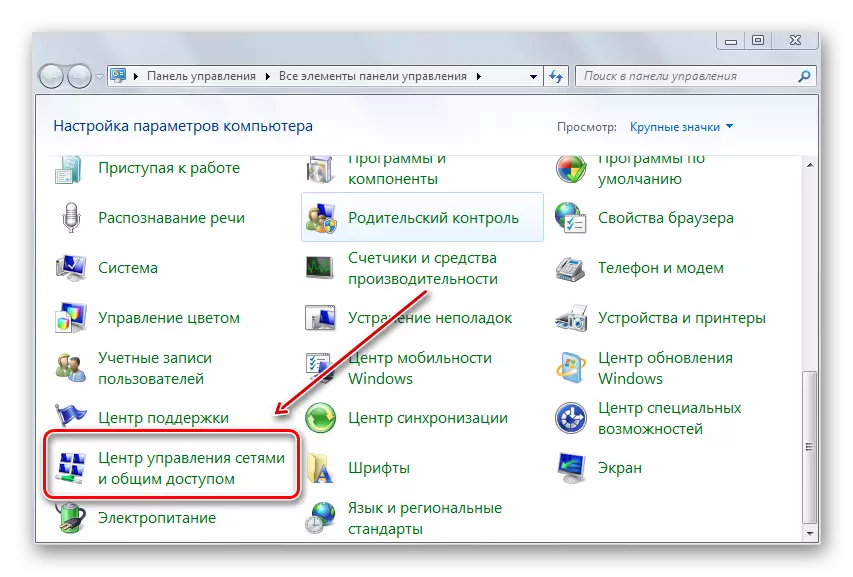
- Call the "Start" menu by pressing the "WIN" key.
- Next, select the "Control Panel".
- Click the mouse over the menu and choose "large icons".
- Next, follow the "Center for Network Management and Common Access".
- Click the mouse on the link properties of the network adapter.
- In the window we find the wireless connection icon and highlight it with PCM.
- Select "Enable" in the menu.


Device Manager
The same result enabling the Wi-Fi adapter through the Device Manager.
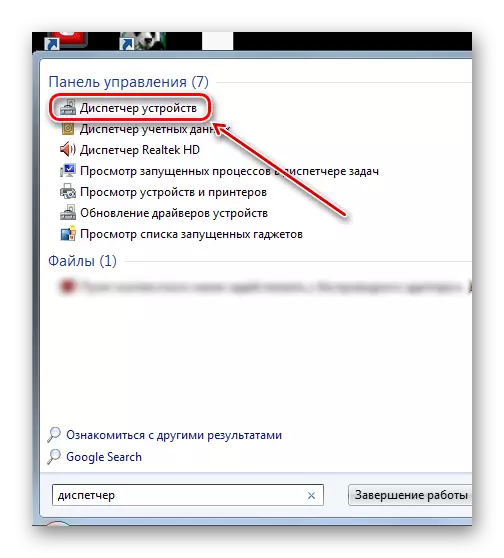
- We enter the "Dispatcher" search string.
- Click on the proposed version.
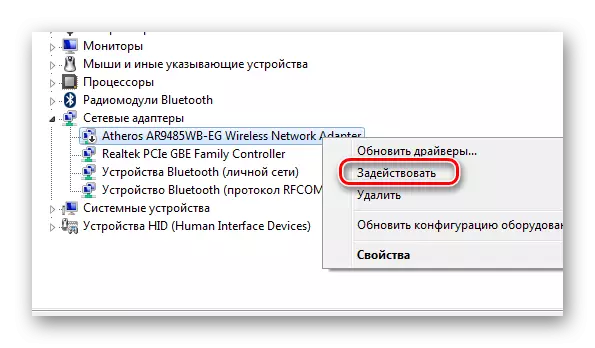
- Select the desired device providing Wi-Fi connection using PCM.
- Next - "use".
Method 3: Disconnecting the "aircraft" mode
The "airplane" function is created specifically for instant disconnection of all wireless connections on the computer. It turns off both Bluetooth and Wi-Fi. Sometimes newbies themselves, by mistake, use this opportunity and face Wi-Fi inoperability. It is clear that in our case, this mode must be set in the "Off" position.
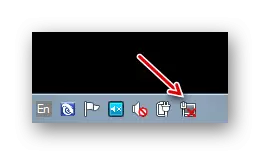
An indicator of finding a PC in this mode is the plane icon in the tray to the right of the taskbar.

- Click on this icon.
- Next, press the specified button on the panel (it should be highlighted). The button will become gray.
- The flight mode will be disabled, and the Wi-Fi button is highlighted. You must see a list of available wireless connections.

In Windows 8, the connections menu looks different. Clicking the Wi-Fi icon in the tray, then press the switch. The inscription should be changed to "incl."

Method 4: Disable Energy Saving Functions
When the portable PC is output from the sleep mode, you can encounter the fact that the network adapter does not catch the network. Windows simply turns it off at the time of sleep, and then for different reasons may not include it again. It often becomes problematic if it is possible to start it without rebooting the OS. This reason is particularly relevant for computers with Windows 8 and 10. To sleep the Wi-Fi module no longer bothered you, you need to perform some settings.
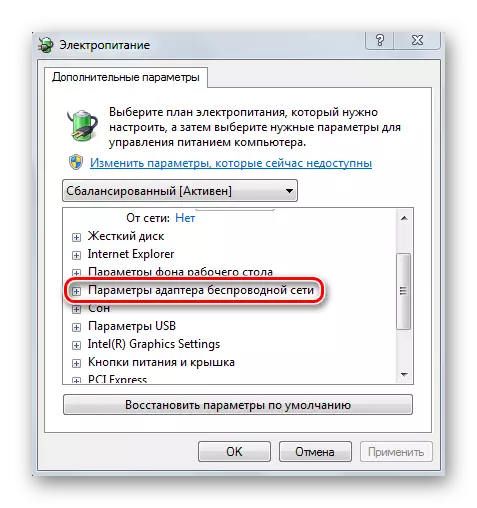
- Go to the "Control Panel" and choose "Power supply".
- Go to the settings of a specific power plan.
- Next click the mouse to change additional parameters.
- Click on the drop-down list of parameters for the module of the Wi-Fi of the Communication.
- Next, we reveal the submenu by clicking on the cross, and set the permanent maximum performance for the device.


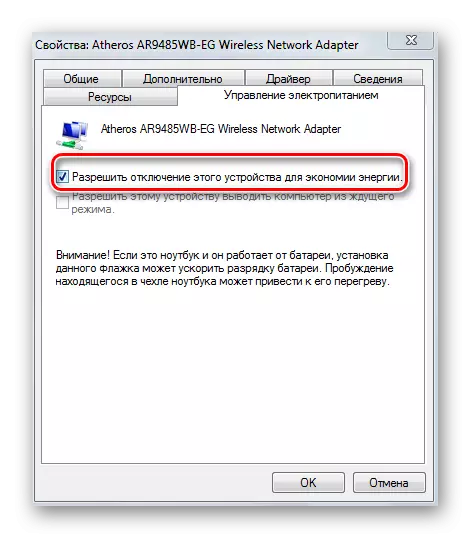
To disable sleep mode for our Wi-Fi, we carry out the following:
- In the "Device Manager" by clicking the PCM on the desired adapter of the wireless connection.
- Next - "Properties".
- We move to the "Power Management" tab.
- Remove the tick that is responsible for turning off the device during sleep mode.
- Perform a restart system.

Method 5: Disable fast download
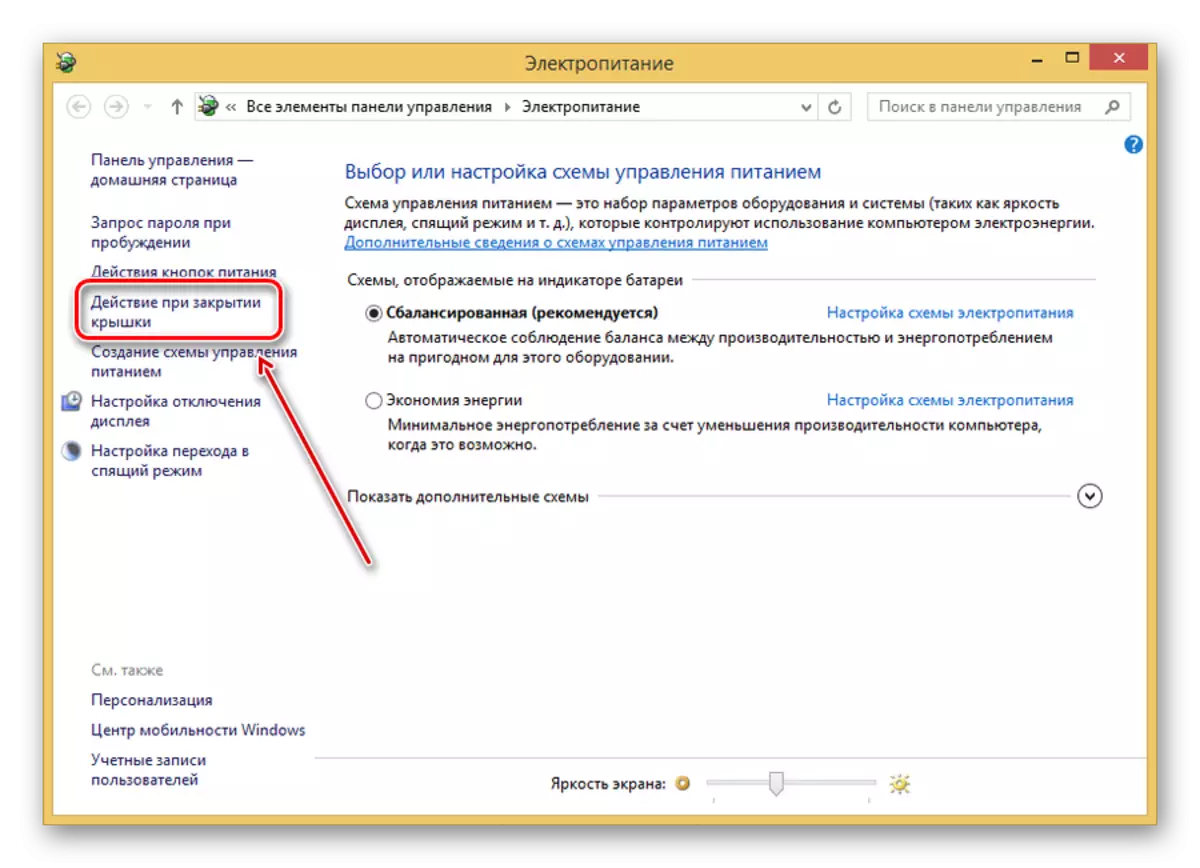
The fast launch function entered in Windows 8 often leads to incorrect operation of various drivers. For her prohibition, we perform the following steps:
- Press "Win" + "x".
- In the menu, click on "Power Management".
- Next - "Action when closing a cover."
- To change inaccessible parameters, click on the link at the top of the window.
- Remove the switching on quick download.
- Reboot your computer.


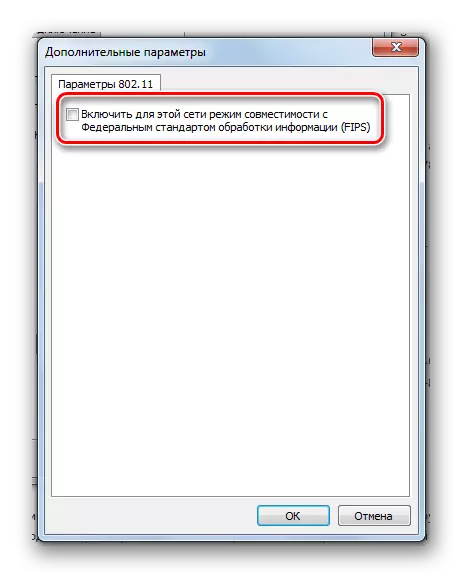
Method 6: Ban of FIPS Mode
In Windows 10, unlike previous versions of this OS, the default mode is a mode compatible with the Federal Information Processing Standard (or FIPS). This can affect the normal functioning of Wi-Fi. If you have installed different from the tenth version of Windows, it is recommended to check this parameter.
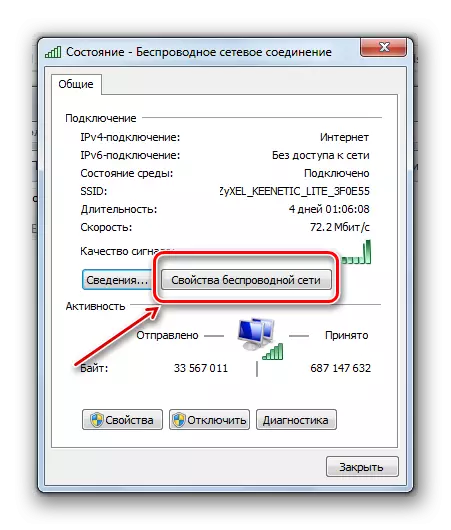
- Click the "Win +" R "keys, enter in the" NCPA.CPL "line and click" ENTER ".
- Next PCM allocate a wireless connection and click on the "state".
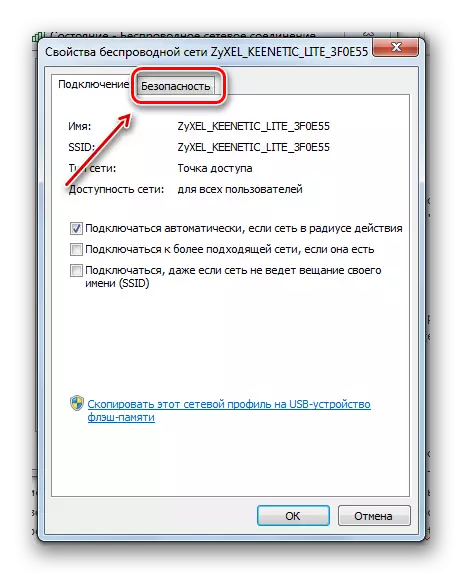
- Press the button to access the connection properties.
- We move to the Safety tab.
- Click on the "Advanced Parameters" button at the bottom of the window.
- Next - if you are tick, we remove it.


Method 7: Routher Settings
If changes were made in the router settings, this can also be one of the reasons for the impossibility to detect Wi-Fi network with a computer. Even with all the necessary drivers in the system, a properly configured network configuration of Windows, the router may prohibit the use of wireless communication. There is a huge number of routers that differ in functionality and branded firmware. Next, consider general recommendations on the example of one router model (Zyxel Keenetic).
All modern routers have a web interface through which almost all parameters of the device and network configuration are configured. Usually, to enter the router settings, you must enter into the address bar of the browser "192.168.1.1". On some models, this address may differ, so try typing the following values: "192.168.0.0", "192.168.1.0" or "192.168.0.1".
In the dialog box input login and password, the router, as a rule, provides all the necessary information. In our case, "Admin" is a login, and 1234 - a password to access the web interface.

All the necessary data for access to the settings of the specific router model should be signed in the attached instruction or use the search on the Internet. For example, enter the name of the router model + "Setup".
The appearance of the interface, the names of the specific elements and their location in each model can be very different, so you must be sure what you are doing. Otherwise, the best - to charge this is a specialist.
Wireless resolution
It happens that users are connected to the router using a power cable. In such cases, they absolutely do not need Wi-Fi communication. Then the wireless communication functions in the router settings can be disabled. To check such settings, we show an example with the ZyXEL KEENETIC router.
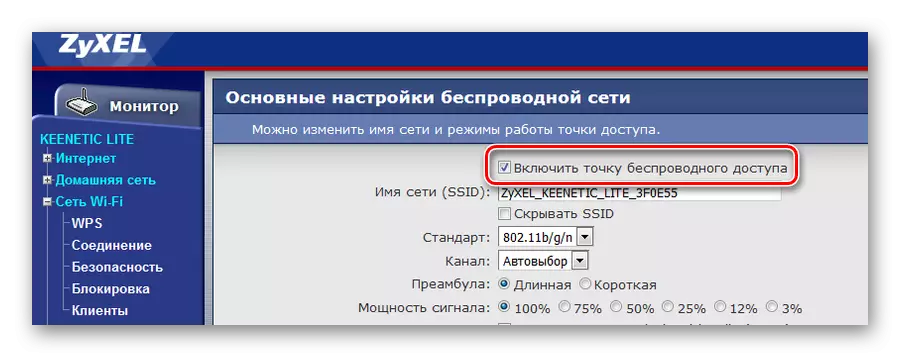
Here we see that in the section responsible for Wi-Fi, the wireless communication is allowed. Designations can be different: "WLAN ENABLE", "Wireless ON" and even "Wireless Radio".
On some models, you can enable or disable Wi-Fi using a button on the housing.
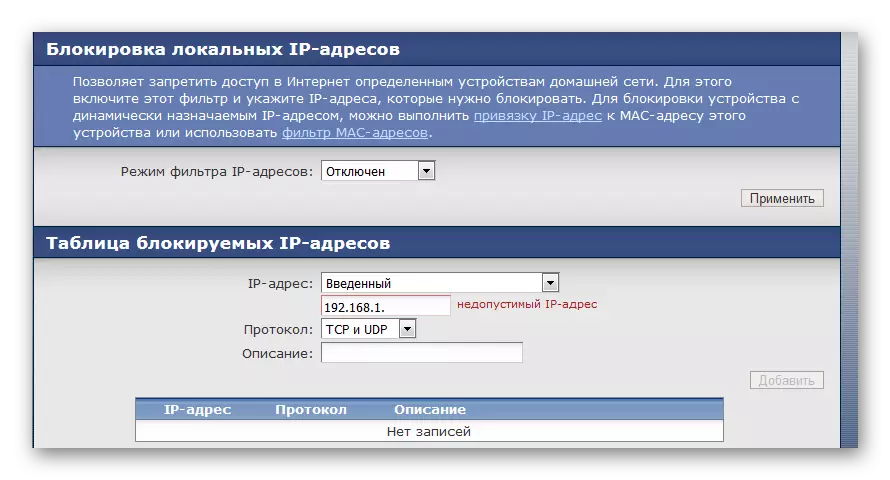
Turning off filtration
Another feature that we need to consider is filtering. Its goal is to protect the home network from various connections from the outside. The Zyxel Keenetic router is capable of filtering both MAC addresses and IP. Filtering works selectively to incoming traffic and outgoing by specific ports and URLs. But we are interested only in the incoming ban. In the ZyXEL web interface, the lock settings are in the "Filters" section.

In the example, it can be seen that the blocking is disabled in principle, and there are no records in the table of locked addresses. In other models of devices, it may look like: "WLAN Filtering Disable", "Filtering Off", "Block Address Disable", etc.

Similar situation and with IP lock settings.
Read more: Solving problems with Wi-Fi access point on a laptop
Channel change
Neighboring wireless networks or some electrical appliances can lead to interference on the Wi-Fi channel. Each Wi-Fi network functions on one of the channels (in Russia from the 1st to the 13th). The problem occurs when several Wi-Fi networks are placed on one of them.
If the user lives in a private house, then within the radius of his adapter, there will probably not be any other networks. And even if such networks are available, then their number is small. In an apartment building, the number of Wi-Fi operating networks can be significantly larger. And if several people simultaneously configure the same static channel for their router, then no interference is avoided.
If the router's settings are not changed, then by default it selects a channel automatically. When the adapter to the network, he just "sits" on the channel that is currently free. And so every time you reboot.
It should be said that only the faulty router might experience problems when Auto Select channel. And in most cases, change the channel - is not the solution to the noise problem. Constant manual determination of these parameters - even the fun. But as a way to gain access to the network at the moment this option is worth considering.
To check the settings select the channel transmitter, you need to go to familiar web-based interface. For example, the Zyxel Keenetic These settings are found under "Network Wi-Fi» - «connection».

The example shows that in the settings set to automatic channel selection mode. To check the current channel operation, you can use the program WifiInfoView.
download WifiInfoView
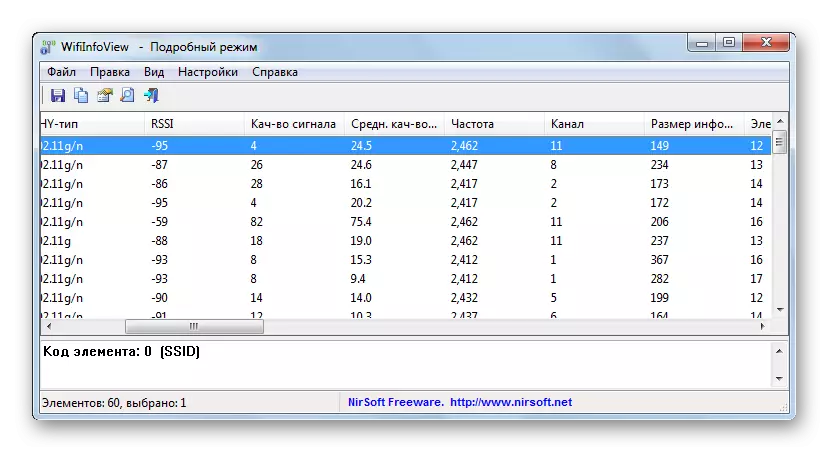
In the first place it is recommended to select 1, 6 or 11. If you can see that these channels are not available, try to specify one of them as current.
Some router displays additional information about the busy channel.

Method 8: router Restart
Quite often it helps normal reset the router. As a rule, this is the first recommendation service support provider for any problems with the network. Consider several options of how to carry out a restart dispensing device.
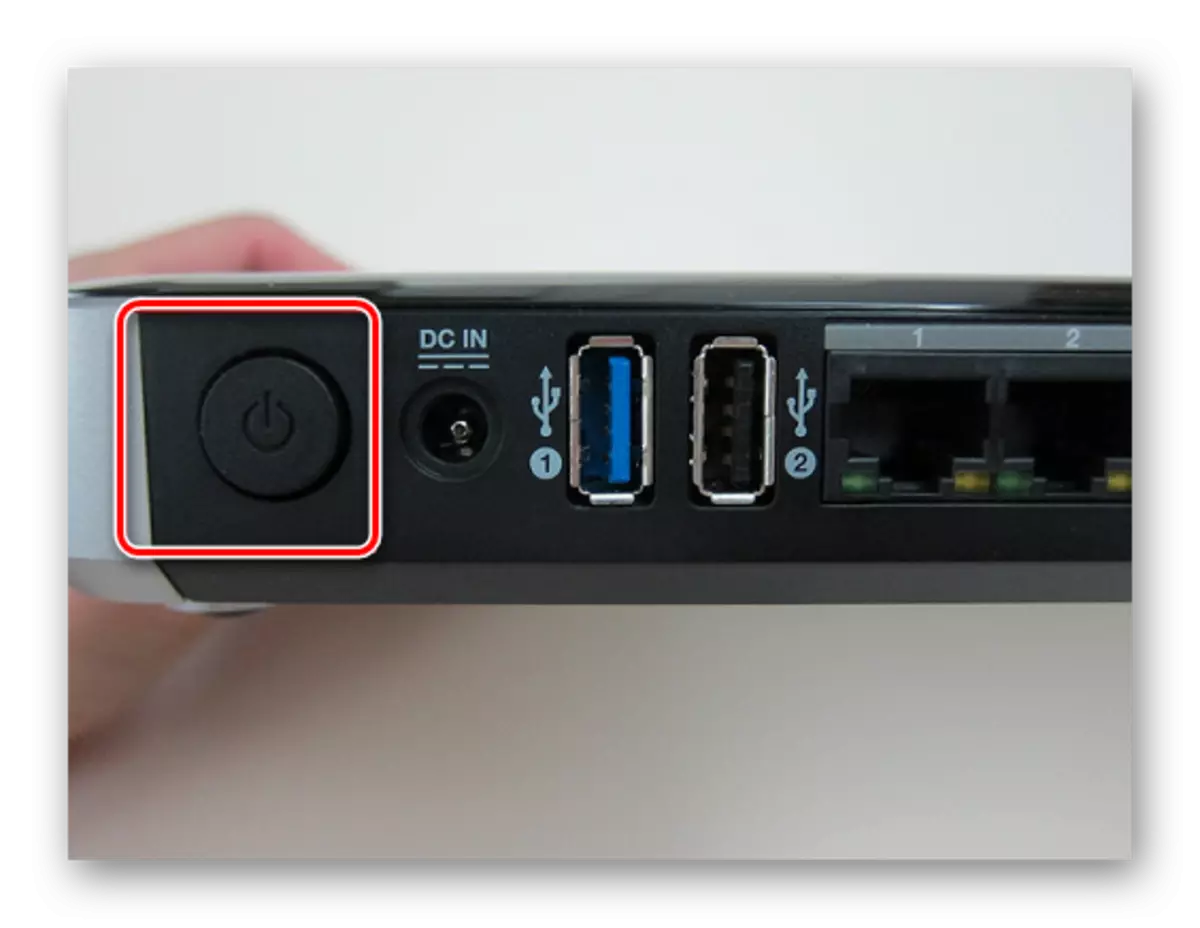
«Power» button
In most cases, the rear side of the router body has a special button, is responsible for enabling / disabling the device.
The same result can be achieved by simply pull the power plug from the wall outlet and wait at least 10 seconds.
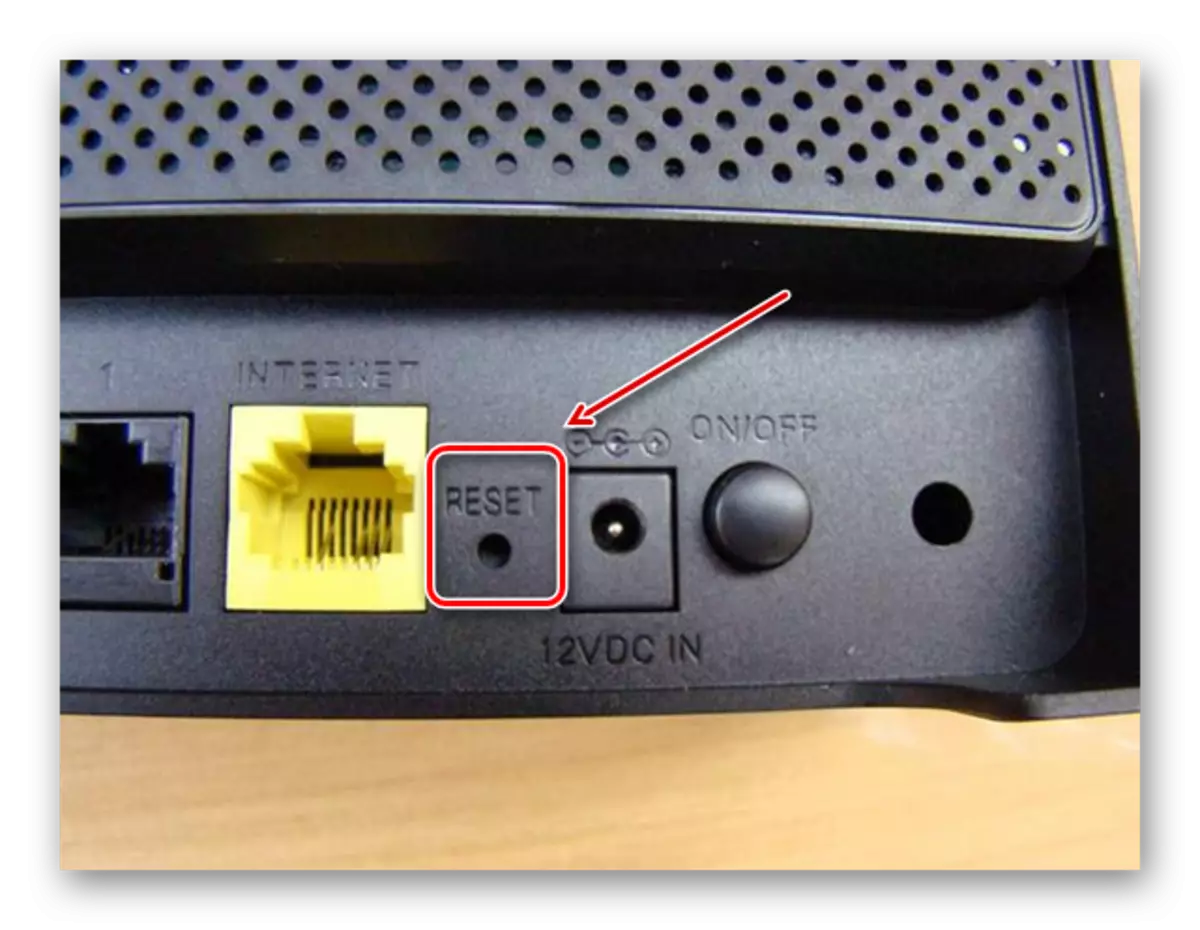
reset button
Button «Reset» in its basic mode allows you to restart. To do this, click on it with something sharp (eg, a toothpick) and then immediately let go. If you keep longer, will reset all settings the distribution device.
Web-based interface
To reboot the router, you can use the device console. Going into the router settings, you must find the button itself to reboot. Where it will be, it depends on the firmware version and device model. For example, this feature is available in the "System" under "Configuration" for Zyxel Keenetic.

Clicking on the button to reboot.

Method 9: Network Reset
Resetting network settings Returns network configuration to the original state and reinstall all adapters in the system. This method is recommended to be used only as the last option, as it makes fundamental changes to many system settings.
Windows 10.
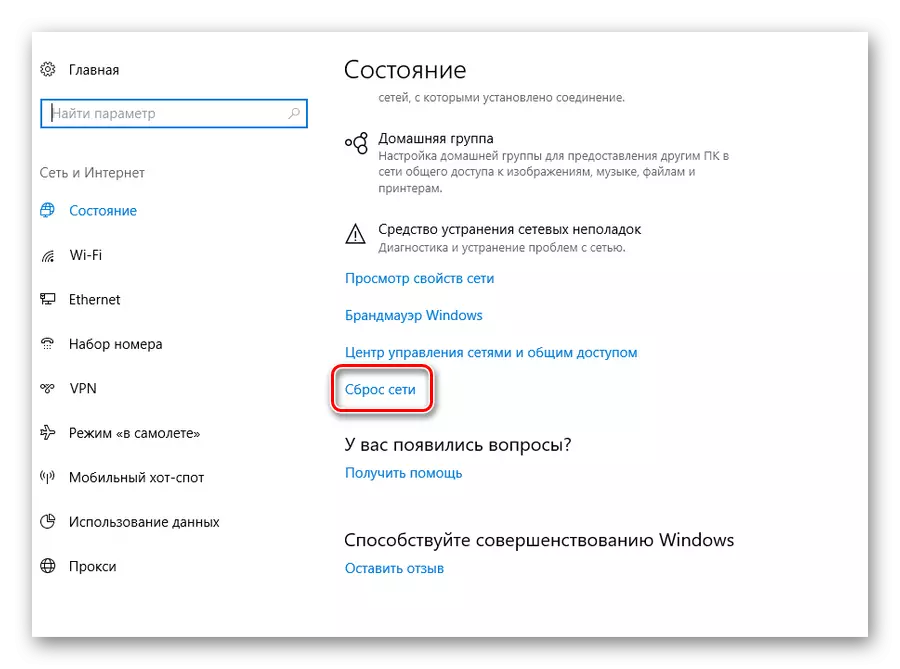
If you have a version of Windows 10 (Build 1607 or newer), then we carry out the following:
- Click on the search icon in the taskbar.
- We enter into the "Network" line, and then select from the proposed options "Network Status".
- At the bottom of the window (perhaps you have to scroll through the mouse wheel), choose the "network reset".
- Click "Reset Now".
- I confirm your choice by choosing "Yes."


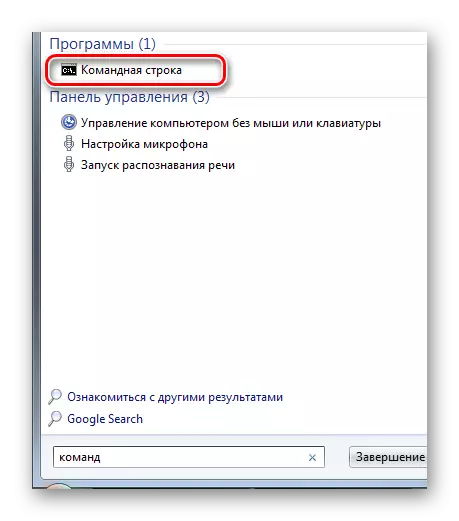
Windows 7.
- In the search bar, we enter the first letters of the desired word ("commands") and the system immediately displays the "Command Line" item first in the list
- Click on this PCM point and select the launch with administrator rights.
- We enter "Netsh WinSock Reset".
- After that restart the PC.
.
Read more: Call "Command Line" in Windows 7

We agree with the introduction of changes by clicking "Yes."

The problem with the wireless network can be solved. If not, you should try to reset directly with TCP / IP. For this you need:
- In the "command line" to dial "Netsh int ip reset c: \ resetlog.txt".
- Reboot.

Thus, there are quite a lot of ways to restore work Wi-Fi for normal users. First of all, you must make sure that the BIOS and the availability of all drivers for the network adapter are correctly configured. If this does not give the result - check the power modes installed in the Windows operating system. And the last step is to work with the configuration of the distribution device itself.