

BSOD (abbreviation, decrypt as the "blue screen of death") arises due to serious failures in the software or hardware system. Often they are systematic character that delivers a lot of trouble. In this article, we will consider the causes of the error indicating the DXGMMS1.SYS in the code on Windows 7.
Blue screen dxgmms1.sys in windows 7
The error culprit is the dxgmms1.sys driver, which refers to the software that is responsible for the work of the graphics subsystem. When damaged, we will inevitably get a failure with BSOD when running programs for working with video and images, games or just on the desktop. In addition, other drivers who have lost the relevance (outdated) can affect such behavior of the system. There are other factors affecting the appearance of this BSOD that we will also look below. It is important to comply with a certain sequence of actions while eliminating the problem, so we will write everything step by step. If the blue screen continues to appear when using the instructions, go to the next option.Step 1: System Restore
The first thing to be done is to try to restore the operating system to the state when it worked without failures. Perhaps the error occurs, incorrect settings, installed programs and drivers or damage to the components. The rollback procedure may eliminate some reasons.

Read more: How to restore Windows 7
When studying the article on the link above, skip the paragraph "Restore system files", since we will talk separately about it.
Step 2: Driver Update
Since DXGMMS1.SYS is part of software to work with graphics, the apparent solution will be updated the video card driver. At the same time, only this operation may not lead to the elimination of the error. It is determined by the fact that all "firewood" work in the bundle and the obsolescence of some files leads to the incorrect work of others. First of all, it concerns software for one of the main hardware components of the PC - chipset. In order not to search for manually inactive records in the Device Manager, you can use special software, such as Driverpack Solution. It scans the system and determine which drivers need to be updated.

Read more: Driver Update on Windows 7
Select the operation described in the Manual Update Paragraph with third-party applications, since unnecessary additional programs can be installed on the full automata. After all operations are completed, you should restart the car and only then update the video card driver.

Read more: How to update NVIDIA / AMD Radeon Video Card Driver
Step 3: Reinstalling DirectX
DirectX libraries are included in the operating system and along with the drivers are responsible for the work of graphic components. If they are damaged, the corresponding errors will be observed. It will help reinstalling the component using an autonomous installer. In the article, the reference to which will be shown below, the required paragraph is called "Reinstalling DirectX (only DirectX component)".

Read more: Eliminate core.dll errors
We will not be able to update libraries (after reinstallation).
Read more: How to update DirectX
Step 4: Clean Loading
The meaning of this procedure is to determine which program has served as a failure. "Clean" it is called because the loading of the PC occurs without running third-party services.
- To work, we need a system application configuration system. Read the ways to start it below.
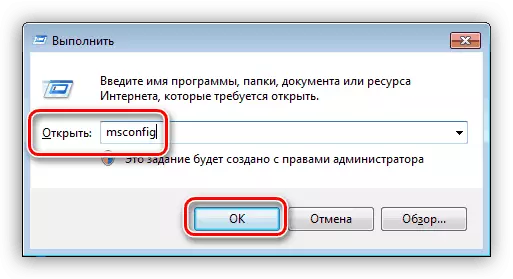
Read more: How to open the "System Configuration" in Windows 7
- Next, we go to the "Services" tab and put the checkbox in Chekbox with the name "Do not display Microsoft Services". After that, the list will remain only points with service from third-party developers.

- Turn off all services with the corresponding button.

- We reboot the machine and wait for the appearance of an error (or perform actions that brought to it earlier). If BSOD appeared, we turn on all the components and go to the next paragraph. If the system works stably, we continue: set the flags on the contrary half of the items and reboot again.

- Monitor the state of the system. The occurrence of the blue screen suggests that the problem program is in the included part of the list. If the error does not appear, remove all the daws and install them opposite the second half. After the problem group is detected, it should also be divided into two parts and continue to work according to the scenario described above. I delete the found software or reinstall (the name usually appears in the service name).
Read more: Installing and deleting programs in Windows 7
Step 5: Check RAM
RAM is a "transshipment point" between the disk subsystem (there "lie" drivers) and the central processor. If it works with errors, the necessary information may be damaged and, as a result, the functionality of the entire system is broken. In order to verify the performance of RAM or identify problems, you need to check the modules with a special software or using the built-in tool in Windows.
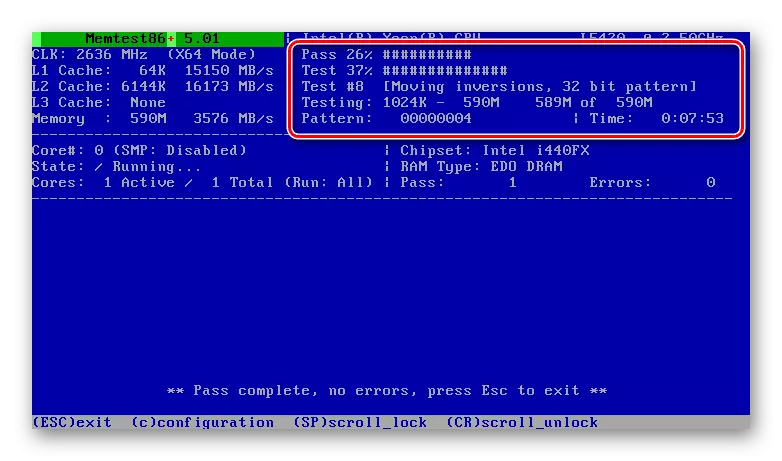
Read more: Verification of RAM in Windows 7
Problem planks should be disabled or replaced by new ones. At the same time, it is desirable to choose the modules of the same manufacturer and with the same parameters as installed.
Read more: Select RAM for Computer
Step 6: Virus Check
DXGMMS1.SYS driver malfunctions can also occur because of the virus trips. Some of their kinds are able to damage or replace key files, thereby violating the system. Deleting malicious programs is not easy, especially for an inexperienced user, so we offer detailed instructions on the link below, which will help determine and eliminate infection, and not allow it in the future.

Read more: Fighting computer viruses
After the PC is cleared of pests, you should return to the beginning and repeat steps 2 and 3 (updating the video card drivers and reinstalling DirectX). This necessity is dictated by possible damage to the files in a viral attack.
Step 7: Restore system files
If after all the described BSOD manipulations continues to appear, you can resort to the extreme tools to restore system components. It is extremely due to the possible full failure of "Windows". Such a troubles usually happen to pirate assemblies and copies, as well as with systems that have been subjected to changes using various design packages containing patched files (Shell32.dll, ExplorerFrame.dll, Explorer.exe and others). If this is your case, it is better to abandon this operation or pre-restore the OS to the state in which it was before installing themes (usually in the instructions for packages present this item).
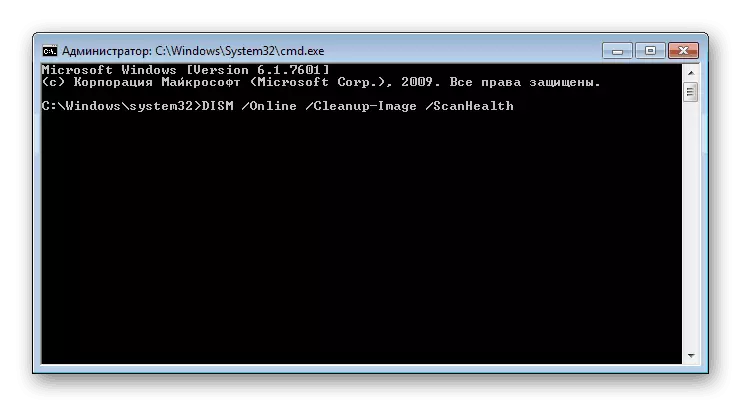
Below are references to the materials describing the process of restoring system files using two different tools. If the first has not worked, you can (need) to use others.
Read more:
How to restore system files in Windows 7
How to restore damaged components in Windows 7 with DISM
Step 8: Detection of hardware faults
Re-emergence of the BSOD discussed today after applying all the recommendations suggest that there are problems in the hardware of PC. We have already spoken about the malfunction of RAM, the video card remains, the central processor and the motherboard, which can be seized due to old age, overheating or overclocking. You should not also forget about the possible problems of the system disk. In several articles, we describe the causes and ways to eliminate them for some components, but complete diagnosis is better to entrust the service center specialists.

Read more:
Video card troubleshooting
Check the processor for performance
Checking disks for errors in Windows 7
How to check your motherboard for performance
Conclusion
In conclusion, we will mention another radical way to eliminate the error DXGMMS1.SYS. This is reinstalling the system with the subsequent installation of all necessary updates and drivers. Before going to the service, it is still worth trying to do this by preserving important data in a safe place.
Read more:
How to install windows 7
Re-install windows 7 without disk and flash drives
How to update your computer with windows 7
In order to avoid the appearance of such a blue screen in the future, install only compatible drivers and get regular updates, protect your system from viruses, and watch the health of the "iron" and do not abuse overclocking.