
Disputes about what is visually better and more convenient, the IPhone controlling the IOS operating system from Apple or the prevalence leading among the Android mobile platforms can be maintained infinitely. Meanwhile, if you are the owner of the android device, but consider the IIOS interface more preferable by performing a number of manipulations, you can easily bring the image to the "apple" view showing on the screen "Green Robot". The practical implementation of such a transformation will be discussed in this article.
The procedure under consideration of the "Alteration" procedure of the Android interface to the most approximated look at the IYOS is to step by step and configure a number of applications, therefore it can be relatively secure and reversible, as well as easy to implement. To effectively fulfill all instructions from this article, except for the last additional, it will take only the skill with various methods to install the software adapted to work in an environment of the "green robot".
Read more: Ways to install applications on the Android device
Step 1: Desktop
The first step on the way to getting on the Android device similar to the iPhone interface is a "replacement" of the system shell's home screen on visually approached by iOS, which is possible by installing the launcher application. Such for Android in the Apple style on Google Play Markt is available. A variety is available - it is enough to enter something similar phrase "Launcher IOS" as a search query, and you will have a choice from a variety of proposals.
We will consider the installation procedure and the possibilities of using the specified "converters" of the interface on the example Launcher iOS 13. from the developer LUUTINH DEVELOPER. - This solution among others similar received from users the largest number of positive feedback at the time of writing.
Download Launcher iOS 13 from Google Play Market
- Install Launcher iOS 13 by clicking from the smartphone to the link presented above or using the search for the application of Google Apps. Run the launcher.

- Provide all the required resolution tools, taping "Allow" under the emerging system requests.

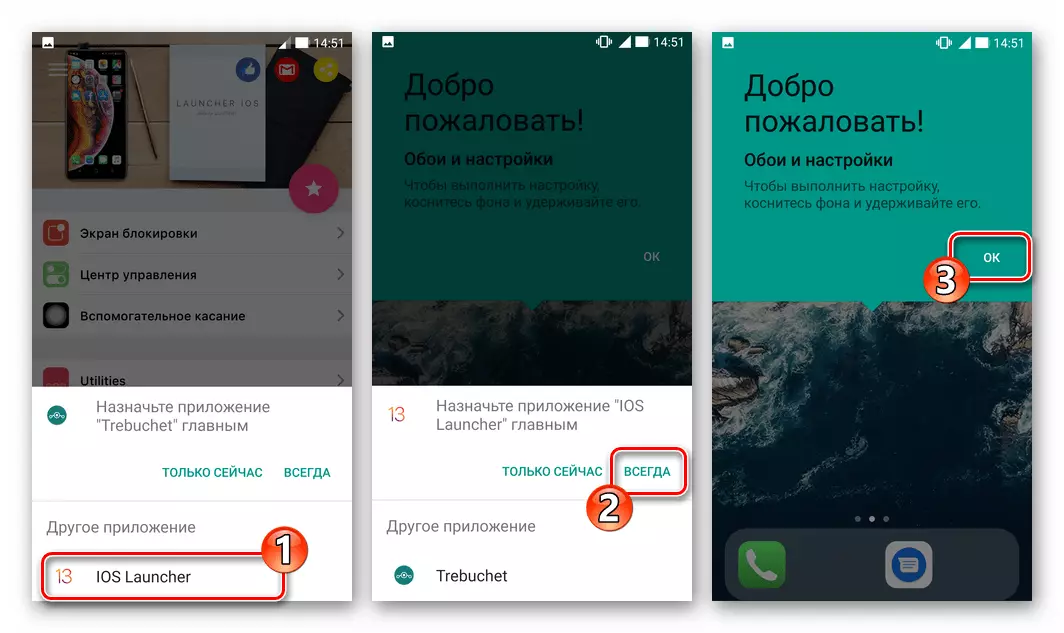
- Now exit the application, more precisely, take such an attempt. As a result, a proposal to select the main screen of the system appears on the smartphone screen - click here "iOS Launcher" and then tap "Always".
- Actually, you can already evaluate the first result of the operation - the appearance of application icons and their location will immediately change after executing the previous point of instructions.
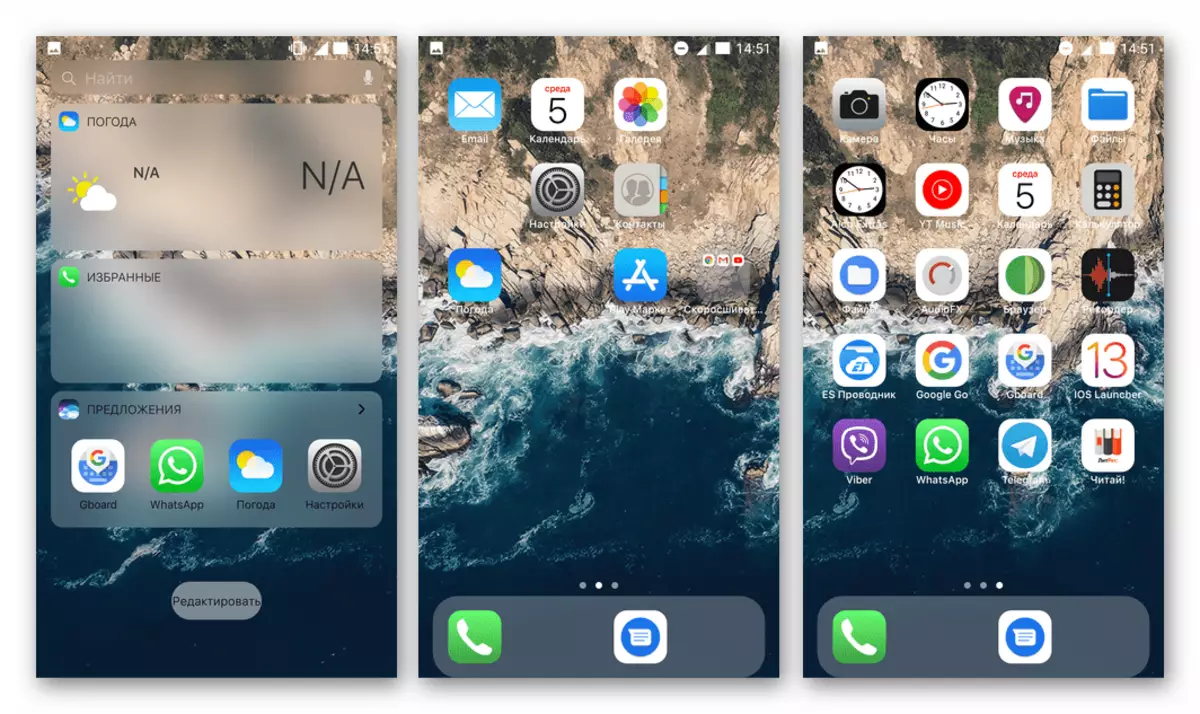
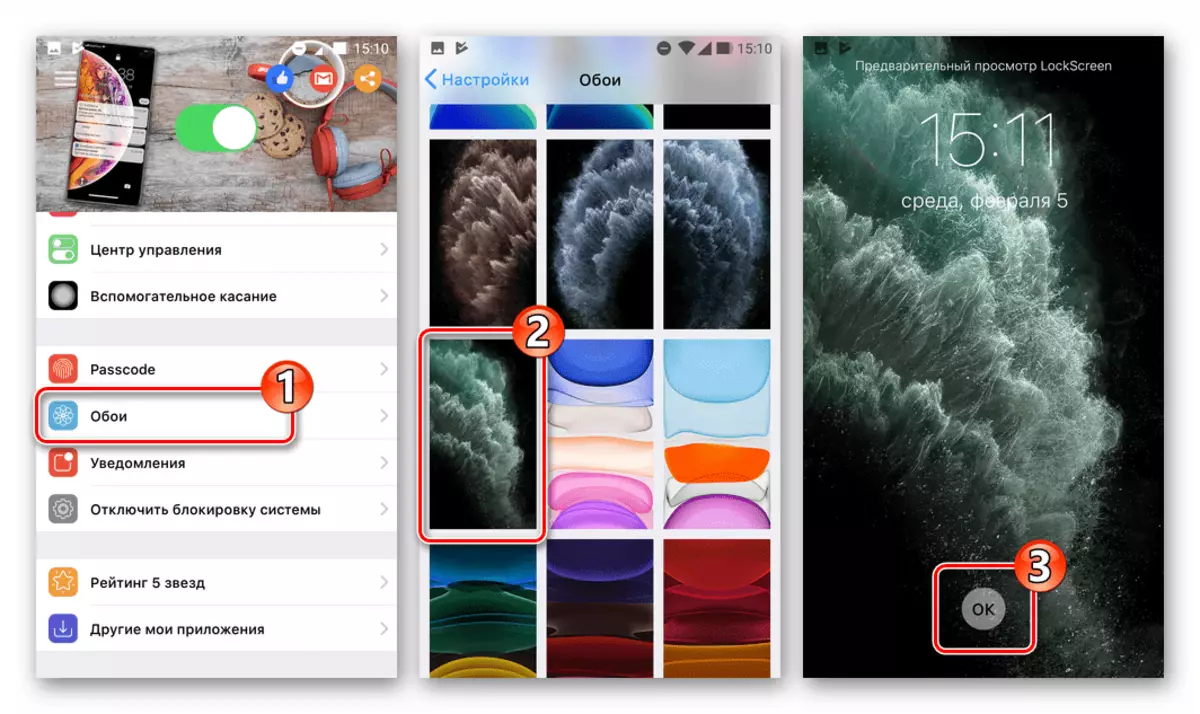
- For greater similarity of the smartphone desktop with this on the iPhone, install the wallpaper from the Apple offered (the image set is supplied with the launcher):
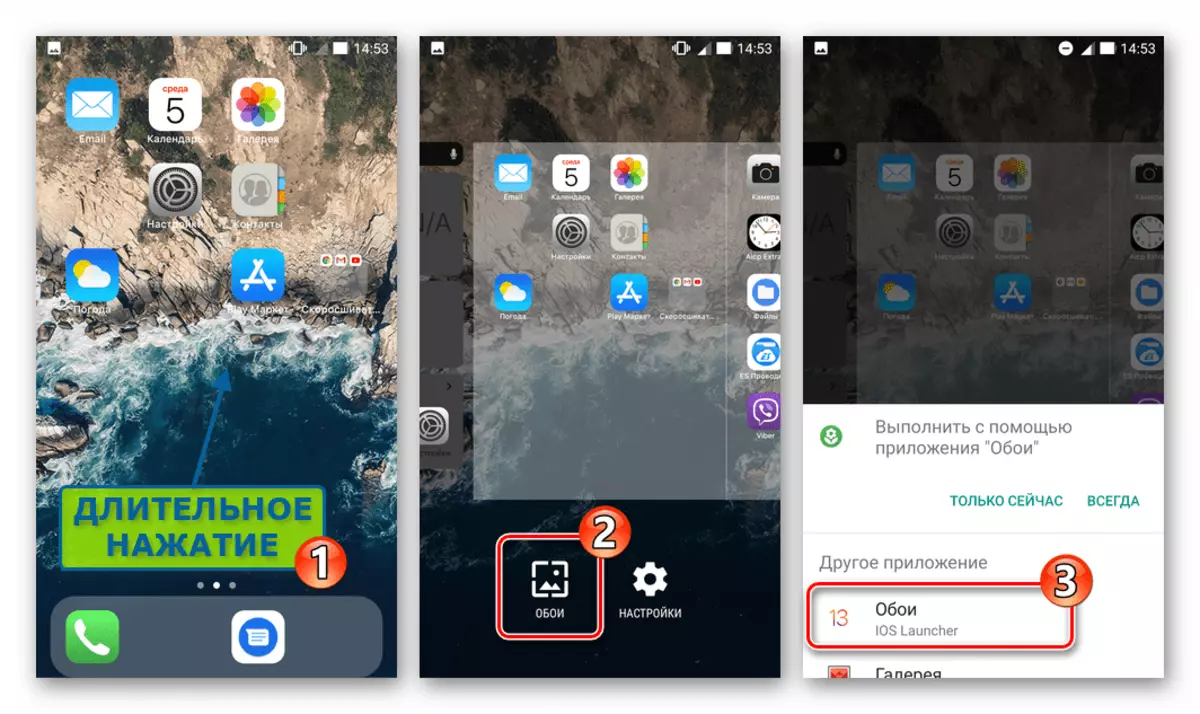
- Long pressing the desktop area free from icons, move it to configuration mode. Tap "Wallpapers" at the bottom of the screen.
- Next, by scrolling the list of available wallpapers, select the appropriate, tap their previews and click "OK" on the image preview screen.

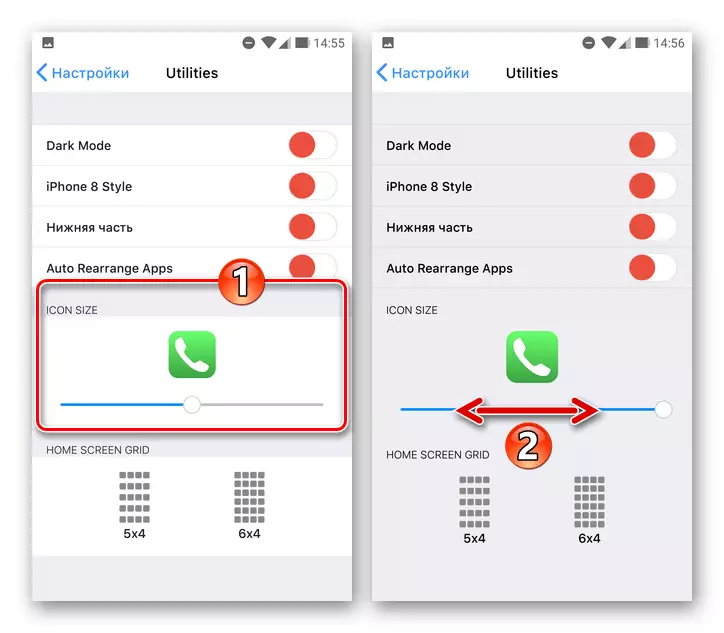
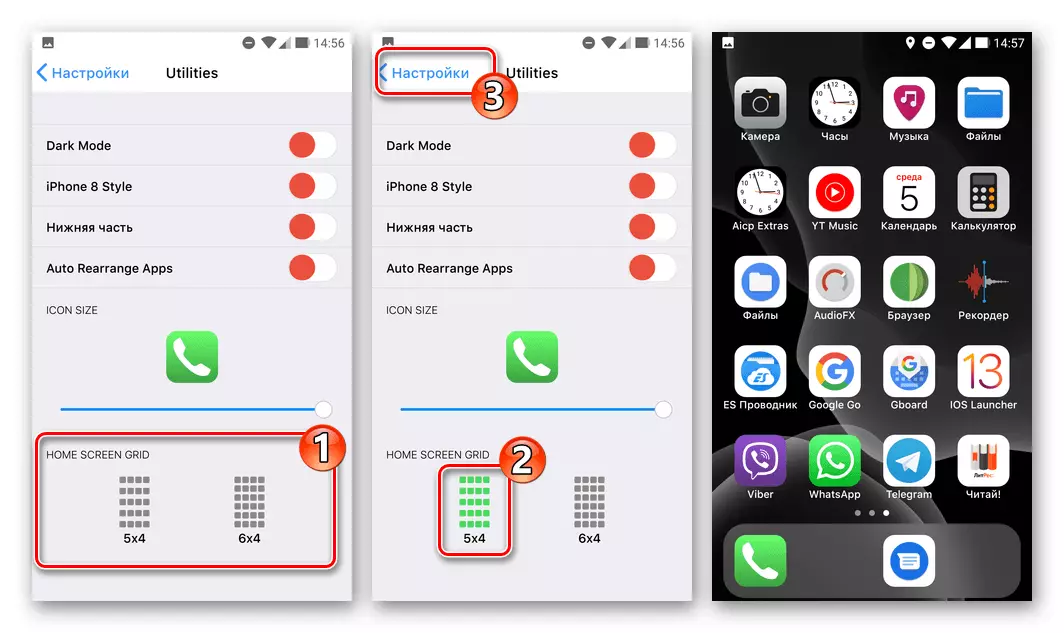
- Another restricting on the desktop of the launcher setup is to change the size of the icons, as well as the selection of the grid, according to which they are located:
- Call the Launcher iOS 13 parameters, while working on the icon-free area of the desktop and then taping the "settings" at the bottom right. Click "Utilities" in the displayed list of options.
- Shifting the runner in the "icon size" area adjust the size of the icons.
- Select one of the options for the location of application icons on the home screen - "5 × 4" or "6 × 4", touching its designation.

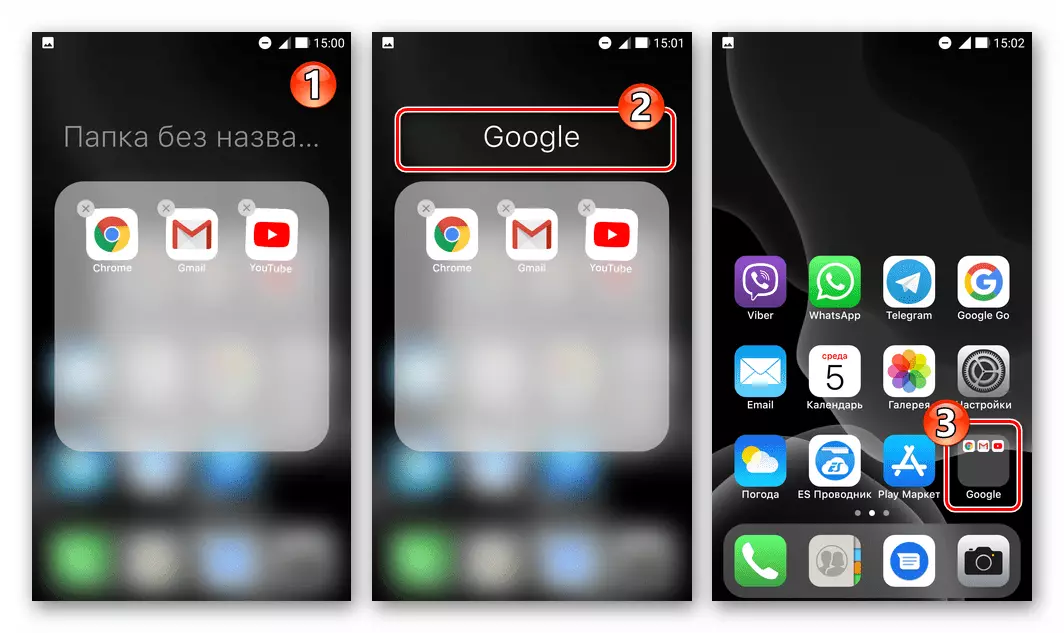
- Regarding the "new" desktop of the smartphone left to carry out one operation - to place the labels of applications and system tools in its place. After installing the IOS launcher, it is carried out somewhat unusual for the Android user by the method, therefore, it may be required to be explained:
- To move the icons, click on it and do not stop exposure until all the icons on the home screen will "tremble" (first appears the action menu). Next, move the item to the place where it must be, then do the same with other icons.
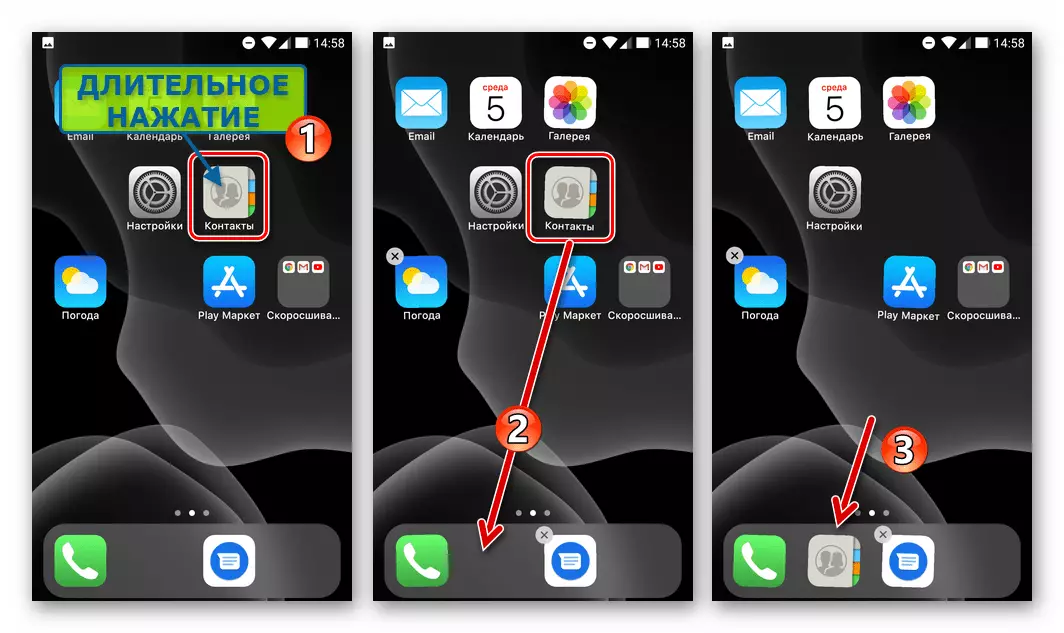
After completing the arrangement of the icons, press the "Back" sensor button.
- Form the folders. To do this, drag the labels one to another, and then enter the name of the received container.
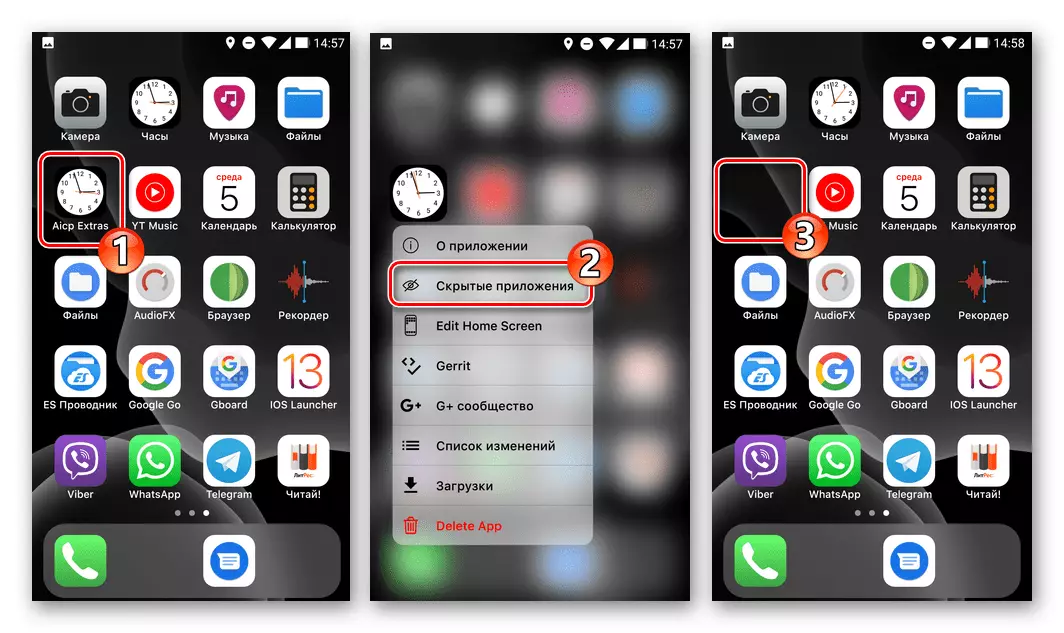
- Another option that should be noted from available in Launcher iOS 13 is the ability to hide applications icons from the home screen of the smartphone. Click on this or that icon until the menu is displayed and then select "Hidden Applications" in it.
- To move the icons, click on it and do not stop exposure until all the icons on the home screen will "tremble" (first appears the action menu). Next, move the item to the place where it must be, then do the same with other icons.
Step 2: Lock Screen
The next step of solving our task is to install the lock screen with notifications in the style of iOS. A good solution to this question offers the developer installed in step above the launcher.
- Install the "Lock and Notifications of IOS 13" application from Google Play Market and run it.

Download the Screen Lock and Notifications iOS 13 from Google Play Market
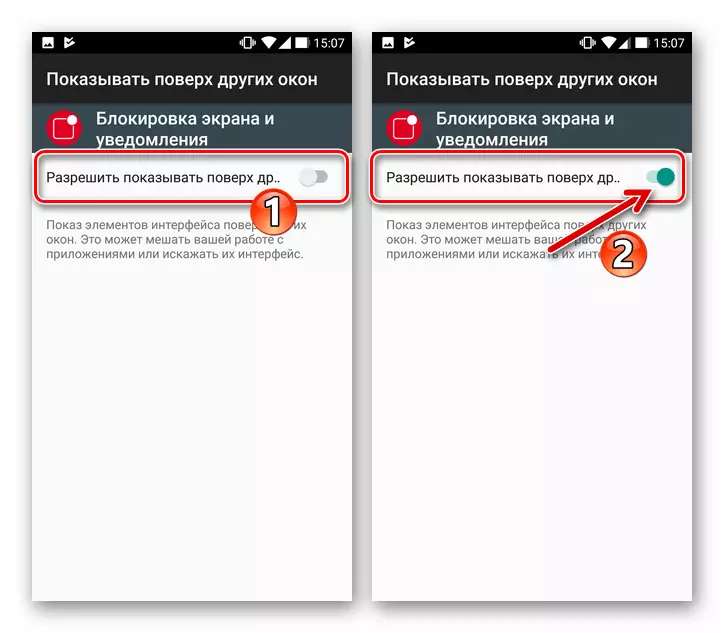
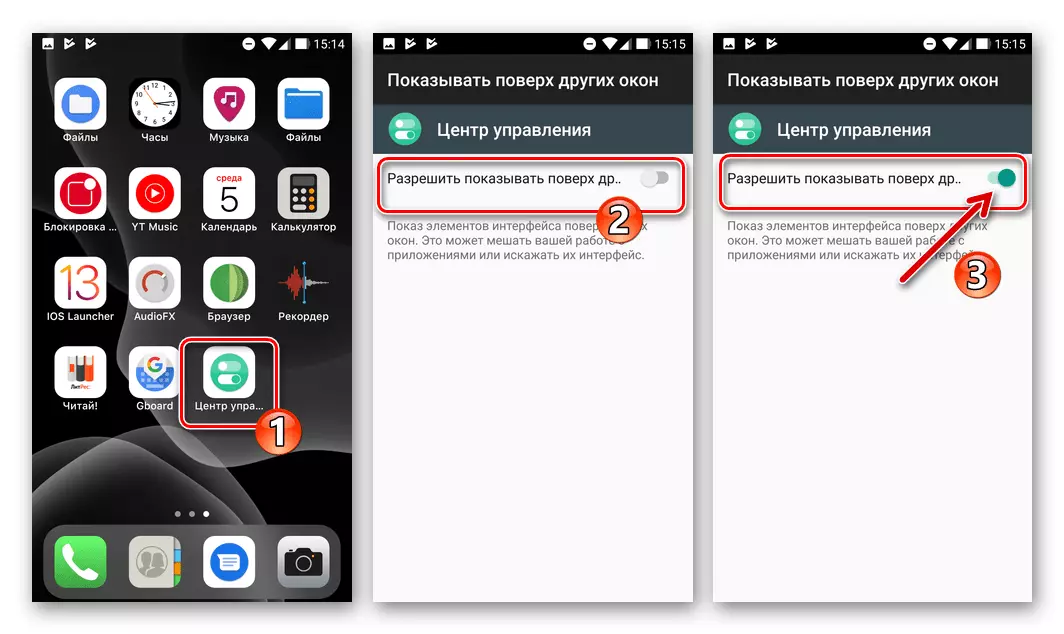
- In the list of options on the master lock screen, click "Disable System Lock". Next, deactivate the android protection from the unauthorized unlocking of the device and return to the application.
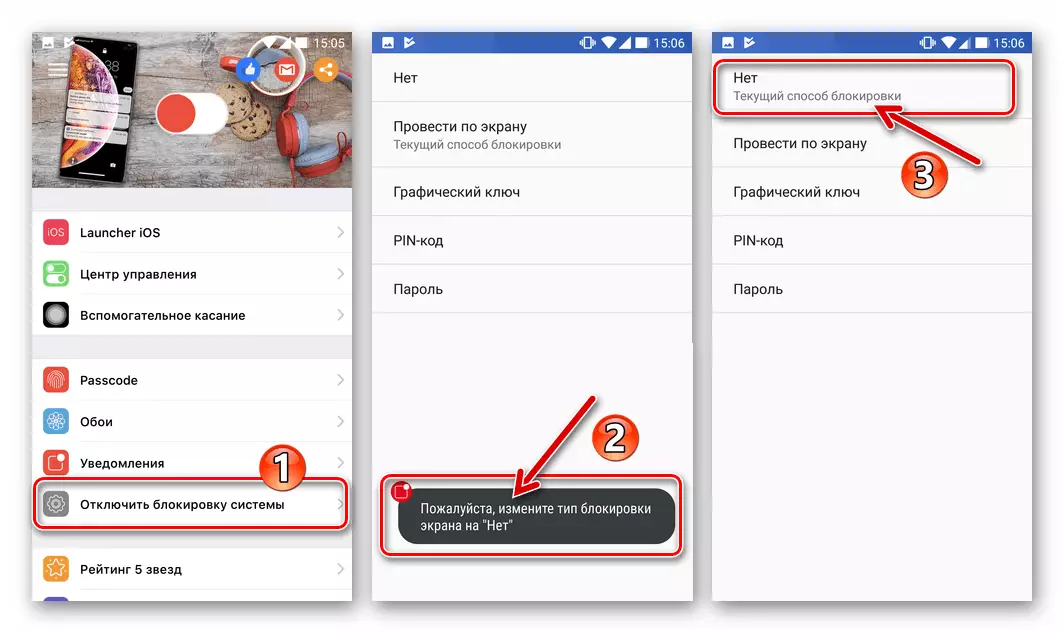
- Translate the switch located at the top of the screen to the "Enabled" position, and then confirm the request received from the application, touching "OK".
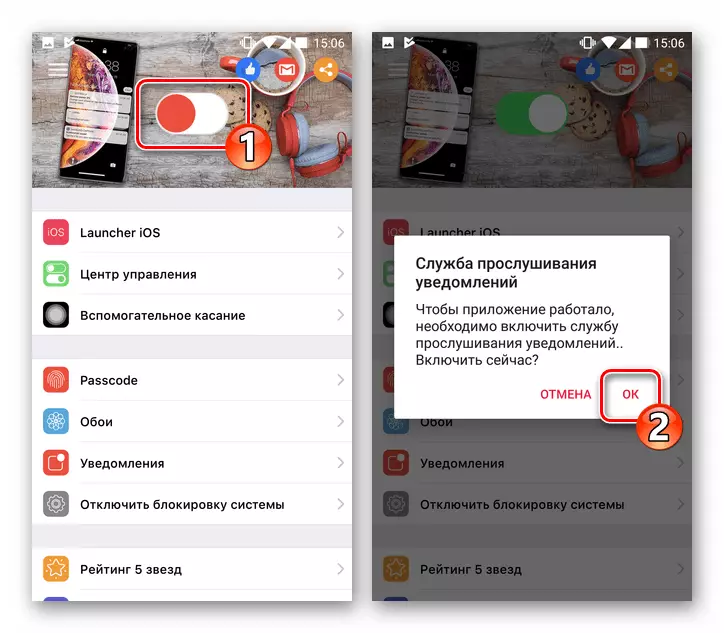
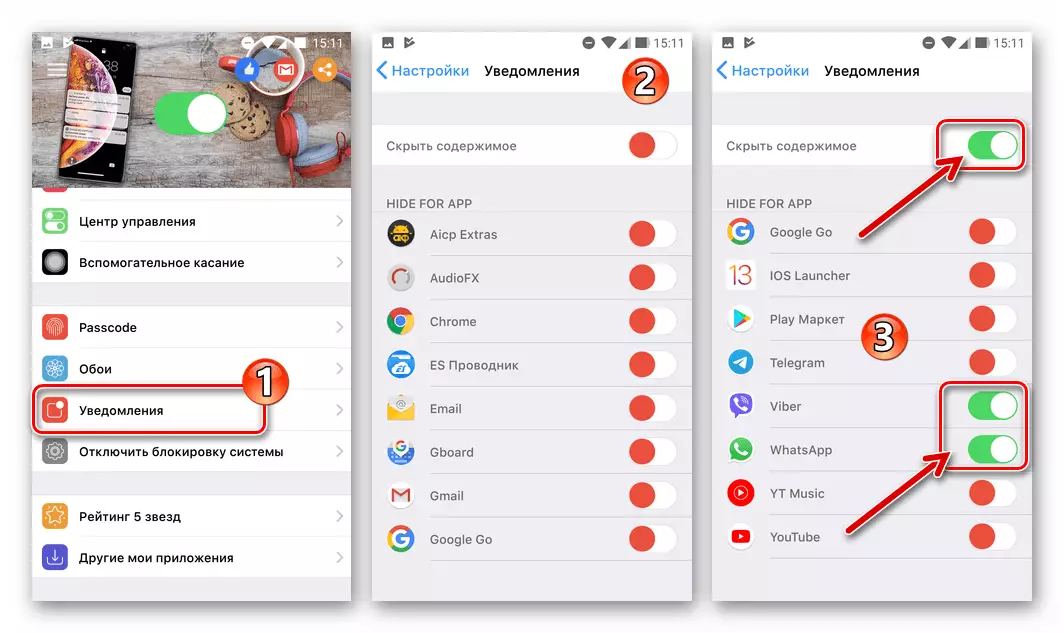
Next, activate the switch, which is located to the right of the "Screen Lock and Notifications" item in the list "Access to notifications" in the "Settings" of Android, confirm your intentions.

Another permission that must be issued is to demonstrate data from the application over other windows - do it upon receipt from the system of the corresponding offer.
- Upon completion of the execution above, it is recommended to restart the smartphone, after which you can move to the evaluation of the result.
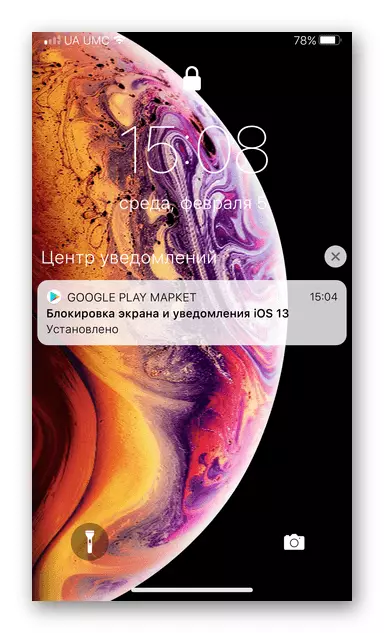
- To adjust the settings of the installed and functioning screen blocker, tap on its icon on the smartphone desktop.
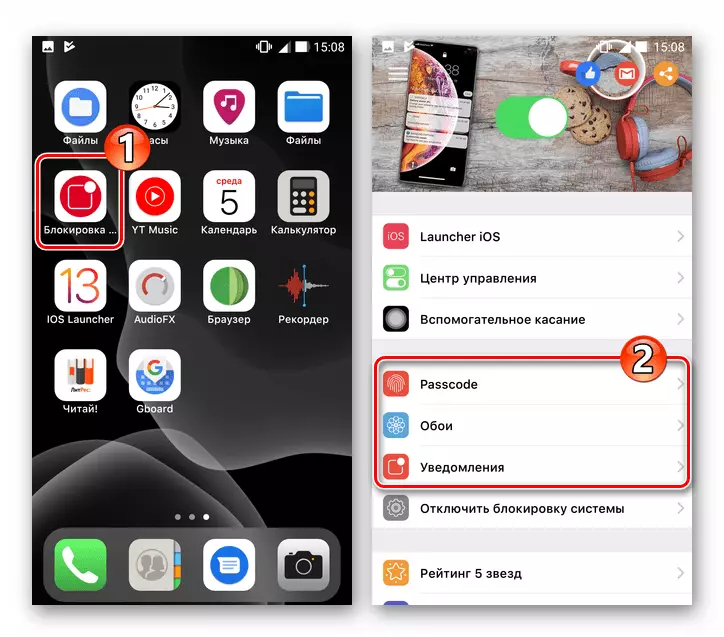
Then, configure the application, moving to the parameter sections from the second category on the screen that opens:
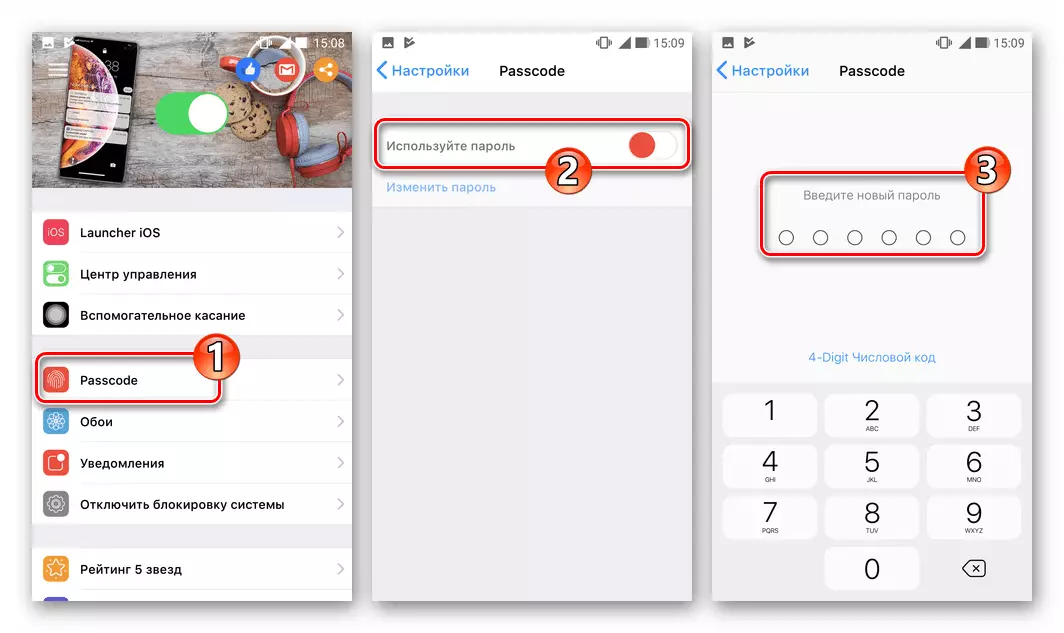
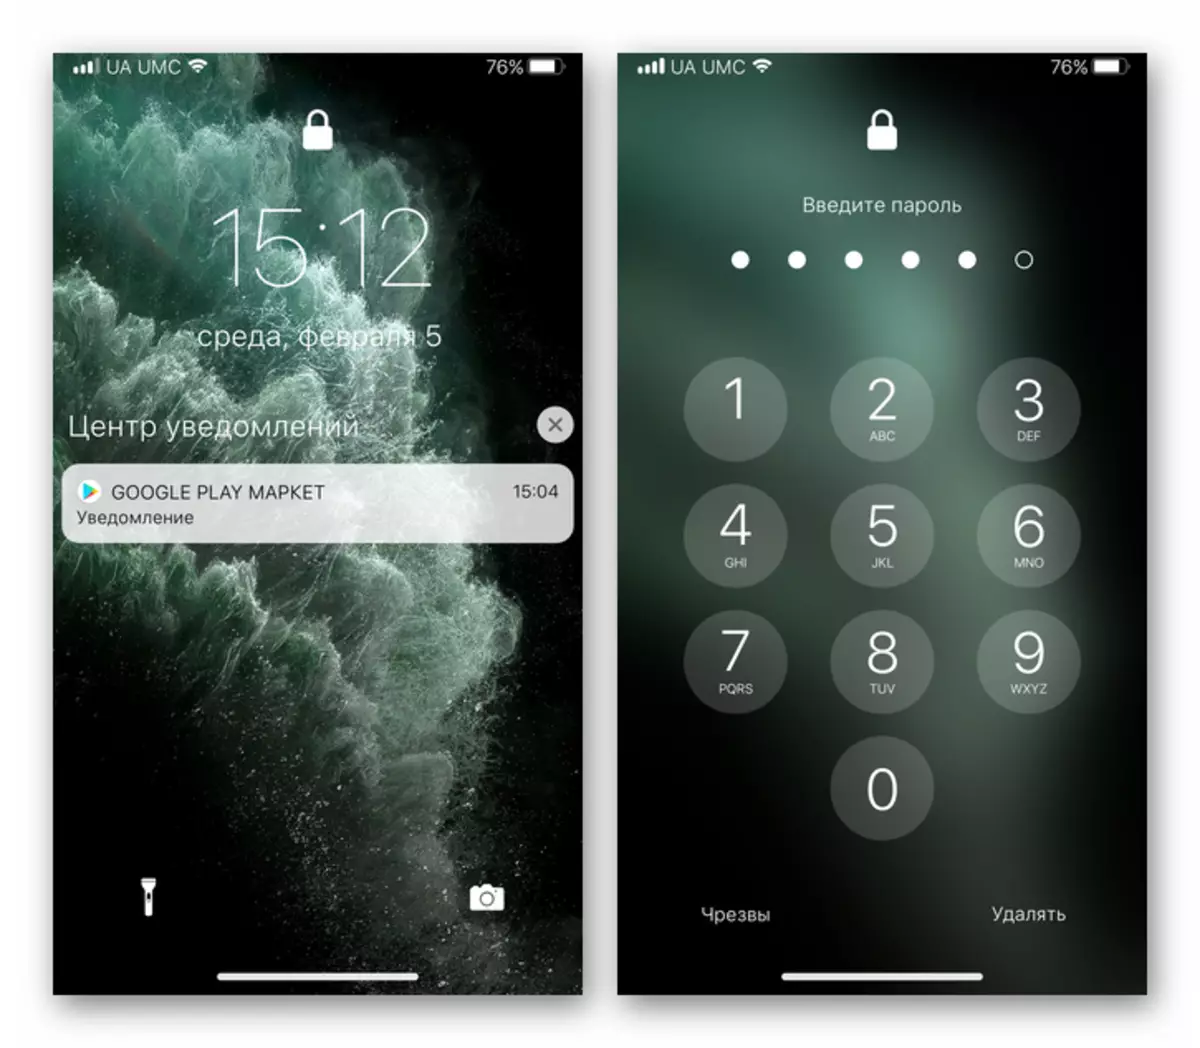
- "Passcode" - setting a password that will be required to unlock the smartphone.
- "Wallpapers" - the ability to install the background image of the blocker from the application of the application or the device storage.
- Notifications - Here, here, you can turn off the demonstration on the locked alerts from individual applications by the activation of the switches.
- Now very similar to an integrated iPhone solution The screen blocker is configured and ready for further operation.
Step 3: Control Center
To get this module on your Android device, as well as in the case of the launcher and the lock screen, you can use the Developer's decision LUUTINH DEVELOPER. As demonstrated in the following instruction, or experiment, establishing the options for the IOS Management Center from Google Apps.
- Go to the following link and install the iOS 13 control center from Google Play Market.
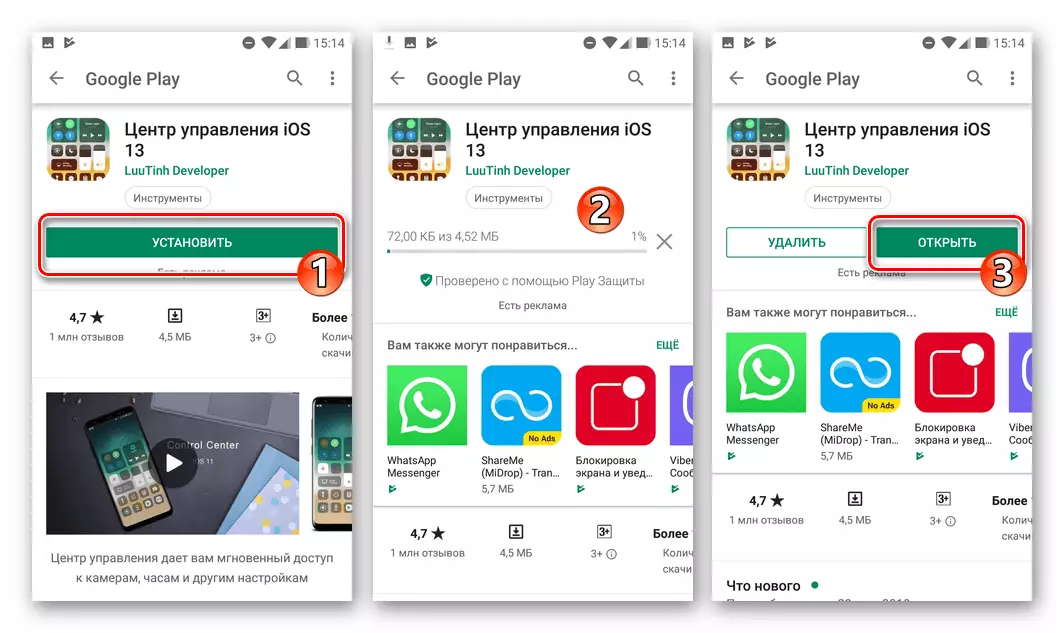
Download iOS 13 Management Center for Android from Google Play Market
- Open the application. When you first start it, you will get on the screen "Show over other windows" of Android settings - activate the "Allow ..." switch located here.
- Allow the IOS 13 control center application to change the system settings - tap "OK" in the system request window and then transfer the appropriate switch to "Enabled".

- This initial configuration of the control center is complete - To invoke it to swipe from the bottom face of the device screen.

Step 4: Status String and Cutting Notifications
Cutting the appearance of the status line of the Android smartphone in a similar to the iPhone view, as well as the concomitant replacement of the curtain of the notification curtains - the task whose solution can cause some difficulties. From the mass of proposals with such (declared developers), not many functionality in Google Play, not many often function. When creating this material, we stopped on Inoty OS 11. But you can experiment with other products may seem more suitable.
- Install the Inoty OS 11 application and run it.
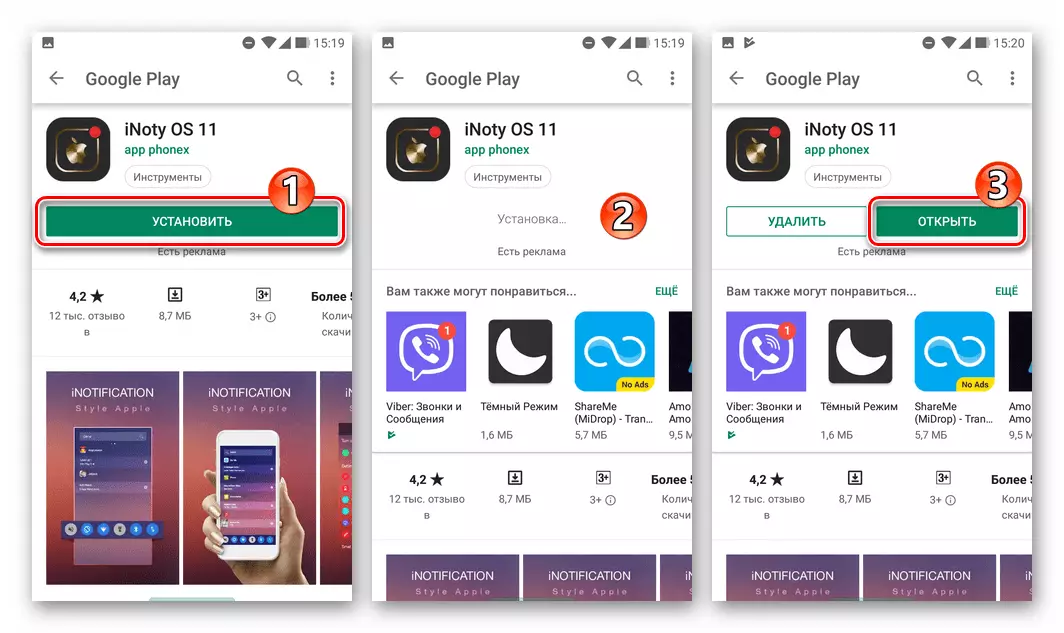
Download the Inoty OS 11 application from Google Play Market
- In the list "Notify Settings", on the screen that opens, tap on the first item - "Turn ON / OFF Notify".

- Next, grant the "Access to Notifications" tools. To do this, activate the switch near the name "Inoty" on the screen that opens, confirm your intentions, tapping "Allow" under the query-warning, and then return to the application.
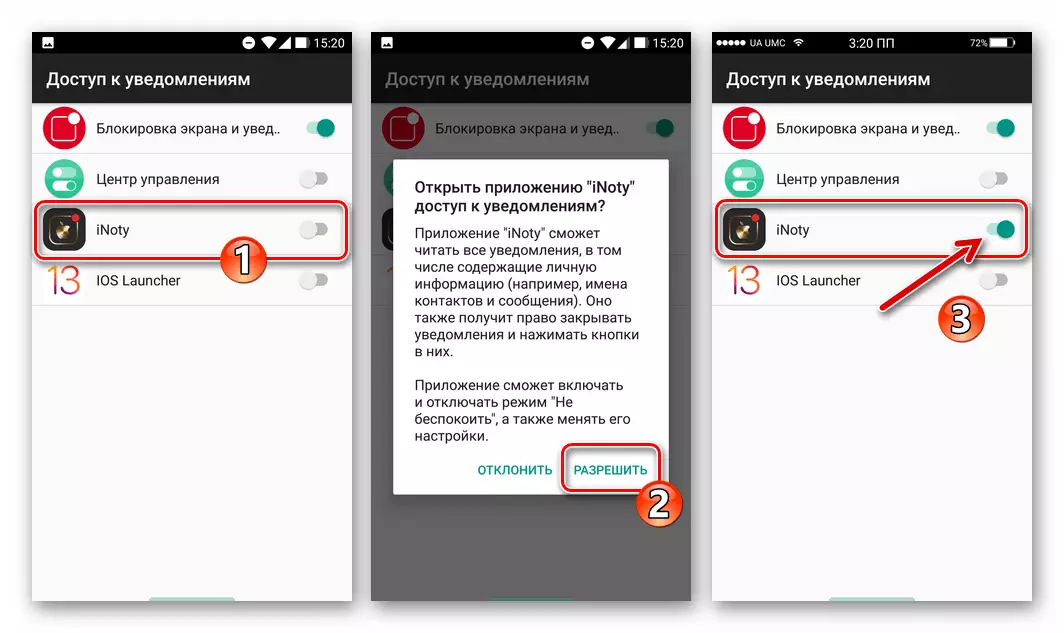
- As a result, Ainoti OS 11 will immediately begin to perform its work, you can proceed with the assessment of the quality and the convenience of change brought to the interface.

- Additionally, moving to the "Notify Settings" parameters, you can adjust some status string settings and notification curtains. So, here is available:
- Changing the color of the status string is "Color Statusbar".
- Installing the background picture for the curtain of notifications - "Change Background Notify".
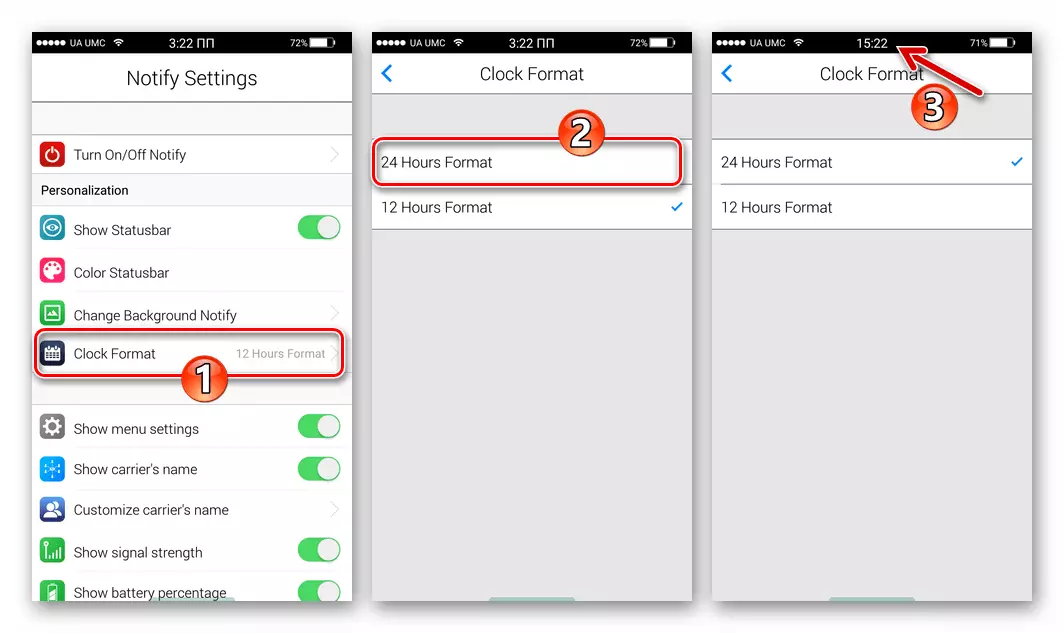
- Change time display format - "Clock Format".
- Set the display in the status bar of any word instead of the name of the telecom operator - "Customize Carrier's Name".


Step 5: Appearance of "Settings" OS
Another manipulation that will make the Android interface close to iOS - the screen replacement from which the transition to the adjustment of various system parameters is carried out. Such a conversion is possible to be performed using user mods distributed in the form of APK files, one of which you can set according to the instructions further.
- Load the APK file available on the phone below the APK file below, and then open it using any file manager for Android.
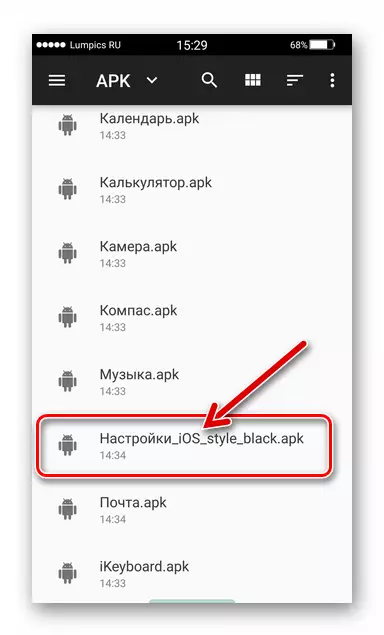
Download Android setting application in iOS style
- Click "Set" if necessary, confirm the need to install software from an unknown source, that is, activate this feature in the Mobile OS settings.
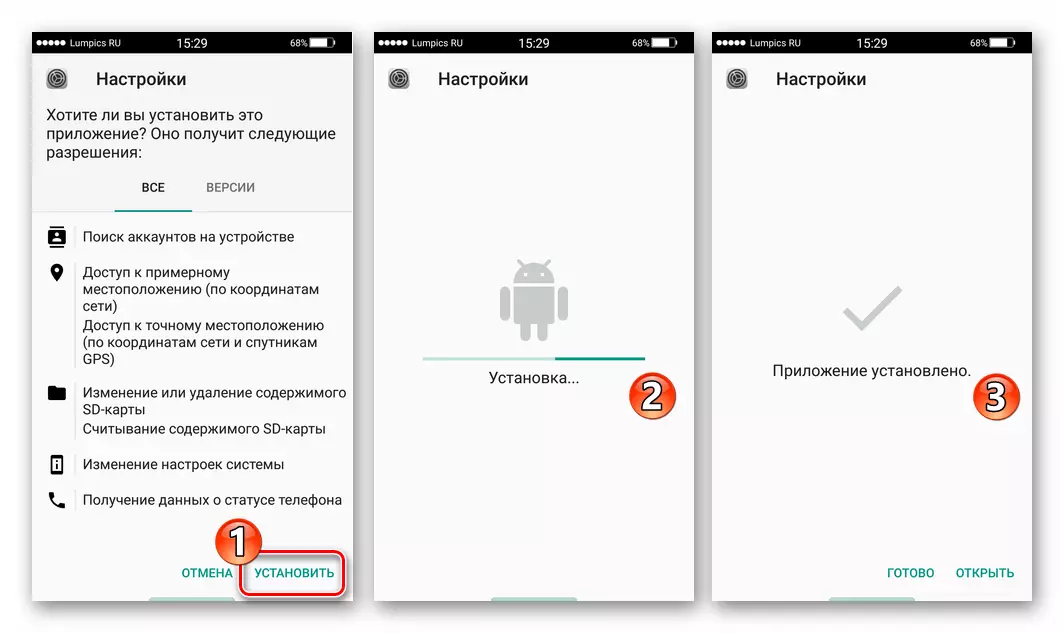
- After completing the installation of the Fashion, run the received application to estimate its appearance and functionality.

Step 6: Applications
The completion step of transition to the iOS-like interface on the Android device can be considered the installation of applications performed in the style of iPhone to solve various tasks associated with the usual use of the smartphone. The list of this kind of software available on Google Play is quite wide and then a small selection of links to download successful, according to users, products is presented. If you are needed not included in the next list and similar to "apple" software tools, look for them in the software store and / or on the Internet.
- Phone and contacts - OS13 DIALER..

Download app Phone and contacts for Android in IOS style from Google Play Market
- Messages - Al Message OS13..
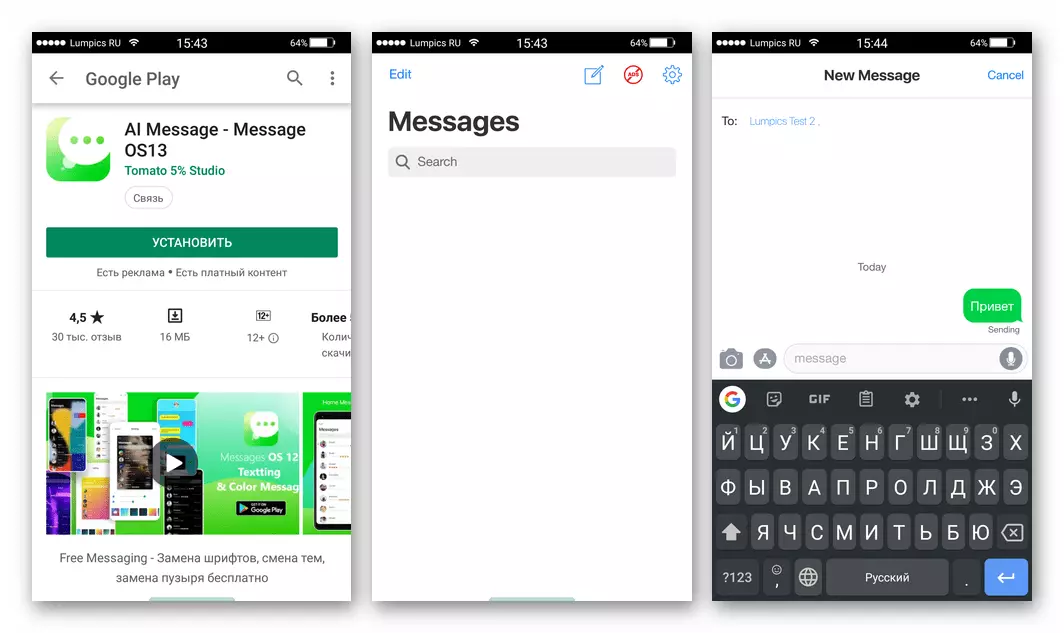
Download App Messages for Android in IOS Style from Google Play Market
- Camera - OS13 Camera..
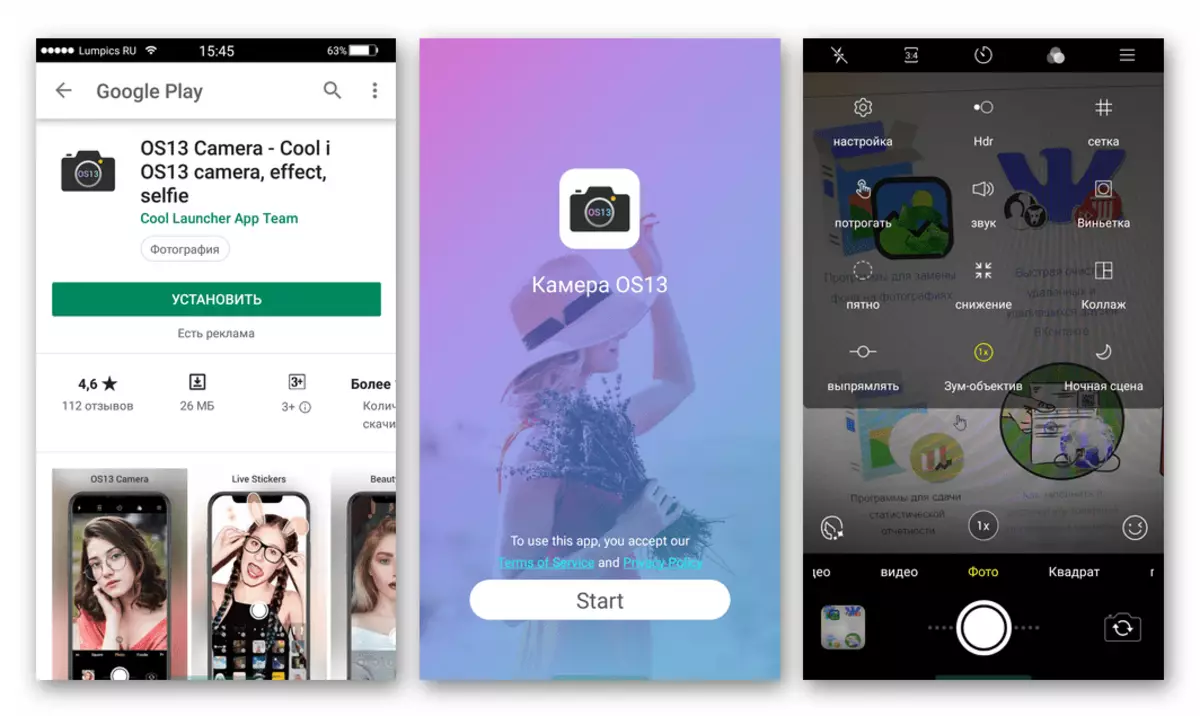
Download application camera for Android in iOS style from Google Play Market
- Gallery - Igallery OS 12..
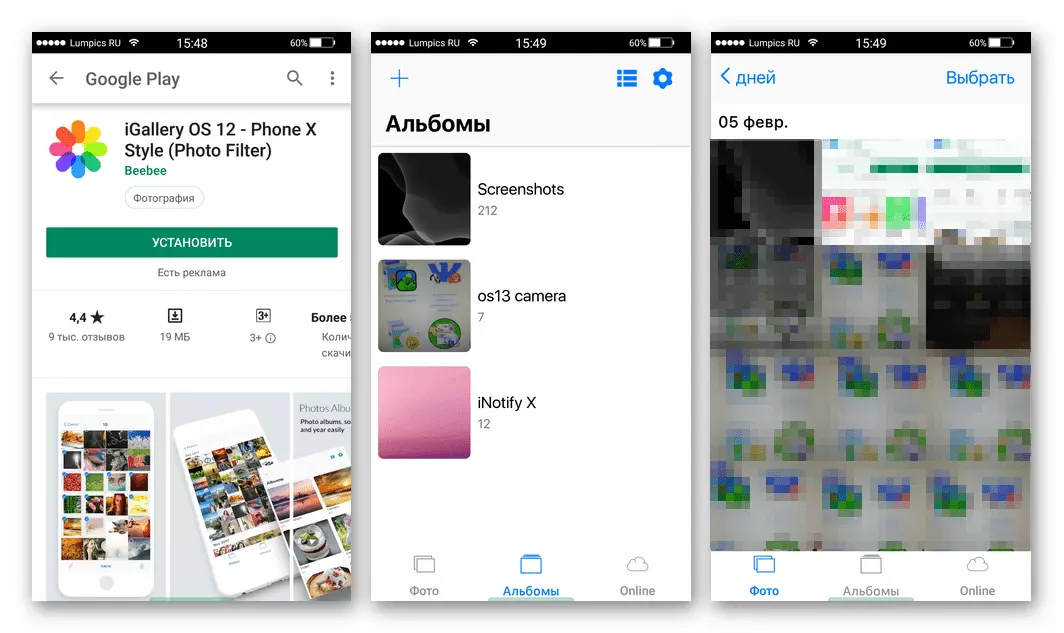
Download application gallery for Android in iOS style from Google Play Market
Additionally. Boot animation
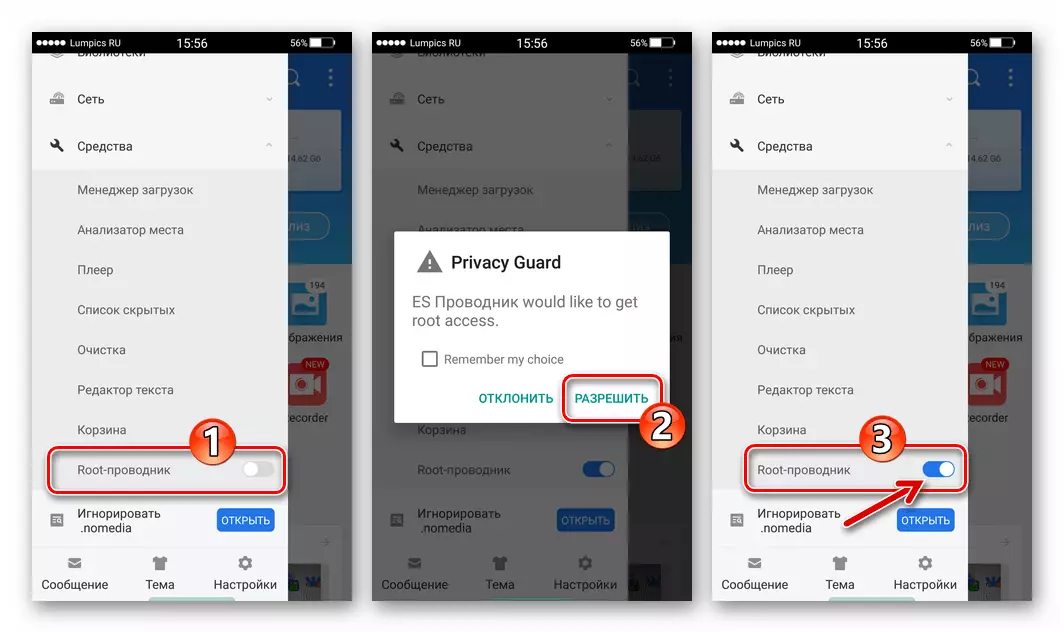
If you are a fairly experienced user and on your android smartphone activated superuser privileges, you can closer to the appearance of the device to iPhone even more, replacing the screen displayed when the OS is loaded on the image with the Apple logo. To implement the conceived, you need a file manager for Android with root access (we use ES File Explorer).
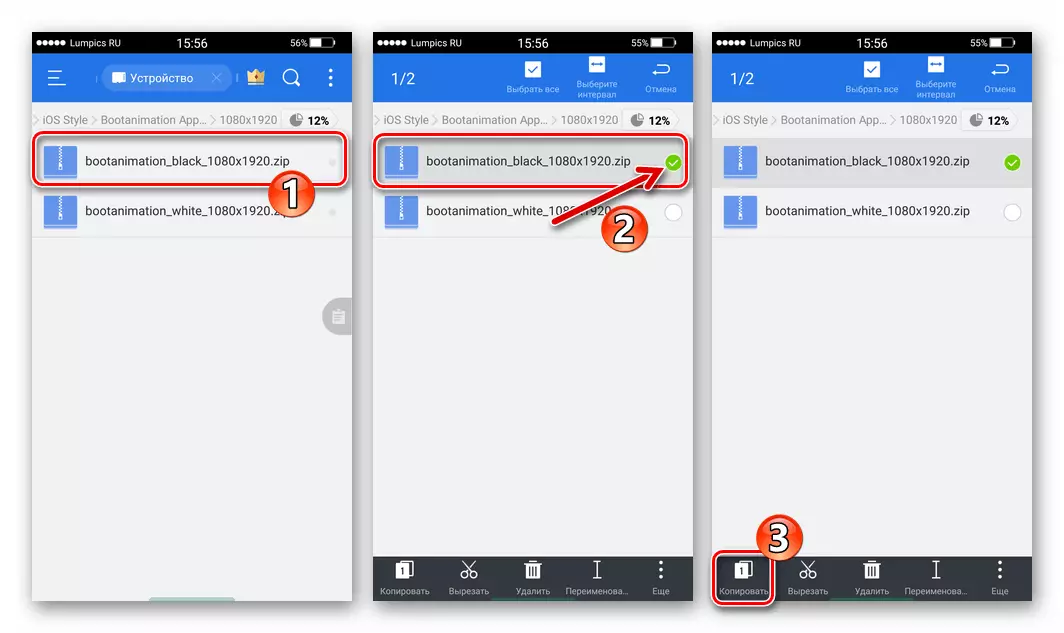
- Download and place the Booth Animation file in the smartphone repository, which you will integrate into the device. Solutions of this issue are distributed in format * .zip. And in abundance are presented on the scope of the network, you need to choose to resolve the displays of your device file. Boot Images "Apple" of two types - Dark and light in permissions 1080 * 1920. and 1080 * 2280. You can download by clicking on the following link:
Download Booth Animation for Android in IOS Style
- Run ES File Explorer. Tape on three chests at the top right Call the main menu of the application, expand the category "Tools".
- Activate the "Root Explorer" option, provide the root-right file manager.
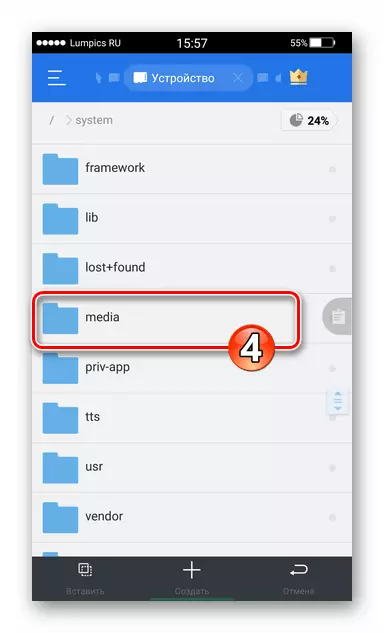
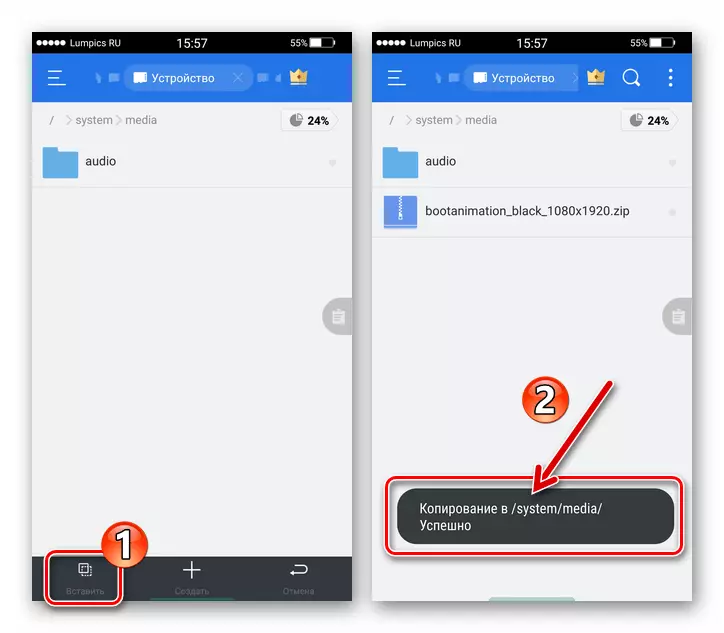
- Go along the location of the boot animation loaded into the memory of the smartphone. Long pressing the file name, select it, and then in the bottom of the panel with the tools, tap "Copy".
- Now go to the root device memory folder, open the System directory,

And then - "Media".
- Tap "Insert" at the bottom of the screen, allow the conductor to use the superuser privileges.
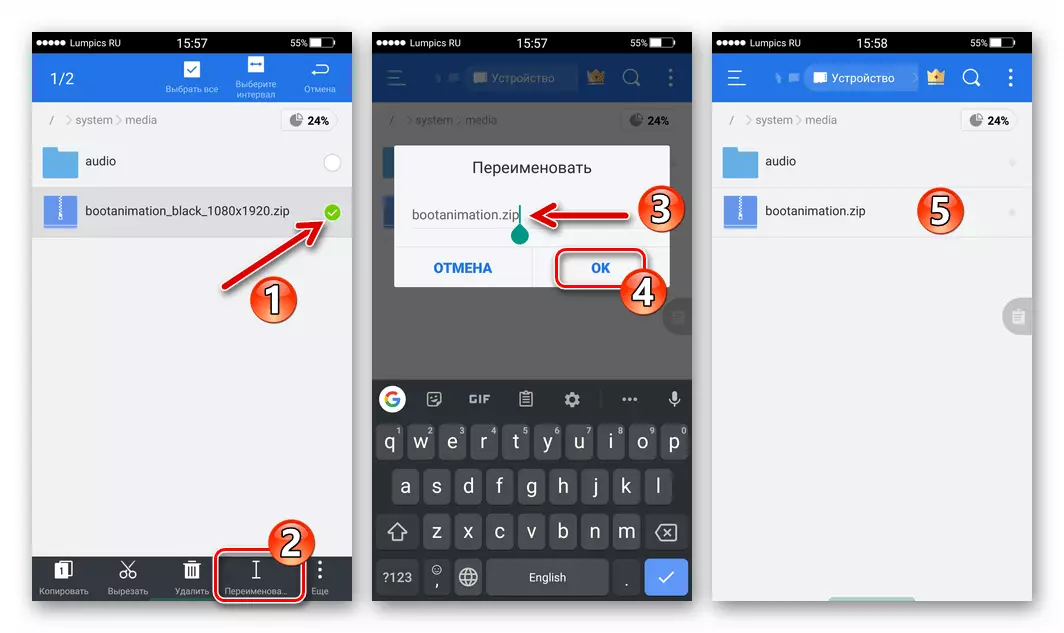
- Rename the file in the System / Media file in bootanimation.zip. . To do this, highlight it with a long press, below, select "Rename", make a new name in the appeared window and tap "OK".
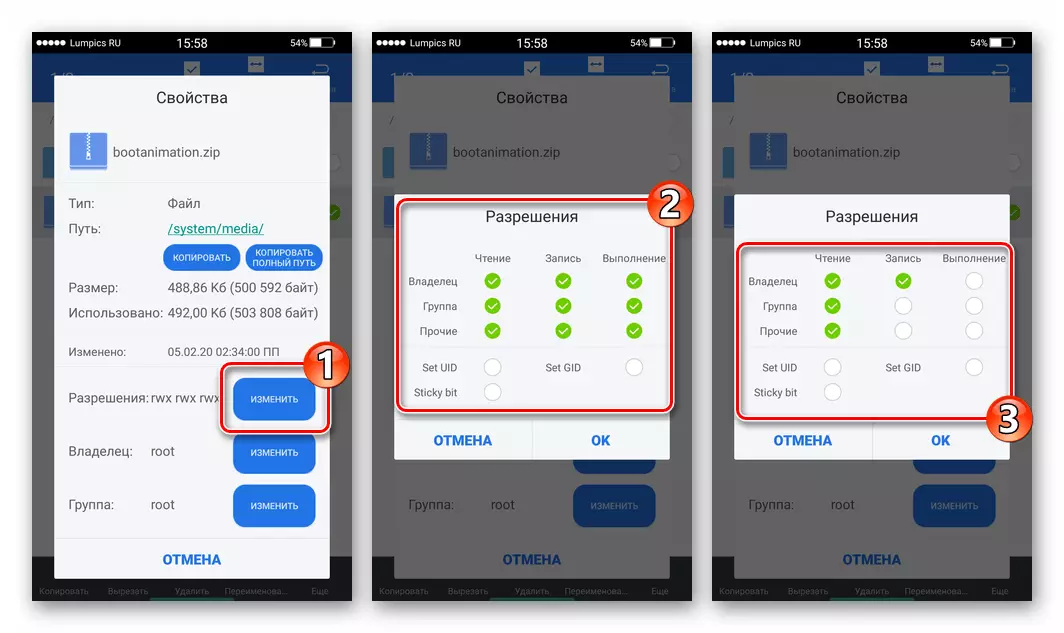
- Next, you need to change the file permissions:
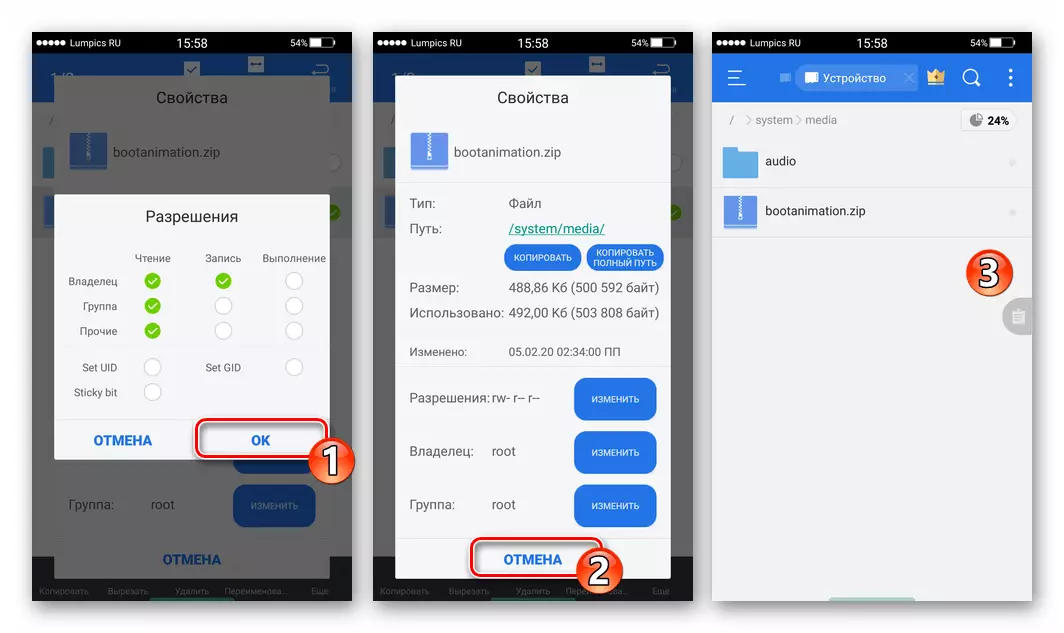
- Re-highlight the boot animation, tap "More" in the lower right corner, select "Properties" in the displayed menu.
- Click on the "Change" button to the left of the "Permissions" item in the window that opens. Next, arrange the checkboxes in checkboxes, as selected in the screenshot below (3), that is, set the resolution file according to the RW-R - R-- (0644) scheme.
- After completing the execution of the above actions, click "OK" in the options for installing permissions and "Cancel" under the list of file properties.

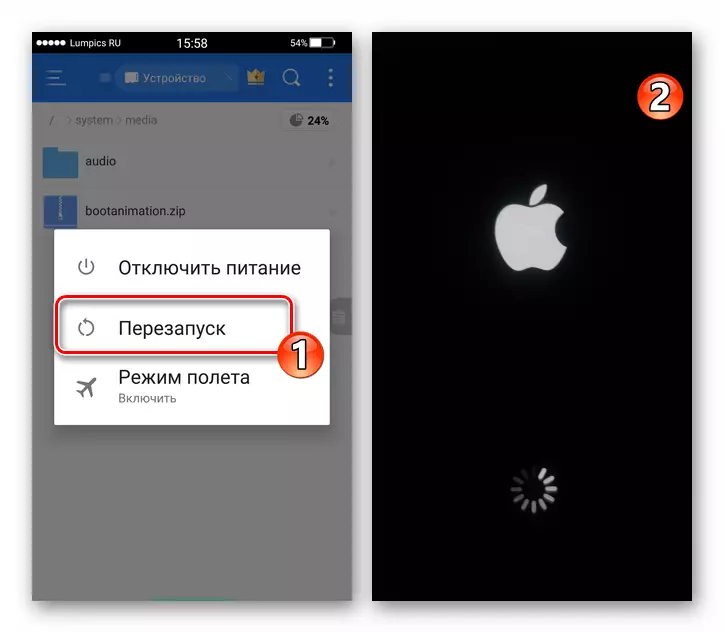
- On this, the installation operation on the Android-smartphone of the boot animated image "in the style of the iPhone" is completed. Turn off and turn on Mobile Device - When you start the operating system, you can estimate the result.
Almost all the Android interface conversion stages of the Android interface stages in order to make it as much as possible on iOS are easy to implement. If you like the design of Apple software solutions, but you are a "green robot" user - experiment, at the expense of the latter, it is quite possible to bring it to the form in accordance with your preferences.