

More on the same topic: how to reset the laptop to the factory settings
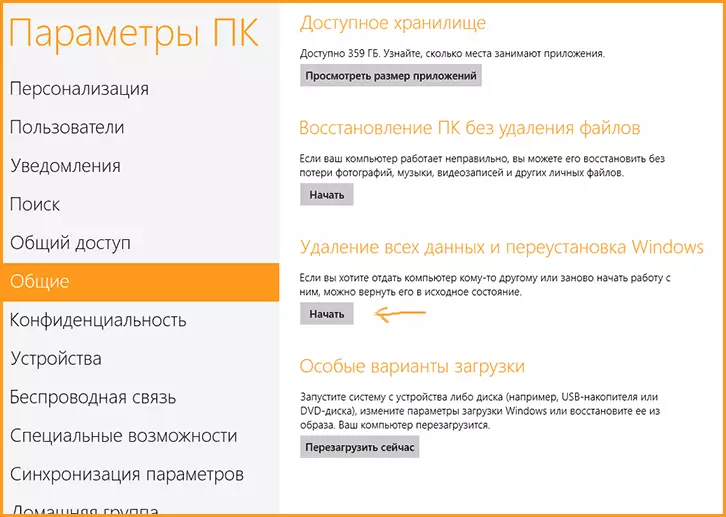
If you open the right panel Charms Bar in Windows 8, click "Parameters", and then "Changing Computer Parameters", go to the "General" parameters section and slightly scroll down, then you will find the "Delete All Data and Windows Reinstall" item. This item is written in the hint, it is advisable to use in cases where you want, for example, to sell your computer and therefore you need to bring it to the factory state, and then when you need to reinstall Windows - it is likely to be more convenient, What to mess with disks and loading flash drives.
When resetting the computer, it is thus using an image of a system recorded by a computer or laptop manufacturer and containing all the necessary drivers, as well as completely unnecessary programs and utilities. This is if you purchased a computer with pre-installed Windows 8. If you installed Windows 8 yourself, there is no such image on the computer (when you try to restore the computer, you will be asked to insert distributional), but you can create it to always be able to produce System Restore. And now about how to do this, as well as, why it can be useful to recover a custom recovery image to that laptop or computer, where there is already an image installed by the manufacturer.
Why do you need a custom restoration image of Windows 8
A little about why it can be useful:- For those who installed Windows 8 on their own - after you have come up with a certain time with the drivers, installed the most necessary programs for themselves, which are set every time, codecs, archivers and everything else - it's time to create a custom recovery image to the next time Not to suffer with the same procedure re-and be able to always (except the damage to the hard disk) quickly return to themselves clean Windows 8 with everything you need.
- For those who purchased a computer with Windows 8 - most likely, one of the first things you do, buying a laptop or PC with pre-installed Windows 8 - Methodically remove half of the unnecessary software from it, such as various panels in the browser, trial antiviruses and Other. After that, I suspect, you also set some of the constable programs. Why not record your recovery image so that at any time it is not for the factory settings at any time (although such an opportunity will remain), namely, to the state you need?
I hope I could convince you of expediency of having a custom recovery image, besides, it does not require any special work - just enter the team and wait a bit.
How to make a recovery image
In order to make the image of Windows 8 recovery (naturally, it is worth it only from a clean and stable system, in which there is only what you really need - the image of Windows 8, installed programs and system files, such as drivers, . Applications will not be saved for the new Windows 8 interface, your files and settings), press the Win + X keys and select the "Command Line (Administrator)" menu. After that, in the command prompt, enter the following command (the folder is specified on the way, and not any file):
RECIMG / CREATEIMAGE C: \ Any_PUB

Upon completion of the program, the system image will be created in the specified folder, and, in addition, it will automatically be installed as the default recovery image - i.e. Now, when you decide to use the computer reset functions in Windows 8, this image will be used.
Creating and switching between multiple images
In Windows 8, it is possible to create more than one image to restore. To create a new image, simply use the above command again by specifying another path to the image. As already mentioned, the new image will be installed as the default image. If you need to change the system image used by default, use the commandRECIMG / SETCURRENT C: \ Drawing folderAnd the next team will allow you to find out which of the images is current:
Recimg / ShowcurrentIn cases where you need to return the use of a recovery image, which was recorded by the computer manufacturer, use the following command:
recimg / deregisterThis command disables the use of a custom recovery image and, if on a laptop or PC there is a manufacturer restore partition, then it will automatically be used when restoring the computer. If there is no such partition, then when you reset the computer, you will be prompted to provide it with a flash drive or disk with Windows installation files 8. In addition, Windows will return to the use of standard recovery images if you delete all custom image files.
Using a graphical interface to create recovery images
In addition to using the command line to create images, you can also use the free RecimgManager program, which can be downloaded here.
The program itself performs the same thing that has just been described and exactly the same way, i.e. In essence, it is a graphical interface for recimg.exe. In Recimg Manager, you can create and select the Windows 8 recovery image used, as well as run the system recovery without going into Windows 8 parameters.
Just in case, I note that I do not recommend creating images simply so that there are - but only if the system is clean and there is nothing superfluous. For example, I would not store installed games in the recovery image.