Preliminary work
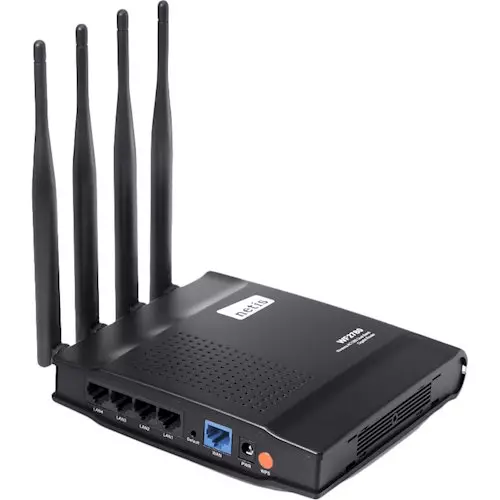
It is worth starting with the fact that the Netis WF2780 router itself needs to be connected to a computer if it has just been purchased and not even unpacked. Try to take into account the cable length from the provider, as well as the network wire that comes in the kit if you connect the router to the computer over the local network. Use the following instructions to independently cope with the connection process without any difficulties.
Read more: Connecting a router to a computer
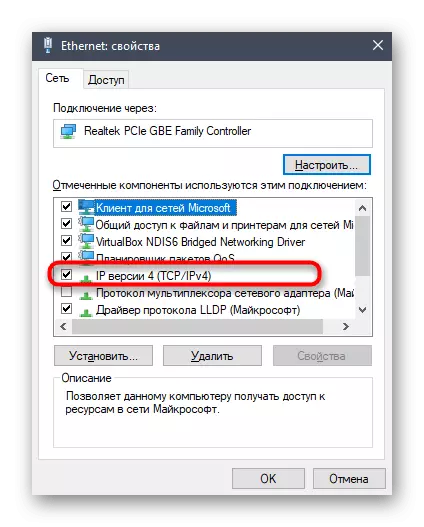
After the router is detected by a computer or at least ready to configure, you will need to perform another important effect on the PC itself before switching to the Netis WF2780 web interface. You need to enable automatic parameters for getting an IP address and DNS servers so that when configuring protocols from the provider does not arise conflict situations. Read more about this in the article by reference below.
Read more: Windows network settings
Authorization in the Internet Center
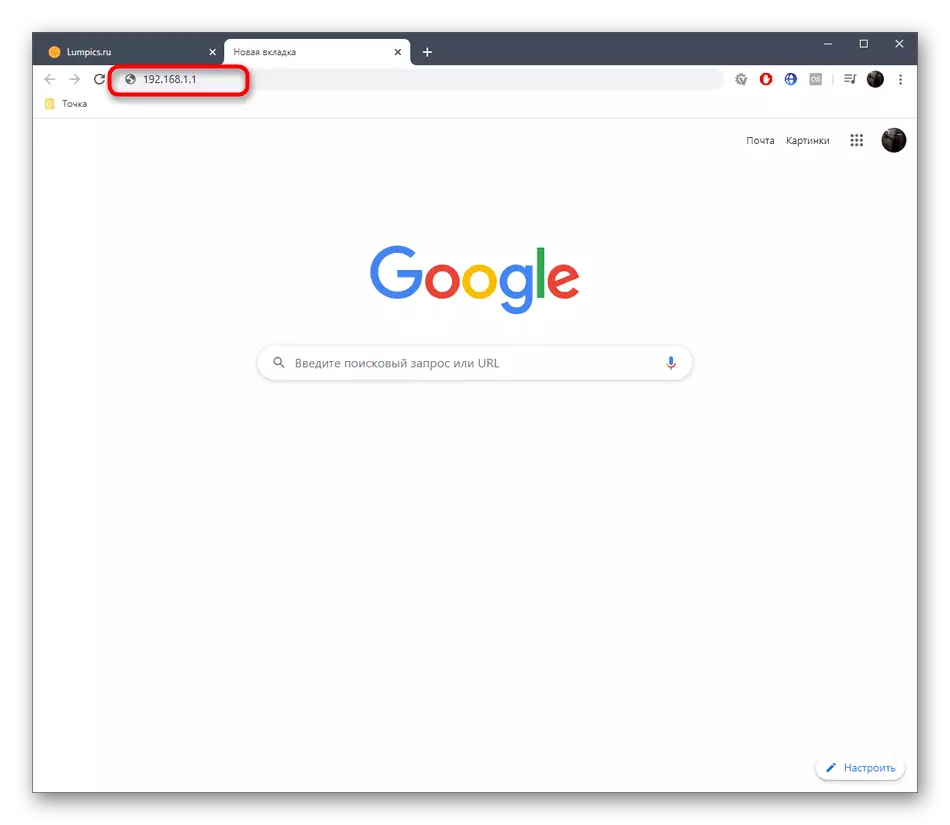
Netis has one feature associated with the use of non-standard passwords to enter the web interface, because of which many users have difficulties in the first authorization. However, the password and login itself are always indicated on the router's sticker or brand box. Additionally, you can use third-party sites that will help find relevant information. You can get acquainted with all ways in another article on our website.
Read more: Definition of login and password to enter the web interface of the router
Fast setting
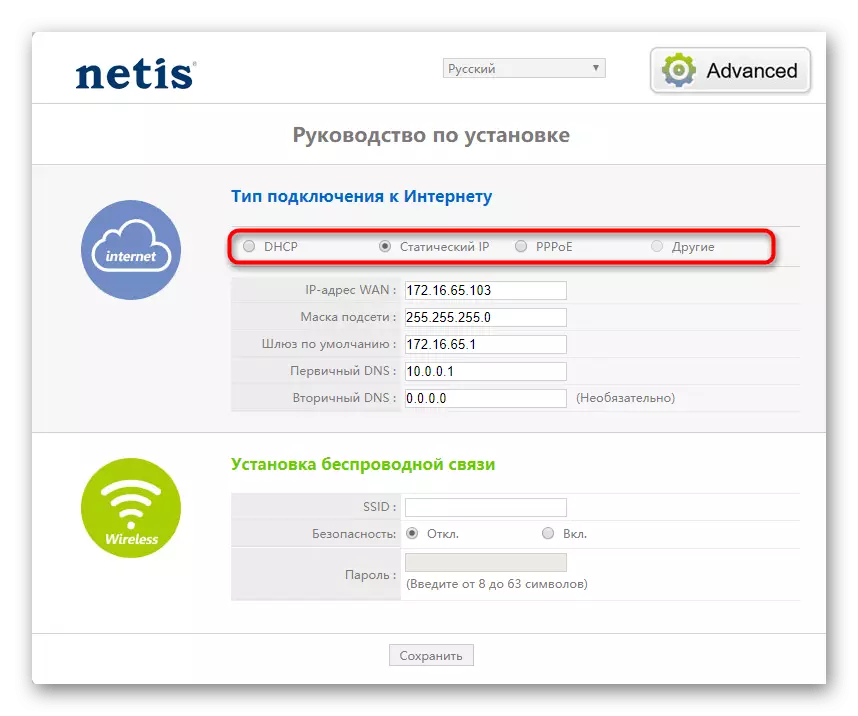
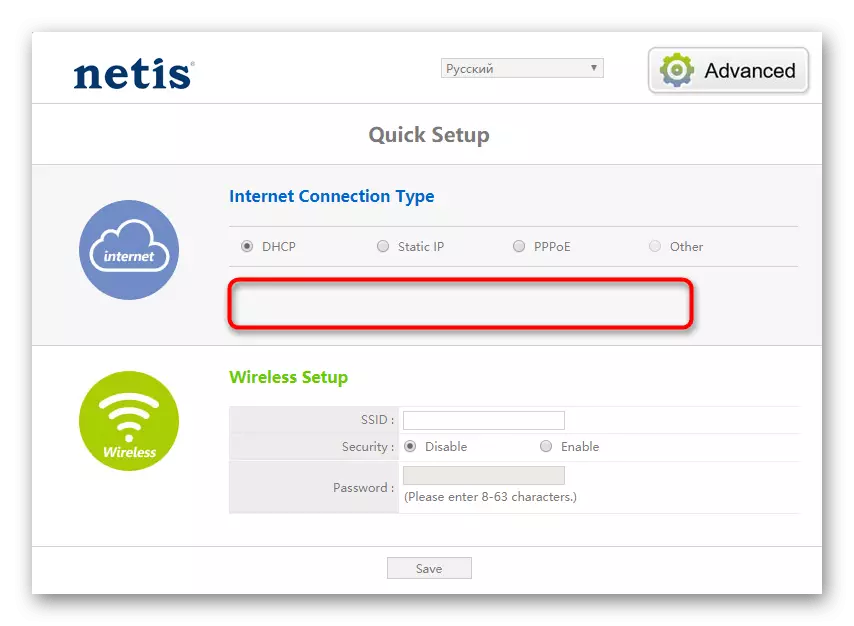
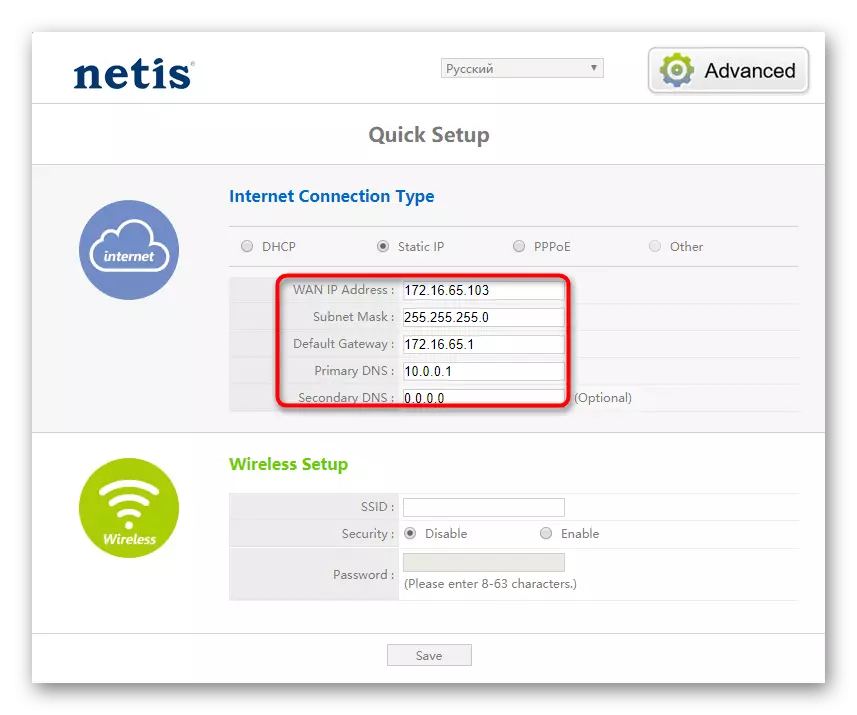
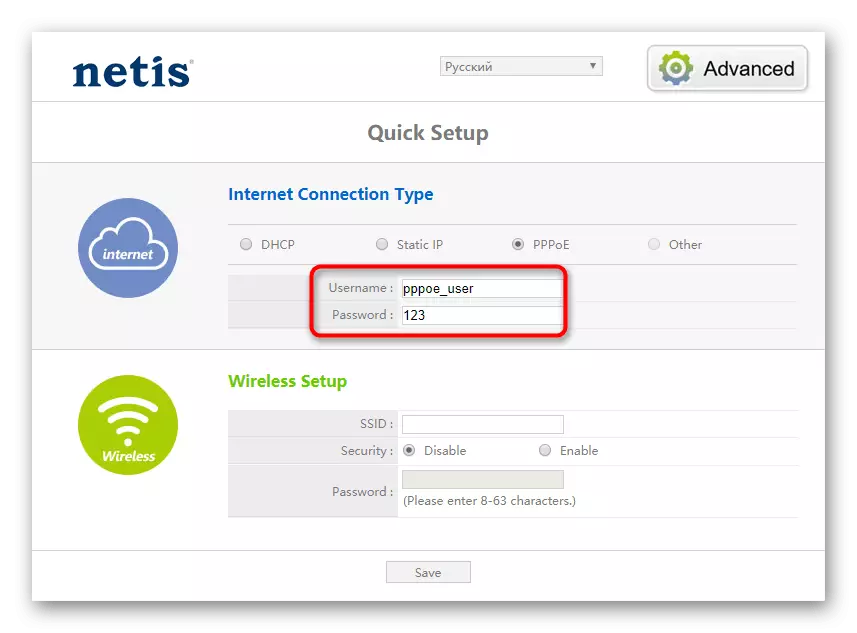
If you want to set only the basic router parameters required for correct Internet access via wired connection or Wi-Fi, select the fast mode that is available in the Netis WF2780 web interface. Then the full configuration process will look like this:
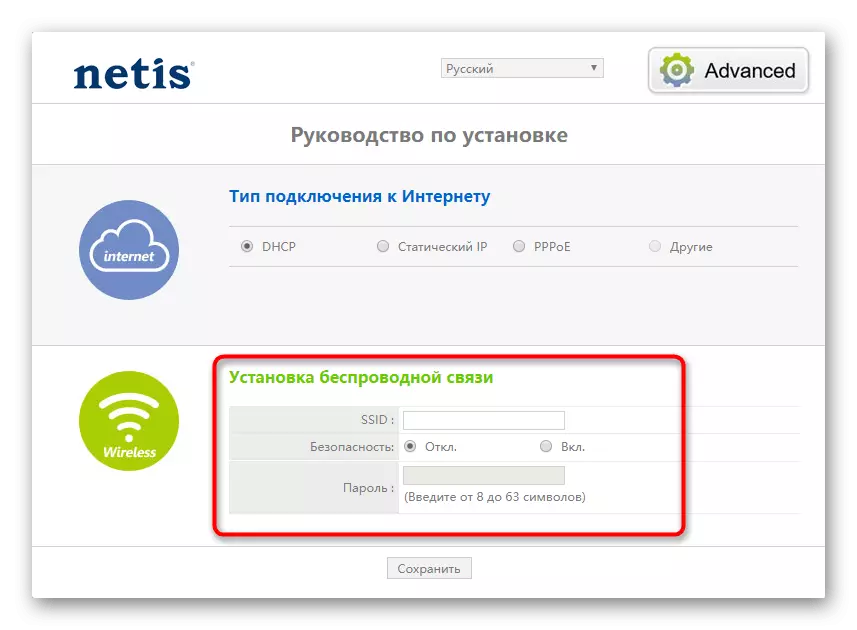
- After successful authorization, expand the drop-down menu and select the optimal interface language.
- Under the inscription "Type of Internet Connection". Mark the protocol that provides you with the provider. This information is usually indicated in the tariff plan or in the contract with the instructions from the Internet service provider. If you failed to find it, use the company's technical support to clarify the details.
- If a dynamic IP address was selected, it is not necessary to configure it, since all parameters will be obtained automatically.
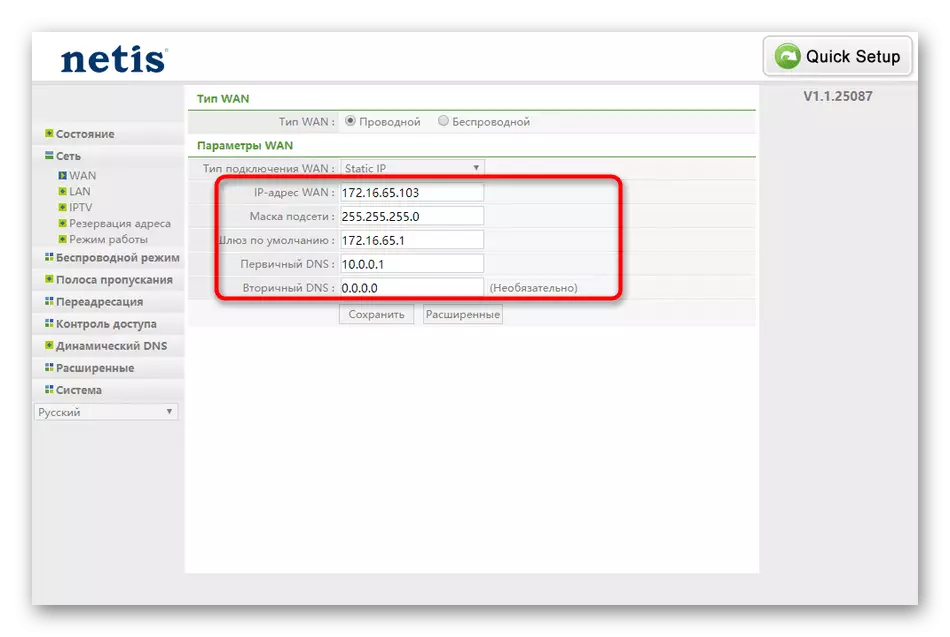
- In the case of static IP, the address, subnet mask and DNS server are entered. This information should inform the user to the Provider or leave printed instructions with all data.
- When using PPPoE popular in the Russian Federation, you need to enter only login and password received from the Internet service provider to establish a connection.
- After setting up the Internet connection type, go below and activate the Wireless Access Point. Set the name for it and set the password consisting of a minimum of eight characters.
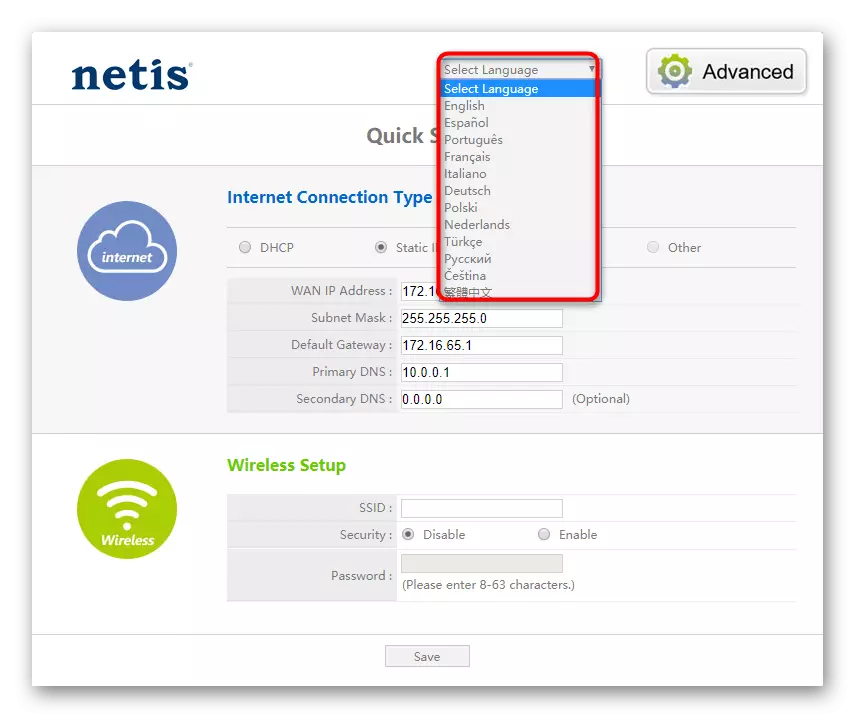
After save all the changes and send a router to reboot so that they come into force. Wait for full on and go to the network check. If it is missing, it means that the settings were set correctly or the signal from the provider for some reason does not come. Check the configuration, and if necessary, contact the company and check if you have already access to the Internet.
Manual configuration Netis WF2780
The Netis WF2780 Internet center has a huge number of various parameters that allow you to create a flexible configuration. It is recommended to resort to them to those users who need to set other settings or the use of the master described above is not possible.Step 1: Network Parameters
Starting everything from the same network connection properties to the Internet, if the quick setup option is not suitable. You still have to refer to the previous instructions, because it is there that we tell what values for each protocol will need to choose.
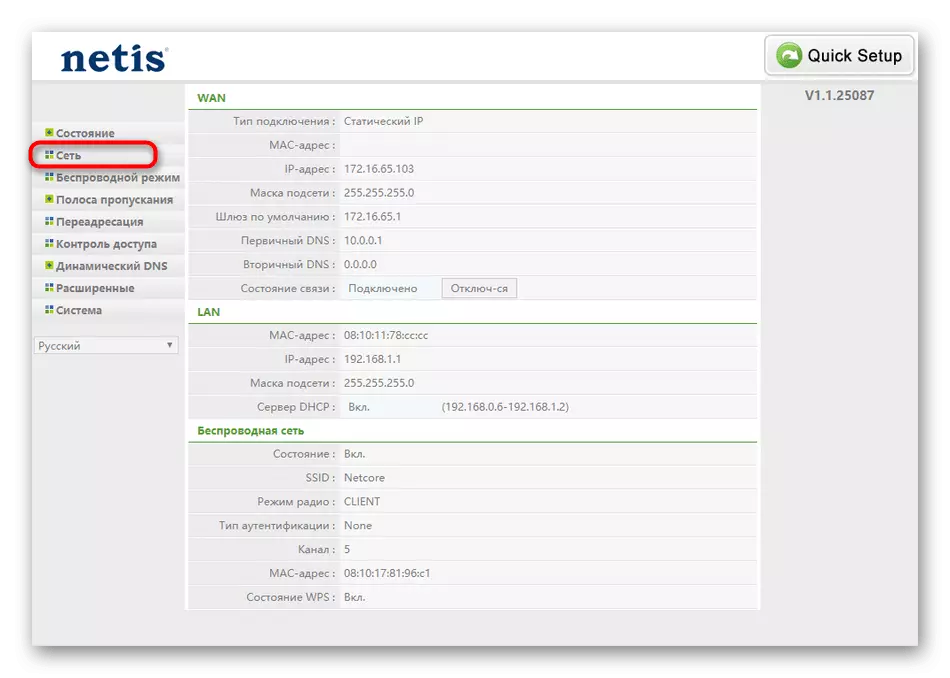
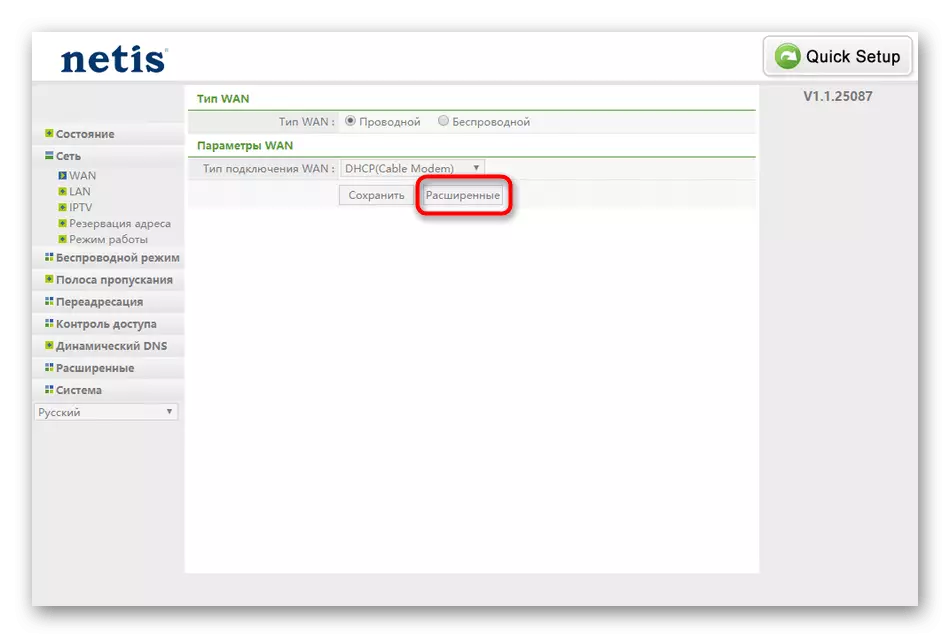
- To start through the left menu of the Advanced section, go to the "Network" category.
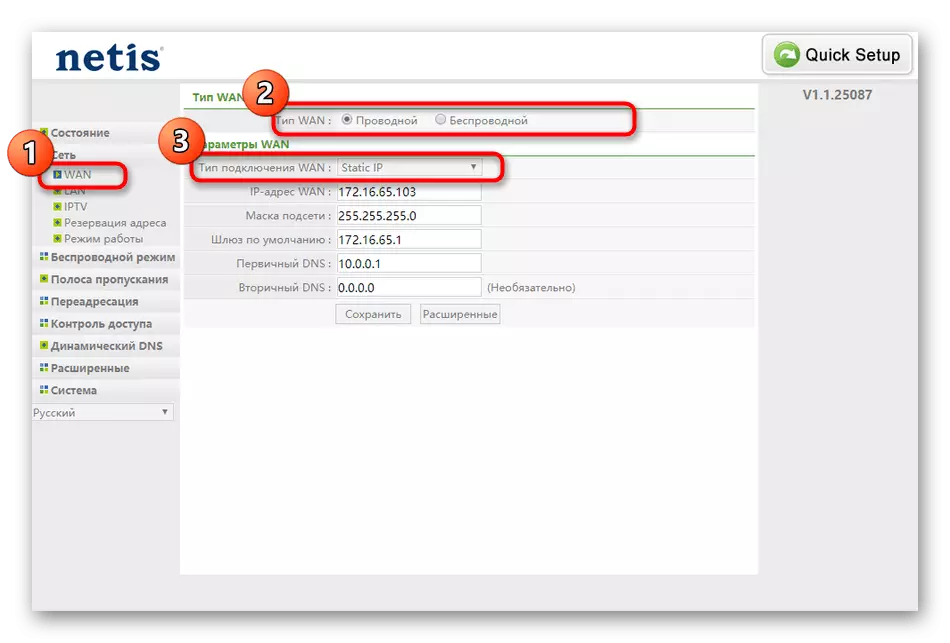
- There you are interested in "WAN", where, first of all, you need to select a wired connection type and in the drop-down menu, specify the protocol for receiving the Internet.
- The protocol itself is configured below in the displayed fields by the same principle we have spoken about.
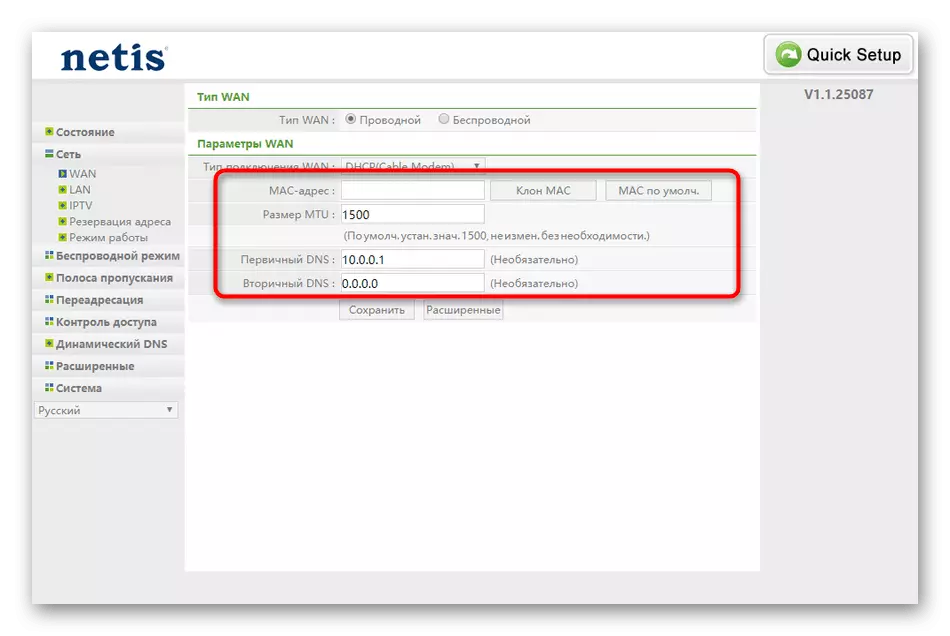
- DHCP holders (dynamic IP) can be processed into advanced settings.
- There is a tool that allows you to clone the MAC address of the computer and manually change the DNS if required. Do not change server addresses just as it can reflect on access to specific sites.
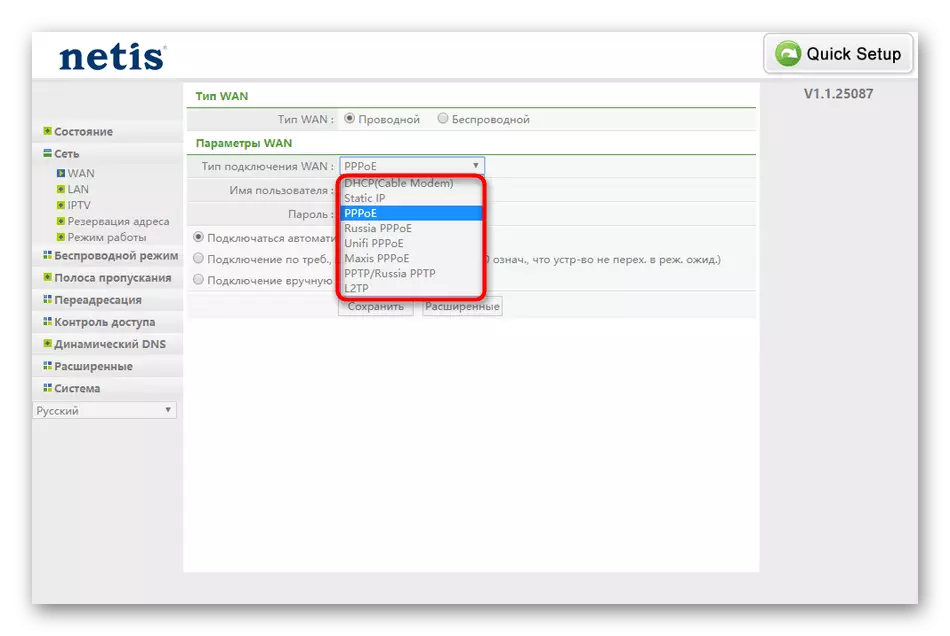
- If necessary, select PPPOE Use the specified drop-down list.
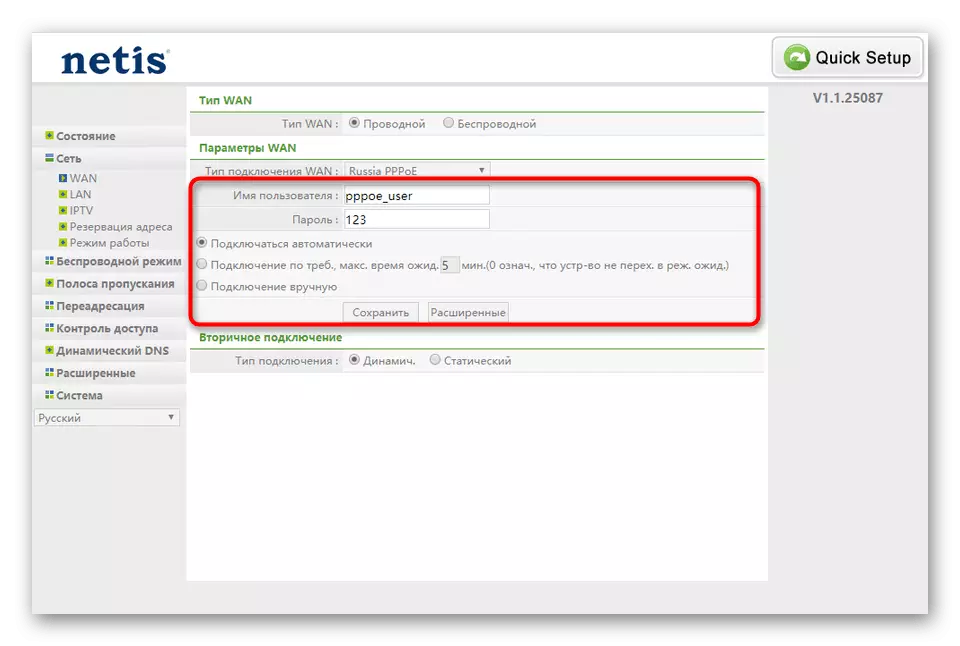
- After that, simply enter the username and password, which was obtained when making a contract with the provider. Mark the "Connect Automatically" to the marker, if you want, after each reboot, the router independently entered the network without the need to re-enter password.
After making changes to wired connection, immediately go to the Internet access check by opening any site of interest. If it does not open - properties are incorrect, the cable or provider is not connected yet provided access to the network.
Step 2: LAN Parameters
Some users prefer to use Wi-Fi without connecting the NETIS WF2780 router with a network cable computer. Then the local network setting is not needed and this step can be simply skipped.
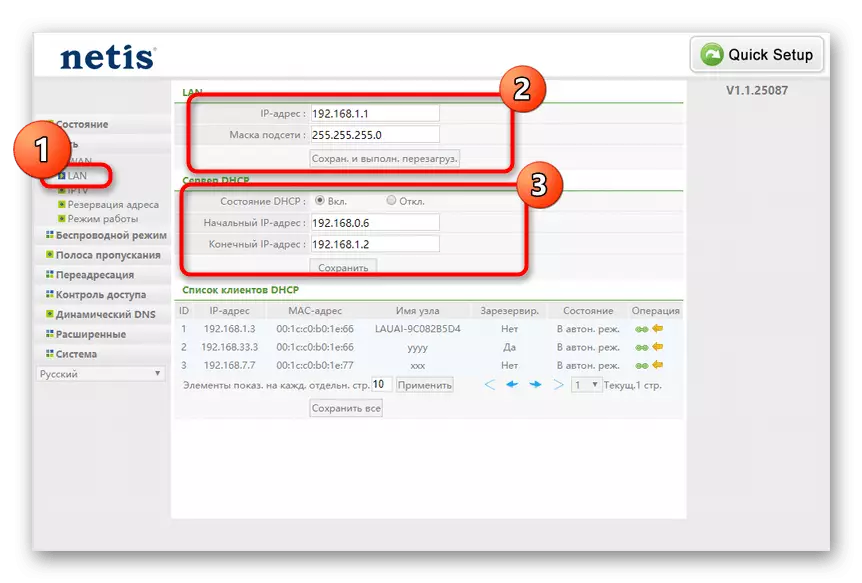
- If you are confident that more than one device will be connected to the LAN router, check the standard parameters by going to the LAN category. There should be an IP address 192.168.1.1 and have a subnet mask 255.255.255.0. Make sure the DHCP is in an active state and the range of IP addresses does not hide the previously indicated 192.168.1.1.
- The local network includes IPTV. Include this option follows when the router is connected to a TV with a Smart TV or a special console that allows you to view TV via the Internet. Select the appropriate device instructions Mode, set additional parameters and assign the LAN port to be used exclusively for IPTV, and access to the usual Internet from a computer will not be able to receive through it.
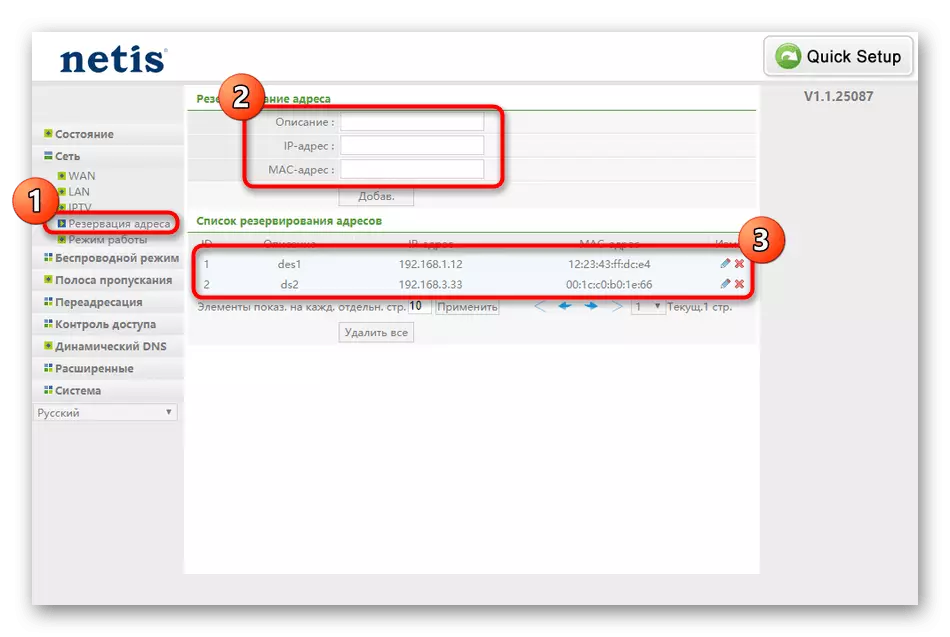
- If you need to further configure the security and access control rules for a particular IP address of the local network, it is recommended to reserve a permanent number for it by specifying the MAC address of the device through a special setting section. The list of added equipment is displayed at the bottom.
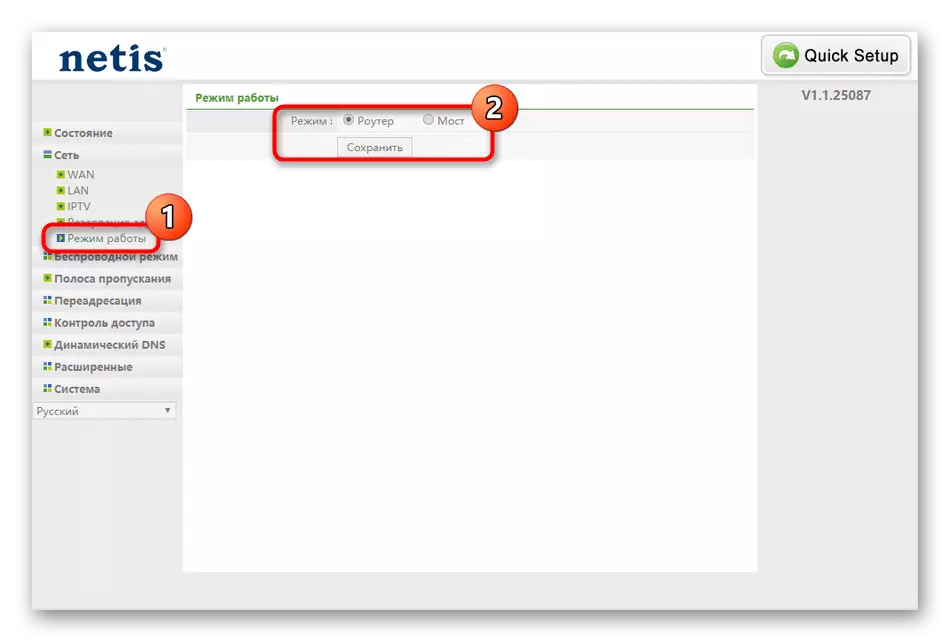
- Finally, it remains only to make sure that the router mode is in the "Router" state, as it is necessary for the correct access to the network.

Step 3: Wi-Fi
In the quick setting wizard for Wi-Fi, you can only set the name and password, which is not always suited by users. Then you will have to resort to a full version of the web interface, where you have to find these parameters.
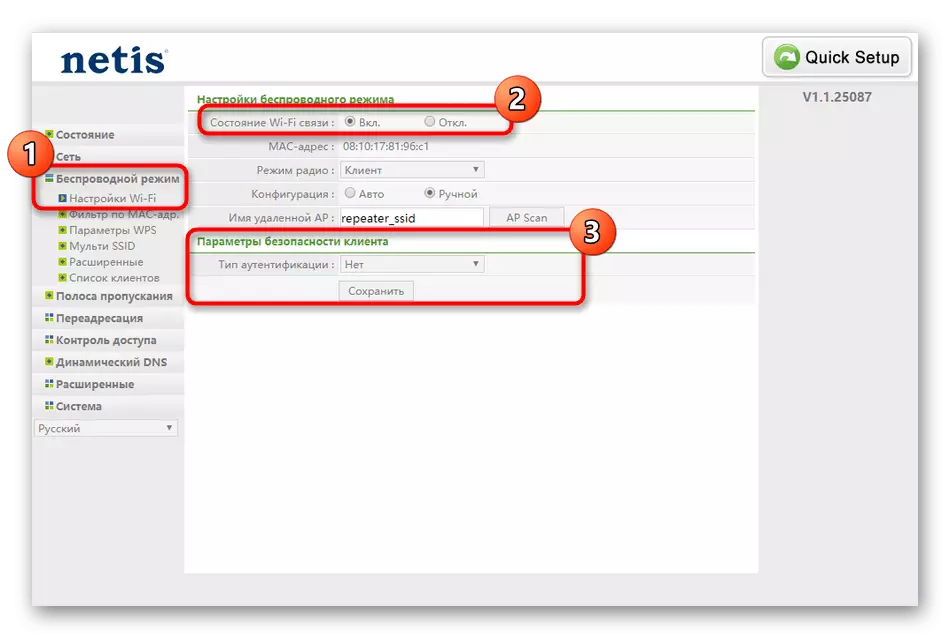
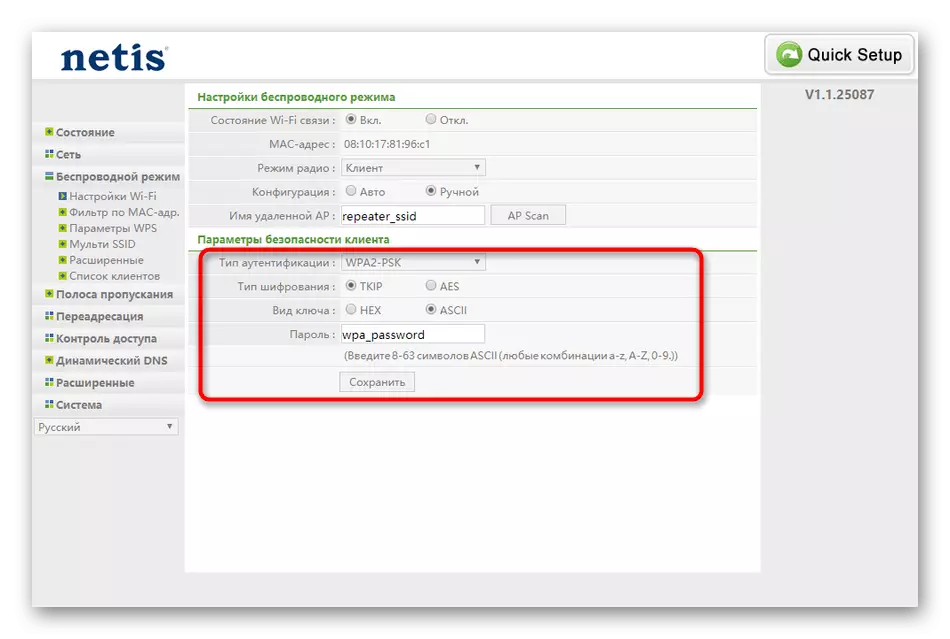
- Through the "Wireless Mode" section, open the "Wi-Fi Settings". Here, make sure that the access point is in active mode or turn it off at all if it is not needed. Pay attention to the type of authentication. You can select the recommended protection protocol and come up with a password or leave the network open, but then access to it will be from any user.
- If you choose the type of authentication, it is better to install WPA2-PSK, since this is the newest and reliable encryption protocol. It is not necessary to change the type or key, so it remains only to enter a password.
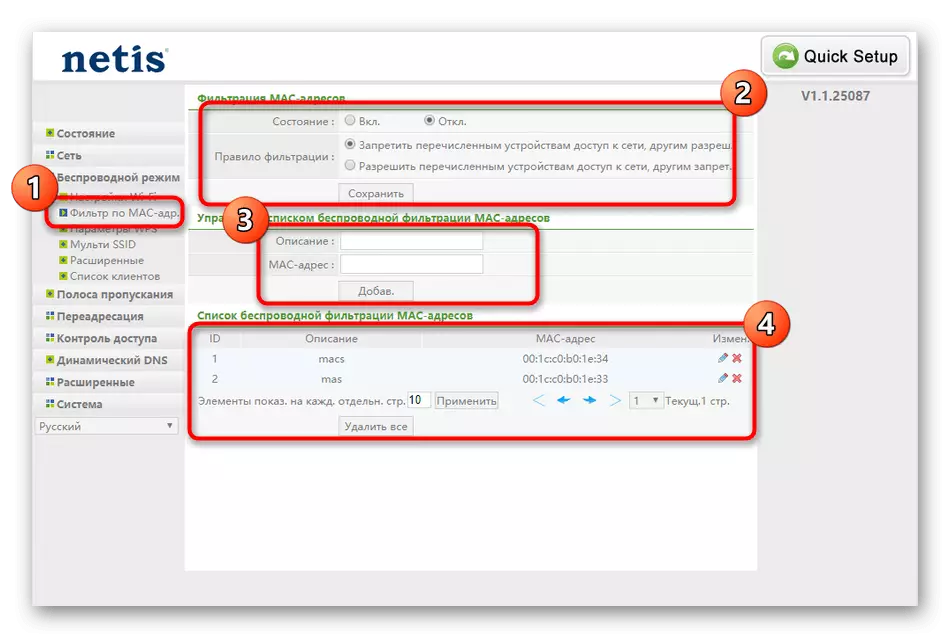
- In the wireless network settings there is a category "Filter by MAC addresses". Here you can choose whether it is necessary to limit access to some kind of devices to Wi-Fi or to prohibit all incoming connections in addition to the specified. Such an implementation will allow you to leave the network open, but at the same time make it open only for home computers and mobile devices, placing them in a separate table. The rest of the clients will simply be able to connect simply if their physical address is absent in the table.
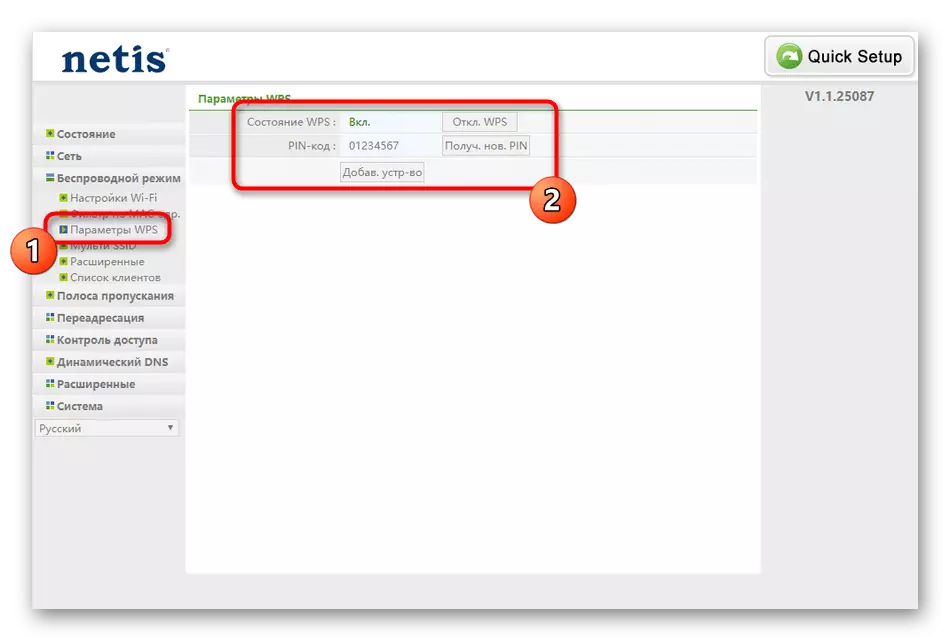
- Fast connection to Wi-Fi is possible thanks to WPS technology. In the appropriate menu, you can activate and enter an additional PIN if you want. Here is the addition of equipment by pressing only one button.
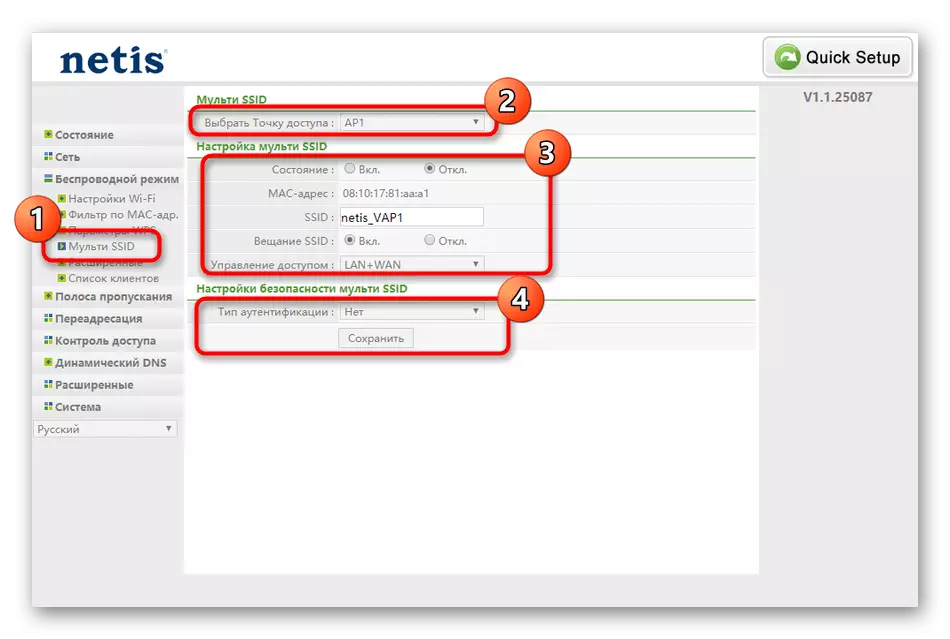
- Move to the "Multi SSID" category to configure the guest point. For it, individual parameters are specified, including the name and type of authentication.
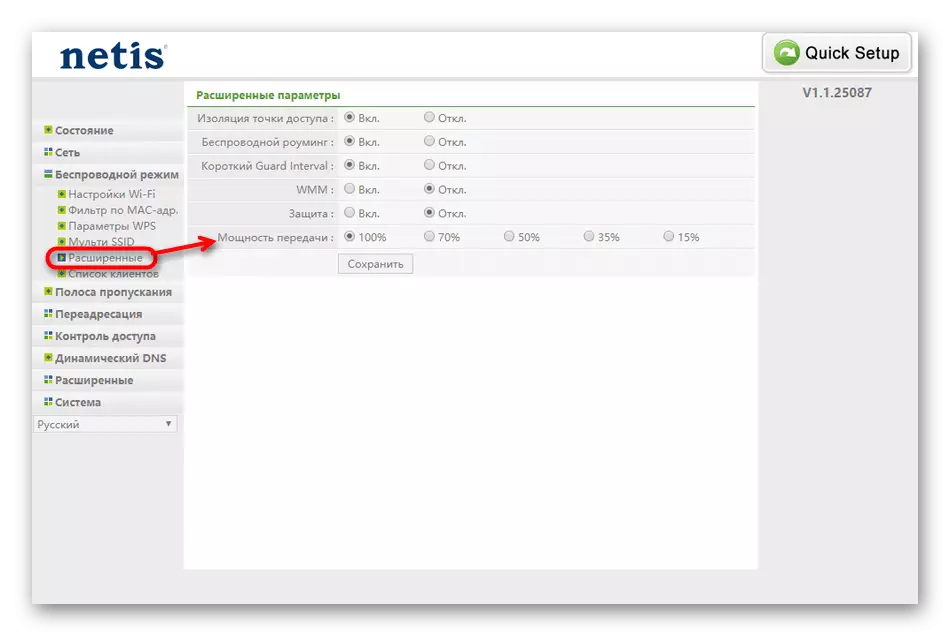
- In extended options, only the transmission power should be changed by setting the value to the maximum. The remaining parameters are intended for experienced users and are configured extremely rarely.
Step 4: Advanced Settings
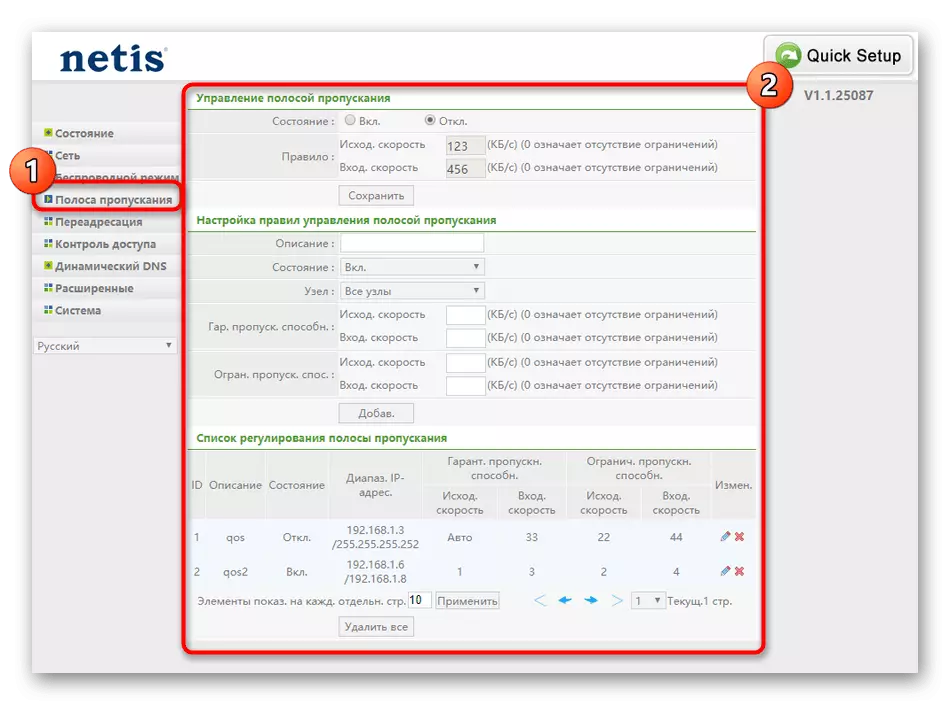
In the web interface of the Netis WF2780 router there are a number of parameters that I would like to allocate in a separate step, since the appeal to them is rare. The first is called "bandwidth". Here the user can configure the speed of the incoming and outgoing signal for certain devices on the schedule, thereby setting the restrictions. Such regulation will help correctly distribute the speed of the Internet between all connected devices, if you need to give a certain priority. In the default state, the speed is distributed evenly.
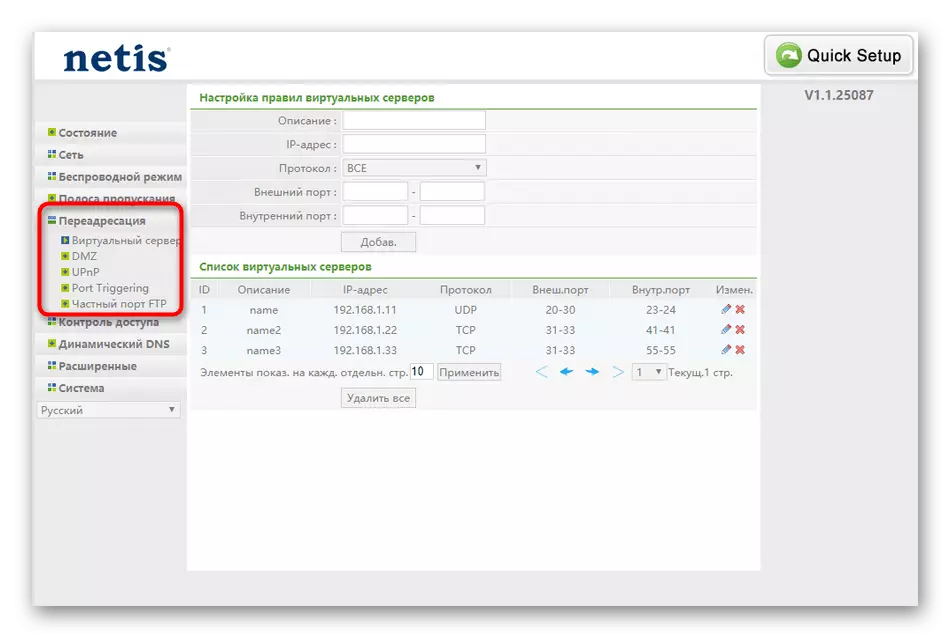
Virtual server owners will be able to configure the demilitarized zone, the FTP server and other parameters in the "Forwarding" section. There is nothing to do here to the usual yowser, and the points are not recommended to change, as this may affect the overall network overall.
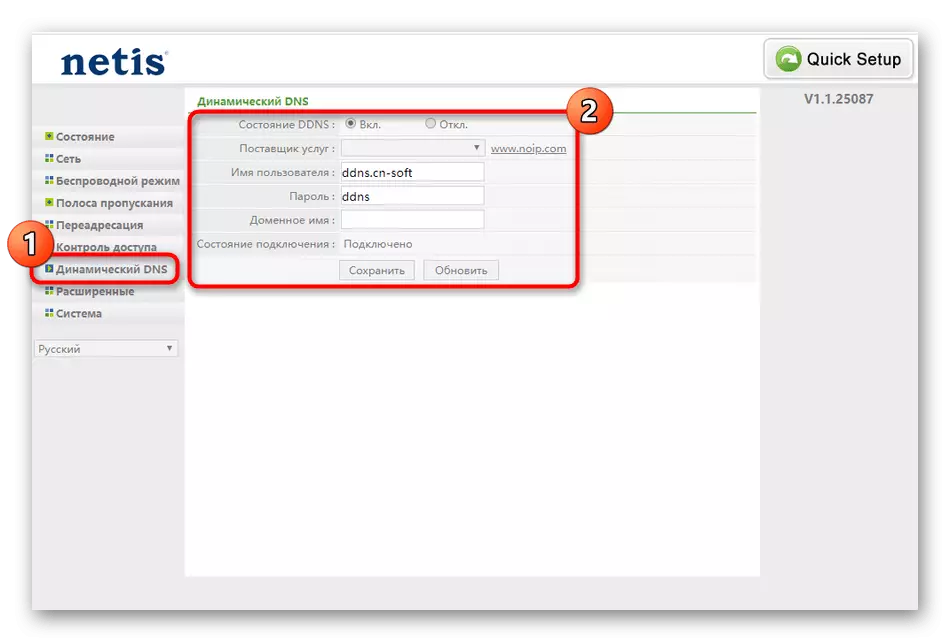
The last item of additional settings "Dynamic DNS". In the web interface, it connects if the profile on a special site provides the DDNS services in advance. After that, the account data is entered in the Internet center and the router is assigned a new address. Most often, the connection of such a service is necessary to obtain remote access to the router settings, read more details.
Read more: Setting the remote connection to the router via the Internet
Step 5: Security Settings
In almost every web interface of any router there are at least several parameters responsible for safety. In Netis WF2780, such items are also there, and some users will need to be changed:
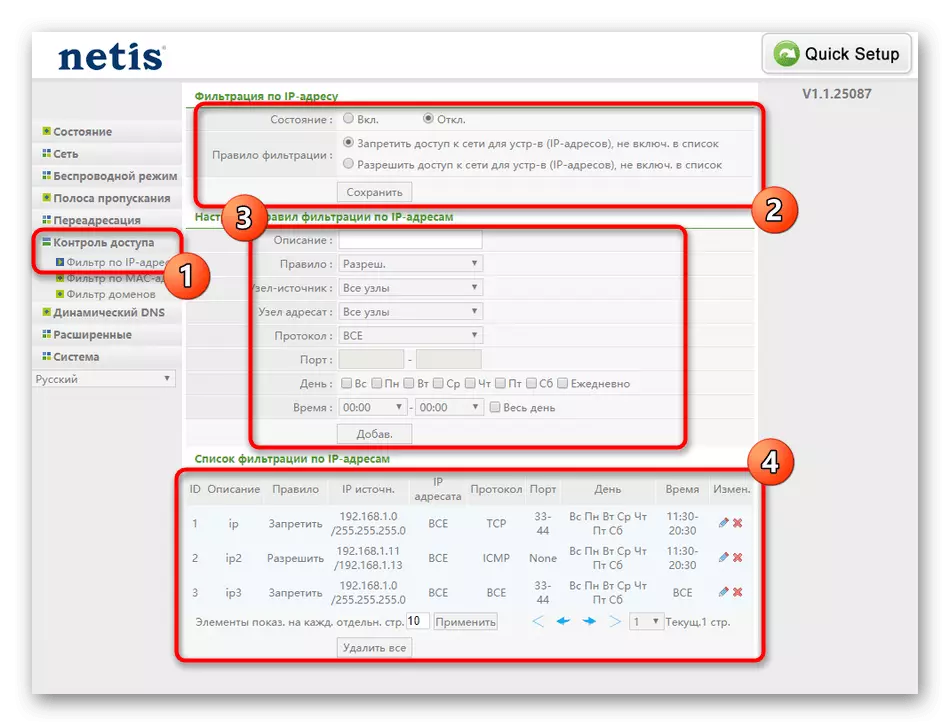
- Through the left menu, move to "Access Control". Here the first category is called "Filter by IP addresses." Activate this rule and set the behavior for it, if there is a challenge in blocking or passing certain sources to their Internet addresses. Specify the schedule and ports, if required. The list of all clients is displayed in the table below.
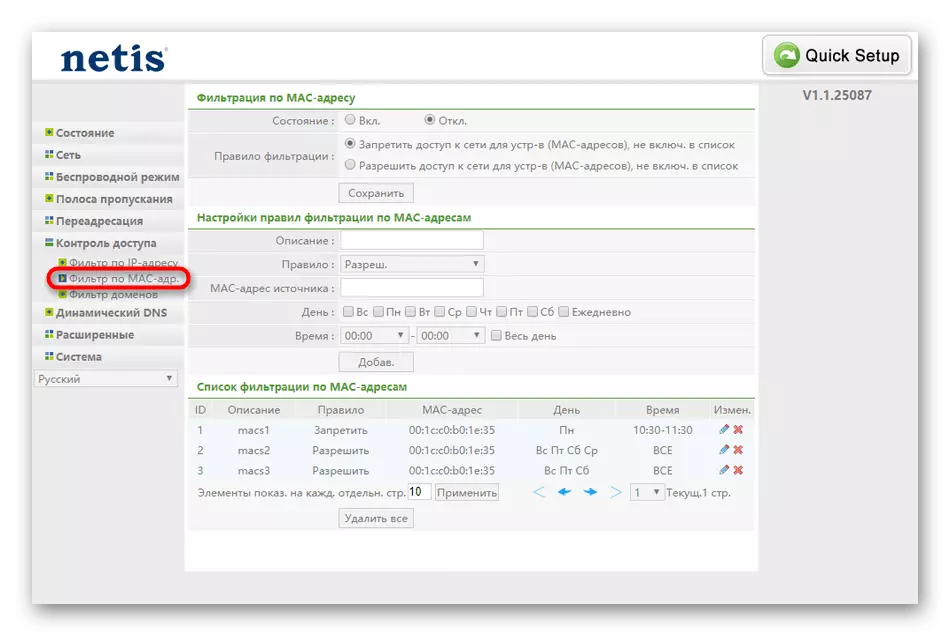
- Next comes "Filter by MAC addresses". By its implementation, this menu is similar to the previous one, only instead of the IP here indicates the physical address of the equipment that you want to block or for which you want to open access.
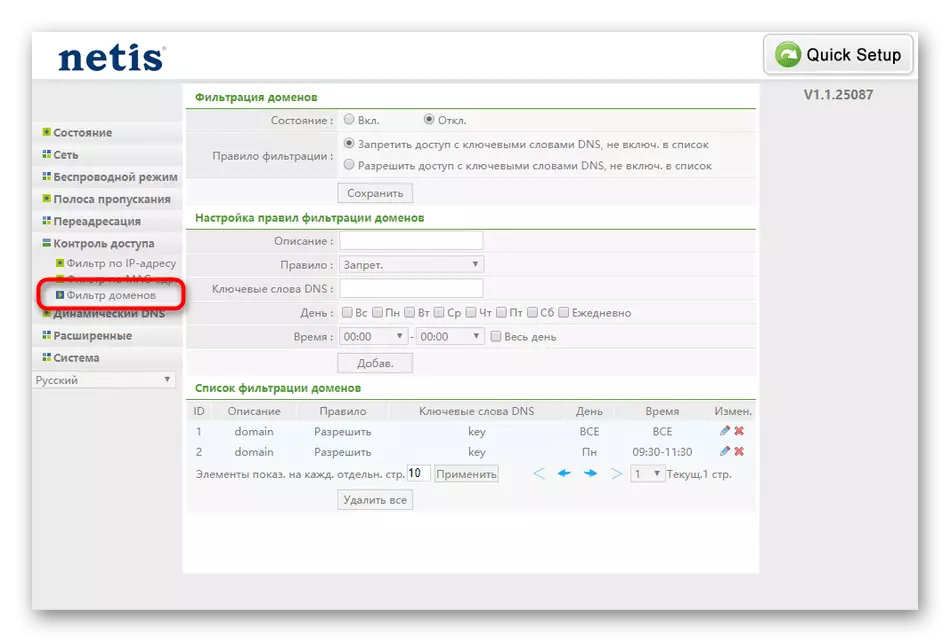
- The last item is "Domain Filter", which is essentially an analogue of parental control. Here you create a list of sites by keywords or full addresses, access to which you need to completely stop or allow only on schedule. All rules entered will be displayed in the table just as in the two previous points.
When making any change, do not forget to click on the "Save" button to apply new settings, otherwise they will assemble immediately after switching to another menu of the Internet center.
Step 6: System Parameters
The final stage of configuration Netis WF2780 is viewing system parameters. Some of them need to be changed right now, and others will have to appeal in the future.
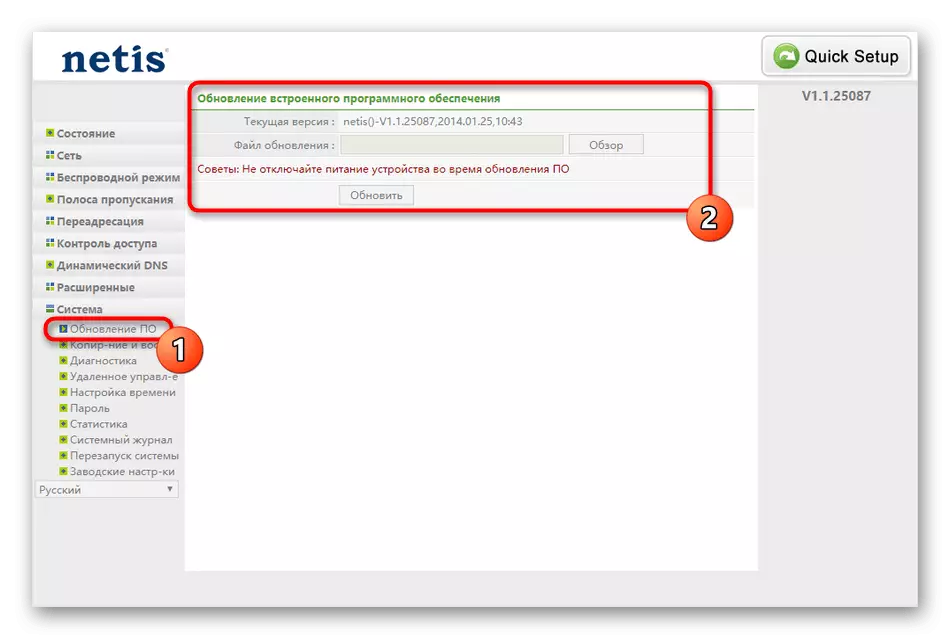
- To begin with, expand the System section and open the first category "software update". If once for the router model used on the official site, a new firmware file will be released, it must be downloaded through this menu to update the configuration.
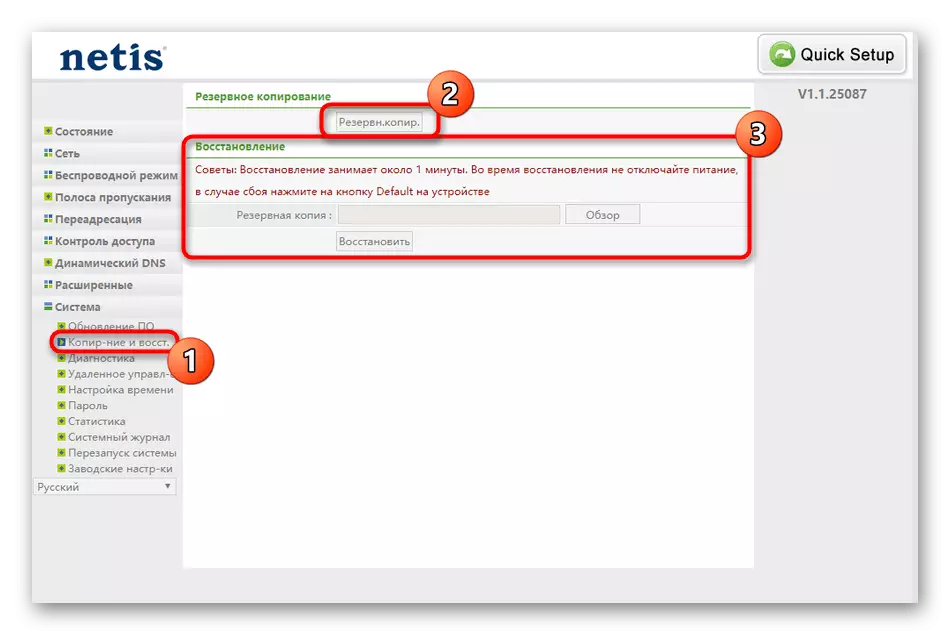
- Next, move to "Backup". This section is especially relevant for those who changed many different access control settings. By pressing only one button, you can download the router settings file and save it on a local or removable storage. If necessary, restoring the configuration occurs through the same menu by downloading the same file.
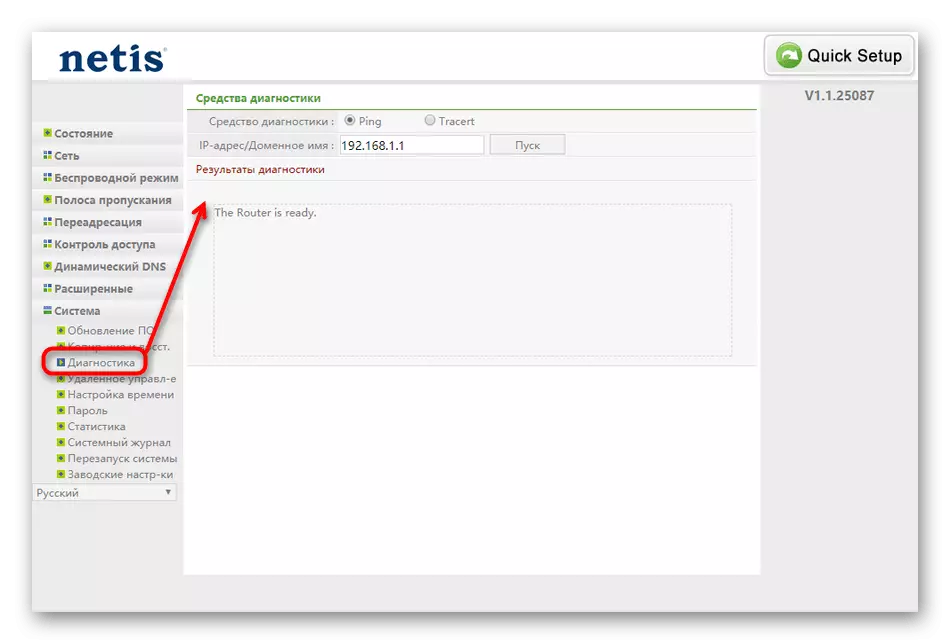
- To verify packet transmission over a specific IP address or site, the Diagnostics tool is used. Here you only follow the purpose and check the stability of the network.
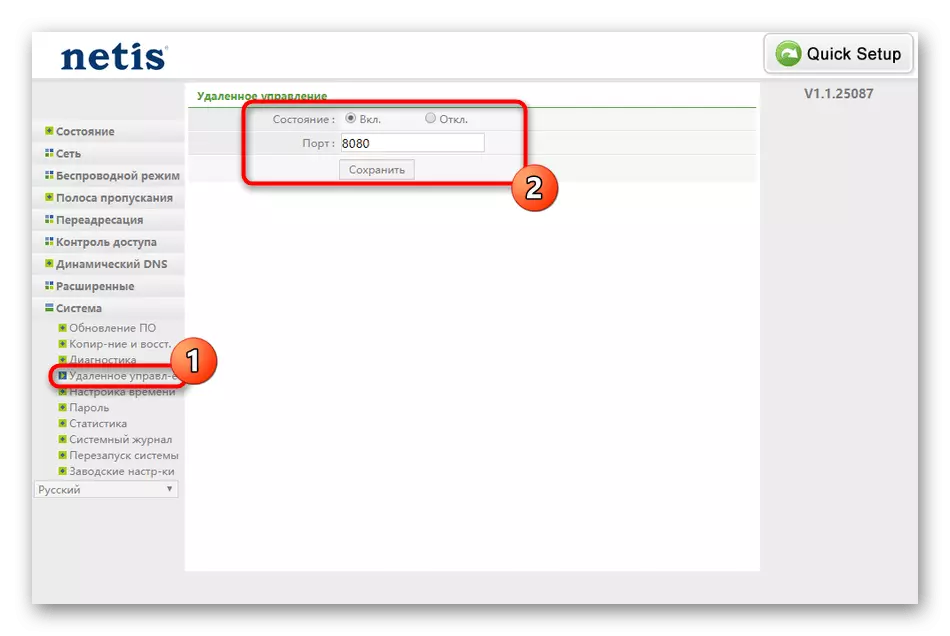
- We have already mentioned the remote control of the router. If the static IP service is connected, the DDNS service is not necessary, instead you can simply enable access through the Remote Control menu.
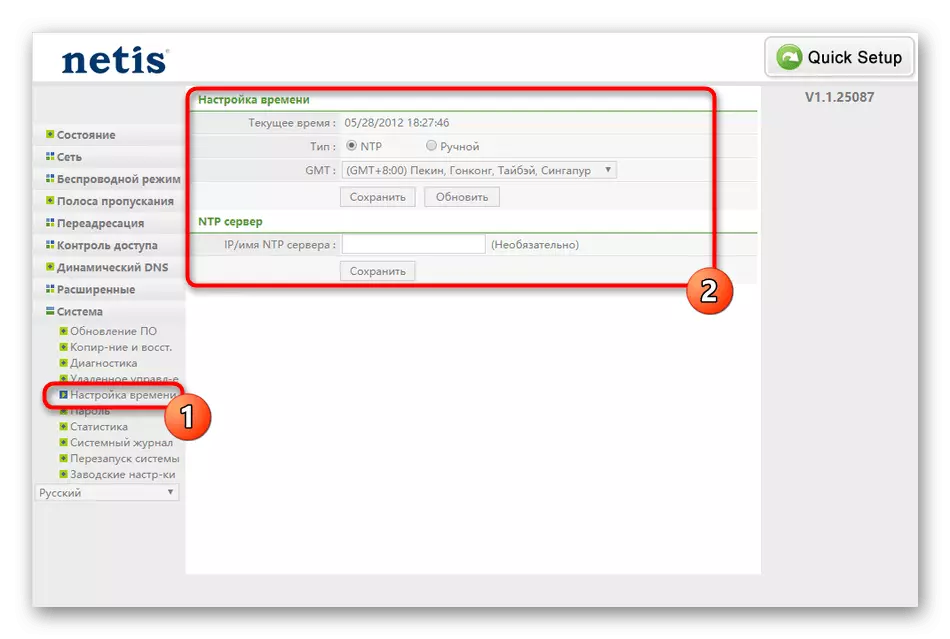
- Earn system time in the case when a schedule was specified for security rules. There will be needed to specify the right time and the date to work correctly.
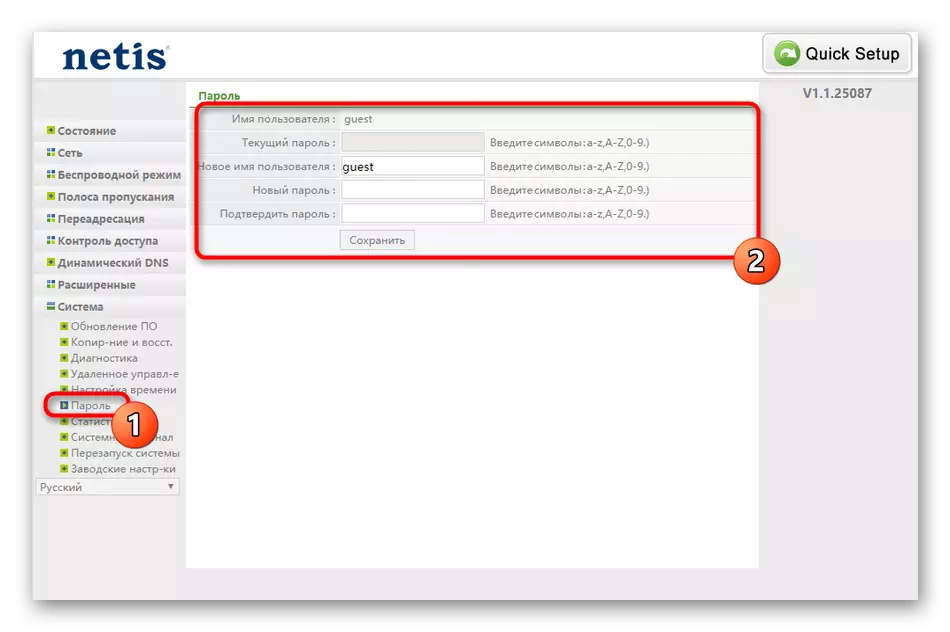
- It is recommended to change the username and password to access the Internet center. Just do not forget those data that enter, otherwise you have to return the router to the initial state.
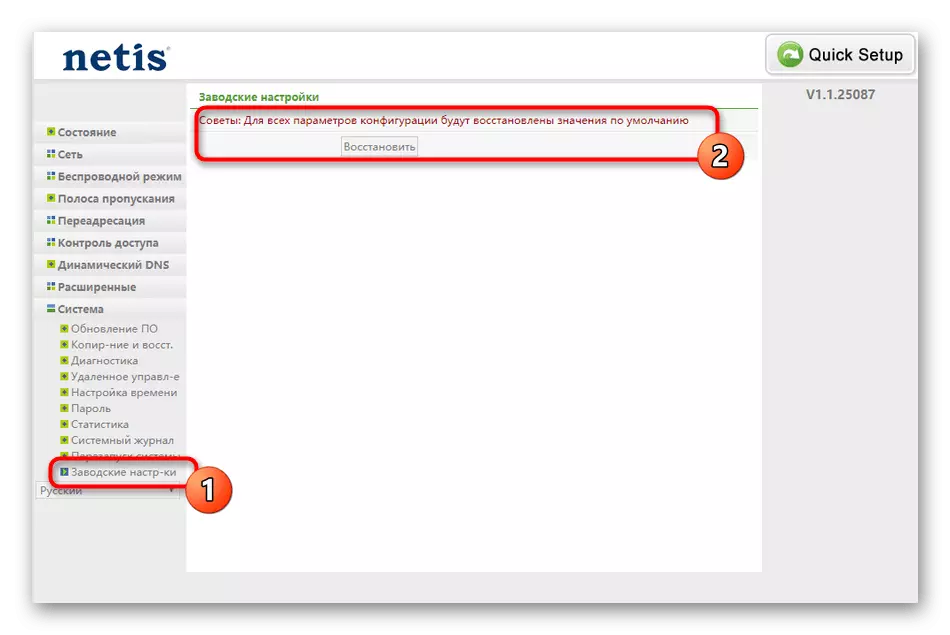
- As for the recovery of standard parameters, this happens through the "factory settings". At the same time, absolutely all items are reset, including network settings, Wi-Fi and access control.
- Upon completion of interaction with the Internet Center, it will remain only to restart the router so that all changes take into force and one could go to its comfortable use.