

Stage 1: Preparation
The first thing you need to adequately prepare both the smartphone and the car.
- First, make sure your phone is running Android 5.0 or later - it is recommended to use instructions from the article below.
Read more: How to check the version of Android on your phone
- Also, make sure your machine supports this shell - you can check this link on the official website.
List of Android Auto compatible
- For devices with Android version 9.0 and below need to download the Android Auto client.
Download Android Auto from the Google Play Store
- In Android 10 is already integrated component for connection to on-board systems of cars, but for better management is recommended to install the application «Android Auto on the phone."
Download Android Auto on the phone screen
- Run the tool after installation. If you are prompted to install or upgrade some services, do it. Otherwise, skip this step.
- Next, you will need to accept the terms of use.
- the application will also need to issue multiple permits - follow the instructions on the screen.
- It is recommended to activate the notification from the Android Auto - it is necessary for normal operation.


After the appearance of the main screen, the shell can move on to the next step.
Stage 2: Connection
Connection Algorithm by cable and wirelessly differs slightly, so here the general steps, referring to specific.- Start the car and turn it into a parking mode, then activate the service Android Auto in the settings of the trip computer.
- Connect the system and the USB cable to your smartphone. For the wireless method, turn on Bluetooth and Wi-Fi, then go to settings first, activate the option "One can see everything", start scanning your computer and connect to the machine.
- Open the app on the phone shell. Additionally you may need to run the same software on the display car.
- Wait a few seconds, until the phone and on-board computer to establish a connection.
If these or other problems during the connection you have, please refer to the appropriate section of this article.
Step 3: Using
We now turn to the basic aspects of using Android Auto. With a shell, you can work as via the display in the car, and from your smartphone, so in each section and look at the one and the other scenario.
Installation and removal of software
Since Android Auto at its core is simply a shell of the main system, installed in the phone app will be displayed in this mode - the only thing they have his support should be stated.Working with the main screen
- When using Auto Android smartphone the major part of its main screen occupy a variety of notification: reminders, messages, browser tips.
- At the top are the access button in the menu of the shell and run the microphone.
- At the bottom is a toolbar for quick access to the main screen, the construction of the route, received call, the music player.
- The display of the car everything is implemented slightly differently. Firstly, the main space is occupied or map with the plotted route, or the programs menu, with shell groups them according to importance.
- Secondly, the upper part is enabled only for the time display, the status of communication and control of the battery charge.
- Third, the main controls are grouped at the bottom - switch between the navigation tool and a list of programs, multimedia widget, access to a list of notifications, and call the voice input.


Calls
Make a call and answer the incoming call in Android Auto envelope is as follows:
- When an incoming call on the device's screen or display vehicle will notice - tapnite thereon for reception.
- For an outgoing call can use the telephone - as in normal interaction, or by voice command. Performing this operation via the onboard vehicle system as possible - press the jump button in the menu.

Then - on the icon dialer.

Select the option that suits you.
- You can also use call using voice commands: Say "Ok Google" then "Call" and nadiktuyte the caller's name or number input.


Laying navigation route
Methods create a route in Google Maps are two available.
- The first option is to use voice commands: activate the appropriate input, then say "Route * Required Address *."
- The second is to pave manually using the machine display. First of all, stop the car and move to parking mode. Next, open the application panel.

Select "Maps".
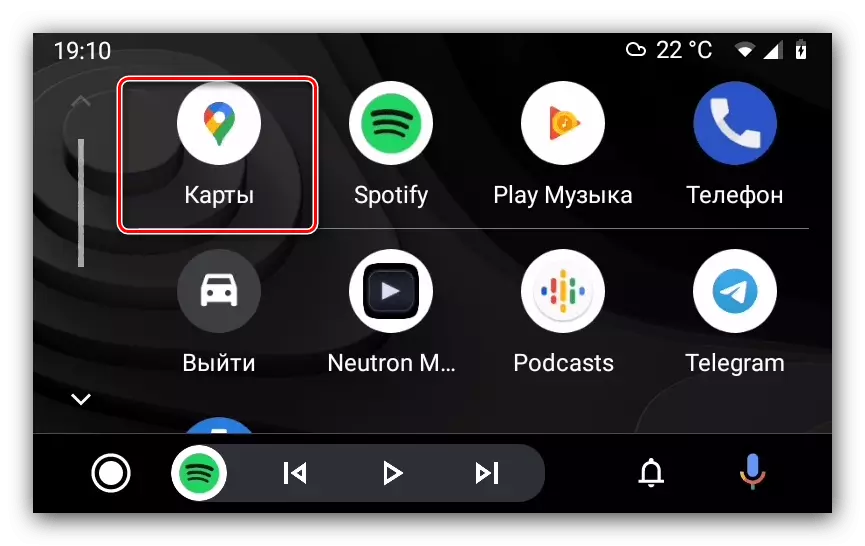
Click on the search engine strip at the top and type the name of the end item.


The route from your current location to the selected address will be laid.
Eliminating possible problems
Now consider the most common problems that may occur during the work with Android Auto.The onboard system does not see the smartphone
The most frequent possible problems that arises for a number of reasons. Steps to eliminate the following:
- Check out the compatibility of devices - perhaps in fact the stereo system of your car can not work with android cars.
- Check the settings - perhaps you did not activate the connection modes on the smartphone and the onboard computer of the machine.
- With a wired connection, check the cable - Android AUTO is very sensitive to the quality of accessories, so cheap solutions may not work.
- When connecting via Bluetooth, make sure that this option is on on both devices.
- Reinstall the tool to work with android cars.
If none of these steps helped you, but 100% compatible cars are compatible - hardware malfunctions are not excluded, so contact the service.
When connected, network errors appear
Under the network errors, there is a number of problems whose essence is indicated by digital codes. The most common are 8, 12 and 16.
- "Network 8 error" means that the device has detected a nonconformity in the operation of Google Play services on a connected smartphone. This problem can be resolved by updating the Google Play Services and installation of correct dates and time.
Read more: Updating Google Play Services
- Code 12 suggests that during the work, the head system of the car and the smartphone lost contact. In most cases, this failure can be eliminated by the USB cable replacement. For a wireless connection, you should make sure that the connection is stable between devices.
- The error with code 16 is the most unpleasant, since the specific reasons for its appearance are not entirely clear. It is known that most often it occurs on firmware with the application cloning feature (for example, Xiaomi and Huawei / Honor). The solution in such a situation will be the removal of all duplicate software and other Google accounts, but if this step does not help, it will be necessary to reset to factory settings.
Read more: Resetting the settings on Android


Resolution pictures on the head and plug-in devices do not match each other
The essence of the problem is that sometimes widescreen display of the onboard system displays a picture in a 4: 3 ratio. It is possible to eliminate it as follows:
- Open the app android auto on your phone.
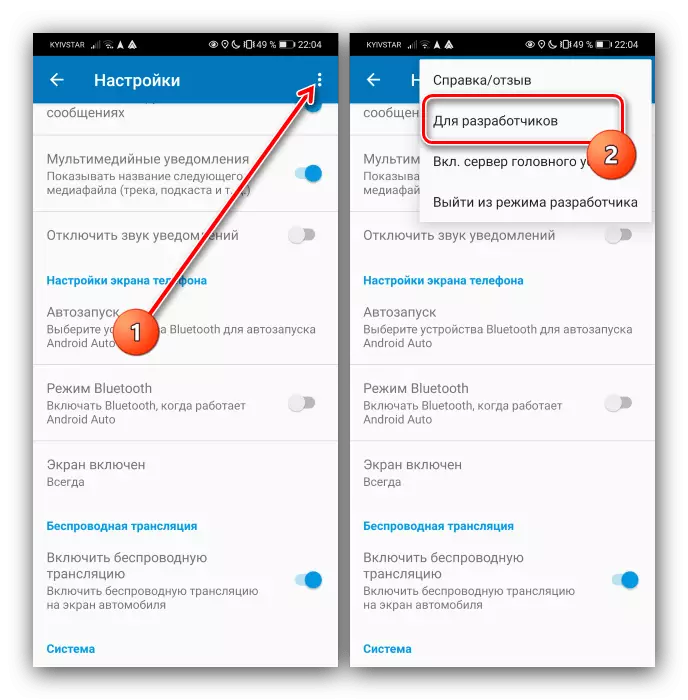
- Call the menu, go to the settings, scroll the list of parameters to the bottom, to the item "version", and tap it 10 times.
- In the warning that appears, click OK.
- Next, tap three points at the top on the right and select "For Developers".
- Look in the "Video Resolution" option in the list - options "720p" and "1080p" will be available. Activate the one that matches the resolution of your smartphone.


Now the problem with the aspect ratio on the display of the head unit must be solved.