

In Windows 10, 8 and Windows 7, there are built-in backup tools that allow you to save the status of the system and important files at a certain point in time (see Windows Recovery Points, Windows 10 File History) or create a full backup (image) of the system (see how Create a backup of Windows 10 will be suitable for previous versions of OS). There are also simple free software for backups, such as Aomei Backupper Standard (described in the previous mentioned instruction).
However, if the "advanced" copy of Windows or Disc Copies (partitions) is required, the built-in OS funds may not be enough, but the VEEAM Agent For Windows Free version is most likely enough for most backup tasks. The only possible drawback for my reader is the lack of the Russian language interface, but I will try to tell about the use of the utility as detailed as possible.
Installing Veeam Agent FREE (Veeam Endpoint Backup)
The installation of the program should not cause special difficulties and is performed using the following simple steps:
- Agree with the terms of the license agreement, putting the appropriate mark and click "Install."
- In the next step, you will be prompted to connect an external drive that will be used for backup to configure it. It is not necessary to do this: you can back up to an internal drive (for example, a second hard disk) or configure later. If you decide to skip this stage during installation, check the "Skip This, I Will Configure Backup Later" item and click "Next".

- Upon completion of the installation, you will see a window with a message that the installation has been completed and set by default "Run Veeam Recovery Media Creation Wizard" that starts creating a recovery disk. If at this stage you do not want to create a recovery disk, you can remove the mark.

Recovery disk veeam
You can create a VEEAM Agent for Microsoft Windows Free recovery disk immediately after installation, leaving the mark from clause 3 or at any time, running "Create Recovery Media" from the Start menu.
What will require a recovery disc:
- First of all, if you plan to create the image of the entire computer or a backup of the disk system partitions, you can only restore them from a backup copy from the created recovery disk.
- The recovery disk VEEAM also contains multiple useful utilities that can be used to restore Windows (for example, the administrator password reset, the command line, the Windows boot recovery).
After starting the creation of Veeam Recovery Media, you will need to perform the following steps:
- Select the type of recovery disc created - CD / DVD, USB drive (flash drive) or ISO image for subsequent recording on a disk or flash drive (only an ISO image is displayed in my screenshot, because computer without optical drive and connected flash drives) .
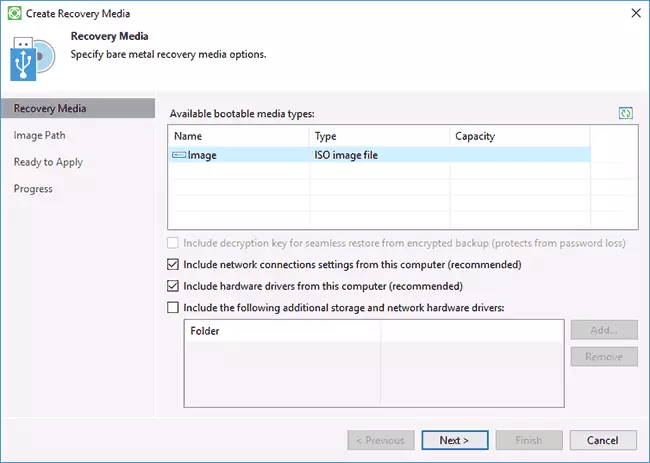
- By default, items are marked, including the network connection of the current computer (useful for recovery from a network drive), and the current computer's drivers (also useful, for example, to boot from the recovery after a disk has been access to the network).
- If you wish, you can mark the third item and add additional folders with drivers to the recovery disk.
- Click "Next". Depending on the selected storage type, you will fall into different windows, for example, in my case, when creating an ISO image - in the choice of a folder to save this image (with the ability to use a network layout).
- The next step will only be left to click "Create" and wait for the completion of the recovery disk.
This is all ready to create backup copies and recovery from them.
Backup copies of the system and disks (partitions) in Veeam Agent
First of all, you need to configure backups in Veeam Agent. For this:
- Run the program and in the main window, click "Configure Backup".

- In the next window, you can select the following options: Entire Computer (backup of the entire computer, must be saved on an external or network disk), Volume Level Backup (backup of the disk partitions), File Level Backup (Create backup files and folders).

- If you select the VOLUME LEVEL Backup version, you will be prompted to choose which partitions should be included in the backup. At the same time, when choosing a system partition (in my screenshot, a C drive C), hidden partitions with a loader and a recovery medium, both on EFI and MBR systems, will be included in the image.

- In the next step, you need to select a backup location: Local Storage, where both local disks are turned on and external drives or Shared Folder - network folder or NAS drive.

- When you select a local storage, you need to specify which disc (disc partition) to save backups and folder on this disk. It also indicates how time to store backup copies.
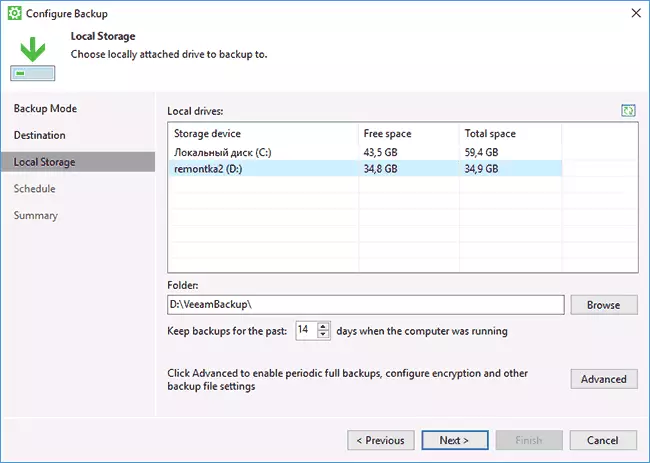
- By clicking on the "Advanced" button, you can create a frequency of creating full backups (a full backup is first created by default, and later the changes that occurred from the moment of its creation are recorded. In case of inclusion of the Active Full Backup frequency, each time in the specified The time will be launched a new backup chain). Here, on the Storage tab, you can set the compression ratio of backup copies and enable encryption for them.

- Next window (Schedule) - setting the frequency of creating backup copies. By default, they are created daily at 0:30, provided that the computer is turned on (or is in sleep mode). If off - the backup is created after the next inclusion. You can also set backups when blocking Windows (LOCK), output from the system (Log Off) or when connecting an external drive specified as the target to store backups (When Backup Target Is Connected).

After applying the settings, you can create a first backup manually by simply pressing the "Backup Now" button in the VEEAM AGENT program. The creation time of the first image may be long (depends on the parameters, the number of stored data, the speed of the drives).

Restore from backup
If necessary, to restore from the backup of Veeam, you can do it:- By running the VOLUME LEVEL Restore from the Start menu (only to restore backup copies of non-system partitions).
- Running File Level Restore - To restore only individual files from the backup.
- After downloading from the recovery disk (to restore the backup of Windows or the entire computer).
VOLUME LEVEL RESTORE
After starting the Volume Level Restore, you will need to specify the backup storage location (usually determined automatically) and the recovery point (in case there are several of them).

And specify which parts you want to recover in the next window. When you try to select system partitions, you will see a message that their restoration inside the running system is impossible (only from the recovery disk).

After that, wait to restore the contents of sections from the backup.
File Level Restore.
If you need to restore only individual files from a backup, start the File LEVEL Restore and select the recovery point, then on the next screen, click Open.
The Backup Browser window opens with the contents and folders in the backup. You can choose any of them (including select multiple) and press the "Restore" button in the Home Menu Backup Browser (appears only when files or files are selected + folders, but not just folders).

If a folder has been selected - right-click on it and select "Restore", as well as Restore mode - Overwrite (Overwrite the current folder) or Keep (Save both version of the folder).
When you select a second option on the disk, the folder will remain in the current form and the recovered copy called the RESTORED name_name.
Restoring a computer or system using a VEEAM recovery disk
If you need to restore the system partitions of the disk, you will need to boot from the boot disk or the VEEAM Recovery Media flash drive (you may need to disable Secure Boot, the EFI and Legacy download is supported).
When loading during the appearance of the inscription "Press Any Key to Boot from CD or DVD", press any key. After that, the recovery menu opens.

- Bare Metal Recovery - Using recovery from backups Veeam Agent for Windows. Everything works in the same way as when restoring partitions in the Volume Level Restore, but with the ability to restore system disk system partitions (if necessary, if the program does not detect the location itself, specify the backup folder on the Backup Location page).
- Windows Recovery Environment - Running Windows Recovery Environment (Built-in System Research).
- Tools - useful in the context of the system recovery tools: command line, password reset, download hardware driver, diagnostics of RAM, saving verification logs.

Perhaps this is all on creating backups using Veeam Agent for Windows FREE. I hope if it is interesting, you can deal with additional options.
You can download the program for free from the official page https://www.veeam.com/ru/windows-endpoint-server-backup-free.html (registration will require registration, which, however, is not checked in any way at the time of writing the article ).