

With the need to change text encoding, users who work browsers, text editors and processors are often encountered. However, when working in the Table Excel processor, such a need can also occur, because this program processes not only the numbers, but also the text. Let's figure it out how to change the encoding in Excele.
Lesson: Encoding in Microsoft Word
Work with text encoding
Text Encoding - This set of electronic digital expressions that are converted to those understandable to the user characters. There are many types of encoding, each of which has its own rules and language. The skill of the program to recognize a specific language and translate it to those understandable for an ordinary person signs (letters, numbers, other characters) determines whether the application will be able to work with a specific text or not. Among popular text encodings should be allocated as follows:
- Windows-1251;
- Koi-8;
- ASCII;
- ANSI;
- UKS-2;
- UTF-8 (Unicode).
The last name is the most common among encodings in the world, as it is considered a kind of universal standard.
Most often, the program itself recognizes the encoding and automatically switches to it, but in some cases the user needs to specify its appearance. Only then can it work correctly with coded symbols.
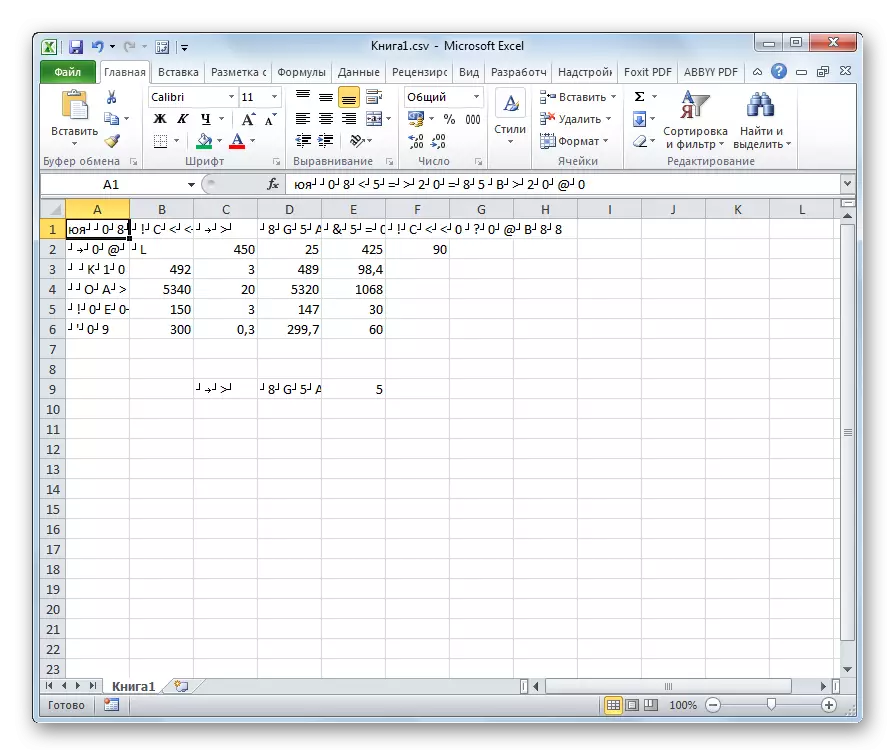
Excel has the greatest number of encoding problems with the Excel program when you try to open CSV files or export TXT files. Often, instead of the usual letters when you open these files through Excel, we can observe incomprehensible characters, the so-called "Crakozyabry". In these cases, the user needs to make certain manipulations in order for the program to start correctly display data. There are several ways to solve this problem.
Method 1: Change the encoding using NotePad ++
Unfortunately, a full-fledged tool that would allow you to quickly change the encoding in any type of texts from Excel. Therefore, it is necessary to use multi-step solutions for these purposes or resort to third-party help. One of the most reliable ways is to use the NotePad ++ text editor.
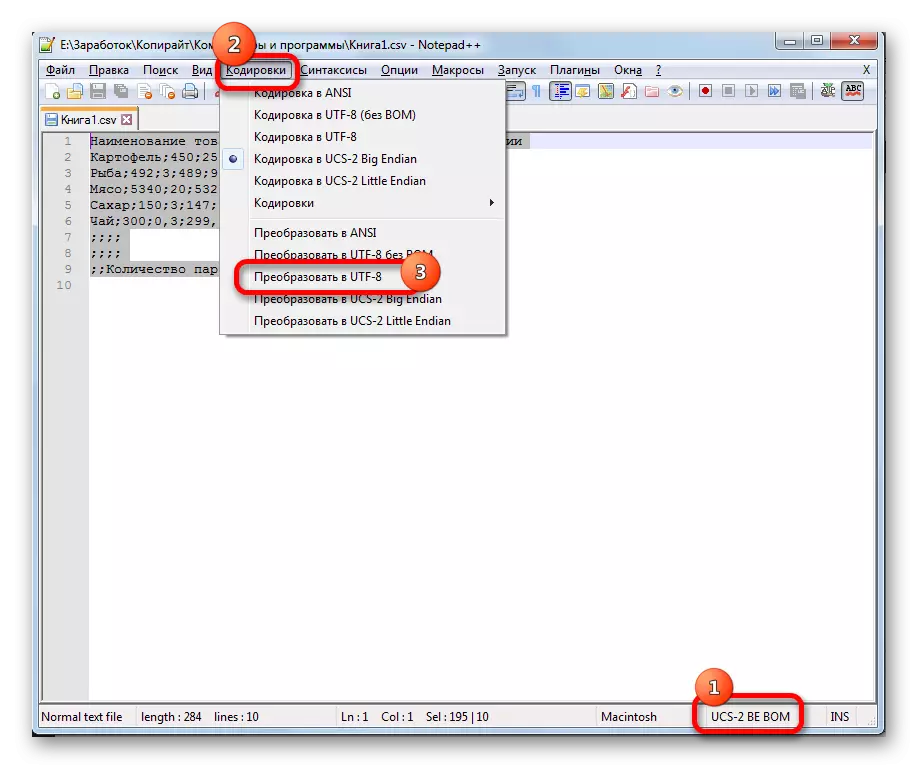
- Run the NotePad ++ application. Click on the file "File". From the opening list, choose the "Open" item. As an alternative, you can dial the CTRL + O keyboard on the keyboard.
- The file open window starts. Go to the directory where the document is located, which is incorrectly displayed in Excele. We highlight it and click on the "Open" button at the bottom of the window.
- The file opens in the NotePad ++ editor window. At the bottom of the window on the right side of the status string indicated the current document encoding. Since Excel displays it incorrectly, it is required to make changes. We recruit the Ctrl + A key combination on the keyboard to highlight the entire text. Click on the "Encoding" menu item. In the list that opens, select the "Convert to UTF-8" item. This is the encoding of Unicode and with her excel works as correct as possible.
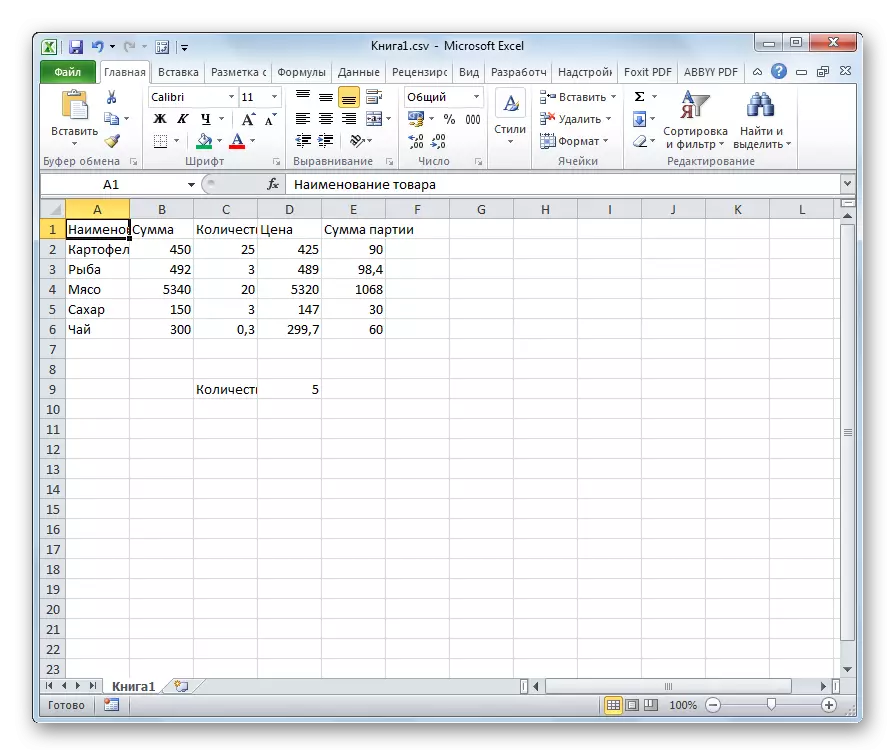
- After that, to save the changes in the file clamping the button on the toolbar in the form of a floppy disk. Close NotePad ++ by clicking on the button as a white cross in a red square in the upper right corner of the window.
- Open the file with a standard way through the conductor or using any other option in the Excel program. As you can see, all characters are now displayed correctly.


Despite the fact that this method is based on the use of third-party software, it is one of the easiest options for transcoding the contents of the files for Excel.
Method 2: Application of text wizard
In addition, you can make the conversion and using the built-in program tools, namely the text wizards. Oddly enough, the use of this tool is somewhat more complicated than the use of a third-party program described in the previous method.
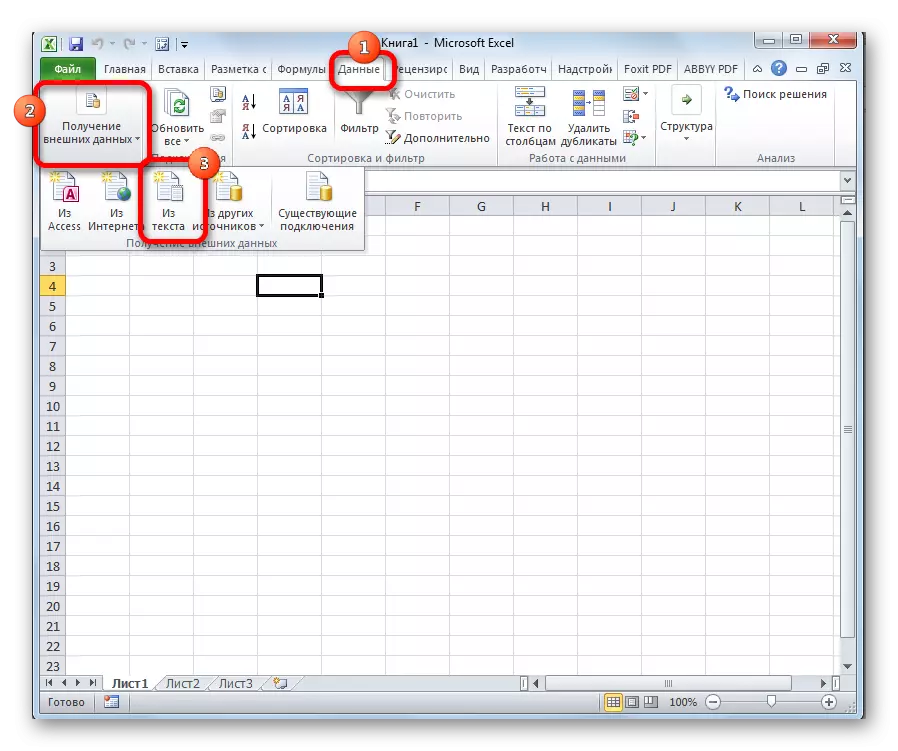
- Run the Excel program. It is necessary to activate the application itself, and not open the document with it. That is, you must appear a blank sheet. Go to the "Data" tab. Click on the button on the "From Text" tape, placed in the "Obtaining External Data" toolbar.
- A text file import window opens. It supports the opening of the following formats:
- TXT;
- CSV;
- PRN.
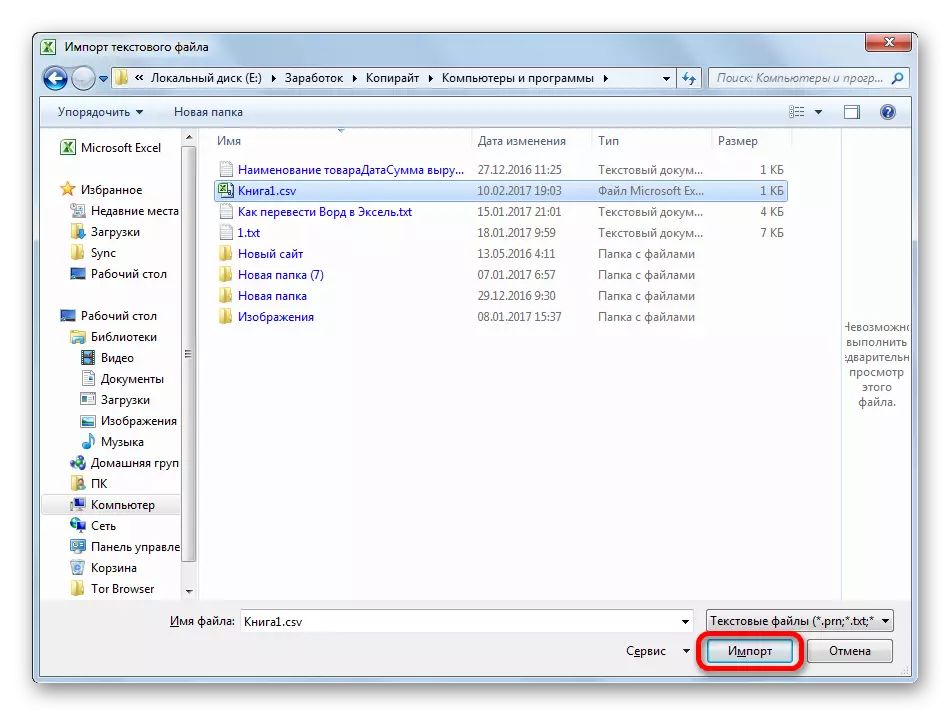
Go to the directory for the location of the imported file, select it and click on the "Import" button.
- The text Wizard window opens. As we see, in the preview field, the characters are displayed incorrectly. In the "File Format" field, we reveal the drop-down list and change the encoding to "Unicode (UTF-8)" in it.

If the data is displayed anyway, it is incorrectly, then try to experiment using other encodings until the text in the preview field is readable. After the result satisfies you, click on the "Next" button.
- The following text wizard window opens. Here you can change the separator sign, but it is recommended to leave the default settings (tab sign). Click on the "Next" button.
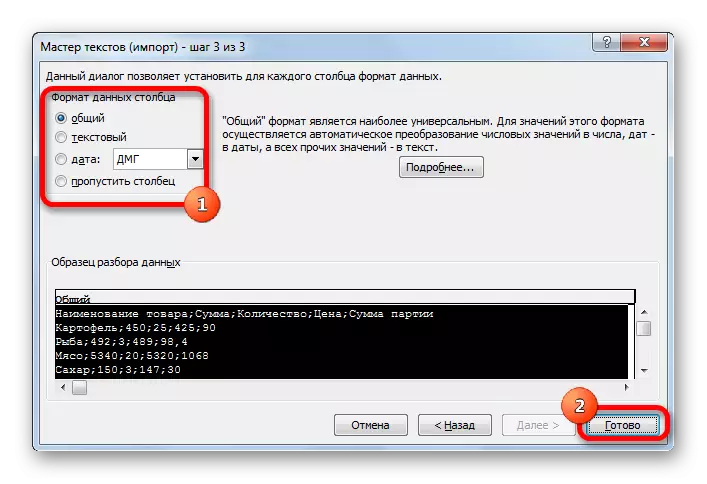
- The last window has the ability to change the column data format:
- General;
- Textual;
- The date;
- Skip column.
Here the settings should be set, given the nature of the processed content. After that, we press the "Finish" button.
- In the next window, specify the coordinates of the left upper range of the range on the sheet where the data is inserted. This can be done by driving the address manually into the appropriate field or simply highlight the desired cell on the sheet. After the coordinates are added, in the Window field, click the "OK" button.
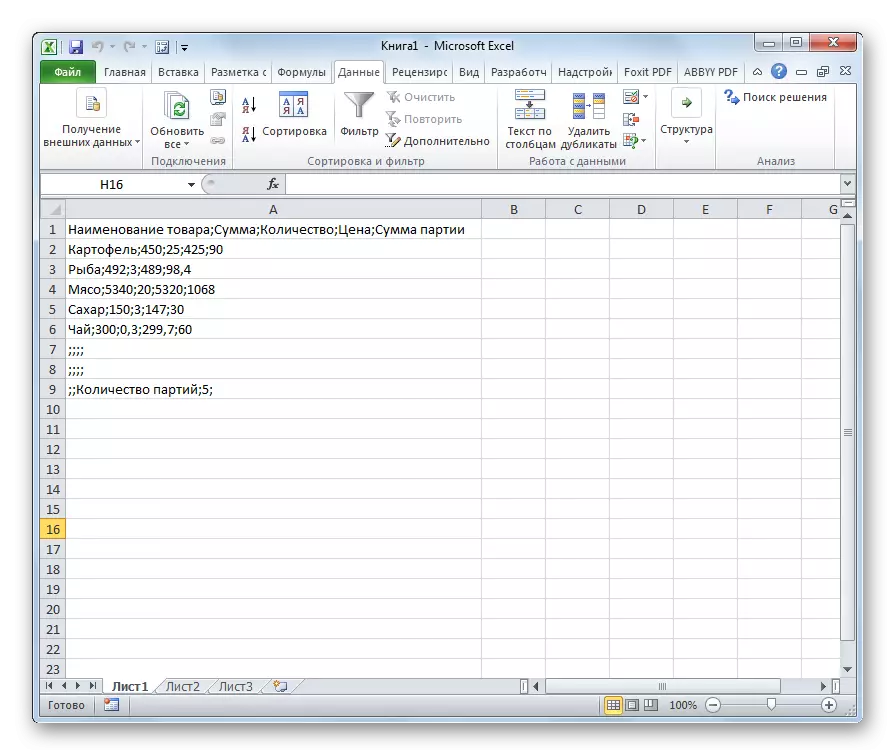
- After that, the text will appear on the sheet in the encoding we need. It remains to format it or restore the table structure, if it was tabular data, as it is destroyed when reformatting.


Method 3: Saving a file in a specific encoding
There is also a reverse situation when the file must not be opened with correct data display, and save in the installed encoding. In Excel, you can perform this task.
- Go to the "File" tab. Click on "Save As".
- A document saving window opens. Using the conductor interface, we define the directory where the file will be stored. Then set the file type if we want to save the book in the format different from the standard Excel format (XLSX). Then I click on the "Service" parameter and in the list that opens, select the "Web document parameters" item.
- In the window that opens, go to the "Encoding" tab. In the "Save Document as" field, open the drop-down list and set the type of encoding from the list, which we consider it necessary. After that, click on the "OK" button.
- Returning to the "Document Save" window and here we click on the "Save" button.


The document will be saved on a hard disk or removable media in the encoding you have identified. But you need to consider that now always documents stored in Excel will be saved in this encoding. In order to change this, you will have to go to the "Web document" window and change the settings.
There is another way to change the encoding settings of the saved text.
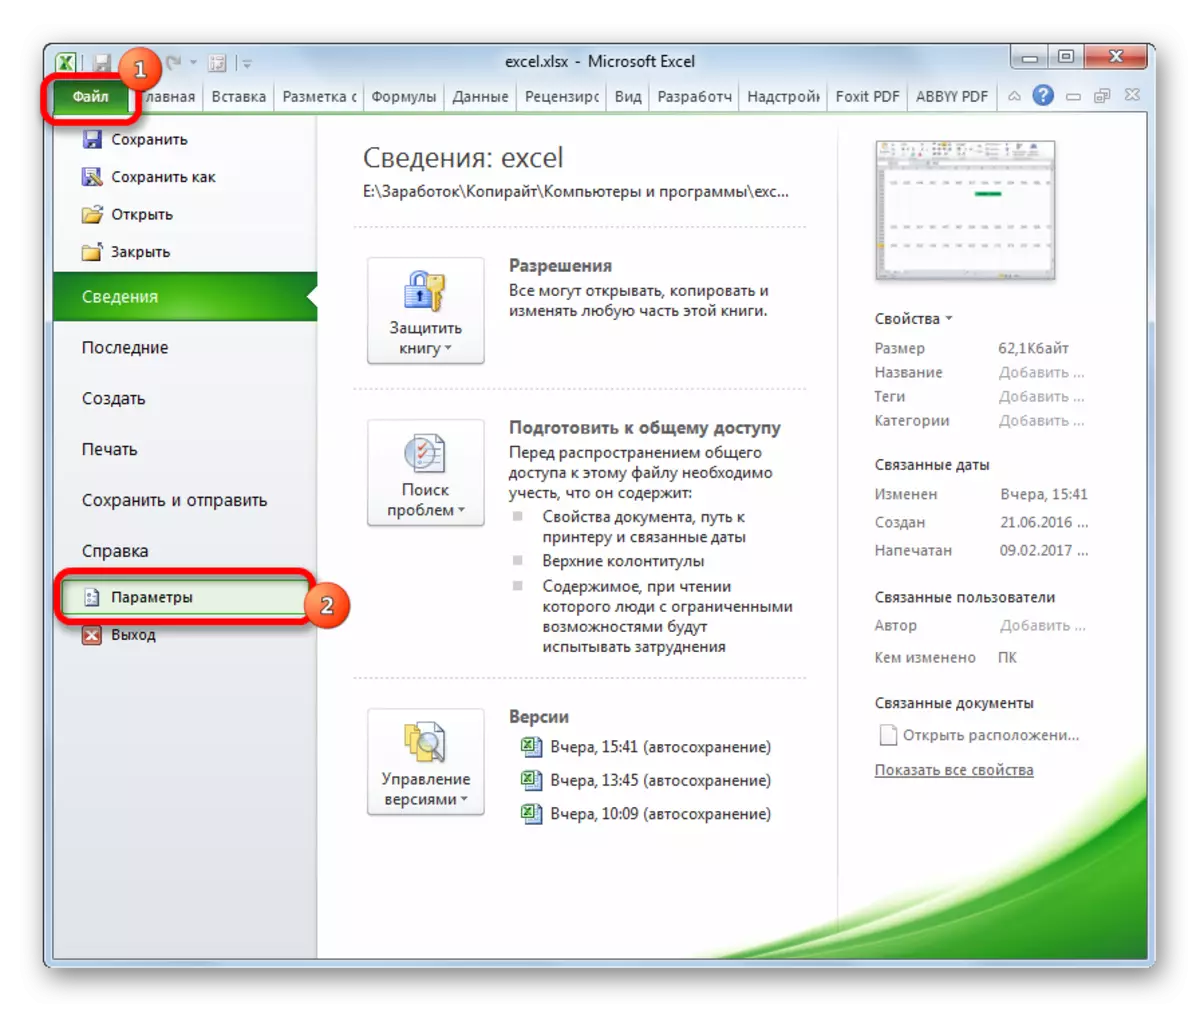
- Being in the "File" tab, click on "Parameters".
- The Excel parameter window opens. Choose subparagraph "additionally" from the list located on the left side of the window. The central part of the window is scrolling down to the "General" settings block. Here click on the "Web Page Settings" button.
- The "Web Document Parameters" window opens, where we are doing all the same actions that they spoke earlier.

Now any document saved in Excel will have exactly the encoding that you have installed.
As you can see, Excel has no tool that would allow you to quickly and conveniently convert text from one encoding to another. The master of the text has too cumbersome functionality and has many possibilities that are not necessary for such a procedure. Using it, you will have to pass a few steps, which directly on this process do not affect, and serve for other purposes. Even conversion through third-party text editor NotePad ++ in this case looks somewhat simpler. Saving files in a given encoding in an Excel application is also complicated by the fact that every time you wish to change this parameter, you will have to change the global settings of the program.