

Overheating of the processor causes various problems in the computer, reduces performance and can output the entire system. All computers have their own cooling system, which allows you to protect the CPU from elevated temperatures. But when overclocking, high loads or certain damage, the cooling system may not cope with its tasks.
If the processor is overheated even in case of system downtime (provided that any heavy programs are not open in the background), then it is necessary to urgently take measures. Perhaps you will have to even replace the CPU.
See also: How to replace the processor
Causes of overheating CPU
Let's look at why the processor overheating can occur:
- Calculation system breakdown;
- Computer components have not been purified from dust for a long time. Dust particles can settle in cooler and / or radiator and score it. Also dust particles have a low thermal conductivity, which is why all the heat remains inside the housing;
- Thermally deposited on the processor lost its qualities after time;
- Dust fell into the socket. It is unlikely, because The processor is very tightly adjacent to the socket. But if it happened, the socket must urgently clean, because It threatens the performance of the entire system;
- Too big load. If you are included simultaneously several heavy programs, then close them, thereby significantly reduced the load;
- Previously, acceleration was performed.
To begin, it is necessary to determine the average operating temperature of the processor both in the mode of heavy loads and in idle mode. If the temperature indicators allow you to test the processor using a special software. The average normal operating temperatures, without heavy loads, are 40-50 degrees, with loads 50-70. If the indicators have exceeded 70 (especially in idle mode), then this is a direct testimony of overheating.
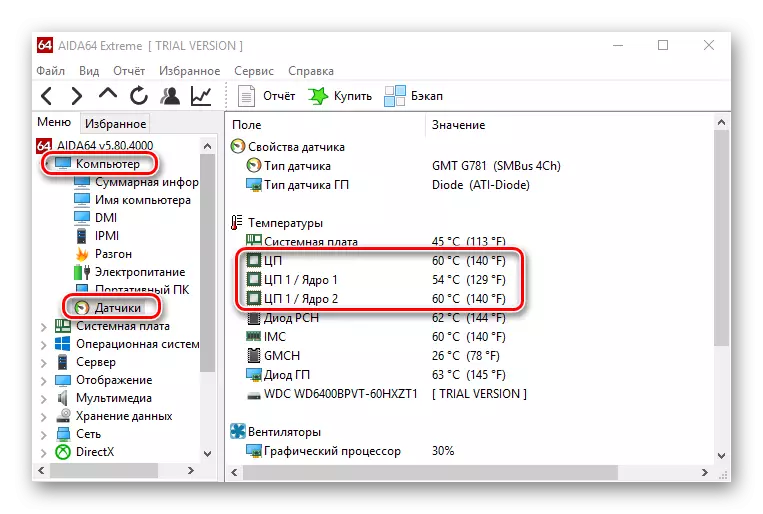
Lesson: How to determine the temperature of the processor
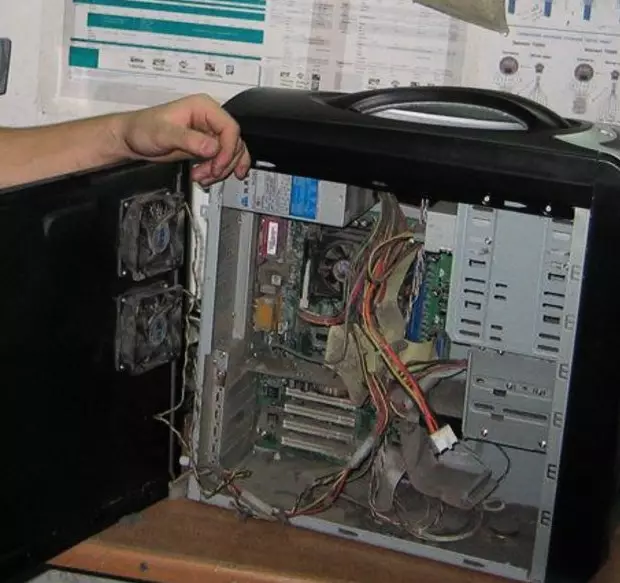
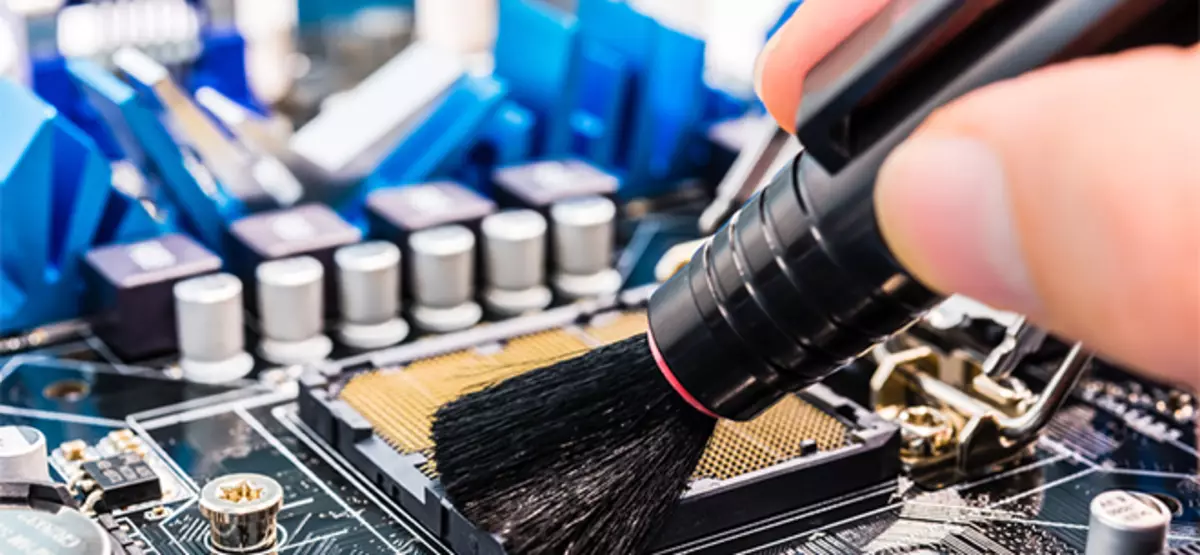
Method 1: We carry out the cleaning of the computer from dust
In 70% of cases, the cause of overheating is the dust accumulated in the system unit. You will need to clean:
- Tender tassels;
- Gloves;
- Sleepy napkins. Better specialized to work with components;
- Low-power vacuum cleaner;
- Rubber gloves;
- Shutter cross.
Working with the internal components of the PC is recommended to be carried out in rubber gloves, because Pot particles, skin and hair can get on components. Instructions for cleaning ordinary components and coolers with a radiator looks like this:
- Disconnect your computer from the network. In laptops additionally need to remove the battery.
- Turn the system unit into a horizontal position. It is necessary that any detail does not accidentally fall out.
- Carefully walk through the tassel and a napkin on all places where you find contamination. If the dust is a lot, then you can use the vacuum cleaner, but only if it is included on the minimum power.
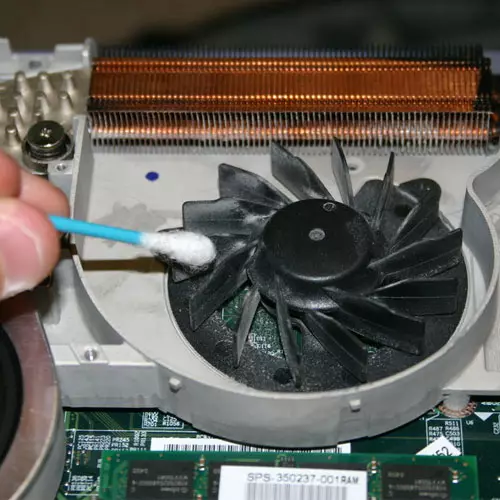
- Gently, with brushes and napkins, clean the cooler fan and the radiator connectors.
- If the radiator and cooler are dirty too deep, they will have to be dismantled. Depending on the design, you will have to either unscrew the screws, or discharge the latches.
- When the radiator with the cooler is removed, blow them with a vacuum cleaner, and the remaining dust is cleaning with tassel and napkins.
- Mount the cooler with the radiator in place, collect and turn on the computer, check the processor temperature.
Lesson: how to remove the cooler and radiator
Method 2: Clean from dust socket
When working with socket, you need to be as neat as possible and attentive, because Even the most minor damage can withdraw a computer, and any dust particle left to disturb its work.
To carry out this work, you will also need rubber gloves, napkins, a tendent brush.
Step-by-step instruction looks like this:
- Disconnect the computer from the power supply, the laptops additionally remove the battery.
- Disassemble the system unit by putting it in the horizontal position.
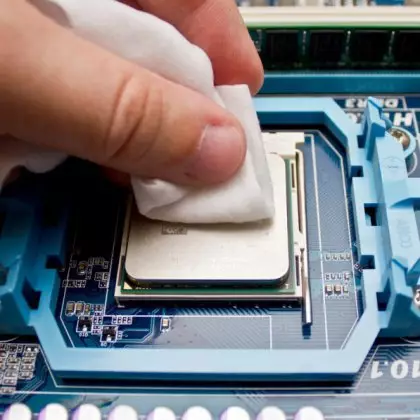
- Remove the cooler with the radiator, remove the old thermal path from the processor. To remove it, you can use a cotton wand or disk moistened in alcohol. Gently wipe the surface of the processor several times, until all the remnants of the paste will be erased.
- At this step, it is desirable to turn off the socket from nutrition on the motherboard. To do this, disconnect from the base of the socket the wire that goes to the motherboard. If you have no such wire or it does not disconnect, then do not touch anything and go to the next step.
- Carefully disconnect the processor. To do this, move it a bit aside until it clicks or remove special metal holders.
- Now carefully and carefully clean the socket with brushes and napkins. Carefully check that there is no longer any dust particles.
- Put the processor into place. It is necessary to insert a special thickening on the corner of the processor in a small connector on the corner of the socket, and then attach a tight processor to the socket. After fixing with metal holders.
- Replace the radiator with the cooler and close the system unit.
- Turn on the computer and check the processor temperature indicators.
Method 3: Increase the speed of rotation of the blades of the cooler
To configure the fan speed in the central processor, you can use BIOS or third-party software software. Consider overclocking on the example of the Speedfan program. This software is distributed completely free of charge, has a Russian-speaking, uncomplicated interface. It is worth noting that with the help of this program you can disperse the blades of the fan per 100% of their power. If they work for complete power, then this method will not help.
Step-by-step instructions for working with Speedfan looks like this:
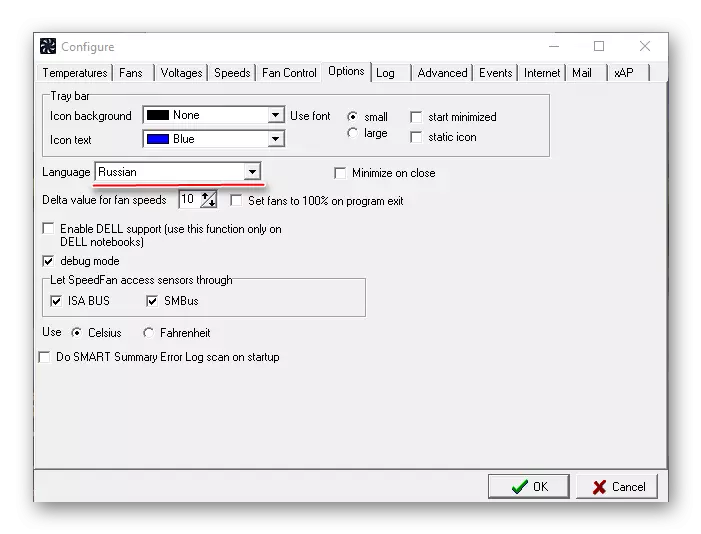
- Change the language of the interface into Russian (this is not necessary). To do this, go over the "Configure" button. Then in the top menu, select "Options". Find the "Language" item in the open tab and select the desired language from the drop-down list. Click "OK" to apply changes.
- To increase the speed of rotation of the blades, go to the main program window. Find the "CPU" item at the bottom. Near this item must be arrows and digital values from 0 to 100%.
- Using the arrows, lift this value. You can raise up to 100%.
- You can also configure the automatic power shift when a certain temperature is reached. For example, if the processor is warmed up to 60 degrees, then the rotational speed will rise to 100%. To do this, go to "Configuration".
- In the top menu, go to the "Speed" tab. Click two times on the inscription "CPU". At the bottom there should be a mini-panel for settings. Slip the maximum and minimum values from 0 to 100%. It is recommended to set approximately such numbers to a minimum of 25%, a maximum of 100%. Check the box opposite "Auto-change". For use, click "OK".
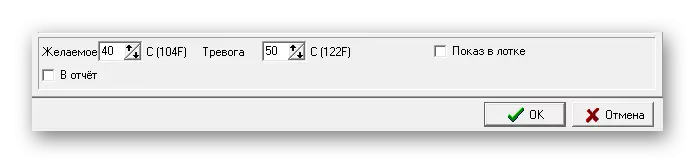
- Now go to the "Temperature" tab. Also click on the "CPU" while the panel with the settings will not appear at the bottom. In the "Desired" paragraph, put the desired temperature (in the area from 35 to 45 degrees), and in the "Alarm" paragraph, the temperature at which the speed of rotation of the blades will increase (it is recommended to set 50 degrees). Click "OK".
- In the main window, we put a tick on the "Automicious fans" item (is under the configuration button). Click "Collapse" to apply the changes.

Method 4: Change the thermal
This method does not require any serious knowledge, but it is necessary to change the thermal colon, and only if the computer / laptop is no longer on the warranty period. Otherwise, if you do something inside the case, it automatically removes warranty obligations from the seller and manufacturer. If the warranty is still valid, please contact a service center to replace the thermal chaser on the processor. You must do it completely free.If you change the paste on your own, then you should take more carefully to choose. No need to take the cheapest tube, because They bring more or less tangible effect only the first couple of months. It is better to take a more expensive sample, it is desirable that silver or quartz connects in its composition. An additional advantage will be if a special brush or a blade for lubricating the processor goes along with a tube.
Lesson: How to change the thermal chaser on the processor
Method 5: Reduce processor performance
If you are accelerated, it could serve the main cause of overheating processor. If the acceleration was not, then this method is not necessary. Warning: After applying this method, the performance of the computer will decrease (it may be noticeably noticeable in heavy programs), but the temperature and load on the CPU will also decrease, which will make the system more stable.
For this procedure, standard BIOS products are best suited. Work in BIOS requires certain knowledge and skills, so inexperienced PC users better entrust this work to someone else, because Even minor errors may disrupt the operation of the system.
Step-by-step instructions for reducing the processor performance in BIOS looks like this:
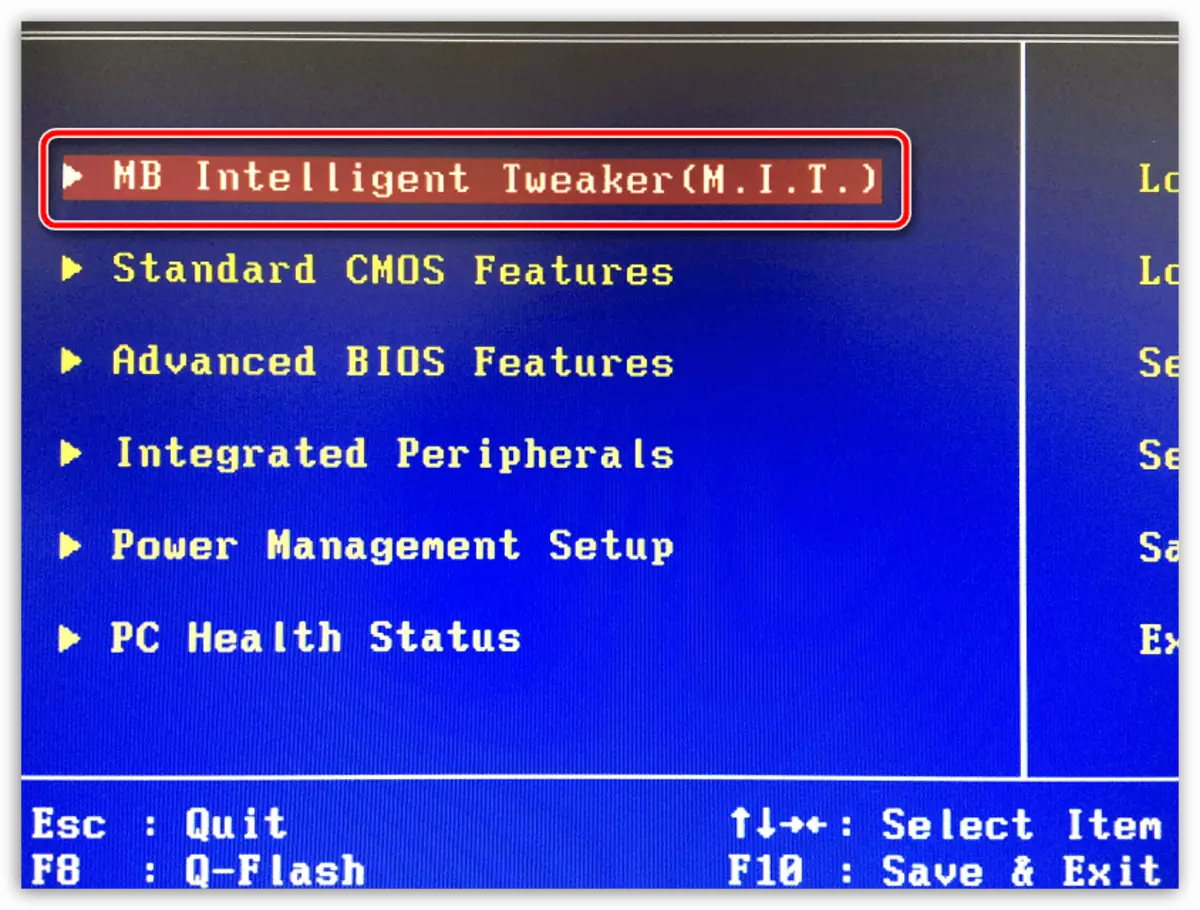
- Enter the BIOS. To do this, you must restart the system and until the windows logo appears, press DEL or key from F2 to F12 (in the latter case, much depends on the type and model of the motherboard).
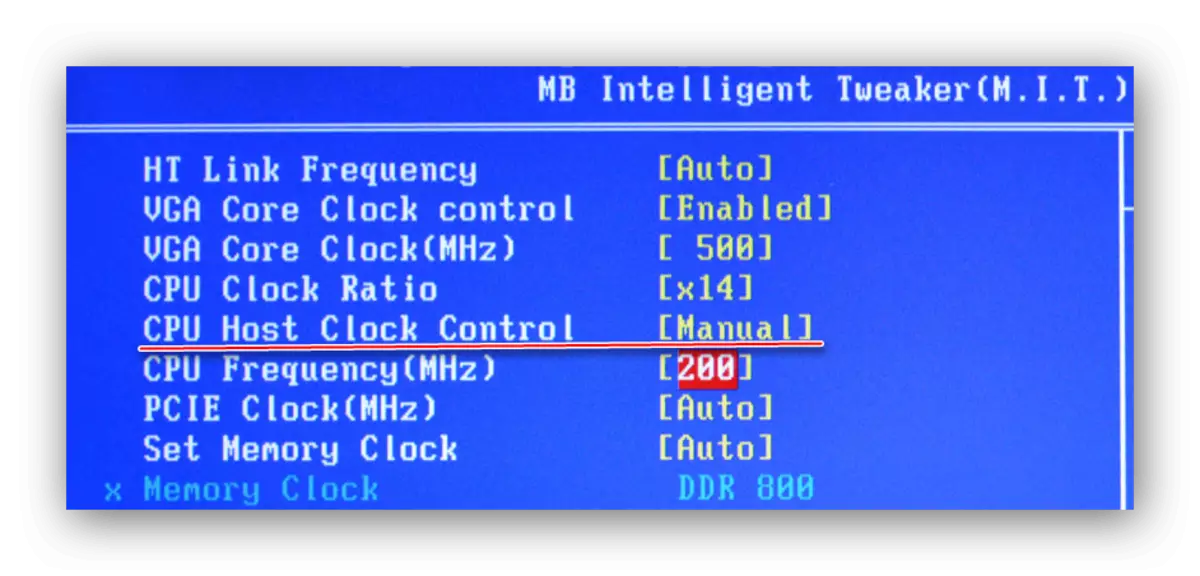
- Now you need to choose one of these menu parameters (the name depends on the model of the motherboard and the BIOS version) - MB Intelligent Tweaker, MB Intelligent Tweaker, M.I.B, Quantum Bios, Ai Tweaker. Control in the bios environment occurs with the arrow keys, ESC and ENTER.
- We move using the arrow keys to the CPU Host Clock Control item. In order to make changes to this item, press ENTER. Now you need to choose the item "Manual", if he stood with you before, you can skip this step.
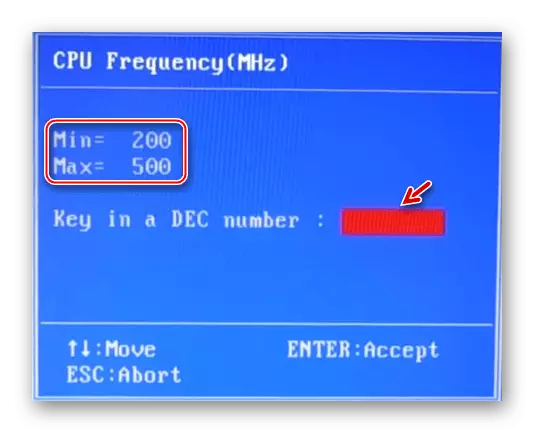
- Move to the CPU Frequency item, as a rule, it is under the "CPU Host Clock Control". Press ENTER to make changes to this parameter.
- You will open a new window, where you need to enter a value in the "MIN" to "MAX" to the "MIN" item, which are located at the top of the window. Enter the minimum of permissible values.
- Additionally, you can also reduce the multiplier. You should not reduce this parameter too much if you executed item 5. To work with multiplies, go to CPU Clock Ratio. By analogy with the 5th point, enter the minimum value in a special field and save the changes.
- To exit the BIOS and save the changes, on the top of the Save & Exit item and press ENTER. Confirm the output.
- Running the system, check the temperature indicators of the CPU nuclei.
Reduce the temperature of the processor can be in several ways. However, all of them require compliance with certain precautions.