

All Android devices, including your phone or tablet, have a preset recovery (Recovery Environment, Recovery Environment), designed to reset the phone to factory settings, the possibility of updating the firmware, some diagnostic tasks. To start the recovery, it is usually used any combination of physical buttons on the disabled device (may differ for different devices) or ADB from Android SDK.
However, pre-installed recovery is limited in their capabilities, and therefore, many Android users have a task to establish custom recovery (i.e., a third-party recovery environment) with advanced features. For example, in this TRWP instruction, it allows you to make full backup of Android devices, install the firmware or get root access to the device.
Attention: All the actions described in the instructions, you perform at your own risk: in theory, they can lead to data loss, to the fact that your device will stop switching on or it will not work correctly. Before performing the steps described, save important data anywhere in addition to the Android device.
Preparation for the firmware of custom recovery TWRP
Before proceeding with the direct installation of third-party recovery, you will need to unlock bootloader on your Android device and enable USB debugging. In detail about all these actions, it is written in a separate instruction how to unlock the bootloader bootloader on Android (opens in a new tab).
The same instruction also describes the installation of Android SDK Platform Tools - components that will be required for the firmware of the recovery environment.
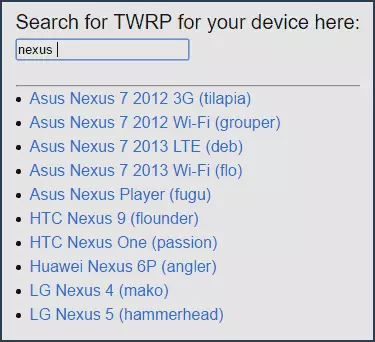
After all these operations were performed, download custom recovery suitable for your phone or tablet. You can download TWRP from the official page https://twrp.me/devices/ (I recommend using the first of two options after selecting the device in the Download Links section).
You can save this downloaded file any place on your computer, but I am for the convenience of "put" it in the Platform-Tools C folder of the Android SDK (in order not to specify the paths when executing the commands that will be used below).
So, now in order about the preparation of Android to the installation of custom recovery:
- Unlock bootloader.
- Enable USB debug and you can turn off the phone while.
- Download Android SDK Platform Tools (if not done when unlocking the bootloader, i.e. it was carried out in some other way than what is described by me)
- Download file from recovery (format .img file)
So, if all actions are completed, then we are ready for the firmware.
How to install custom recovery on android
We proceed to download the file of the third-party recovery environment to the device. The procedure will be as follows (installation in Windows):
- Go to FastBoot mode for Android. As a rule, for this on the disabled device you need to press and hold the sound and power reduction buttons until the FastBoot screen appears.
- Connect your phone or tablet via USB to a computer.
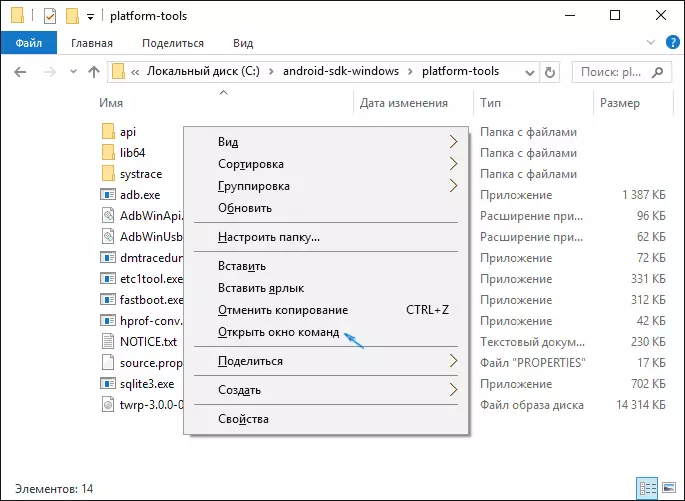
- Go to the computer to the folder with Platform-Tools, while holding the shift right-click on an empty place in this folder and select "Open commands window".
- Enter the FastBoot Flash Recovery Recovery.img command and press Enter (here recovery.img - the path to the file from the recovery, if it is in the same folder, you can simply enter the name of this file).
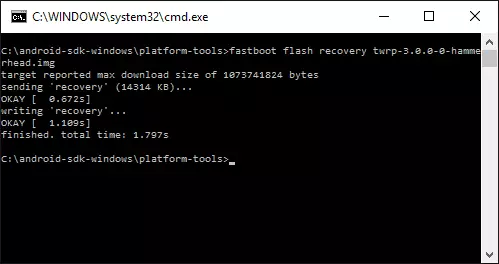
- After you see a message that the operation has been completed, disconnect the USB device.
Ready, Custom recovery TWRP is installed. We try to run.
Running and initial use of TWRP
After completing the installation of custom recovery, you will still be on the FastBoot screen. Select Recovery Mode (usually using the volume keys, and confirmed by clicking the power button).

When you first download TWRP, you will be offered to select a language, as well as select the mode of operation - read-only or "resolve the changes".
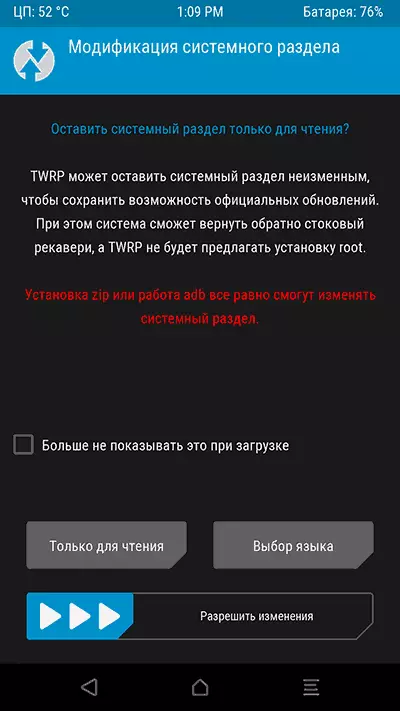
In the first case, you can use custom recovery only once, and after restarting the device, it will disappear (i.e., for each use, steps 1-5 are described above, but the system will remain unchanged). In the second, the recovery environment will remain on the system section, and you can upload it if necessary. I also recommend not to mark the item "no longer show it when loading," since this screen can still need to be needed if you decide to change your decision about resolving changes.

After that, you will find yourself on the main screen of Team Win Recovery Project in Russian (if you chose this language), where you can:
- Make ZIP files, such as SuperSU to get root access. Install third-party firmware.
- Perform a full backup of your Android device and restore it from a backup (while while in TWRP you can connect your MTP device to a computer to copy the created Android backup to a computer). This action I would recommend to do before you begin to further experiments on the firmware or receiving root.

- Perform a reset device with data removal.
As you can see, everything is simple enough, although some of the devices can be certain features, in particular - the non-clear FastBoot screen with not English or the absence of the ability to unlock the bootloader. If you encounter something like this, I recommend searching for information about the firmware and installing the recovery specifically for your Android phone or tablet model - with a high probability, you can find some useful information on the thematic forums of the owners of the same device.