

If you want to fully control the operation of applications, services and services on your computer or laptop, then you must configure the autorun. Autoruns is one of the best applications that will allow you to do this without much difficulty. This program will be devoted to our today's article. We will tell you about all the subtleties and nuances of using Autoruns.
Learning to use Autoruns
From how well the autoload of individual processes of your operating system is optimized, the speed of its loading and speed is dependent. In addition, it is in autoload that viruses may be hidden when a computer is infected. If the standard Windows startup editor can be managed mainly already installed applications, then in Autoruns the possibilities are much wider. Let's analyze in more detail that functionality of the application that can be useful to the ordinary user.Preset
Before proceeding directly to the use of Autoruns functions, let's first set up the application accordingly. To do this, do the following:
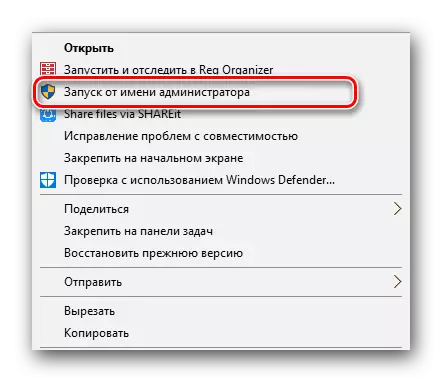
- Run Autoruns on behalf of the administrator. To do this, simply click on the application icon with the right mouse button and select the "Run on behalf of the administrator" in the context menu.
- After that, you need to click on the "User" line in the upper area of the program. An additional window will open in which you will need to select the type of users for which the autoload will be adjusted. If you are the only user of the computer or laptop, then it is enough just to select the account that contains the username you chose. By default, this parameter is the latest on the list.
- Next, open the "Options" section. To do this, just click the left mouse button on the line with the corresponding name. In the menu that appears, you need to activate the parameters as follows:
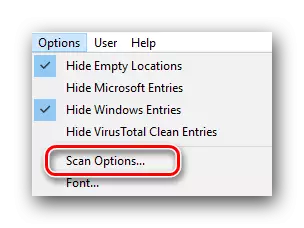
- After the display settings are exhibited correctly, go to the scan settings. To do this, click again on the "Options" string, and then click on the "Scan Options" item.
- You need to set local parameters as follows:
- After setting the ticks in front of the specified rows, you must click on the "Rescan" button in the same window.
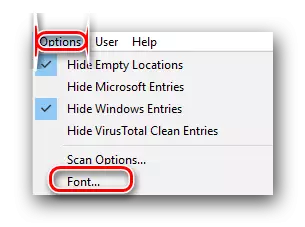
- The last option in the Options tab is the "font" string.
- Here you can optionally change the font, style and size of the displayed information. After performing all the settings, do not forget to save the result. To do this, click the "OK" button in the same window.

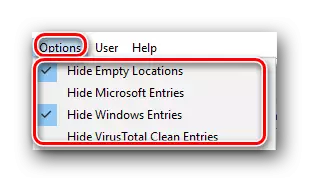
Hide Empty Locations - We put a tick opposite this line. This will allow you to hide from the list of empty parameters.
Hide Microsoft Entries. - By default, opposite this line is a tick. You should remove it. Disabling this option will allow you to display additional Microsoft parameters.
Hide Windows Entries. - In this line, we extremely recommend installing the checkbox. Thus, you hide vital parameters, changing which you can greatly harm the system.
Hide Virustotal Clean Entries - If you put a mark on the opposite of this line, you will hide from the list those files that have virusally deemed safe. Please note that this parameter will only work on condition that the corresponding option is enabled. We will tell about this below.
Scan Only Per-User Locations - We advise you not to set the mark opposite this line, since in this case only those files and programs that relate to a specific user system will be displayed. The rest of the place will not be checked. And since the viruses can be hidden absolutely anywhere, then you should not put a tick opposite this line.
Verify Code Signatures. - This string is worth noting. In this case, the digital signatures will be checked. This will allow you to immediately identify potentially dangerous files.
Check Virustotal.com. - We also strongly recommend this item. These actions will allow you to immediately display the file verification report on the Virustotal online service.
Submit Unknown Images - This subsection refers to the previous point. If the file data in Virustotal does not find, they will be sent to check. Please note that in this case, the scanning of items may take a few more time.


Here is the actual and all the settings that you need to set before. Now you can go directly to editing the autorun.
Edit autorun parameters
To edit autorun elements in Autoruns there are various tabs. Let's consider the more detailed assignment and the process of changing parameters.
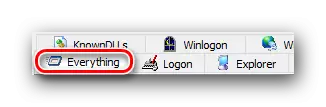
- By default, you will see the Open tab "Everything". This tab will display absolutely all items and programs that run automatically when the system is loaded.
- You can see the strings of three colors:
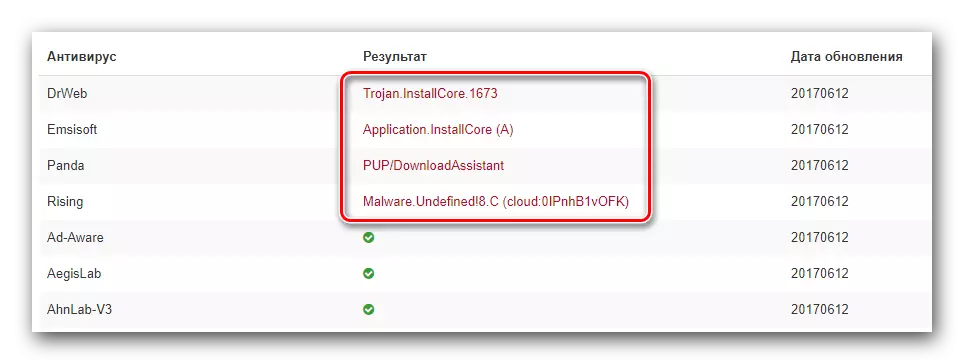
- In addition to the color of the string, you should pay attention to the numbers that are at the very end. This refers to the report Virustotal.
- Note that in some cases these values can be red. The first digit means the number of suspicion of suspicion at risk, and the second is the total number of checks. Such records do not always mean that the selected file is a virus. Do not eliminate errors and errors of the scan itself. Clicking the left mouse button on numbers, you will get to the site with the results of the check. Here you can see what there are suspicions, as well as a list of antiviruses, which were conducted.
- Such files should be excluded from autoload. To do this, it is enough to remove the tick opposite the file name.
- It is not recommended to delete unnecessary parameters forever, as it will be problematic to return them to the place.
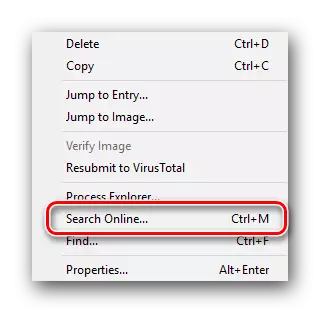
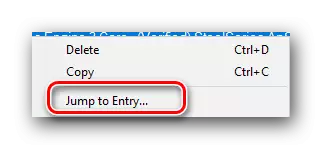
- By right-clicking on any file, you will open the additional context menu. In it, you should pay attention to the following items:
- Now let's go through the main tabs of the Autoruns. We have already mentioned that in the "EVERYTHING" tab, all the elements of the startup are arranged. Other tabs allow you to control autorun parameters in different segments. Let's consider the most important of them.
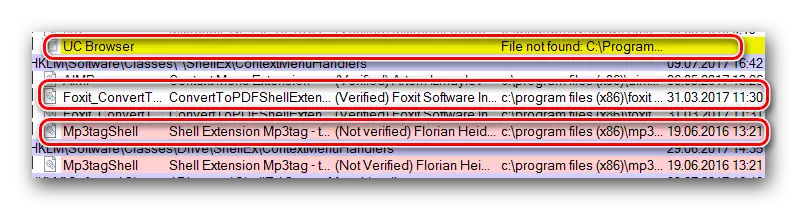
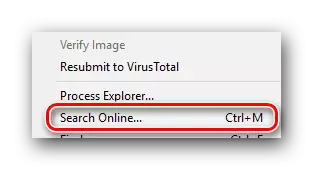
Yellow . This color means that only the path in the registry is specified to a specific file, and the file itself is missing. Best of all such files do not disable, as this can lead to various kinds of problems. If you are not sure to assign such files, then highlight the string with its name, and then right-click. In the context menu that appears, select Search Online. In addition, you can highlight the string and simply press the Ctrl + M key combination.
Pink . This color signals that the selected item does not have a digital signature. In fact, there is nothing terrible in this, but most modern viruses are just distributed without such a signature.
Lesson: We solve the problem with a Digital driver signature verification
White . This color is a sign that everything is in order with the file. It has a digital signature, the path to the file itself and the registry branch is prescribed. But despite all these facts, such files can still be infected. We will tell about it further.


Jump to Entry. . By clicking on this line, you will open the window with the location of the selected file in the startup folder or in the registry. This is useful in situations where the selected file needs to be removed completely from the computer or change its name / value.
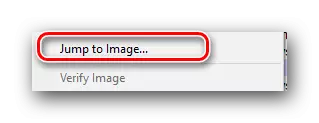
Jump to Image. . This option opens a window with a folder to which this file was installed by default.
Search Online . We have already mentioned about this option. It will allow you to find information about the selected element on the Internet. This item is very useful in the case when you are not sure whether to disable the selected file for autoloading.

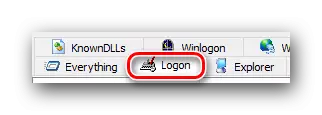
Logon. . This tab contains all applications installed by the user. Puting or removing ticks from the corresponding Chekboxers, you can easily enable or disable the autoload of the selected software.
Explorer . In this branch, you can disable extra applications from the context menu. This is the most menu that occurs when you press the file with the right mouse button. It is in this tab that you can turn off annoying and unnecessary elements.

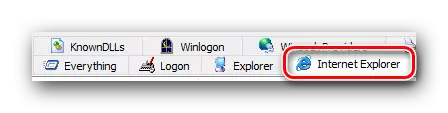
Internet Explorer. . This item is likely to do not need a submission. As the name implies, this tab contains all the autoload elements that belong to the Internet Explorer browser.
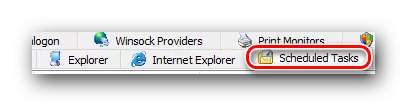
Scheduled Tasks . Here you will see a list of all the tasks that were scheduled by the system. This includes various checks of updates, defragmentation of hard drives and other processes. You can disable extra scheduled tasks, but do not turn off those that you do not know.
Services. . As the name follows, this tab contains a list of services that are automatically downloaded when the system is started. Which of them leave, and which turn off - to solve only you, as all users have different configurations and software needs.

Office. . Here you can turn off the startup elements that belong to the Microsoft Office software. In fact, you can disable all items to speed up the download of your operating system.

Sidebar Gadgets. . This section includes all the gadgets of additional Windows panels. In some cases, gadgets can be downloaded automatically, but not to perform any practical functions. If you have not been installed, then most likely your list will be empty. But if you need to disable the installed gadgets, you can do this in this tab.

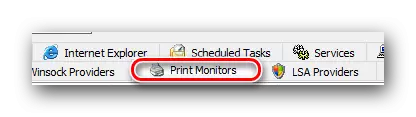
Print Monitors. . This module allows you to turn on and off for autoloading various items that relate to printers and their ports. If your printer is missing, you can turn off local parameters.
That's actually all the parameters that we would like to tell you in this article. In fact, tabs in Autoruns are much larger. However, they need deeper knowledge to edit them, since rampant changes in most of them can lead to unpredictable consequences and problems with the OS. Therefore, if you still decide to change the remaining parameters, then do it carefully.
If you are the owner of the Windows 10 operating system, then our special article may also come in handy, which addresses the topic of adding autoload elements for the specified OS.
Read more: Adding applications to autoloading on Windows 10
If during the use of Autoruns you will have additional questions, then boldly ask them in the comments to this article. We will gladly help you optimize the autoload of a computer or laptop.