

Installation of the operating system (OS) is a difficult process that requires sufficiently deep knowledge in the field of computer ownership. And if many have already figured out how to install Windows to your computer, then with Linux Mint is more complicated. This article is intended to explain to the ordinary user all the nuances arising from the installation of a popular OS based on the Linux kernel.
After that, the program will open for the hard disk markup. This process is quite complex and volumetric, so we consider it in more detail below.
Step 5: Disc markup
Manual disk marking mode allows you to create all the necessary sections for optimal operation of the operating system. In fact, for MINT, just one root section is enough, but in order to increase the level of security and ensure optimal system operation, we will create three: root, home and swap section.
- The first thing is necessary from the list located at the bottom of the window, to determine the media to which the GRUB system loader will be installed. It is important that it is located on the same disk where the OS will be installed.
- Next, you need to create a new partition table by clicking on the button of the same name.

Next, you will need to confirm the action - click on the "Continue" button.

Note: If the disk was previously marked, and this happens when one OS is already installed on the computer, then this item must be skipped.
- The partition table was created and the program "Free Place" appeared in the workspace. To create the first partition, select it and press the button with the "+" symbol.
- The Create section window opens. It needs to specify the size of the space allocated, the type of new section, its location, application and point of mounting. When creating a root section, it is recommended to use the settings shown in the image below.
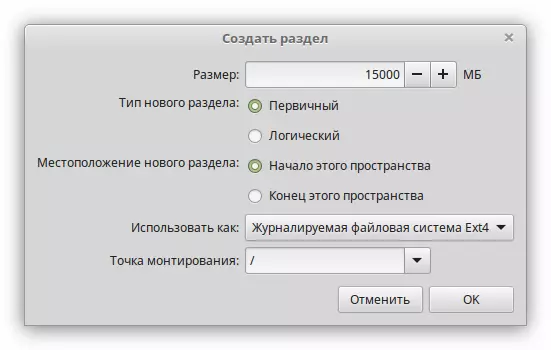
After entering all the parameters, click "OK".
Note: If you install on the disk with already existing partitions, then define the type of section as "logical".
- Now you need to create a swap section. To do this, select the "Free Place" item and press the "+" button. In the window that appears, enter all the variables, referring to the screenshot below. Click OK.

Note: The amount of memory allocated to the paging section should be equal to the volume of the installed RAM.
- It remains to create a home partition where all your files will be stored. To do this, again, select the "Free Place" string and press the "+" button, after which fill all the parameters according to the screenshot below.

Note: Under the home section, select the remaining space on the disk.
- After all sections were created, click "Set Now".
- A window will appear where all the actions that were produced earlier will be listed. If you have not noticed anything superfluous, click "Continue" if there are some discrepancies - "return".


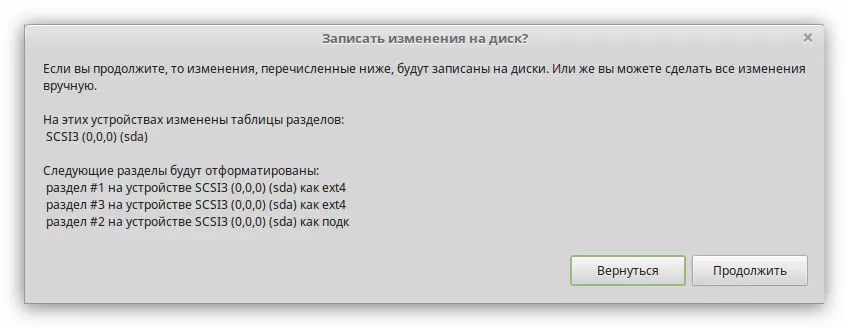
On this disk markup is completed, and it remains only to make some system settings.
Step 6: Completing the installation
The system has already started to be installed on your computer, at this time you are offered to configure some of its elements.
- Specify your location and click the Continue button. You can do this in two ways: Click on the map or enter the location manually. From your place of residence will depend on the computer. If you specified incorrect information, you can change it after installing Linux Mint.
- Determine the keyboard layout. By default, the appropriate language of the installer is selected. Now you can change it. This parameter can also be set after installing the system.
- Fill your profile. You must enter your name (you can enter it with Cyrillic), computer name, username and password. Special attention is paid to the username, since through it you will receive the right of the superuser. Also at this stage you can determine whether to automatically log in or when you start a computer every time you request a password. As for the encryption of the home folder, then put a tick if you plan to configure the remote connection to the computer.

Note: When you specify a password consisting of all of several characters, the system writes that it is short, but this does not mean that it cannot be used.


After specifying all user data, the setup will be completed and you can only wait for the end of the installation process of Linux Mint. You can follow the progress, focusing on the indicator at the bottom of the window.

Note: During installation, the system remains operational, so you can fold the installer window and use it.
Conclusion
Upon completion of the installation process, you will be asked to choose two options: stay in the current system and continue to study it or restart your computer and log in to the installed OS. Left, keep in mind that after rebooting, all changes will disappear.