

There are situations where the user is far from his computer, but it is necessary to connect to it for information or a certain operation. Also, the user may experience a need for assistance. To solve such a problem, a person who has decided to provide such assistance needs to be remotely connected to the device. Let's find out how to configure the remote access to the PC running Windows 7.

Method 2: AMMYY ADMIN
The next very popular third-party program for organizing remote access to the PC is AMMYY ADMIN. The principle of operation of this tool is similar to the algorithm of action in TeamViewer.
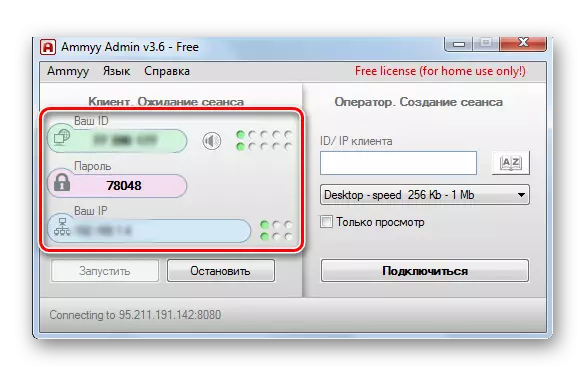
- Run the AMMYY ADMIN to the PC to which you will connect. Unlike TeamViewer, it is not necessary to even need to be installed to start. In the left part of the window that opened in the "Your ID", "Password" and "Your IP" fields, data will be displayed for the connection procedure from another PC. You can need a password, but you can choose the second component for the input (ID or IP of the computer).
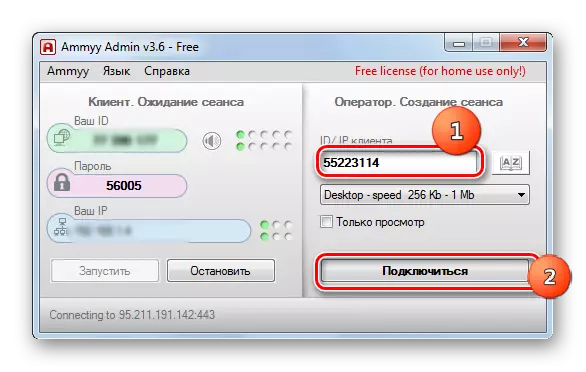
- Now start the AMMYY ADMIN to the PC from which you will be connected. In the right-hand part of the application window in the "ID / IP client" field, enter an eight-digit ID or IP of that device with which you want to connect. How to find out this information, we told in the previous paragraph of this method. Next click on "Connect".
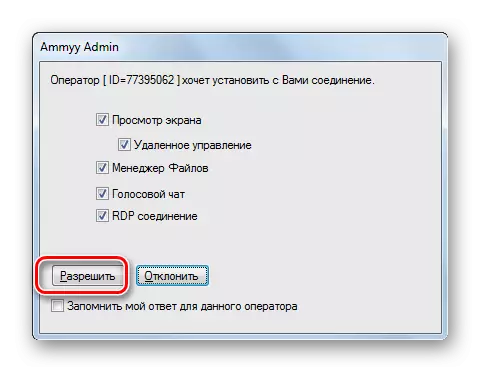
- The password input window opens. The empty field requires to enter a five-digit code, which is displayed in the AMMYY ADMIN program on a remote PC. Next click "OK".
- Now the user who is near a remote computer must confirm the connection by clicking the "Allow" button in the window that appears. Immediately, if necessary, removing the check mark near the relevant items, it may limit the execution of certain operations.
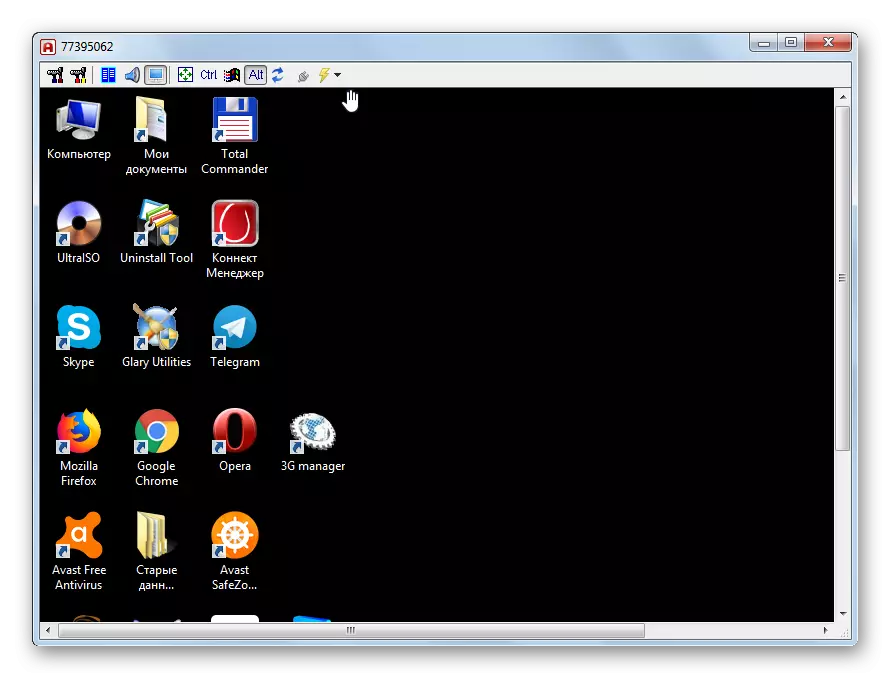
- After that, the "desktop" of the remote device will appear on your PC and you can produce the same manipulations on it as directly at the computer.

But, of course, you will have a legitarious question, what to do if no one will be in a PC to confirm the connection? In this case, on this computer, you need not only to run AMMYY ADMIN, write it login and password, but also make a number of other actions.
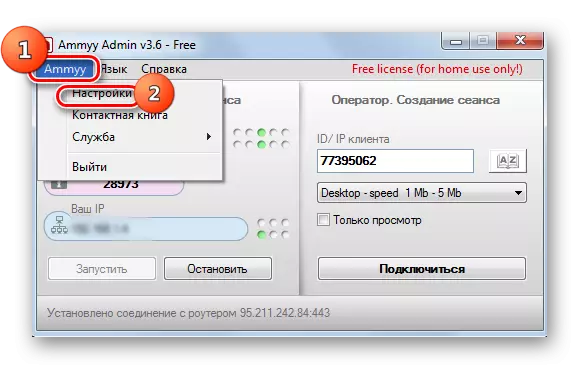
- Click in the "AMMYY" menu. In the open list, choose "Settings".
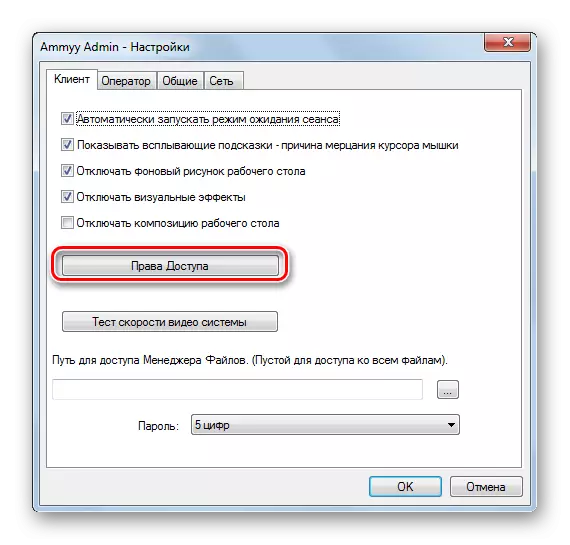
- In the settings window that appears in the Client tab, click on the "Access Right" button.
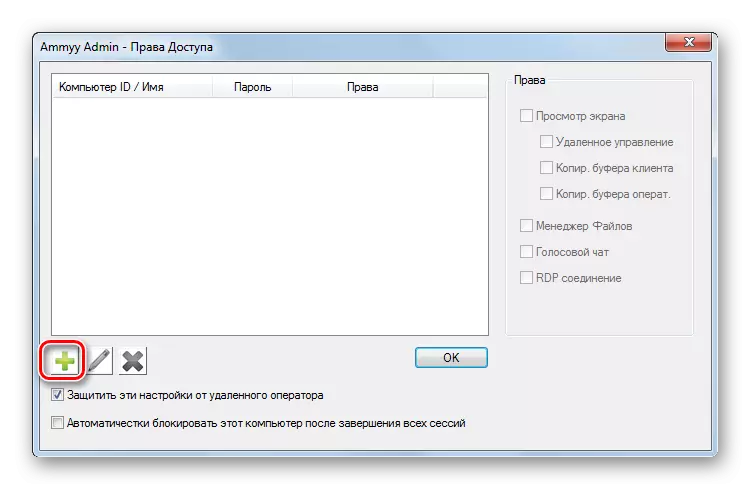
- Opens the "Access Rights" window. Click on the icon in the form of a green icon "+" in its lower part.
- A small window appears. In the Computer ID field, you need to enter the AMMYY ADMIN ID on the PC from which access to the current device will be accessed. Therefore, this information needs to know in advance. In the lower fields you can enter a password when you enter the access of a user with the specified ID. But if you leave these fields empty, then the password is not even required when connected. Click "OK".
- The specified ID and its rights are now displayed in the "Access Rights" window. Click "OK", but do not close the AMMYY ADMIN program itself and do not disconnect the PC.
- Now that you find yourself in the distance, it will be enough to start AMMYY ADMIN on any device supported by it and enter the ID or IP of that PC, over which the manipulations described above. After clicking on the "Connect" button, there will immediately be compounded without the need to introduce a password or confirmation from the destination.


Method 3: Setting the "Remote Desktop"
You can configure access to another PC, and using the built-in operating system tool, which is called "Remote Desktop". It is necessary to take into account that if you are connected not to the server computer, then only one user can perform work with it, since the simultaneous connection of several profiles is not provided.
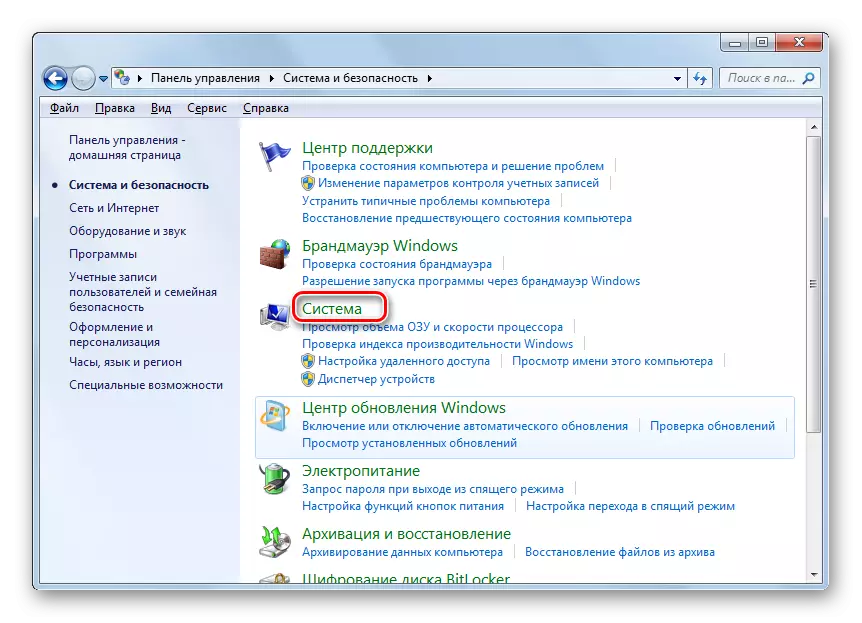
- As in previous methods, first of all, you need to configure the computer system to which the connection will be made. Click "Start" and go to the "Control Panel".
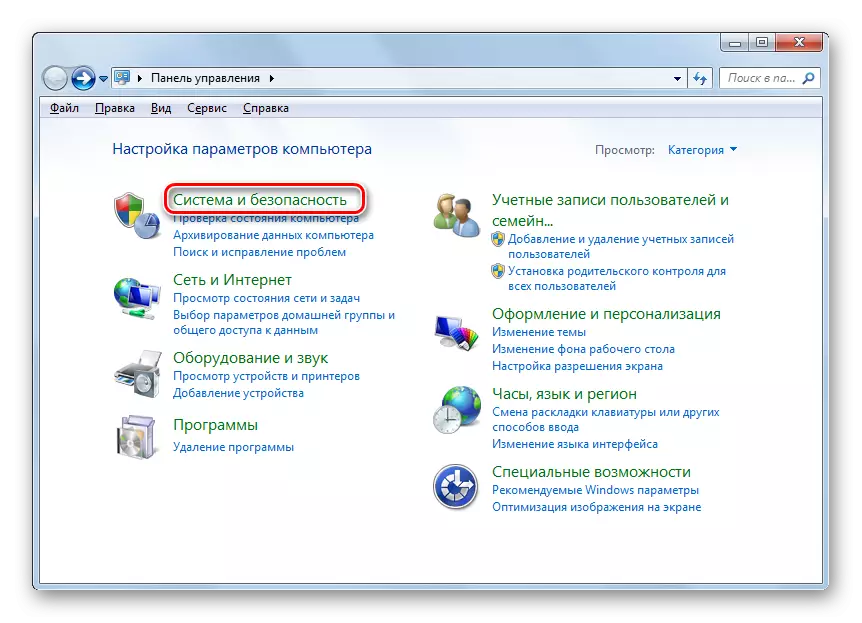
- Go through the "System and Security" item.
- Now go to the System section.
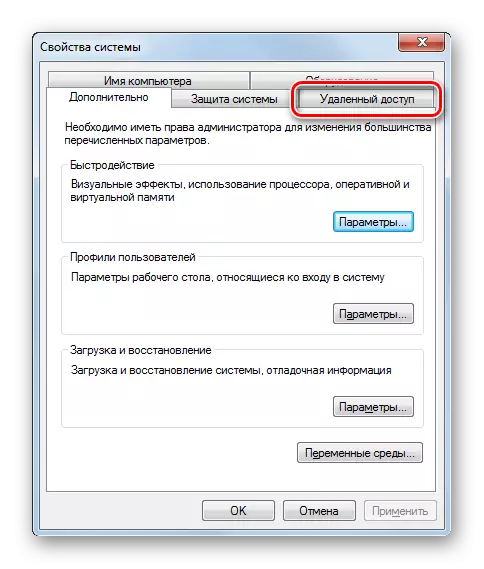
- On the left side of the open window, click on the "Advanced Parameters" inscription.
- Opened options for setting up additional parameters. Click by name "Remote Access" section.
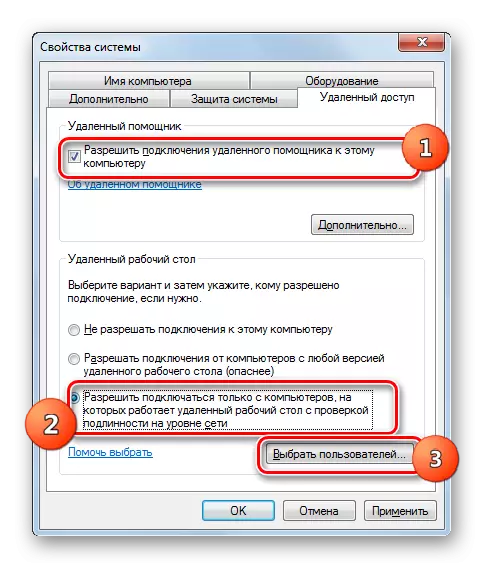
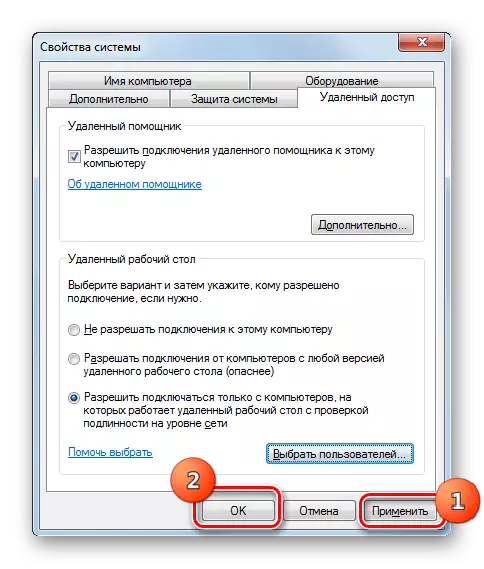
- In the "Remote Desktop" block, the default radio channel must be active in the "Do not allow connection ..." position. You need to rearrange it to "Allow connect only from computers ...". Also install the markup opposite the inscription "Allow the connection of a remote assistant ..." if it is missing. Then click "Select users ...".
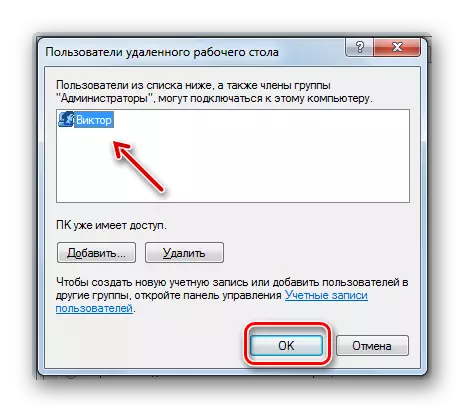
- A shell "Remote Desktop Users" appears to select users. Here you can assign those profiles from which remote access to this PC will be allowed. If they are not created on this computer, you need to pre-create accounts. Administrator's rights profiles are not necessary to add to the "remote desktop users" to the window, since it is provided by the right of access by default, but under one condition: these administrative accounts must have a password. The fact is that in the security policy of the system, the restriction is written that the specified view of the access can be provided only if you have a password.
All other profiles, if you want to give them the opportunity to enter this PC remotely, you need to add to the current window. To do this, click "Add ...".
- In the window that opens, "Select:" Users "" Wheel through the commas registered on this computer names of accounts of those users who wish to add. Then press OK.
- Selected accounts should be displayed in the Remote Desktop Users window. Click OK.
- Next, clicking "Apply" and "OK", do not forget to close and the "System Properties" window, and otherwise not all the changes you make will take effect.
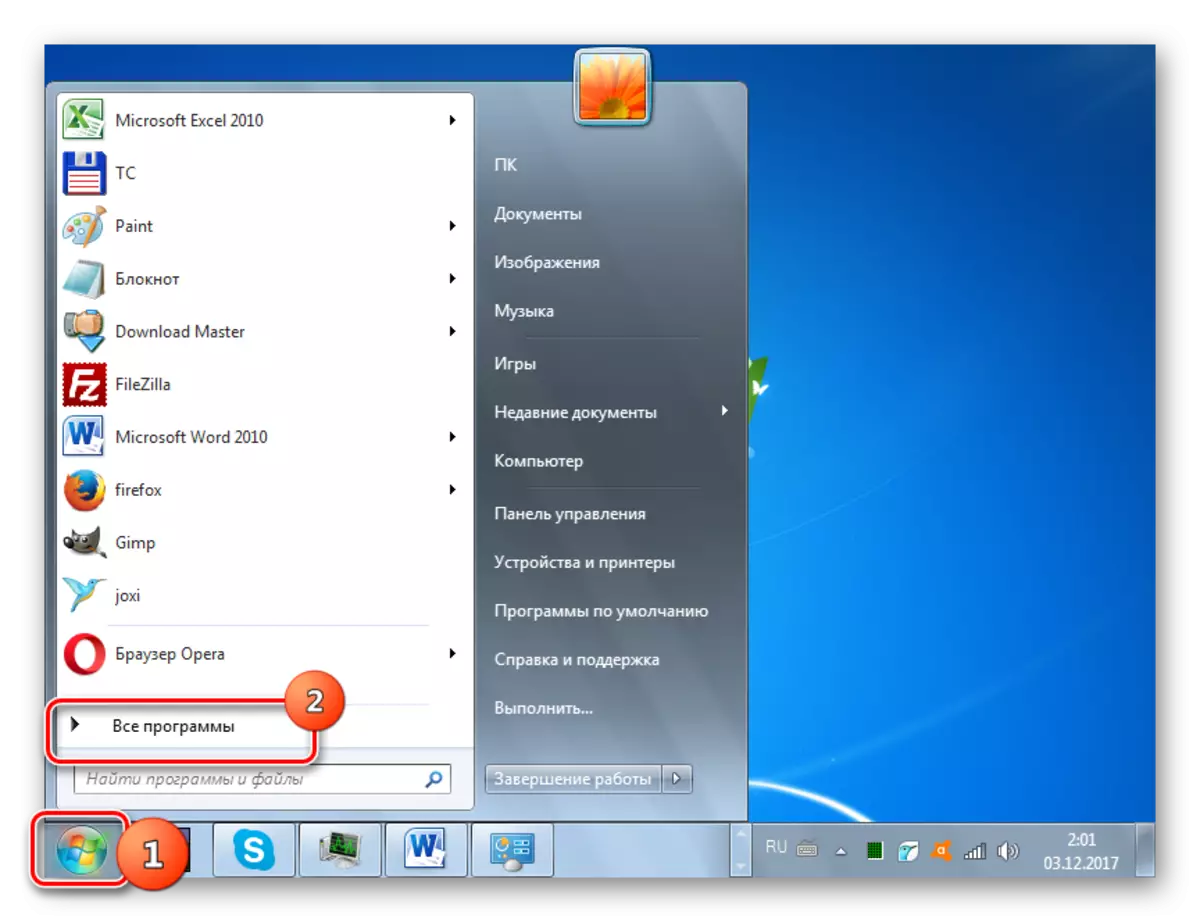
- Now you need to learn the IP of the computer to which you will perform connection. In order to obtain the specified information, call the "Command Line". Click again "Start", but this time go to the inscription "All Programs".
- Next, go to the "Standard" directory.
- Having found the "Command Line" object, make it right with the right mouse button. In the list, select the "Run from the administrator" position.
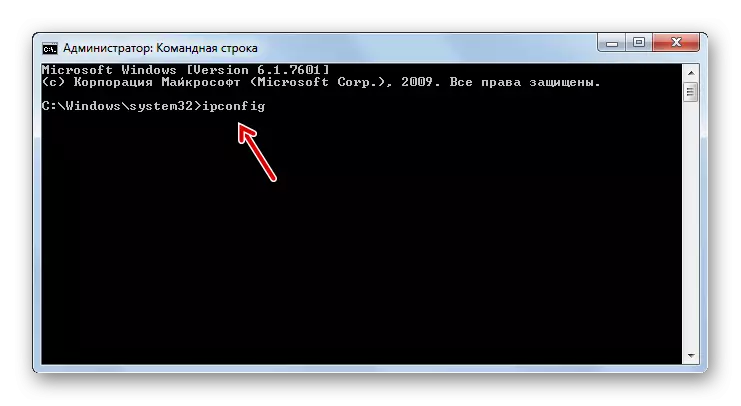
- The Shell "Command Line" will start. Drive the following command:
ipconfig
Click ENTER.
- In the window interface, a number of data will be displayed. Look for among them the value that matches the "IPv4 address" parameter. Remember it or record it, as this information is needed to connect.

It should be remembered that the connection to the PC, which is in the hibernation mode or in sleep mode, is impossible. In this regard, you need to make sure that the specified functions are disabled.
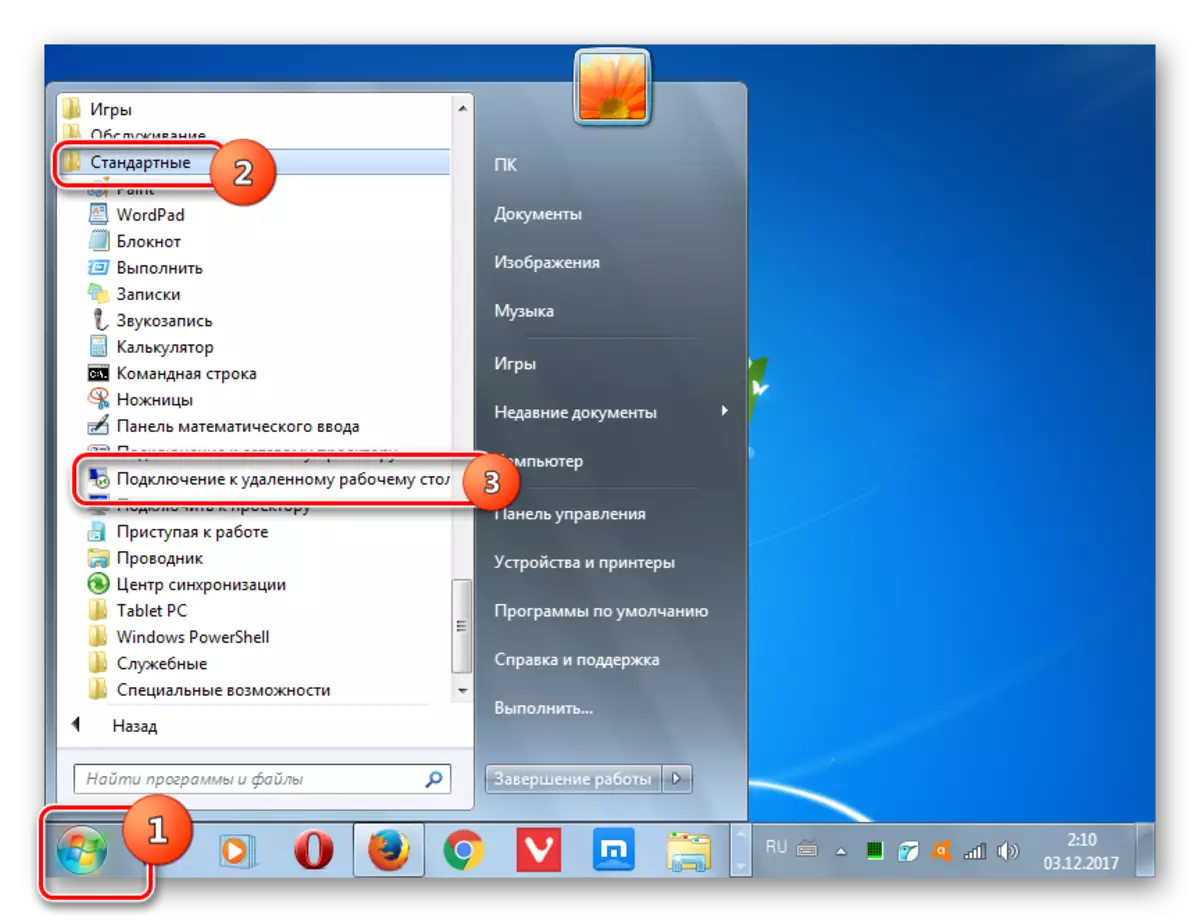
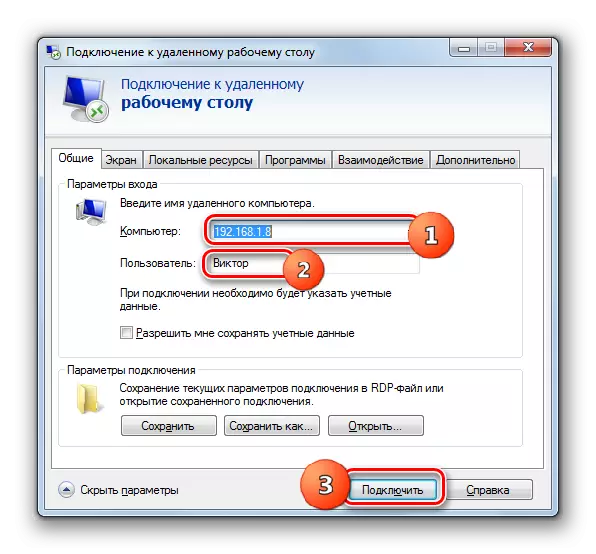
- We now turn to the parameters of the computer from which we wish to connect with the remote PC. Go to it through the "Start" in the "Standard" folder and click the name "Connect to a remote desktop".
- Window opens with the same name. Click on the inscription "Show Options".
- A whole unit of additional parameters will open. In the current window in the General tab, in the Computer field, enter the value of the IPv4 address of the remote PC, which we have previously learned via the "Command Line". In the "User" field, enter the name of one of those accounts whose profiles were previously added on a remote PC. In other tabs of the current window, you can make more subtle settings. But as a rule, it is not required to change anything for the usual connection. Next click "Connect".
- Connect to a remote computer.
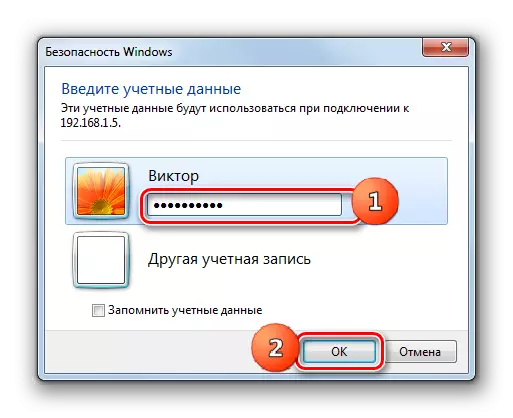
- Next, you will need to enter a password from this account and click on the "OK" button.
- After that, the connection will occur and the remote desktop will be opened in the same way as in previous programs.

It should be noted that if the default settings are installed in the Windows Firewall, it is not necessary to change anything in them to use the above method. But if you changed the parameters in a standard protector or use third-party firewalls, it may be necessary to further adjust the specified components.
The main disadvantage of this method is that with the help of it without any problems, you can connect to the computer only on the local network, but not via the Internet. If you want to configure communication via the Internet, then, in addition to the all described, you will have to perform the operation of the available ports on the router. The algorithm for its execution from various brands and even models of routers can be very different. In addition, if the provider allocates dynamic, not a static IP, then additional services will have to use.


We found out that in Windows 7 remote connection to another computer can be installed, both using third-party programs and using the built-in OS tool. Of course, the access configuration procedure using specialized applications is much easier than a similar operation performed exclusively by the system functionality. But at the same time, making a connection using the built-in toolkit Windows, you can get around various restrictions (commercial use, limit for the connection time, etc.), which are available from other manufacturers, as well as provide a better display of the "desktop" . Although, given how difficult it is to perform this in the absence of a connection on a local network, having only a connection through the World Wide Web, in the latter case, the optimal solution will still use third-party programs.