

If you need to analyze or intercept network packets in Linux, it is best to use a console utility for this. TCPDUMP. . But the problem arises in rather complicated management. An ordinary user will seem to work with the utility uncomfortable, but it is only at first glance. The article will be described how the TCPDUMP is arranged, which syntax it has, how to use it, and numerous examples of its use will be presented.
READ ALSO: Internet connection setup manuals in Ubuntu, Debian, Ubuntu Server
Installation
Most developers of Linux operating systems are included in the TCPDUMP utility to the list of pre-installed, but if for some reason it is missing in your distribution, you can always download it and install it through the Terminal. If your OS is based on Debian, and this is Ubuntu, Linux Mint, Kali Linux and their like, you need to execute this command:Sudo Apt Install TCPDUMP
When you install, you need to enter a password. Please note that when it is not displayed, it is not displayed, also to confirm the installation you need to enter the "D" symbol and press ENTER.
If you have Red Hat, Fedora or CentOS, then the installation team will have the following form:
Sudo Yam Install TCPDUMP
After the utility is installed, it can immediately use it. About this and many other things will be told on the text.
READ ALSO: PHP Installation Guide in Ubuntu Server
Syntax
Like any other command, TCPDUMP has its own syntax. Knowing it, you can set all the necessary parameters that will be taken into account when executing the command. The syntax is as follows:
TCPDUMP Options -i Filter Interface
When using the command, you must specify the interface for tracking. Filters and options are not mandatory variables, but they allow you to perform more flexible settings.
Options
At least the option is not necessarily indicating, you still need to list. The table demonstrates not all of their list, but only the most popular, but they are more than enough to solve most of the tasks.| Option | Definition |
|---|---|
| -A. | Allows you to sort packets with ASCII format |
| -L. | Adds a scroll function |
| -I. | After entering, you need to specify the network interface that will be tracked. To start tracking all the interfaces, enter the word "any" after the option. |
| -c. | Completes the tracking process after checking the specified number of packages |
| -w. | Generates a text file with verification report |
| -E. | Shows the level of the Internet connection package |
| -L. | Displays only those protocols that support the specified network interface |
| -C. | Creates another file while recording a package if its size is greater than the specified |
| -r. | Opens a read file that was created using the -W option. |
| -J. | TimeStamp format will be used to record packages |
| -J. | Allows you to view all the available TimeStamp formats. |
| -G. | Used to create a file with logs. The option also requires the instructions of the time value, after which a new log will be created. |
| -V, -vv, -vvv | Depending on the number of characters in the option, the command output will become more details (the increase is directly proportional to the number of characters) |
| -f. | In the output shows the name of the IP address domain |
| -F. | Allows you to read information not from the network interface, but from the specified file |
| -D. | Demonstrates all network interfaces that can be used |
| -N. | Deactivates the display of domain names |
| -Z. | Specifies the user under the account of which all files will be created. |
| -K. | Skip test analysis |
| -Q. | Demonstration of brief information |
| -H | Allows you to detect 802.11S headers |
| -I. | Used when capturing packets in monitor mode |
After breaking the options, just below we move directly to their applications. In the meantime, filters will be considered.
Filters
As mentioned at the very beginning of the article, you can add filters to TCPDUMP syntax. Now the most popular of them will be considered:
| Filter | Definition |
|---|---|
| Host. | Serves to indicate the name of the host |
| net. | Specifies IP subnet and network |
| IP | Used to specify the address of the protocol |
| SRC | Displays packages that were sent from the specified address. |
| DST | Displays packages that were obtained by the specified address. |
| ARP, UDP, TCP | Filtration by one of the protocols |
| Port. | Displays information related to a specific port |
| and, OR | Serves to combine multiple filters in the team |
| less, greater | Package output less or more specified size |
All of the above filters can be combined with each other, so in the issuance of the command you will observe only the information you want to see. To understand more detail in the use of the above filters, it is worth leading examples.
See also: Frequently used commands in Terminal Linux
Examples of using
Frequently used TCPDUMP command syntax options will now be shown. It will not be possible to list them, since their variations can be an infinite set.View the list of interfaces
It is recommended to initially check the list of all its network interfaces that can be traced. From the above table, we know that for this you need to use the -D option, so in the terminal, run the following command:
Sudo tcpdump -d.
Example:

As you may notice, in the example there are eight interfaces that can be viewed using the TCPDUMP command. The article will be given examples with PPP0, you can use any other.
Normal traffic capture
If you need to track one network interface, you can do this using the -i option. Do not forget to enter the interface name after entering it. Here is an example of the execution of such a team:
Sudo TCPDUMP -i PPP0
Please note: in front of the command itself you need to enter "sudo", as it requires the right of superuser.
Example:

Note: After pressing ENTER in "Terminal", intercepted packets will continuously. To stop their stream, you need to press the CTRL + C key combination.
If you execute a command without additional options and filters, you will see the following display format for monitored packages:
22: 18: 52.597573 IP VRRP-TOPF2.p.mail.ru.https> 10.0.6.67.35482: Flags [P.], SEQ 1: 595, ACK 1118, Win 6494, Options [NOP, NOP, TS VAL 257060077 ECR 697597623], Length 594
Where color is allocated:
- blue - the time of receipt of the package;
- Orange - version of the protocol;
- green - address of the sender;
- purple - recipient's address;
- gray - Additional information about TCP;
- Red - the size of the package (displayed in bytes).
This syntax has the ability to output in the "Terminal" window without using additional options.
Traffic capture with option -v
As you know from the table, the -V option allows you to increase the amount of information. We will analyze on the example. Check the same interface:
Sudo TCPDUMP -V -i PPP0
Example:

Here you can see that the next line appeared in the output:
IP (TOS 0x0, TTL 58, ID 30675, OFFSET 0, FLAGS [DF], Proto TCP (6), Length 52
Where color is allocated:
- Orange - version of the protocol;
- blue - the lifespan of the protocol;
- green - field header length;
- purple - version of the TCP package;
- Red - the size of the package.
Also in the command syntax you can prescribe the -vv or -vvv option, which will allow you to further increase the amount of information displayed on the screen.
-W and -R option
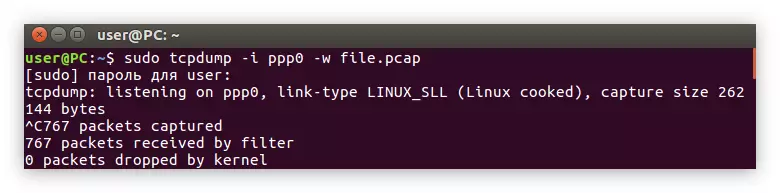
The option table mentioned the ability to save all displayed data into a separate file to later be viewed. For this corresponds to the -W option. It is quite simple to use it, just enter it in the command, and then enter the name of the future file with the ".pcap" extension. Consider all of the example:
Sudo TCPDUMP -i PPP0 -W file.pcap
Example:

Please note: during record logs to the file on the "Terminal" screen, no text is displayed.
When you want to view the recorded output, you must use the -R option, after which you write the name of the previously recorded file. It applies without other options and filters:
Sudo TCPDUMP -R File.pcap
Example:

Both of these options are perfectly suitable in cases where you need to save large volumes of text for the subsequent parsing.
Filtering by IP.
From the filter table, we know that DST allows you to display console only those packages that were obtained by the address are specified in the command syntax. Thus, it is very convenient to view the packages received by your computer. To do this, in the command you just need to specify your IP address:
Sudo TCPDUMP -i PPP0 IP DST 10.0.6.67
Example:
As you can see, in addition to DST, we also prescribed an IP filter. In other words, we said to the computer so that when selecting packets, he paid attention to their IP address, and not to other parameters.
IP can be filtered and sent packets. In the example, we will give our IP again. That is, now we are tracking which packages are departed from our computer to other addresses. To do this, you need to execute the following command:
Sudo TCPDUMP -I PPP0 IP SRC 10.0.6.67
Example:
As you can see, in the command syntax, we changed the DST filter on the SRC, thereby telling the car to search for the sender by IP.
Host filtering
By analogy with IP in the team, we can specify the Host filter to sew packages with the host of interest. That is, in the syntax, instead of the IP address of the sender / recipient, it will be necessary to indicate its host. It looks like this:
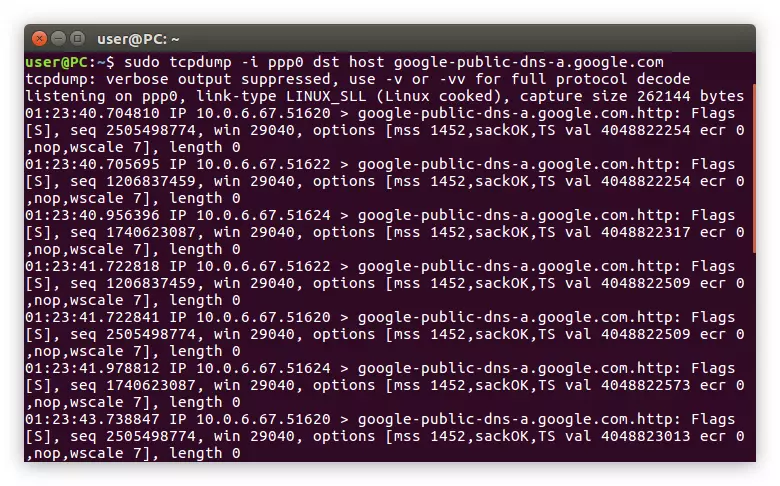
Sudo TCPDUMP -i PPP0 DST Host Google-public-dns-a.google.com
Example:
In the image you can see that only those packages that were sent from our IP on Google.com are displayed in the Terminal. How can I understand, instead of the Google host, you can enter any other.
As in the case of filtering by IP, in the DST syntax, you can replace the SRC to see the packages that are sent to your computer:
Sudo TCPDUMP -i PPP0 SRC Host Google-public-dns-a.google.com
Note: The Host filter must stand after DST or SRC, otherwise the command will give an error. In the case of filtering by IP, on the contrary, DST and SRC stand in front of the IP filter.
Application and OR filter
If you have the need to use several filters at once in the same command, then you need to use the And or OR filter (depends on the case). Pointing filters in the syntax and separating them with these operators, you "make" work them as one. On the example it looks like this:
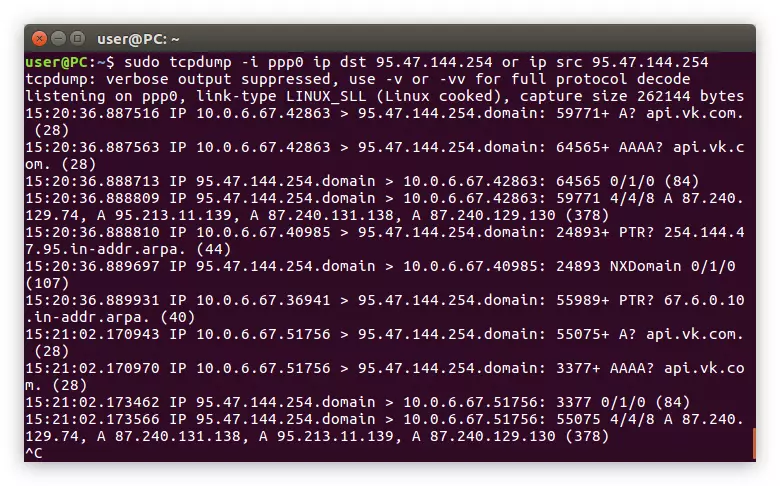
Sudo TCPDUMP -I PPP0 IP DST 95.47.144.254 OR IP SRC 95.47.144.254
Example:

From the syntax of the command, it is clear that all packages that were sent to the "Terminal" are displayed on the address 95.47.144.254 and packages obtained by the same address. You can also change some variables in this expression. For example, instead of an IP, specify Host or replace the addresses yourself.
PORT and PORTRANGE filter
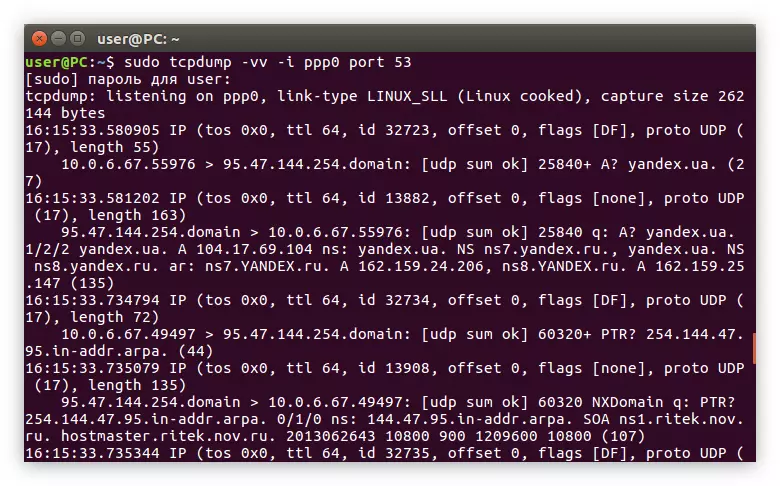
The PORT filter is perfect in cases where you need to get information about packages with a specific port. So, if you need to see only answers or DNS requests, you need to specify port 53:
Sudo TCPDUMP -VV -I PPP0 Port 53
Example:

If you want to view HTTP packages, you need to enter port 80:
Sudo TCPDUMP -VV -I PPP0 Port 80
Example:

Among other things, it is possible to track the range of ports at once. For this purpose, the PORTRANGE filter is applied:
Sudo TCPDUMP Portrange 50-80

As you can see, in a ligament with the PORTRANGE filter, it is not necessary to specify additional options. Just just set the range.
Filtering by protocols
You can also display only the traffic that corresponds to any protocol. To do this, use the name of this protocol as a filter. We will analyze on the example of UDP:
Sudo TCPDUMP -vvv -i PPP0 UDP
Example:
As you can see in the image, after executing the command in the Terminal, only packages with the UDP protocol appeared. Accordingly, you can filter and other, for example, ARP:
Sudo TCPDUMP -VVV -I PPP0 ARP
or TCP:
Sudo TCPDUMP -VVV -I PPP0 TCP
Net Filter
The NET operator helps to filter the packages by taking the designation of their network. It is also easy to use, as well as the rest - you need to specify the NET attribute in the syntax, then enter the network address. Here is an example of such a team:
Sudo TCPDUMP -I PPP0 NET 192.168.1.1
Example:
Package Filtering
We did not consider two more interesting filters: LESS and GREATER. From the table with filters, we know that they serve to output data packets more (less) or less (greater) size indicated after entering the attribute.
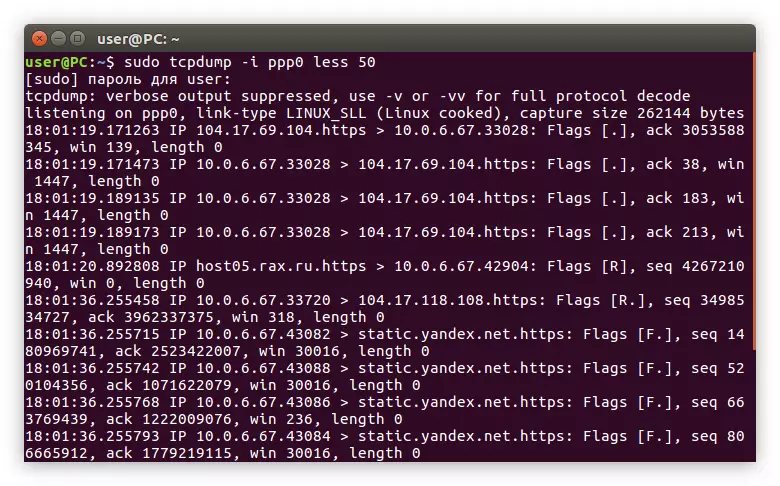
Suppose we want to follow only the packages that do not exceed 50 bits, then the team will have the following form:
Sudo TCPDUMP -I PPP0 LESS 50
Example:
Now let's see the packages in the Terminal, the size of which is more than 50 bits:
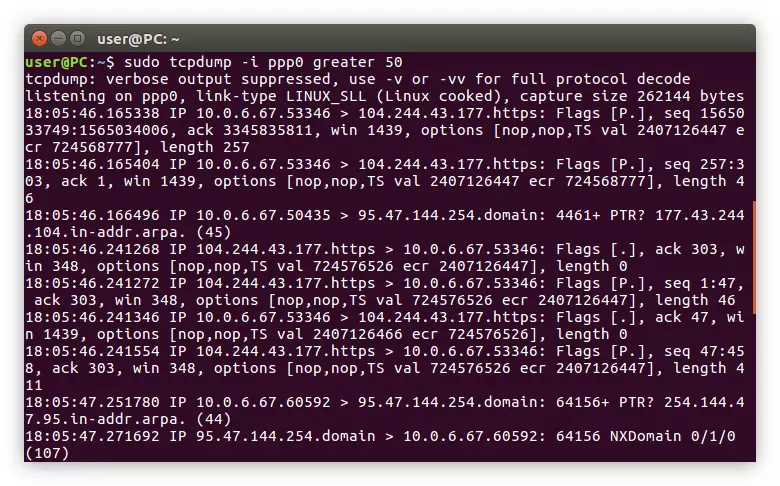
Sudo TCPDUMP -I PPP0 GREATER 50
Example:

As you can see, they are applied equally, the difference is only in the name of the filter.
Conclusion
At the end of the article, we can conclude that the team TCPDUMP. - This is a great tool with which you can track any data passed on the Internet. But for this not enough to simply enter the command itself into the "Terminal". It will be possible to achieve the desired result only if you use all sorts of options and filters, as well as their combinations.