
Making good pictures on your iPhone, the user is almost always faced with the need to transfer them to another Apple gadget. About how you can send photos, we'll talk further.
Transferring pictures from one iPhone to another
Below we look at some effective ways to transfer images from a single Apple-device to another. It does not matter, you carry pictures to your new phone, or send an image to a friend.Method 1: AirDrop
Suppose a colleague to whom you want to send the image, is currently close to you. In this case, efficient use AirDrop function allowing to instantly transmit images from one to another iPhone. but before you use this tool, make sure that:
- Both devices installed iOS not lower than 10 version;
- Smartphones activated Wi-Fi and Bluetooth;
- If any of the phones activated the modem mode, it is worth the time off.
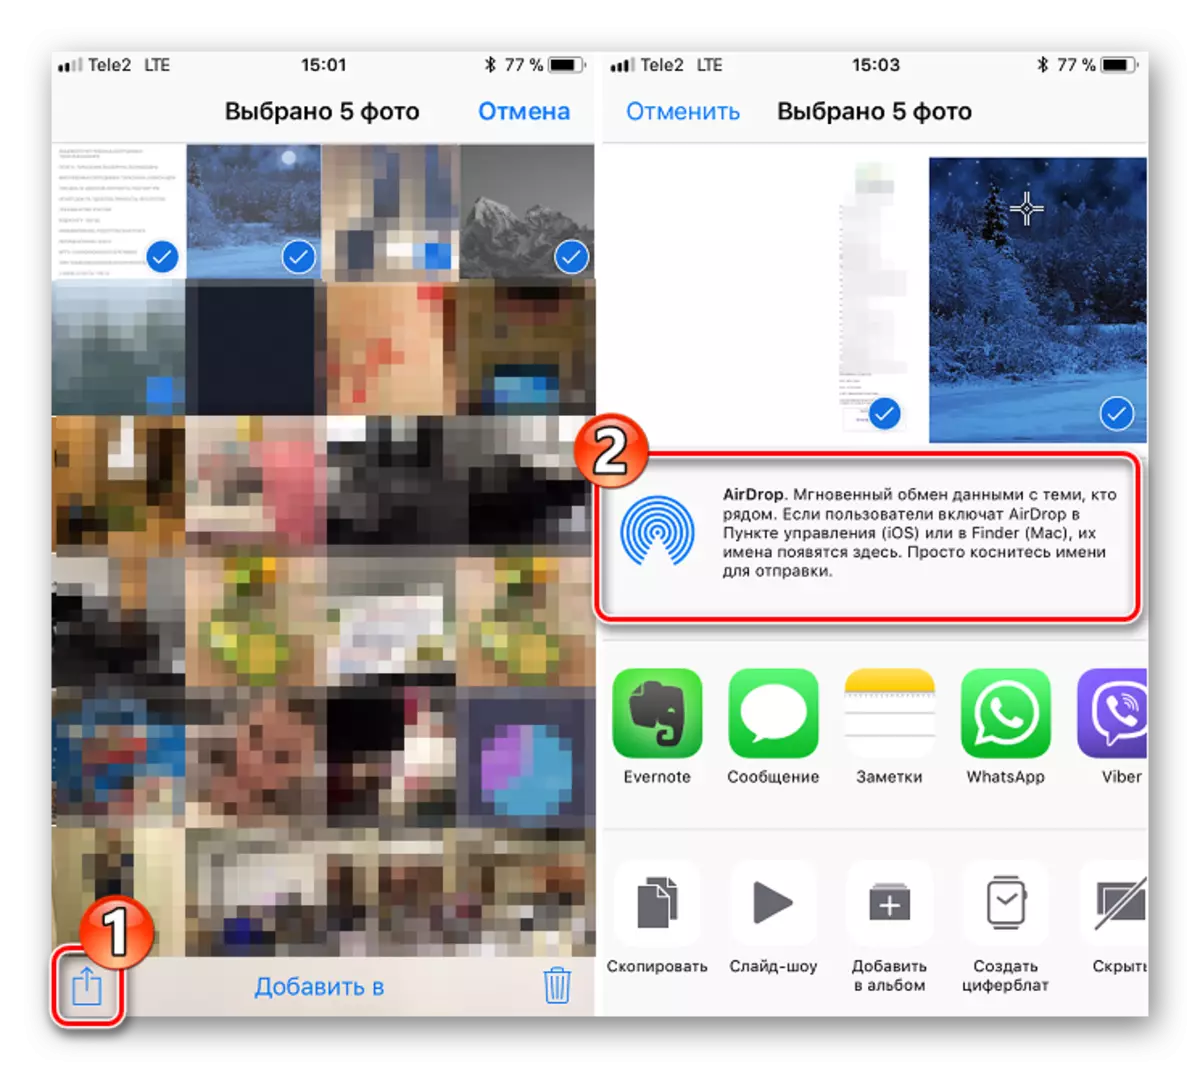
- Open the app Foto.Esli you want to send multiple images, click on the top right button "Select", and then select the photos you want to transfer.
- Tapnite in the lower left corner of the icon and send in the AirDrop section, select your buddy icon (in this case iPhone users are no nearby).
- After a few moments, the images will be transferred.

Method 2: Dropbox
Service Dropbox, as, indeed, any other cloud storage, it is convenient to use for image transfer. Consider further process exactly to his example.
Download Dropbox
- If you have not yet installed Dropbox, download it for free from the App Store.
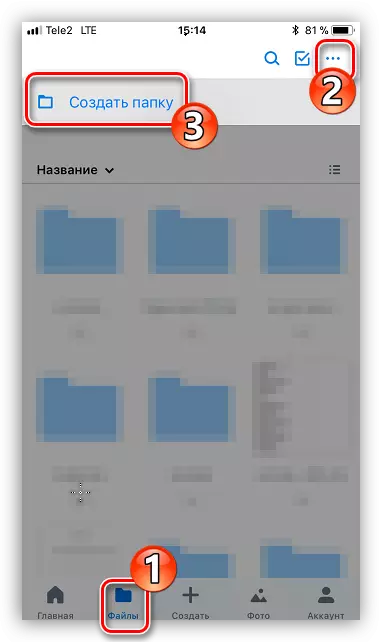
- Run the application. To start, you need to upload to the "cloud" images. If you want to create for them a new folder, go to the tab "Files" tapnite in the top right corner of the icon with three dots, select the "Create Folder".
- Enter a name for the folder, then clicking on the button "Create".
- At the bottom tapnite on the button "Create". will display additional menu on the screen, in which select "Upload".
- Mark the desired images, and then selecting the "Next" button.
- Note the folder to which images are added. If the folder you specified by default, does not suit you, tapnite under the item "Select another folder", and then select the one you want.
- Loading images on the Dropbox server will begin, the duration of which will depend both on the size and number of images and the speed of your Internet connection. Wait for the synchronization icon near each photo will disappear.
- If you transferred images to another your iOS device, then to see them, it is enough to go on the gadget to the Dropbox application under your profile. If you want to reneeze the pictures on the iPhone of another user, the folder must be "split". To do this, go to the "Files" tab and select the optional menu icon near the desired folder.
- Click on the Share button, and then enter your mobile phone number, Dropbox login or user email address. Select the "Send" button in the upper right corner.
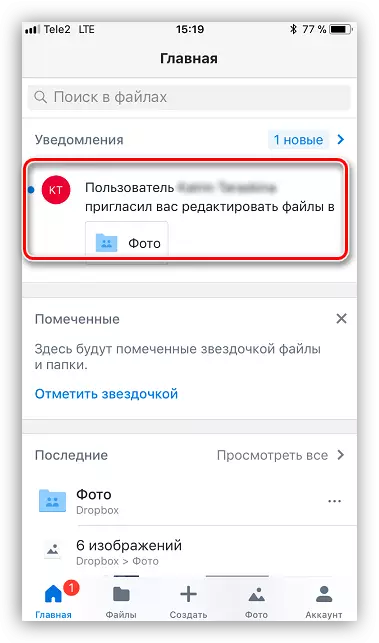
- The user will come from Dropbox notification that you have provided it with access to viewing and editing files. The desired folder is immediately displayed in the application.


Method 3: Vkontakte
By and large, instead of the VK service, almost any social network or messenger can be used with the possibility of sending photos.
Download vk.
- Run the VKontakte application. Make a swipe left to open the application sections. Select "Messages".
- Find the user to whom you plan to send the photo cards and open the dialogue with it.
- In the lower left corner, select the clip icon. An additional menu will appear on the screen in which you will need to mention the pictures designed for transmission. At the bottom of the window, select the Add button.
- Once the images are successfully added, you can only click the "Submit" button. In turn, the caller will immediately get notified for any received files.


Method 4: iMessage
Trying to make the communication between users of iOS-products as comfortable as possible, Apple has long been implemented in standard reports additional service iMessage, which lets you send messages and images to other users to the iPhone and iPad for free (in this case, only the Internet traffic will be used).
- First, make sure that you have, and your interlocutor has an iMessage service activated. To do this, open the phone settings, and then go to the "Messages" section.
- Check that the switch about «iMessage» item is active. If necessary, enable this option.
- The point is left for small - to send pictures. To do this, open the message application and select the new text icon in the upper right corner.
- To the right of the Count "To" tap on a plus card icon, and then in the displayed directory, select the desired contact.
- Click in the lower left corner on the icon with the camera, after passing to the "Media" point.
- Select one or more photo to send, and then complete the message.


Please note that with the active IMESSAGE option, your dialogs and the send button must be highlighted in blue. If the user, for example, is the owner of the Samsung phone, then in this case the color will be green, and the transmission will be executed as an SMS or MMS message in accordance with the tariff set by your operator.
Method 5: Backup
And if you move from one iPhone to another, you are most likely important to copy absolutely all images. In this case, you will need to create a backup copy to subsequently install it on another gadget. The most convenient to do it on the computer using iTunes.
- To begin with, you will need to create a relevant backup on one unit, which will later be transferred to another device. This is described in more detail in our separate article.
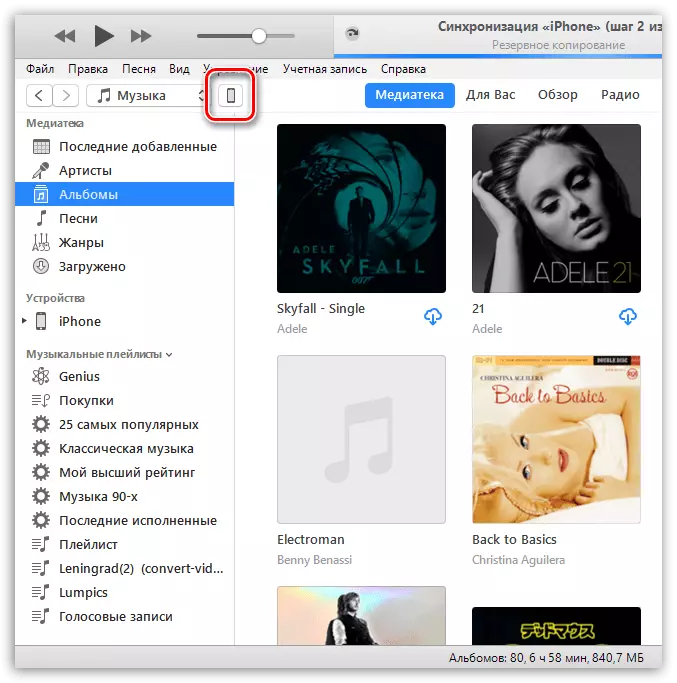
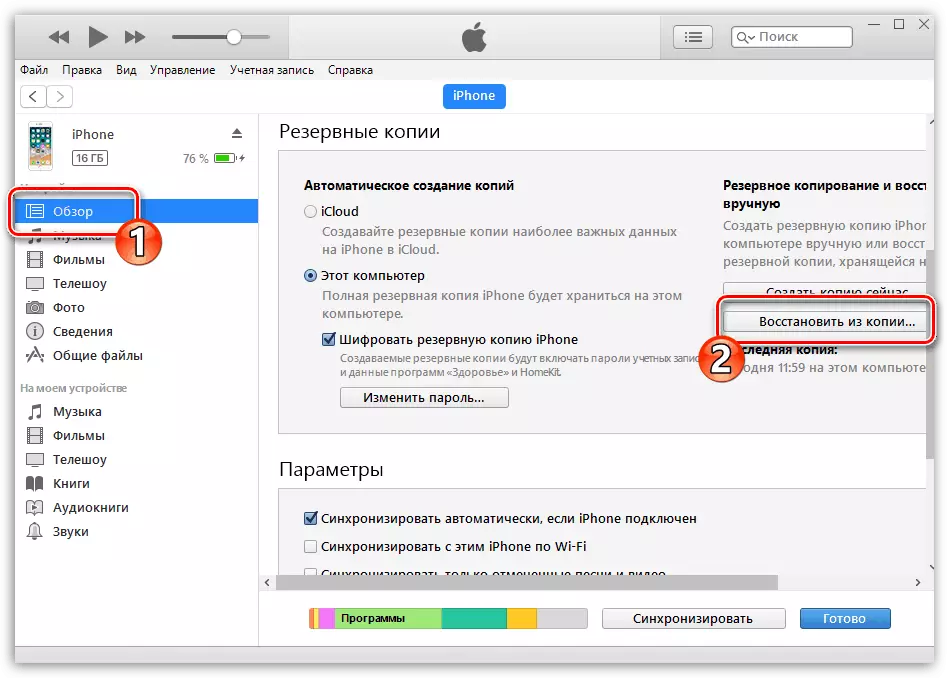
- When the backup is created, connect the second device to the computer to now sync it. Open the gadget control menu by clicking on its icon in the top area of the program window.
- Opening the Overview tab in the left pane, click on the "Restore from the copy" button.
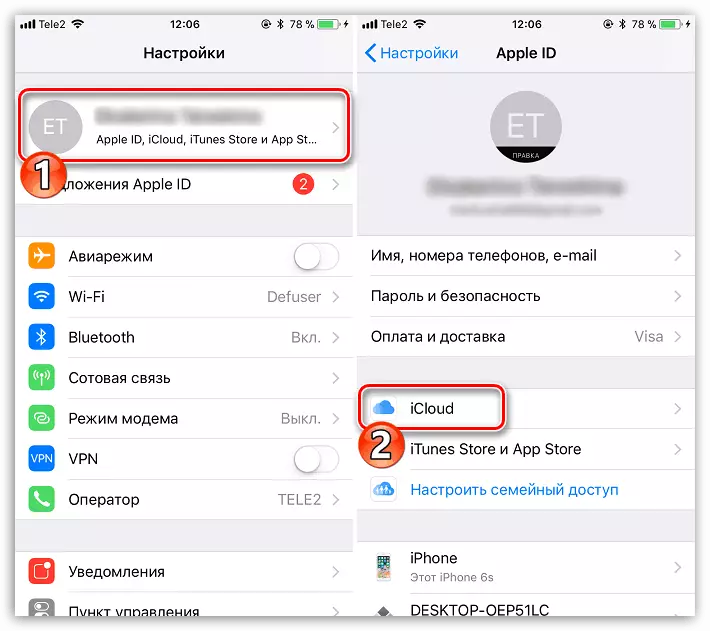
- But before you run the backup installation process, the search function must be disabled on the iPhone, which does not exist existing data from the device. To do this, open the settings, select your account at the top, and then go to the "icloud" section.
- Next, to continue, open the "Find iPhone" section and translate the Tumbler near this item to an inactive position. Enter the password from Apple ID.
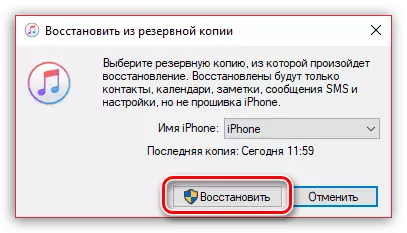
- All the necessary settings were carried out, and therefore, we return to Aytyuns. Run the recovery, and then confirm the start of the process by checking the previously created backup.
- In the event that you previously activated the backup encryption function, the system will require enter the password code.
- Finally, the recovery process will be launched, which, as a rule, takes 10-15 minutes. At the end, all the photos contained on the old smartphone will be transferred to the new one.
Read more: How to create a backup iPhone in iTunes


Method 6: ICloud
Built-in cloud service ICloud allows you to store any data added to the iPhone, including photos. Transferring photos from one iPhone to another, it is convenient to use this standard service.
- First, check if you are activated by synchronization with iCloud. To do this, open the smartphone settings. At the top of the window, select your account.
- Open the "icloud" section.
- Select "Photo". In a new window, activate the ICloud Mediamatka item to enable unloading all photos from the library to the cloud. So that all photo taken immediately went to all your devices used under the same Apple ID, activate the "Unloading to my photo thumbnails" item.
- And finally, photos unloaded in iCloud can be available not only to you, but also to other Apple devices users. To open them the ability to view the photo, activate the toggle switch near the "Sharing ICLOUD" item.
- Open the "Photo" application on the General tab, and then click on the Open Sharing button. Enter the name for the new album, and then add pictures to it.
- Add users who will have access to photos: To do this, click on the plus game icon in the right domain, and then select the desired contact (accepted both email addresses and phone numbers iphone).
- Invitations will be sent to these contacts. Opening them, users will be able to see all the photos permitted earlier.


These are the main ways to move pictures to another iPhone. If you are familiar with other more convenient solutions that have not entered the article, be sure to share them in the comments.