

In the first two USB methods, the drive will be created in OS X, and then show how the OS X Yosemite boot flash drive is made in Windows. For all the described options, a USB is recommended for a capacity of at least 16 GB or an external hard disk (although the flash drive is 8 GB). See also: The loading flash drive MacOS Mojave.
Creating a loading flash drive Yosemite using a disk utility and terminal

Before you begin, download the OS X Yosemite from the Apple App Store. Immediately after the download is completed, the system installation window will open, close it.
Connect the USB flash drive to your MAC and run the disk utility (you can search in Spotlight, if you do not know where to search it).
In Disk Utility, select your drive and then - the tab "Delete", as a format, specify «Mac OS Extended (Journaled)." Click the "Erase" button and confirm formatting.

Upon completion of formatting:
- Select the Disk section tab in the disk utility.
- In the "Section Scheme" list, specify "Section: 1".
- In the "Name" field, specify the name on Latin, consisting of one word (we will use this name in the future in the terminal).
- Click the "Parameters" button and make sure that the GUID section scheme is installed there.
- Click the Apply button and confirm the creation of the section scheme.

The next step is the OS X Yosemite recording on the USB flash drive using the terminal command.
- Run the terminal, you can do it via Spotlight or found in the "Utilities" folder in programs.
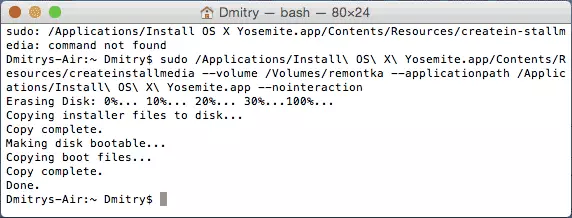
- In the terminal, enter the command (ATTENTION: In this team, you need to replace the remontka on the name of the section that you were given in the previous 3rd point) Sudo / Applications / Install \ OS \ X \ Yosemite.app/contents/resources/createInstallMedia --VOLUME / Volumes / Remontka --ApplicationPath / Applications / Install \ OS \ X \ Yosemite.app --Nointeraction
- Enter the password to confirm the action (despite the fact that it will not be displayed when entering the process, the password is still entered).
- Wait for the installation of the installer files to complete (the process takes sufficient time. At the end, you will see the Done message in the terminal).
Ready, boot flash drive OS X Yosemite is ready to use. To install the system from it on Mac and MacBook, turn off the computer, insert the USB flash drive, then turn on the computer while holding the OPTION button (ALT).
Use the DiskMaker X program
If you do not want to use the terminal, and you need a simple program to make the OS X Yosemite boot flash drive on Mac, Diskmaker X is a great option for this. Download the program from the official website http://diskmakerx.com
Also, as in the previous method, before using the program, download Yosemite from the App Store, then run DiskMaker X.
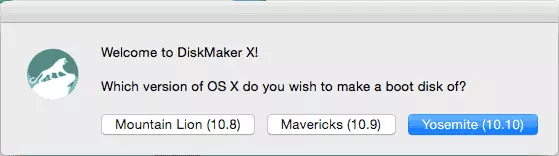
At the first stage you need to specify which version of the system you need to write to the USB flash drive, in our case it is Yosemite.
After that, the program will find the previously downloaded OS X distribution and will offer to use it, click "Use This Copy" (but you can choose another image if you have).

After that, it will only be left to choose a flash drive to record, agree with the deletion of all data and wait for the completion of copying files.
Boot flash drive OS X Yosemite in Windows
Perhaps the fastest and most convenient way to write a bootable USB drive with Yosemite in Windows - using the TRANSMAC program. It is not free, but 15 days work without the need to purchase. You can download the program from the official site http://www.acutesystems.com/
To create a boot flash drive, you will need an OS X Yosemite image in .dmg format. If it is in stock, connect the drive to the computer and run the TRANSMAC program on behalf of the administrator.

In the list on the left, right-click on the desired USB drive and select the Restore WITH DISK Image context menu.

Specify the path to the OS X image file, agree with the warnings that the data from the disk will be deleted and wait for the end of copying all files from the image - the loading flash drive is ready.