
For example, NVIDIA officially recommends delete all drivers before upgrading to the new version, as unexpected errors sometimes occur, or, for example, the BSOD's blue screen. However, it happens relatively rarely.
In this manual, how to completely remove the NVIDIA, AMD and Intel video card drivers from the computer (including all side elements of the driver), as well as how manual removal through the control panel is worse than using the DISPLAY UNINSTALLER utility for these purposes. (See also How to update video card drivers for maximum performance in games)
Removing the video card drivers from the control panel and Display Driver Uninstaller
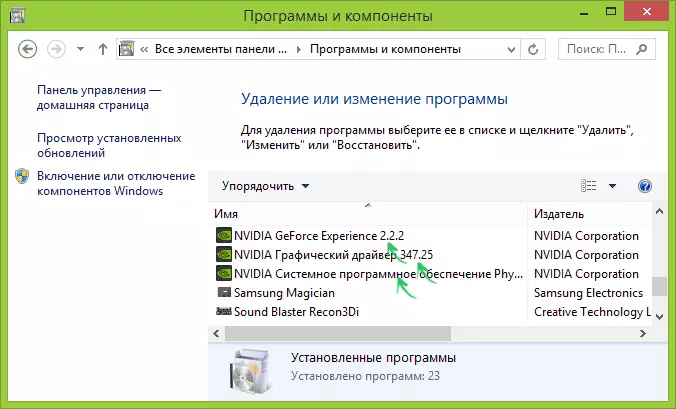
The usual way to delete is to go to the Windows Control Panel, select the item "Programs and Components", find all items related to your video card, after which you will delete them. Anyone, even the most novice user cope with it.
However, this method has disadvantages:
- Remove the driver for one uncomfortable.
- Not all driver components are deleted, the NVIDIA GeForce video card drivers are left, AMD Radeon, Intel HD Graphics from Windows Update (or installed immediately after removing the drivers from the manufacturer).
If the removal was required due to any problems in the video card when updating the drivers, the last item may have a critical value, and the most popular way to fully delete all drivers is the free Display Driver Uninstaller program, which automates this process.
Using Display DRIVER Uninstaller

You can download Display Driver Uninstaller from the official page (download links are at the bottom of the page, in the downloaded archive you will find another self-expanding EXE archive, in which the program is already located). Installing on a computer is not required - enough "Display Driver Uninstaller.exe" start in a folder with unpacked files.
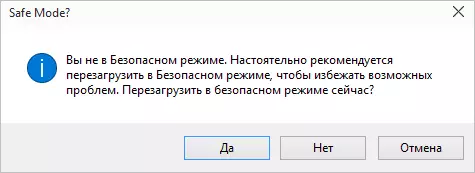
The program is recommended to use, running Windows in safe mode. It can independently restart the computer, and you can do it manually. To do this, press Win + R, type msconfig, after which on the Download tab, select the current OS, set the "Safe Mode" mark, apply the settings and restart. Do not forget to remove the same mark upon completion of all actions.
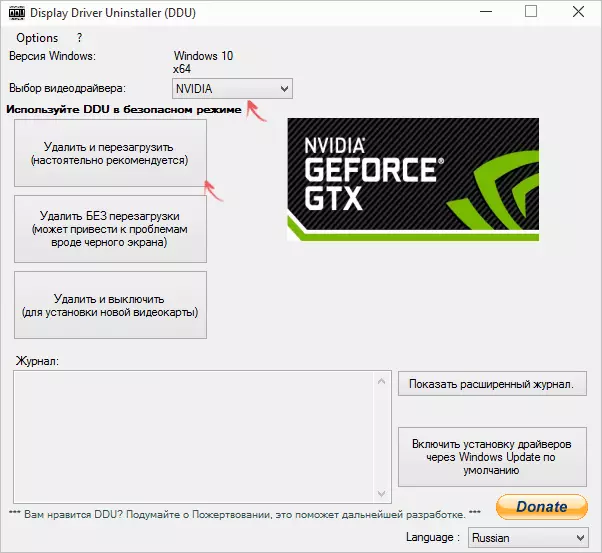
After starting, you can install the Russian language of the program (it did not turn on it automatically) on the right below. In the main window of the program you are offered:
- Select the video card driver to be deleted - NVIDIA, AMD, Intel.
- Select one of the actions - complete deletion and reboot (recommended), deleting without reloading and deleting and off the video card (for installing a new one).
In most cases, it is enough to choose the first option - Display Driver Uninstaller will automatically create a system recovery point, will delete all components of the selected driver and restart the computer. Just in case, the program also stores logs (actions log and results) into a text file that can be viewed if something went wrong or you need to get information about the actions produced.
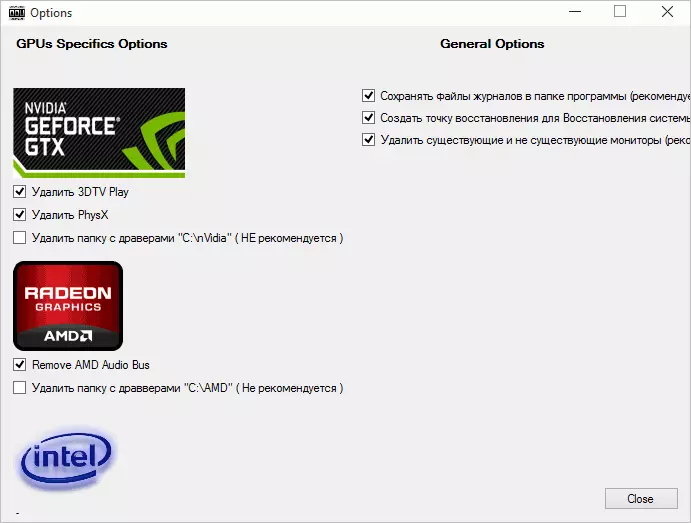
Additionally, before removing the video card driver, you can click "Options" in the menu and configure the removal options, for example, to refuse to remove NVIDIA PHYSX, disable the recovery point (I do not recommend) and other options.