
The solid-state disk compared to hard has such advantages as a high level of performance and reliability, low power consumption, no noise and much more. Therefore, more and more users choose CDS as a systematic. When connecting such a drive, you can find that it is not determined by the system or is not even displayed in the BIOS. It may look like a no disk in the "Explorer", Windows settings or in the BIOS load selection list.
Causes of SSD connection troubleshooting
Problems with the display of CEDs in the system may occur by such reasons as the absence of a letter of a disk or initialization, the presence of hidden partitions and an incompatible file system. At the same time, this may occur due to incorrect BIOS settings and physical damage to the disc itself or one of the elements of the compounds between the motherboard and the SSD.Cause 1: The disk is not initialized
It often happens that the new disk is not initialized when connected to a computer and, as a result, it is not visible in the system. The solution is the execution of the procedure in manual mode according to the following algorithm.
- Press "Win + R" simultaneously and in the window that appears, enter the compmgmt.msc. Click "OK".
- A window will open, where the "Disk Management" should be clicked.
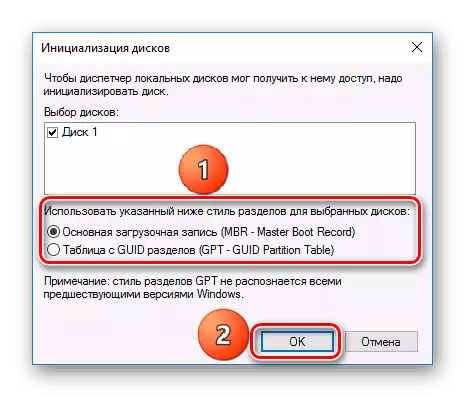
- Click the right mouse button on the desired drive and select "Initialize the disk" in the menu that opens.
- Next, make sure that the "Disc 1" field has a tick, and install the marker opposite the item with the MBR or GPT mention. "Main boot record" is compatible with all versions of Windows, but if you plan to use only current releases of this OS, it is better to choose a "table with GUID partitions".
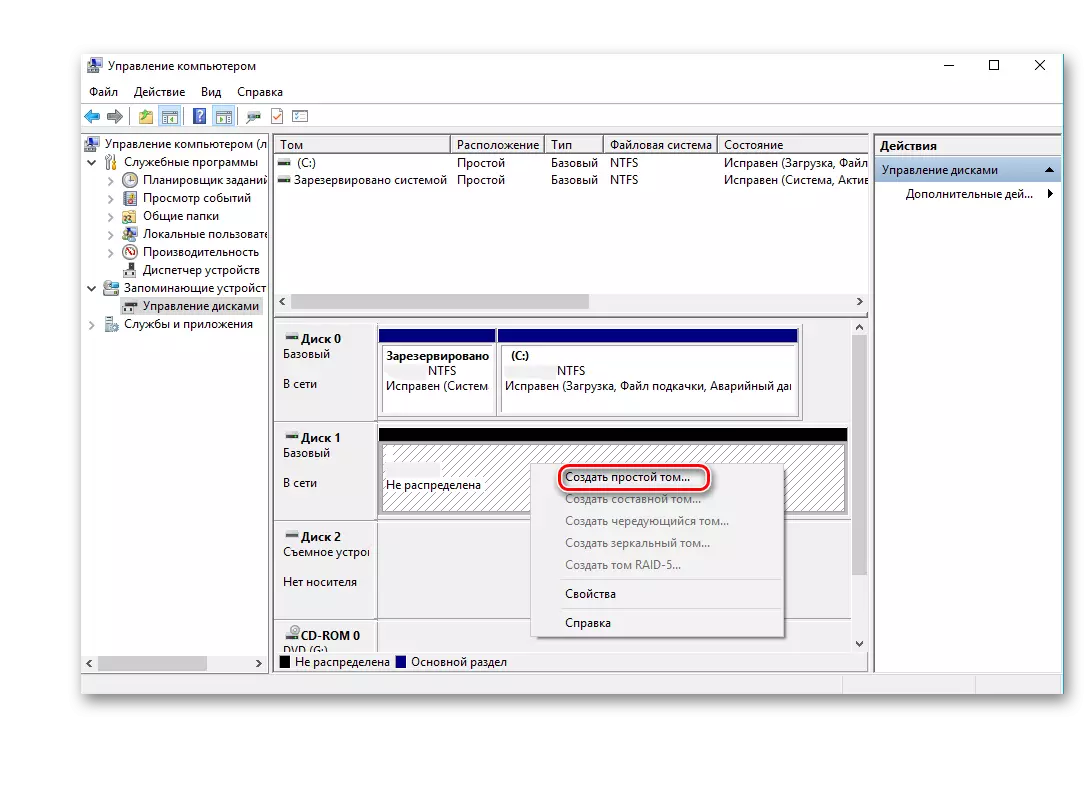
- After the procedure is completed, you should create a new section. To do this, click on the disk and select "Create a simple volume".
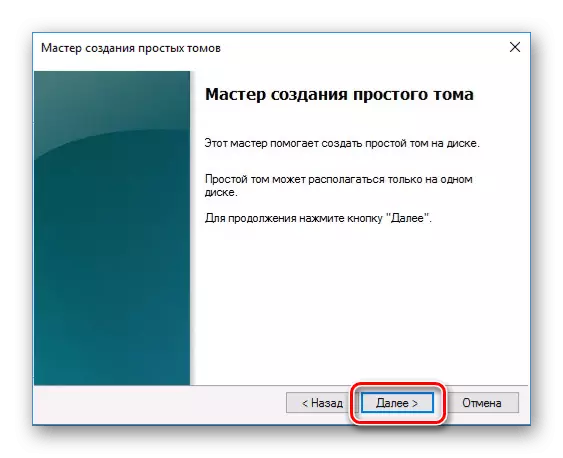
- The "Wizard of the New Tom" will open, in which click "Next".
- Then you need to specify the size. You can leave the default value, which is equal to the maximum disk size, or select a smaller value. After making the necessary changes to click "Next".
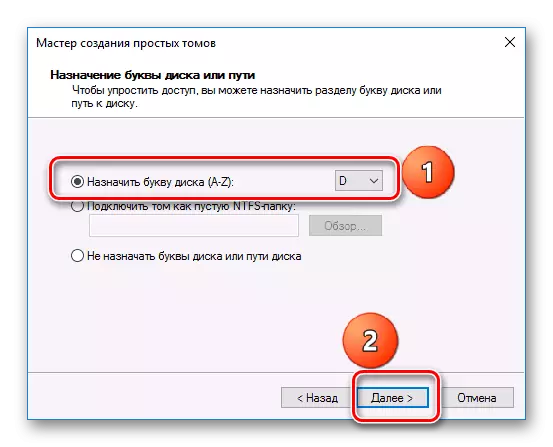
- In the next window, agree with the proposed version of the letter of the volume and click "Next". If you wish, you can assign another letter, the main thing is that it does not coincide with the existing one.
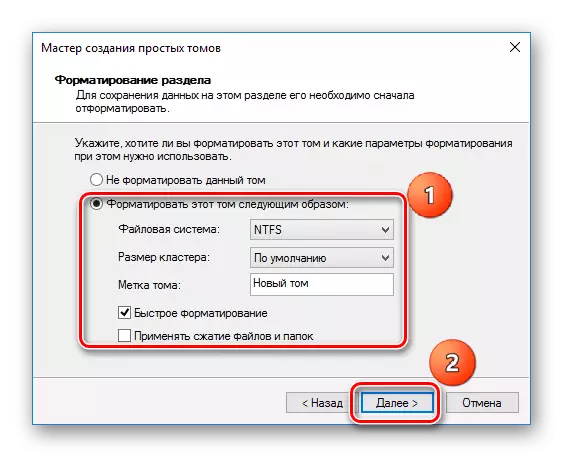
- Next you need to formatting. We leave the recommended values in the "File System" fields, Tom Mark and in addition, turn on the "Fast Formatting" option.
- Click "Ready."


As a result, the disc will have to appear in the system.
Cause 2: no drive letter
Sometimes SSD has no letters and therefore is not displayed in the "Explorer". In this case, you need to assign him a letter.
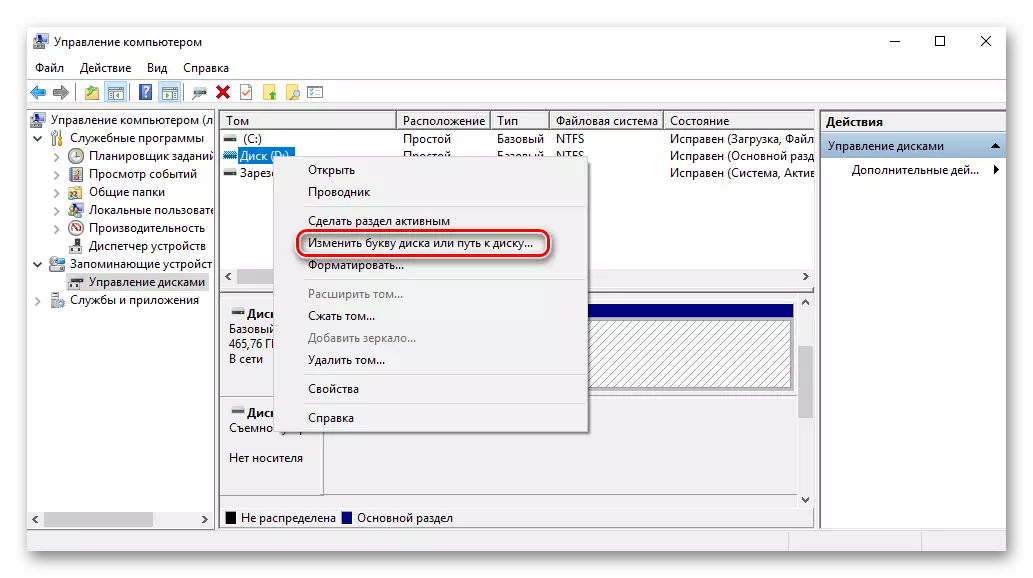
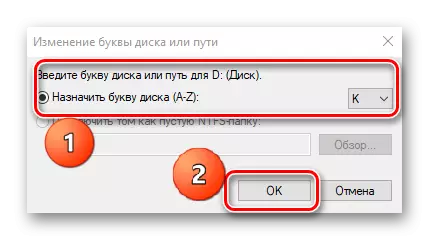
- Go to "Disk Management", repeating the steps 1-2 described above. Click the PCM on CZD and select "Change the letter of the disk or the path to the disk."
- In the window that appears, click on "Change".
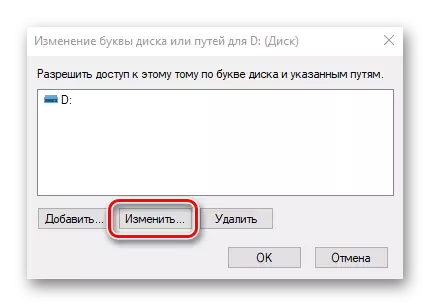
- Choose from the list the letter for the disk, and then click "OK".
After that, the specified storage device is recognized by the OS, it is possible to carry out standard operations with it.
Cause 3: no partitions
If the acquired disk is not new and has already been used for a long time, it may also not be displayed in "My Computer". The reason for this may be damage to the system file or MBR table due to failure, infection with a viral file, improper operation, etc. At the same time, the SSD is displayed in "Disk Management", but its status is "not initialized." In this case, it is usually recommended to perform initialization, however, due to the risk of data loss, it is still not worth it.
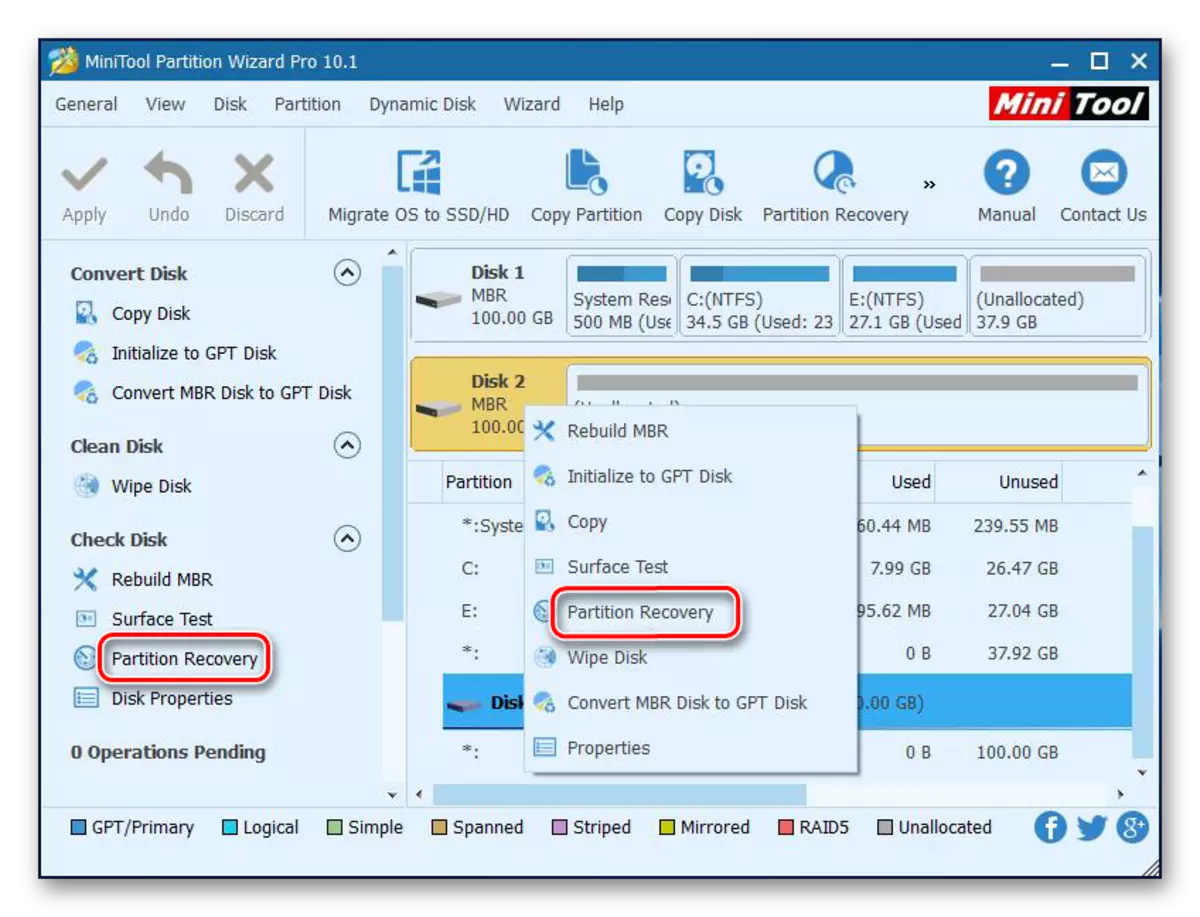
In addition, another situation is possible in which the drive is displayed as one unallocated area. Creating a new volume, as is usually done, can also lead to data loss. Here, the solution may be the restoration of the section. To perform this requires certain knowledge and software, for example, Minitool Partition Wizard, which has the appropriate option.
- Run the Minitool Partition Wizard, and then select the Partition Recovery string in the Check Disk menu after specifying the target SSD. Alternatively, you can right-click on the disk and select the item item.
- Next, you need to select the RCD scan range. Three options are available: "Full Disk", "Unallocated Space" and "Specified Range". In the first case, the search is made throughout the disk, in the second - only in free space, in the third - on certain sectors. We leave "Full Disk" and click "Next".
- In the next window, two options for scanning mode are offered. In the first - "Quick Scan" - the hidden or deleted partitions are restored, which are continuous, and in the second - "Full Scan" - each sector of the specified range on SSD is scanned.
- After the disc scanning is complete, all partition found are displayed as a list in the results window. Select all the necessary and press "FINISH".
- Next, confirm the execution of the recovery operation by clicking on "Apply". After that, all sections on SSD will appear in the "Explorer".


It should help solve the problem, but in a situation where there is no necessary knowledge and on the disk are the necessary data, it is better to turn to professionals.
Cause 4: Hidden section
Sometimes SSD is not displayed in Windows due to the presence of a hidden partition. This is possible if the user hidden the Tom using a third-party software to prevent data access. The solution is to restore the partition using software to work with discs. The same Micitool Partition Wizard copes well with such a task.
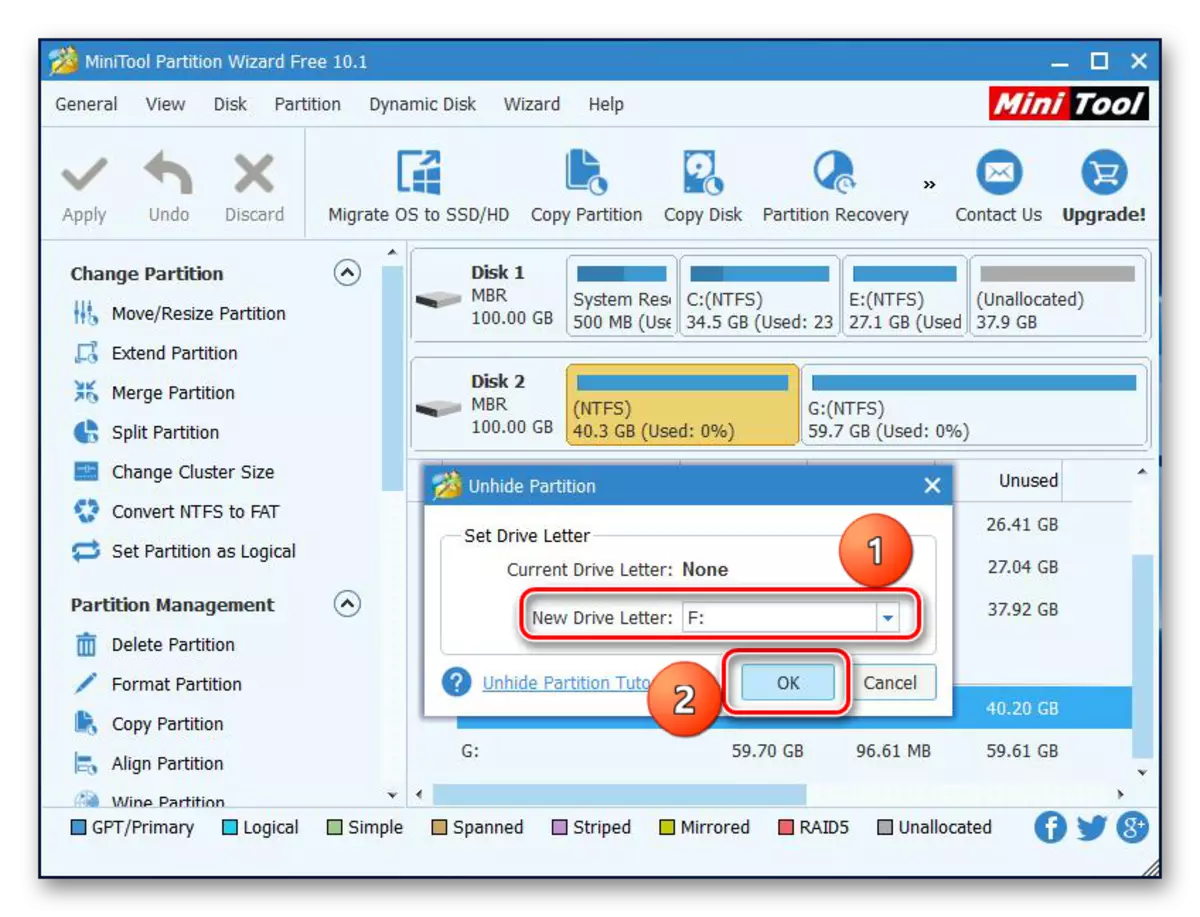
- After starting the application, right-click on the target disk and select Unhide Partition. The same feature is started by selecting the line of the same name in the menu on the left.
- Then we assign the letter for this section and click "OK".

After that, hidden sections will appear in the "Explorer".
Cause 5: Unsupping File System
If, after execution of the SSD actions described above, it still does not appear in the "Explorer", the file system of the disk is different from FAT32 or NTFS, which Windows works. Usually, such a drive is displayed in the disk manager as the area "RAW". To correct the problem, you need to perform actions on the following algorithm.
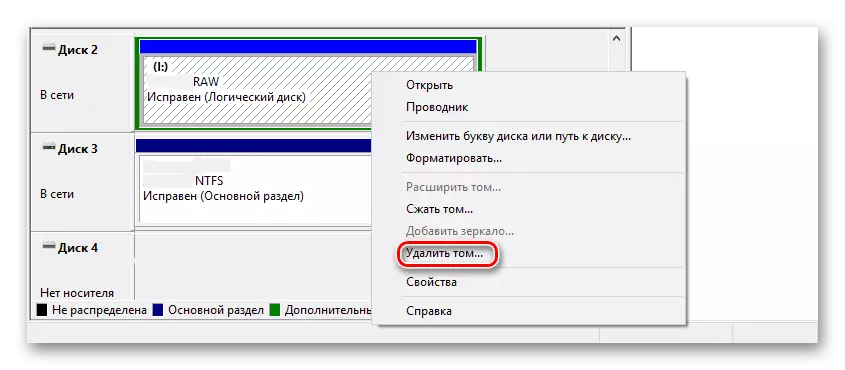
- Run "Disk Management", repeating steps 1-2 from the instruction above. Next, click on the required partition and select "Delete TOM" string.
- Confirm the deletion by clicking yes.
- As you can see, the status of Tom has changed to "freely".


Next, create a new volume according to the above instruction.
Cause 6: Problems with BIOS and Equipment
There are four main reasons according to which Bios does not detect the presence of an internal solid-state drive.
SATA is disabled or has the wrong mode
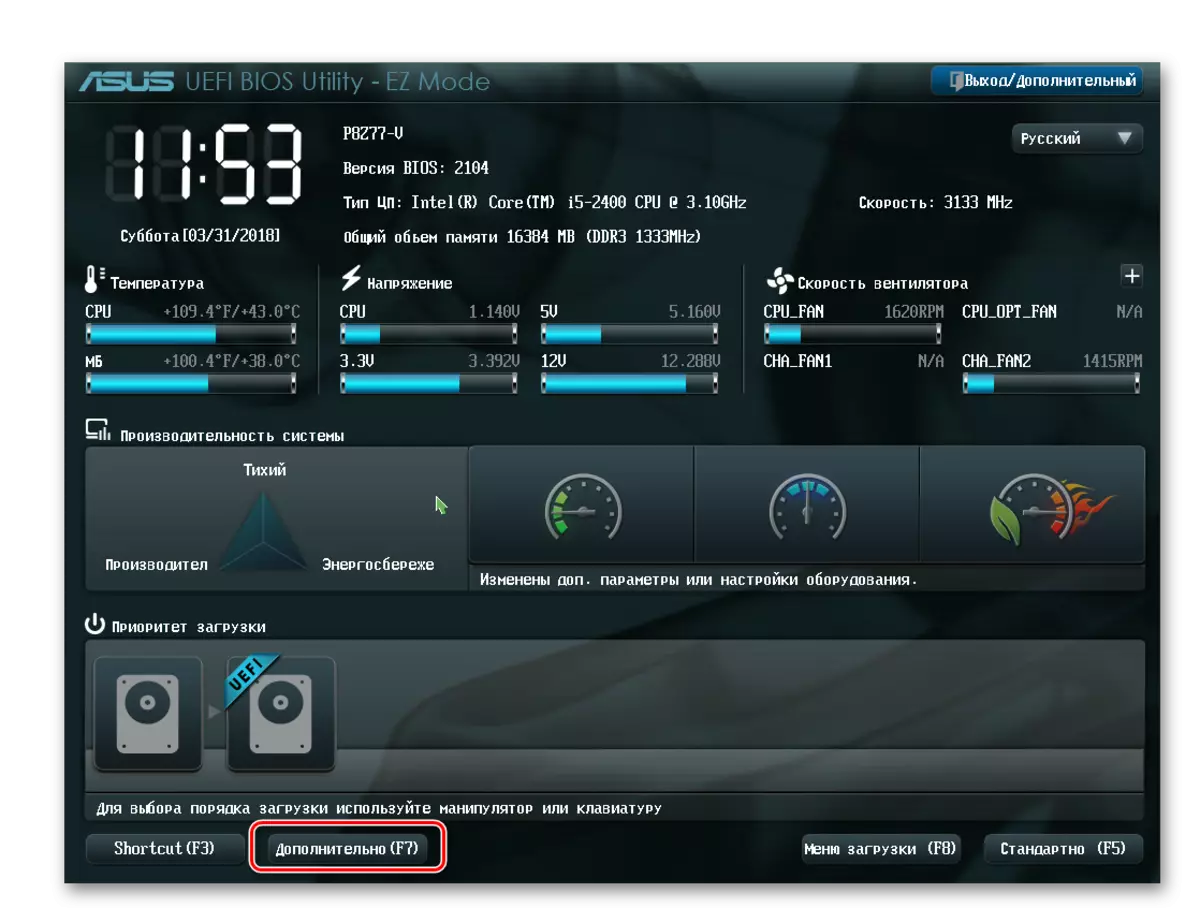
- To enable it, go to the BIOS and activate the advanced settings display mode. To do this, click on the "Advanced" button or click "F7". In the example below, all actions are shown for the UEFI graphical interface.
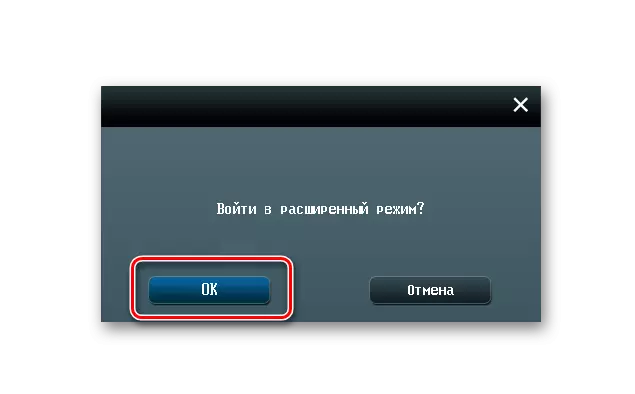
- Confirm the entrance by clicking OK.
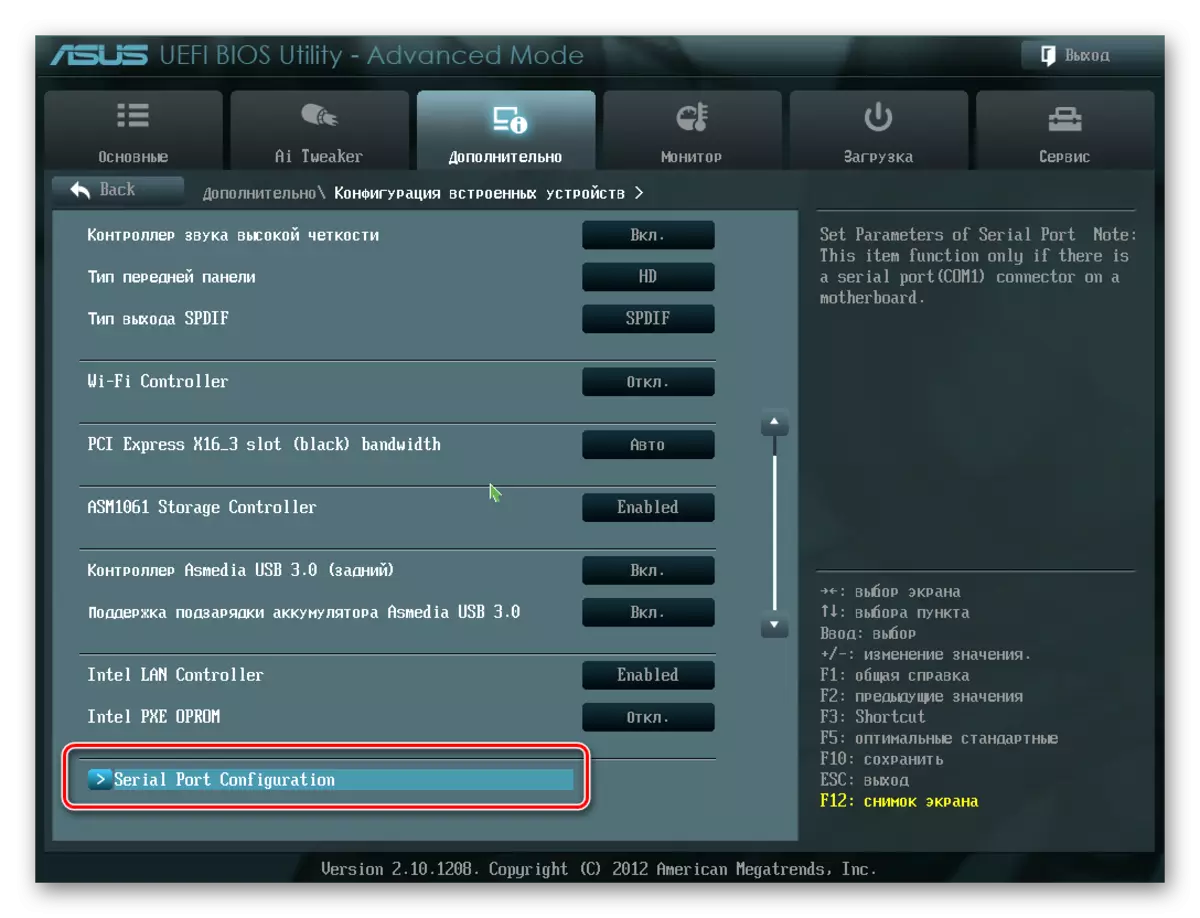
- Next, we find the configuration of the built-in devices in the "Advanced" tab.
- Click on the "Serial Port Configuration" line.
- In the "Serial Port" field, the "On" value should be displayed. If not, then we press the mouse over it and in the appeared window choose "On".
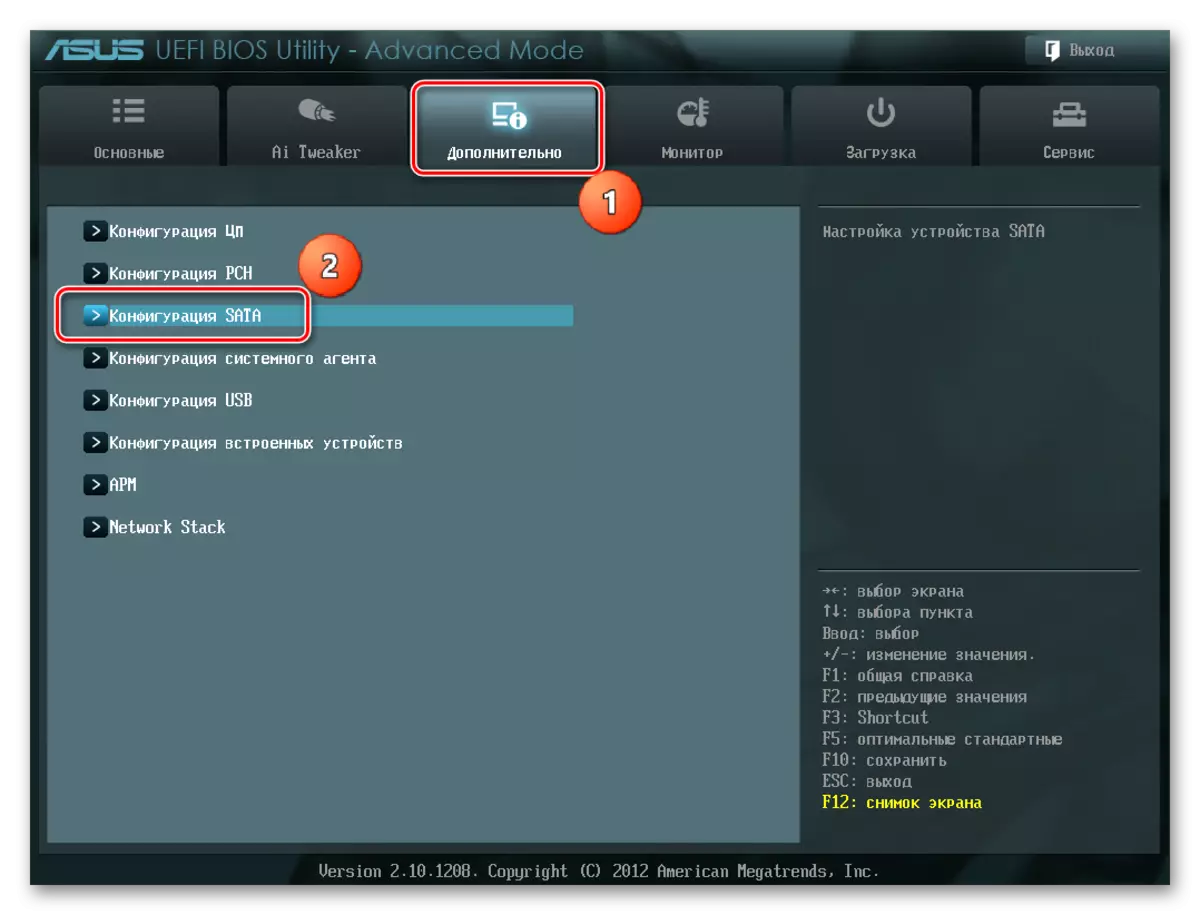
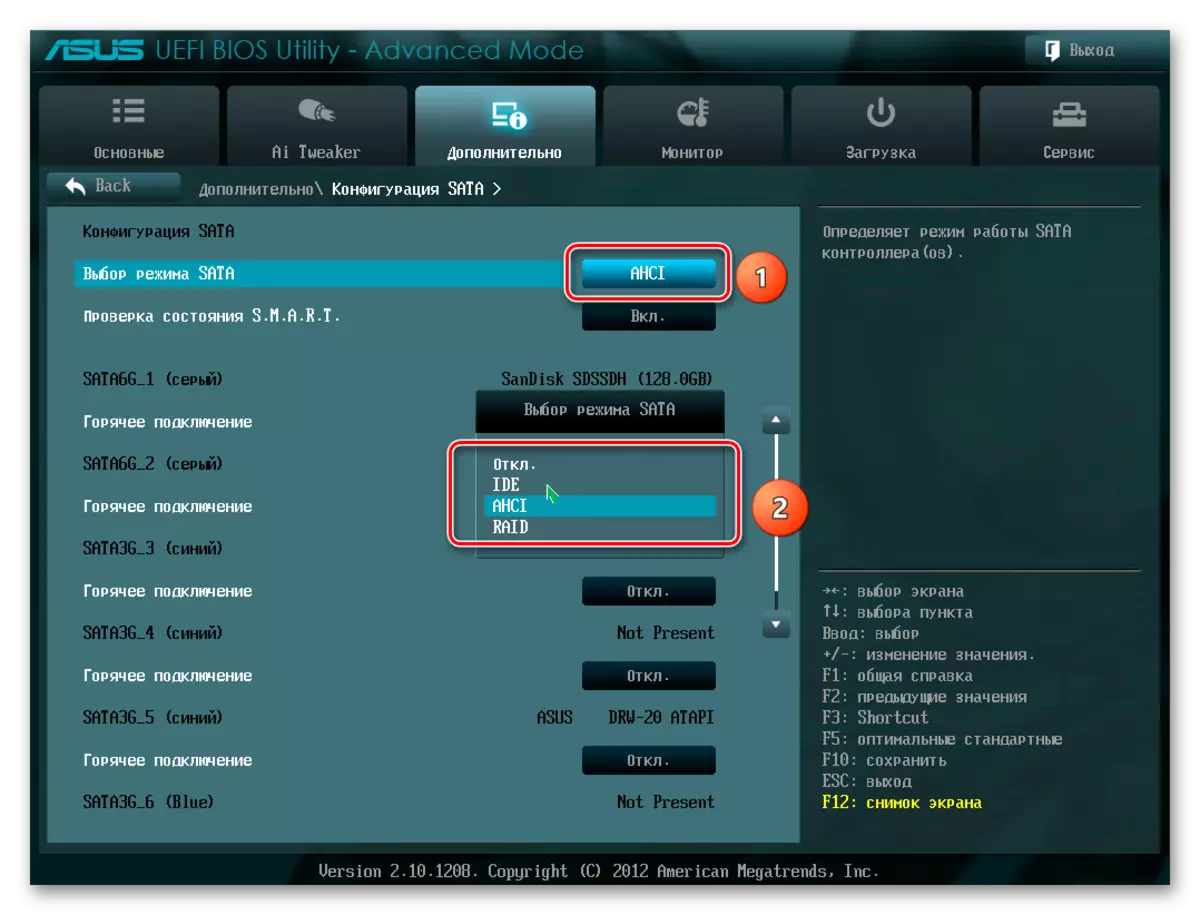
- If there is still a connection problem, you can try switching the SATA mode with AHCI on IDE or vice versa. To do this, first go to the "SATA Configuration" section, located in the "Advanced" tab.
- Press the button in the "SATA Mode" row and select IDE in the window that appears.


Incorrect BIOS settings
BIOS also does not recognize the disk if incorrect settings take place. It is easy to check the system date - if it does not match the true, this indicates a failure. To troubleshoot it, it is required to reset and return to the standard parameters according to the sequence below.
- Disconnect the PC from the network.
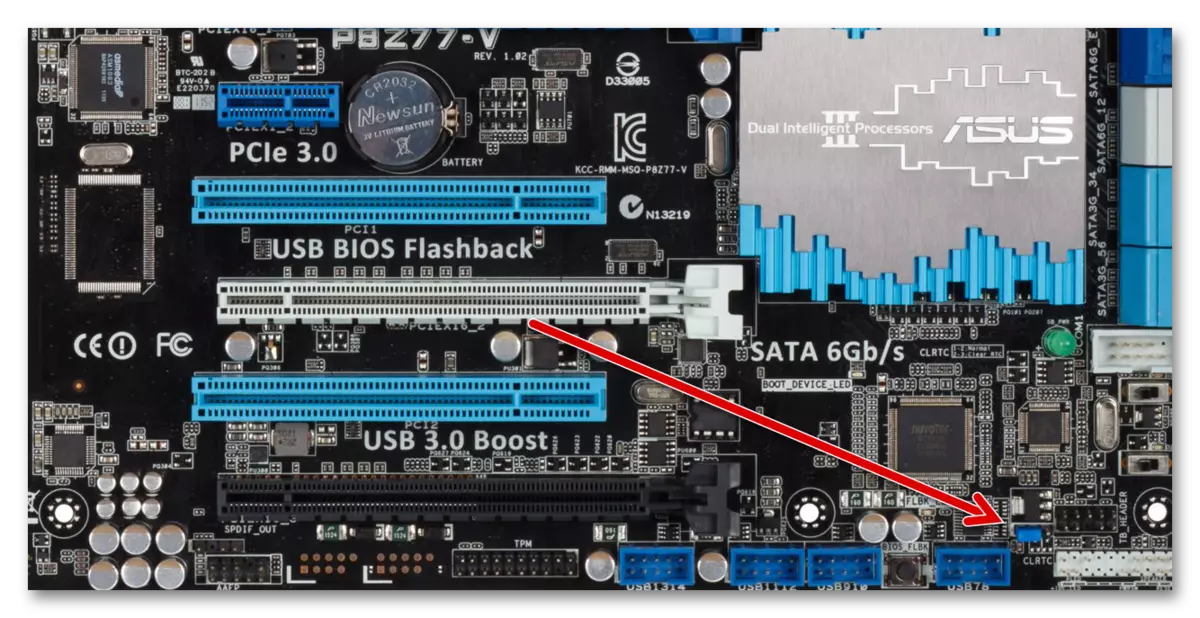
- Open the system unit and find the jumper on the Motherboard with the "CLRTC" inscription. It is usually located near the battery.
- Pull out the jumper and install it on the contacts 2-3.
- Wait about 30 seconds and return the jumper to the initial contacts 1-2.
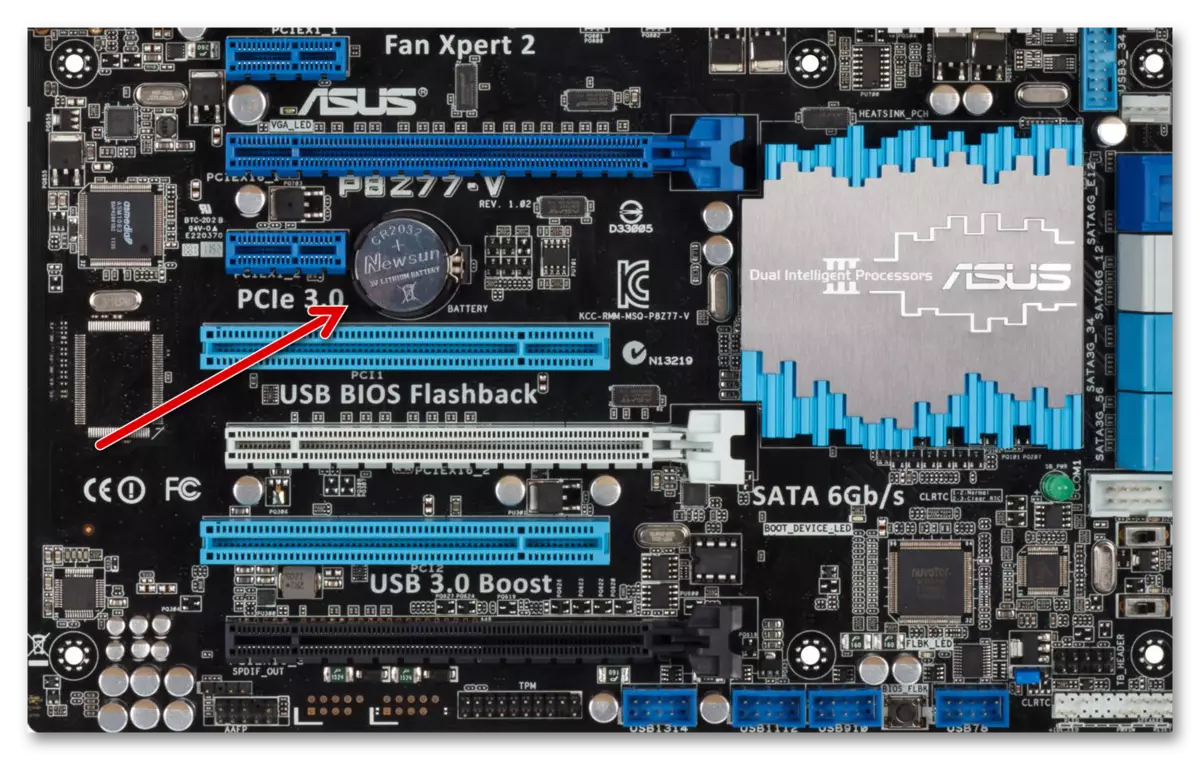
Alternatively, you can remove the battery that is in our case next to the PCIE connectors.
Faulty data cable
BIOS will also not detect an SSD if the SATA cable has damage. In this case, it is necessary to check all connections between the motherboard and SSD. It is advisable to prevent any bends or pinching of the cable when laying. This can all damage the wires inside the insulation, although the material may look normally. If there is doubt in the cable state, it is better to replace it. To connect SATA devices, Seagate recommends using cables less than 1 meter long. Longer sometimes can fall out of the connectors, so be sure to check that they are tightly connected to the SATA ports.
Faulty solid-state disk
If, after the above procedures, the disc is still not displayed in the BIOS, most likely, there is a factory marriage or physical damage to the device. Here you need to contact the computers repair workshop or the supplier of the SSD, previously making sure the presence of warranties.
Conclusion
In this article, we considered the reasons for the absence of a solid-state drive in the system or BIOS when it is connected. The source of such a problem can be both a disk or cable state and various software malfunctions and incorrect settings. Before proceeding with one of the listed methods, it is recommended to check all connections between the SSD and the motherboard, try to replace the SATA cable.