

Not so long ago, everyone kept contacts on the SIM card or in the phone's memory, and the most important data was recorded by a handle in a notebook. All these options for saving the information cannot be called reliable, because SIM cards, and the phones are not eternal. In addition, now in their use with such a goal there is not the slightest need, since all important information, including the contents of the address book, can be stored in the cloud. Optimal and accessible solution - Google account.
Import contacts in Google Account
With the need to import contacts from somewhere most often encountered the owners of Android smartphones, but not only they. It is in these devices that Google account is the main one. If you have just purchased a new device and want to transfer the contents of the address book from a regular phone to it, this article is for you. Looking ahead, we note that you can import not only the entries on the SIM card, but also contacts from any email, and this will also be discussed below.Important: If the phone numbers on the old mobile device are stored in its memory, they will need to be transferred to the SIM card.
Option 1: Mobile device
So, if you have a SIM card with telephone numbers stored on it, import them into the Google account, which means that the phone itself is, you can use the built-in mobile operating system tools.
Android
It is logical to start solving the tasks of the task from smartphones under the control of the Android operating system owned by the "Corporation of Good".
Note: The instruction below is described and shown on the example of "Clean" Android 8.0 (OREO). In other versions of this operating system, as well as on devices with corporate shells from third-party manufacturers, the interface and the names of some items may differ. But the logic and sequence of actions will be similar to the following.
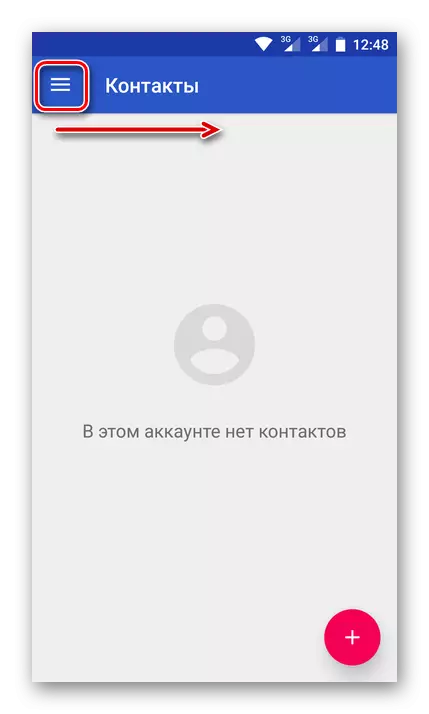
- On the master screen of the smartphone or in its menu, find the icon of the standard "Contacts" icon and open it.
- Go to the menu, taping on three horizontal strips in the upper left corner or making a swipe left right along the screen.
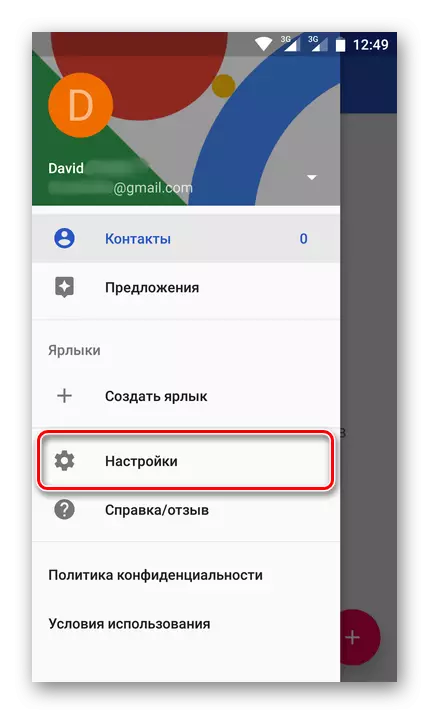
- In the side menu that opens, go to the "Settings" section.
- Scroll down a bit down, find and select "Import" item.
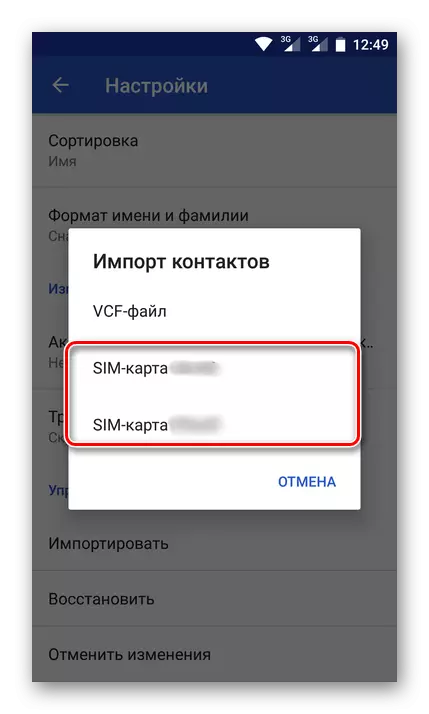
- In the pop-up window, tap the name of your SIM card (by default the name of the mobile operator or reduce it). If you have two cards, select the one you contain the necessary information.
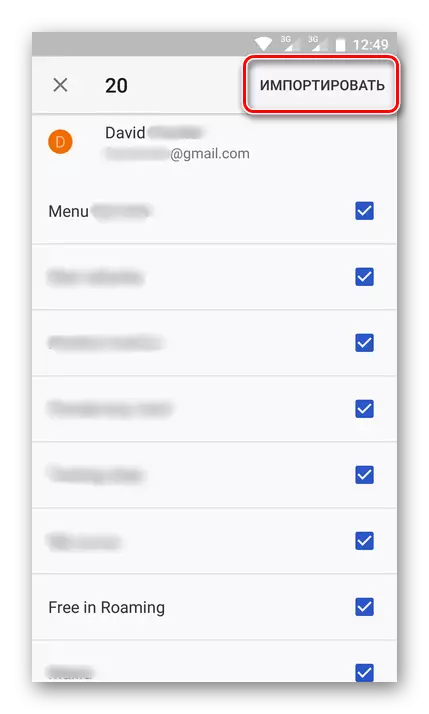
- You will find a list of contacts stored in SIM card memory. By default, they will all be marked. If you want to import only some of them or exclude extra, just remove the ticks to the right of those records that you do not need.
- Note the necessary contacts, press the "Import" button in the upper right corner.
- Copying the contents of your selected address book with a SIM card to google account will be performed instantly. In the lower area of the "Contacts" application, a notification will appear about how much records were copied. A check mark will appear in the left corner of the notification panel, which also signals the successful completion of the import operation.


Now all this information will be stored in your account.

You can get access to them with an absolutely any device, just just enter your account, specifying the Gmail email and password from it.
iOS.
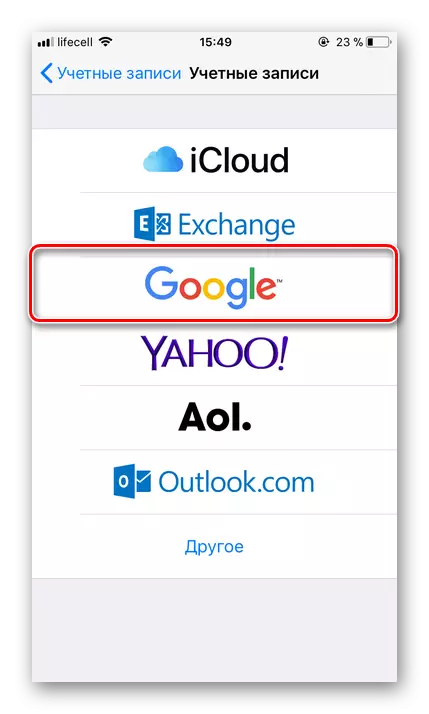
In the same case, if you use a mobile device based on the Apple operating system, the procedure that you want to complete the address book from SIM card will be slightly different. Previously need to add your Google account on the iPhone if you didn't do this earlier.
- Open the "Settings", go to the "Accounts" section, select "Google".
- Enter authorization data (login / mail and password) from your Google account.
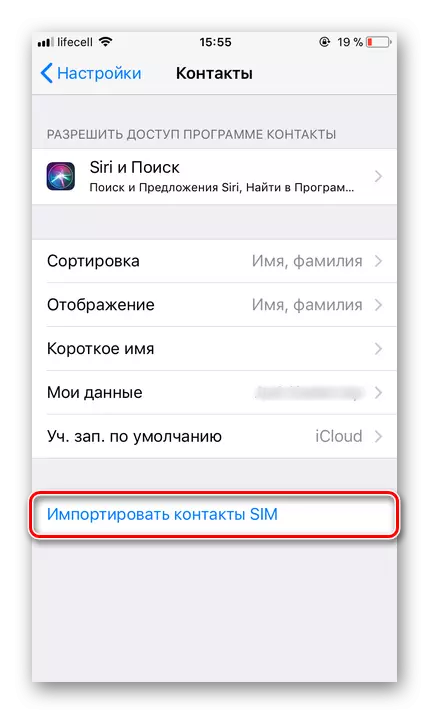
- After the Google Account is added, go to the "Contacts" section in the device settings.
- Tap the "Import Contacts SIM" located at the bottom.
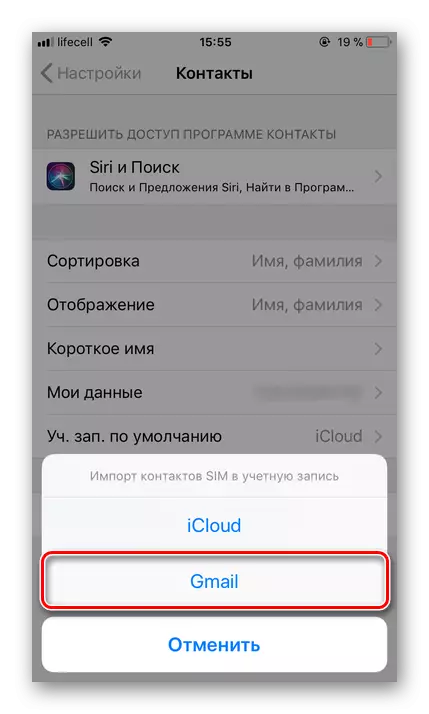
- A small pop-up window will appear on the screen, in which you need to select the "Gmail" item, after which the phone numbers from the SIM card will be automatically saved in your Google Account.


This is how easily you can save contacts from Sims to Google account. Everything is done quite quickly, and most importantly, it guarantees the eternal safety of such important data and provides the ability to access them from any device.
Option 2: Email
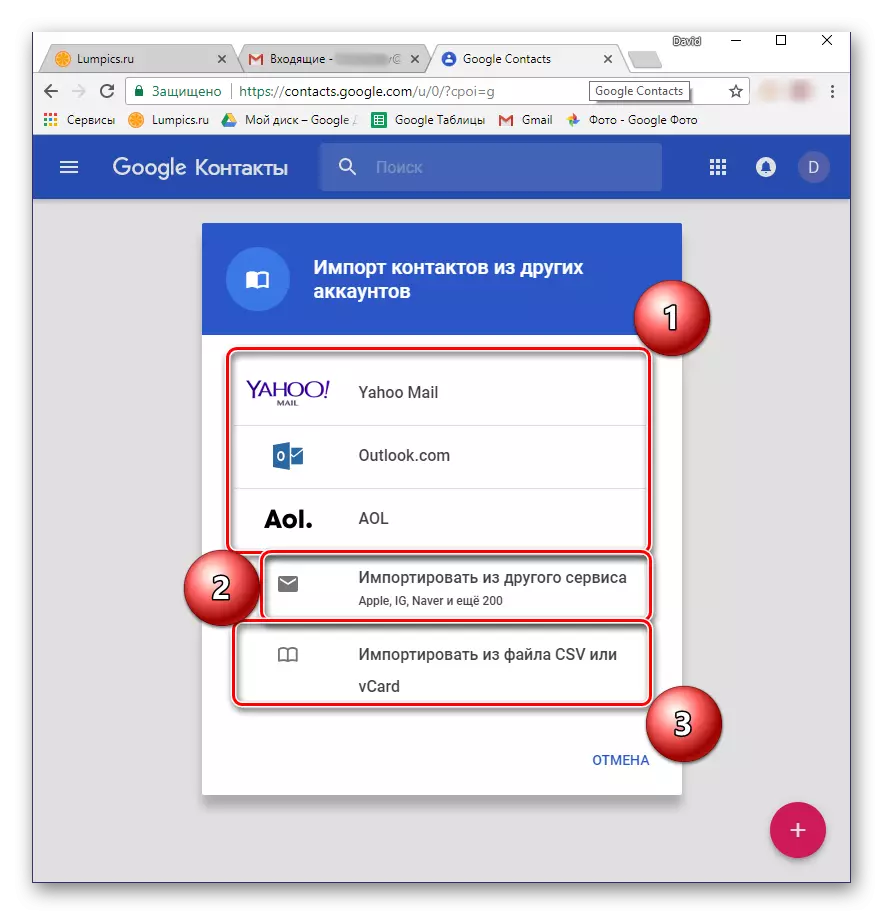
You can import to the GUL account not only phone numbers and user names contained in the SIM-card address book, but also email contacts. It is noteworthy that this method offers several import options at once. As so-called data sources can be:
- Popular foreign mail services;
- More than 200 other mailers;
- CSV or VCard file.
All this can be performed on the computer, and the last option is supported by mobile devices. Let's tell about everything in order.
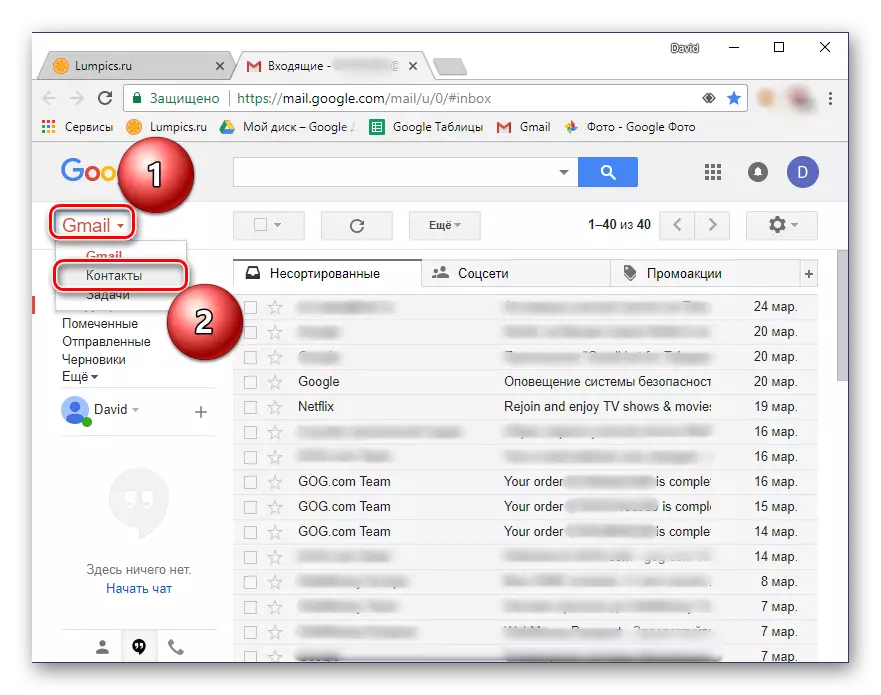
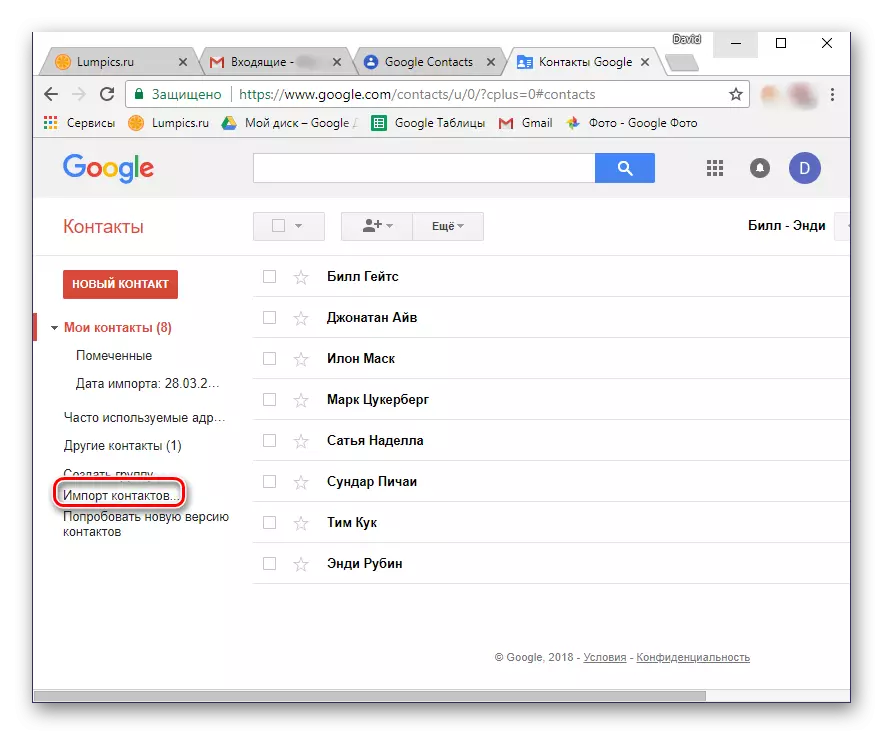
Go to Gmail.
- Going to the link indicated above, you will find yourself on the page of your Google-Mail. Click here in the upper left corner of the lettering Gmail. From the drop-down list, select "Contacts".
- On the next page, go to the main menu. To do this, press the button in the form of three horizontal bands located in the upper left corner.
- In the menu that opens, click on the "More" item to disclose its contents, and select "Import".
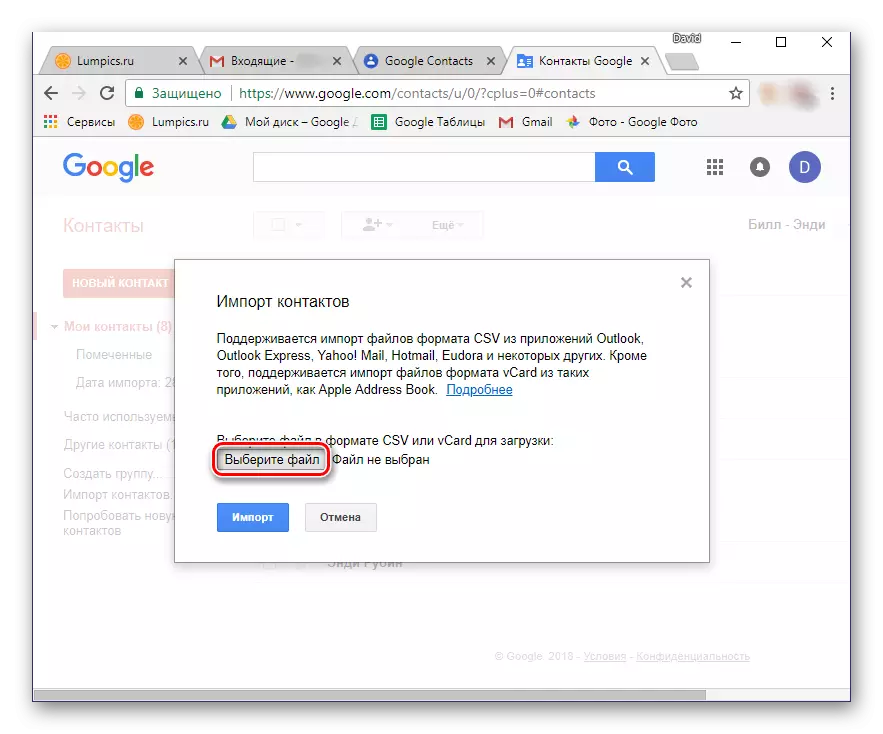
- A window for selecting possible import options will appear on the screen. About what makes each of them implies, was mentioned above. As an example, first consider the second point, since the first works on the same principle.
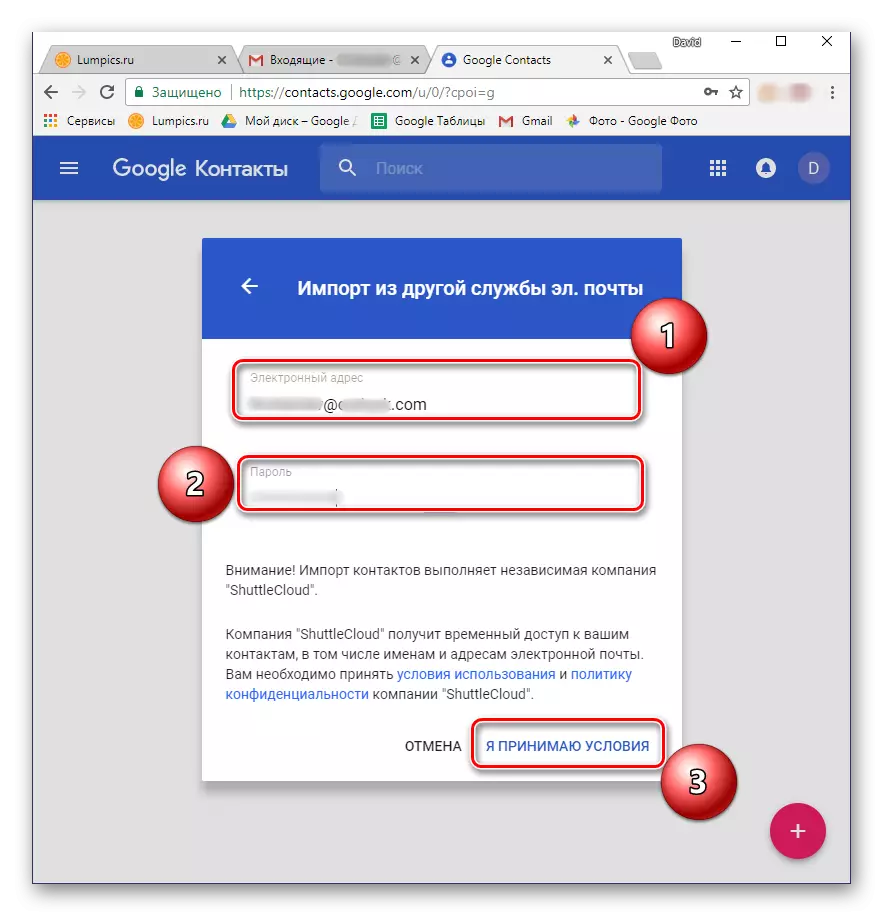
- After selecting the "Import from another service" item, you will need to enter a login and password from the mail account from which you want to copy contacts in Google. Then click the "I accept the conditions" button.
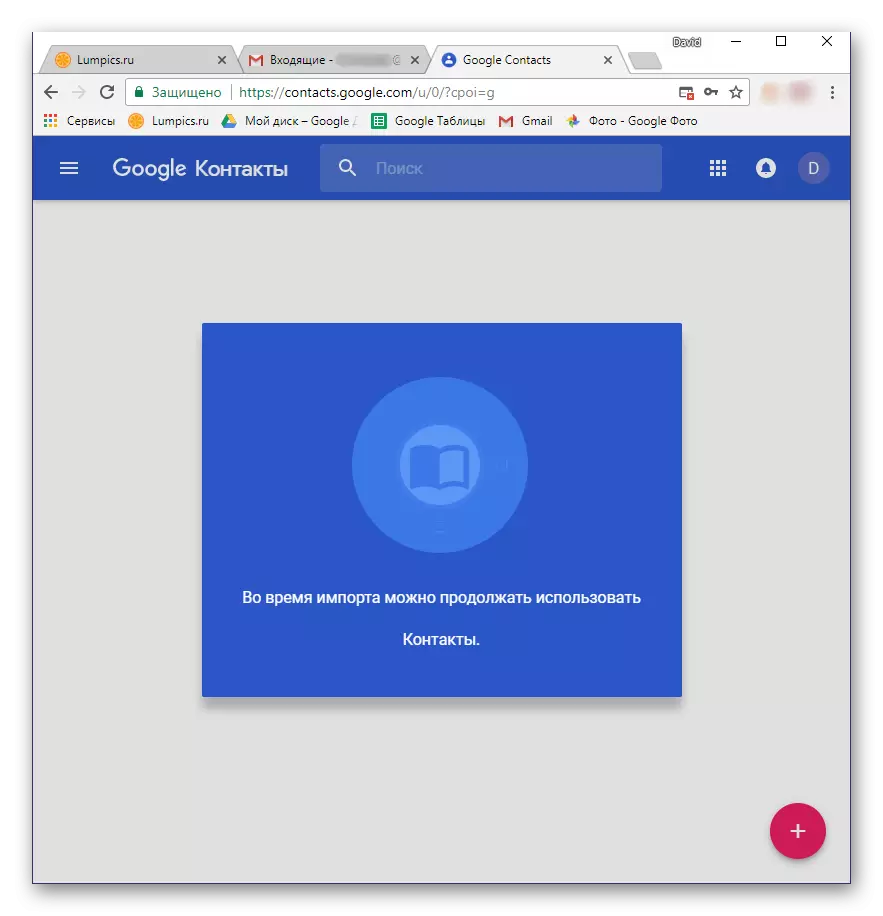
- Immediately after this, the procedure for importing contacts from the mail service you specified, which will take quite a bit of time.
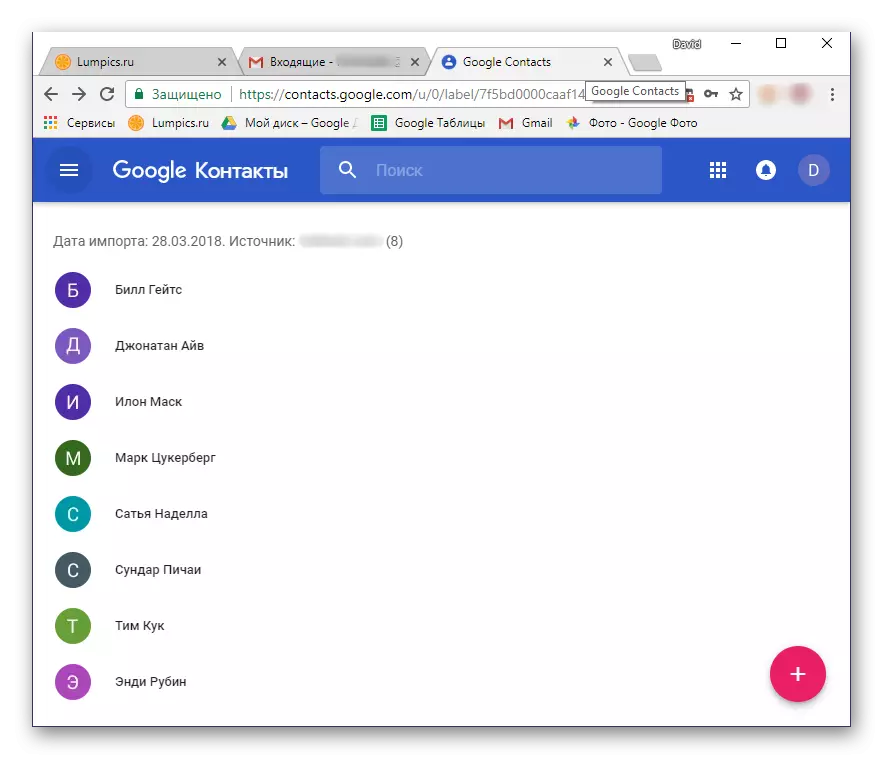
- By completing it, you will be redirected to Google's contacts page where you will see all added records.


Now consider the import of contacts in Google from the CSV or the VCARD file, which to start you will need to create. In each mail service, the algorithm for performing this procedure may differ slightly, but in general, all the steps are very similar. Consider the necessary to perform an action on the example of Outlook mail owned by Microsoft.
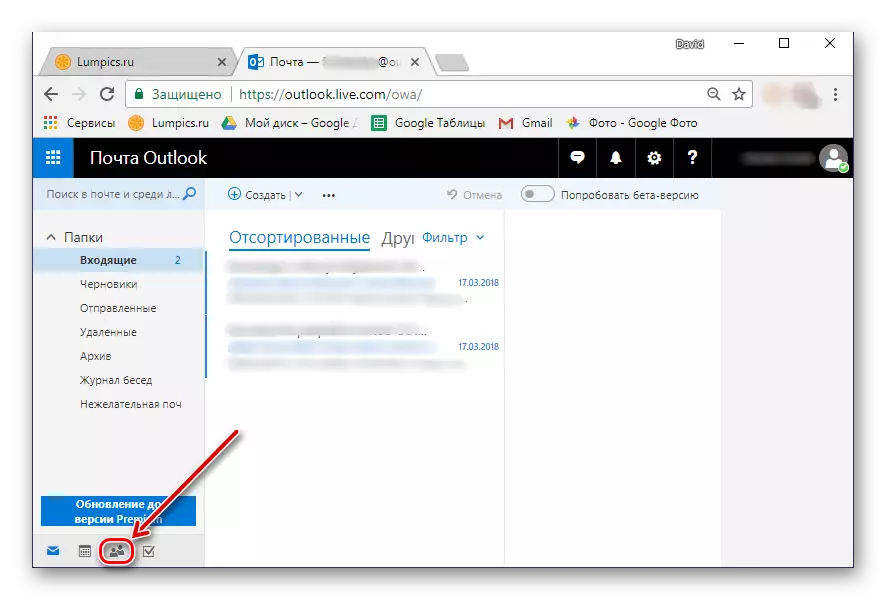
- Go to your mailbox and find the "Contacts" section there. Go to it.
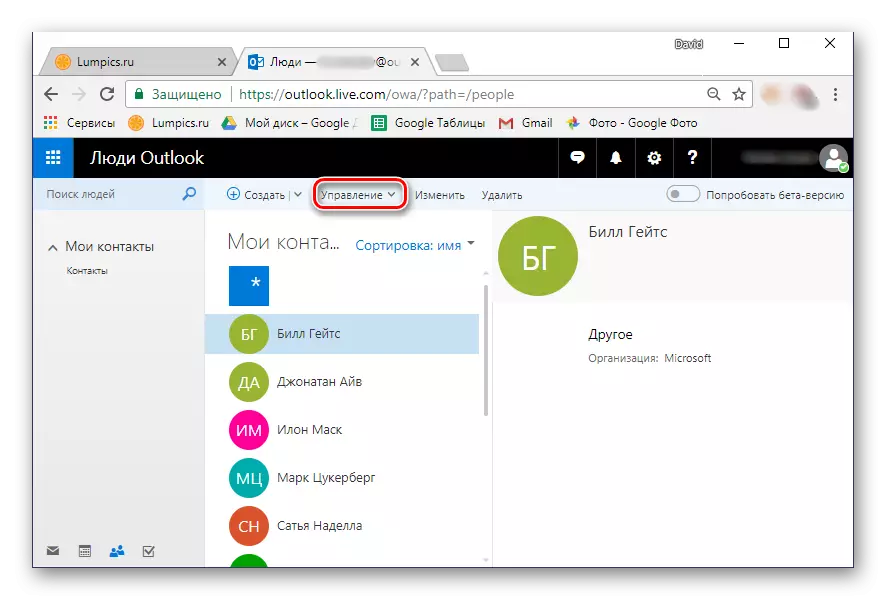
- Find the "Management" section (Possible options: "Advanced", "still") or something close in meaning and open it.
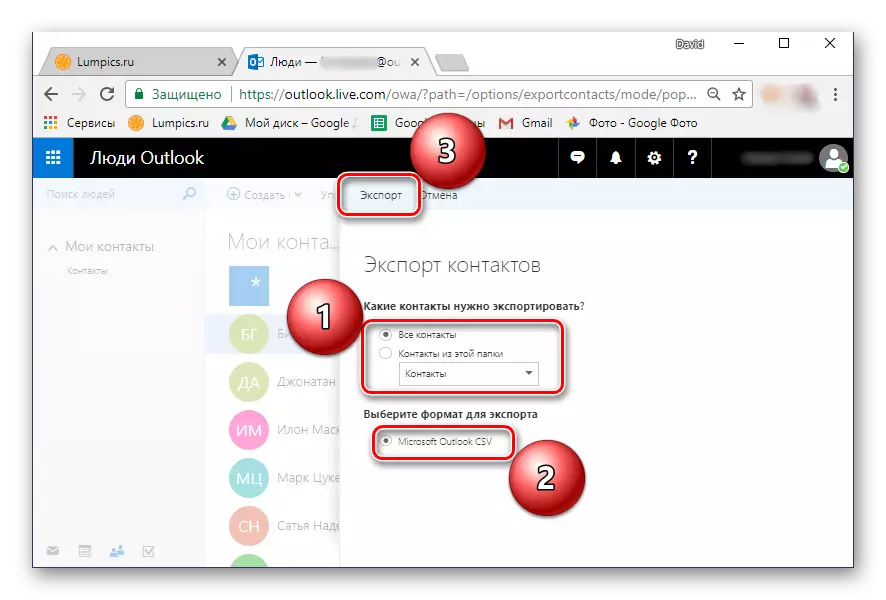
- Select "Contact Export".
- If necessary, decide which contacts will be exported (all or selectively), as well as check the output file format with data - CSV for our purposes.
- The file with stored contact information will be downloaded to your computer. Now you need to return to Gmail mail again.
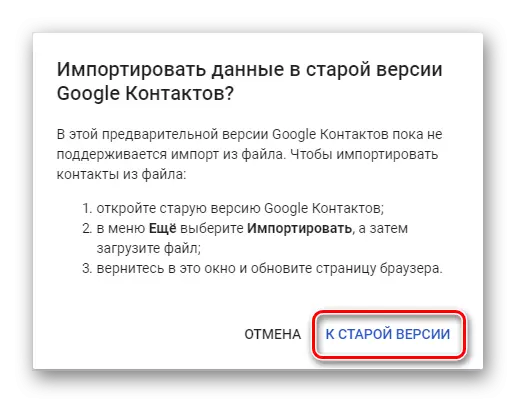
- Repeat steps 1-3 from the previous instructions and in the selection window of the available options, select the last item - "Import from the CSV or VCARD file". You will be asked to go to the old version of Google contacts. This is a prerequisite, so you just need to press the appropriate button.
- In the Gmail menu, located on the left, select "Import".
- In the next window, click "Select File".
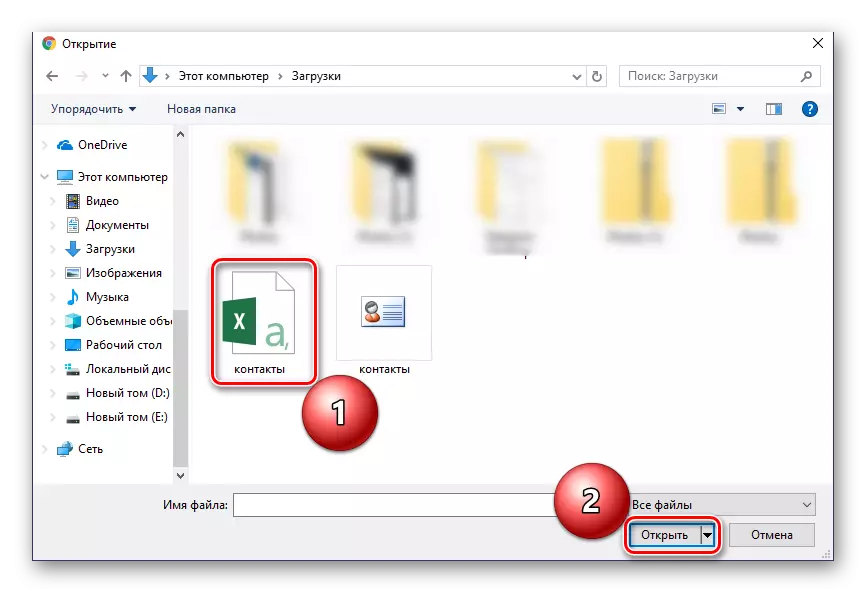
- In Windows Explorer, go to the folder with the exported and previously downloaded by the contact file, click on it with the left mouse button to select and click Open.
- Click the Import button to complete the data transfer procedure in the Google Account.
- Information from the CSV file will be saved to your Gmail Mail.


As mentioned above, import contacts from third-party mail service to the Google account can be from a smartphone. True, there is one small nuance - the address book should be saved to the VCF format file. Some mailers (both sites and programs) allow you to export data to files with such an extension, so just select it at the save stage.
If the mail service you use, as well as the Microsoft Outlook considered by us, does not provide such an opportunity, we recommend that it is converted. The article submitted by reference below will help you in solving this task.
Read more: Convert CSV files in VCF
So, having received a VCF file with address book data, do the following:
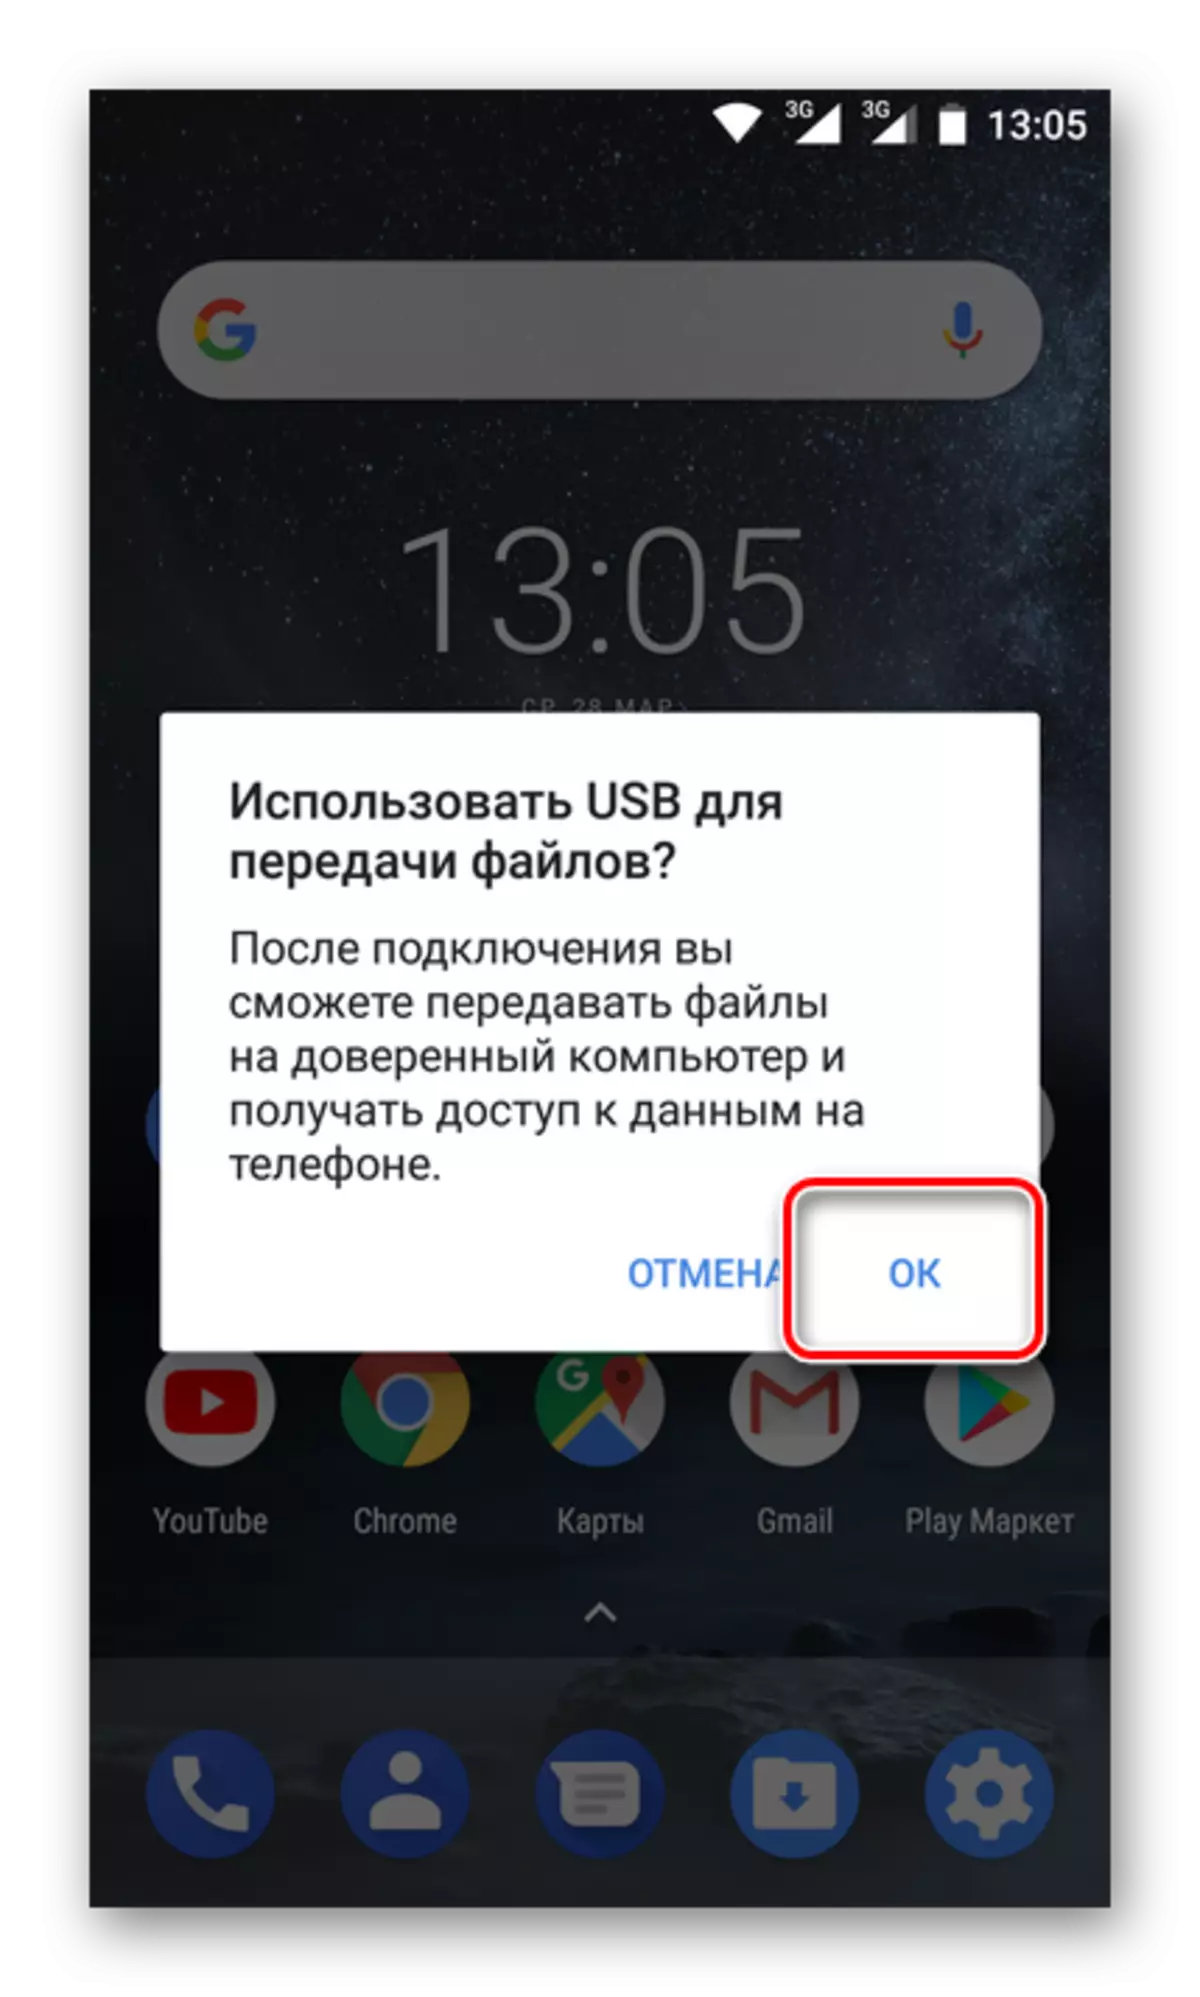
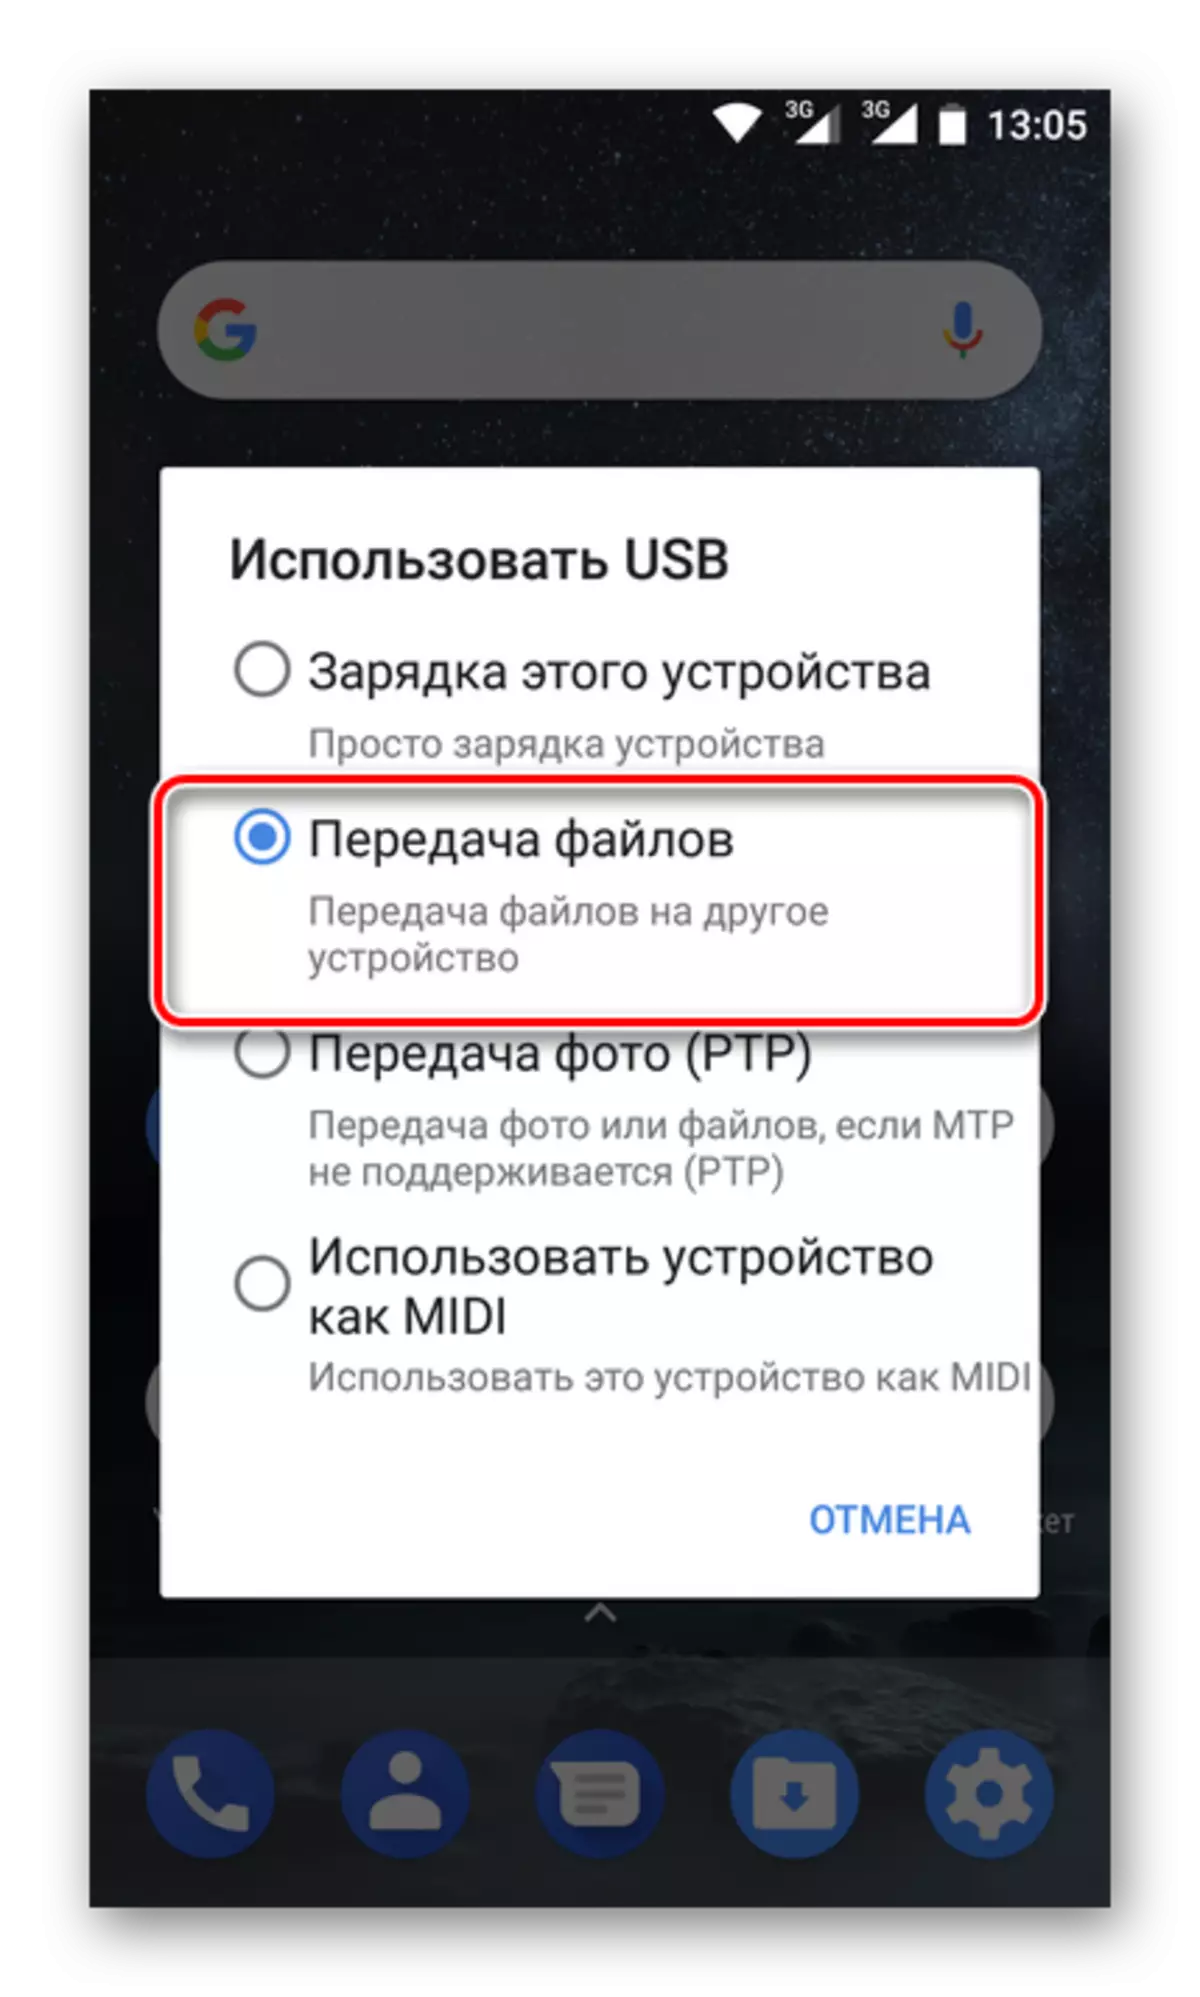
- Connect your smartphone to a USB cable computer. If the query shown below appears on the device screen, click OK.
- In the event that such a request does not appear, switch yourself from charging mode to "File Transfer". You can open the selection window by lowering the curtain and taping on the "Charging this device" item.
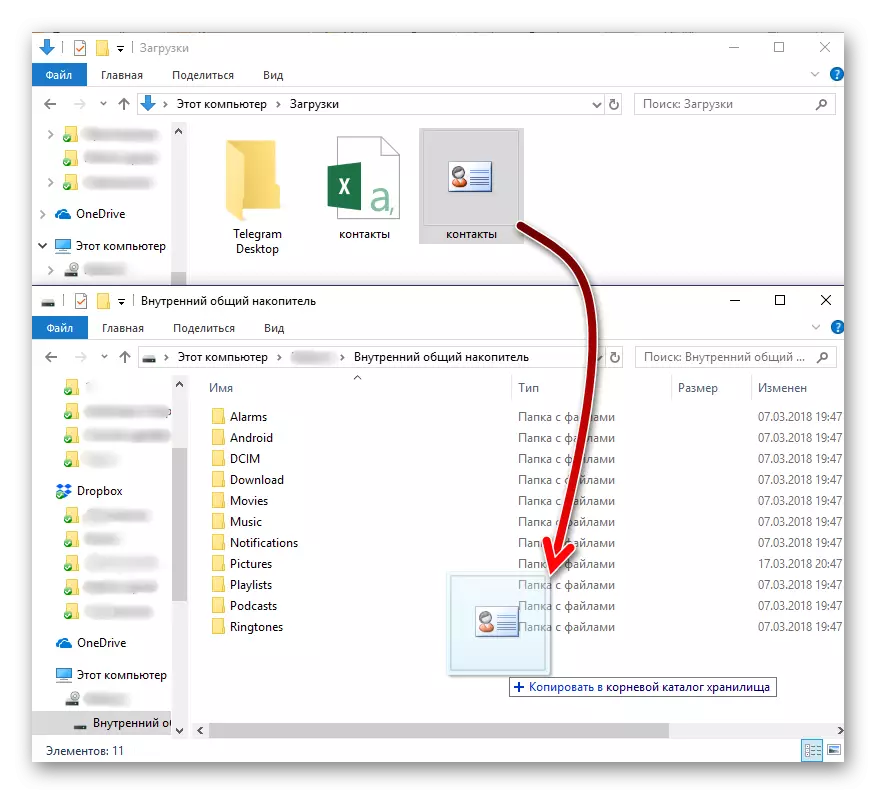
- Using the operating system conductor, copy the VCF file to the root of the drive of your mobile device. For example, you can open the necessary folders in different windows and simply drag the file from one window to another, as shown in the image below.
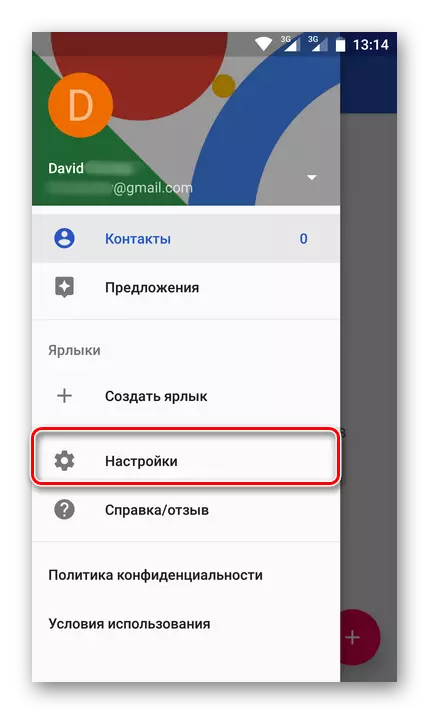
- Having done this, turn off the smartphone from the computer and open the standard "Contacts" on it. Go to the menu by making the swipe on the screen from left to right, and select "Settings".
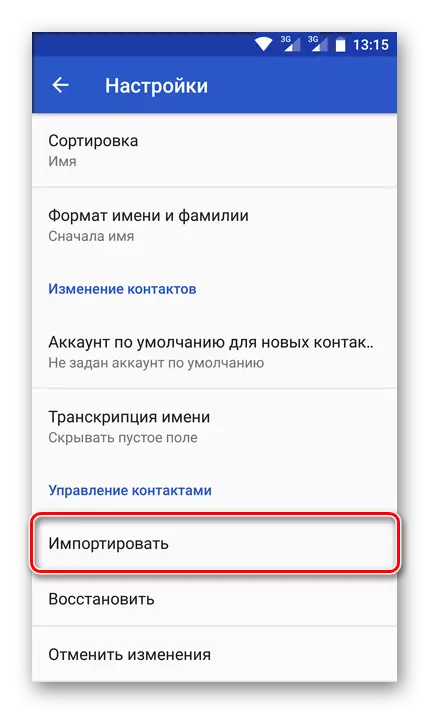
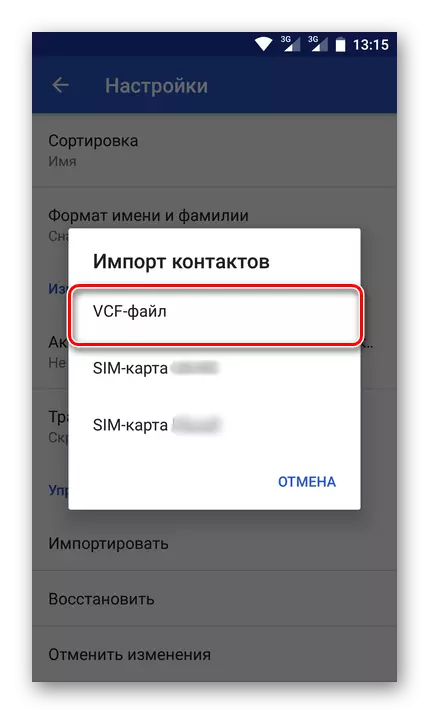
- Scroll through the list of available partitions down, tap "Import".
- In the window that appears, select the first item - "VCF file".
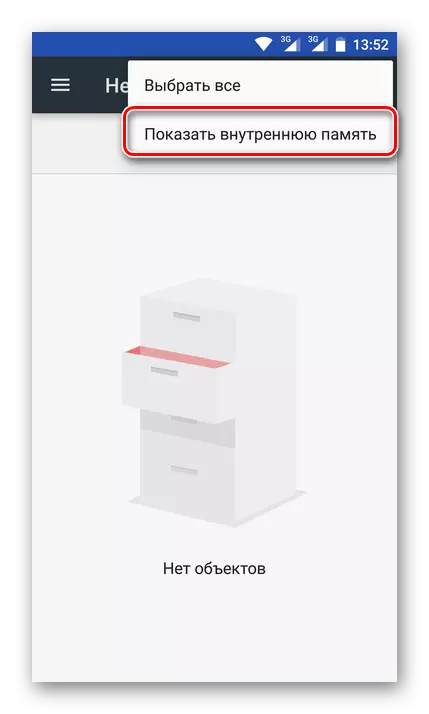
- The File Manager built into the system (or used instead). Perhaps, the standard application will require allow access to the internal repository. To do this, tap on three vertically located points (the right upper angle) and select "Display internal memory".
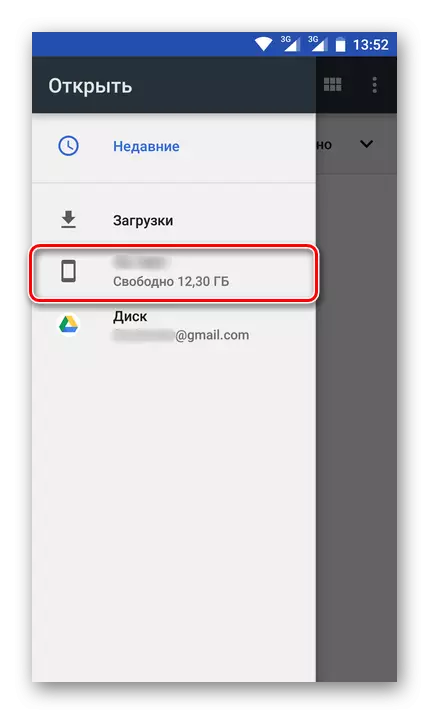
- Now go to the file manager menu, taping on three horizontal stripes on the left above or making a swipe left right. Select the item named your phone.
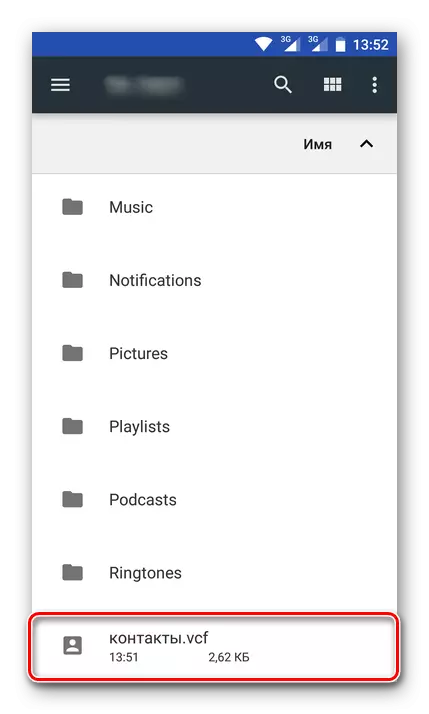
- In the directory list that opens, find the VCF file previously copied to the device and tap it on it. Contacts will be imported into your address book, and at the same time go to Google's account.
As you can see, unlike the only option of importing contacts with the SIM card, you can save them from any email to Google in two different ways - directly from the service or through a special data file.
Unfortunately, on the iPhone, the method described above will not work, and the fault of this climony of iOS. However, if you import contacts to Gmail via a computer, and then logged in the same account on your mobile device, you will also access the necessary information.
Conclusion
On this, consideration of the methods for saving contacts to the Google account can be considered over. We described all possible solutions to this task. Which one to choose is to solve only you. The main thing is that now you will definitely never lose these important data and you will always have access to them.