

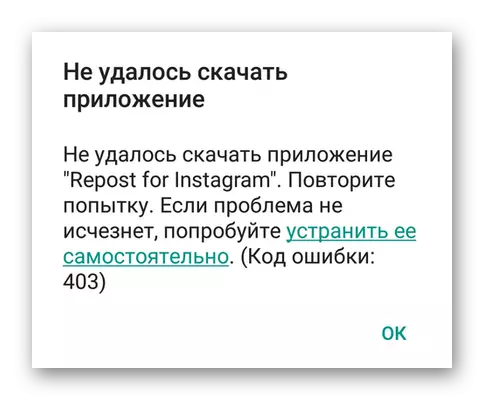
Android operating system is still not ideal, from time to time, users face various failures and errors in her work. "Failed to download the application ... (error code: 403)" - one of these unpleasant problems. In this article, consider what reasons it arises and how to eliminate it.
Get rid of error 403 when downloading applications
The reasons for which in the Play markete can occur 403, there are several. We highlight the main of them:
- Lack of free place in the memory of the smartphone;
- Communication failure or poor Internet connection;
- Unsuccessful attempt to connect to Google services;
- Blocking access to servers from the "Corporation of Good";
- Lock access to servers from the provider.
Deciding that it interferes with the download of the application, you can proceed to eliminate this problem than we do further. If the reason was failed to determine, we recommend alternately to perform all the steps described below.
Method 1: Check and configure Internet connection
Perhaps the error 403 provoked unstable, weak or simply a slow connection with the Internet. All that can be recommended in this case is to restart Wi-Fi or mobile Internet, depending on what you use at the moment. Alternatively, you can also try to connect to another wireless network or find a place with a more stable 3G or 4G coating.In addition to standard tools for cleaning memory on a smartphone, you can use third-party software. This is written in more detail in a separate article on our website.
Read more: How to clean android smartphone from garbage
Method 3: Cleaning Cache Plate Market
One of the causes of the error 403 may be the Play Market itself, more precisely, temporary data and cache, which accumulate in it for a long time of use. The only solution in this case is its forced cleaning.
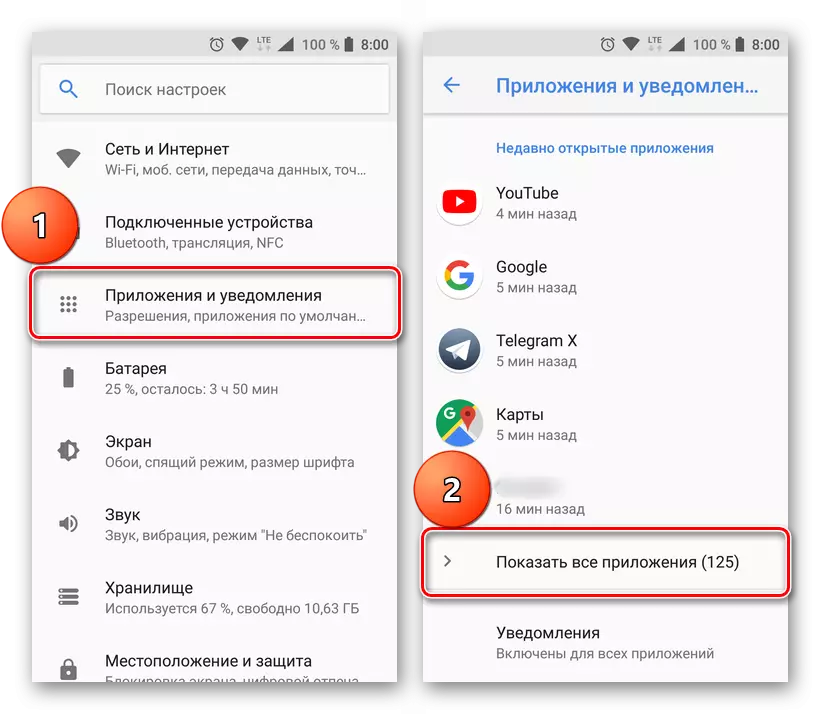
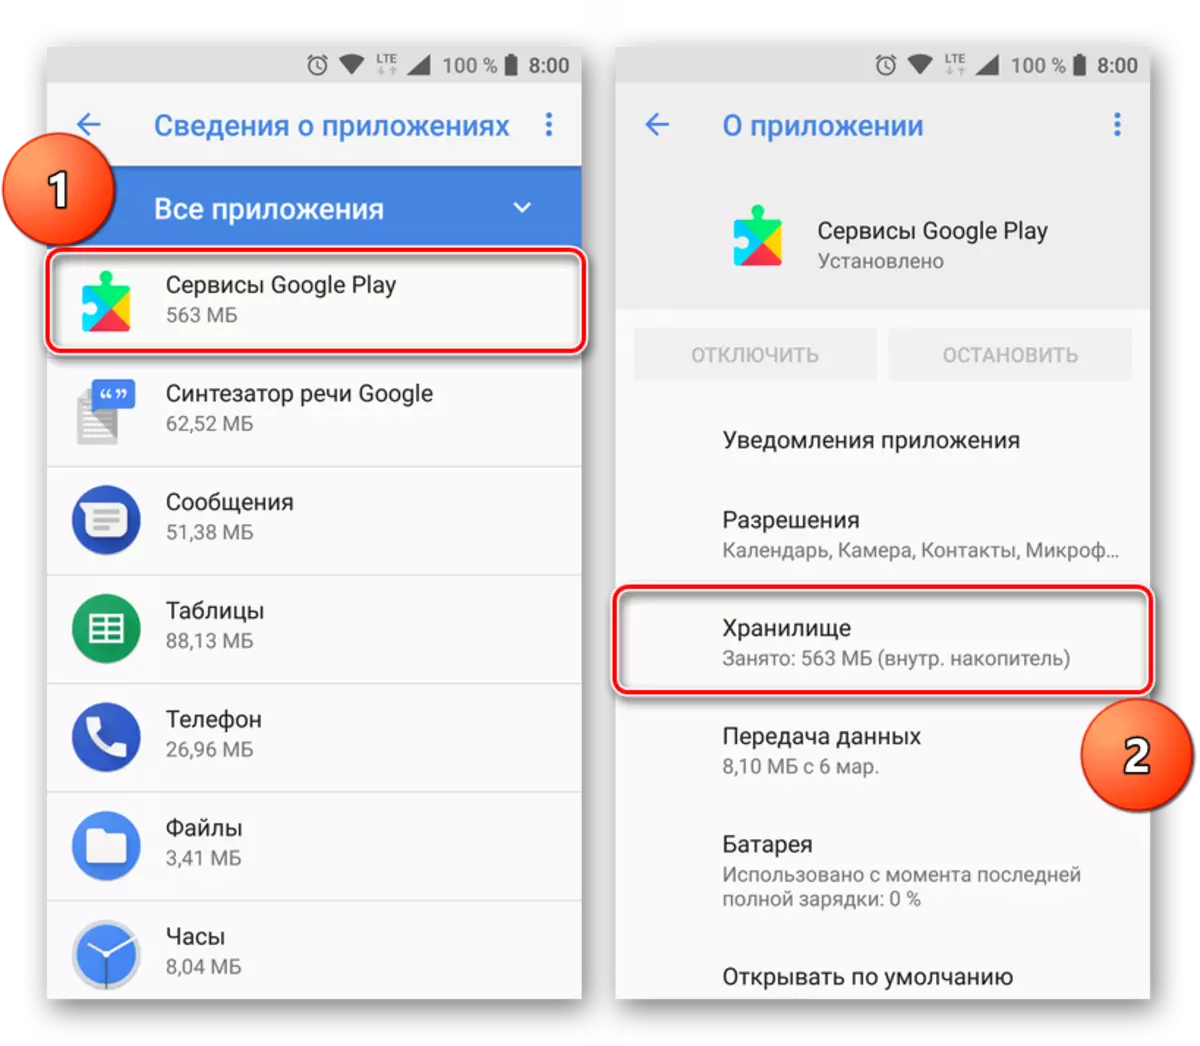
- Open the "Settings" of your smartphone and alternately go to the "Applications" section, and then to the list of installed programs.
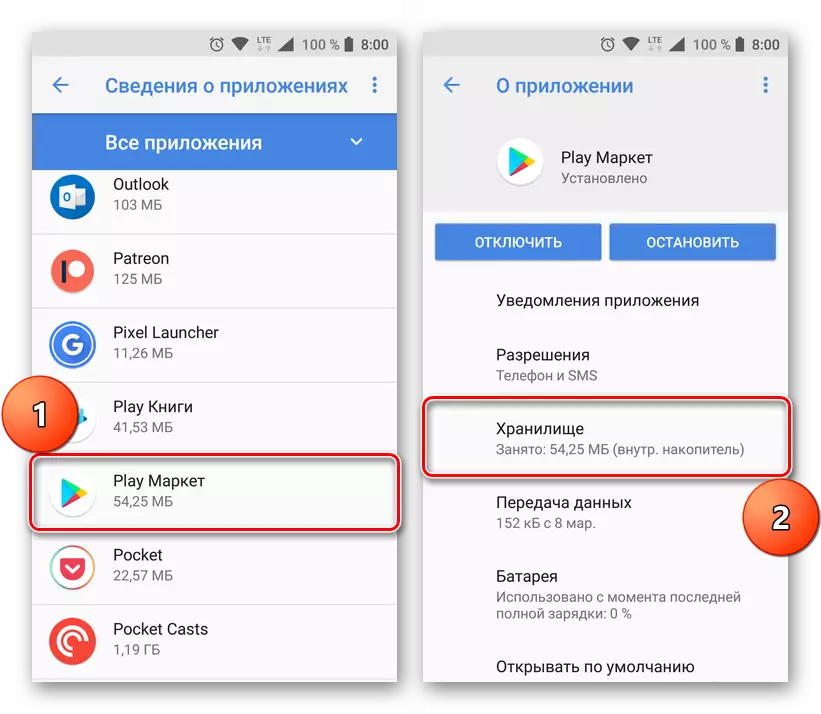
- Find a play market there and tap according to his name. In the window that opens, select "Storage".
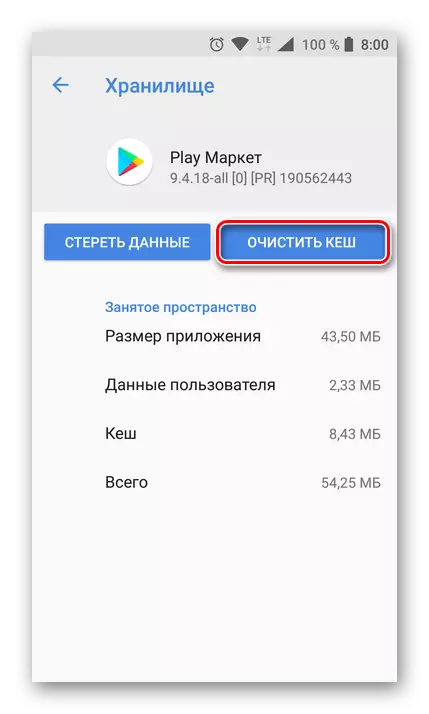
- Click "Clear Kesh" and confirm your actions if necessary.
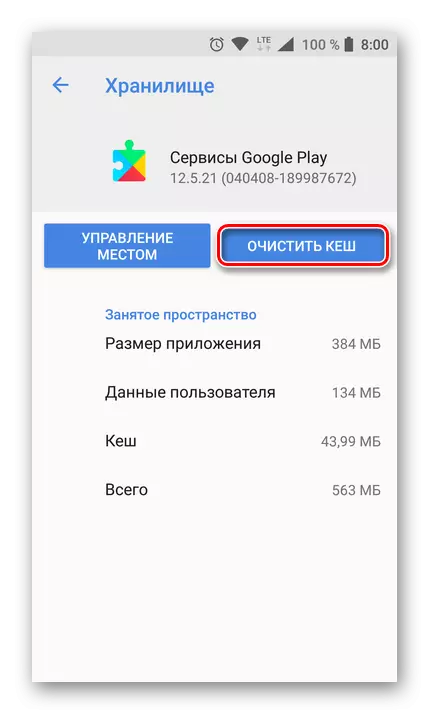
- Return to the list of installed applications and find Google Play services there. Opening the page information about this software, tap on the "Storage" item for opening it.
- Click the Clear Kesh button.
- Exit the settings and restart the device, and after it starts, open the Play Market and try to establish a problem software.
Such a simple procedure, like cleaning the Google-shop and services branded application cache - quite often allows you to get rid of such errors. Often, but not always, therefore, if this method did not help you get rid of the problem, go to the next solution.
Method 4: Enabling data synchronization
Error 403 may occur, because of the problems with the synchronization of the Google Account data. Play Market, which is an integral part of brand services of a good corporation, can incorrectly function precisely because of the lack of data exchange with servers. To enable synchronization, you must perform the following:
- Opening "Settings", find the "Accounts" item there (may be called "Accounts and Synchronization" or "Users and Accounts") and go to it.
- There find your google account, opposite which your email is indicated. Tap for this item to go to its main parameters.
- Depending on the Android version on your smartphone, do one of the following:
- In the upper right corner, switch to the active position of the Tumbler responsible for data synchronization;
- Opposite each item of this section (right), click on the button in the form of two circular shooters;
- Click on the circular arrows to the left of the inscription "Synchronize Accounts".
- These actions activate the data synchronization feature. Now you can exit the settings and run the playmark. Try installing the application.


With a large probability, the error with code 403 will be eliminated. To more effectively combat the problem under consideration, we recommend alternately to perform the steps described in the method 1 and 3, and only after that check and, if necessary, activate the data synchronization feature with Google Account.
Method 5: Reset to factory settings
If none of the above options for solving problems with installing applications from Play Market does not help, it remains to be resorted to the most radical method. Having dropped the smartphone to the factory settings, you will return it to the state in which it is directly after the purchase and first launch. Consequently, the system will work quickly and stable, and no failures with errors will not be worried. You can learn from a separate article on our website how to reveal your device.
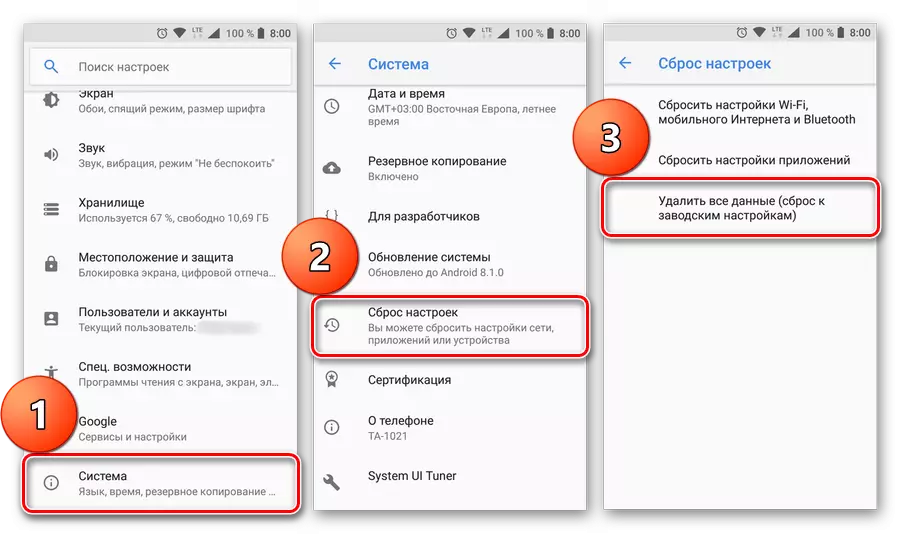
Read more: Reset Android smartphone to factory settings
A significant disadvantage of this method is that it implies a complete deletion of all user data, installed programs and settings. And before proceeding to the execution of these irreversible actions, we strongly recommend the backup copy of all important data. To do this, you can use one of the methods described in the device backup article.
Read more: Backup data from smartphone before firmware
Solution for residents of Crimea
Holders of android devices living in the Crimea may encounter a 403 error in the playing market due to some regional restrictions. Their cause is obvious, so we will not go into details. The root of the problem lies in the forced blocking of access to Google's branded services and / or directly server servers. This unpleasant restriction can proceed from both the Corporation and the Provider and / or Cellular Operator.Solutions there are two - using an alternative application store for Android or private virtual network (VPN). The latter, by the way, can be implemented as a third-party software, and by performing manual configuration.
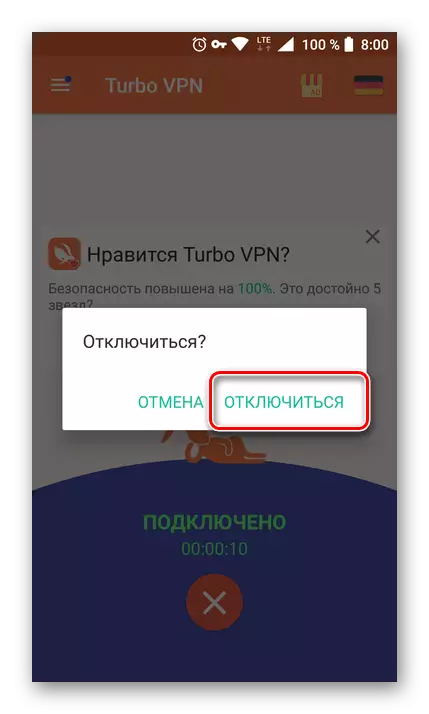
Method 1: Using third-party VPN client
It does not matter whose side is blocked access to one or another functional features of the Play Market, it is possible to bypass these restrictions using a VPN client. For devices based on Android, a rather many such applications have been developed, but the problem is that due to the regional (in this case) errors 403 install from the official store any of them will not work. We will have to resort to the help of thematic web resources such as XDA, 4PDA, APKMirror and the like.
In our example, a free client TURBO VPN will be used. In addition to it, we can recommend solutions such as Hotspot Shield or Avast VPN.
- Having found the installer of the appropriate application, place it on the drive of your smartphone and installed. To do this, you will need to do the following:
- Allow installation of applications from third-party sources. In the "Settings", open the Security section and activate the Installation item from unknown sources.
- Install the software itself. Using a built-in or third-party file manager, go to the folder with the downloaded APK file, run it and confirm the installation.
- Run the VPN client and select the appropriate server or allow the application to do it yourself. Additionally, it will be necessary to provide permission to start and use the private virtual network. Just click "OK" in the pop-up window.
- After you connect to the selected server, you can minimize the VPN client (the status of its operation will be displayed in the curtain).


Now start the playing market and install the application, when you try to download which the error 403 occurs. It will be installed.
Important: We strongly recommend using VPN only when it is really necessary. By installing the desired application and updating all the others, tear off the server, using the corresponding item in the main window of the program used.
The use of a VPN client is an excellent solution in all cases when it is required to get around any restrictions on access, but it is clearly not necessary to abuse.
Method 2: Setting up the VPN connection manually
If you do not want or for some reason you cannot download a third-party application, configure and run VPN on your smartphone manually. It is done quite simple.
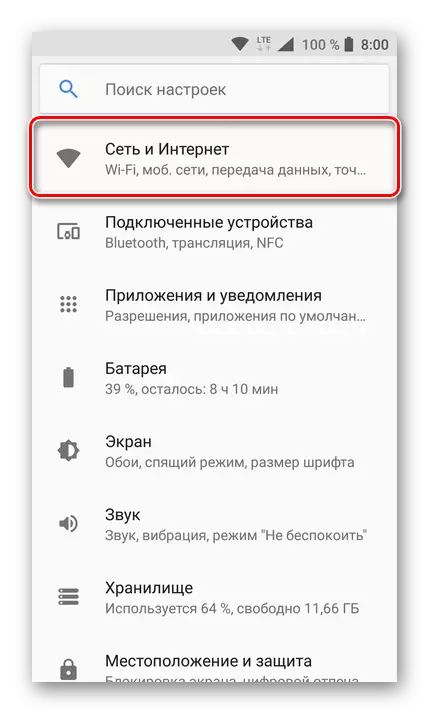
- Opening the "settings" of your mobile device, go to the "Wireless Network" section (or "Network and Internet").
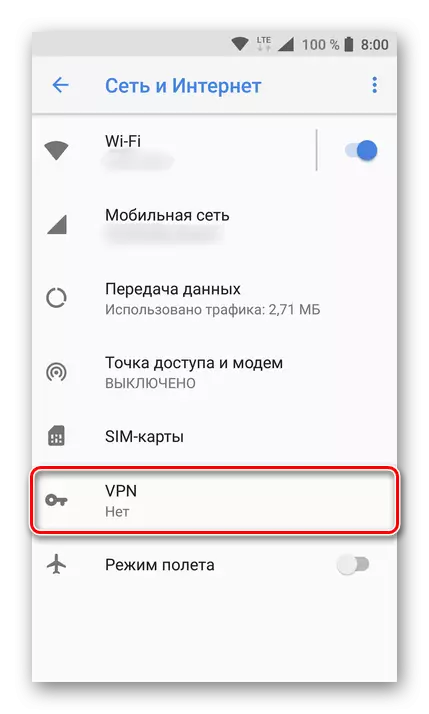
- Click "More" to open an additional menu that will contain the item-VPN object. In Android 8, it is located directly in the settings "Network and the Internet". Choose it.
- On the old versions of the Android directly when you go to the settings section, you may need to specify the PIN code. Enter any four digits and be sure to remember them, and better write.
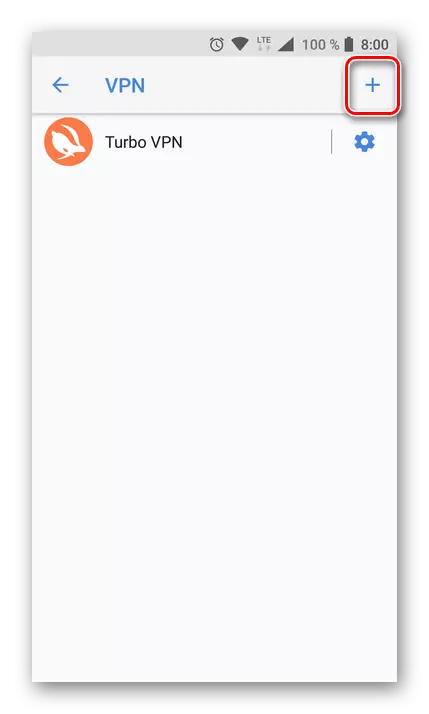
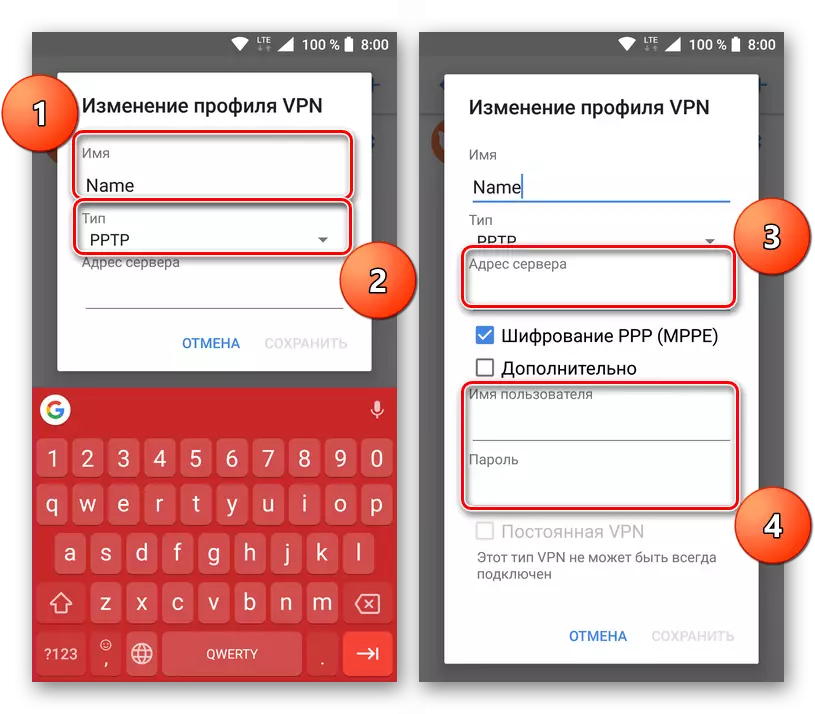
- Next, in the upper right corner, tap the "+" sign to create a new VPN connection.
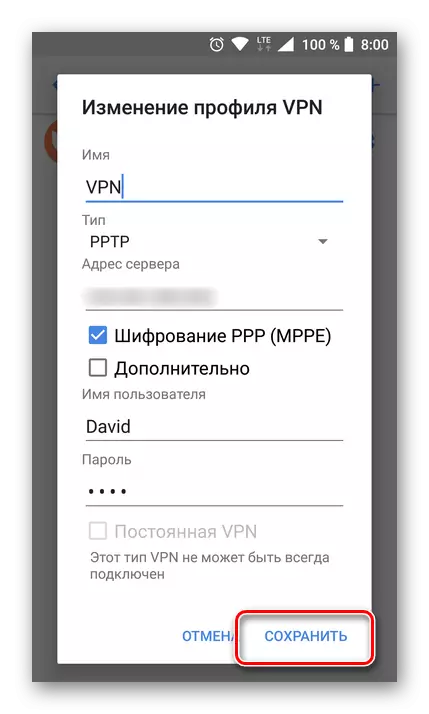
- Set the network you created any convenient name for you. Make sure the PPTP is selected as the protocol type. In the Server Address field, you must specify the address VPN (issued by some providers).
- After filling in all fields, click on the Save button to create your own virtual private network.
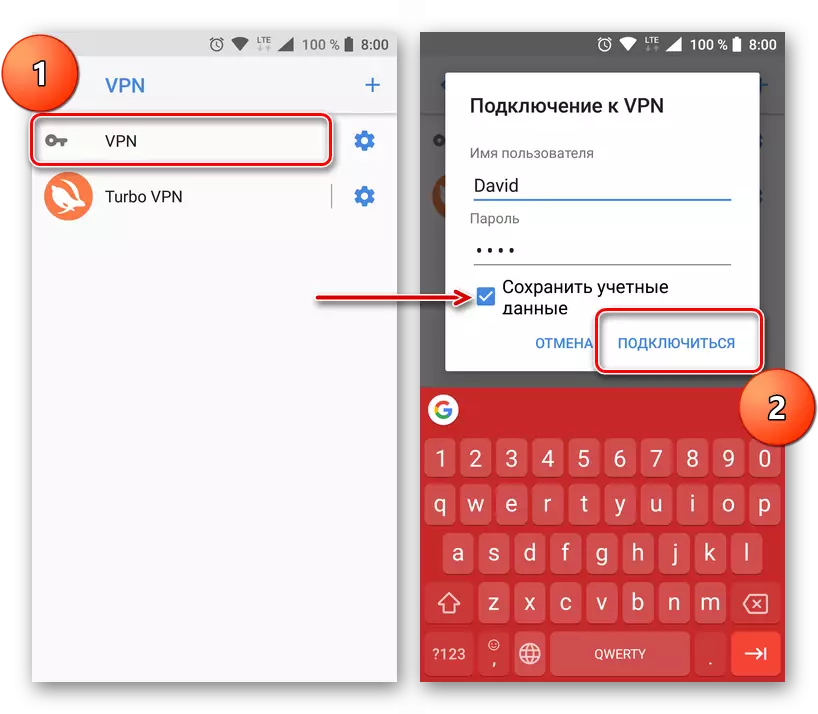
- Tap for connecting to start it, enter the username and password (on Android 8, the same data was introduced at the previous stage). To simplify the subsequent connections procedure, check the box opposite the "Save account data" item. Click the Connect button.
- The status of the activated VPN connection will be displayed in the notifications panel. By clicking on it, you will see information about the amount of received and received data, the duration of the connection, and you can also disable it.
- Now go to Play Market and install the application - 403 errors will not distort you.
Note: On devices with Android 8 in the same window, the username and password needed to connect to the created VPN are entered.
As in the case of third-party VPN clients, we recommend using an independently created connection only as needed and do not forget to disable it.
Read also: Setting up and using a VPN on Android
Method 3: Installing an alternative app store
Play Market, in view of its "official", is the best application store for the Android operating system, but it has a lot of alternatives. Third-party clients have their advantages over the brand software, but there are also flaws. So, together with free versions of paid programs, it is quite possible to find and unsafe or simply unstable offers.
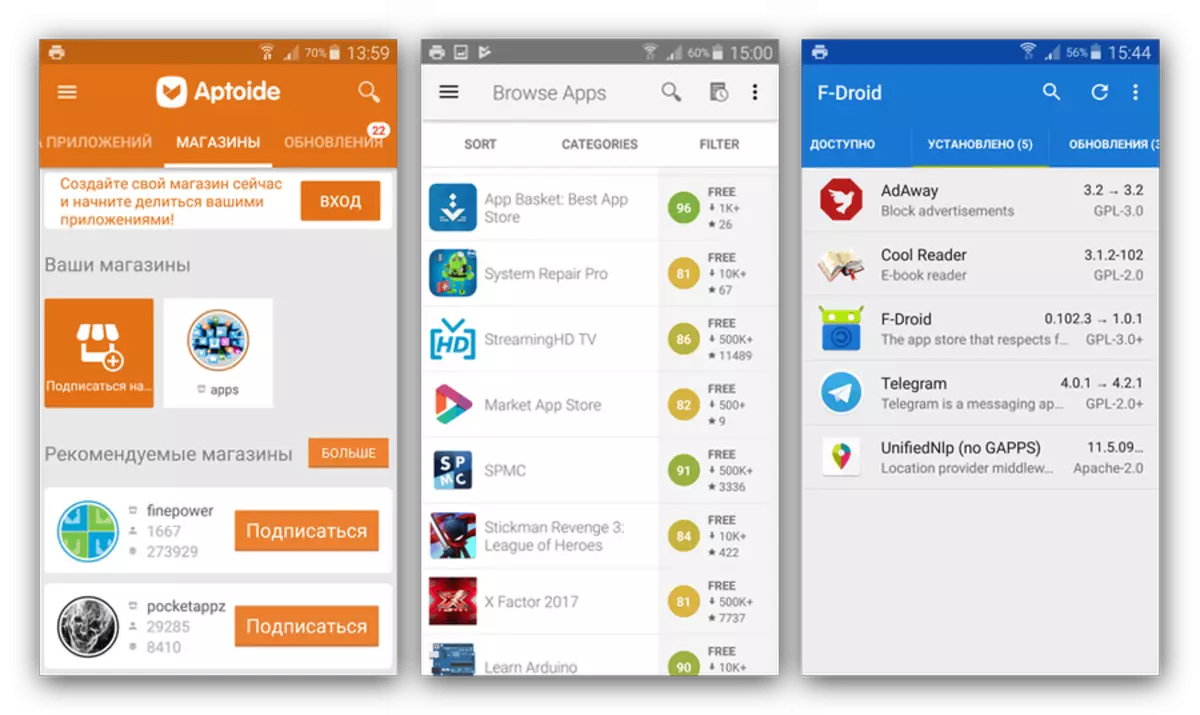
In the event that none of the methods described above did not help eliminate the error 403, the use of the market from one of the third-party developers is the only possible solution to the problem. On our site there is a detailed article on such clients. After reading her, you can not only choose a suitable store for yourself, but also to know about where to download it and how to install on your smartphone.
Read more: The best alternatives to Play Market
Conclusion
The error 403 considered in the article is a rather serious collection in the work of the playing market and does not allow you to use its basic function - installing applications. As we installed, she has a lot of reasons for the appearance, and the solution options are even more. We hope this material turned out to be useful for you and helped completely eliminate such an unpleasant problem.