

The products of the Chinese company TENDA relatively recently began mass expansion into international markets. Therefore, in comparison with other popular brands, it is not so well known to the domestic consumer. But thanks to the combination of affordable price and high degree of innovation, it is becoming increasingly popular. TENDA routers are already often found in home networks and small offices. In this regard, the question of how to configure them is becoming increasingly relevant.
Customize the TENDA router
Easy tuning is another TENDA product. The only inconvenience in this process can be called only that not all models of routers have an interface in Russian. Therefore, further explanations will be made on the example of the TENDA AC10U router, where the Russian-speaking interface is present.How to go to the router settings
The procedure for connecting to the TENDA router web interface is no different from how it is done in devices from other manufacturers. You must first select a place for the router and connect it via the WAN port with a cable from the provider, and through one of the LAN ports with a computer. After that:
- Check that the network connection settings on the computer are set on the automatic receipt of the IP address.

- Open the browser and enter the address of the router. Default is 192.168.0.1.

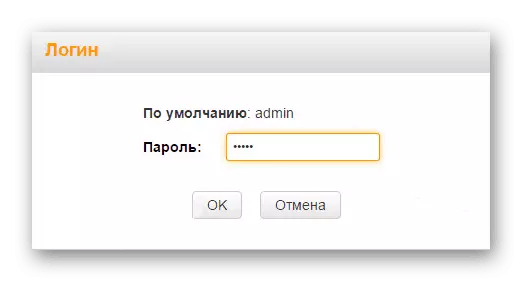
- In the Authorization window, enter the Admin password. Login by default is also admin. It is usually registered in the top line.
After that, it will be redirected to the router settings page.
Fast setting
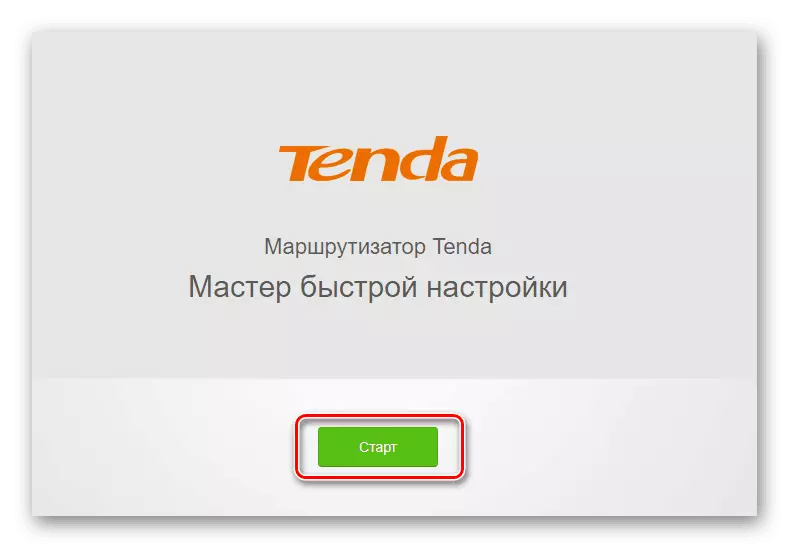
After the user connects to the router configuration, the quick setup wizard automatically opens. To use it is very simple. Initially, it is recommended to check the availability of the Russian language:

If this question is not relevant - this step can be skipped. Then:
- By clicking on the "Start" button, start the master.
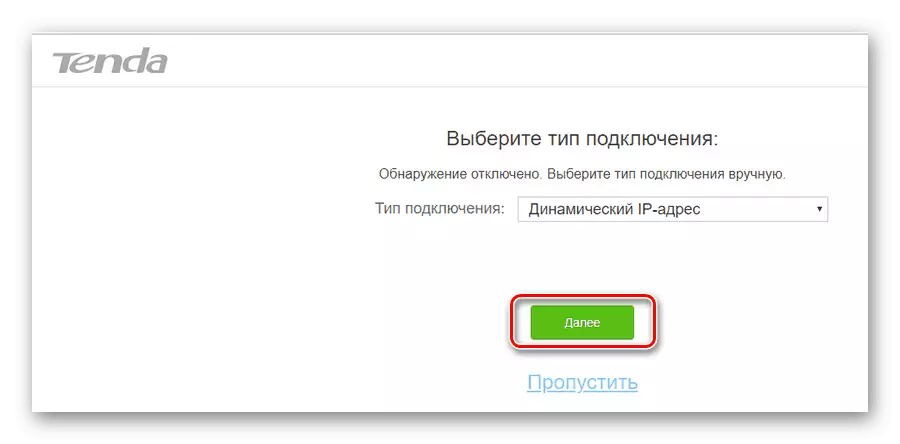
- Select the type of connection to the Internet according to the contract with the provider.
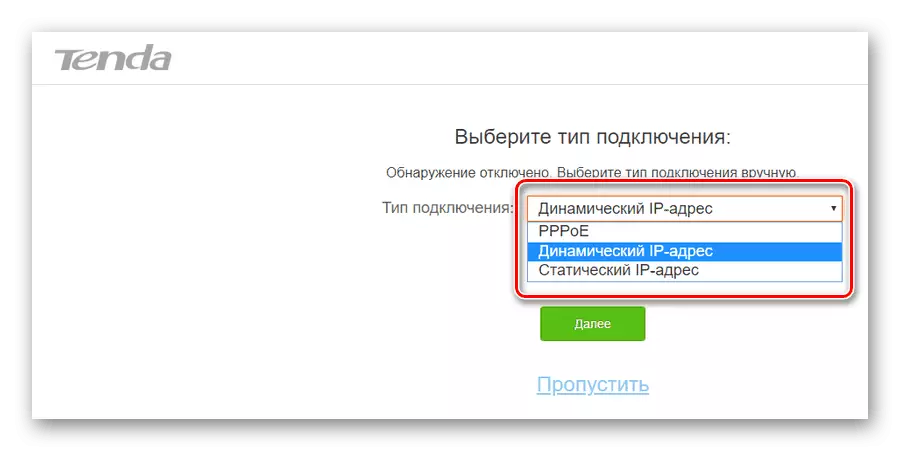
- Depending on the type of connection selected, do the following:
- For RPRoy - Enter the username and password received from the provider.

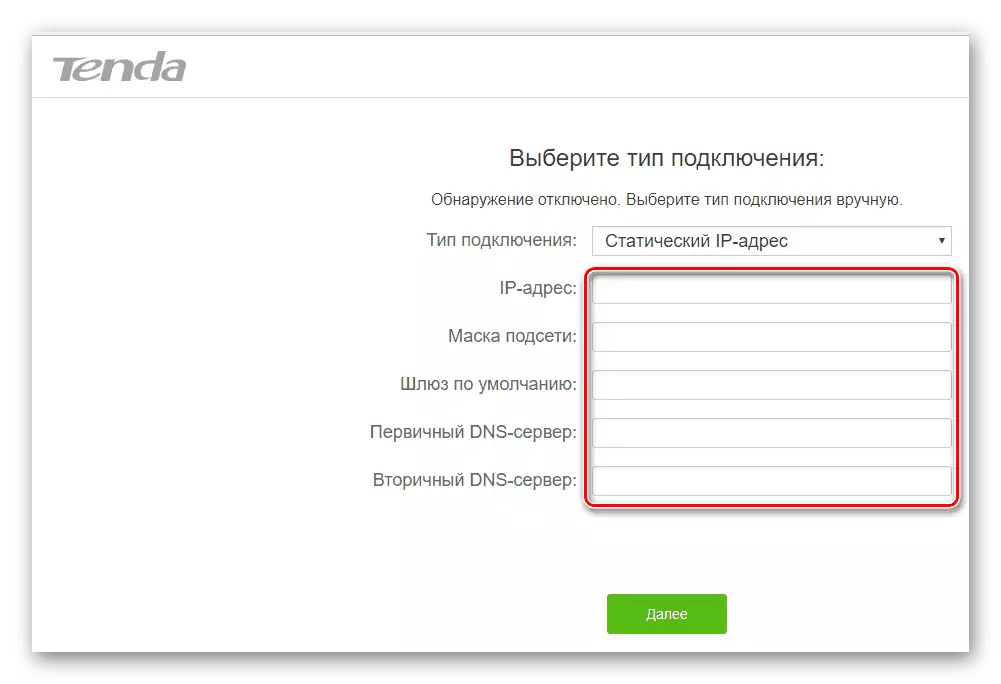
- For a static IP address - Fill out the information lines that have previously received from the Internet service provider.
- In the case of using a dynamic IP address - just click on the "Next" button.
- For RPRoy - Enter the username and password received from the provider.
Next, you need to configure the basic parameters of the Wi-Fi connection. In the same window, an administrator password is installed to access the router web interface.

In the upper field, the user is given the opportunity to adjust the radius of the wireless network cover by setting the Wi-Fi transmitter to low or high power. Next goes the standard network name parameters and password to connect to it. If you check the checkbox "Not required", the network will be open to access anyone who wants, so it is necessary to think seriously before activating this parameter.
In the last line, an administrator password is installed, with which in the future it can be connected to the router configuration. There also has an item offering to install for Wi-Fi and for the administrator a single password, and the not required mark, which allows you to leave access to the web interface free. The expediency of such settings, as in the previous case, is very dubious and the user must be aware of all possible consequences before using them.
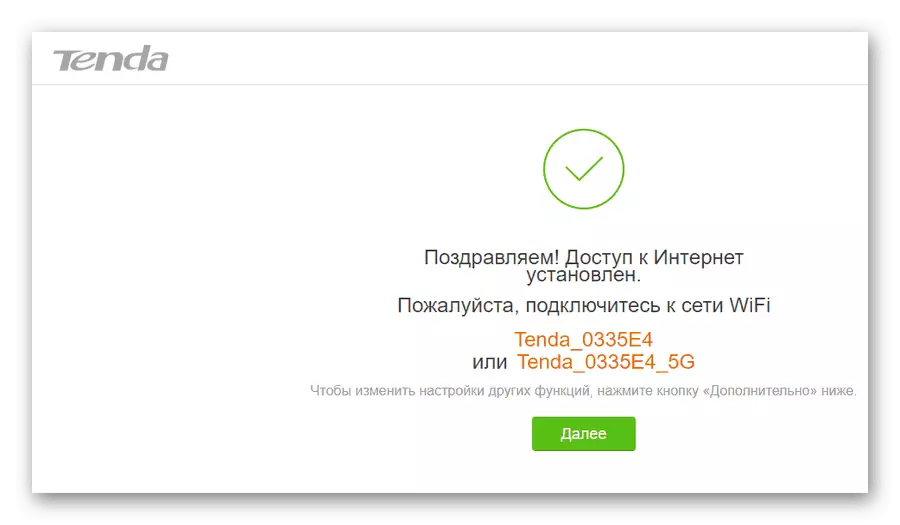
After installing the wireless network settings, the final quick setup wizard window will open.
By pressing the "Next" button, the transition to the installation of additional parameters is carried out.
Manual setting
You can go into manual TENDA router mode, only running the quick setup wizard and at the connection type selection stage, clicking the "Skip" link.

You will then see the Wireless Network Settings window and set the administrator password, which has already been described above. By clicking on the "Next" button, the user hits the main page of the router configuration:

If we talk about manual configuration of the Internet connection, then there is little meaning for the user in it, as I enter the corresponding section, you can see exactly the same windows that appear and during the work of the quick customization wizard:
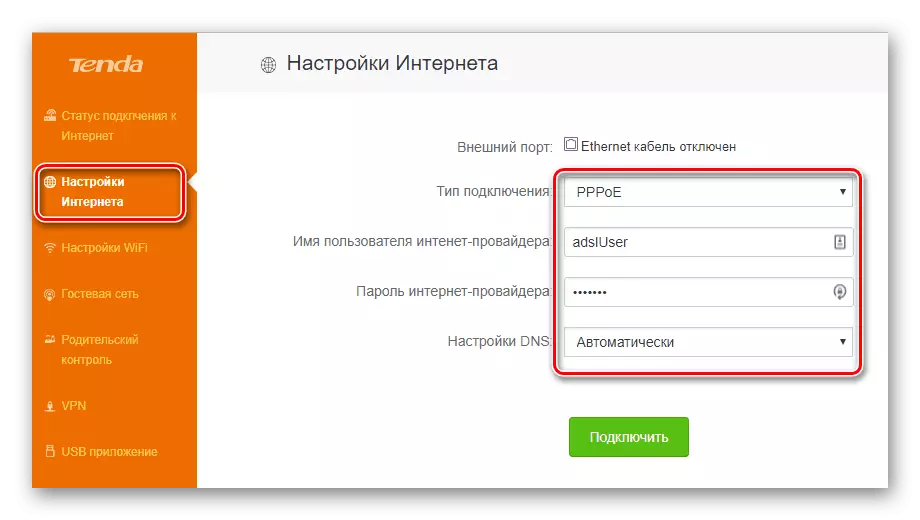
An exception is only a case when the provider works through a PRTR or L2TP connection, for example, Beeline. Configure it in fast setup mode will not work. To configure such a connection, you need:
- Go to the "VPN" section and click on the "PRTR / L2TP Client" icon.
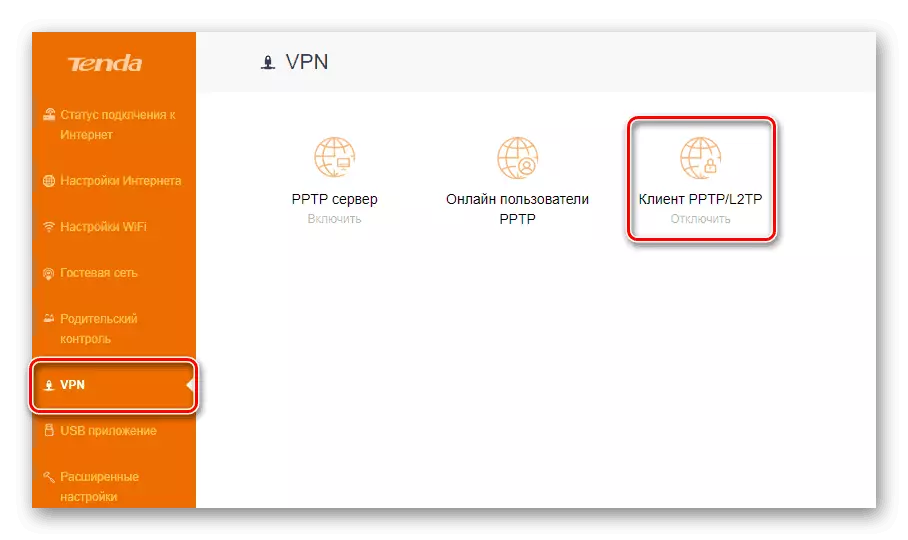
- Make sure that the client is enabled, select the PRTR or L2TP connection type and enter the address of the VPN server, login and password according to the data obtained from the provider.

The section dedicated to the Wi-Fi Connection Settings has a richer menu:

In addition to the standard parameters that are available in the quick setup wizard, you can install:
- Schedule Wi-Fi, which allows you to turn off access to a wireless network at a certain time of the day by day of the week;

- Network mode, channel number and bandwidth separately for 2.4 and 5 MHz networks;

- Access point mode, if another router, or DSL modem applies to connecting to the Internet.
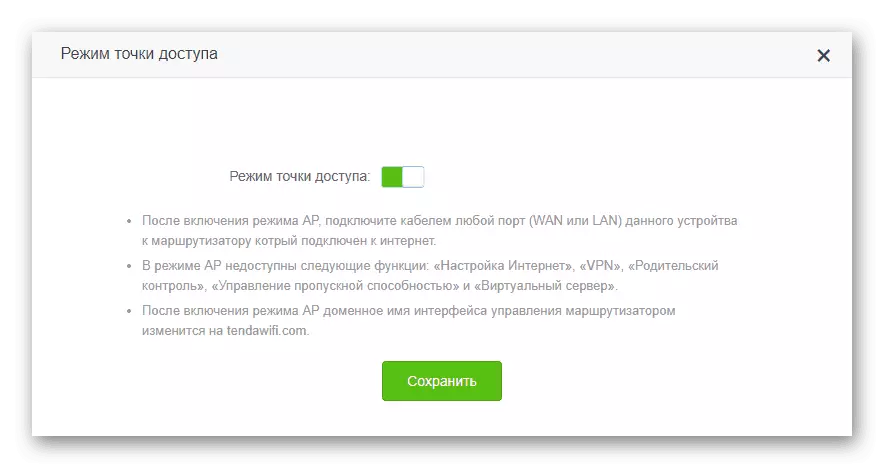
In the advanced wireless settings, other interesting features are also present, the set of which may differ depending on the router model. All menu items are equipped with detailed explanations, which makes the wireless network setting as simple as possible.
Additional features
In addition to basic functions that provide access to the worldwide network and distribution of Wi-Fi, there are many additional features in the tenda routers that make work on the network more secure and comfortable. Let us dwell on some of them.
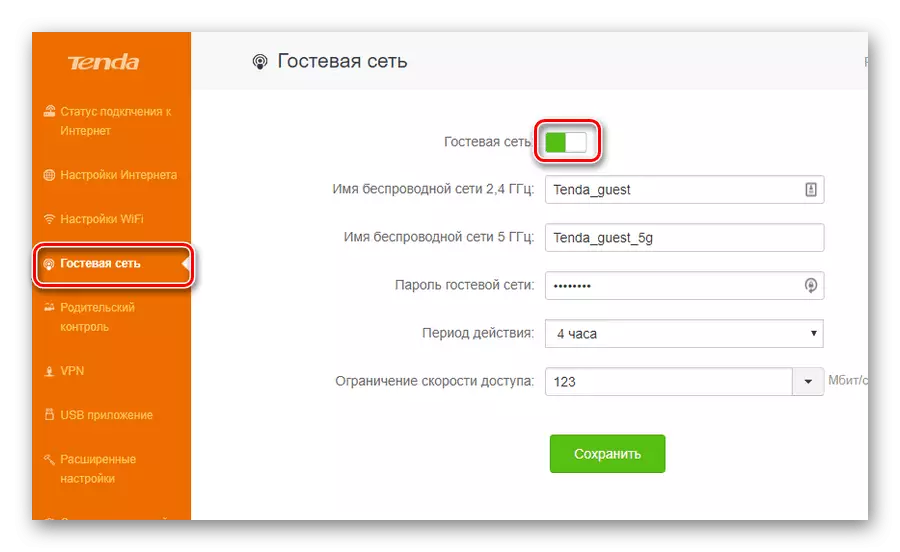
- Guest network. Activation of this feature provides access to online office visitors, customers and any strangers. This access will be limited and guests will not be able to connect to the LAN Office. In addition, it is allowed to establish limitations for the period of action and the speed of the guest network.
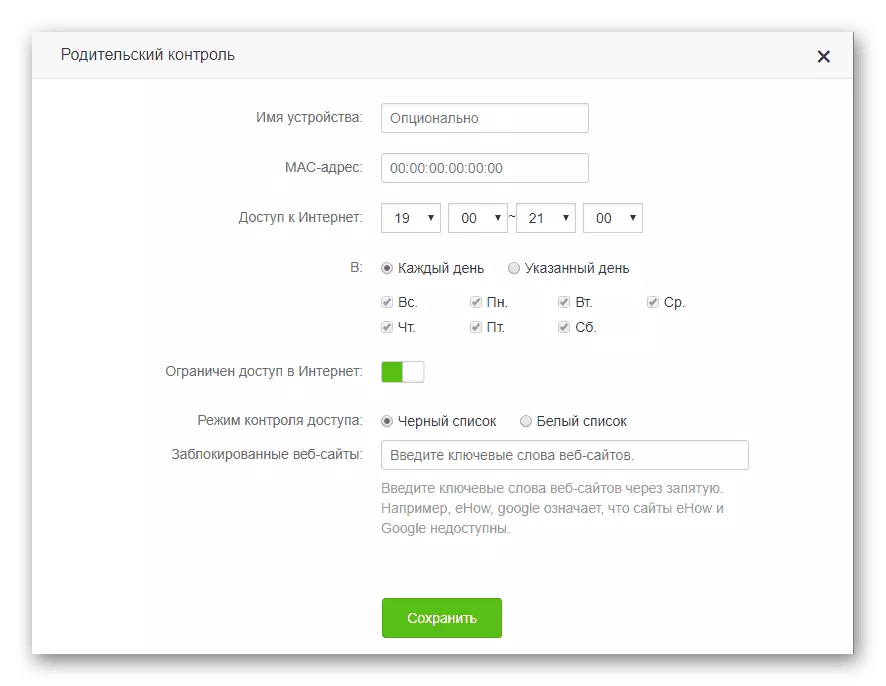
- Parental control. Those who want to control the time of finding a child at a computer are enough in the router web interface to go to the appropriate section and click on the Add button. Then, in the window that opens, enter the MAC address of the device from which the child goes into the network, and set the required limitations. They are set in the mode of black or white list by time of day and day of the week. In addition, it is possible to enable the ban on visiting individual web resources, entering their names in the corresponding field.
- VPN server. Configuring the router in this capacity is carried out in the configuration section of the same name, which has already been mentioned when describing the L2TP connection setting. To activate the VPN server function, you need to go to the EM> submenu »RRTR server and move the virtual slider into the on position. Then, using the "Add" button you need to enter username and passwords of users who will be allowed to use this function, and save changes.
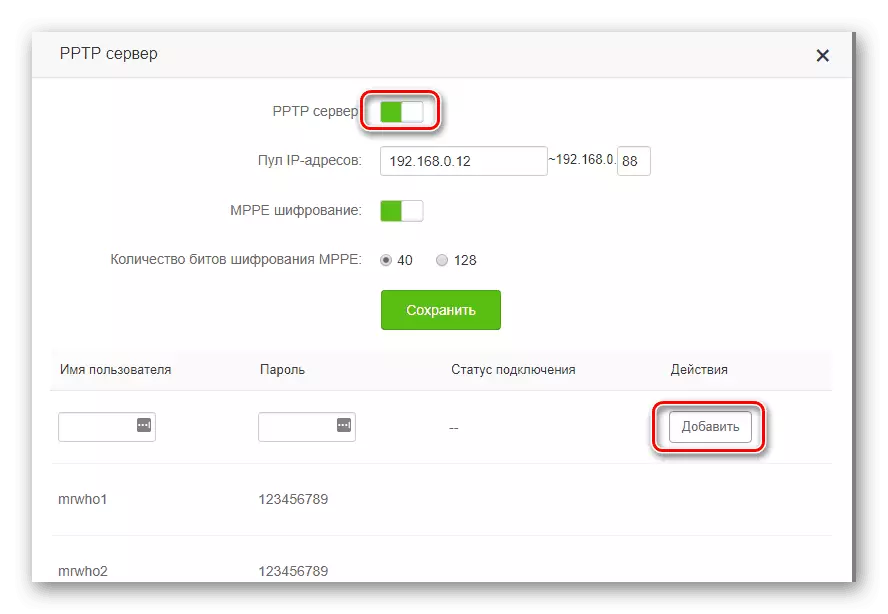
After that, by clicking on the link "Online users of the RRTR", you can control which of the users remotely connected to the network via VPN and the duration of its session.

The list described above the list of additional features provided by the tenda router is not limited. Going to the "Extended Settings" section, you can make another number of interesting settings. They are extremely simple and do not require additional explanations. In more detail, it is possible to stop except on the function of the Tenda App, which is a kind of chip of the company.

By activating this feature, you can download the link to the TENDA APP Mobile Application Mobile application through the QR code provided. After installing this mobile application, access to the router control from your smartphone or tablet, thus boasting without a computer or laptop.
On this review, the TENDA router setup is completed. It should be noted that the web interface of the TENDA F, FH, TENDA N devices differs somewhat from the above. But in general, it is even easier and the user who acquainted with this article will not be difficult to set up and these devices.