

D-Link company is engaged in the production of network equipment. The list of their products has a large number of routers of different models. Like any other such device, such routers before starting work with them are configured through a special web interface. The basic adjustments are set to the WAN connection and the wireless access point. All this can be done in one of the two modes. Next, we will tell you how to independently make such a configuration on D-Link devices.
Preparatory actions
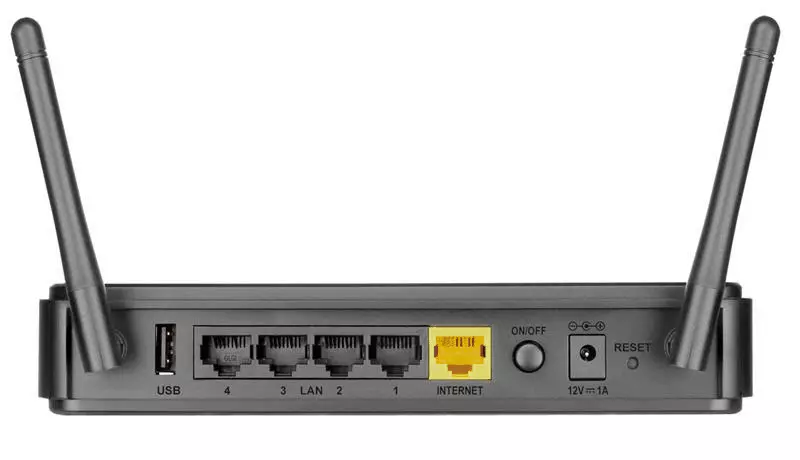
After unpacking the router, set it to any suitable location, then inspect the rear panel. Usually there are all connectors and buttons. The WAN interface connects the wire from the provider, and in Ethernet 1-4 - network cables from computers. Connect all the necessary wires and turn on the router power.
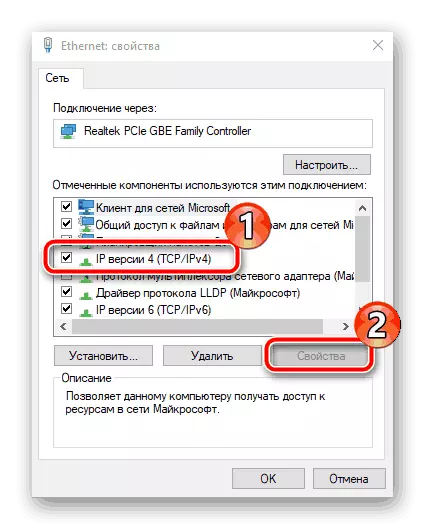
Before entering the firmware, look at the network settings of the Windows operating system. Obtaining IP and DNS there should be set to automatic mode, otherwise there will be a conflict situation between Windows and the router. Another our article on the link below will help you deal with the verification and adjustment of these functions.
Read more: Windows 7 network settings
Customize D-Link routers
There are several versions of the firmware of the routers under consideration. Their main difference is in the modified interface, but the main and additional settings do not disappear anywhere, just the transition to them is performed a little differently. We will consider the configuration process on the example of a new web interface, and if your version is different, find the items specified in our instructions. Now we will focus on how to go to the D-Link router settings:
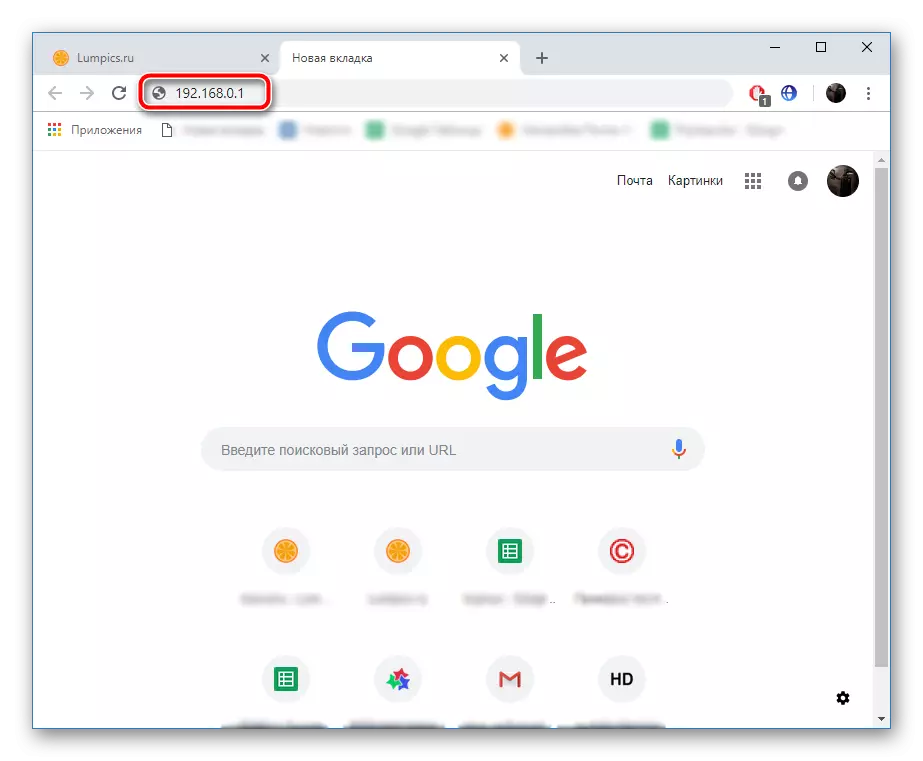
- In your web browser, type 192.168.0.1 or 192.168.1.1 and go through it.
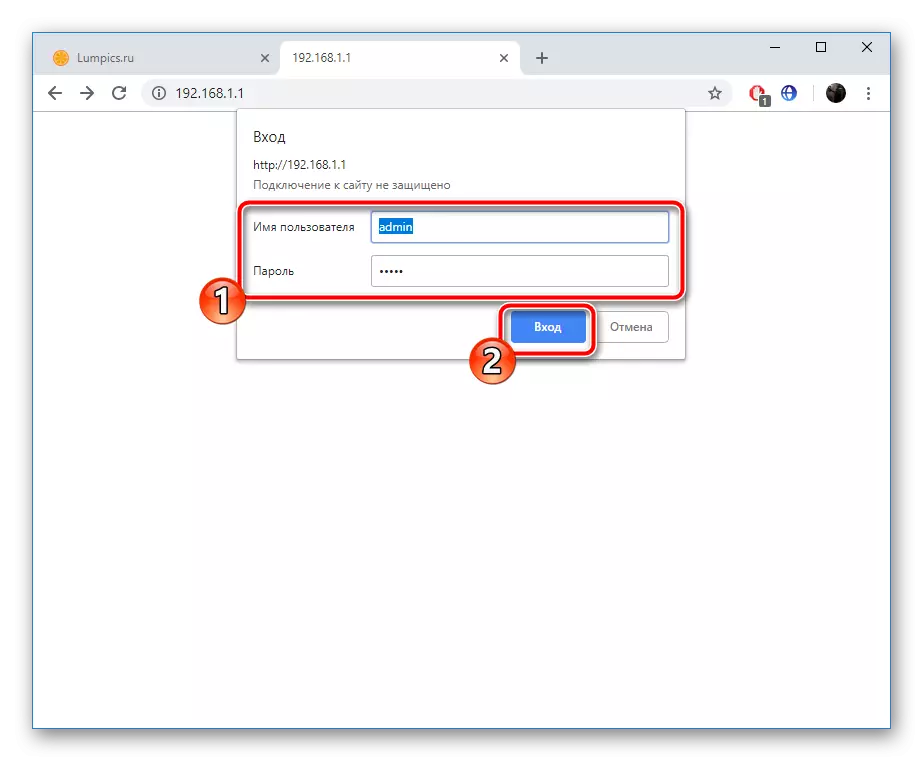
- A window will appear for login and password. In each line here, write Admin and confirm the input.
- Immediately recommend to decide on the optimal language of the interface. It changes at the top of the window.

Fast setting
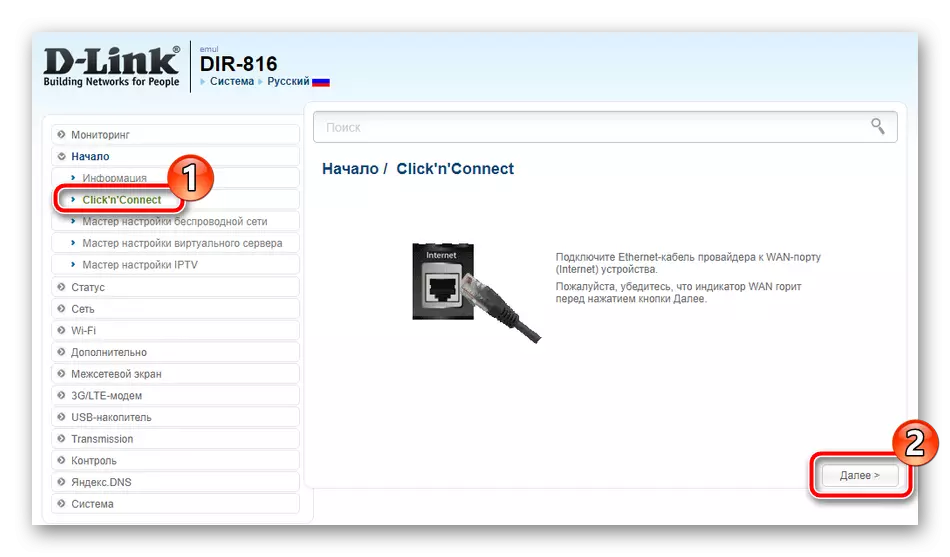
We will start with quick customization or "click'n'Connect" tool. This configuration mode is designed for inexperienced or undemanding users who need to specify the basic parameters of the WAN and the wireless point.
- From the menu on the left, select the category "Click'n'Connect", read the notification that opens and to start the wizard click on the "Next".
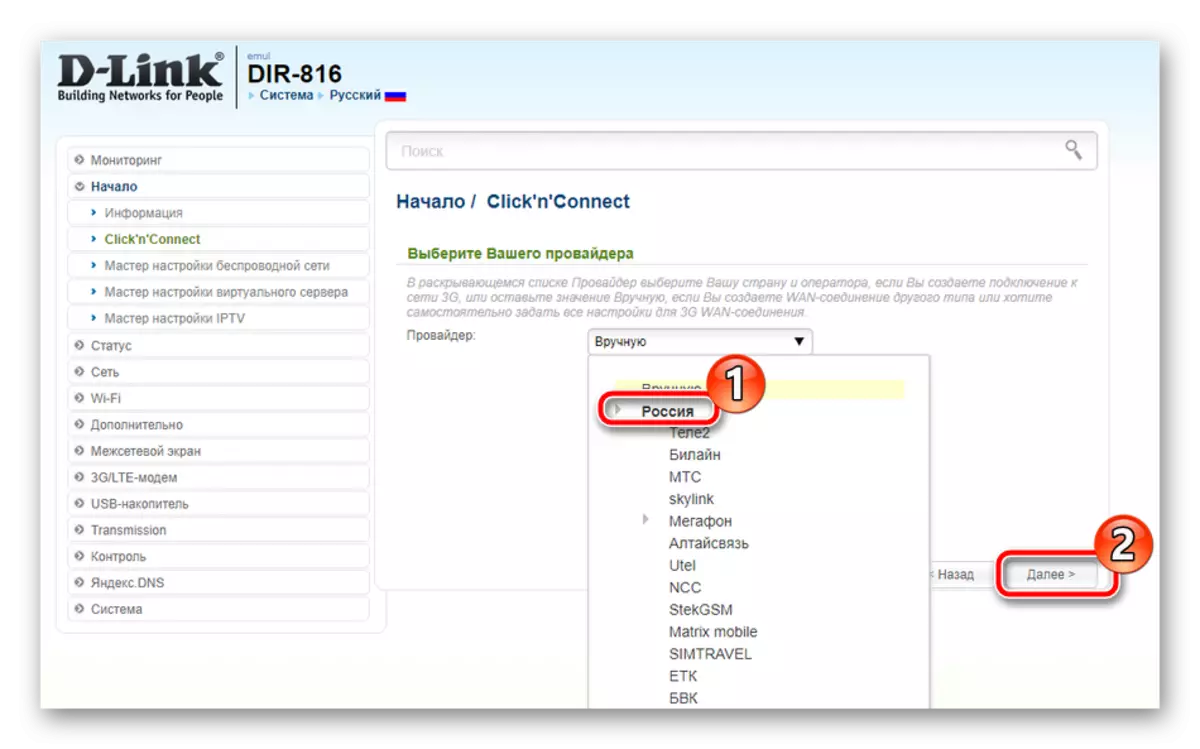
- Some company routers support work with 3G / 4G modems, so the first step may be the choice of the country and the provider. If you do not use the mobile Internet function and want to stay only on the WAN connection, leave this parameter at the manual value and move to the next step.
- A list of all available protocols will appear. At this step, you will need to refer to the documentation provided to you when concluding an agreement with the Internet service provider. There is information about how the protocol should be selected. Mark it to the marker and click on "Next".
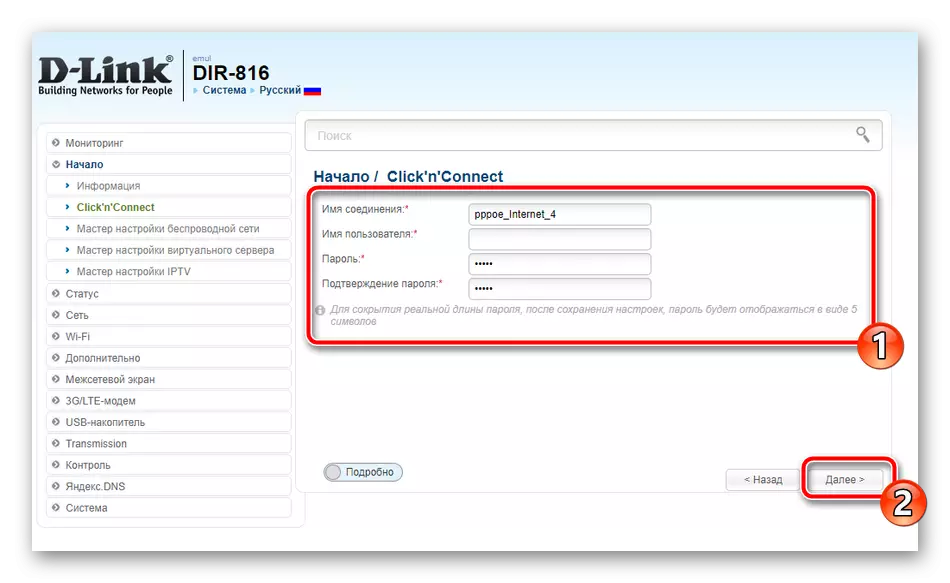
- The username and password in the types of WAN connections are pre-specified by the provider, so you only have to specify this data in the appropriate lines.
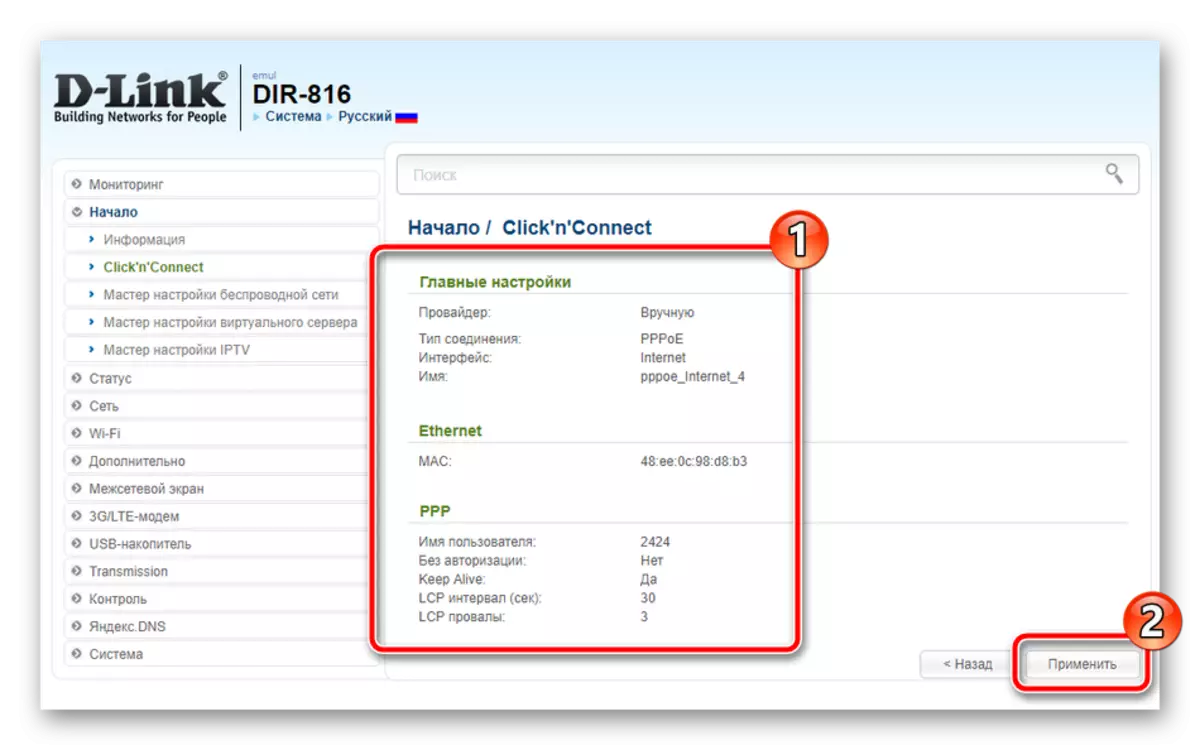
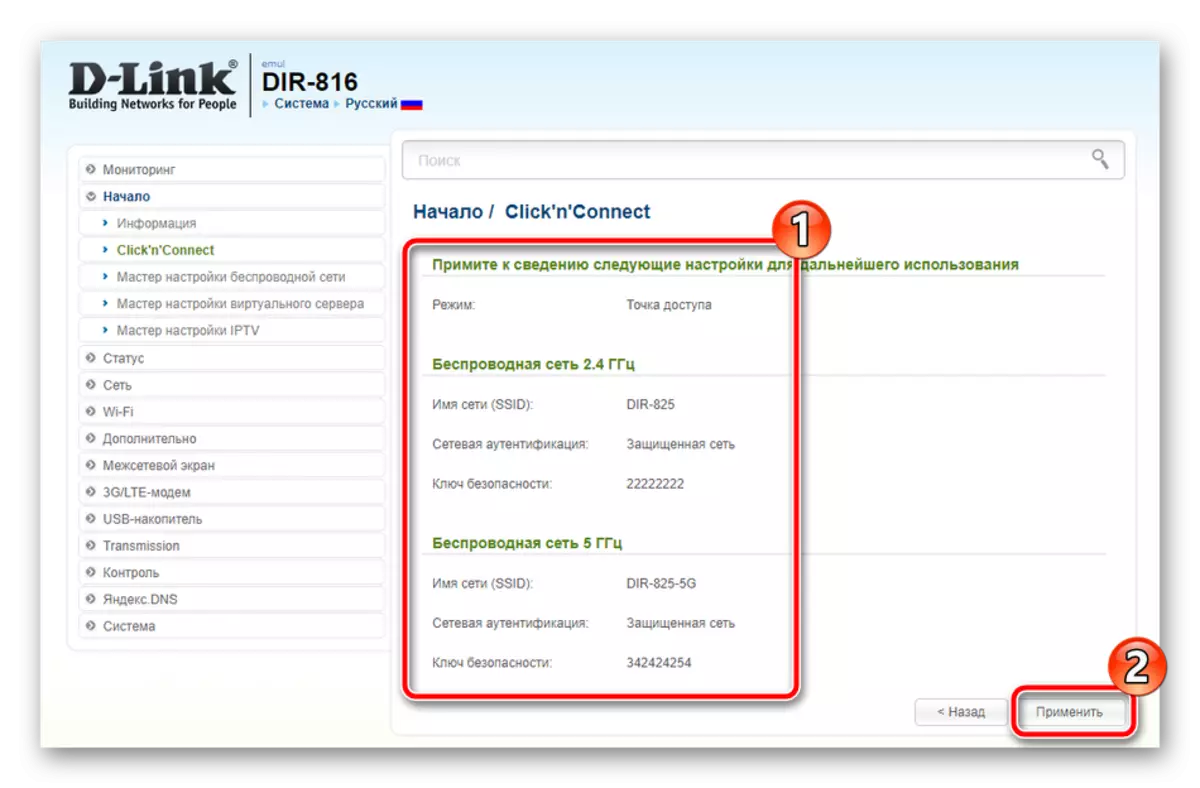
- Make sure the parameters are selected correctly and click on the "Apply" button. If necessary, you can always return one or more steps back and change the wrong parameter.

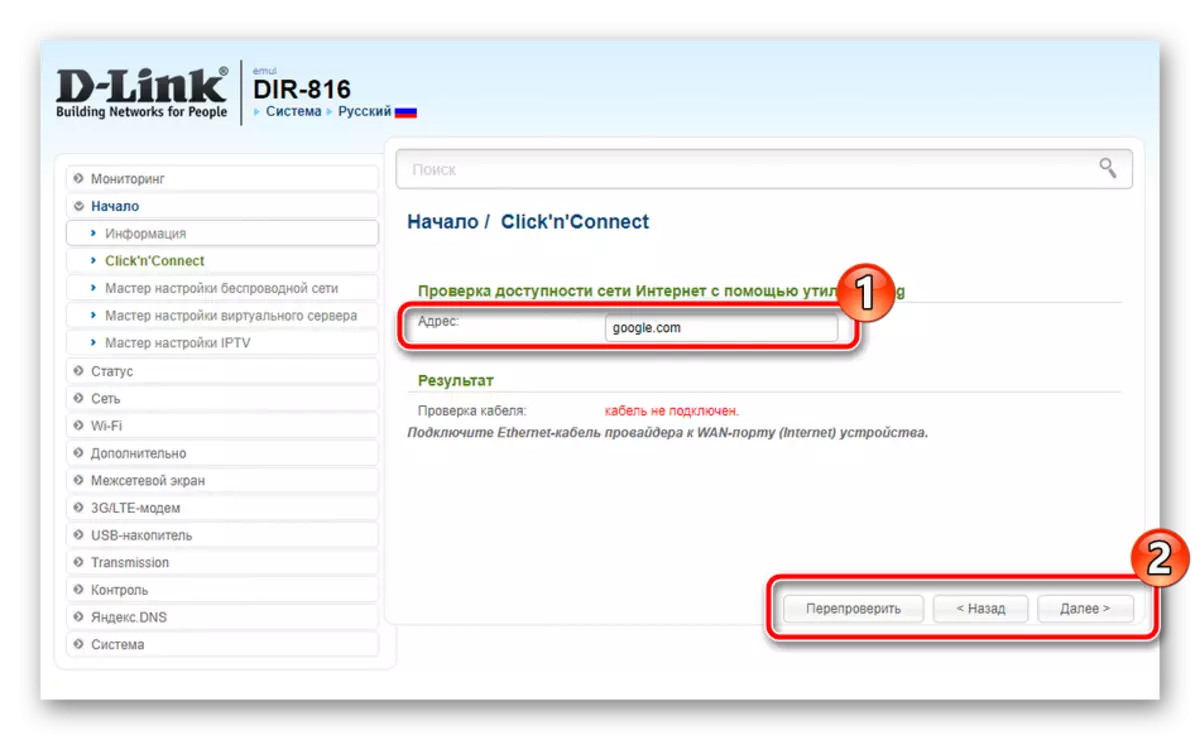
A propaging device will be performed using the built-in utility. It is necessary to determine the availability of Internet access. You can manually change the check address and the analysis is reused. If this is not required, just go to the next step.
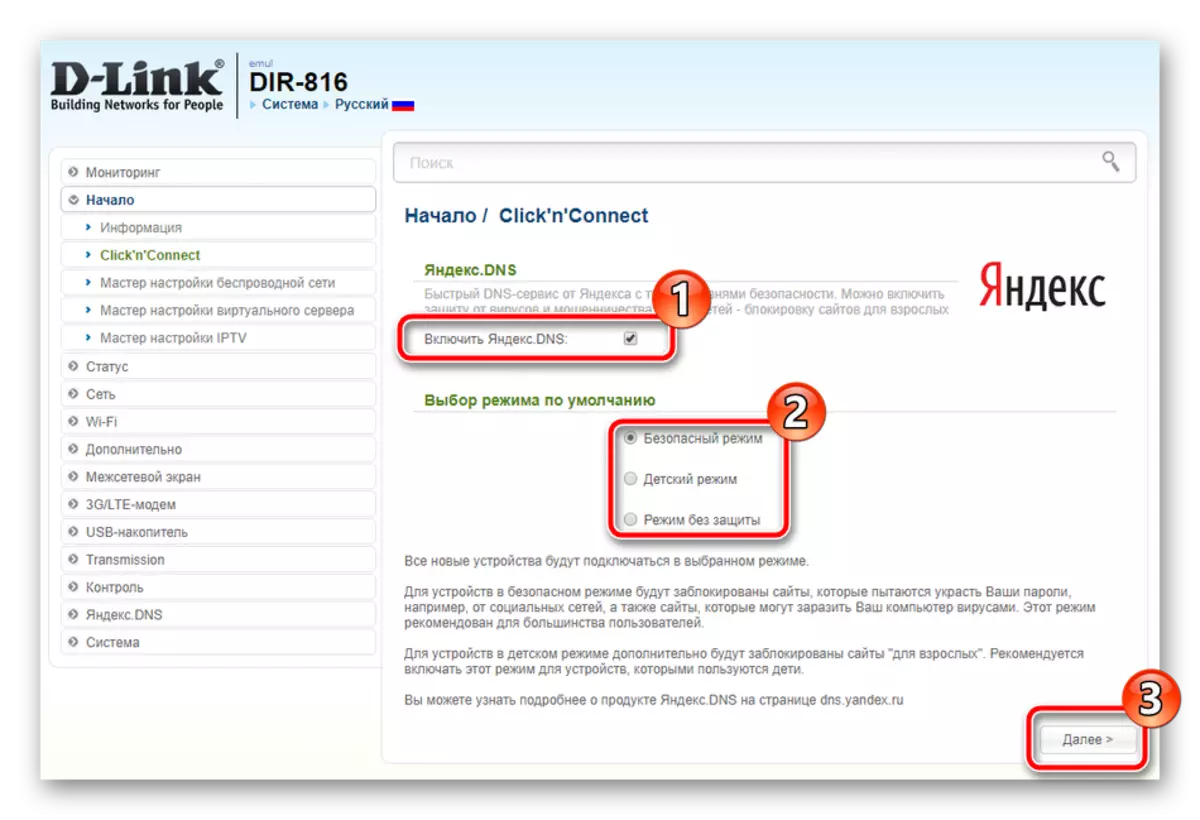
Certain models of D-LINK routers support work with the DNS service from Yandex. It allows you to protect your network from viruses and fraudsters. Detailed instructions You will see in the Settings menu, and you can also select the appropriate mode or completely refuse to activate this service.
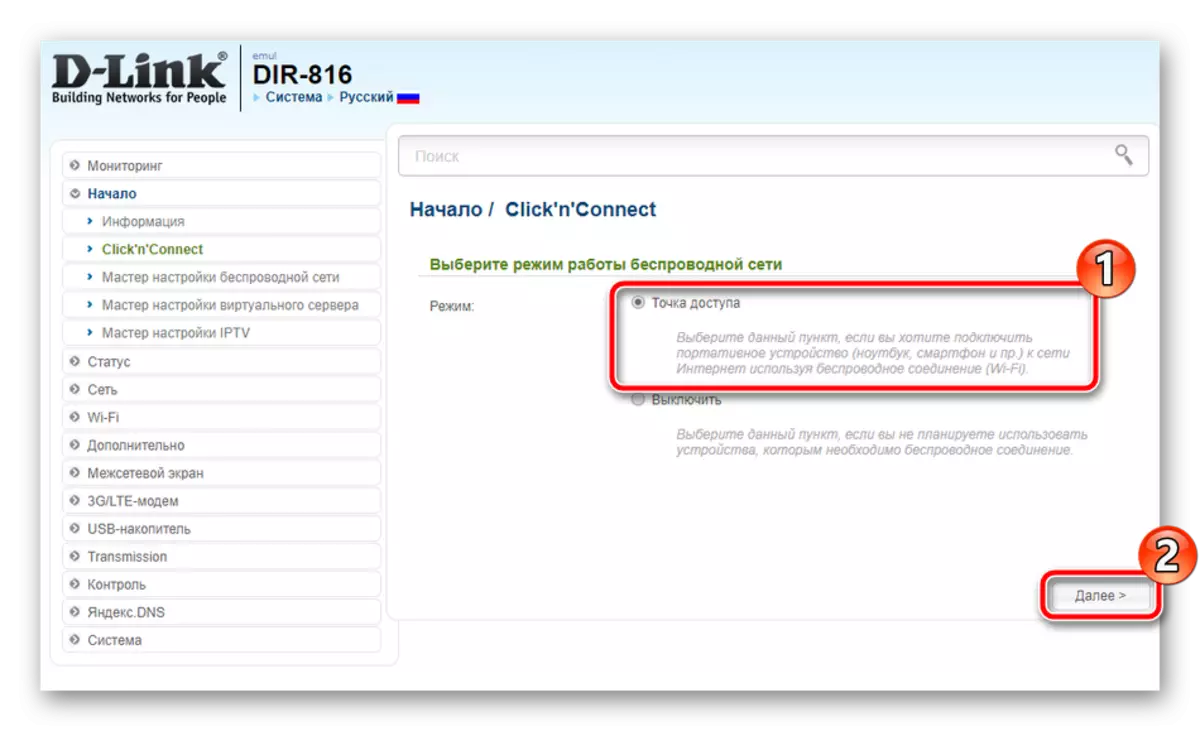
Next, in quick configuration mode, wireless access points are created, it looks like this:
- First, set the marker opposite the point of access point and click on "Next".
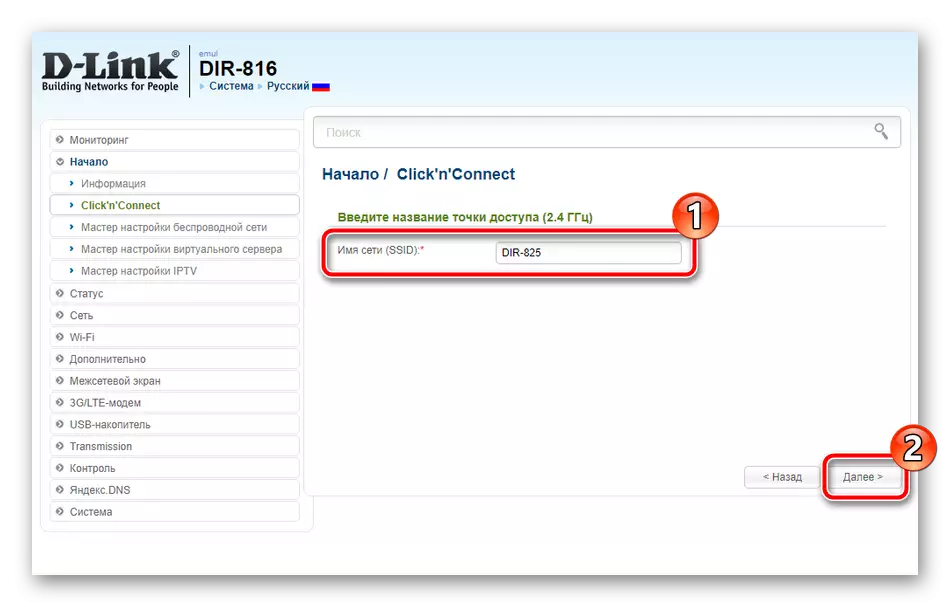
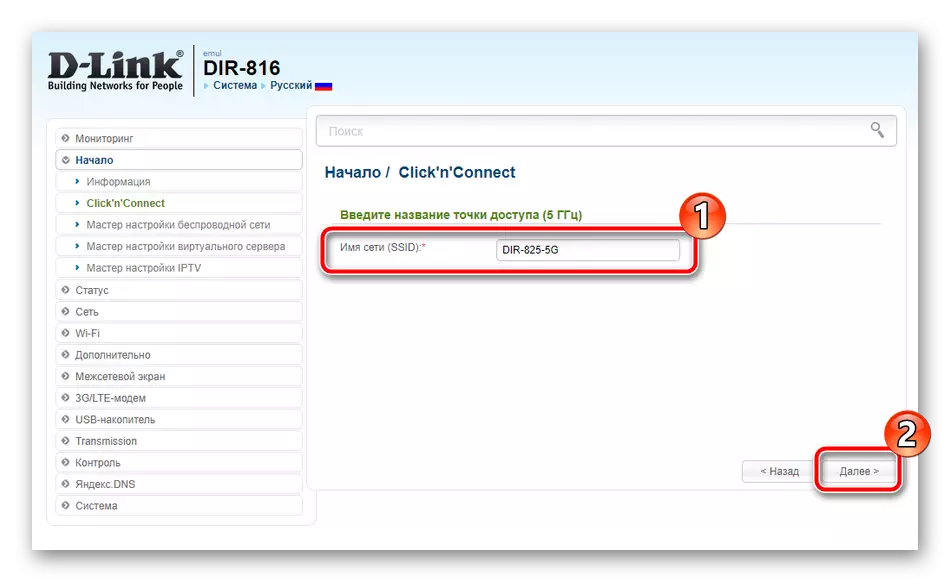
- Specify the network name with which it will be displayed in the Connection List.
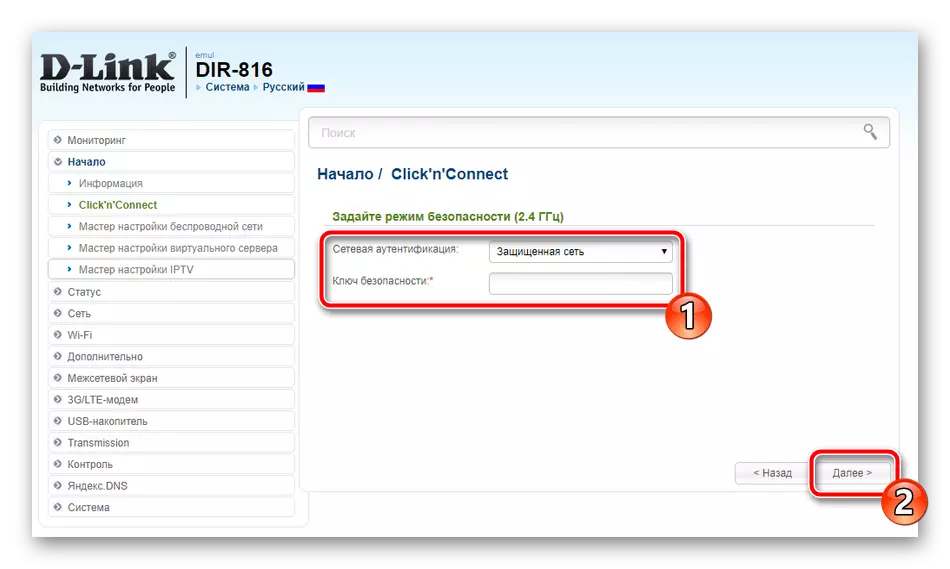
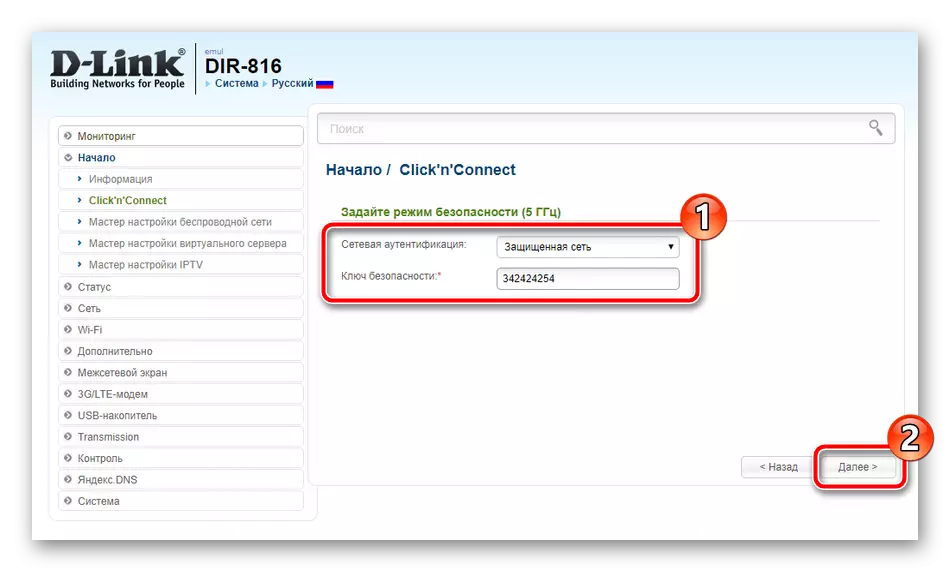
- It is advisable to choose the network authentication type "Protected Network" and come up with your own reliable password.
- Some models support the work of several wireless points at different frequencies at once, so they are configured separately. Each indicates a unique name.
- After that, the password is added.
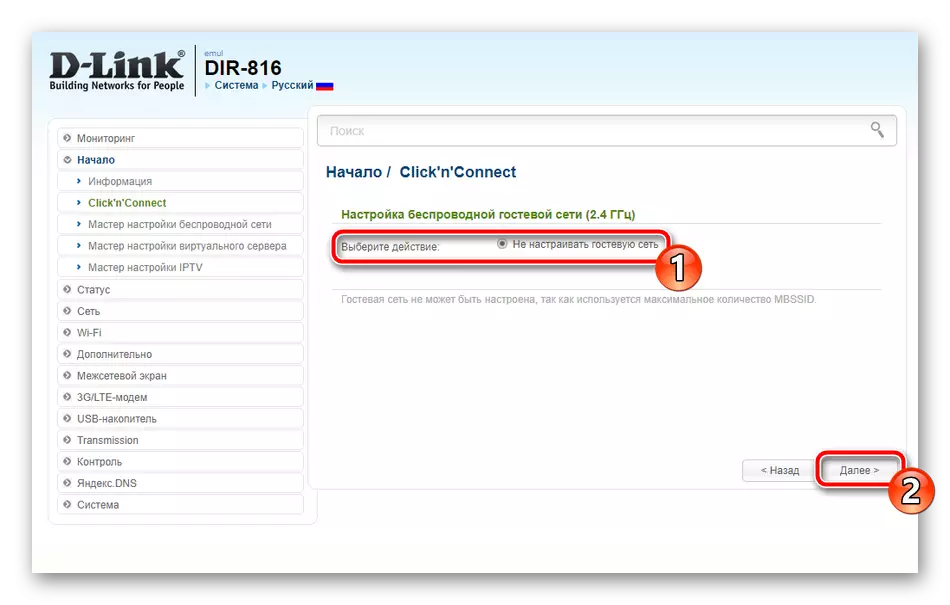
- You do not need to make a marker from the point "Do not set up a guest network", since the previous steps meant the creation of at once all available wireless points, therefore there were no free.
- As in the first step, make sure that everything is indicated correctly, and click on "apply".
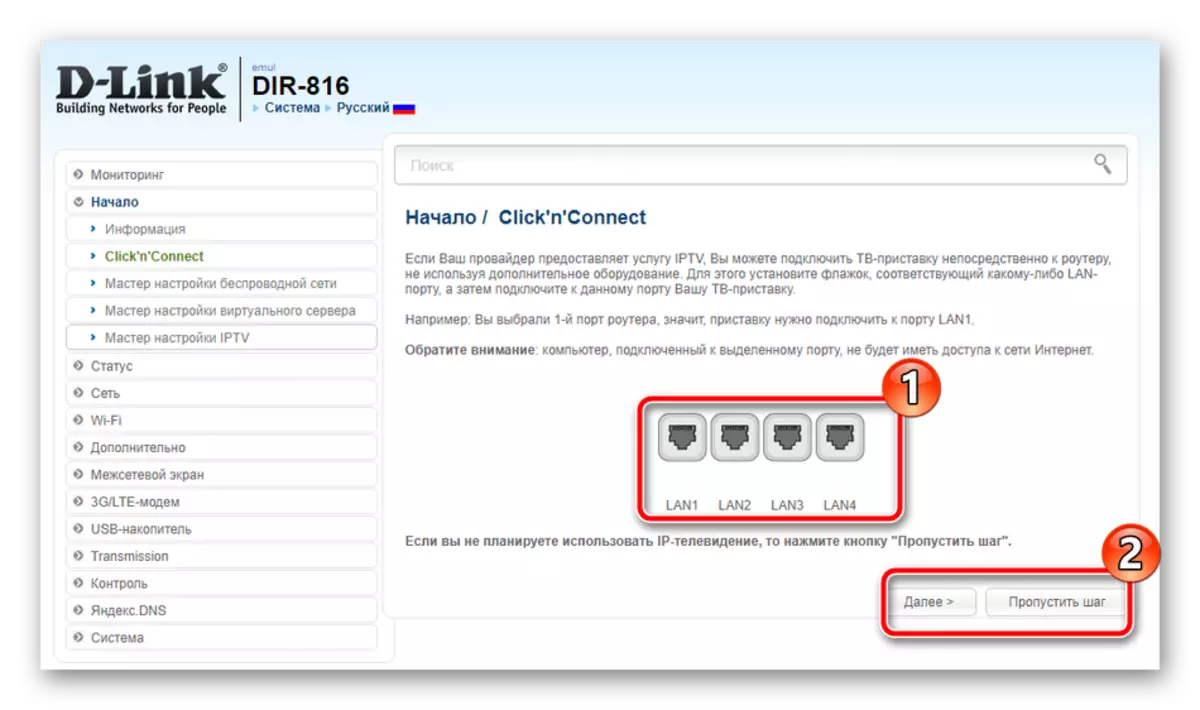
The last step is to work with IPTV. Select the port to which the TV prefix will be connected. If it is not available, just click on "Skip Step".
On this process of adjusting the router through "Click'n'Connect" is completed. As you can see, the whole procedure occupies a sufficiently small amount of time and does not require the user the availability of additional knowledge or skills for the correct configuration.
Manual setting
If you do not satisfy the quick setup mode because of its limitations, the best option will be set all the parameters manually using the same web interface. Let's start this procedure from the WAN connection:
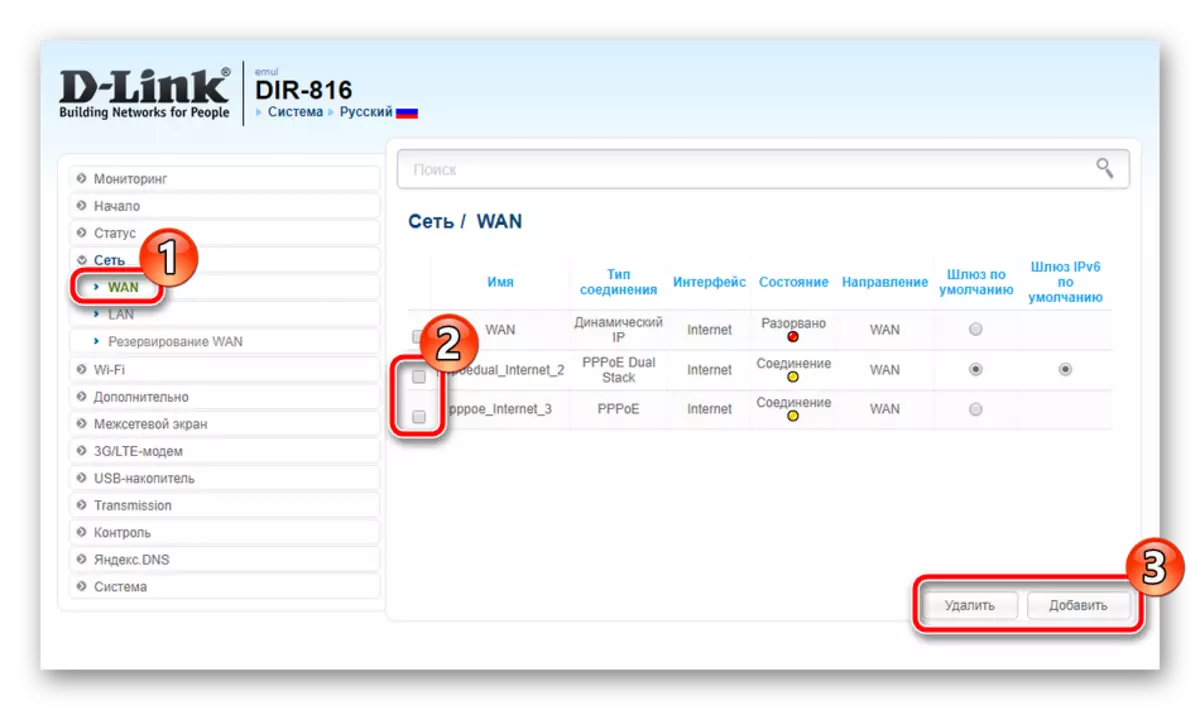
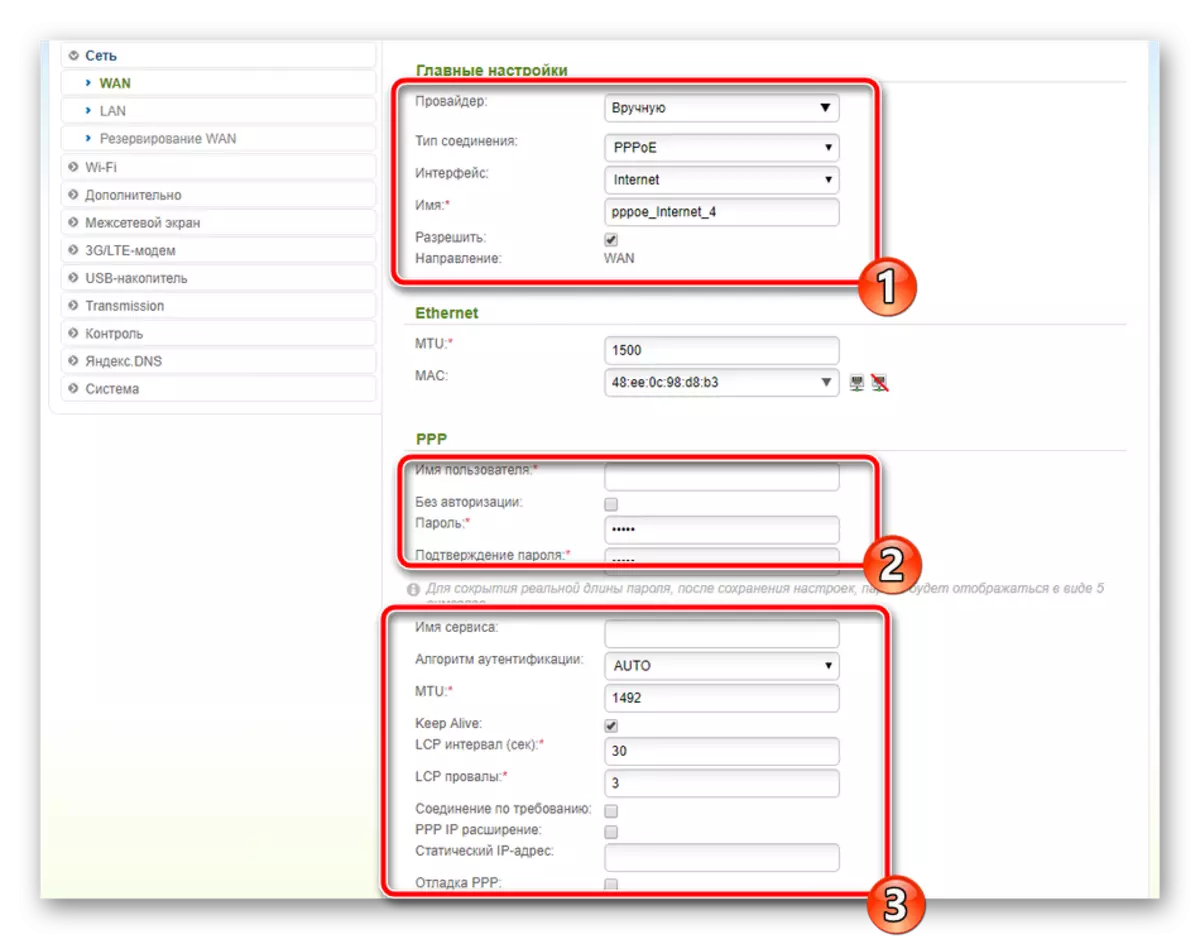
- Go to "Network" category and select "WAN". Tick the profiles present, delete them and immediately proceed to add a new one.
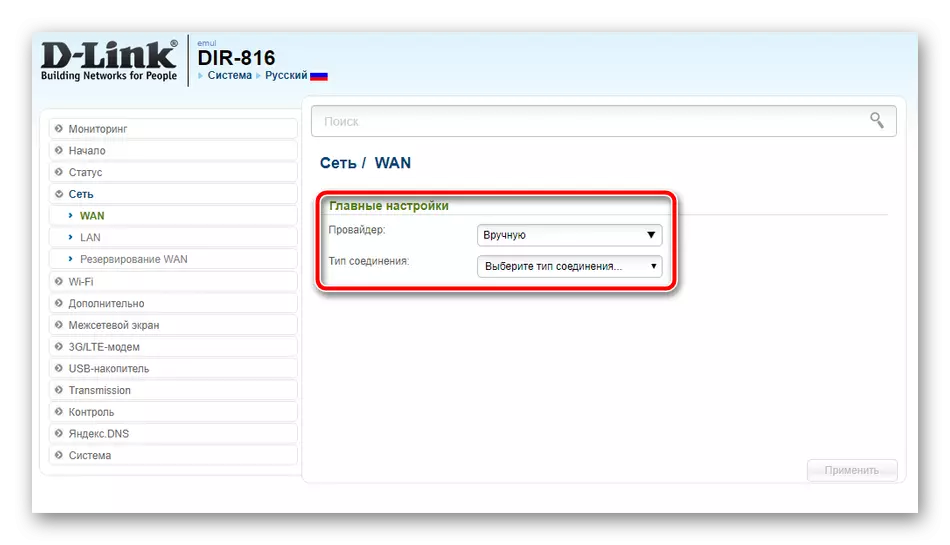
- Specify your provider and connection type, after that, all other items will appear.
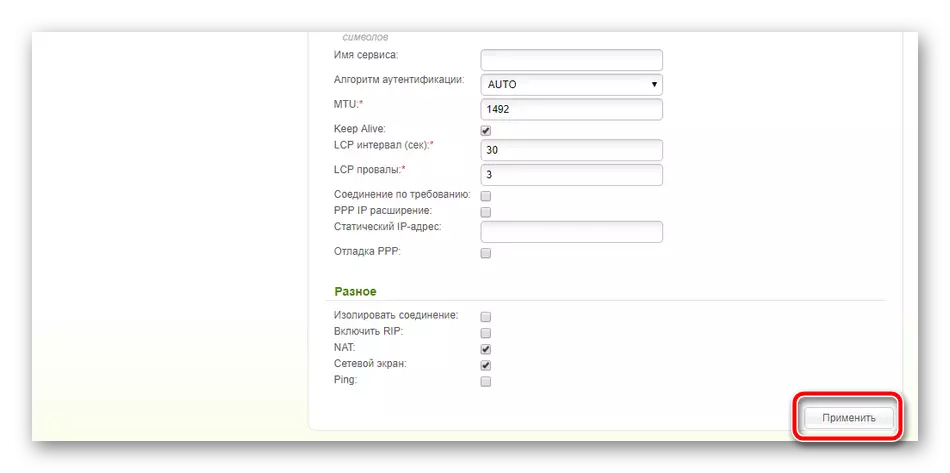
- You can change the network name and interface. Low below is the section where the username and password is entered if the provider requires. Additional parameters are also set in accordance with the documentation.
- Upon completion, click on "Apply" at the bottom of the menu to save all changes.
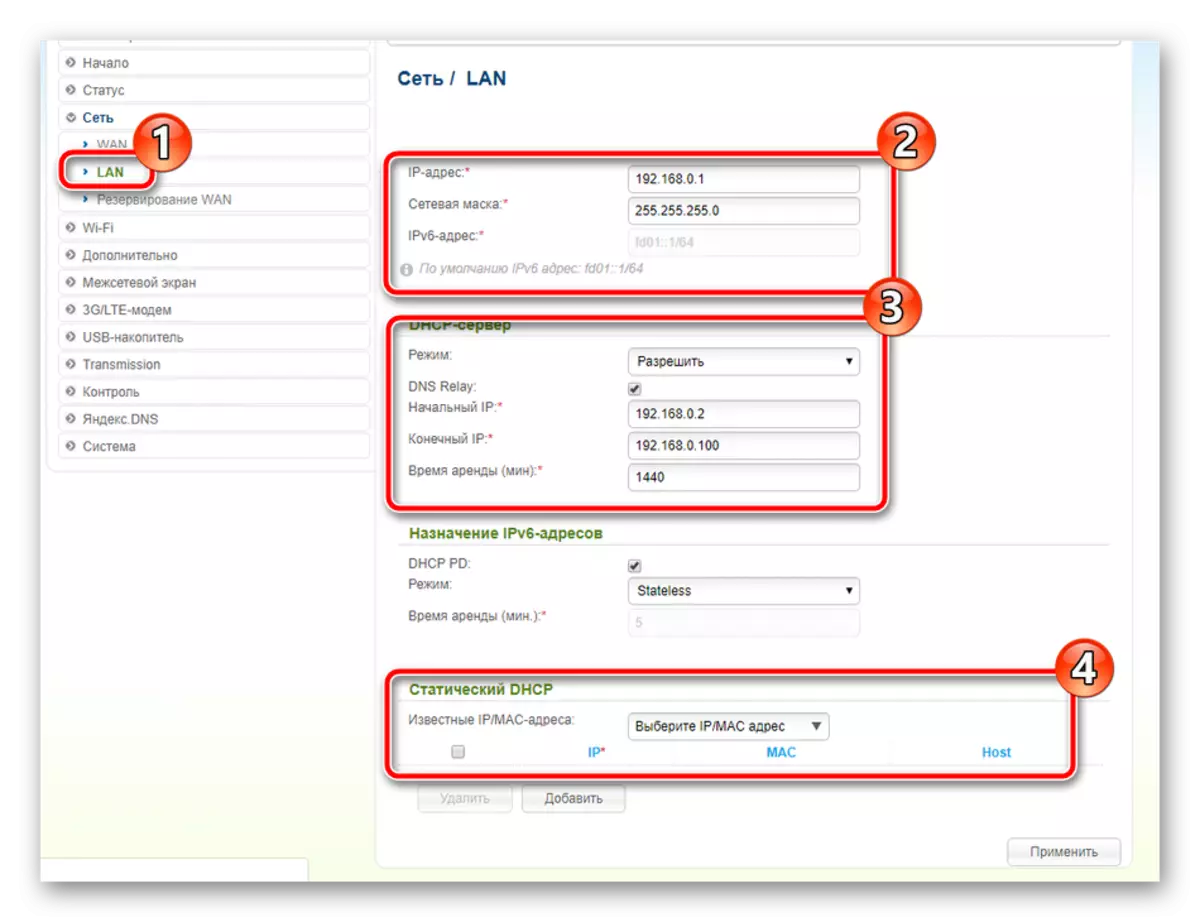
Now you will configure LAN. Since computers are connected to the router via a network cable, you need to tell about the adjustment of this mode, and it is done like this: Move to the "LAN" section, where you have a change in the IP address and the network mask of your interface, but in most cases nothing needs to be changed. It is important to make sure that the DHCP server mode is in an active condition, since it plays a very important role when automatically transmitted packets within the network.
This configuration of WAN and LAN is complete, then it is necessary to disassemble the work with wireless points in detail:
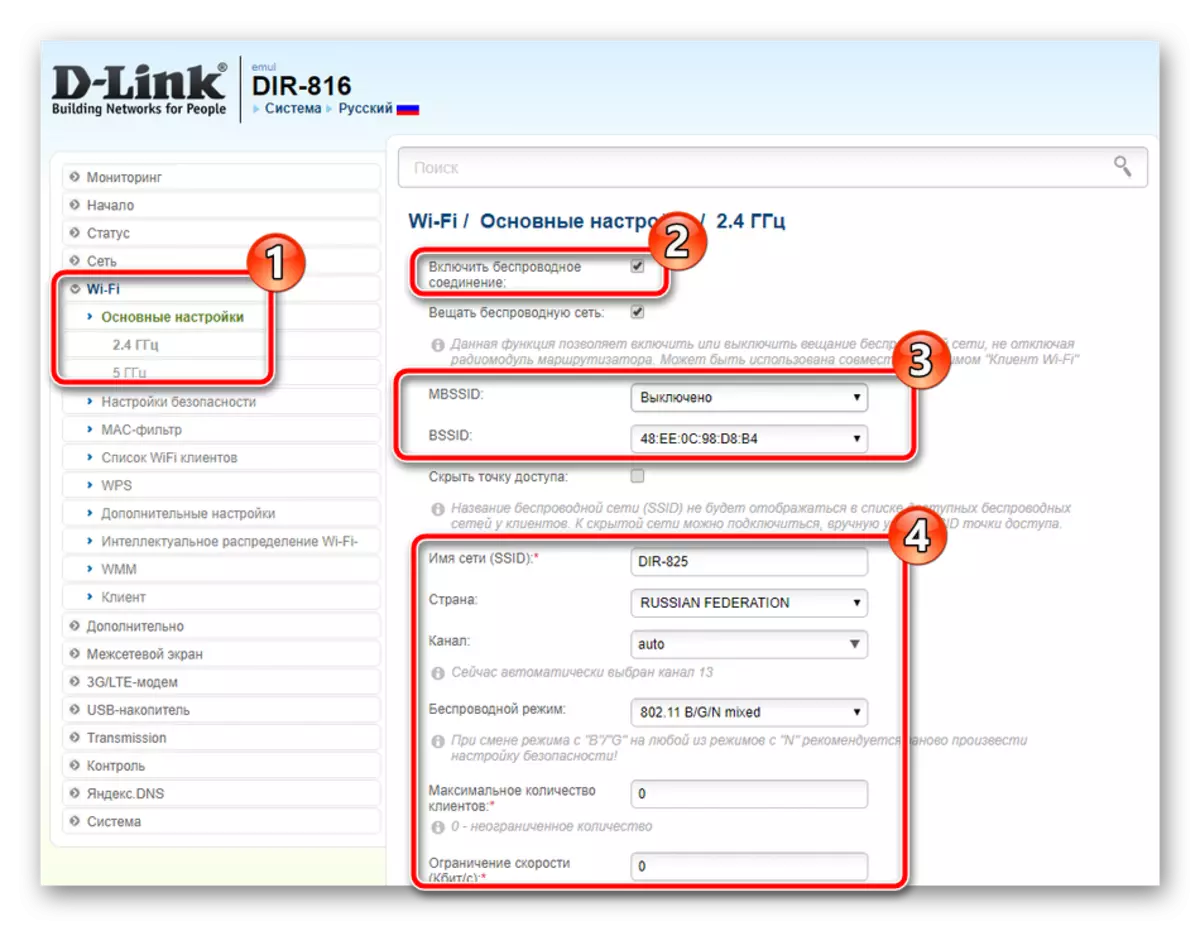
- In the "Wi-Fi" category, open "Basic Settings" and select a wireless network if several of course are present. Tick the checkbox "Enable Wireless Connection". In case of need, adjust the broadcast, and then set the point name, location country and you can set a speed limit or number of customers.
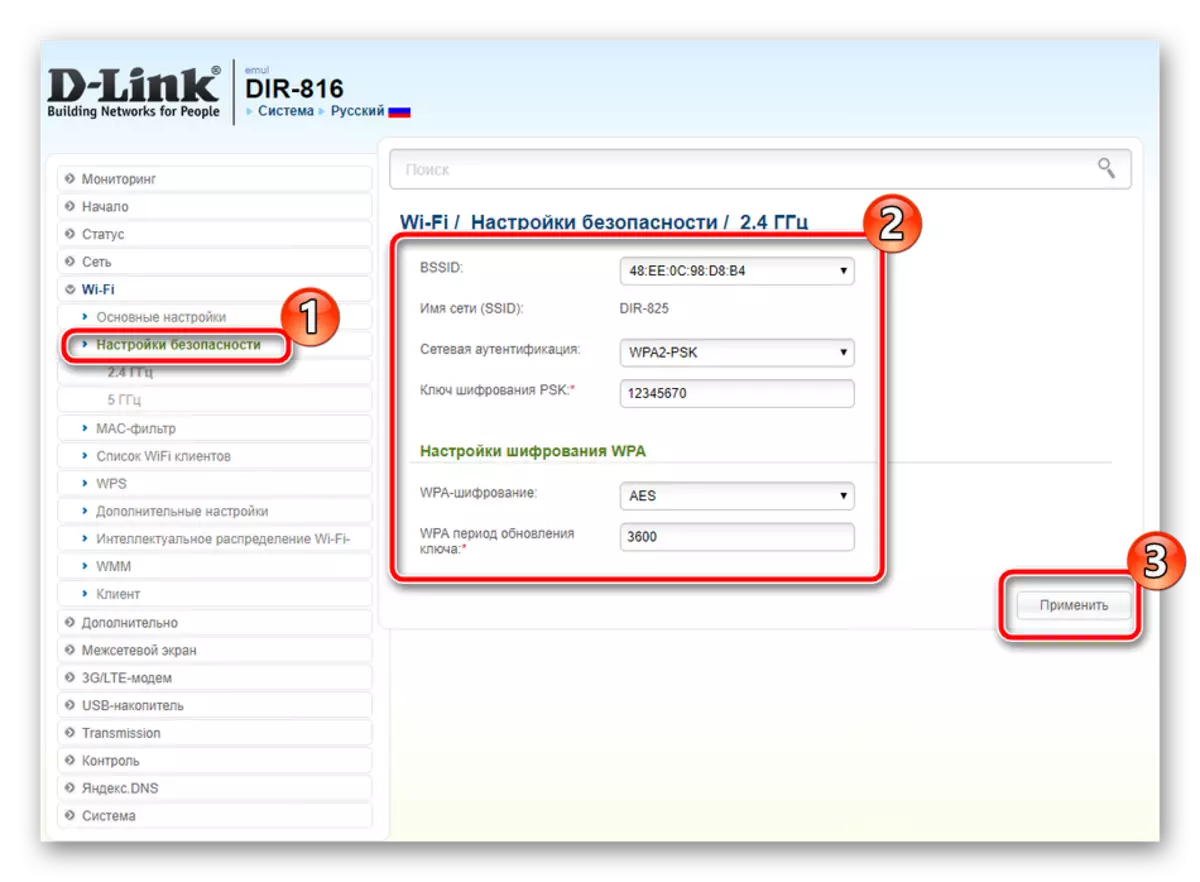
- Go to "Security Settings". Here, select the type of authentication. We recommend to use "WPA2-PSK" because it is the most reliable, and then simply specify the password to secure the point from foreign connections. Before going out, do not forget to click on "apply", so the changes will be accurately saved.
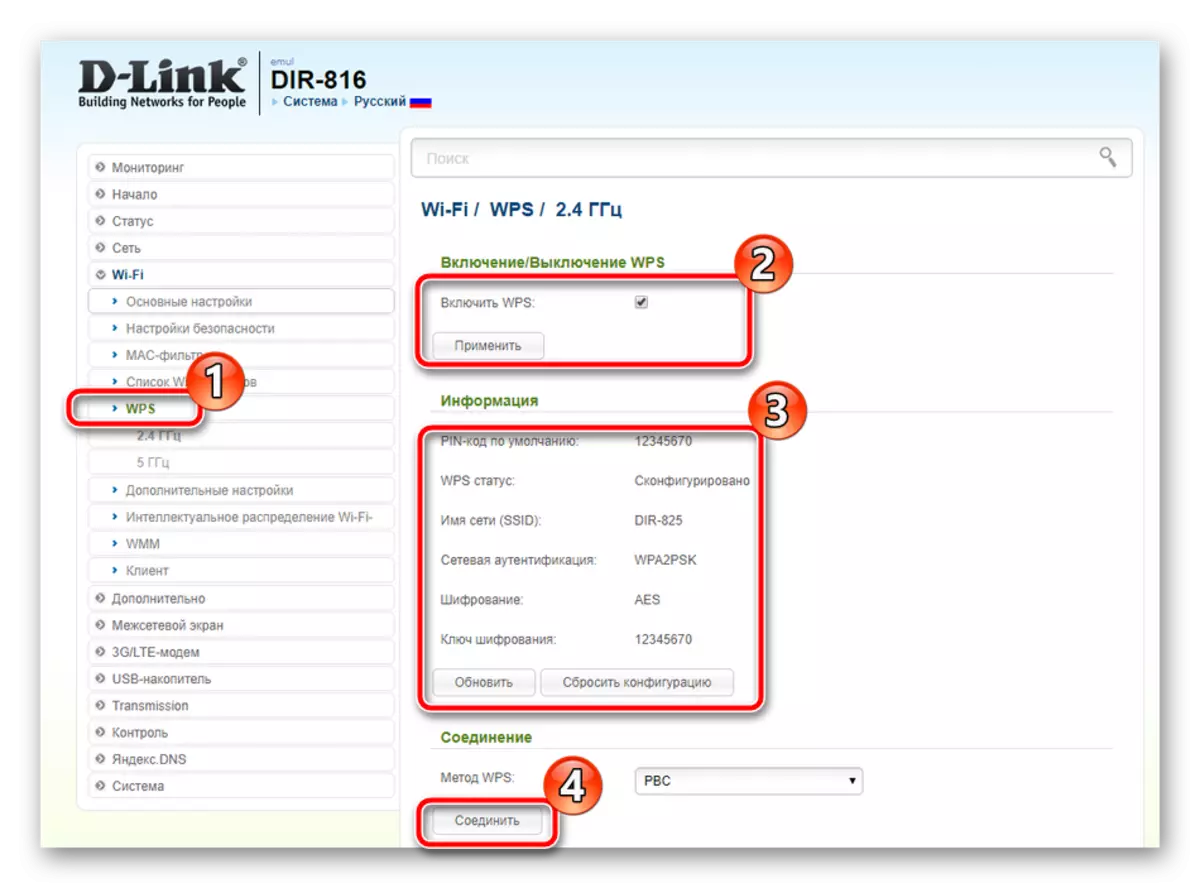
- In the WPS menu, work with this feature. Its activation or deactivation, reset or updating its configuration and the launch of the connection is possible. If you do not know what WPS is, we recommend familiarizing another our article on the link below.
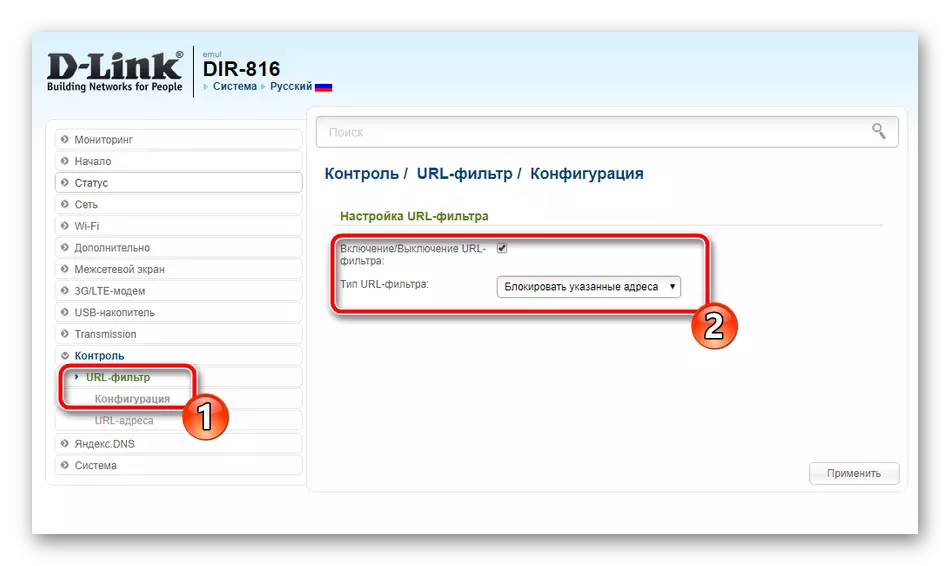
- First open the "URL filter". It allows you to block or on the contrary to allow specified addresses. Select a rule and move further.
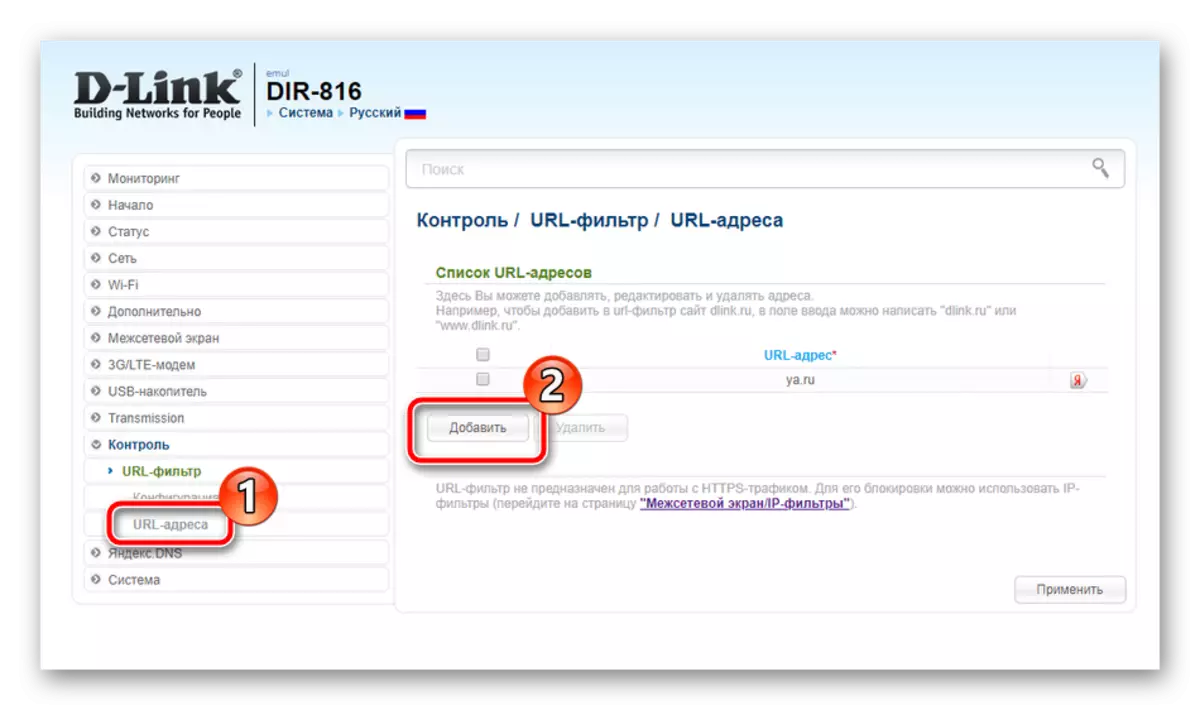
- In the subsection "URL addresses" just the management of them. Click on the Add button to enter a new link to the list.
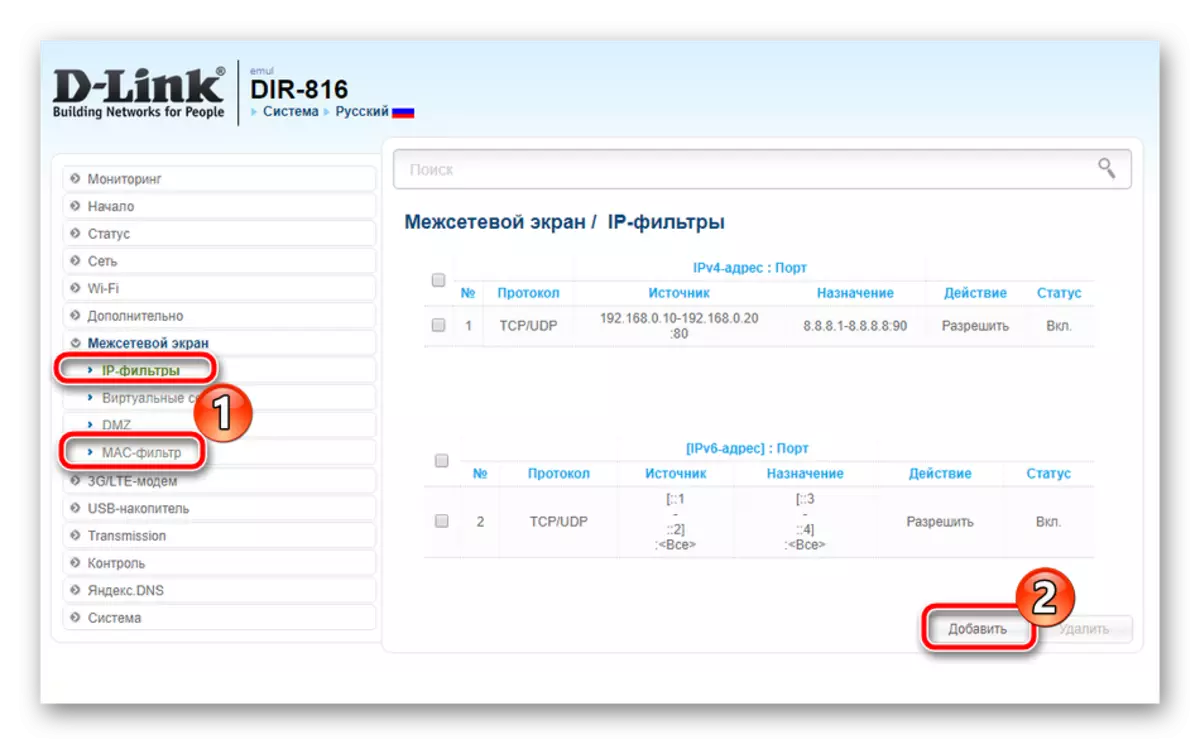
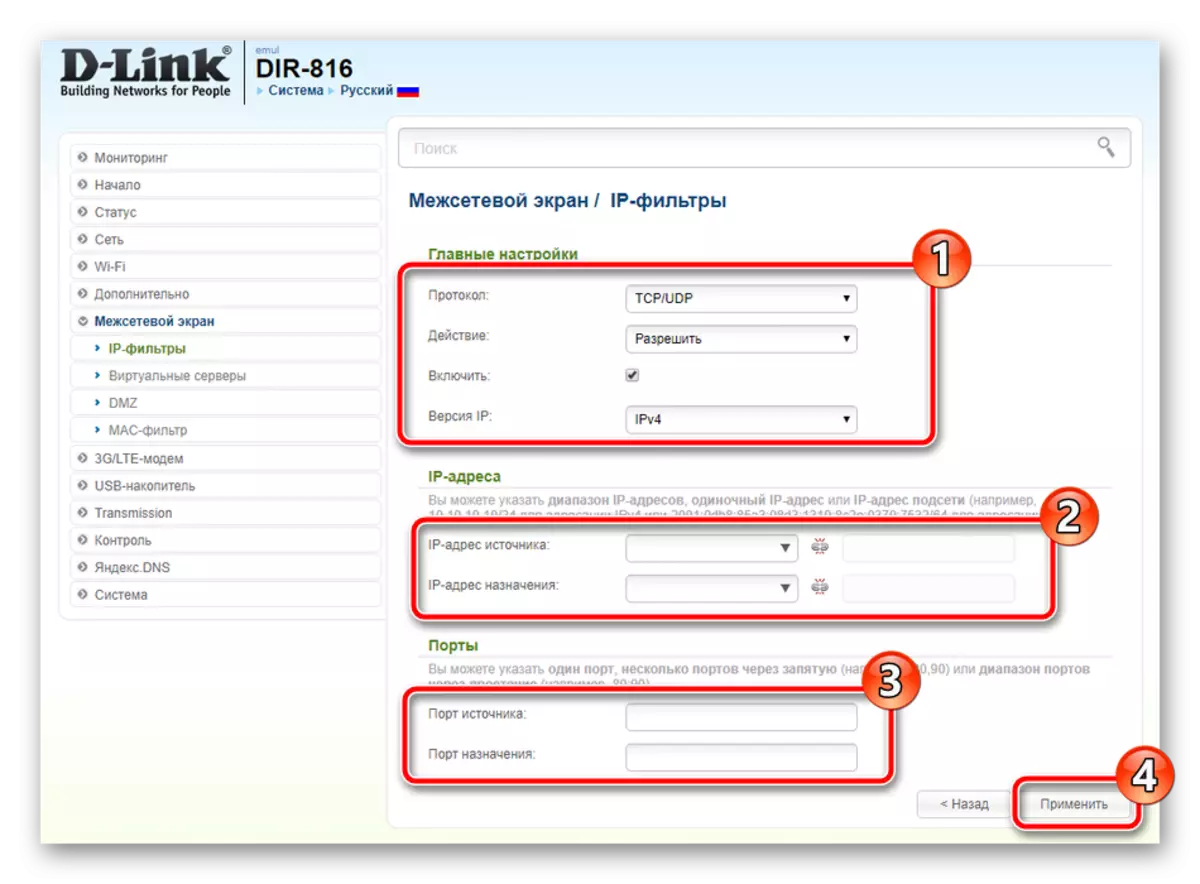
- Go to the category "Firewall" and edit the "IP filters" and "Mac filters" functions.
- They are configured to approximately the same principle, but in the first case only addresses are indicated, and in the second blocking or permission occurs for devices. Enable equipment and address in the appropriate lines.
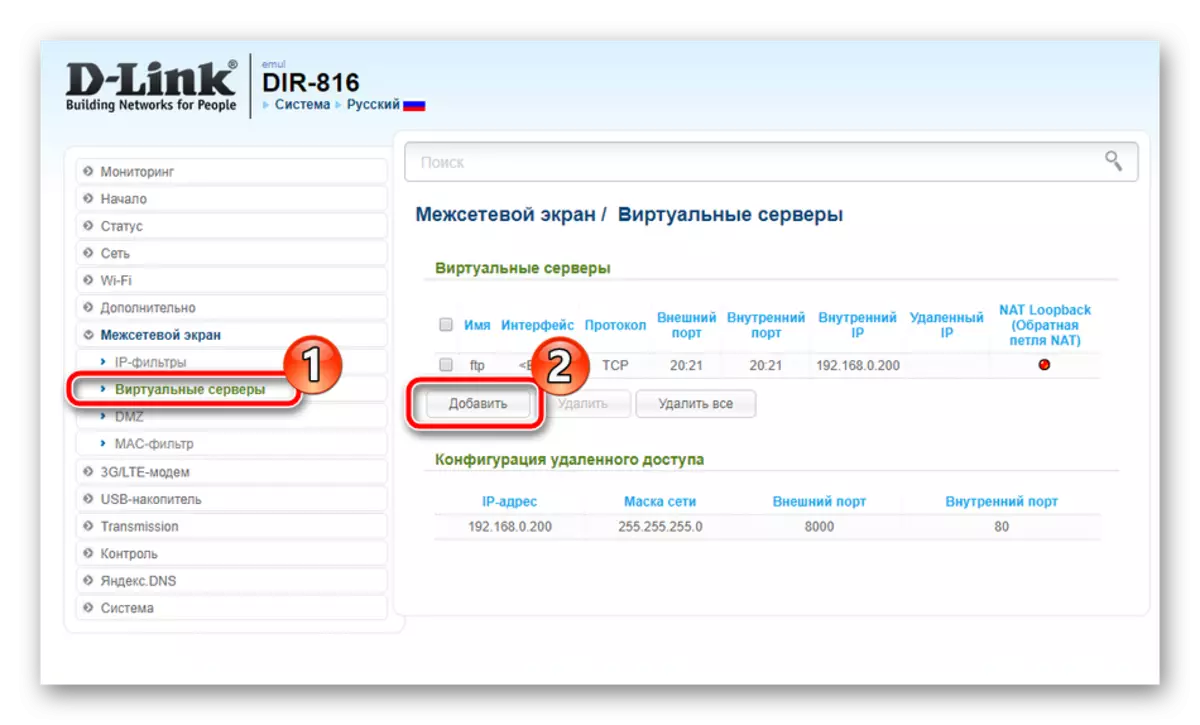
- Being in the "Firewall", it is worth familiar with the subsection "Virtual Servers". Add them to open ports for specific programs. This process is considered in detail in the other article on the reference below.
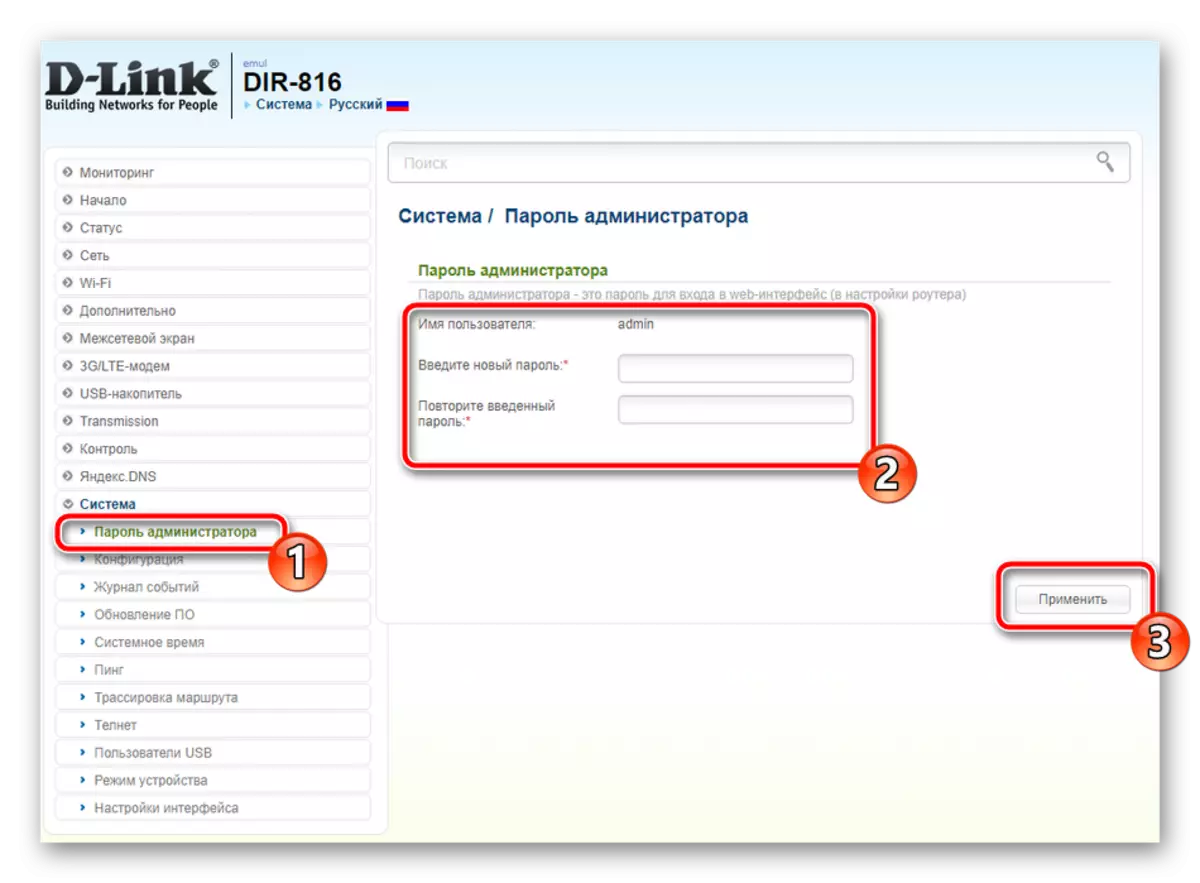
- Go to the "Administrator Password" section. The key change is available here for entering firmware. After the change, do not forget to click on the "Apply" button.
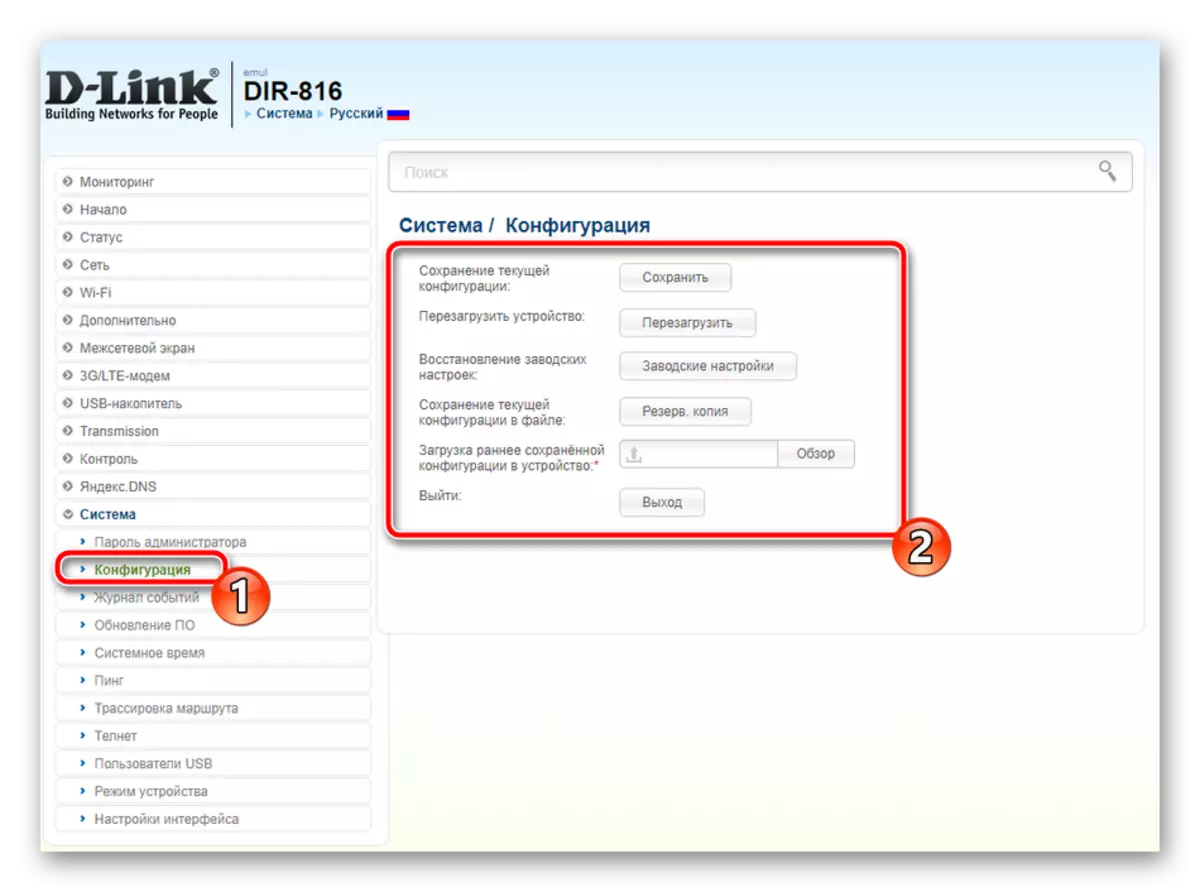
- In the "Configuration" section, the current settings are saved to the file, which creates a backup, and the factory parameters are restored and the router itself is restarted.
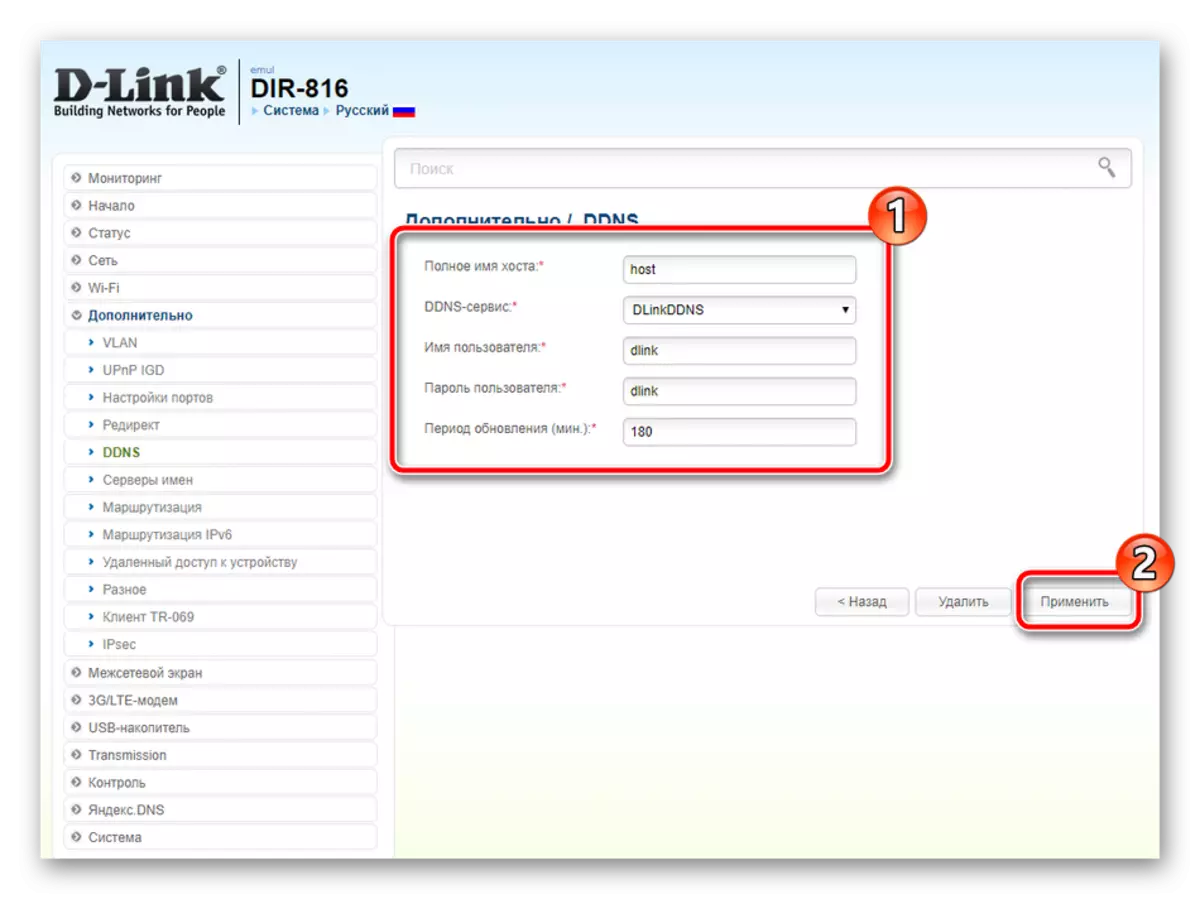
This ends up setting up wireless points, and before completing the main stage of the configuration, I would like to mention a few more additional tools. For example, the DDNS service is activated via the corresponding menu. Click on the already created profile to open the edit window.
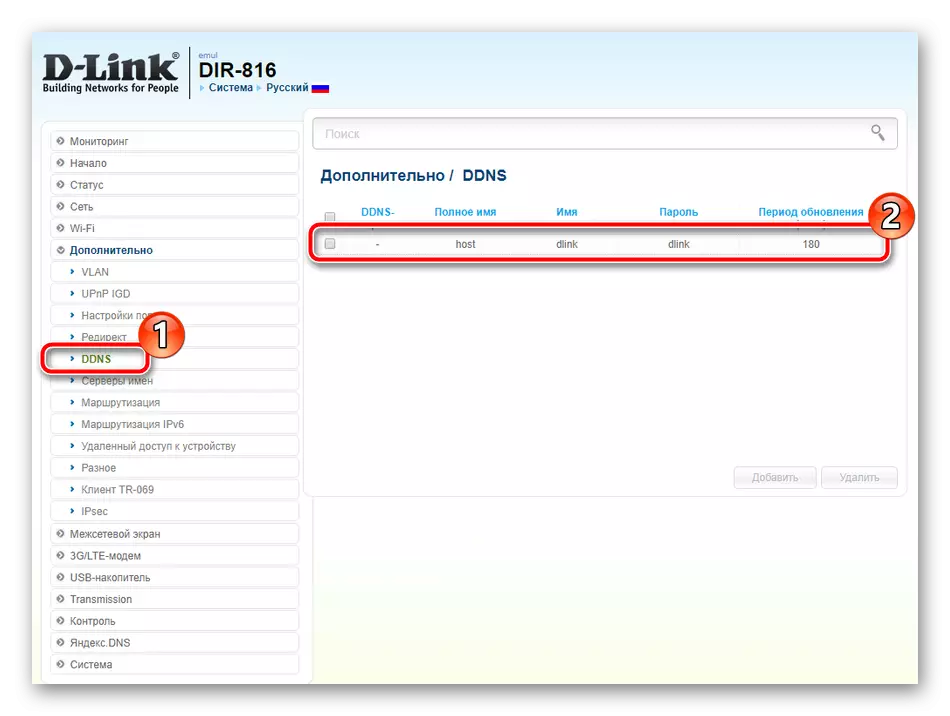
In this window, you enter all the data that received when the provider is obtained from this service. Recall that the dynamic DNS is most often not needed by the usual user, and only installed in the presence of servers on the PC.
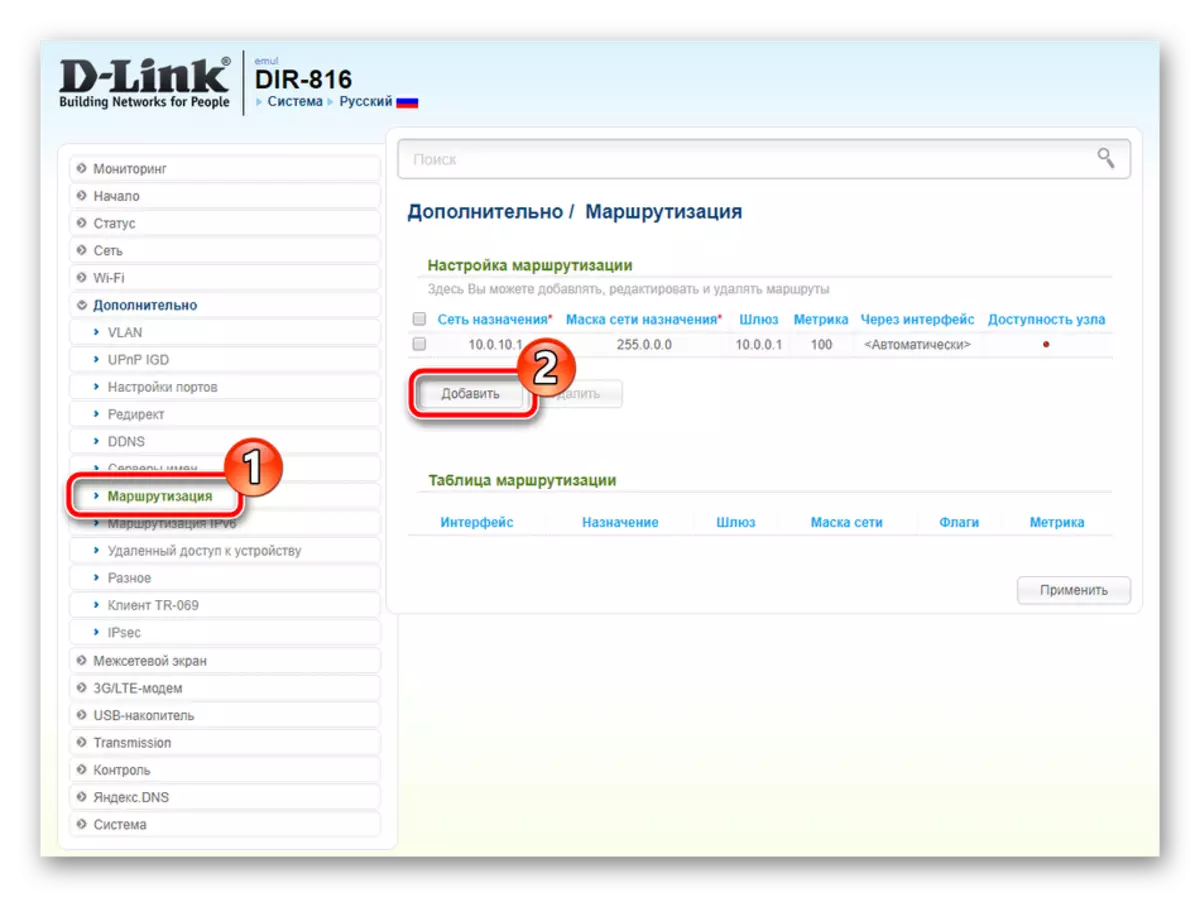
Pay attention to "Routing" by clicking on the Add button, you will be moved to a separate menu, where it is specified, for which address you need to configure the static route, avoiding tunnels and other protocols.
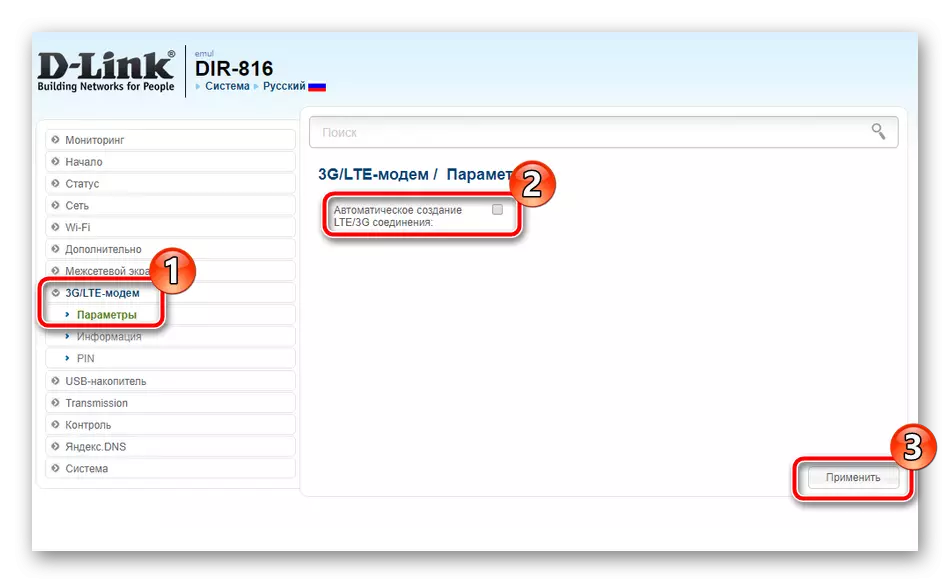
When using a 3G modem, look at the category "3G / LTE-modem". Here in the "Parameters" you can activate the function of automatic connection of the connection if necessary.
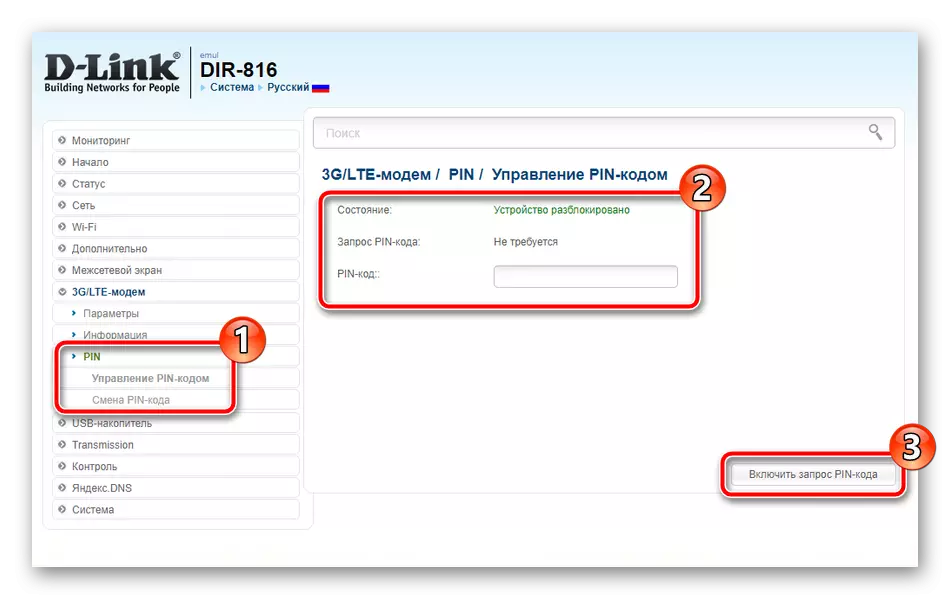
In addition, in the "PIN" section, the level of device protection is configured. For example, by activating the authentication by the PIN code, you make unauthorized connections impossible.
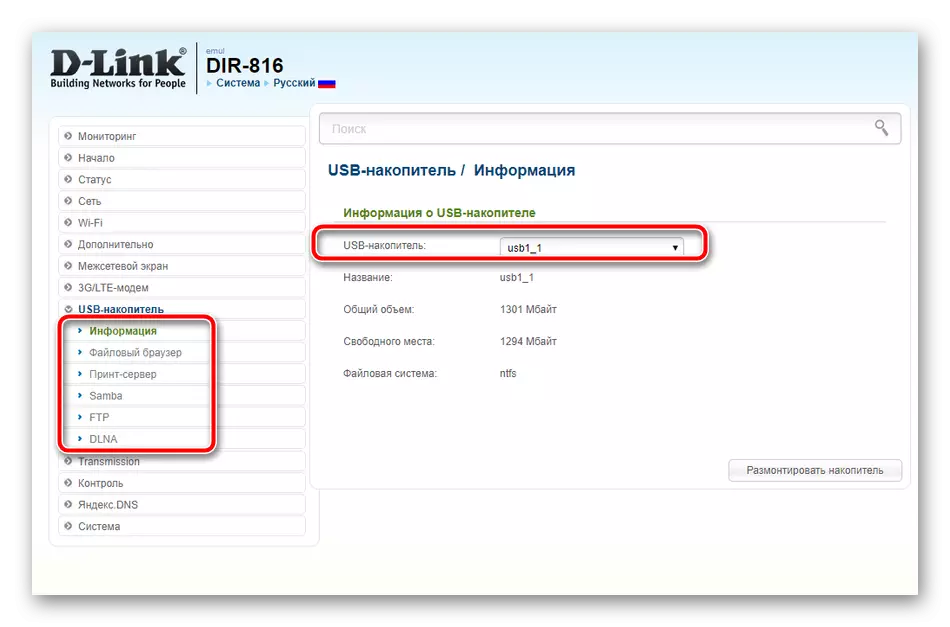
Some D-Link Network Equipment Models have one or two USB connector on board. They serve to connect modems and removable drives. In the category "USB-drive" there are many sections that allow you to work with a file browser and flash drive level.
Security Settings
When you have already provided a stable connection to the Internet, it's time to take care of the reliability of the system. Several security rules are helped to protect it from third-party connections or access of certain devices:
Read more: Opening ports on the D-Link router
Completion setting
On this configuration procedure, it is almost complete, it remains only to set several system parameters and you can begin to fully work with network equipment:
Today we reviewed the overall configuration process of D-Link routers. Of course, it is worth considering the features of certain models, but the basic principle of setup remains almost unchanged, so you should not have any problems when using any router from this manufacturer.