

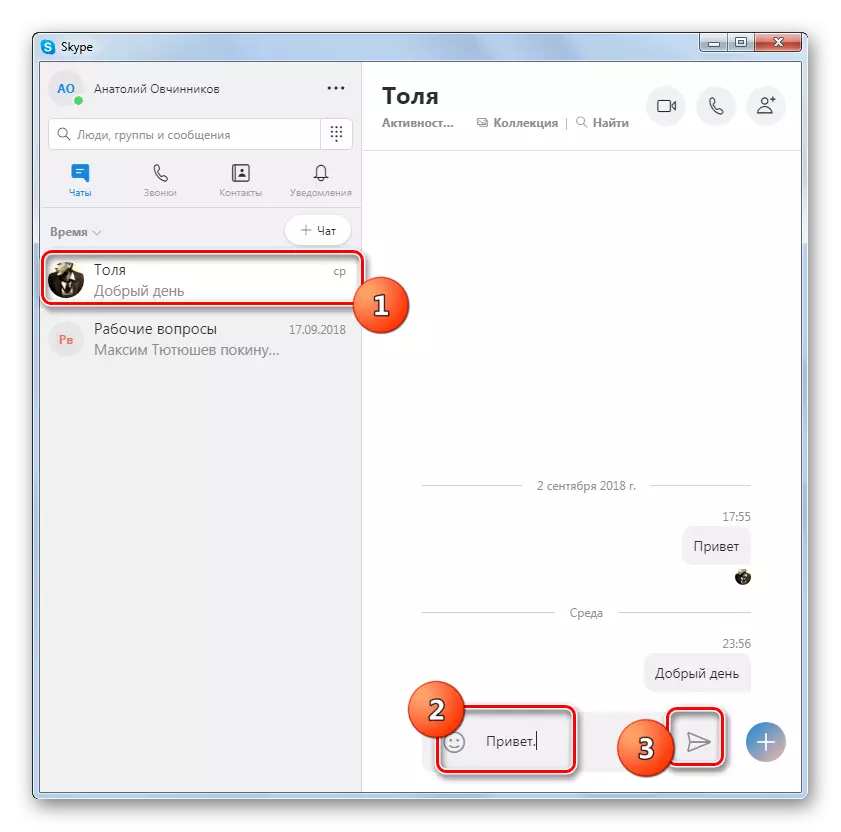
Among the problems with which the user may encounter when working with the Skype program, you should call the impossibility of sending messages. This is not a very common problem, but, nevertheless, quite unpleasant. Let's find out, one hundred to do if messages are not sent in the Skype program.
Method 1: Internet connection check
Before you blame in the inability to send the interlocutor to the message Skype program, check the connection to the Internet. It is possible that it is absent, and is the cause of the above problem. Moreover, this is the most frequent reason why you cannot option. In this case, you need to search already the root cause of this malfunction, which is a large separate topic for the conversation. It can be improved in the wrong Internet settings on the computer, in equipment malfunction (computer, network card, modem, router, etc.), problems on the provider side, in late payment for the service provider, etc.Quite often solve the problem allows a simple restart of the modem.
Method 2: Update or Reinstall
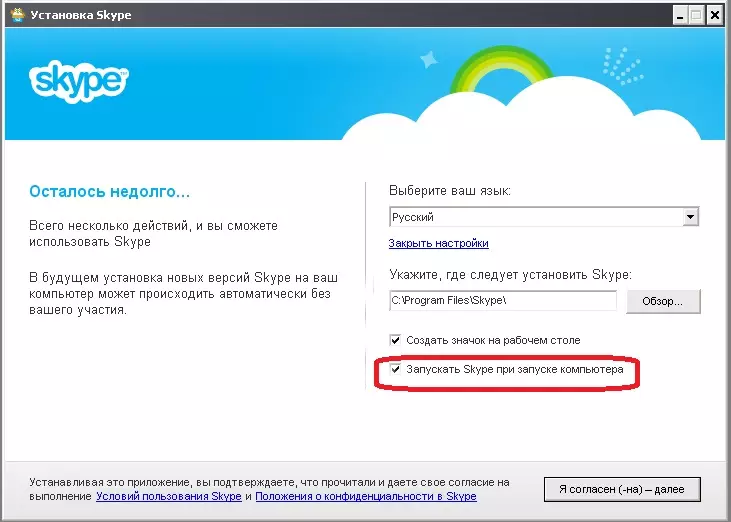
If you do not use the latest version of Skype, then the reason for the impossibility of sending a message can be exactly what. Although, for this reason, the letters are not sent so often, but it is not necessary to neglect this probability. Update Skype to the last version.
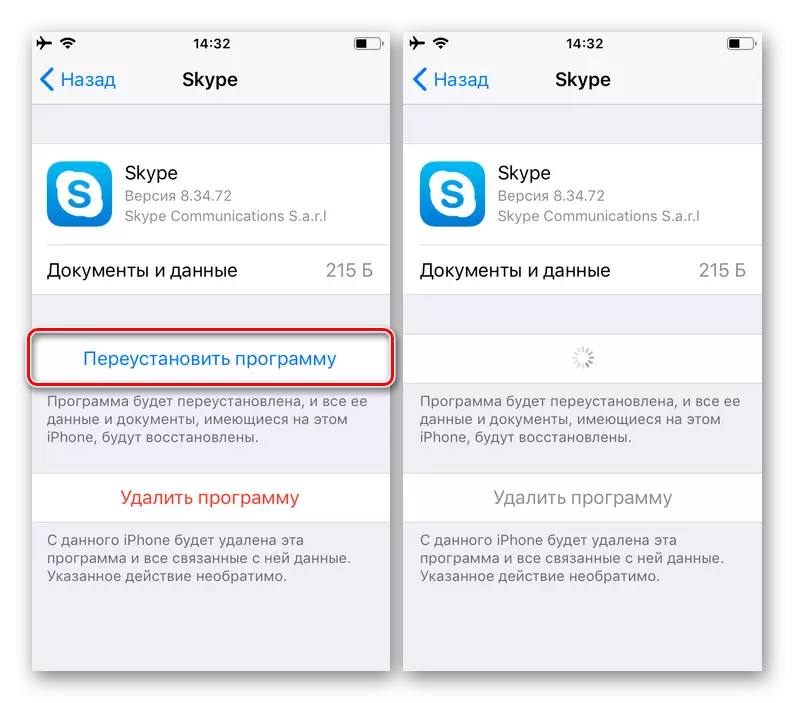
In addition, even if you use the newest version of the program, then resume its functionality, including in terms of sending messages, it may help to remove the application with re-installing Skype, that is, simple words, reinstalling.
Method 3: Reset Settings
Another reason for the absence of the ability to send a message to Skype, are malfunctions in the program settings. In this case, they need to reset. In different versions of the messenger, the algorithms for performing this task are slightly different.Reset settings in Skype 8 and above
Immediately consider the procedure for resetting settings in Skype 8.
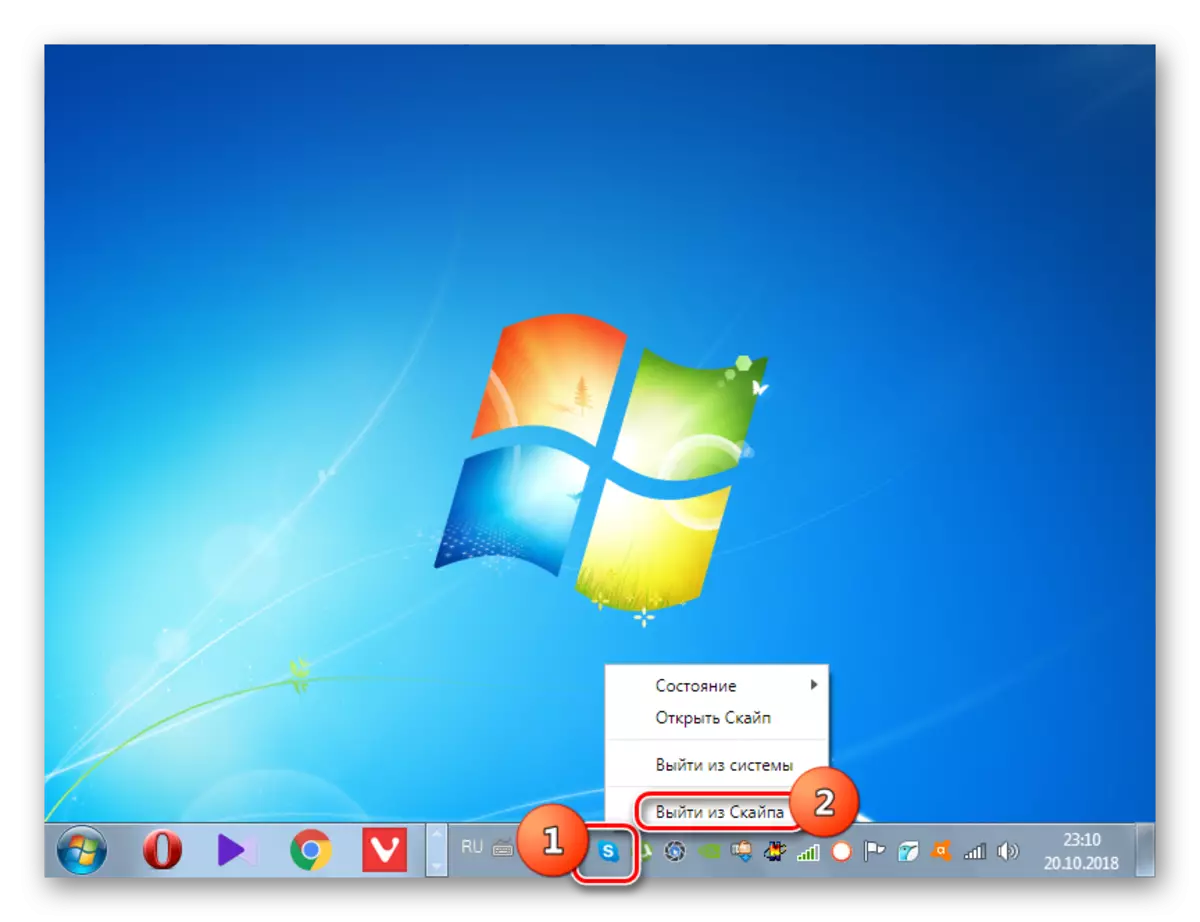
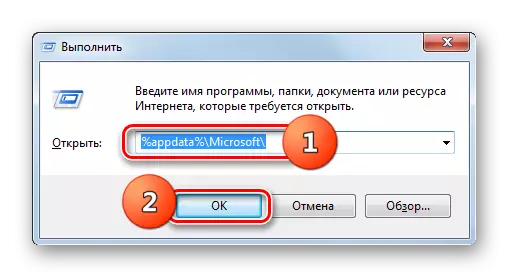
- First of all, it is necessary to complete the work in the messenger if it is started at the moment. You click on the Skype icon in the Trete Right Mouse button (PCM) and select "Exit Skype" from the discontinued list.
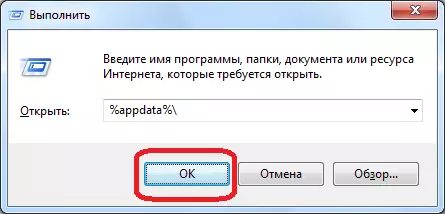
- After exiting Skype, we type Win + R combination on the keyboard. We enter the command to the displayed window:
% APPDATA% \ Microsoft \
We make click on the "OK" button.
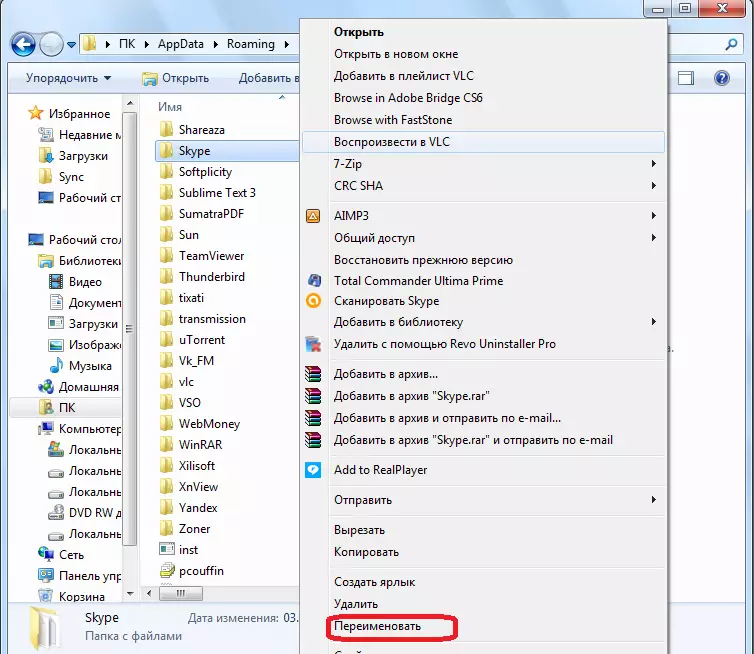
- "Explorer" will open in the Microsoft directory. You need to find a catalog under the name "Skype for Desktop". You click on it by PKM and from the displayed list, select the "Cut" option.
- Go to the "Explorer" to any other computer directory, click on the empty location of the PCM window and select the "Insert" option.
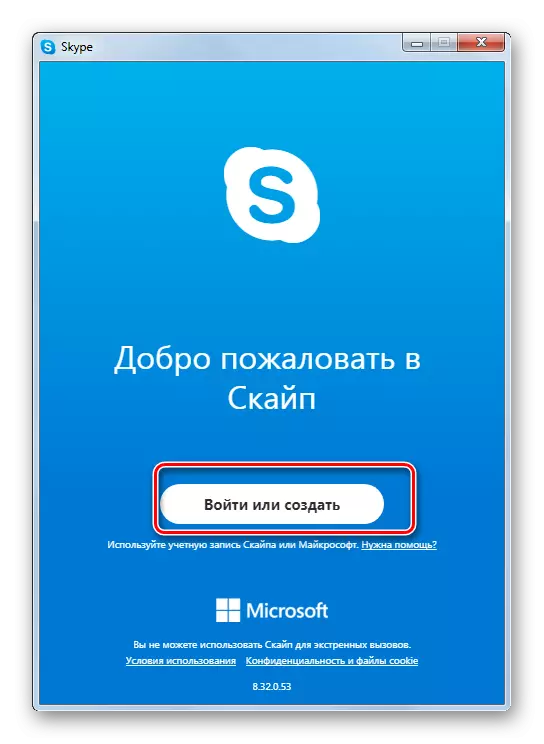
- After the folder with profiles is cut from its original location, run Skype. Even if earlier the login was performed automatically, this time you have to enter authorization data, since all settings have been reset. Click on the "Let's go" button.
- Next click "Login or Create".
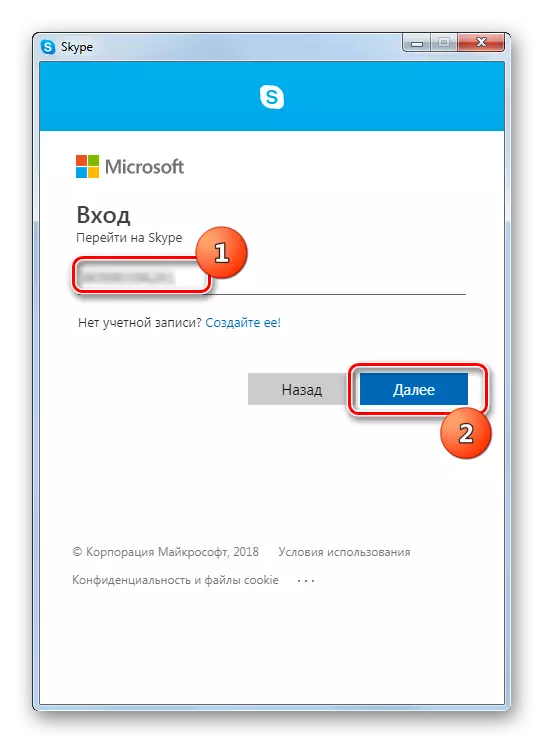
- In the window that opens, we enter login and click "Next".
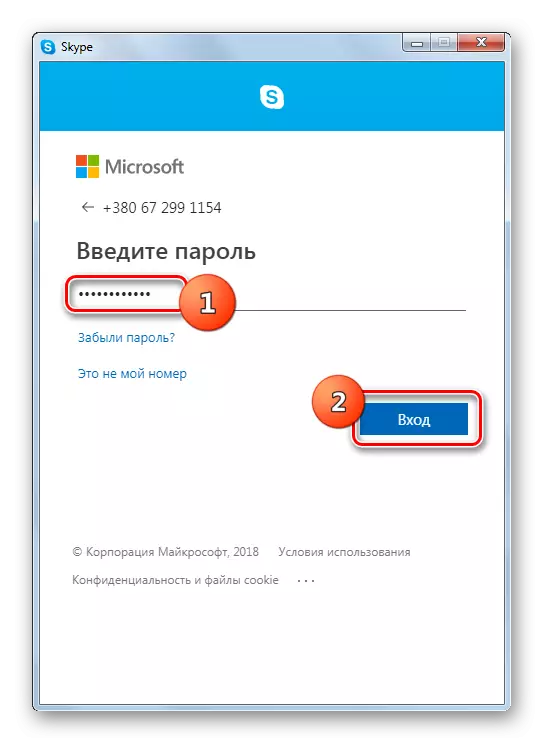
- In the next window, enter a password to your account and click "Login".
- After the program started, check if messages are sent. If everything is fine, we do not change anything else. True, you may need to manually transfer some data (for example, messages or contacts) from the old profile folder, which we have previously moved. But in most cases it will not be required, since all information will be tightened from the server and boot into a new profile directory, which will be formed automatically after starting Skype.
If no positive changes are detected and messages will not be sent, this means that the cause of the problem lies in another factor. Then you can exit the program to delete a new profile directory, and to return the one that was previously moved.


Instead of moving, you can also use renaming. Then the old folder will remain in the same directory, but she will be assigned another name. If the manipulations do not give a positive result, then simply delete a new profile directory, and the oldest name is returned.

Reset settings in Skype 7 and below
If you still use Skype 7 or earlier versions of this program, you will have to make similar to the actions described above, but already in other directories.
- Close Skype program. Next, click the Win + R key combination. In the "Run" window, enter the value "% appdata%" without quotes, and click on the "OK" button.
- In the opened directory, we find the Skype folder. There are three options that you can make it to reset the settings:
- Delete;
- Rename;
- Move to another directory.
The fact is that when removing the Skype folder, your entire correspondence will be destroyed, and some other information will be destroyed. Therefore, in order to be able to restore this information, the folder must be either renamed or move to another directory on the hard disk. We do it.
- Now launch the Skype program. If nothing happened, and the messages are still not sent, this indicates that it is not in the settings, but in something else. In this case, we simply return the "Skype" folder to place, or rename it back.
If the messages are sent, then again we close the program, and from the renamed or displaced folder, copy the Main.db file, and move it to the newly formed Skype folder. But, the fact is that in the Main.db file, your correspondence archive is stored, and it is in this file that a problem can be concluded. Therefore, if the bug began to be observed again, then we repeat the entire procedure described above another time. But, now the main.db file is not returned back. Unfortunately, in this case, you have to choose one of two: the ability to send messages, or the preservation of the old correspondence. In most cases, it is more reasonable to choose the first option.

Mobile version of Skype.
In the mobile version of the Skype application available on Android and iOS-devices, you can also encounter the inability to send messages. The overall elimination algorithm for this problem is largely similar to that in the case of a computer, but still there are differences dictated by the features of operating systems.
Note: Most of the actions described below are equally executed on the iPhone, and on Android. As an example, for the most part, we will be used second, but important differences will be shown on the first.
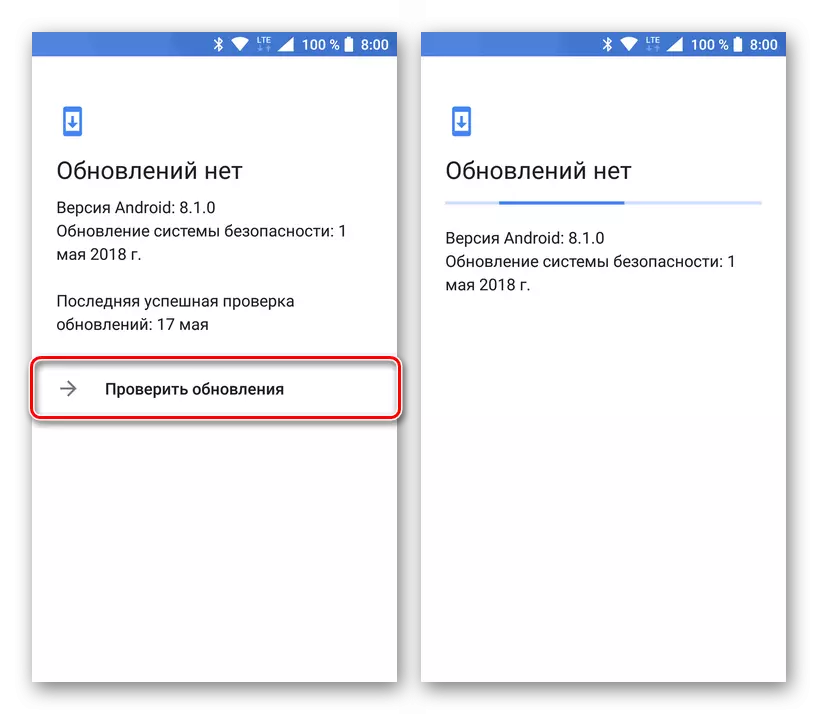
Before proceeding to troubleshoot the problem, you should make sure that the mobile device is included in the mobile device, the cellular or wireless network is not so important. Also, the latest version of Skype must be installed on the latest version and, very desirable, the current version of the operating system. If this is not the case, you first update the application and OS (of course, if possible), and only after that go to the execution of the recommendations described below. On outdated devices, the correct work of the messenger is simply not guaranteed.
Method 2: Cleaning Cache and Data
If the forced data synchronization has not restored the performance of the message to send messages, it is likely that the reason for the problem should be sought in the Skype itself. During the long-term use, this application, like any other, could turn the garbage data from which we and to you have to get rid of. This is done as follows:
Android
Note: On android devices, to improve the efficiency of the procedure, you also need to clear the cache and the Google Play data of the Market.
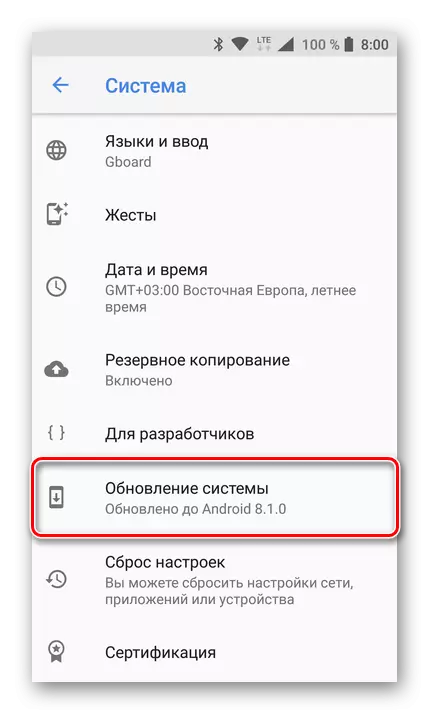
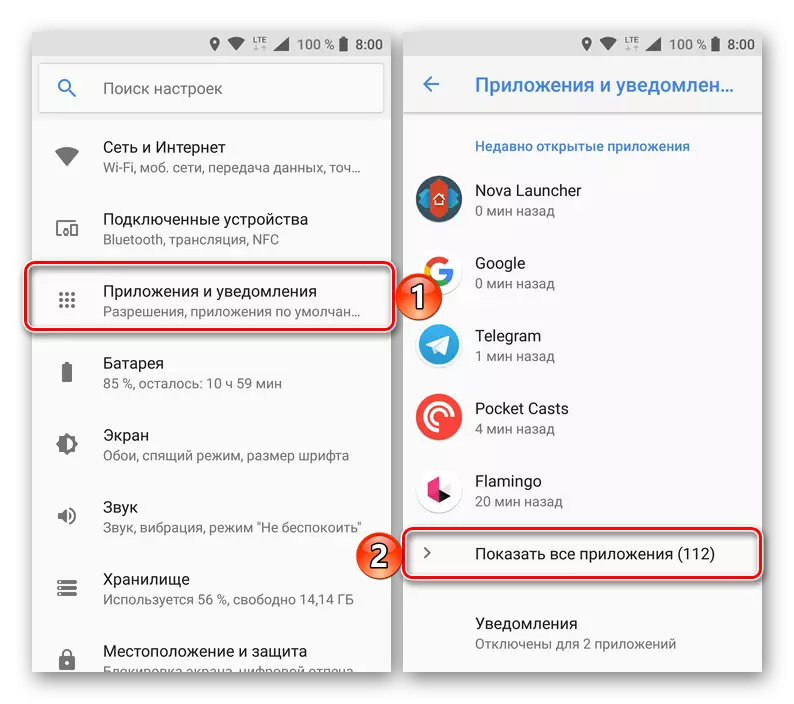
- Open the "Settings" of the device and go to the "Application and Notifications" section (or simply "applications", the name depends on the version of the OS).
- Open a list of all installed applications by finding the appropriate menu item, find the playing market in it and tap it to its name to go to the page describing.
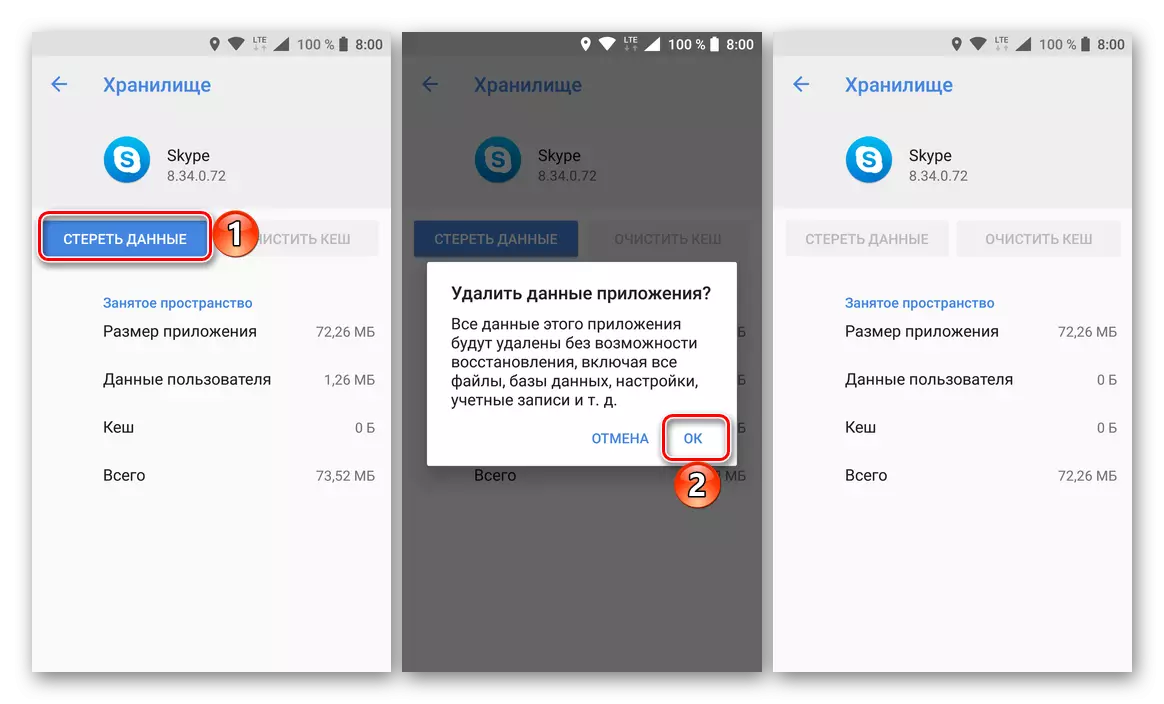
- Select the "Storage" item, and then alternately click on the "Clear Cache" and "Erase Data" buttons.
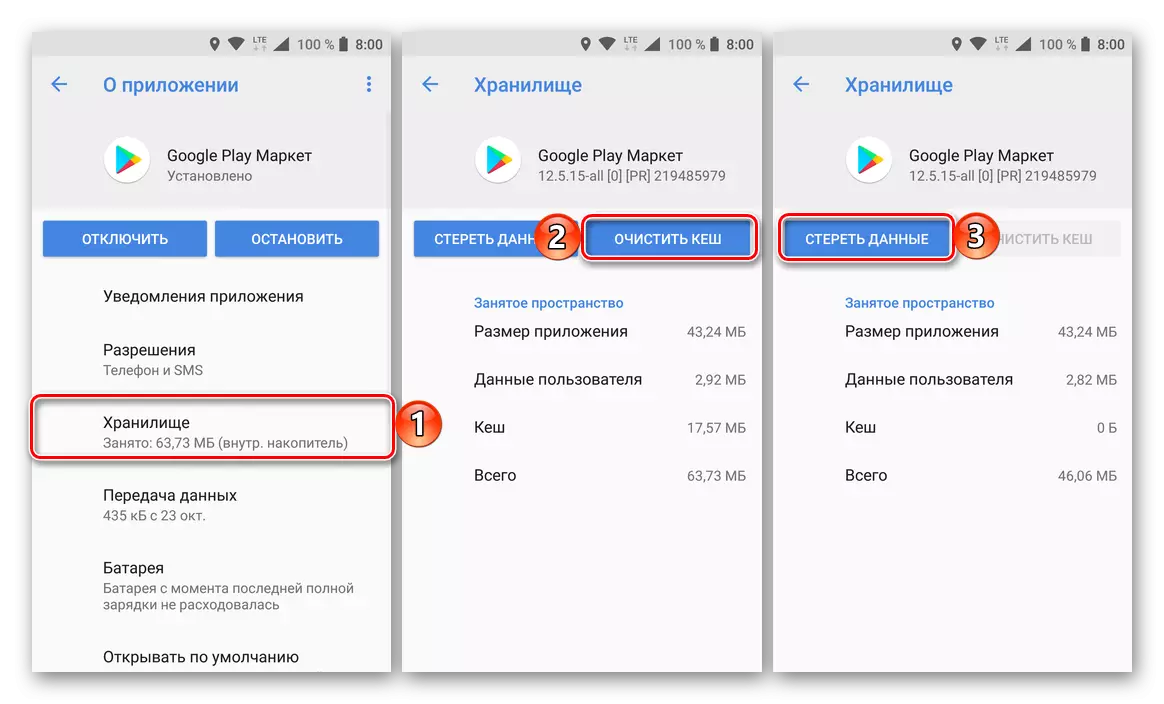
In the second case, the action will need to confirm by pressing "Yes" in the pop-up window.
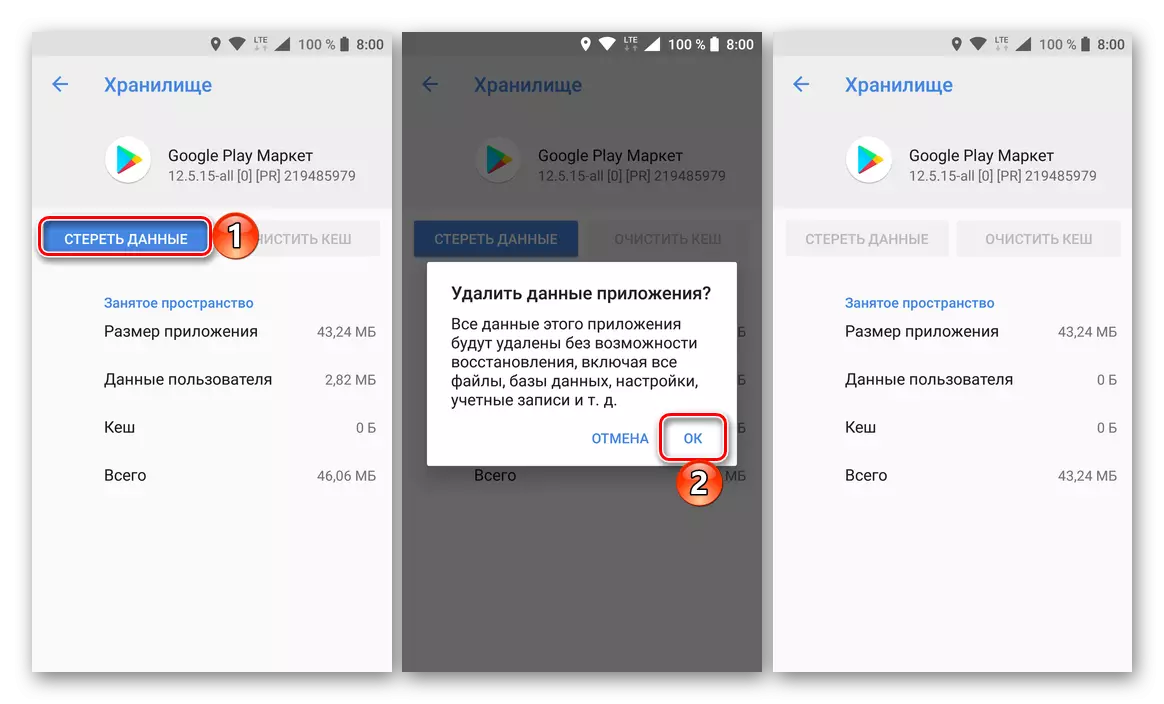
- "Relieving" application store, do the same with Skype.
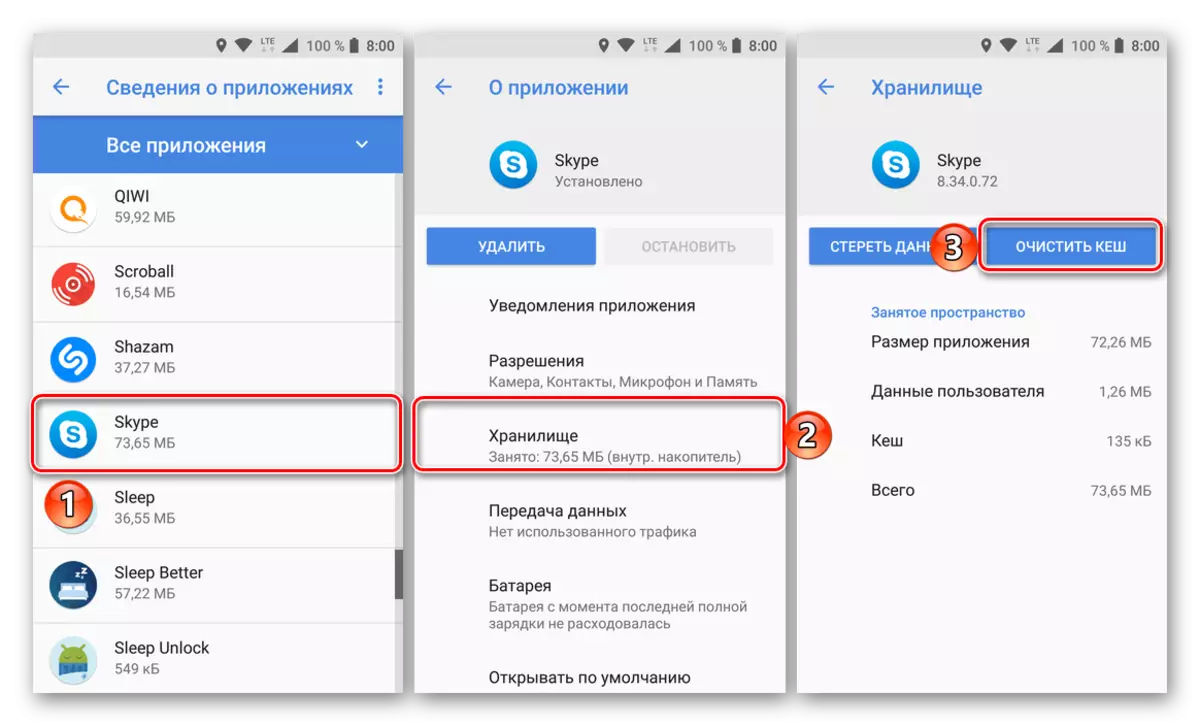
Open the page of your information, go to "Storage", "Clean the cache" and "erase the data" by clicking on the relevant buttons.
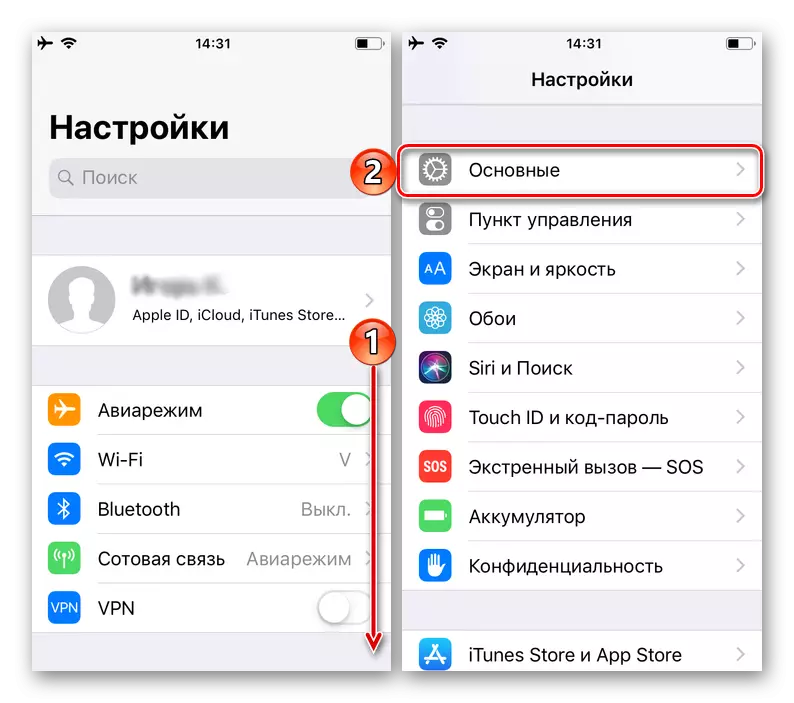
- Open the "Settings", scroll through the list of items presented there are a bit down and select "Basic".
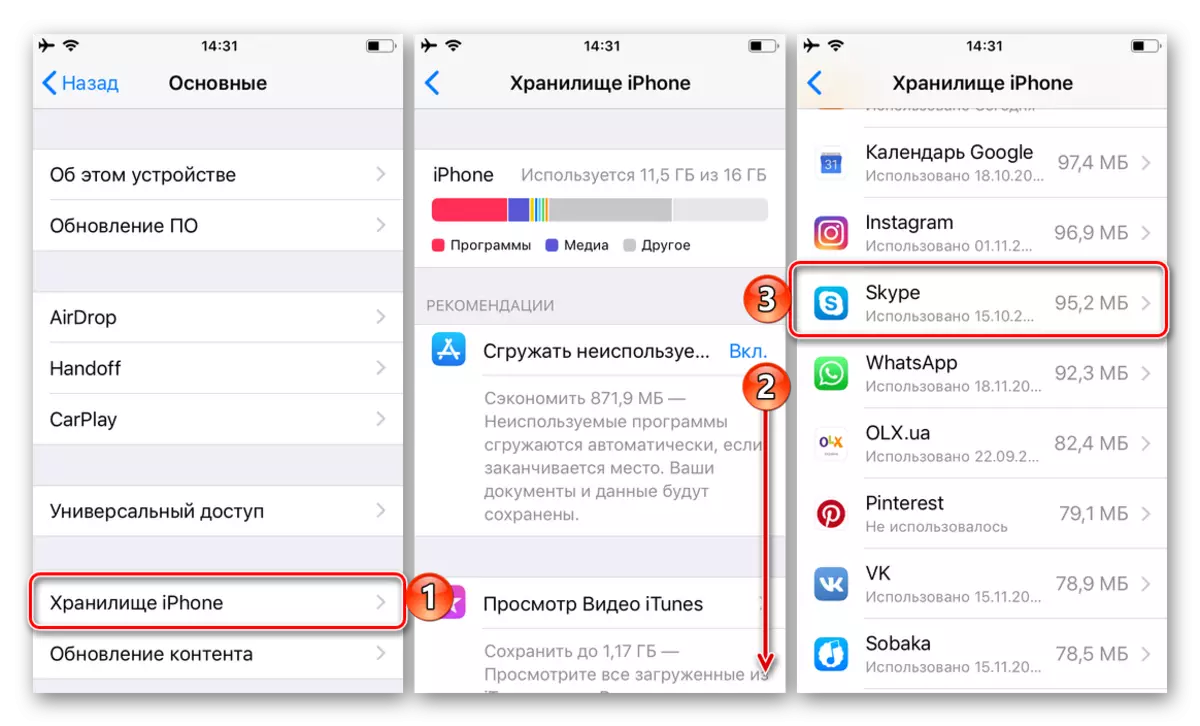
- Next, go to the "iPhone Storage" section and scroll down this page down until the Skype application, by the name of which you want to tap.
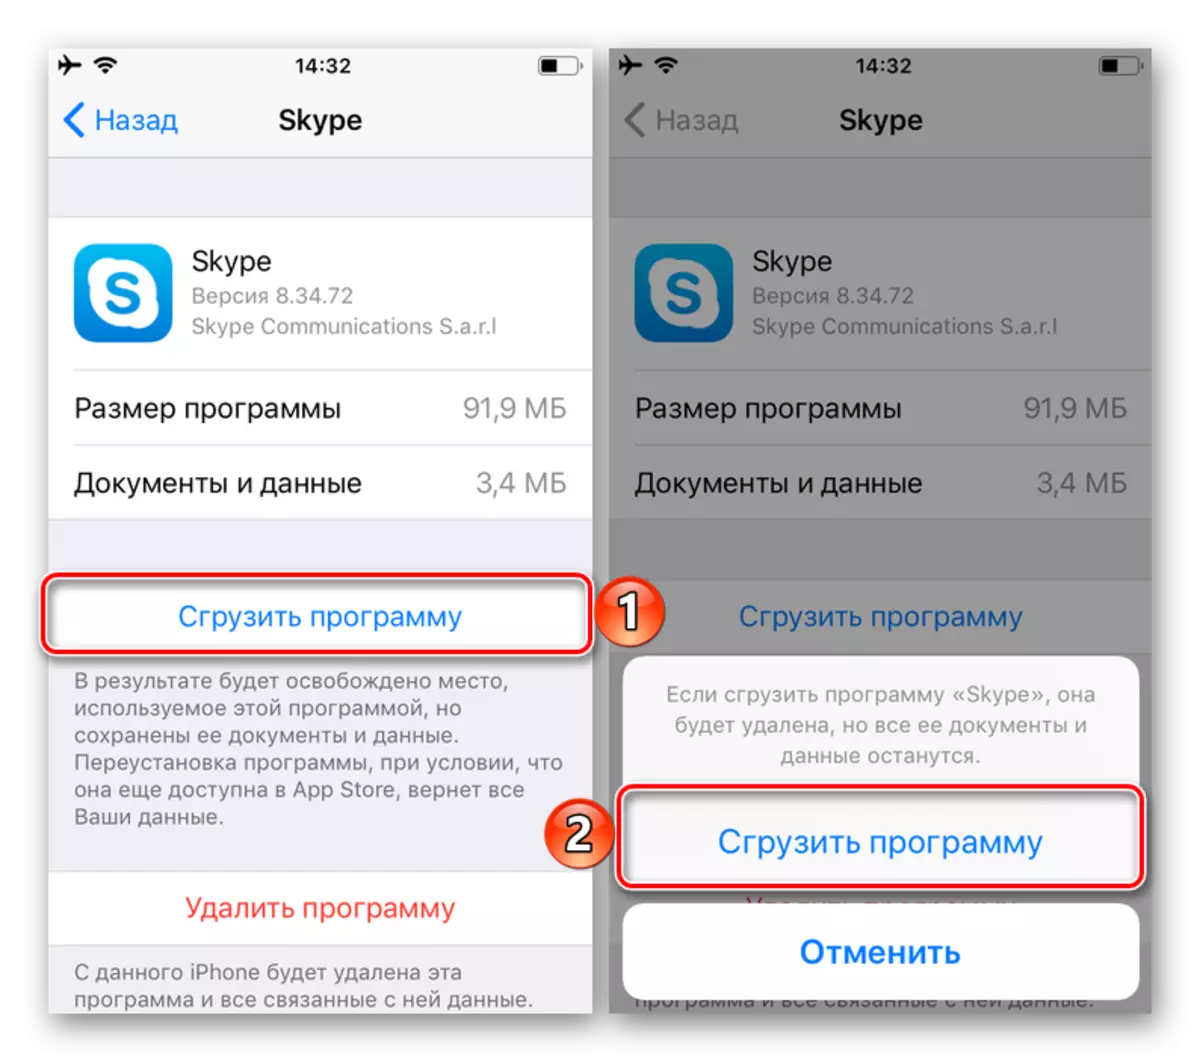
- Once on his page, click on the "Download program" button and confirm your intentions in the pop-up window.
- Now tap on the changed "Reinstall program" and wait for this procedure.

iOS.
Method 3: Reinstall the application
Most often, the problem in the work of most applications is solved precisely by cleaning their cache and data, but sometimes it turns out not enough. There is a chance that even "clean" Skype still does not want to send messages, and in this case it should be reinstalled, that is, first delete, and then re-install from Google Play Market or App Store, depending on which you use the device.

Note: On smartphones and tablets with Android, you first need to "reset" google play market, that is, repeat the actions described in steps 1-3 of the previous method (part "Android" ). Only then proceed to reinstall Skype.
Read more:
Deleting Applications on Android
Removing iOS applications
Re-installing Skype, log in to it under your username and password and try sending a message again. If this time the problem is not eliminated, it means that the reason for it lies in the account itself, about working with which we will also tell me further.
Method 4: Adding a new login
Thanks to the execution of all (or, I would like to believe, only their parts) of the recommendations described above can permanently eliminate the problem with sending messages in the mobile version of Skype, at least in most cases. But sometimes it does not happen, and in such a situation you have to dig deeper, namely, changing the main email, which is used as a login for authorization in the messenger. About how to do this, we have already written before, so we will not stop in detail on this topic. Check the article on the link below and do everything that is offered.
Read more: Change login in the mobile version of Skype
Conclusion
As it was possible to understand from the article, the reasons for which it is impossible to send a message in Skype, maybe several. In most cases, everything comes down to a banal absence of communication, at least, if we are talking about the version of the PC application. On mobile devices, things are somewhat different and considerable efforts should be made to eliminate some reasons. And yet we hope that this material was useful for you and helped restore the performance of the main function of the Messenger application.