

Modern versions of Windows are endowed with built-in tools that can restore the initial state of system files if they are modified or damaged. Their use is required when some component of the operating system runs unstable or with failures. For Win 10 there are several options for how to analyze their integrity and return to the working condition.
Features of the integrity of system files in Windows 10
It is important to know that even those users whose operating systems have stopped being loaded as a result of any events can use restoring utilities. To do this, it is enough for them to have a bootable flash drive or CD, which help to get into the command line interface before the installation of new windows.
"Windows Protection Unable to run the recovery service"
- Check if you launched a "command line" with administrator rights, as needed.
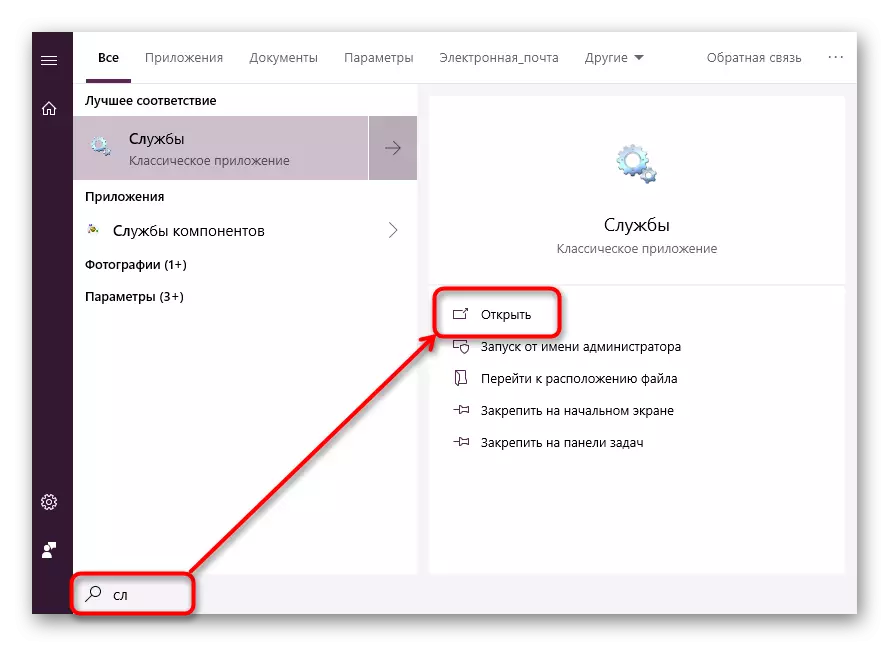
- Open the "Services" utility by writing this word in the "Start".
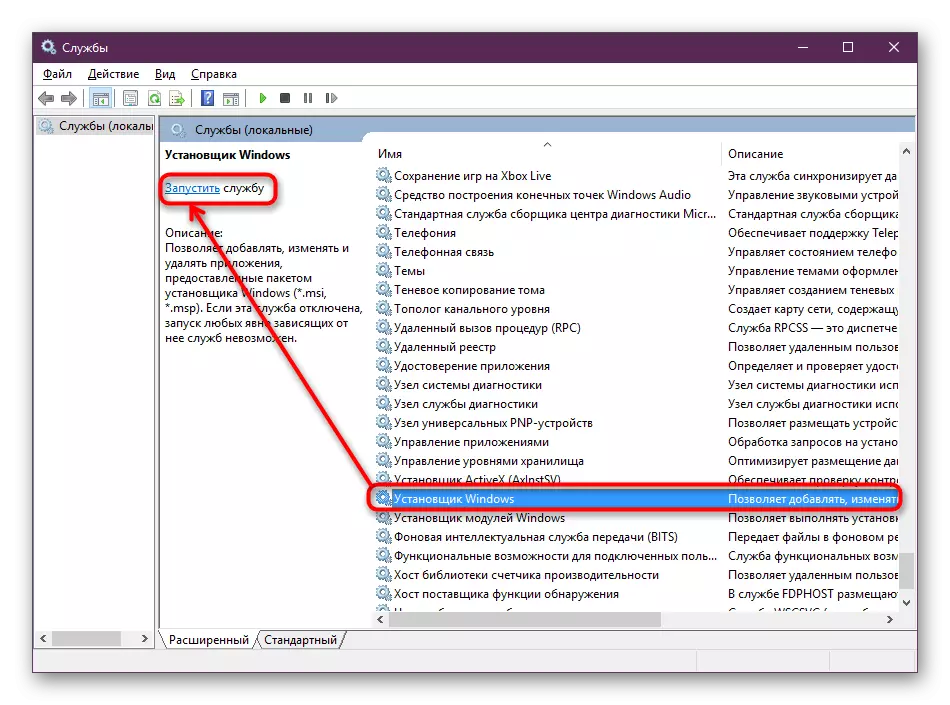
- Check if the "Shadow Copying Tom" services are enabled, the Windows Installer and Installer Module and Installer. If at least one of them is stopped, run it, and then return to CMD and start scanning the SFC again.
- If it does not help, go to step 2 of this article or use the instructions for starting SFC from the recovery environment below.
"At the moment another service or recovery operation is performed. Wait for it and restart SFC »
- Most likely, at this point in parallel, Windows update is made, in view of which it is enough for you to wait for its completion, if necessary, restart the computer and repeat the process.
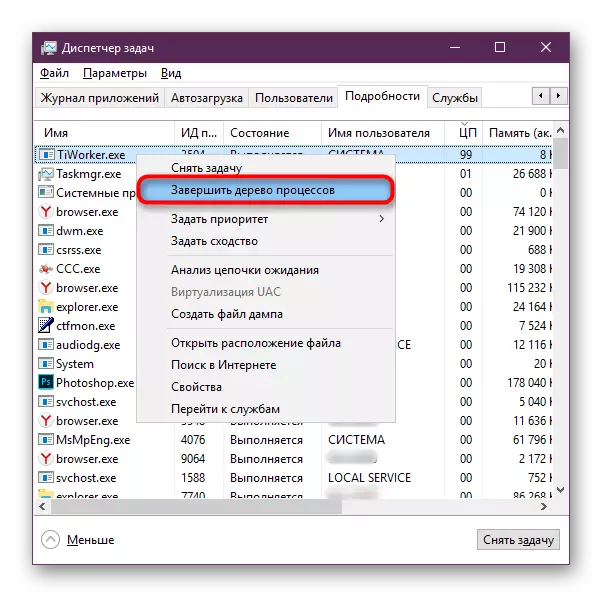
- If after a long wait, you see this error, and in the Task Manager, you see the Tiworker.exe process (or "Windows Modules Installer Worker"), stop it by clicking on the line with it right-click and selecting the "Tree Complete processes. "
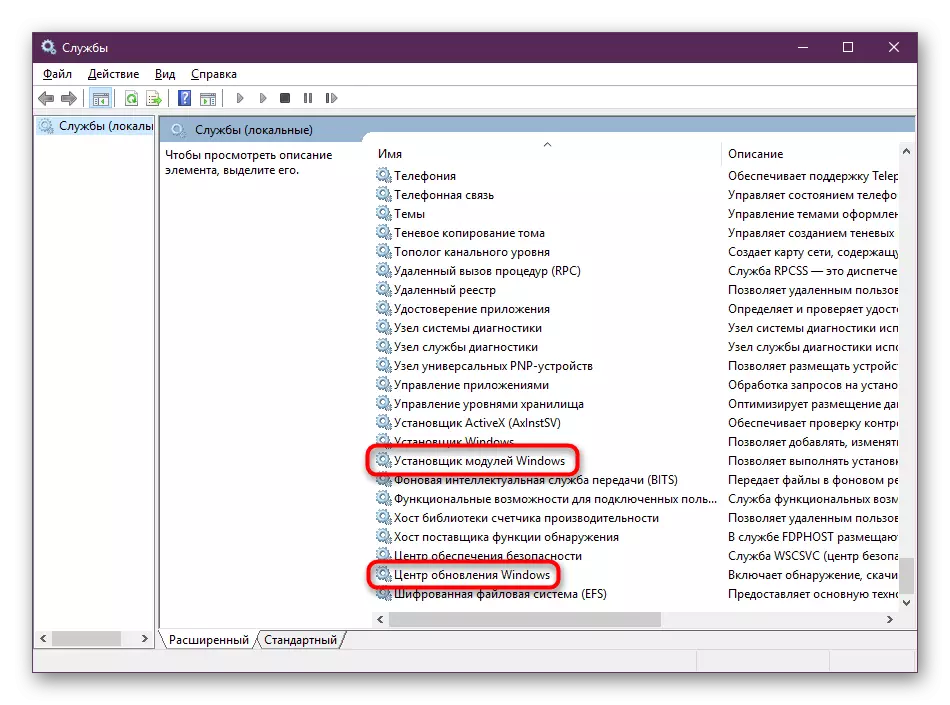
Or go to "Services" (how to open them, it is written slightly above), find the "Windows Installer" and stop it. The same can be tried to do with the Windows Update Center. In the future, the service should be turned on to be able to automatically receive and install updates.
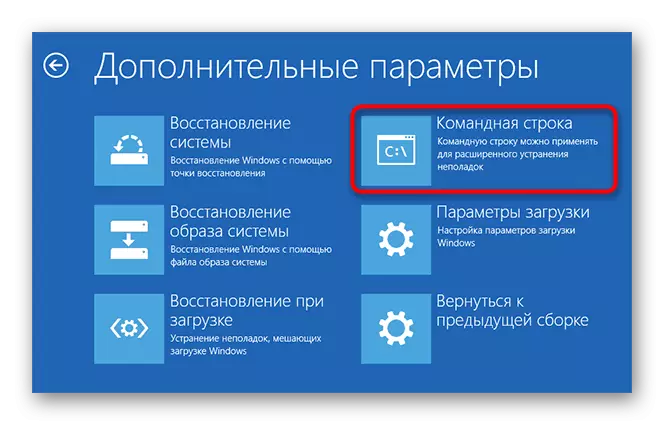
Run SFC in the recovery environment
If there are serious problems, because of which it is impossible to load / correctly use Windows in normal and safe mode, as well as when one of the errors discussed above, you should use SFC from the recovery environment. In the "dozen" there are several ways to get there.
- Use the boot flash drive to load a PC from it.
Read more: Configure BIOS to download from a flash drive
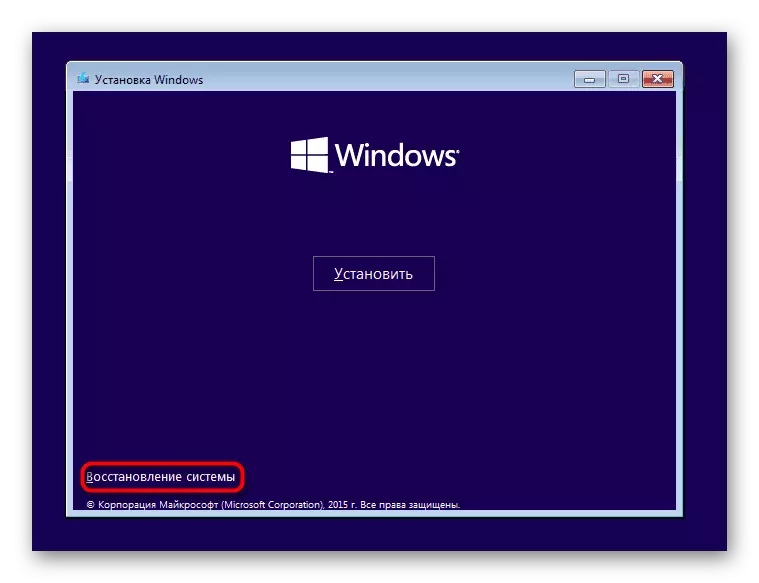
On the Windows Setup screen, click the "System Restore" link, where to select "Command Line".
- If you have access to the operating system, reboot to the recovery environment as follows:
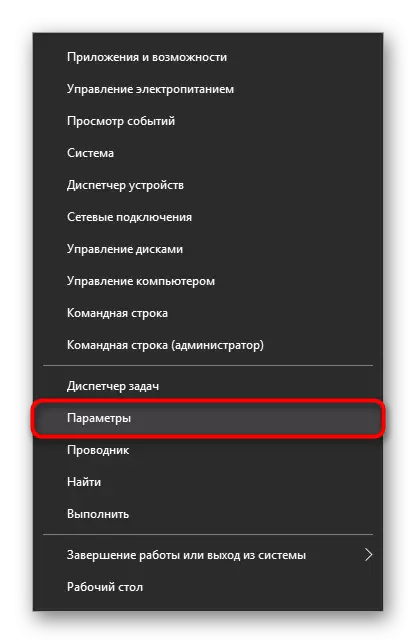
- Open "Parameters" by pressing the PCM on the "Start" and selecting the parameter of the same name.
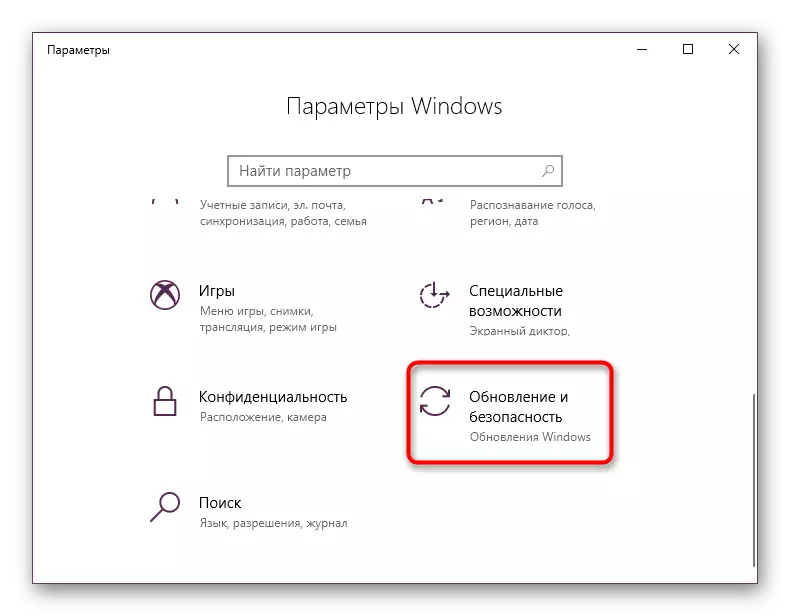
- Go to "Update and Security".
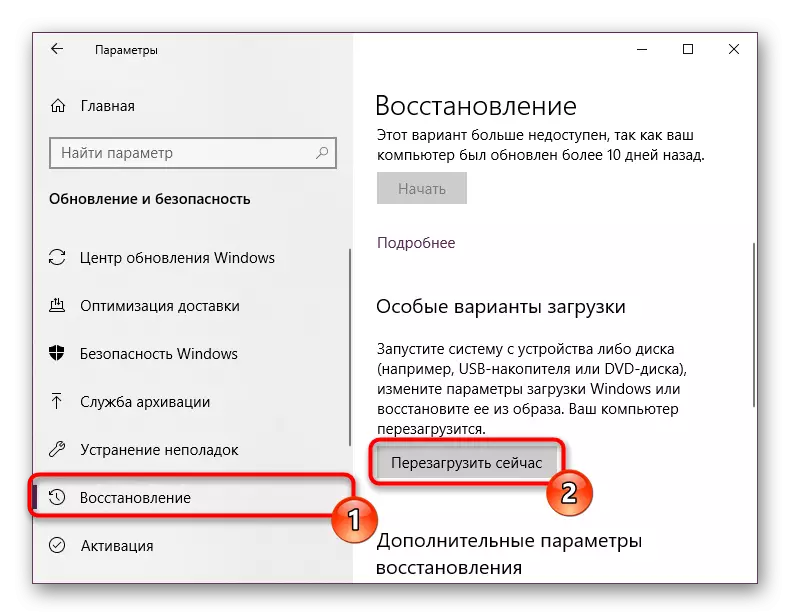
- Click on the Restore tab and find the "Special Download Options" section where you click on the Restart Now button.
- After rebooting, log in to the "Troubleshooting" menu, from there to "Advanced Options", then to the "Command Line".
Regardless of the method, which was used to open the console, in one thing, enter the commands in the open CMD below, after each pressing Enter:
diskpart.
List Volume
EXIT
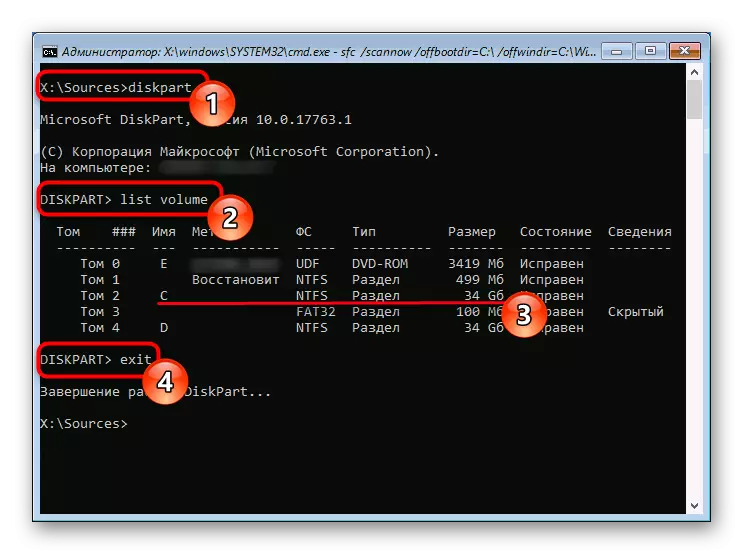
In the table that List Volume will withdraw, locate the letter of your hard disk. This must be determined for the reason that the letters assigned to the discs here differ from those that you see in Windows itself. Focus on the size of the volume.
Enter the SFC / SCANNOW / OFFBOOTDIR = C: \ / / OffWindir = C: \ Windows, where C is the disc letter that you have just defined, and C: \ Windows is the path to the Windows folder in your operating system. In both cases, examples may differ.
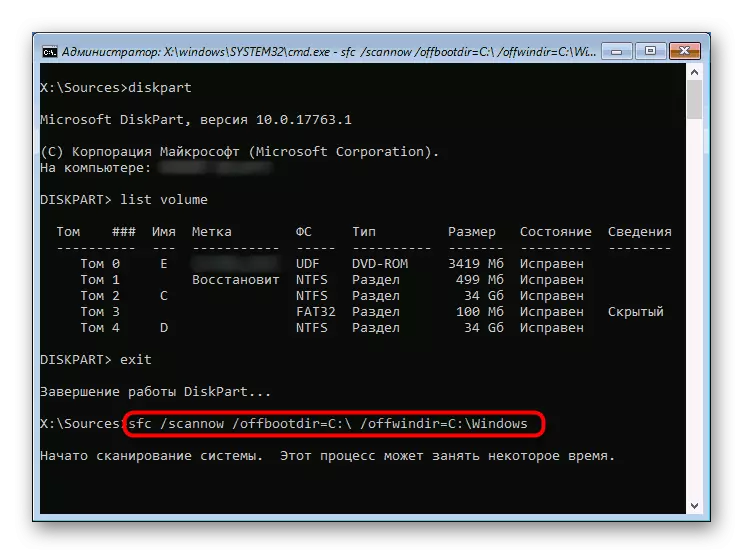
So the SFC starts, performing checking and restoring the integrity of all system files, including those that could not be available when the tool is running in the Windows interface.
Step 2: Run DISM
All system components of the operating system are located in a separate place, which is also referred to as the repository. There are original versions of files that are later damaged items.
When it is damaged during any causes, Windows begins to work incorrectly, and SFC when trying to perform check or recovery issues an error. The developers have provided a similar outcome of events by adding the ability to restore the storage of components.
If you do not work SFC check, run, following further recommendations, DISM, and then use the SFC / SCANNOW command again.
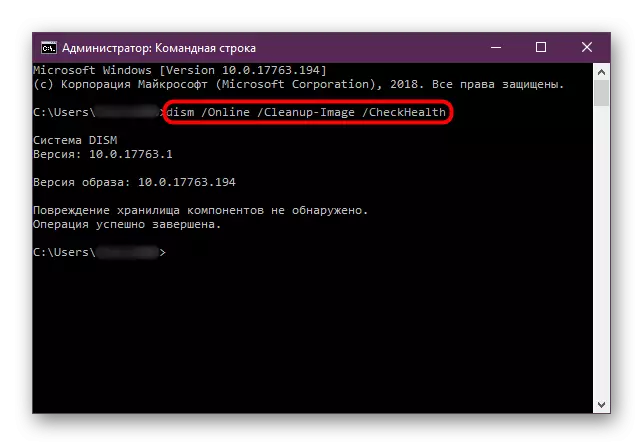
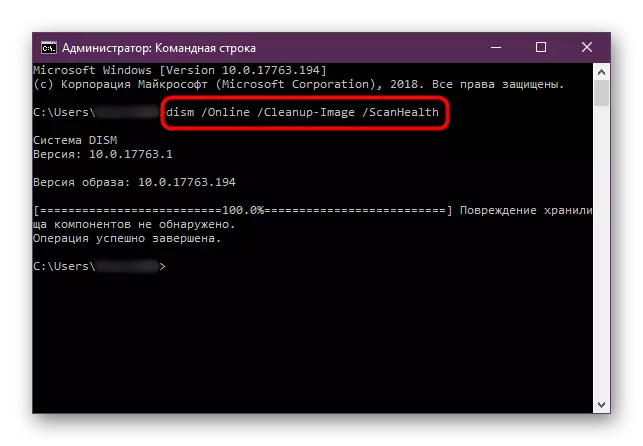
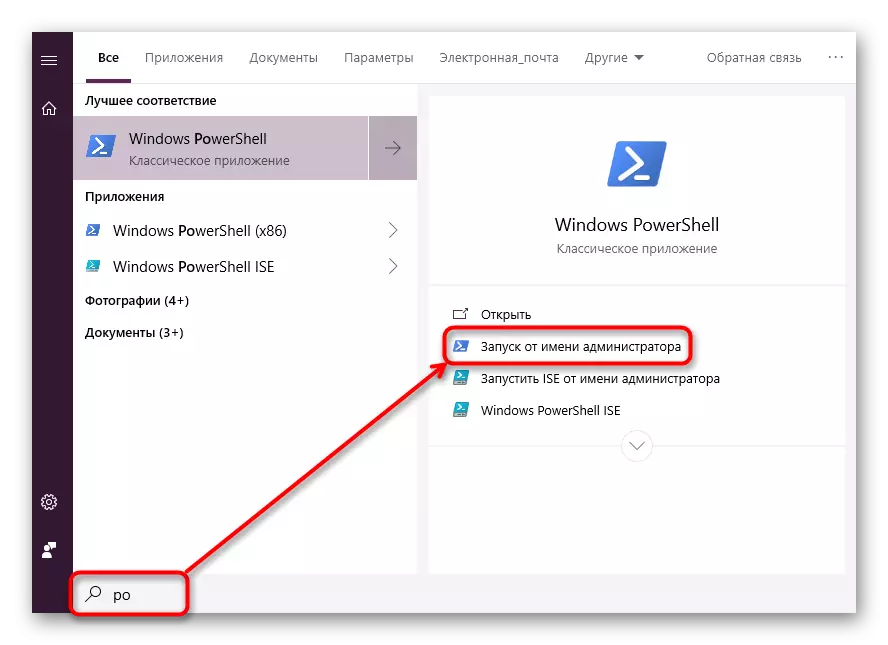
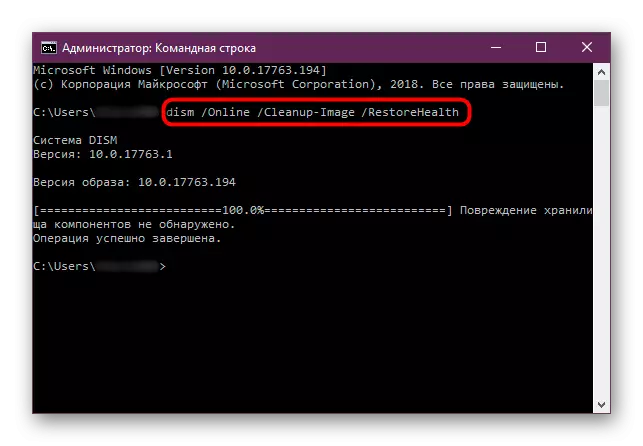
- Open the "Command Line" of the same way that is specified in step 1. Similarly, you can call "PowerShell".
- Enter the command whose result you need to get:
DISM / Online / CleanUp-image / checkHealth (for CMD) / REPAIR-WindowsImage (for PowerShell) - An analysis of the state of the repository is performed, but the restoration itself does not occur.
DISM / ONLINE / CLEANUP-Image / SCANHEALTH (for CMD) / REPAIR-WindowsImage -NLINE -ScanHealth (for PowerShell) - scans the data area to the integrity level and errors. It takes significantly more time than the first team, but also serves only for information purposes - eliminating problems found does not occur.
DISM / Online / CleanUp-image / restoreHealth (for CMD) / REPAIR-WindowsImage -NLINE -restoreHealth (for PowerShell) - checks and restores the damage to the repository. Note that this requires a certain time, and the exact duration depends exclusively from the problems detected.
Recovery DISM.
In rare cases, it is not possible to use this tool, and restore it online through the "command line" or "PowerShell" also does not work. Because of this, it is required to restore the image of pure Windows 10, it is likely that you will probably even be resorted to the recovery environment.
Restoring in Windows Wednesday
When Windows works, restore the DISM becomes the most simple as possible.
- The first thing you need is the presence of a clean, preferably not modified by different grief-collectors, the image of Windows. You can download it on the Internet. Be sure to pick up the assembly as close to yours. The coincidence should be at least the assembly versions (for example, if you have installed Windows 10 1809, then look for exactly the same). Owners of current buildings "Dozens" can use the Media Creation Tool from Microsoft, where its latest version is also located.
- Having found the desired image, mount it to a virtual drive using specialized programs suchEEM TOOLS, ULTRAISO, ALCOHOL 120%.
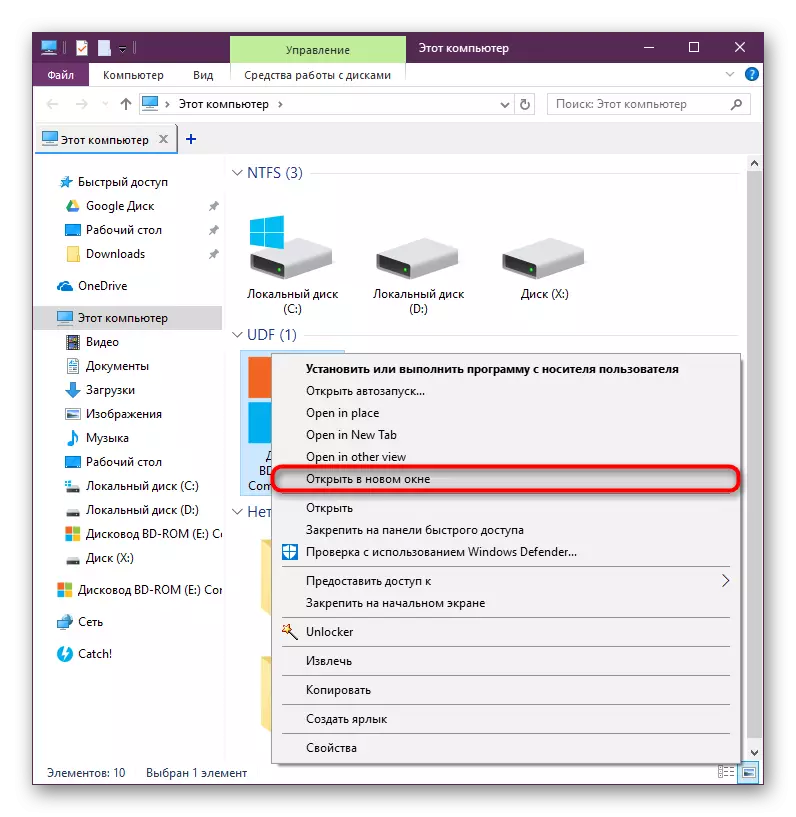
- Go to "This Computer" and open the list of files from which the operating system consists. Since the installer is most often started by pressing the left mouse button, press PCM and select "Open in a new window".
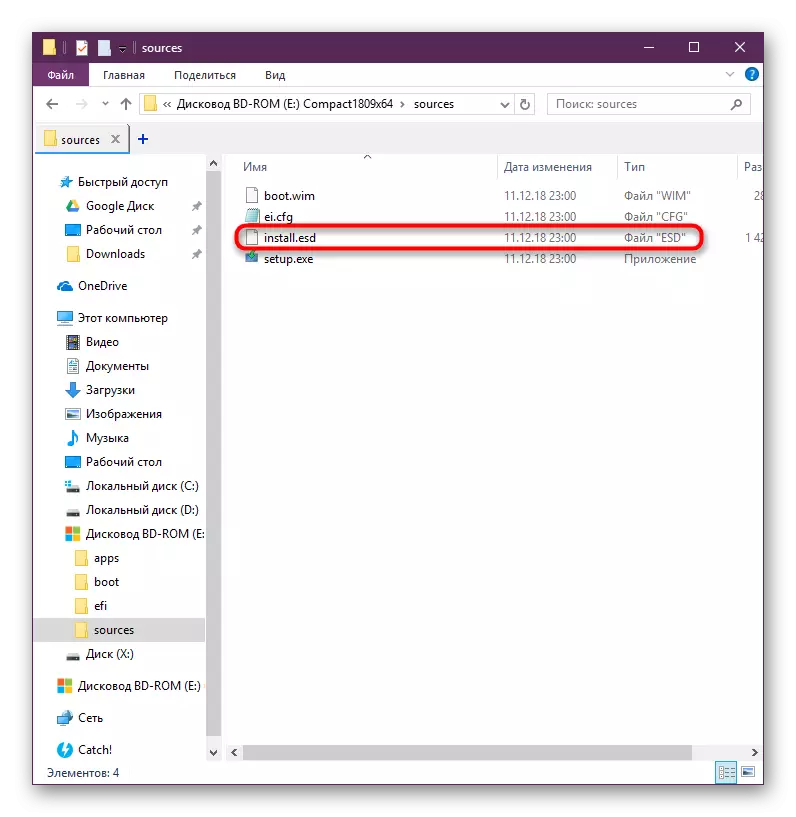
Open the "Sources" folder and see which of the two files you have: "install.wim" or "Install.esd". This is useful to us further.
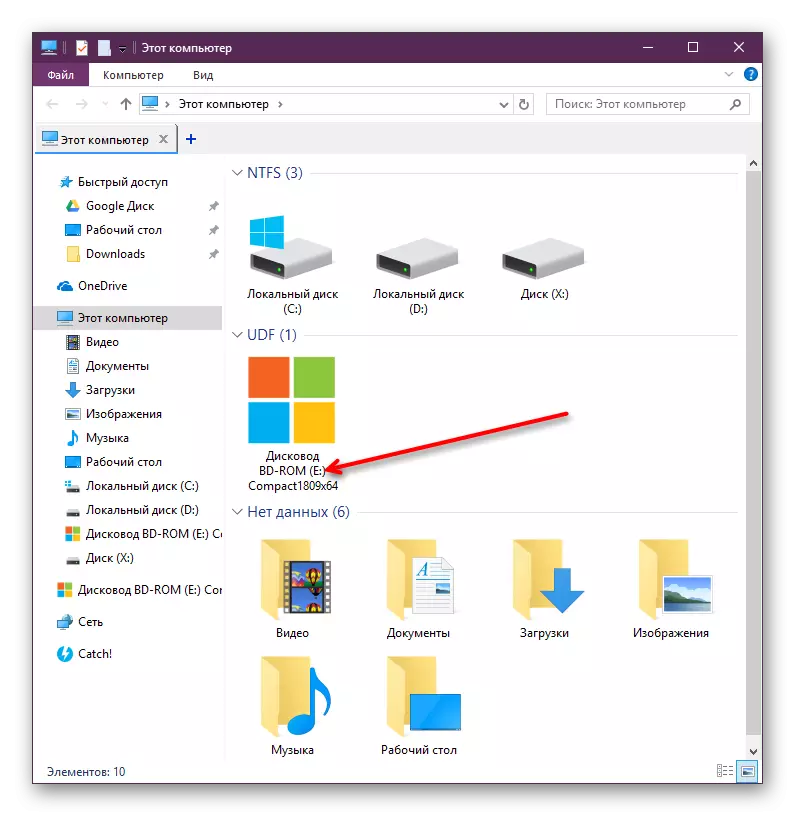
- In the program through which the image was mounted, or in this computer, see what the letter was assigned to him.
- Expand the "Command Line" or "PowerShell" on behalf of the administrator. First of all, we need to know which index is assigned a version of the operating system, how do you want to take a DISM. To do this, write the first or second command depending on which file you found in the folder in the previous step:
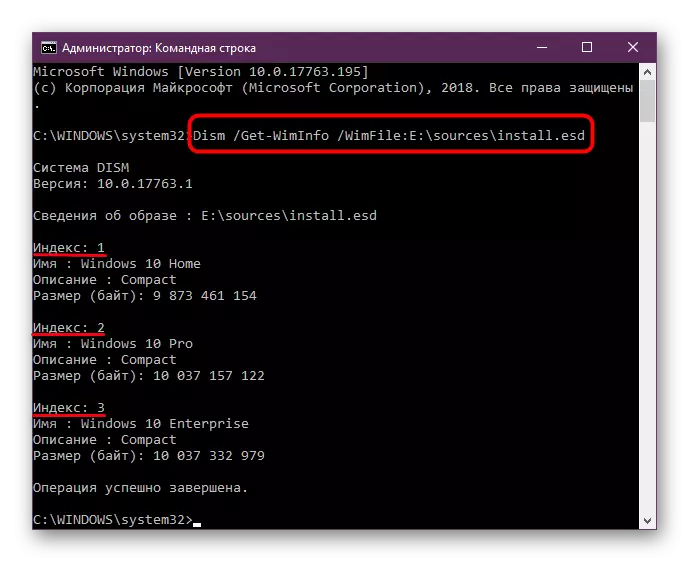
DISM / Get-Wiminfo /Wimfile::\Sources\Install.esd
or
DISM / Get-Wiminfo /Wimfile ::\Sources\Install.wim
where E is the letter of the disk assigned to the mounted image.
- From the list of versions (for example, Home, Pro, Enterprise) we are looking for the one that is installed on the computer and look at its index.
- Now enter one of the following commands.
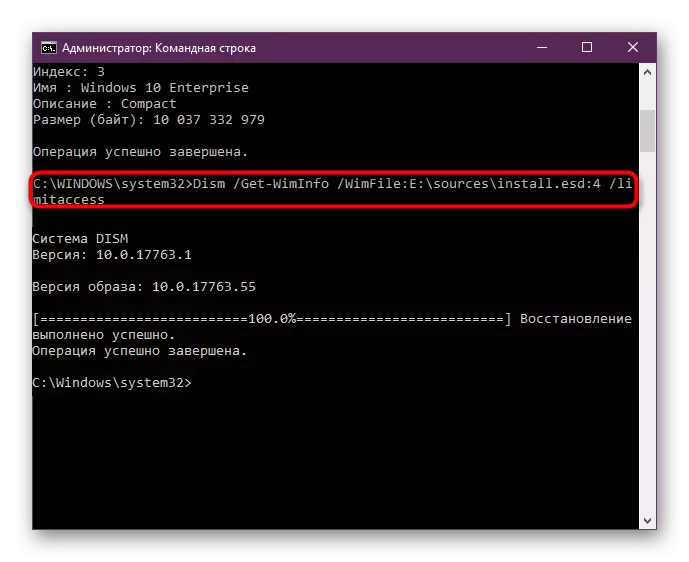
DISM / Get-Wiminfo /Wimfile::\Sources\Install.esd: INDEX / LimitAccess
or
DISM / Get-Wiminfo /Wimfile::\Sources\Install.Wim: Index / LimitAccess
where E is the disk letter assigned to the mounted image, the index - the number you have determined in the previous step, and / limitaccess - an attribute that prohibits the command to access Windows Update (as it happens when working with the method 2 of this article), and the boring local file at the specified address from the mounted image.
The index in the command can not write if in the installer Install.esd / .wim Only one Windows assembly.
Wait for the end of the scan. In the process it may freeze - just wait and do not try to complete the work of the console ahead of time.
Work in the restoration environment
When it is impossible to produce a procedure in Windows Works, you need to refer to the recovery environment. So the operating system will not be downloaded yet, so the "command line" can easily access the C section and replace any system files on the hard disk.
Be careful - in this case you will need to make a bootable USB flash drive from where you come from and where you will take Install to replace. The version and assembly number must match the one that is installed and damaged!
- In advance in the launched Windows, look, an install file of which extension is in your Windows distribution - it will be used to recover. In detail this is written in steps 3-4 instructions for recovering DISM in the Windows environment (just above).
- Refer to the "Starting SFC in the Recovery Environment" section of our article - there are in steps 1-4 there are instructions for entering the restoration environment, the launch of CMD and working with the DiskPart console utility. Think the letter of your hard disk and the letter of the flash drive and exit DiskPart as described in the SFC section.
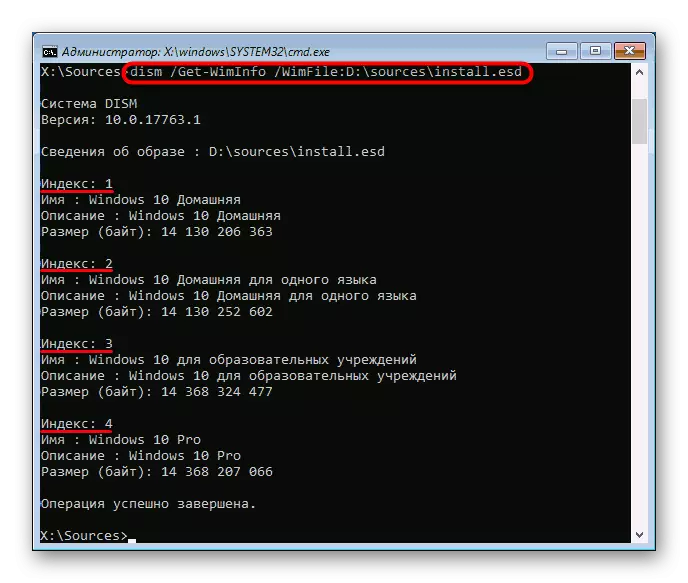
- Now that the letters at HDD and flash drives are known, work with DiskPart is completed and the CMD is still open, write the following command that will define the Windows version index, which is recorded on the USB flash drive:
DISM / Get-Wiminfo /Wimfile ::\Sources\Install.esd
or
DISM / Get-Wiminfo /Wimfile ::\Sources\Install.wim
where D is the letter of the flash drive that you have determined in step 2.
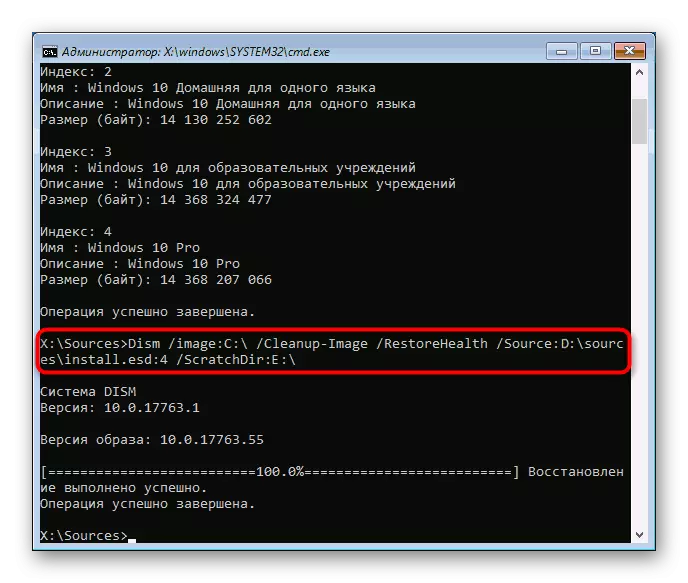
- Enter the command:
DISM / Image: C: \ / / CleanUp-image / restoreHealth /Source:d:\sources\Install.esd: INDEX
or
DISM / Image: C: \ / / CleanUp-image / restorehealth /source:d: \sources\install.wim:index
where C is the letter of the hard disk, D is the letter of the flash drives that you defined in step 2, and the index is an OS version on a flash drive that coincides with the version of the installed Windows.
In the process, temporary files will be unpacking, and if there are several partitions / hard drives on the PC, you can use them as storage. To do this, at the end of the command specified above, add the attribute / scratchdir: E: \, where E is the letter of this disk (it is also defined in step 2).
- It remains to wait for the completion of the process - after that, restoration with a large probability should be successful.
You need to know in advance which version of the OS is installed on your hard disk (Home, Pro, Enterprise, etc.).
So, we looked at the principle of using two tools restoring system files in Win 10. As a rule, they cope with most problems that have arisen and return the user's stable operation of the OS. Nevertheless, sometimes some files cannot be done again by workers, because of which the user may need to reinstall Windows or go to manual recovery, copying files from a working original image and replacing them in a damaged system. First you will need to contact the logs at:
C: \ Windows \ Logs \ CBS (from SFC)
C: \ Windows \ Logs \ DISM (from DISM)
Find a file there that could not be restored to get it out of the pure image of Windows and replace in the damaged operating system. This option does not fit in the framework of our article, and at the same time it is rather complicated, so it is only experienced to people with experienced and confident in its actions.
READ ALSO: Ways to reinstall the Windows 10 operating system