

One of the most famous distributions based on the Linux kernel is considered to be Arch. Among the other platforms, it is allocated in difficulty in installing and configuring, but this attracts users who want to learn more about the structure of this operating system and increase the level of knowledge in the use of the classical console. Arch Linux is installed completely manually, starting from creating partitions of a hard disk and ending with new accounts. All actions are performed through the "Terminal" by entering the relevant commands.
Install Arch Linux
Within the framework of this article, I would like to consider the procedure for installing this platform as in detail, taking into account the pretty configuration of all components. We broke the entire process to steps so that novice users were easier to navigate. For the installation itself, you will only need a flash drive with a minimum of 2 GB or the same disk. Everything else is loaded from the Internet or added directly during the installation of the OS. Note that adding all the necessary components is performed through an active Internet connection.Step 1: download distribution image
The platform under consideration, like most other distributions, is in open access and can be downloaded from the official site of developers. We recommend using this particular source, as you are guaranteed to get a working image without any errors and malicious files inside.
Download Arch Linux Distribution from the Official Site
- Go to the above link and select "Download".
- You can use any mirror, but we advise you to choose a BitTorrent link.
- After downloading, run the file via any torrent client and expect to complete the download of the image to the computer.


Now there is a full-fledged image of the operating system. It remains only to write to the disk or flash drive, after which it will be possible to start directly to the installation procedure.
Step 2: Creating a bootable media
Now the USB flash drives are more popular, because they are more convenient to disks, and the appropriate connector is present absolutely on all computers. Therefore, let's stop at this option. You will need to take advantage of a special program that will create the bootable from the usual flash drive. Detailed instructions on this topic are in a separate article according to the following link.Read more: Record OS image on a USB flash drive
Step 3: Configuring BIOS to start the boot flash drive
As you know, the start of installation of the operating system is made after connecting the drive and restart the computer. In this case, it is important that the BIOS starts the download from the flash drive, and not the hard disk. To ensure successful execution of this task, you will need to manually set priority through the BIOS settings. To deal with this procedure will help another material further.
Read more: Configuring BIOS to run from flash drive
Step 4: Download Installer and Live-mode
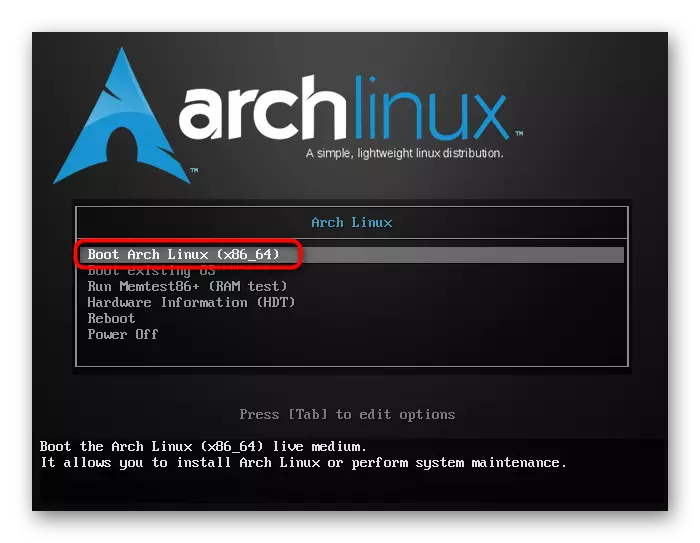
After executing the previous step, it will be enough to insert a flash drive into a free connector and run PC. After a certain amount of time, the Arch Linux bootloader appears on the screen. It has several items, for example, a reboot or view of iron information, but now you are interested in "Boot Arch Linux". Arrows on the keyboard, select this item and press the ENTER key.
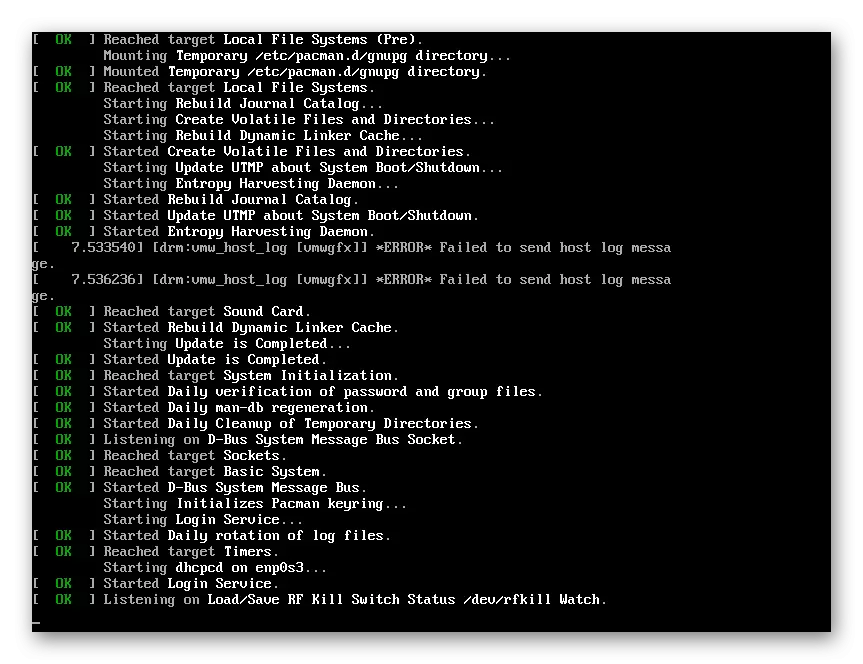
All standard components for Live mode begins. This may take a few minutes, so do not turn off the PC and do not press any keys on the keyboard. After successfully downloading, you will fall into the Live mode with the console, where the further installation procedure is performed.
Step 5: Hard Disc Markup
Hard disk marking - the first one will encounter the user when installing the platform under consideration. To work correctly, all disk space should be divided into several logical volumes, each of which will be stored its information, the storage parameters are also set manually. In general, the process is simple, you only need to perform several teams and carefully monitor their writing in the console.
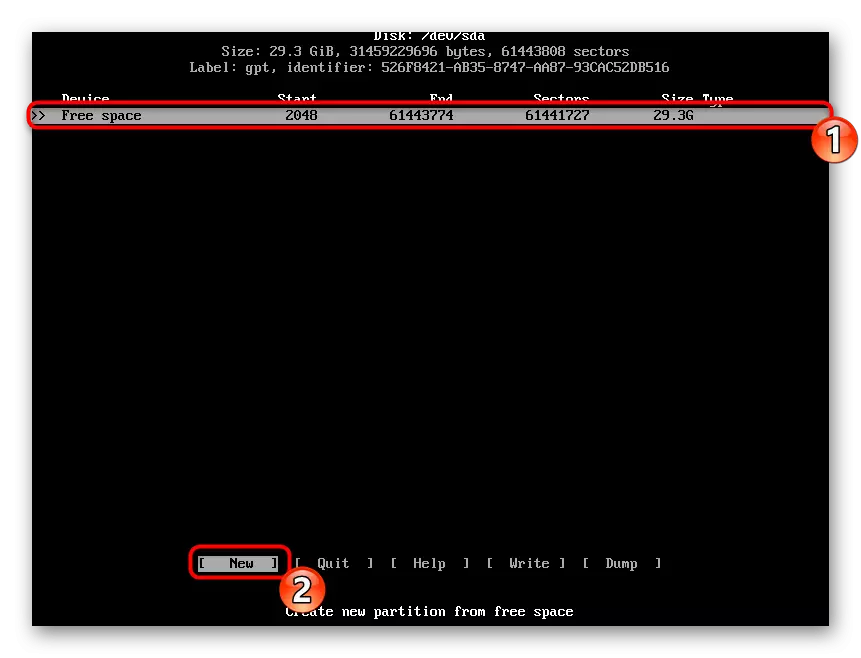
- The storage markup is best done through the standard utility, and to start it in the Terminal, you need to enter CFDisk / Dev / SDA.
- The partition table is primarily selected. A newer is considered GPT, so it is better to use it if you can not independently decide on the choice.
- Arrows on the keyboard move between connected devices. Select a markup drive and activate the "New" item by going to it using the left and right arrows.
- First, the place is separated for the GRUB loader. It provides the correct launch of the operating system. It is always recommended to allocate a separate section under it. You only need to set the volume volume and click on ENTER. The loader is quite enough 200 MB.
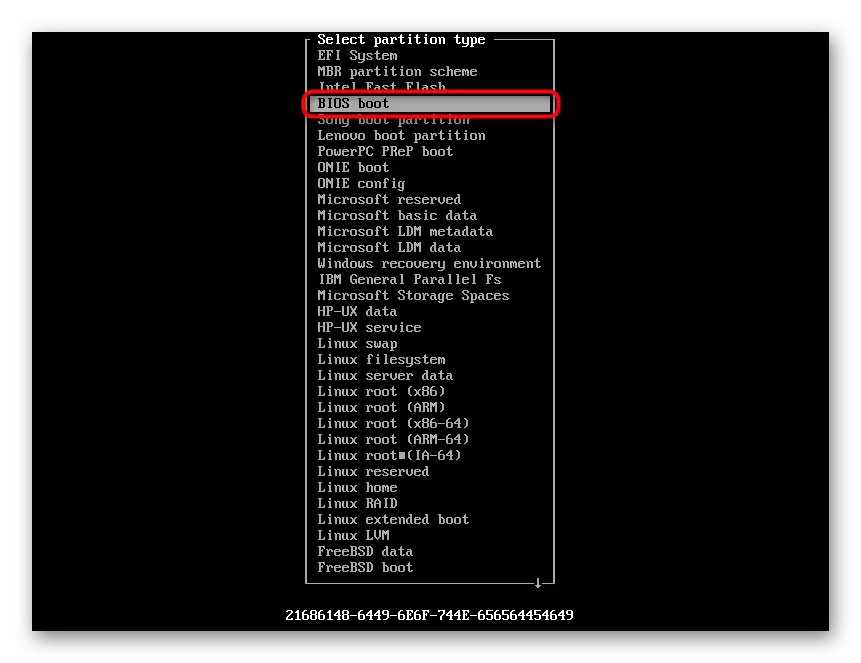
- If you have selected the GPT partition table, and not the MBR, it is additionally created a logical partition for storing the loader image. Select «FREE SPACE» and "NEW" again.
- The image of the loader is worth separating 1 megabytes of free space.
- Now set this section a specific type so that it is loaded from it when the computer starts. To do this, select "/ DeV / SDA2" in the table and go to the "Type" menu.
- Rock up the keyboard arrows to the Bios Boot and click on ENTER.
- Additionally, the root section is created where all system files will be placed. Again in the table, perform already familiar actions, indicating the size of 20-30 GB.
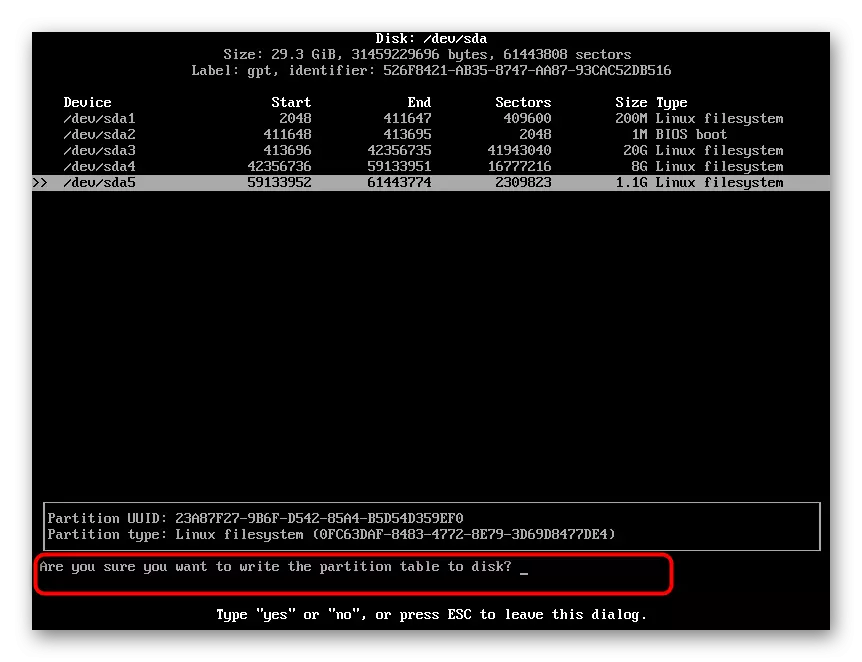
- Next, create a partition that will perform the role of a home directory. Take to it almost all available location, leaving a few gigabytes for the paging file (recommended volume of the paging file in Arch is equal to the number of RAM in the PC). Finally, after the home directory, create a paging file, and in the end you should have five sections. When the procedure is completed, save the changes by selecting the "write" option.
- Confirm the entry by writing in the "Yes" line.
- After all, you can exit the editor of the sections through clicking on "Quit"


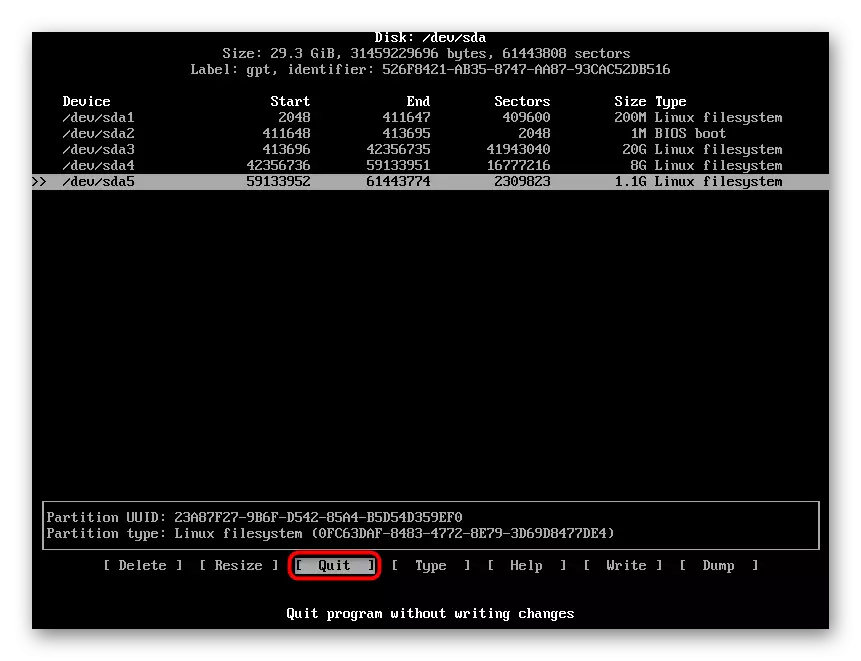
Upon completion of this step, the hard disk will be divided into the required number of sections. The user will only remain configured by setting the file system and priorities, after which everything will be ready to install.
Step 6: Formatting and Mounting Storage Partitions
Now all created sections do not belong to certain file systems and formatting should be made to install them. Due to the fact that all volumes were created manually, formatting and mothing should also be carried out independently.
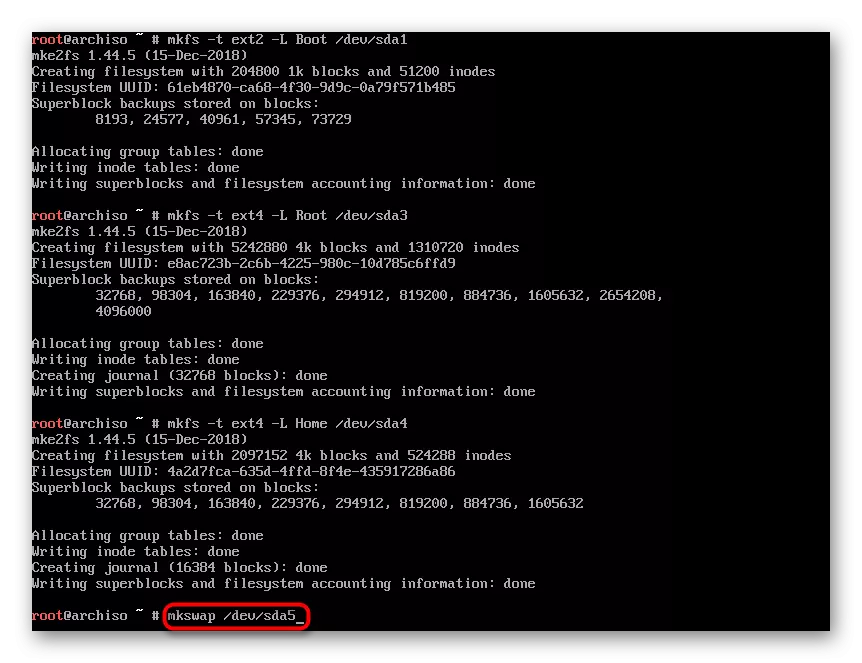
- The loader section is better to determine the format of FS "EXT2" to ensure the best work. Therefore, in the console, activate the MKFS -T EXT2 -L BOOT / DEV / SDA1 command, where / dev / sda1 is the name of the first created partition.
- The second section of the initial image does not need to be formatted, so we turn to the main system directory and format it in a familiar "EXT4" format MKFS -T EXT4 -L root / dev / sda3.
- Exactly the same action is required to perform with a home directory, scoring the expression MKFS -T EXT4 -L HOME / DEV / SDA4.
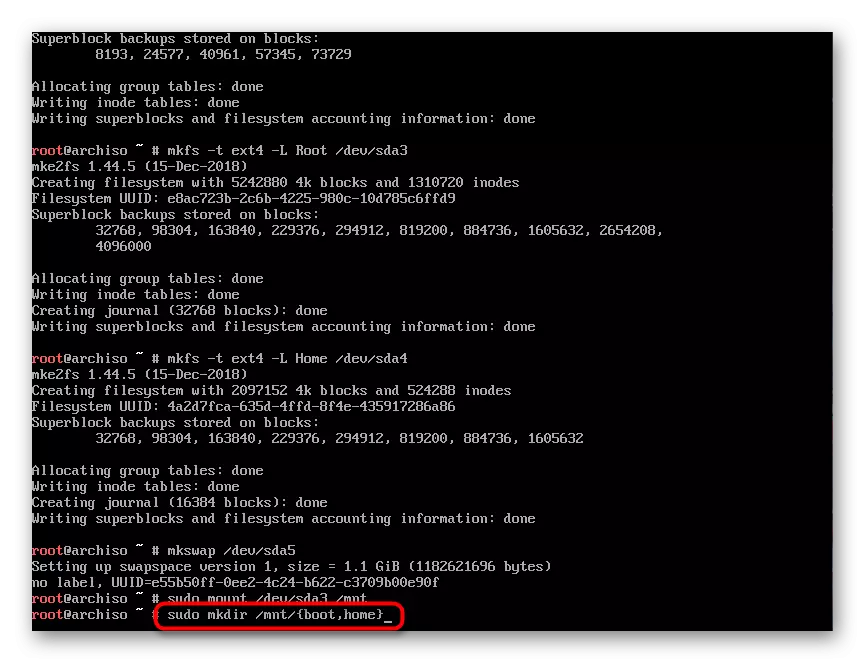
- The paging file is also not formatted, so immediately mount it via MKSWAP / DEV / SDA5.
- Connecting created sections is also performed manually, only after that they will be suitable for work. You should start with the root catalog Sudo Mount / Dev / SDA3 / MNT.
- Next, create separate folders for the bootloader and the home directory via Sudo MKDIR / MNT / {BOOT, HOME}.
- It remains only to mount the remaining partitions sequentially input Rows Mount / Dev / SDA1 / MNT / BOOT, MOUNT / DEV / SDA4 / MNT / HOME and re-swapon / dev / sda5.


All sections were successfully prepared for further installation on them ARCH. If everything went without any errors, feel free to go to the next step.
Step 7: System Installation
As already mentioned earlier, an active Internet connection will be required for the full installation of the Arch, since additional components are loaded from official storage. If the wired connection is set immediately, then for Wi-Fi you must alternate such commands:
WiFi-Menu.
LS / ETC / NetTl
NetTl Start Profile
By defining the connection, you can go to the installation, but first we recommend choosing the most optimal mirror so that the boot process passed as quickly as possible:
- Run the file with mirrors via the vim /etc/pacman.d/mirrorlist command.
- Copy one of the mirrors by double pressing the Y key, and then transfer it up the list by inserting the P key. Exit from the file is carried out by pressing SHIFT +: and input WQ.
- Run the package installation procedure by entering the PACSTRAP / MNT Base Base-Devel.
- Expect the installation completion. During this operation, do not restart the computer and do not press any keys on the keyboard.


Adding packets will be completed when a new input row appears in the console. This means that you can start the initial system setting.
Step 8: Setup after installation
It is important not only to add all the necessary components, but also to configure the main parameters so that the interaction with the OS is as comfortable as possible. Pay attention to the following actions, they are just intended for optimal configuration:
- A configuration file for all mounted file systems is prior to the system folder. It will not only store useful information, but also describe the type of disk integration in the OS. To create a component, use the GenfStab -u / MNT >> / MNT / ETC / FSTAB command.
- The loader is not ready yet, so it is impossible to reboot. To perform further configuration, log in via Arch-Chroot / MNT.
- Set the time zone through the Sudo Timedatectl Set-Timezone Europe / Kiev, where Europe / Kiev is the desired region. Use the following command to use Sudo Timedatectl Set-NTP 1 to set the network time protocol.
- Previously, you already encountered work in the VIM text editor before installing Arch Linux, but now this important component is missing in the system itself. You can install it by the Pacman -S Vim or Pacman -sy Vim command.
- Confirm the addition of packages by selecting the appropriate option when the query appears.
- After that, activation of the encodings with which the OS will work. It is necessary for the correct display of various symbols of Cyrillic and Latin. Run the appropriate configuration file: vim /etc/locale.gen.
- Remove the sign # with suitable lines, for example, with en_us.utf-8 and ru_ru.utf-8. Save the changes and exit the editor.
- It will be needed to update the completed configuration by entering Locale-Gen.
- Now switch the operating system language into Russian for the convenience of further management: ECHO "LANG = RU_RU.UTF-8"> /etc/locale.conf.
- Set the computer name that you need when contacting it. Use the ECHO "User-PC"> / etc / hostname command, where the user-PC is the device name.
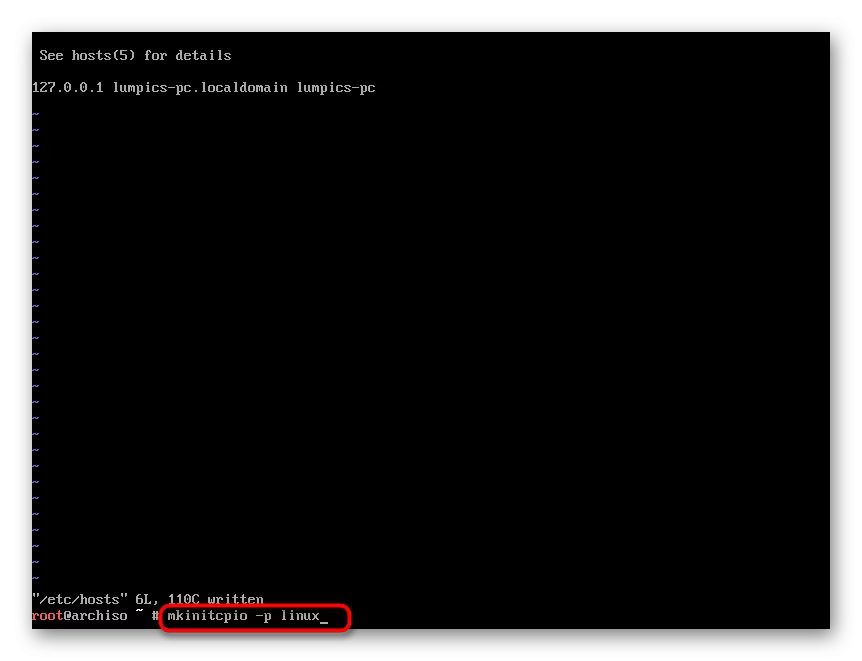
- It remains only to confirm the user by adding it to the configuration file. First start it with Vim / etc / hosts.
- Enter the string 127.0.0.1 User-PC.Localdomain User-PC, record and close the editor.
- Some processors require an image of early downloads for the correct startup of the OS. If you are not sure if it is needed, just install the image via Mkinitcpio -p Linux.
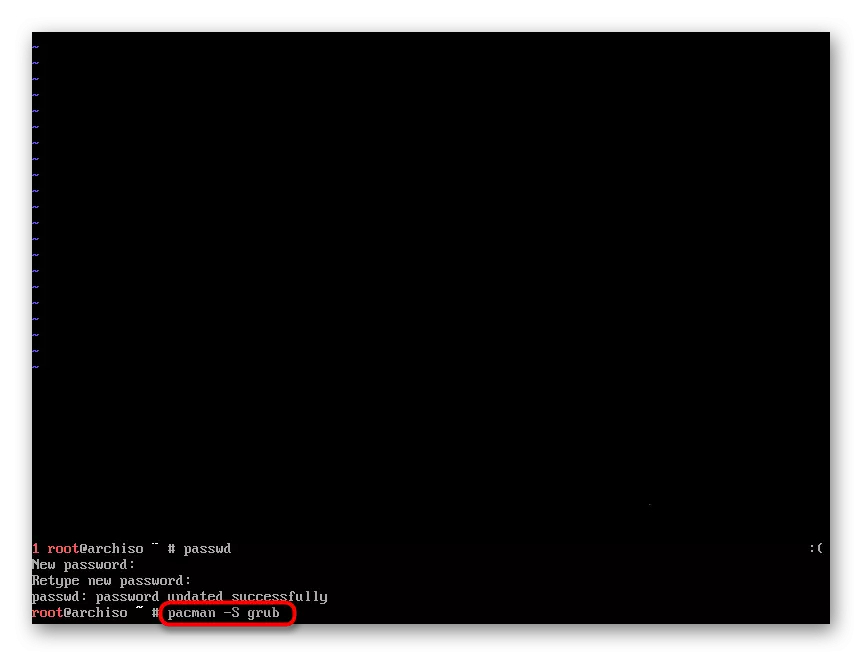
- Set the password for root access via the passwd command.
- It remains only to install the GRUB bootloader and configure the Internet. It is installed in a standard manner - PACMAN -S GRUB.
- After completion, the GRUB-Install / DeV / SDA disk is added to the GRUB-Install / Dev / SDA disk and a separate GRUB-MKConfig -O /Boot/Grub/Grub.cfg configuration file is created.
- Setting up the Internet network is also carried out before rebooting the system. Pay attention to the following commands and follow them alternately:
LS / SYS / CLASS / NET / (Definition of Active Network Interface).
CP / ETC / NETCTL / ETC / Ethernet-DHCP / ETC / NetTl / Ethernet-DHCP (Copy Configuration File).
VIM / etc / netctl / Ethernet-DHCP (launch a configuration file through a text editor).
- In the configuration file, change the value of Interface to the one you learned earlier through the LS command.
- Activate the default selected profile: NetTL Enable Ethernet-DHCP.
- Exit EXIT environments, then unmount all file systems via Umount -R / MNT and restart Arch Linux by printing reboot.


On this procedure, the complete configuration of the operating system is completed. It remains only to wait for the reboot and you can proceed to work.
Step 9: Using Arch Linux
Typically, the Arch Linux distribution is interested in those users who have already had earlier experience with other simpler assemblies on this core. However, this does not cancel the fact that novice users also come to this platform. They need to be prepared for the fact that most of the actions and settings are carried out through the standard console. You can get acquainted with the implementation of basic functions in our articles on the following links.
See also:
Formatting flash drive in Linux
Installing Adobe Flash Player in Linux
Unpacking TAR.GZ format archives in Linux
Installing Drivers for NVIDIA Video Card in Linux
In addition, today you are faced with a number of popular teams that will have to use frequently in the Terminal. We suggest carefully examine each of them and try to remember the use, syntax and correctness of the input. This will also help detailed materials.
See also:
Frequently used commands in "Terminal" Linux
LN / FIND / LS / GREP in Linux
On this, our article is completed. We hope you easily mastered the entire installation procedure and no difficulties have arisen during its execution. For more information on work in this platform, refer to the official documentation developed by the creators of the system.
General Recommendations Arch Linux