
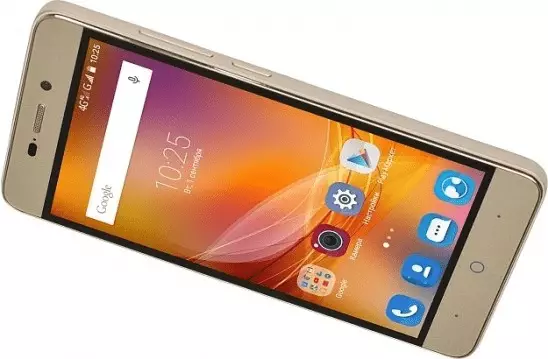
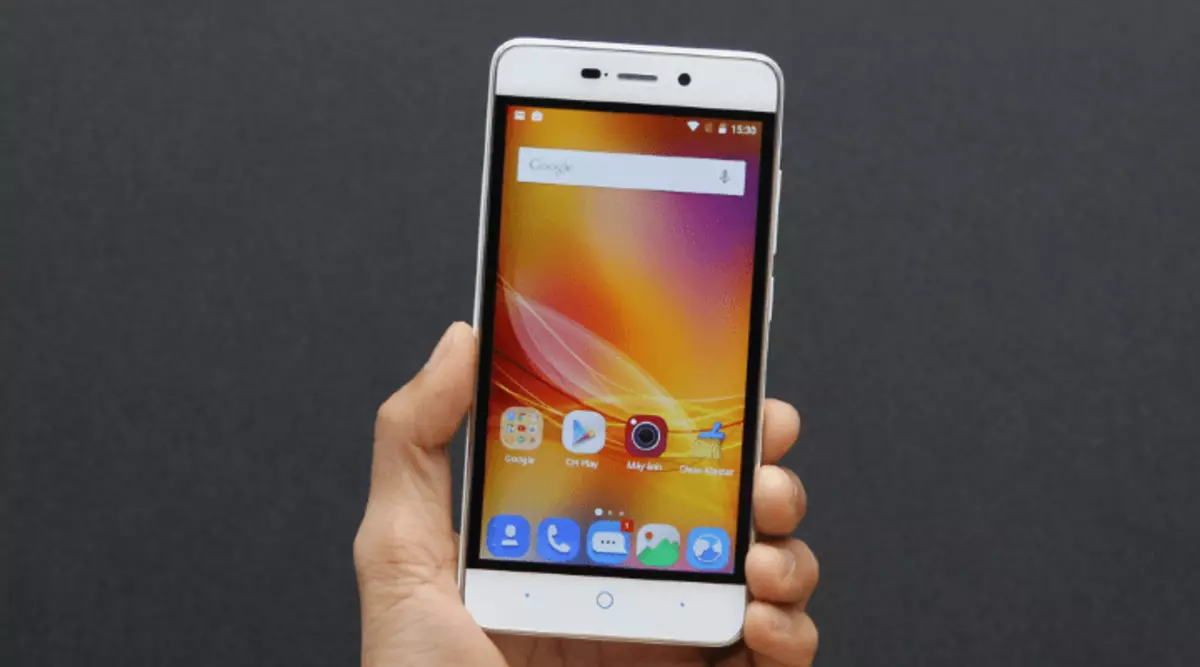
Service, and in some cases, the complete reinstalling Android is the need to face almost all users of smartphones operating under the control of this mobile OS and operated for several years. The next article is devoted to the firmware of the ZTE Blade X3 (T620) apparatus. The means and receivers considered in the material make it possible to update the version of the official operating system of the model, restore the performance of systemic software in critical situations, and correctly go to the custom.
Despite the fame and wide use of Android tools described below, all operations involving interference in the software part of the apparatus are initiated by its owner at its discretion and at their own risk! Administration Lumpics.ru and the author of the material are not responsible for the possible negative consequences of the application of instructions!
Preparatory and associated procedure firmware
In order for manipulations with system software for android devices to be implemented and the positive result has been achieved, a certain preparation is required. The following actions are designed to ensure the relative security of the OS reinstallation on the device, the safety of user information, as well as largely predetermine the success of the entire firmware process.
Drivers
The first action that the owner of Blade X3 should be taken to reinstall the Android OS on his phone, is the installation on the PC of the drivers that ensure the interaction of specialized software and a mobile device translated into one of the special modes of operation.
If in the process of phone and PC interaction and the PC will arise the problems associated with the drivers, set the components manually from the package downloaded by reference:
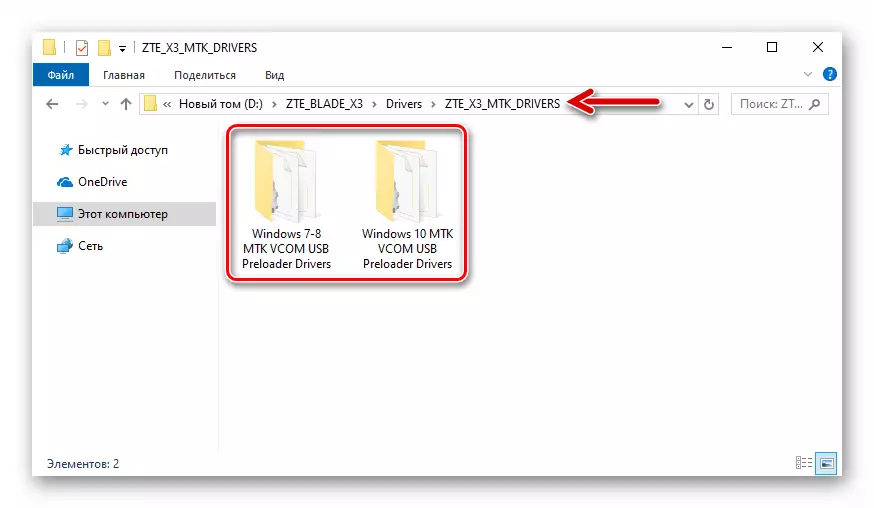
Download Drivers for the ZTE Blade X3 Phone Firmware (Manual Installation)
Launch modes Device
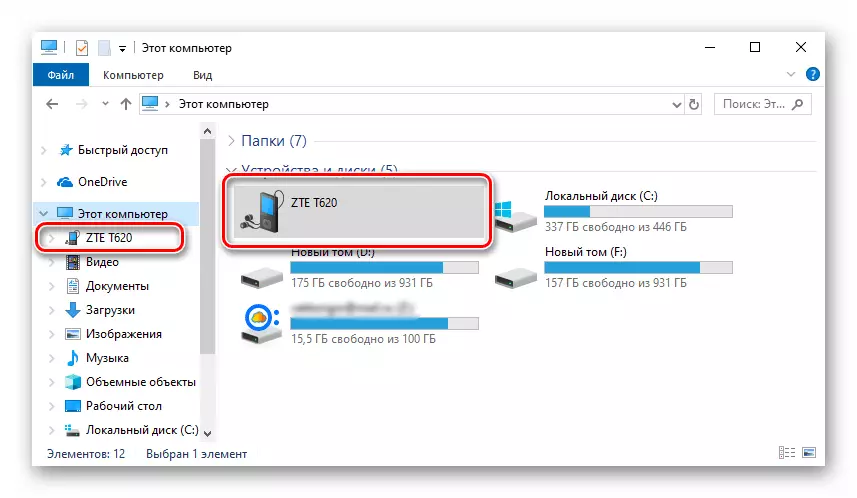
To make sure that the drivers installed to the driver are installed, you must translate the mobile device to the service mode of operation and connect it to the PC, watching the "Device Manager (DU)" window. Among other things, knowledge of how to translate the device to the following specific states will be required to successfully implement the reinstalling of the mobile OS methods from this article.
- MTK Preloader is the most effective mode for working with system software on Android devices operating on the MediaTek hardware platform. This state is automatically activated by short time each time the Blade X3 is turned on, and in the case of a "pickup", the specialized software allows you to write data to any section of the device's memory and restore performance according to even if the mobile operating system is seriously damaged.
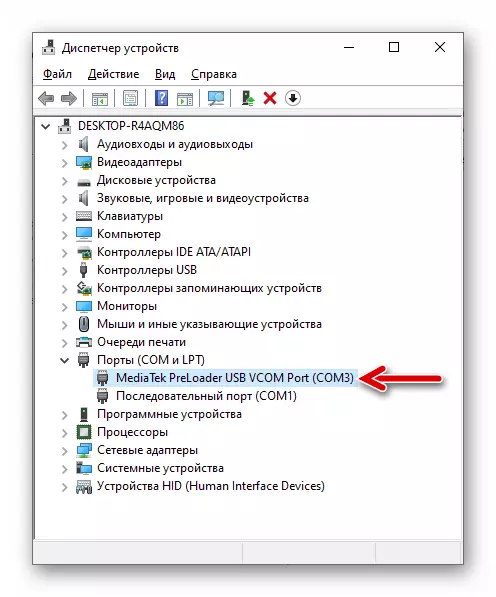
Fully turn off the smartphone and connect it to the PC. In the list of devices displayed by the "Du" among the "COM and LPT ports", two to three seconds will appear, and then disappear "MediaTek Preloader USB Vcom Port".
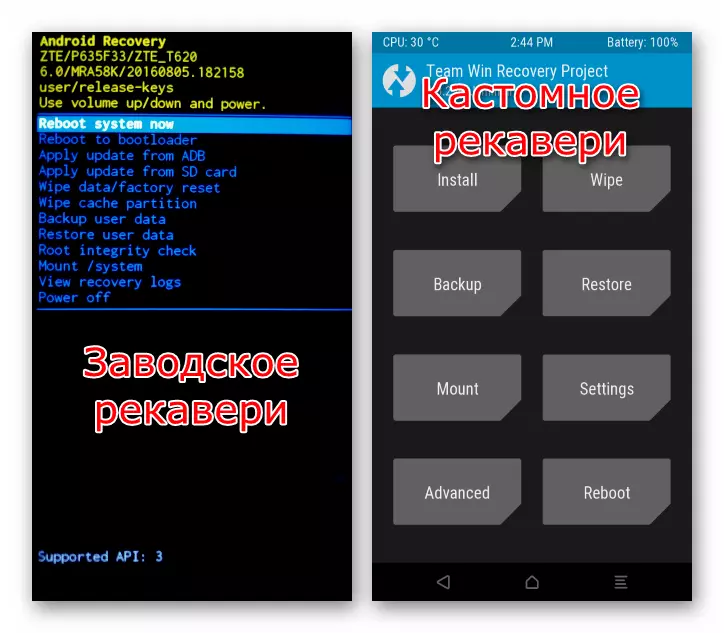
- Recovery environment ("Recovery"), integrated in the Blade X3 in production, can be used to reset the parameters of the system according to the model and installation / update of the official firmware. If the smartphone is equipped with a modified medium (described below in the article), you can get much more features. And "native", and custom recovery are called as:
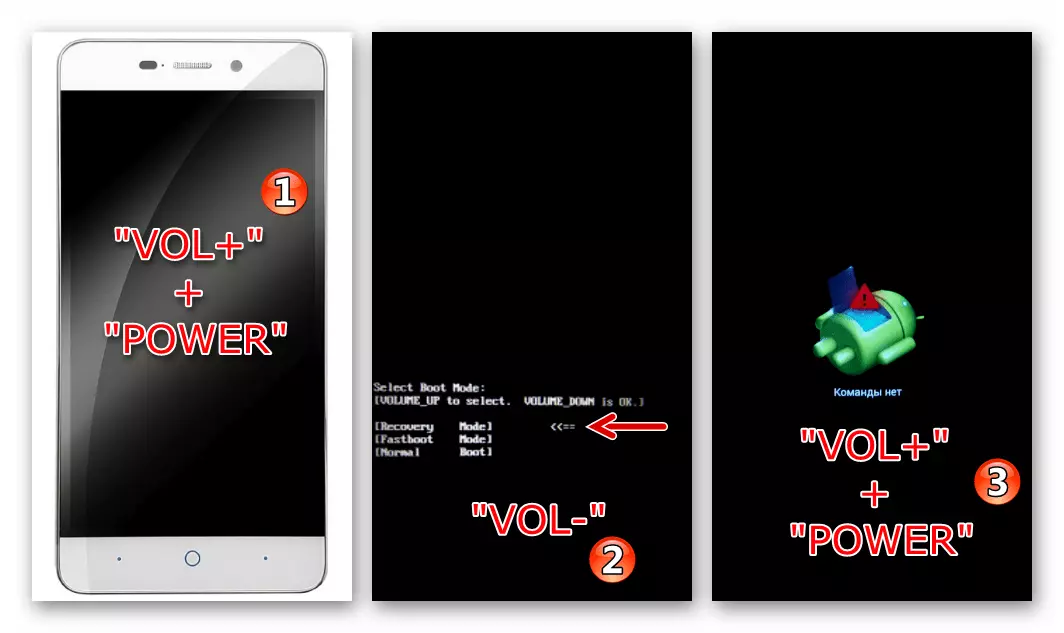
- Turn off the phone. Click simultaneously "Volume +" and "Power" and keep the buttons before displaying the menu of the menu from three points on the Device screen. With the help of an increase in the volume key, we move the arrow, install it opposite "[Recovery Mode]" and then press the "volume".
- When the "broken android" and the inscriptions "Commands do not" appear on the screen, press the "Volume +" and "Power" on the screen, which will lead to the transition to the main menu of the medium.
- Connecting a smartphone computer translated into the recovery environment, it makes sense only in the case of using custom recovery - thus the ability to copy various packages to the device, without loading in Android.

Data backup
One of the main rules to follow users who have decided to carry out the phone firmware on android requires the implementation of backup all important information for any possibility.
Read more: Backing up information from Android devices before firmware
Before interfering with system software, copy all user data to a reliable storage place (in Google account, to a PC disc or device memory card, cloud storage, etc.) it is necessary - the use of almost any way of flashing ZTE Blade X3 implies removal All data from the memory of the device. Accordingly, contacts, photos, music, video and other later will need to restore.
How to flash zte blade x3
When choosing a flashing method from the following in the article, it should be guided by the current state of the system on the device (it works normally or not loaded, the device "does not submit signs of life", etc.); The desired result, that is, the type (official or custom) Android, which will be installed and will eventually manage the work of the smartphone. It is recommended to explore all the instructions from start to the end, to estimate their use in one situation or another, and only then begin the manipulations implying interference in the system for BLAYD X3.
Method 1: Official
In the official system software of the smartphone under consideration, there are modules that the user can use for the purpose of maintenance (most often - updates) Android. The first tools below are effective if the phone works in general normally, but the OS assembly on it needs to be updated or reinstalled, and the second may become an effective solution to the task of restoring the system launch, the crash.
Effective use of any of the official means to flash the device will require the presence of a ZIP-package with OS components. You can download the required link:
Download the official firmware Android 6 of the ZTE Blade X3 smartphone for installation without a PC
Update from memory card
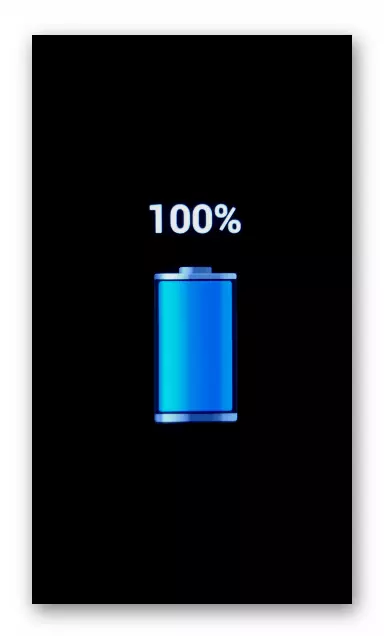
- We charge the device's battery, preferably completely, but not less than 50%.
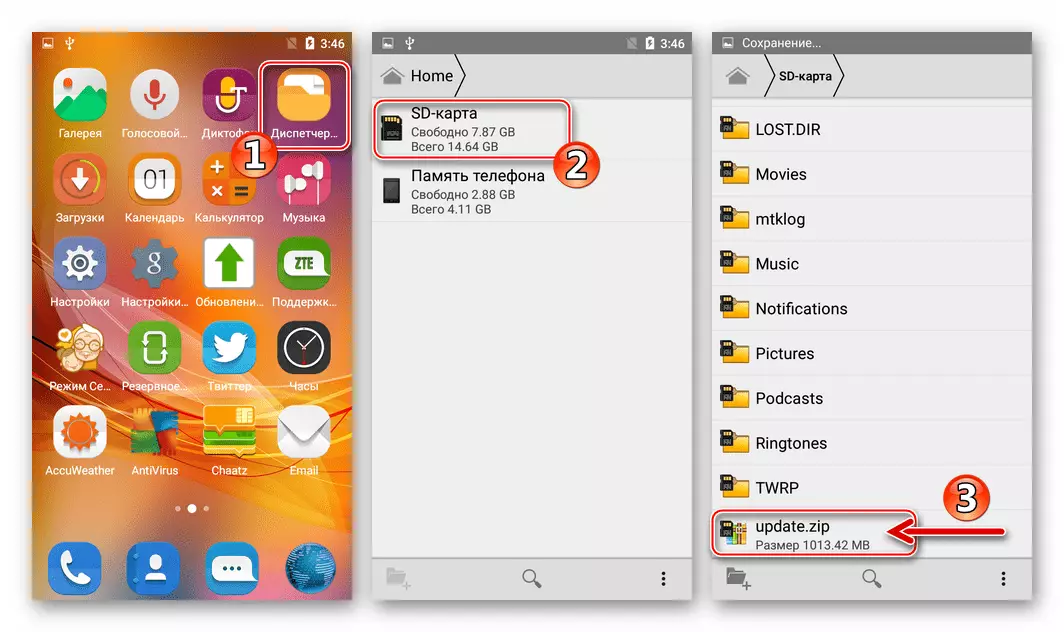
- Download the firmware and put it, without renaming and without unpacking, on the removable smartphone drive (in the root directory).
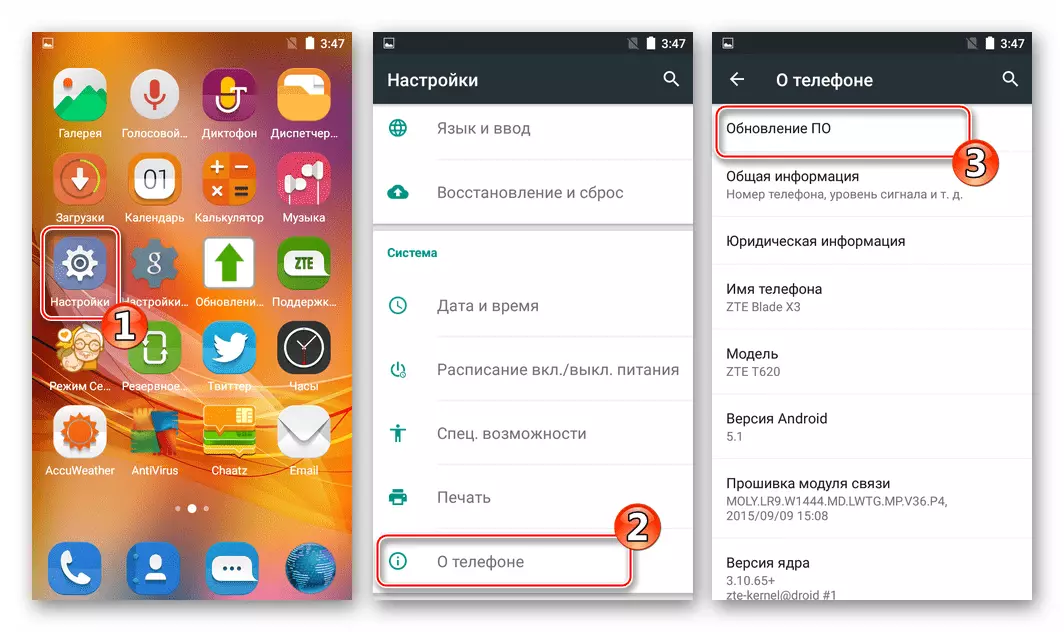
- Go to the Android environment along the path: "Settings" - "On the phone" - "Update by".
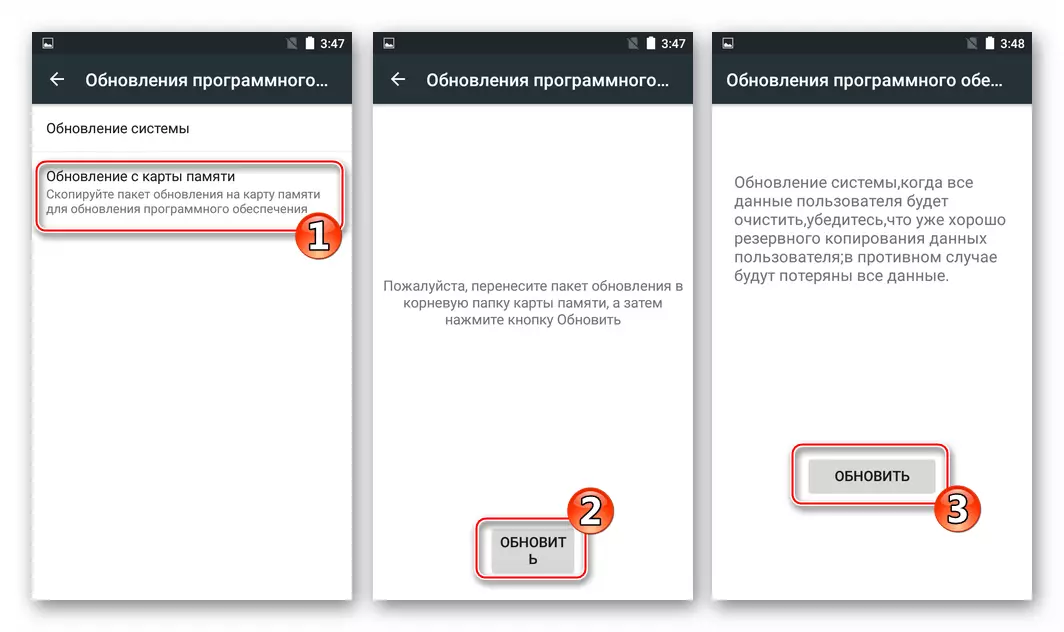
- We go into the "Update from the Memory Card" section, Tabay "Update" twice on the following screens.
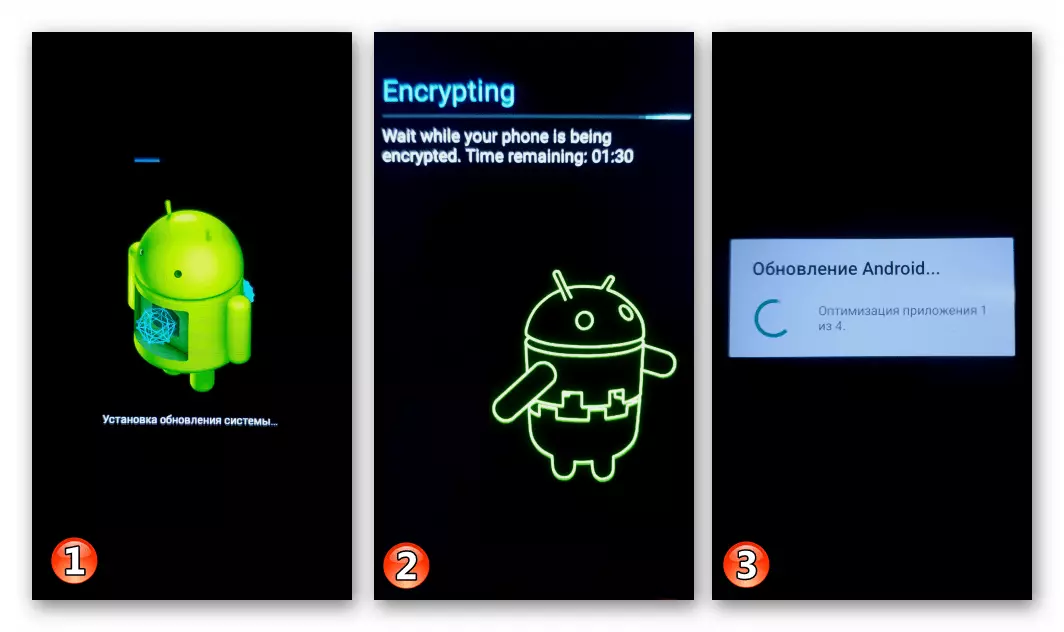
- Next, the actualization / reinstallation of the firmware does not require user intervention. We expect to complete the deployment of the Android component package in the device's memory, without taking anything.
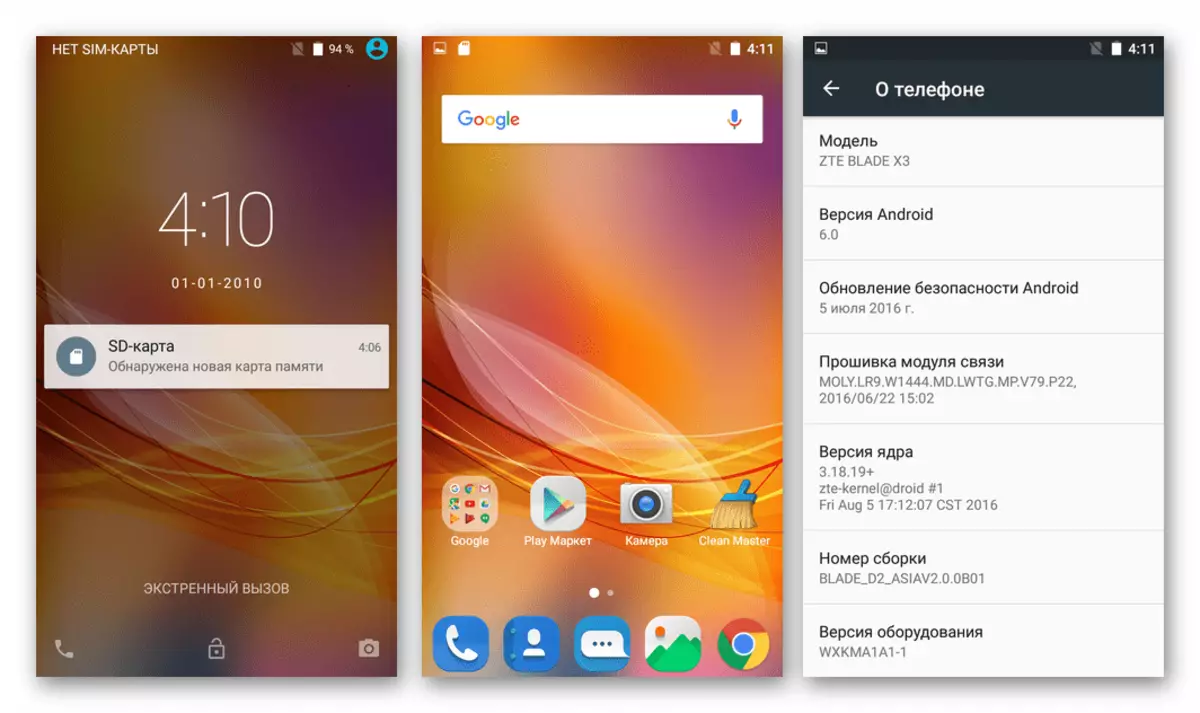
- As a result, the execution of the above steps will automatically launch the official OS of the latter from the version created for the machine.
Recovery environment
- As in the case of the use of the Android application "Updates", the first step required for the successful flashing of ZTE Blade X3 through the factory recovery is charging the device's battery. Next, download the "update.zip" package and put it on the phone's memory card. If the mobile OS does not start, the copying is made using a PC card or another smartphone.
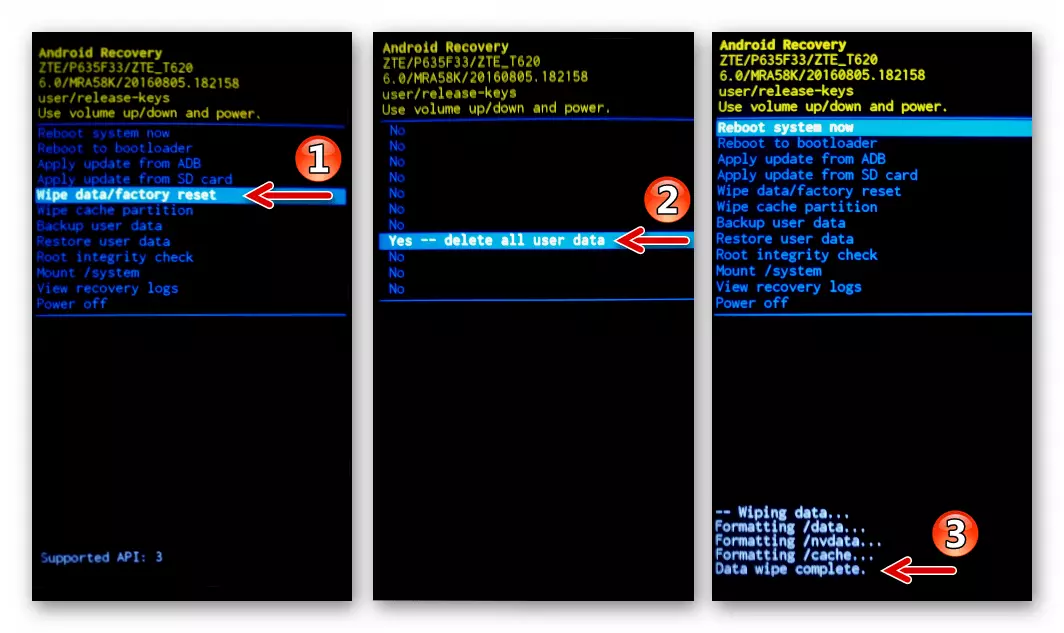
- We load into the recovery, perform the return of Android settings for factory and cleaning the device's memory, as described in the first part of this article.
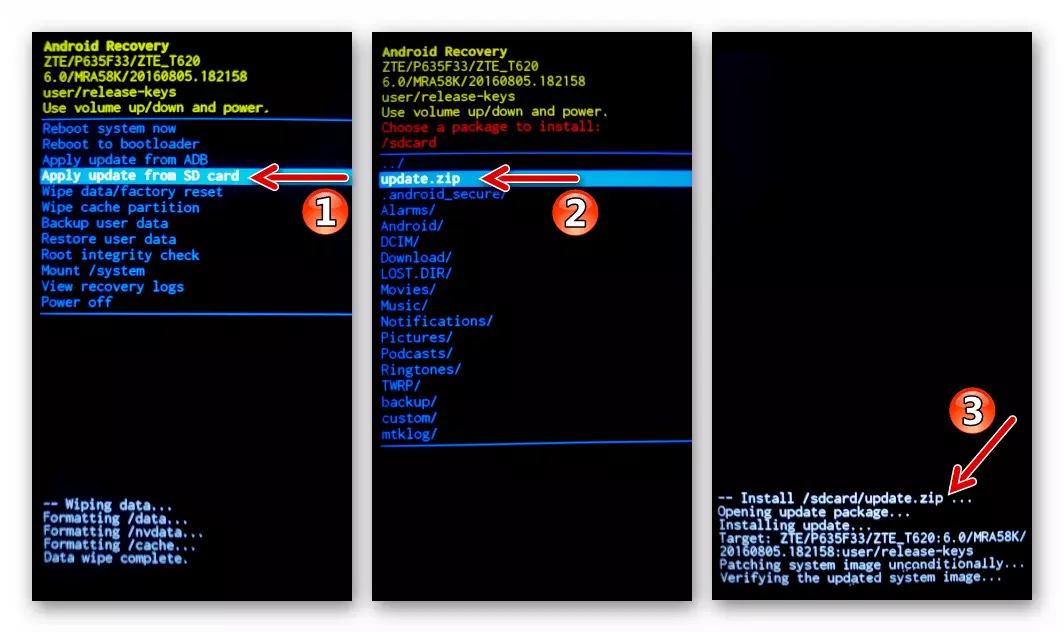
- Go to "Apply Update From SD Card", move the allocation to the "Update.zip" package and press "Power". We expect without making any actions until the archive with the OC components will be opened, verified and deployed in the device's memory.
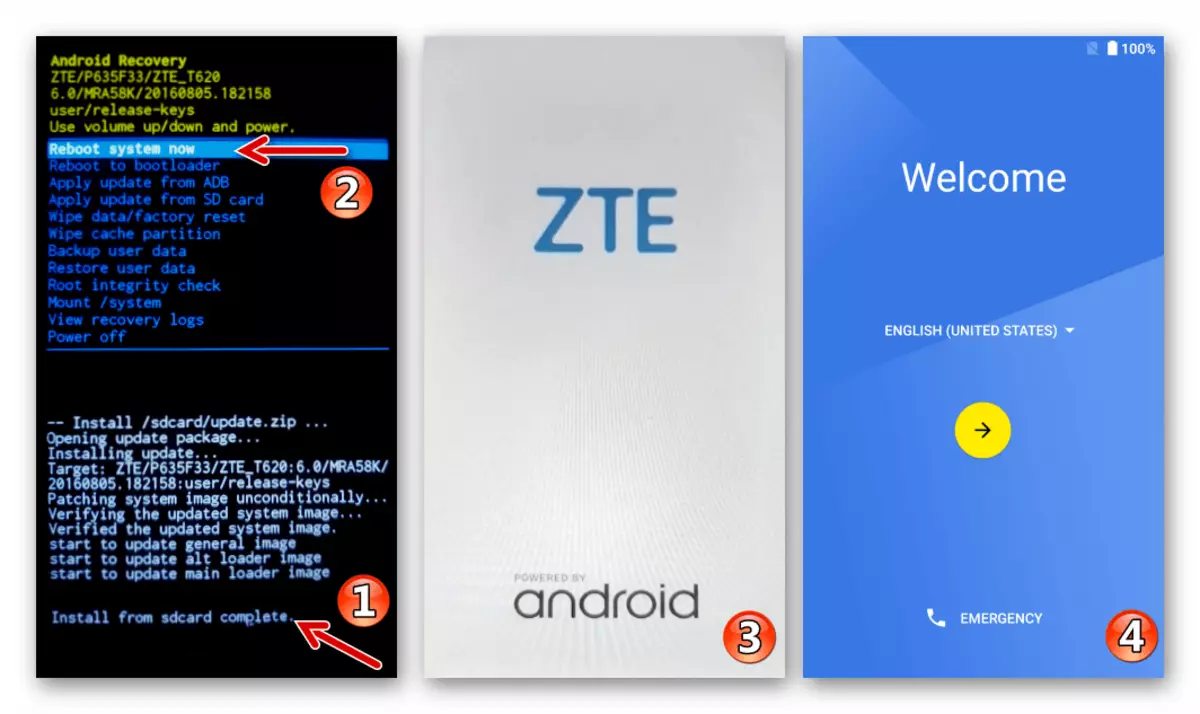
- After conducting all the necessary manipulations, the system will notify us about their successful completion by the message "Install From Sdcard Complete." At the bottom of the screen. Select in the list of functions of the Reboot System Now recovery environment. Next, we look forward to running reset and updated OS.
- It remains to specify the values of the basic parameters android
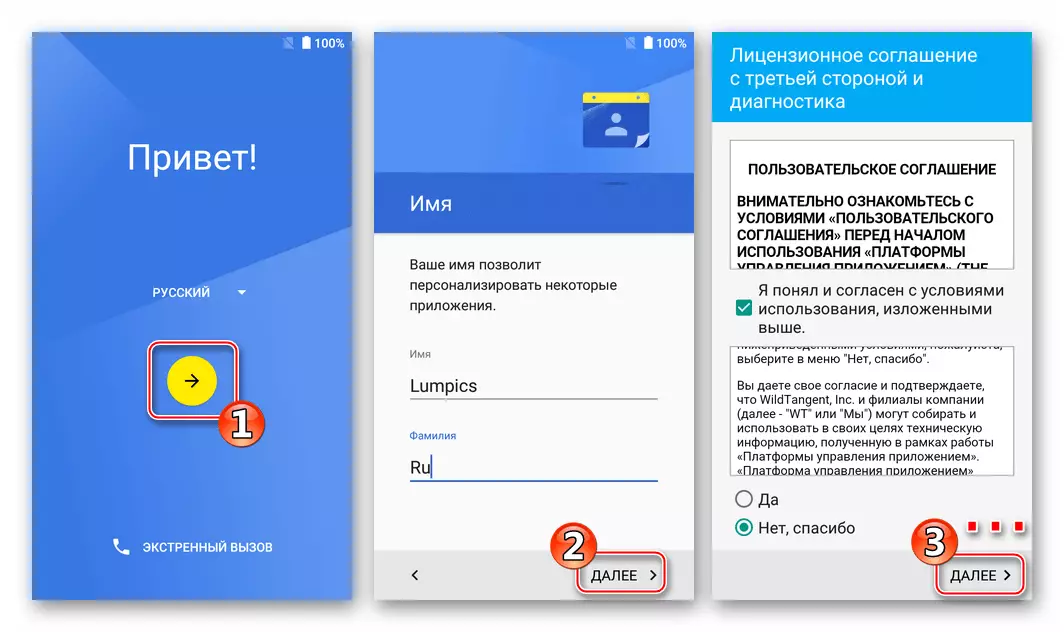
And you can go to the operating phone.
Method 2: SP Flash Tool
The most effective tool for the implementation of almost all possible manipulations with system software according to the BLADE X3 model from ZTE is software. Sp Flash Tool developed by the creator of the processor of the device - MEDIATEK. Using the program, it is possible to carry out the usual flashing, as well as derive the device from the "surpinated" state, then the corresponding instructions are presented.
We prepare a tool to work by connecting the archive with its components to a separate directory on the PC disk.
"Standard" flashing
In most cases, using a flush tool to reinstall the official android on the device model under consideration with whatever purpose, quite accurately and carefully perform the following instructions.
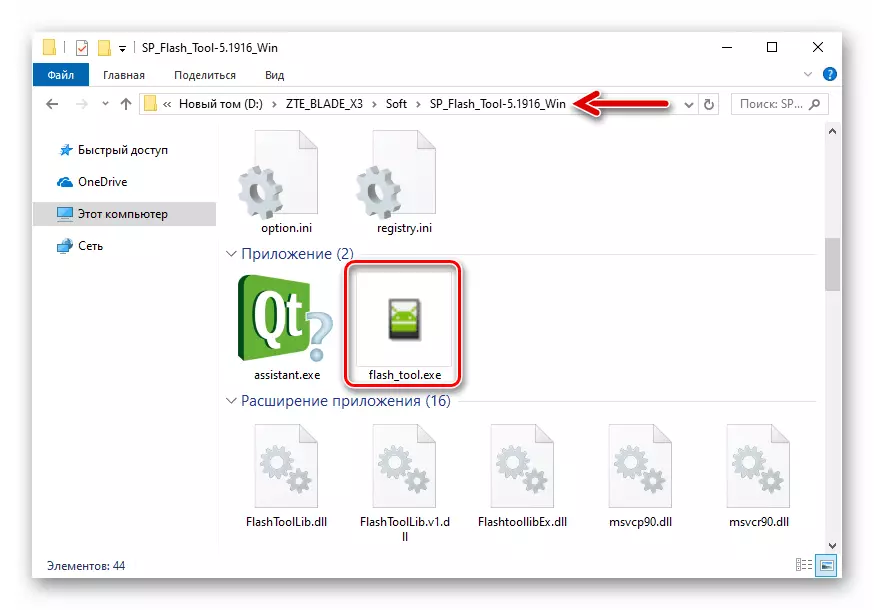
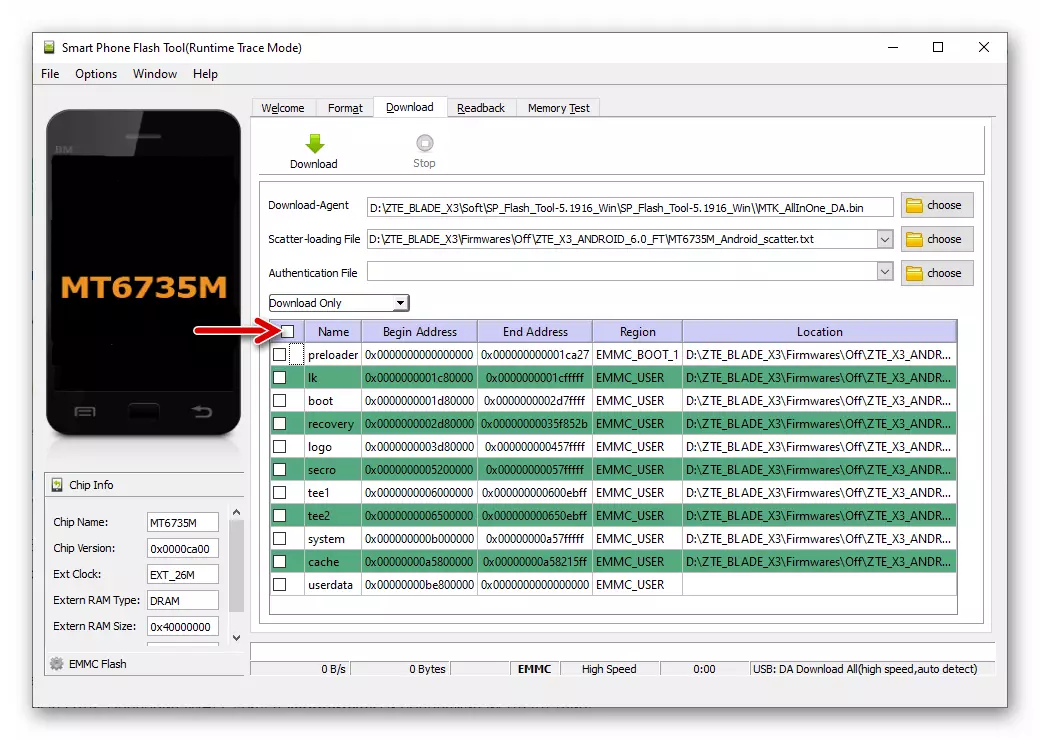
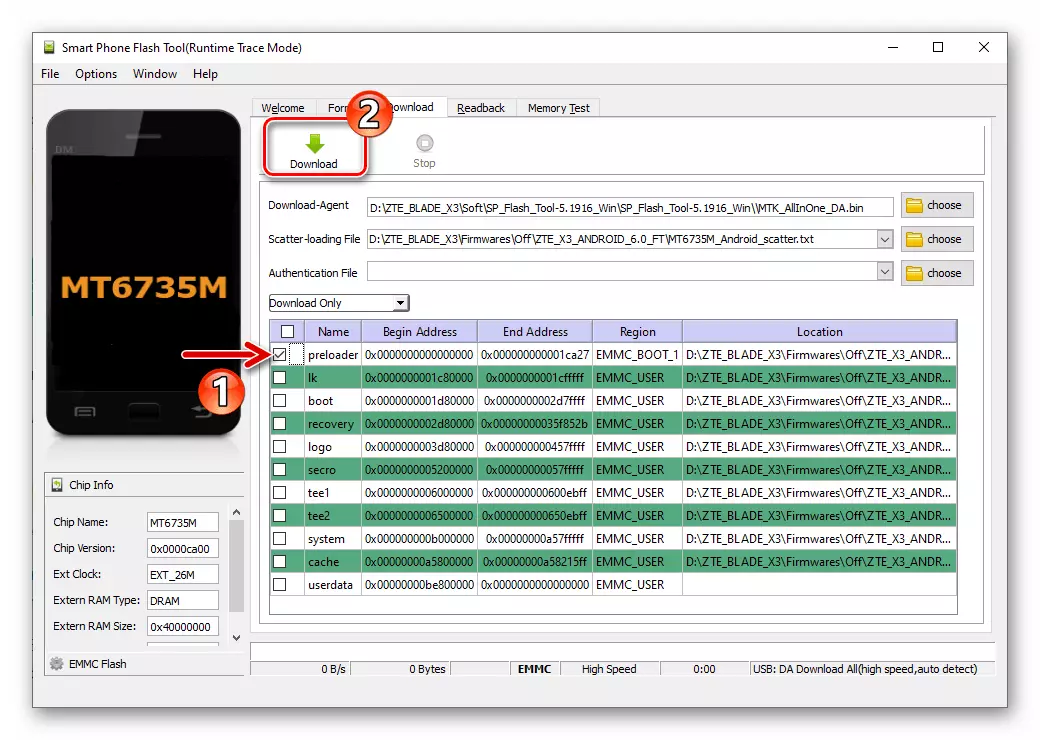
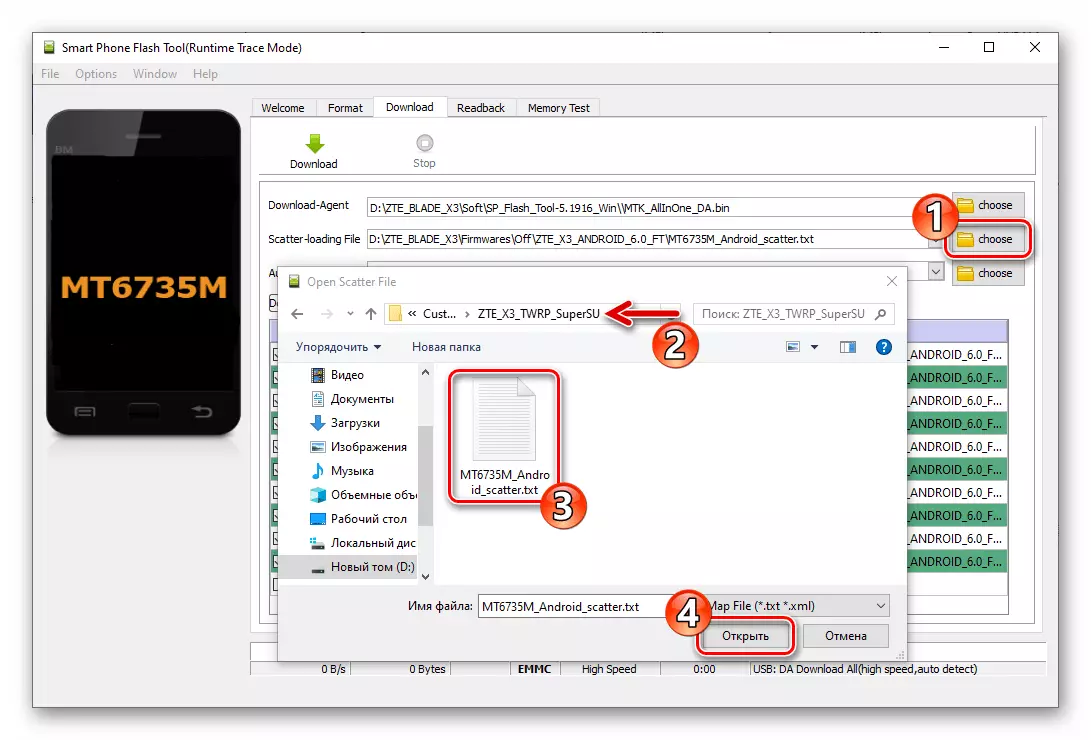
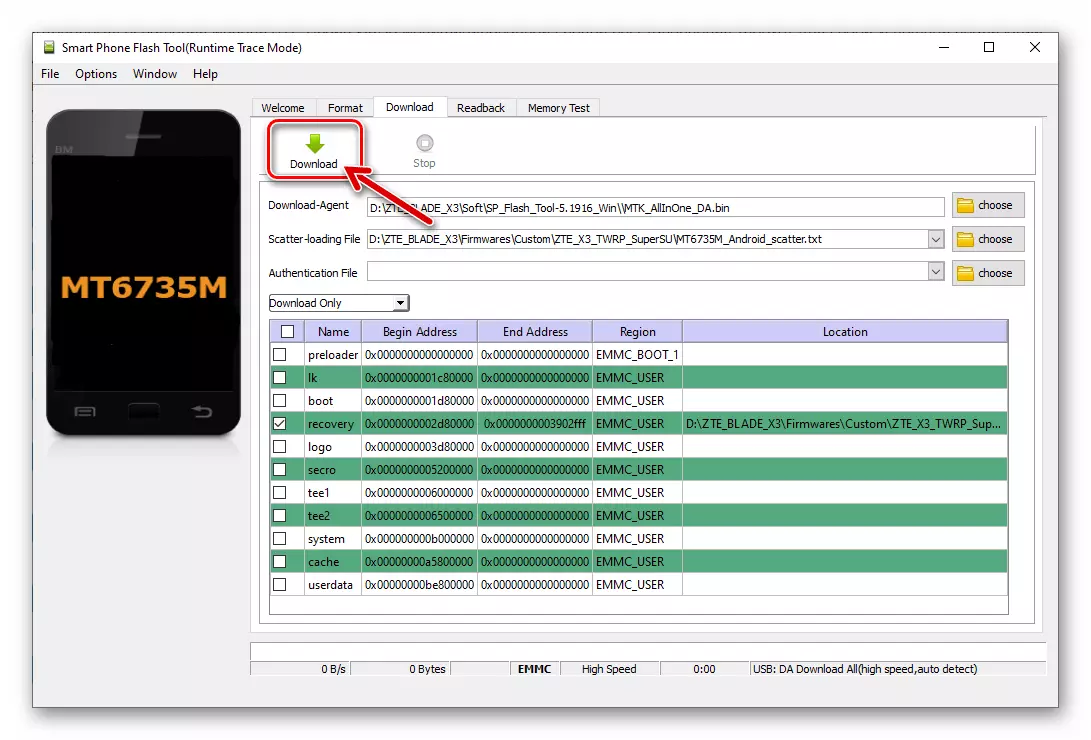
- Open the flash driver and add to it the MT6735M_Android_scatter.txt blocks from the folder with the formal assembly images of the mobile operating system.
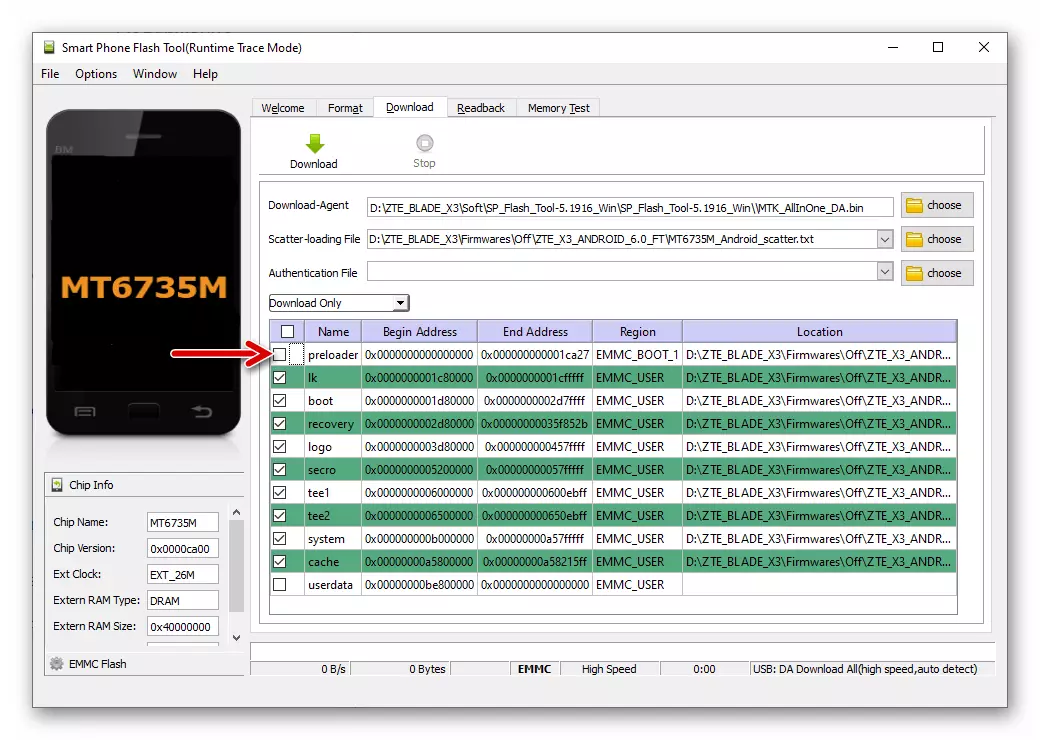
- NECESSARILY! We remove the mark from Chekbox "Preloader".
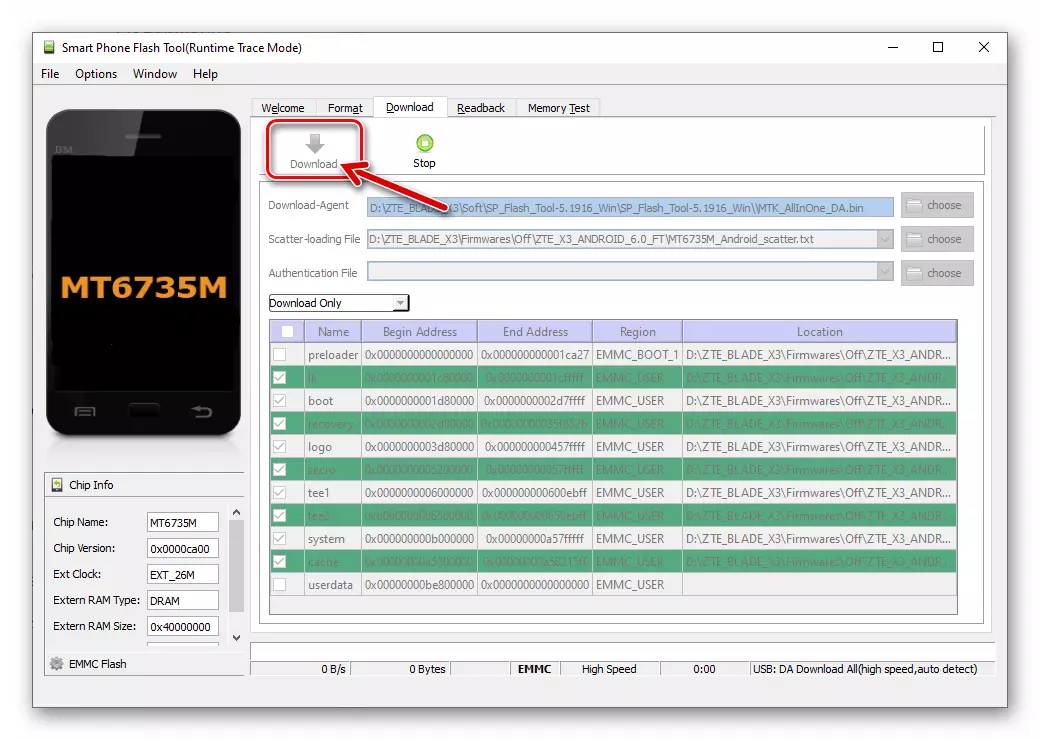
- Turn off the phone completely, we prepare the Micro-USB cable, conjugate with the PC port. In the Flash Tool window, click the "Download" button - the application will switch to the waiting state of the mobile device.
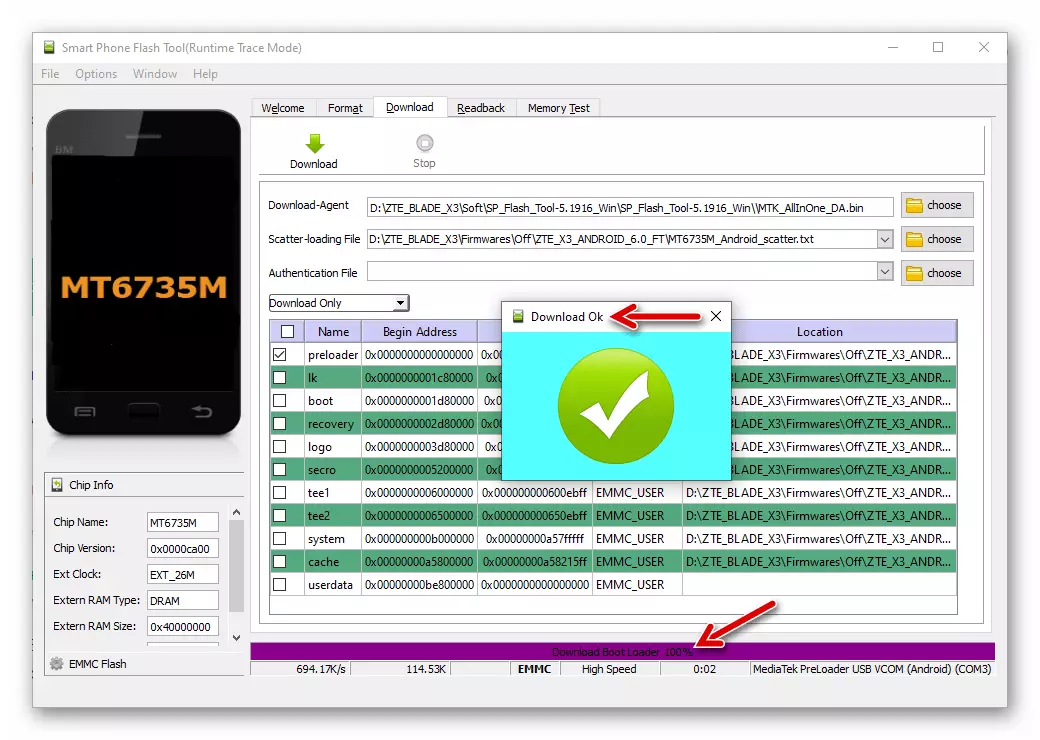
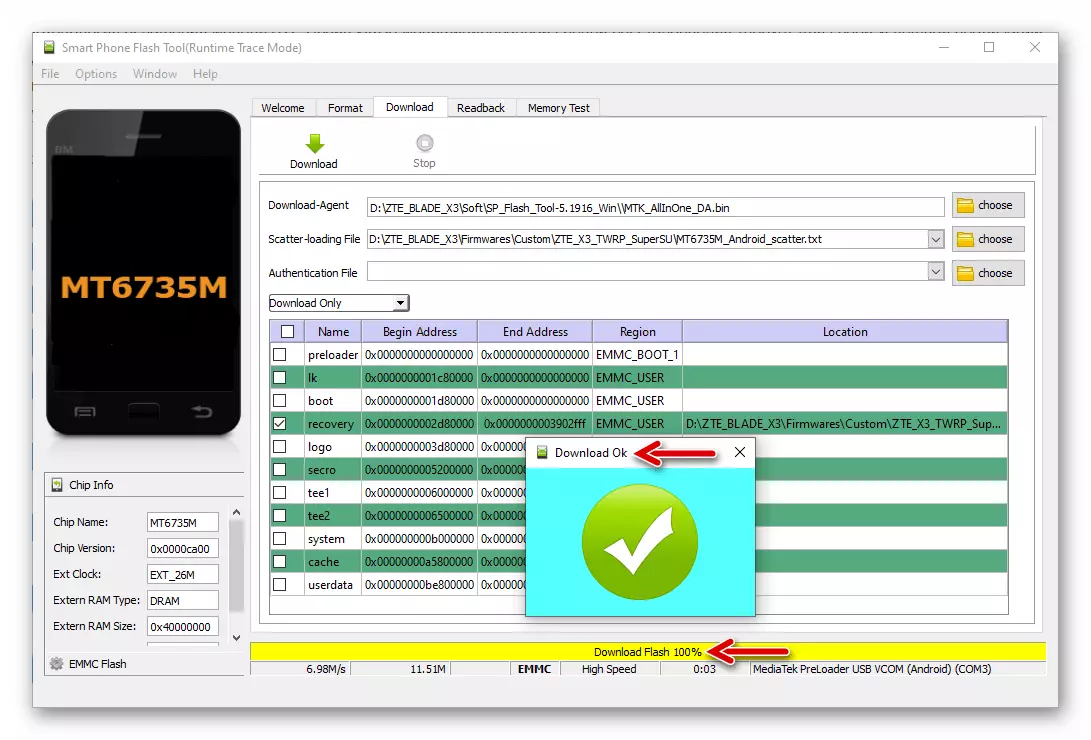
- Connect the shut off your smartphone to the computer - as soon as the first is defined in Windows, the flashing process will automatically begin.
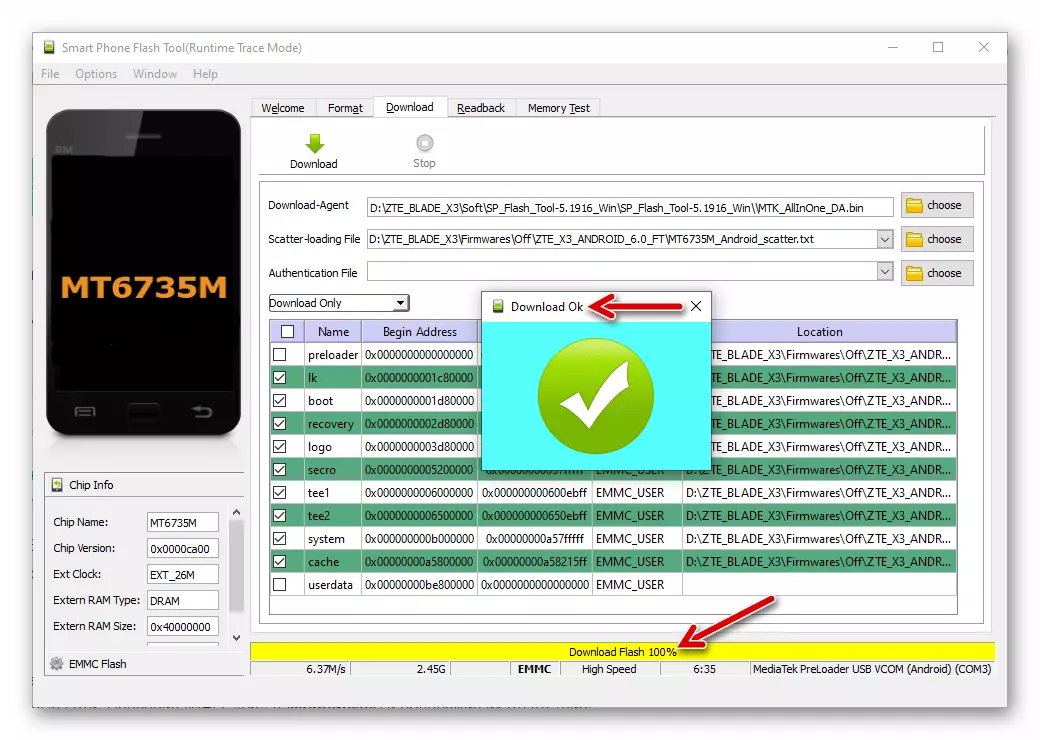
- Waiting for the completion of the operation carried out by a flash drive, the "Download OK" notification window opens.
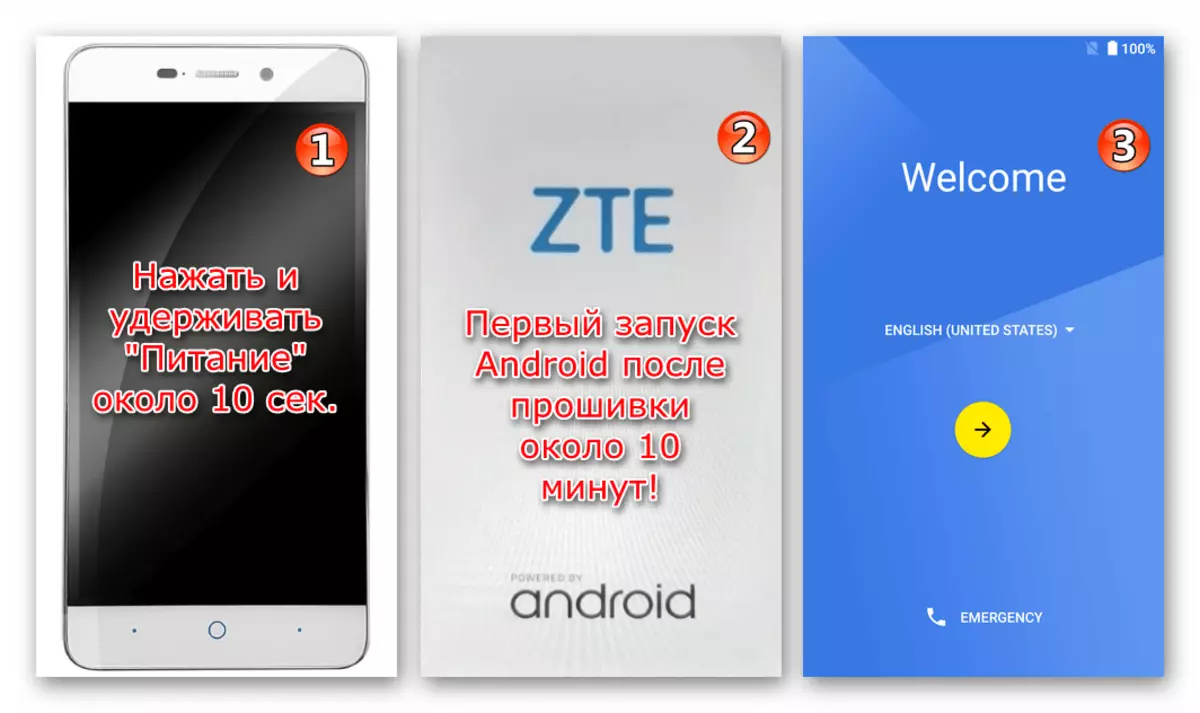
- Disconnect the ZTE Blade X3 from the computer and run, for a long time (about 10 seconds) while holding down the "POWER" key to it - until the ZTE boot screen appears on the screen. Next, we expect the start of the reheattered system. The process of loading the Android OS for the first time after the above manipulations can last for quite a long time, and is completed by the appearance of the welcome screen "Welcome".
- Additionally:
If the first after the firmware, the launch of the smartphone OS did not take place within 20 minutes ("hanging" on the boothel), go to the factory recovery and perform a reset / clearing memory. This procedure eliminates the factors that prevent the normal loading of the freshly installed Android in 99% of cases.
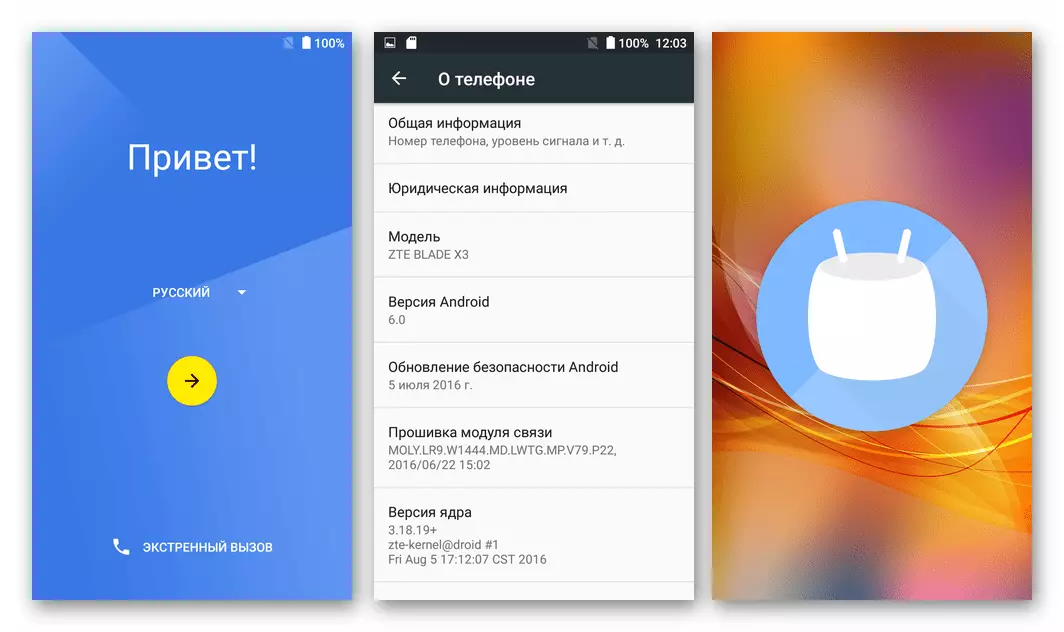
- Select the settings of the mobile OS and move to the operation of the reflamped smartphone.


Restoration ("Deadlining")
In situations where Blade X3 became the "brick" from glass and plastic, that is, does not respond to the switch key, demonstrates endless load, etc., and also when the firmware method described above is completed with the appearance of errors (5054, 2022 , 2005, etc.) in the Flash Tool window, to return the system software to workable condition, it is somewhat different from the "standard" algorithm of actions.
Once again focusing! Using the following instruction is suitable exclusively in critical situations!
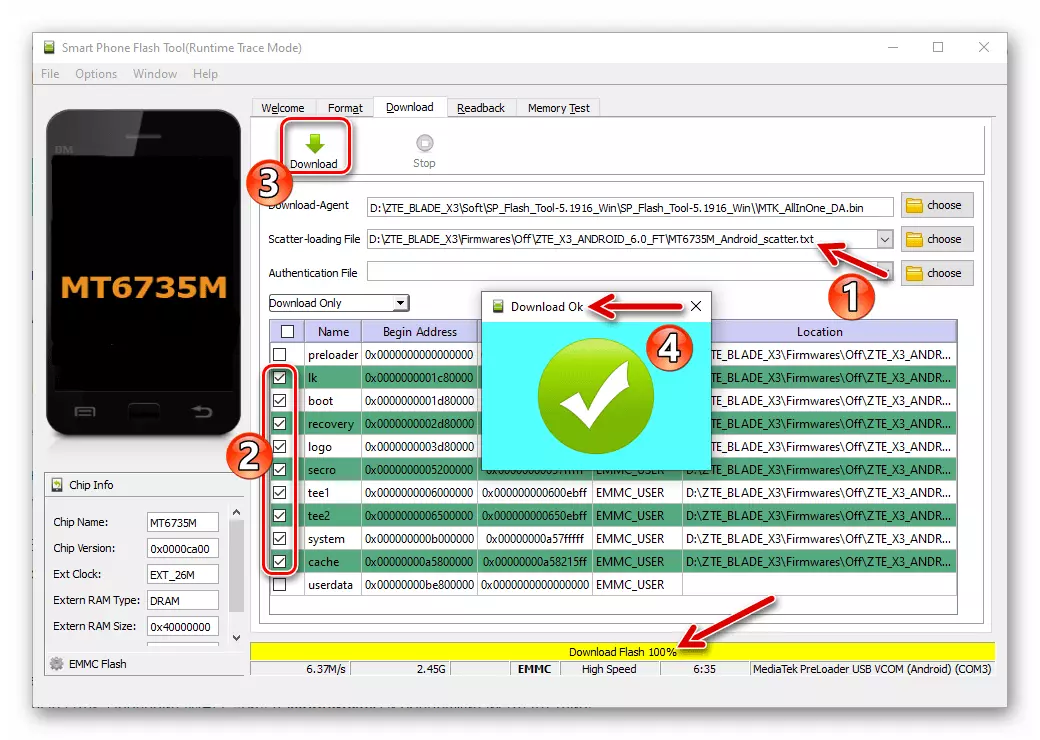
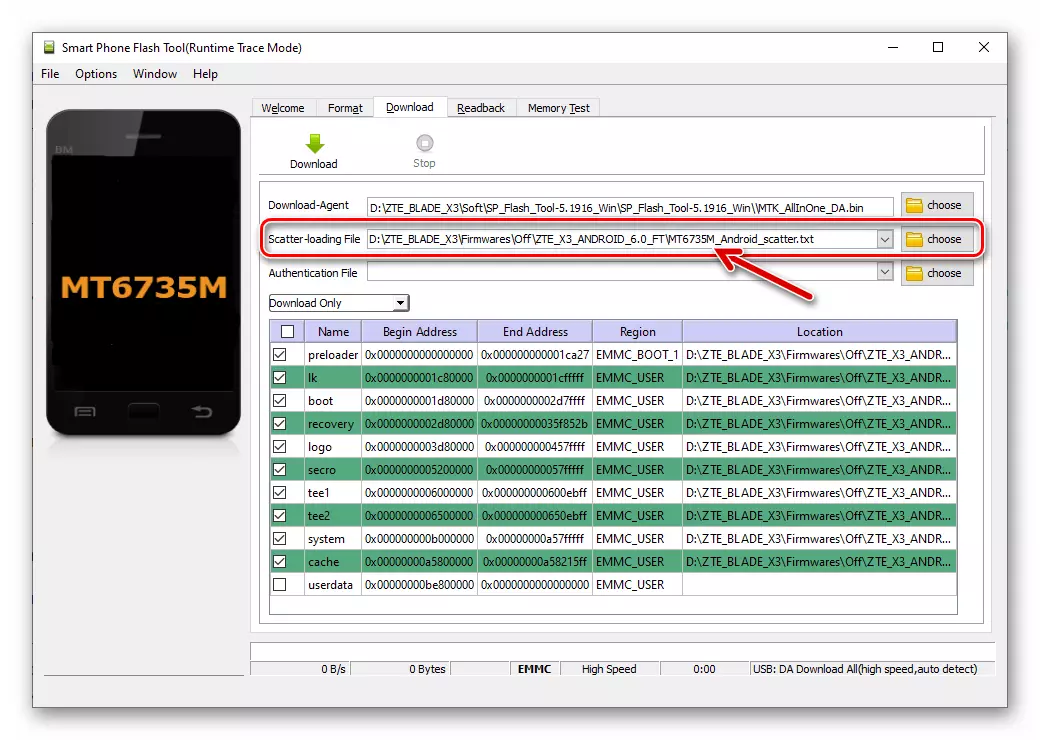
- Open FlashTool and specify the program path to the scatter file.
- We remove all the marks near the names of the phone's memory partitions in the main field of the firmware window (click on checkbox "Name").
- Install a tick next to the name "Preloader". Click "Download".
- Connect the machine to the computer and wait for the completion of the overwriting selected in step above the block of its memory.
- Disconnect the cable from the device. Now you can try to turn on the machine - if "okarizing" was caused only by damage to the bootloader, Android, it is possible, it will start.
- To fully restore Android on the ZTE Blade X3, we flash the phone through the flashlight above described by the "standard" method, that is, eliminating the "Preloader" component from the list of rewritable.


Bacup NVRAM Recovery
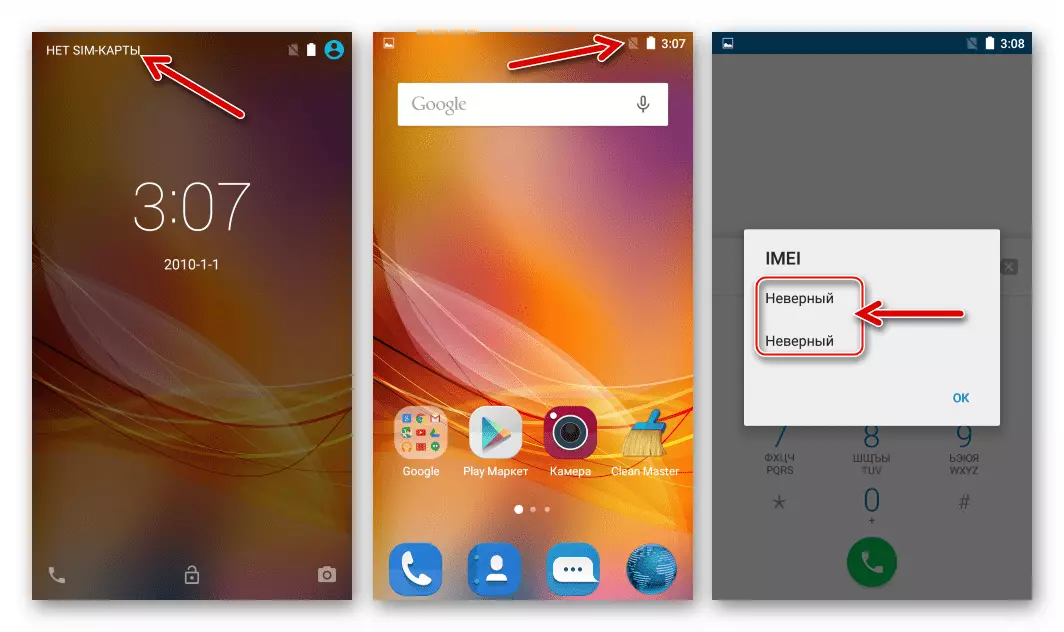
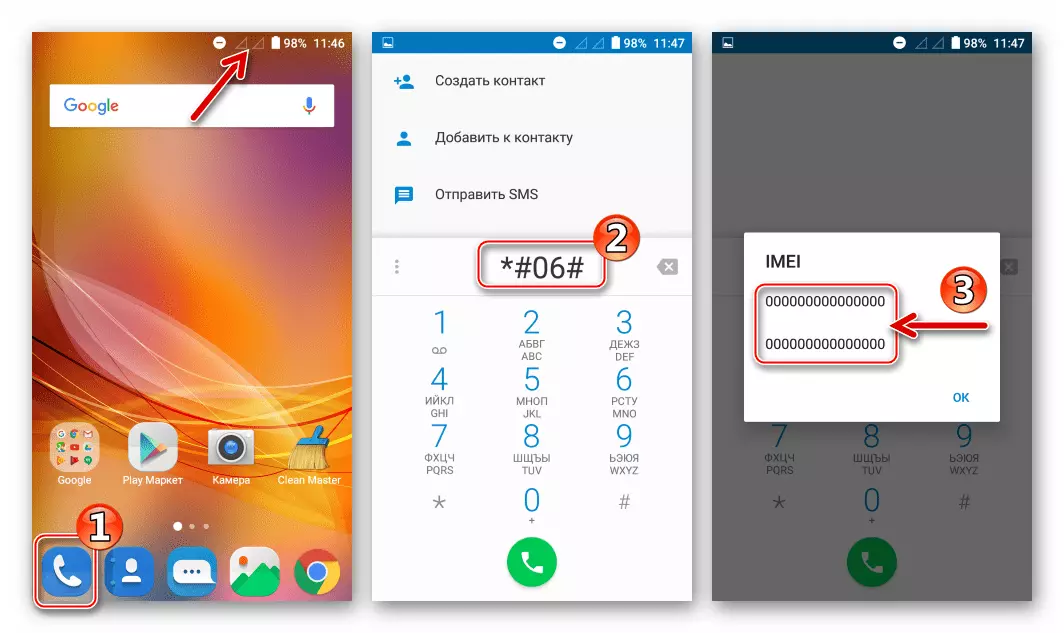
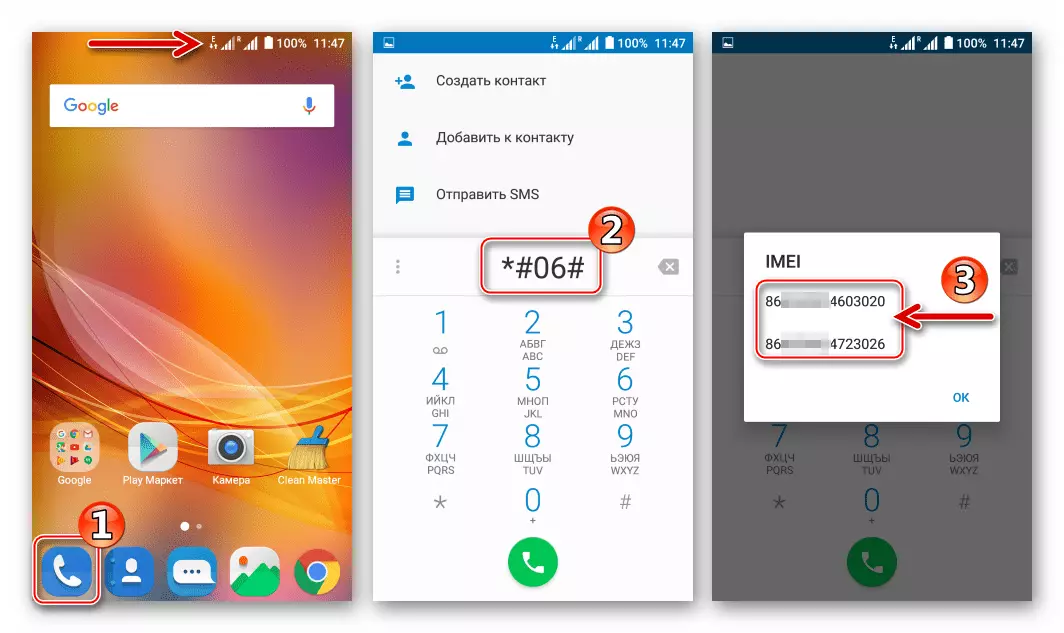
As already mentioned above in the article, after reinstalling Android and / or "emission" of Blade X3, the situation may well have a situation when wireless networks do not work on the machine. After checking IMEI (* # 06 # in the phone "phone") and, finding their absence / incorrect, go to the restoration of the "NVRAM" of the device.
The ideal option, if there is a dump area, removed using a flash station from a detailed instance of the device in advance.
- We load the block card file from the folder with the appendates of the official OS in the Flash Tool.
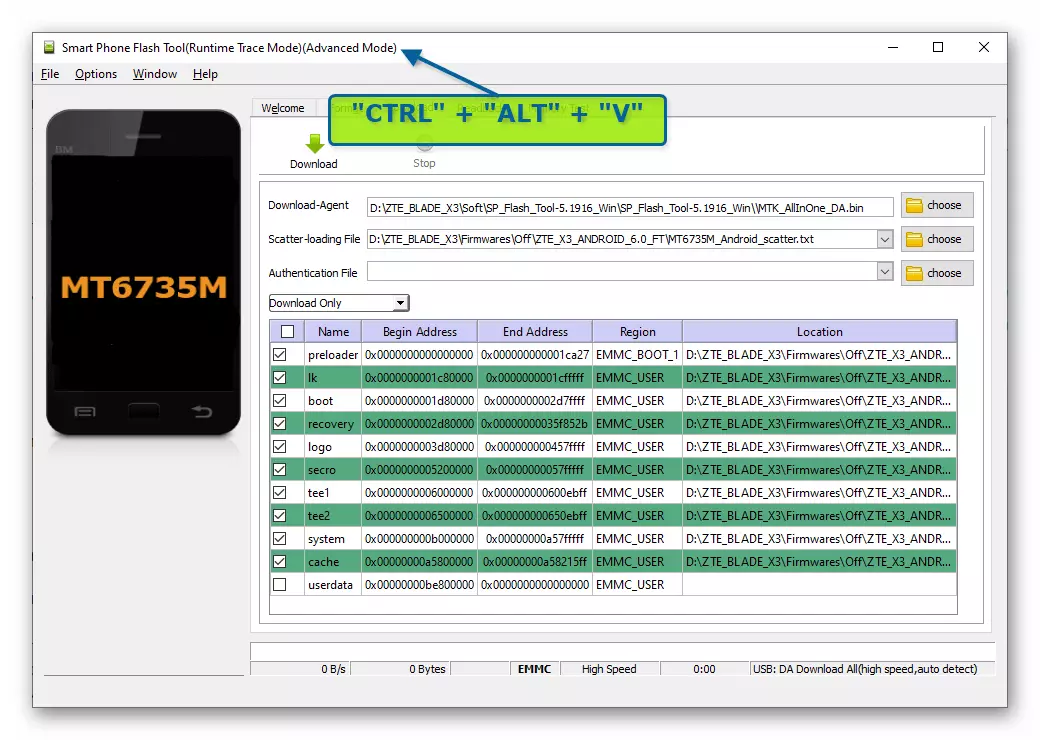
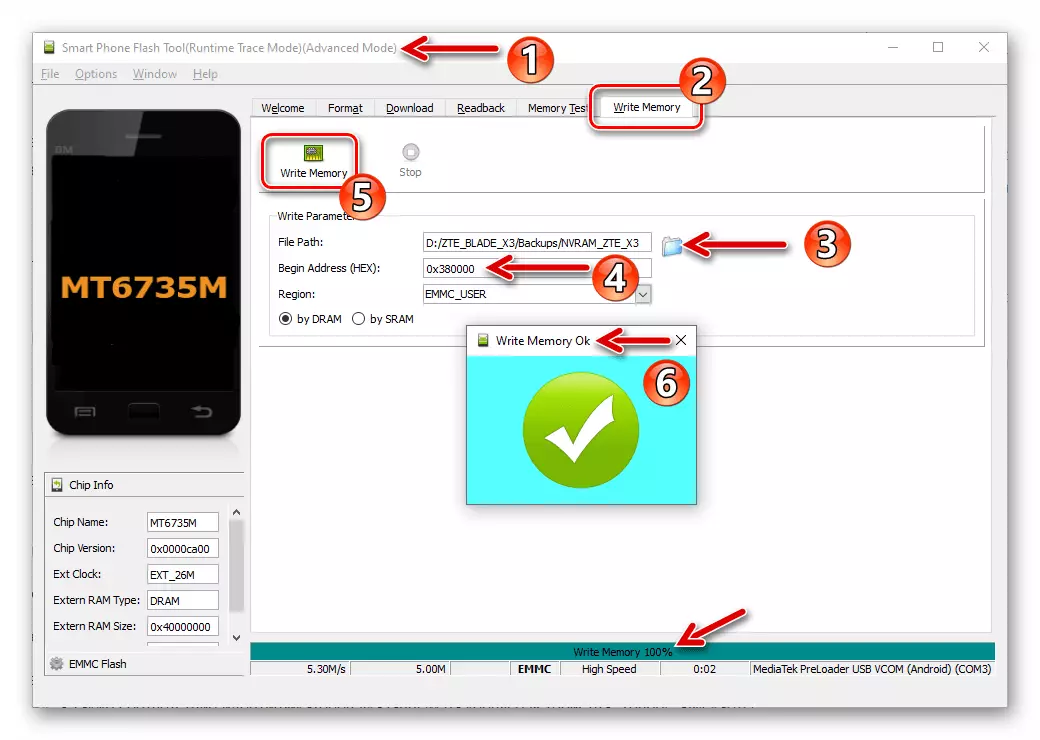
- Overwrite separate device memory blocks through a flashlight is carried out using the default hidden function of the Write Memor application, activate access to it:
- On the PC keyboard, press "Ctrl" + "Alt" + "V" simultaneously, which will translate the firmware to the "advanced" mode of operation.
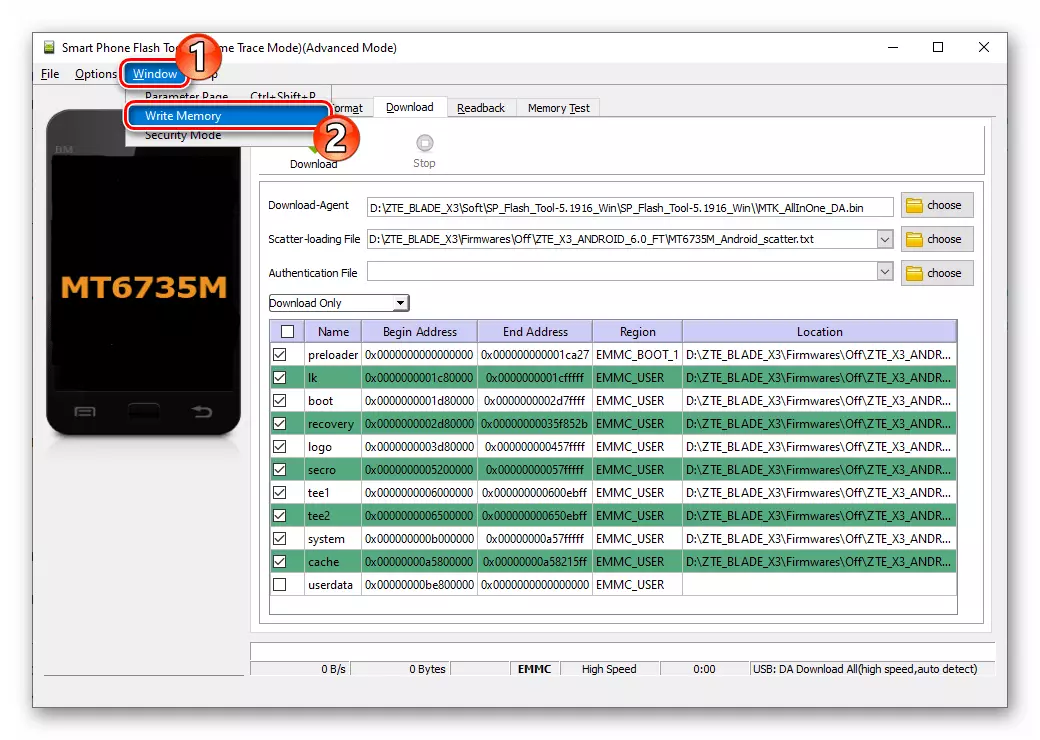
- Call the "Window" menu, click in it by the name "Write Memory" and as a result we fall into the eponymion section of the application.
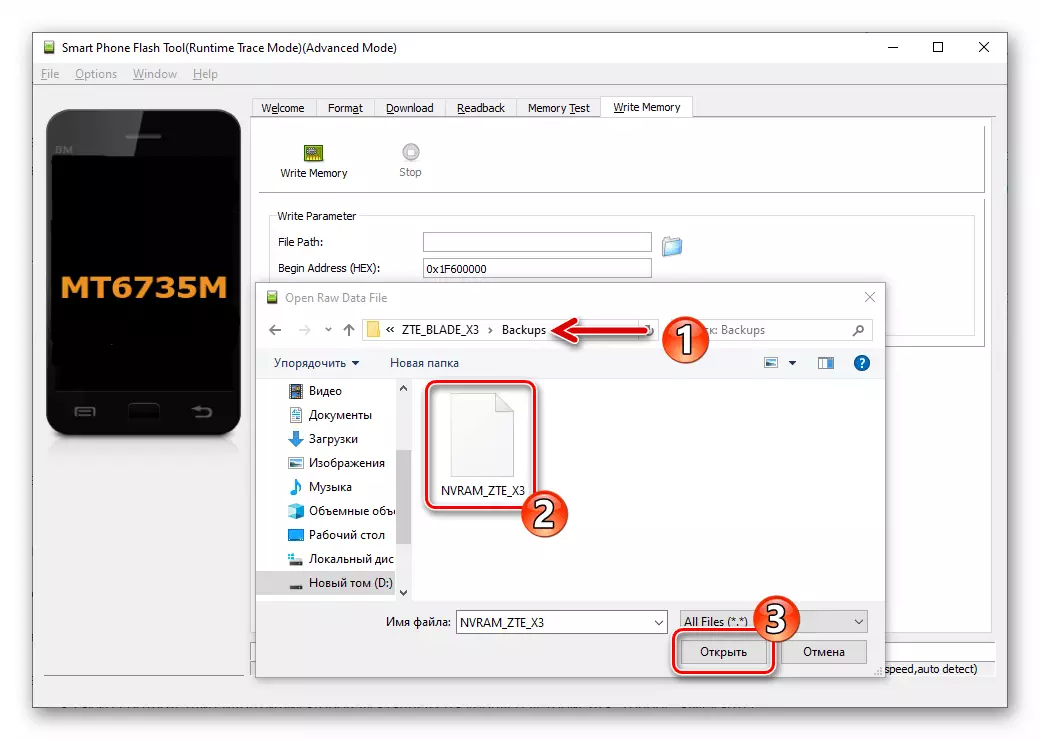
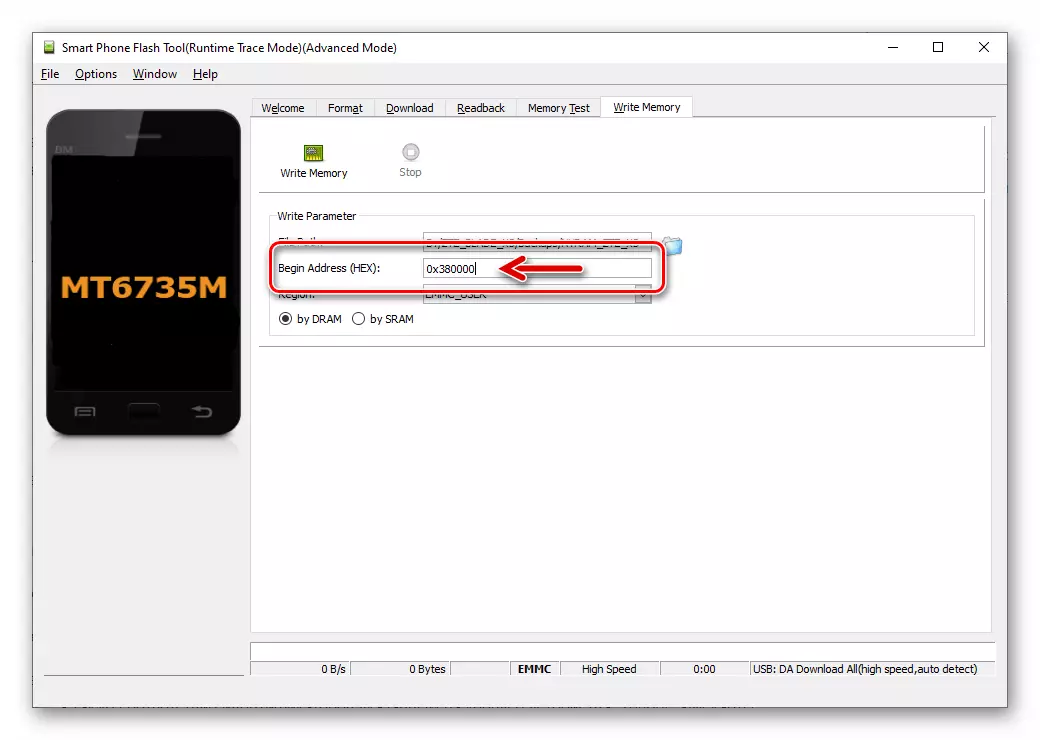
- Click on the "Browse" button and then move along the path where the previously saved dump "NRAMM" is located. Having selecting a backup file, click "Open".
- In the Begin Address (Hex) field, we enter the 0x380000 parameter.
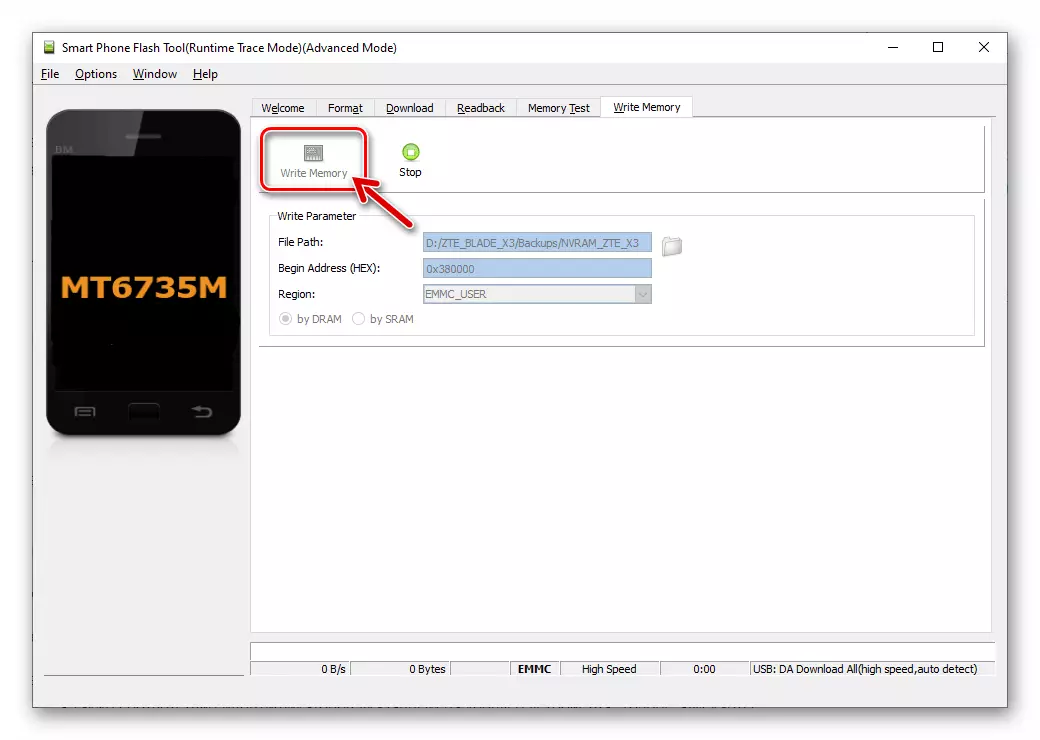
- Click on the "Write Memory" button, after which I connect the fully turned off the machine to the computer.
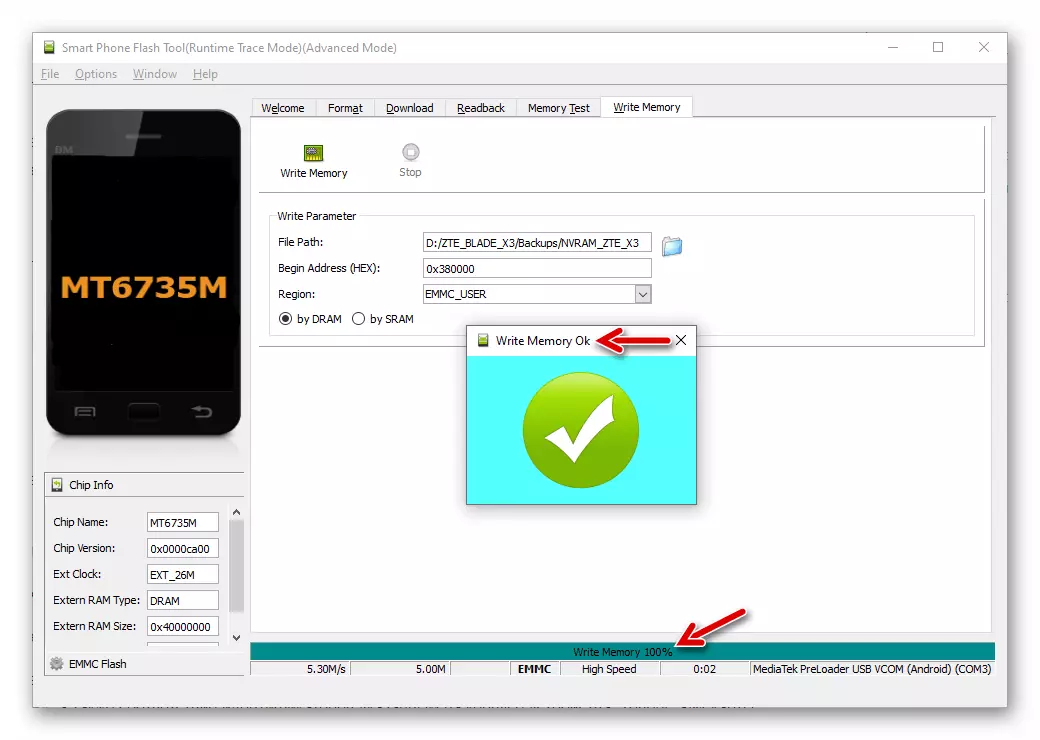
- Waiting for the completion of the rewriting of the target section of the flashlight - Displays the "Write Memory OK" message program.
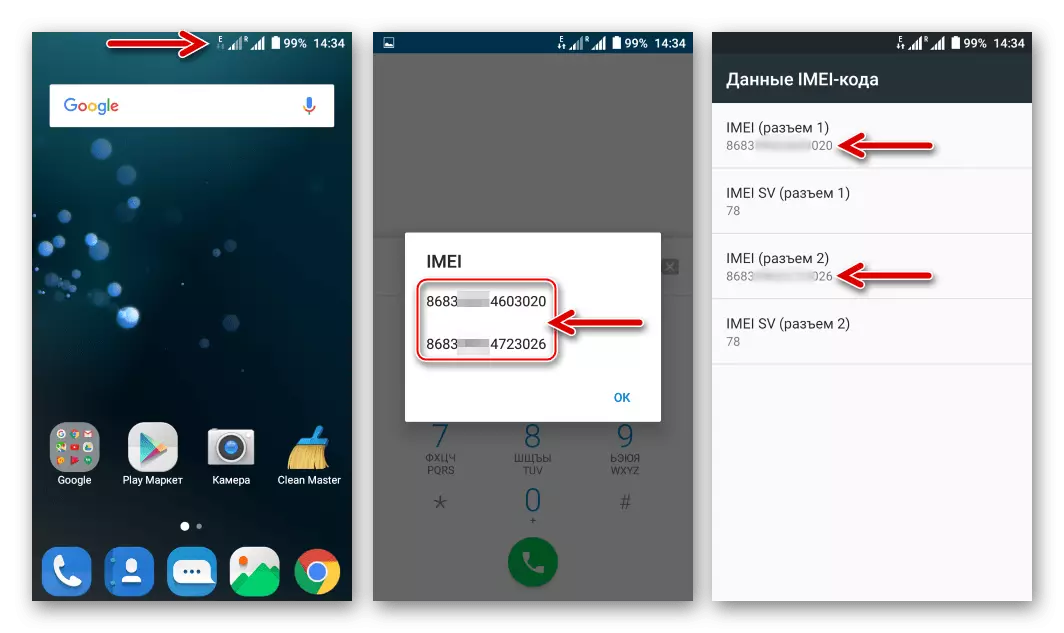
- Disconnect from your smartphone YUSB cable and turn on the device. After downloading Android, check the presence of IMEI by entering the combination of * # 06 # using the dialer, as well as the correspondence of the identifiers specified on the device case. Now SIM cards must perform their functions without problems.
Restoring NVRAM and IMEI without a backup
If for any reason the reasons "NRRAM" was not created, the recovery of the section is possible, but a somewhat more complex method than is described above.
For the successful implementation of the following instructions, you will need: the dump of the domain area, obtained from another instance of the model; program Maui Meta. to register your IMEI; ZTE Blade X3 Radio Mode Calibration Database Calibration Database Fastened OS based on Android 6. All of the above can be obtained by downloading the archive on the link below and connecting it into a separate folder.
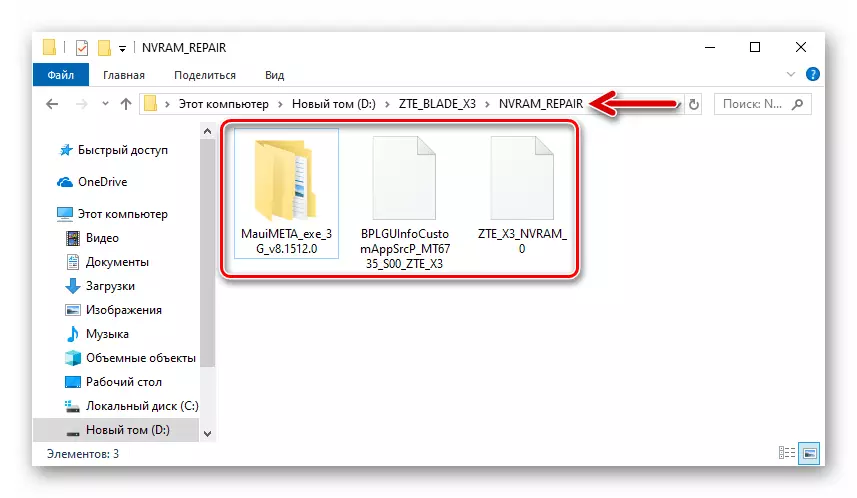
Download everything you need to restore NVRAM and IMEI on the smartphone ZTE Blade x3
- We carry out overwriting the "NVRAM" area through FlashTool using the ZTE_X3_NVRAM_0 file from the archive with the recovery components.
- Rebooting in Android, we discover that the values of the IMEI apparatus are reset.
- In order to get the right identifiers on the phone, the software will be required to be called Maui Meta, install it:
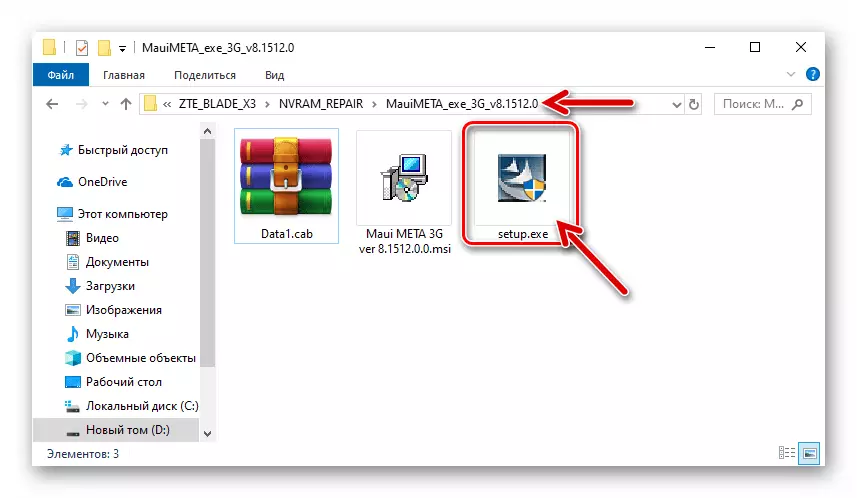
- Run the setup.exe installer from the Mauimeta_v8.1512.0 directory.
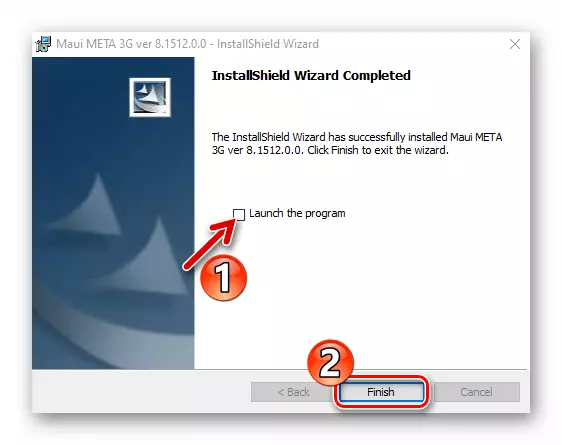
- Follow the instructions
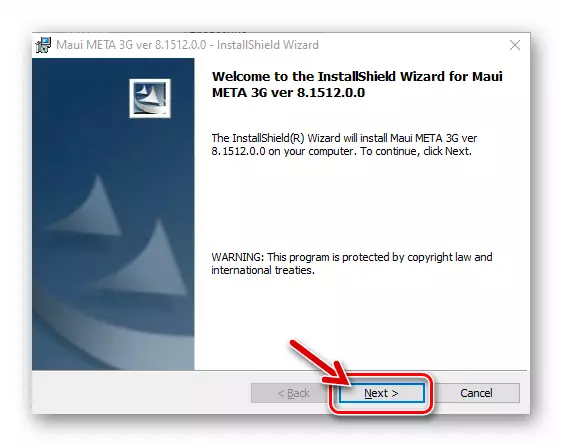
Institute.
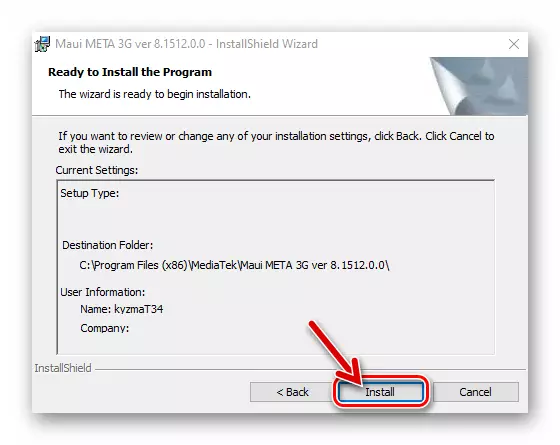
- In the last window of the Maui Maau Meta Wizard, we remove the checkbox "Launch The Program" and click "FINISH".
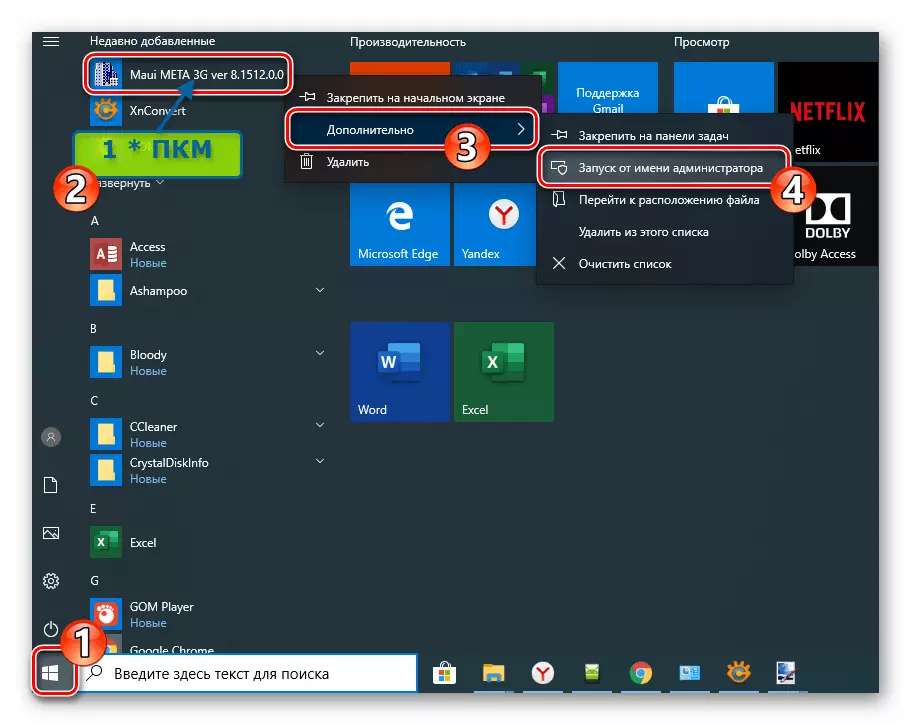
- Run the Maui Meta program on behalf of the administrator.
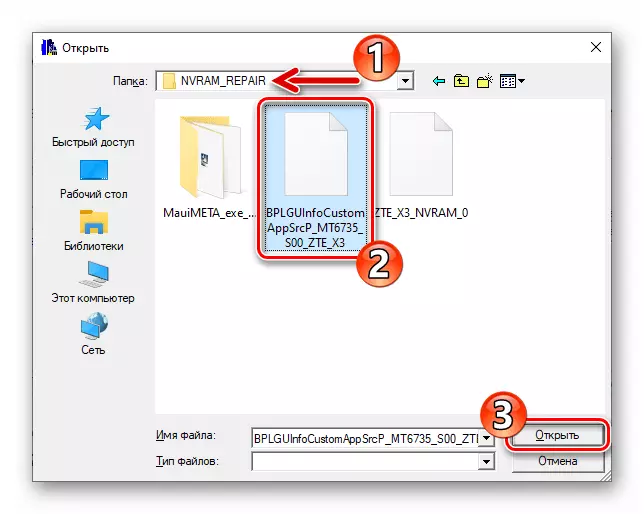
- Open the "Action" menu and click on the "Open NVRAM Database ..." item, and then
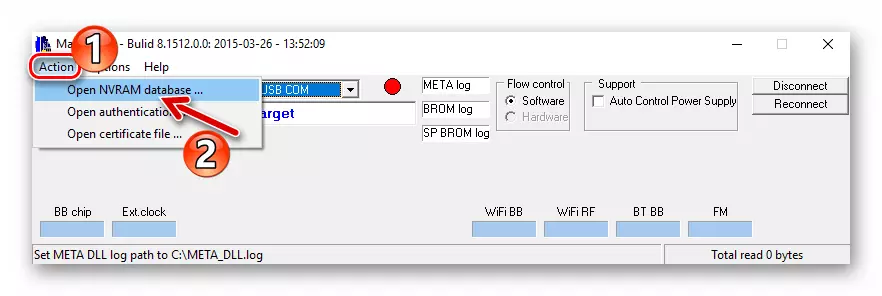
Go along the path of the BPLGUINFOCUSTOMAppSRCP_MT6735_S00_ZTE_X3 database location path. We highlight the file, click "Open".
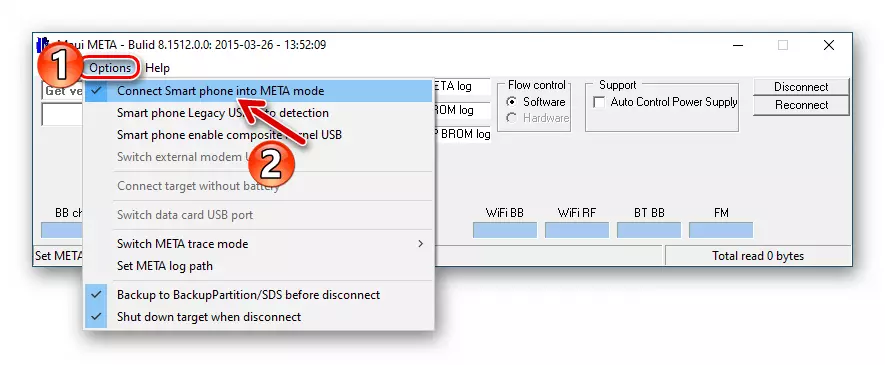
- Call the Options menu, you activate the "Connect Smart Phone Into Meta Mode" option.
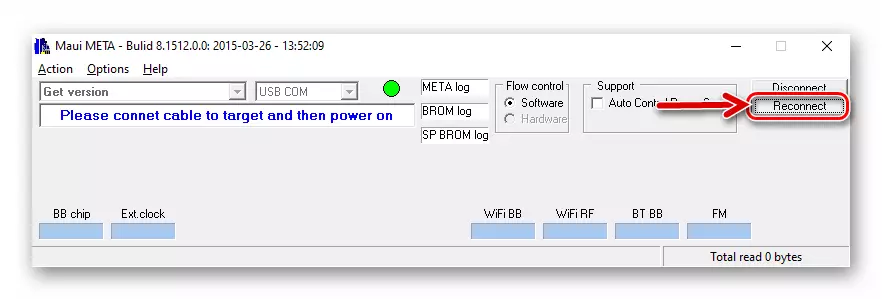
- Click "Reconnect" and then connect the smartphone to the PC in the off state.
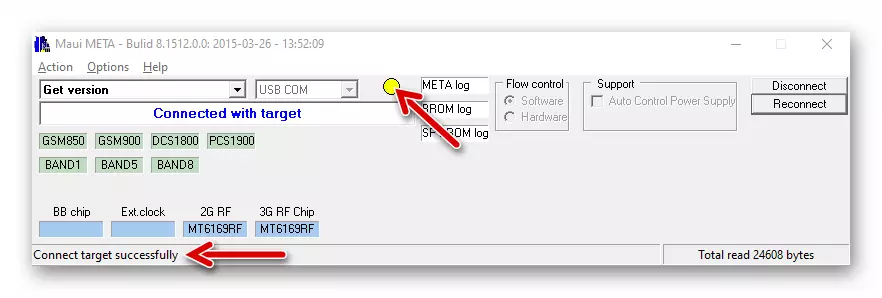
- As a result of a successful pairing on the phone screen, the ZTE boot screensaver will "freeze", and in the Maui Meta window, the flashing (green-red) is painted in yellow. These factors suggest that the program has successfully connected to the smartphone.
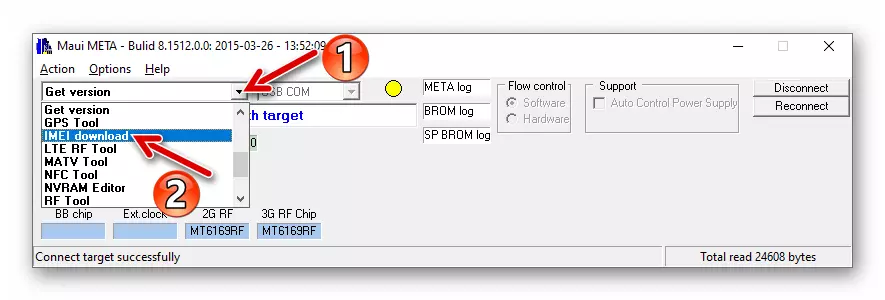
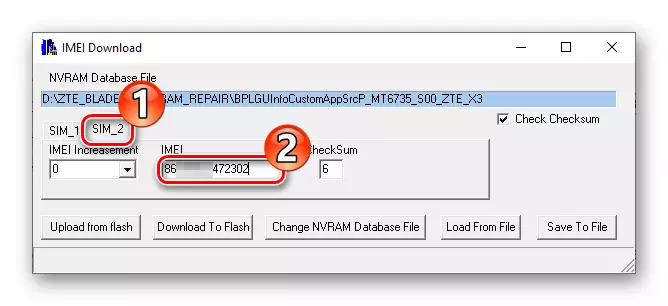
- In the drop-down list of application partitions, select "IMEI DOWNLOAD".
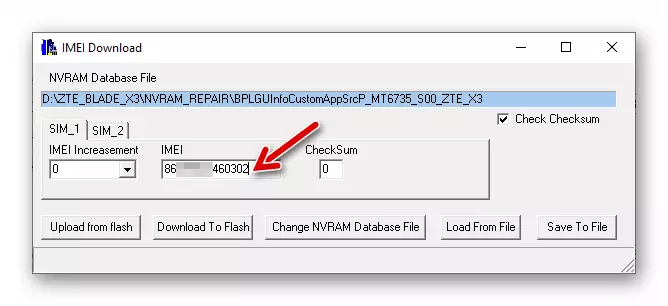
- In the "IMEI" field, the windows that opened the first 14 digits of the first identifier are introduced.
- Go to the "SIM 2" tab of the IMEI DOWNLOAD windows and provide a program 14 digits of the second identifier.
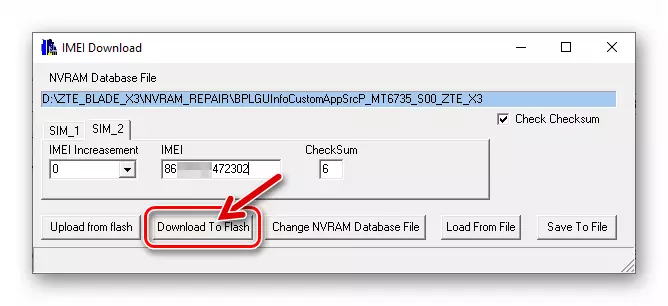
- Click on the button that initiates the record of the "HAVE" values in the memory of the device - "Download to Flash".
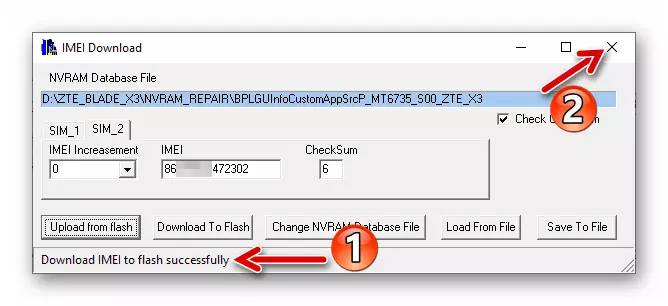
- As a result of successful rewriting of values, the message "Download Imei to Flash SuccessFully" will appear. Now the "IMEI DOWNLOAD" window must be closed.
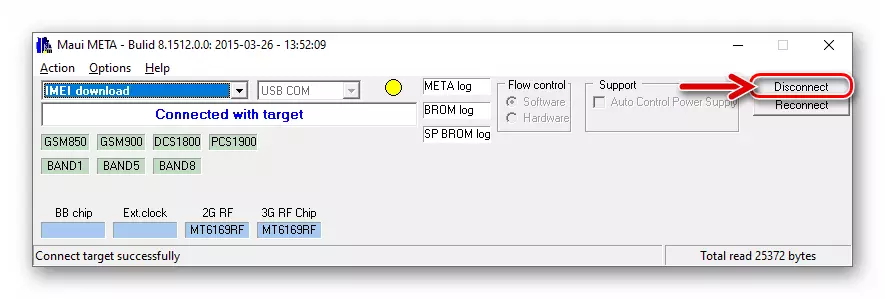
- Click "DISCONNECT" in the main window of Mauimet - the smartphone will automatically turn off.
- Disconnect the device from the computer, launch it in Android. It remains to check "HAVE" using the "Record" application (* # 06 #). On this, the recovery of the parameters contained in the "NVRAM" area of the phone's memory has been completed.
Installation of custom recovery, receiving root-rights
Many owners of the considered smartphone model have heard about the capabilities provided by the modified TEAMWIN Recovery recovery environment and seek to receive this recovery on its apparatus.
Methodology for equipping the model of Blade X3 model of the modified recovery environment requires for its successful implementation of the simultaneous installation of the recovery of the privileges of the superuser simultaneously, so the following instructions should be made scrupulously and completely, even if the root right to use on the device is not planned! Before manipulations on the smartphone you need to install the official Android firmware 6 on any of the instructions suggested above!
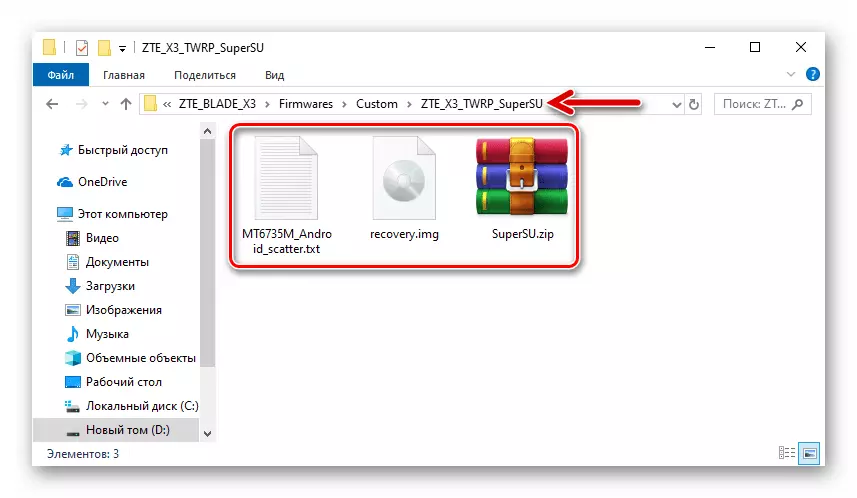
Download TWRP + SuperSU for ZTE Blade X3 Smartphone
- We download and unzip the above package above the package into a separate folder on the PC disk.
- File SuperSu.zip. We put on the removable drive of Blade X3.
- We launch the flash drive, load the scatter file to the program from the folder obtained after the first step of this instruction.
- Click "Download" and connect the connected phone to the USB PC connector.
- We expect to complete the overwriting of the Recovery area of the memory of the device with information from the IMG image of TWRP - the appearance of the message "Download OK".
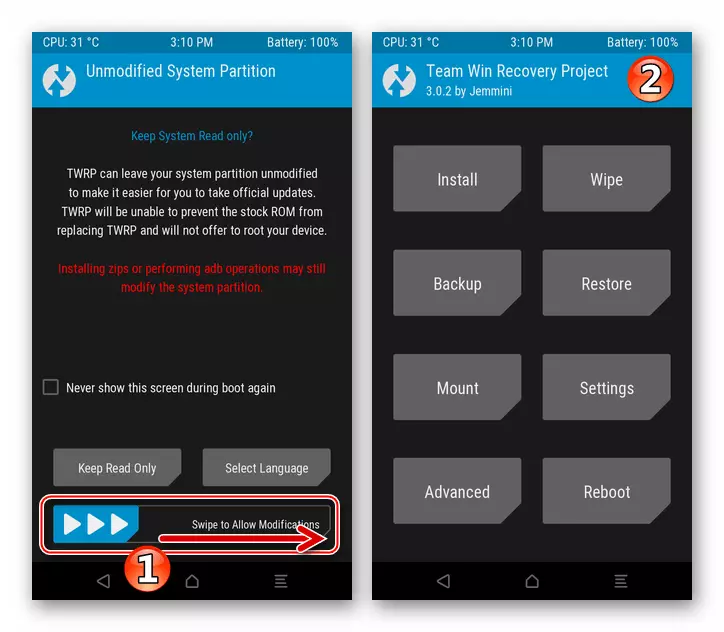
- Next - Important! Disconnect the device from the computer and boot into the recovery, but not in Android! That is, click on the "Volume +" and "Power" smartphone at the same time, select "Recovery Mode" in the list of inclusion modes.
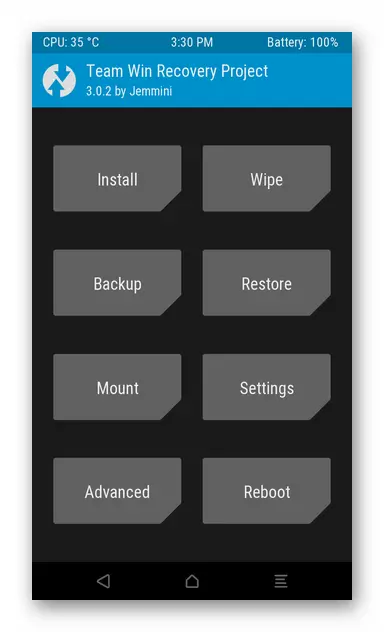
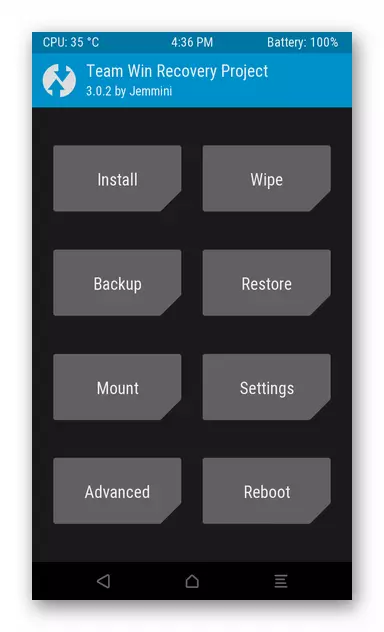
- After loading the recovery environment, we move the "Swipe to Allow modifications" runner to the right, as a result of which the main menu TWRP will appear.
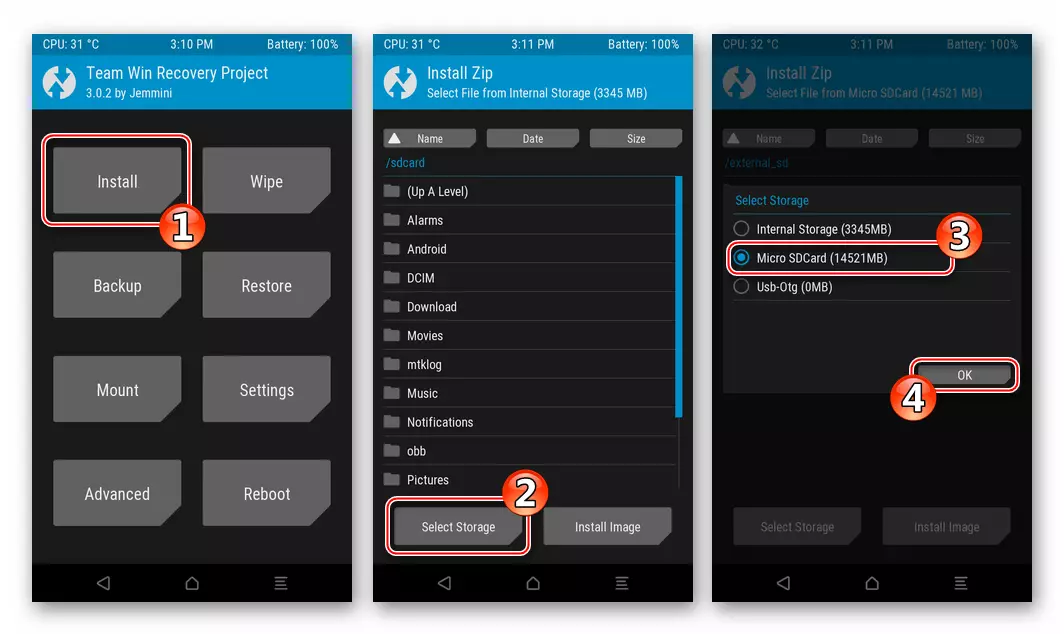
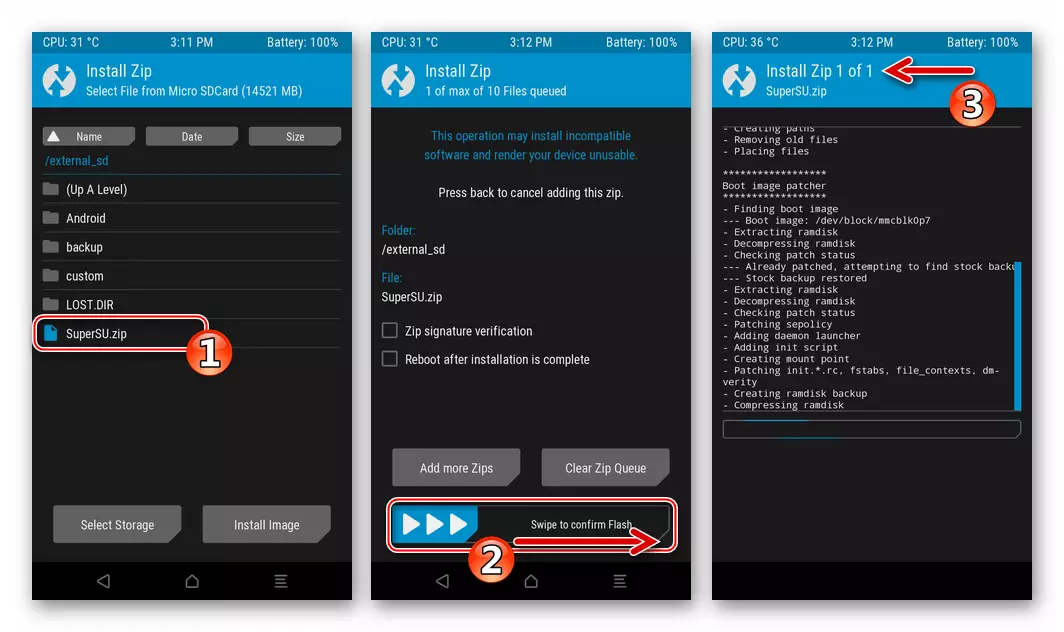
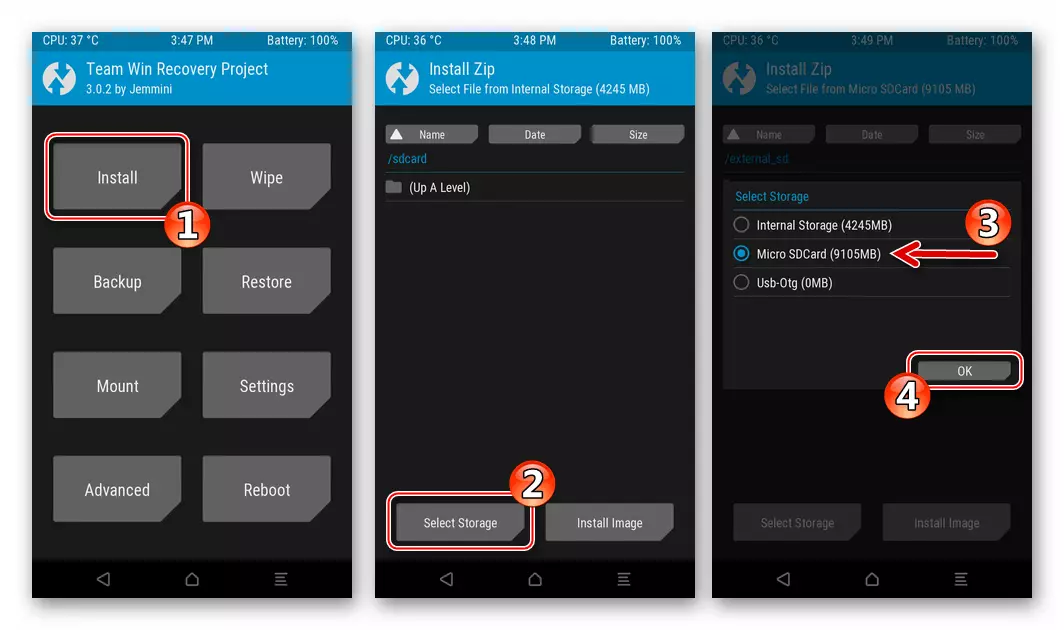
- Tabay "Install", choose using the "Select Storage" button "Micro SDCard" as a source of packets installed via TWRP.
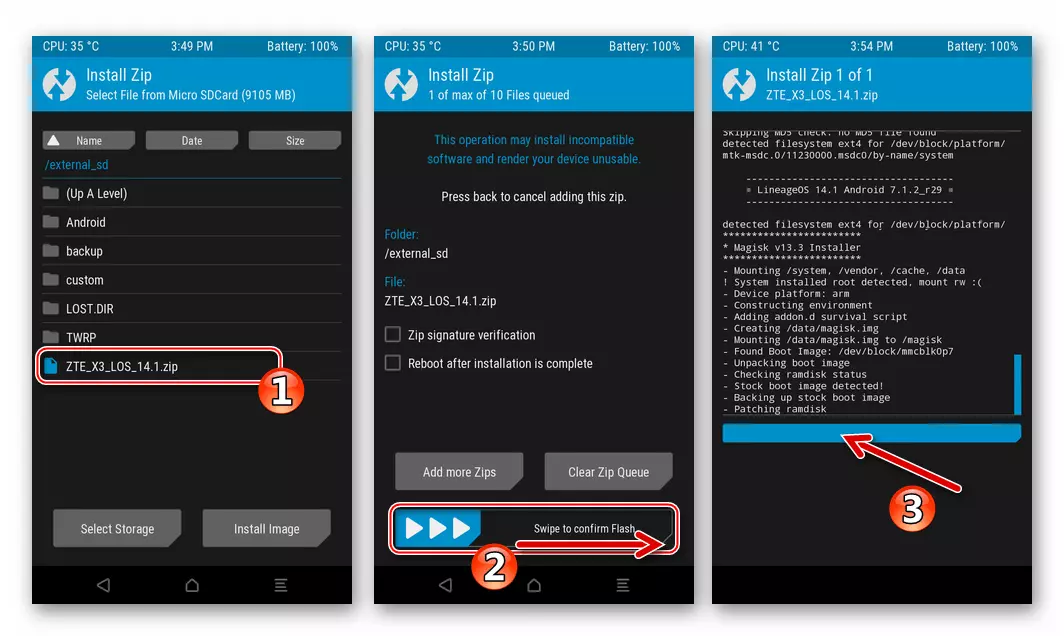
- In the displayed list of files and directories, we find "supersu.zip" and concern the name of this package. Next, activate "Swipe to Confirm Flash", which initiates the transfer of components to the device to activate the root rights and installation of the privilege manager.
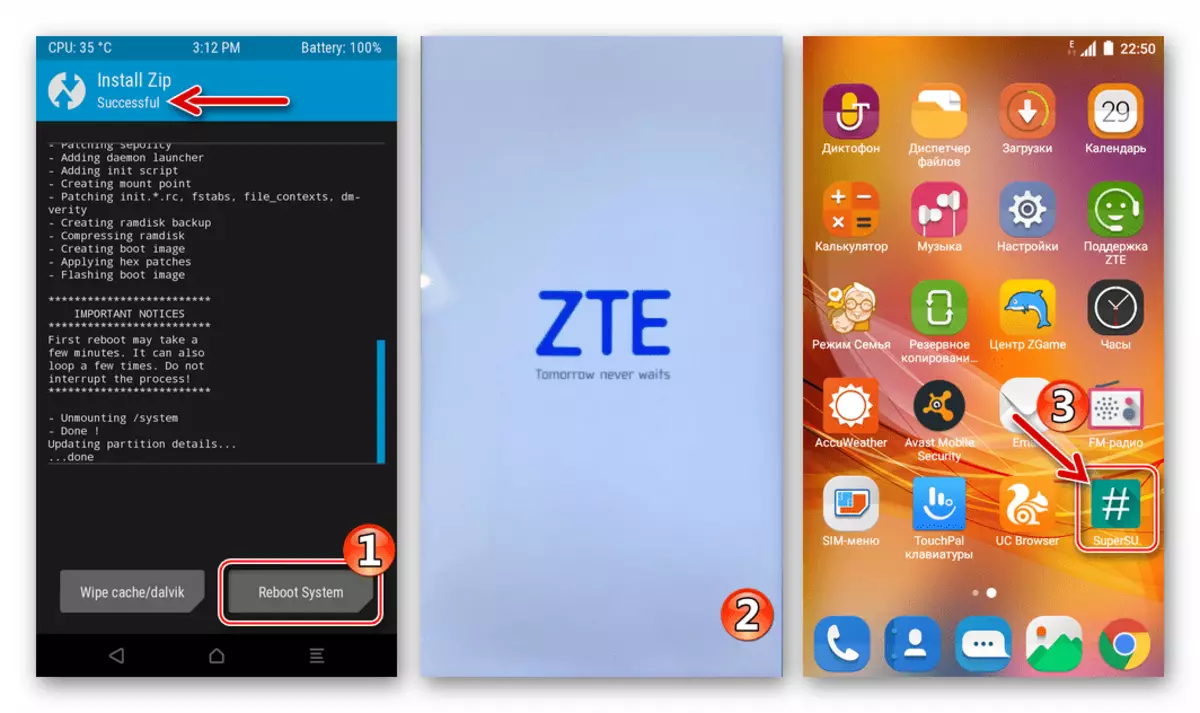
- Upon completion of the "SuperSU" installation, the "Reboot System" button appears on the screen - touch it. The device will reboot in Android. On this operation on the installation of custom recovery in ZTE Blade X3 and receiving root-privileges on it are considered complete.


Method 3: Custom firmware
The most interested among those who want to convert the software appearance to the Blade X3 users called unofficial firmware. Indeed, the transition to one of the customs, and for the model of such solutions, a large amount is adapted - this is an effective method to give the device "second life", access the missing features of the mobile OS, to organize the ability to use a newer, rather than the manufacturer, android version.

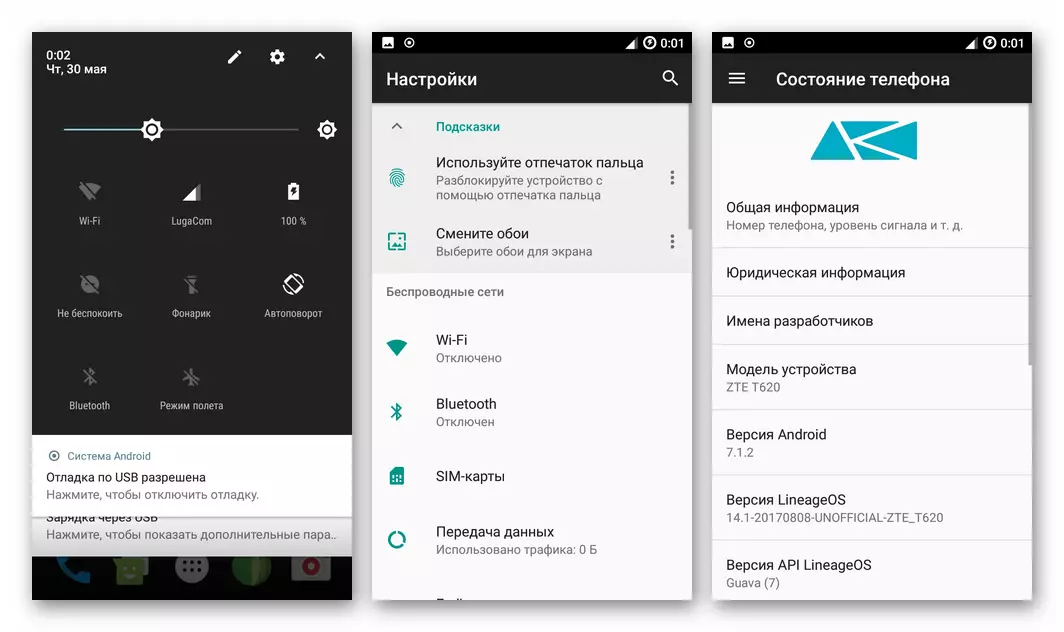
All custom firmware adapted to use on the model under consideration are installed via TWRP on the same algorithm. As an example, consider the installation of one of the most successful solutions - the unofficial port of the famous android shell LineageOS 14.1. on the base Nougat..

Download LineageOS 14.1 Custom Firmware 14.1 based on Android 7.1 for the ZTE Blade X3 smartphone
- Install TWRP via Flash Tool, as proposed in the description of the previous method of manipulation with system software in this article.
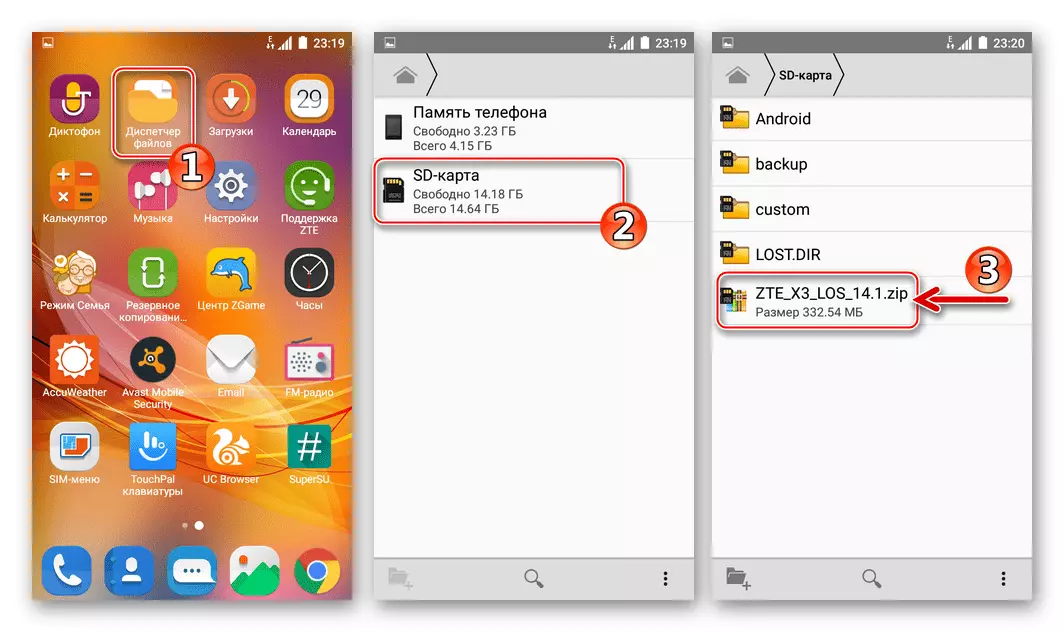
- Download the zip package of custom firmware and copy it to the memory card installed in the device.
- Further actions will be made in a modified recovery - go to TWRP.
- The first thing to be taken before performing any manipulations, imposing interference in the BLEYD ICS3 system, is to create a complete backup system and its preservation on a removable device drive:
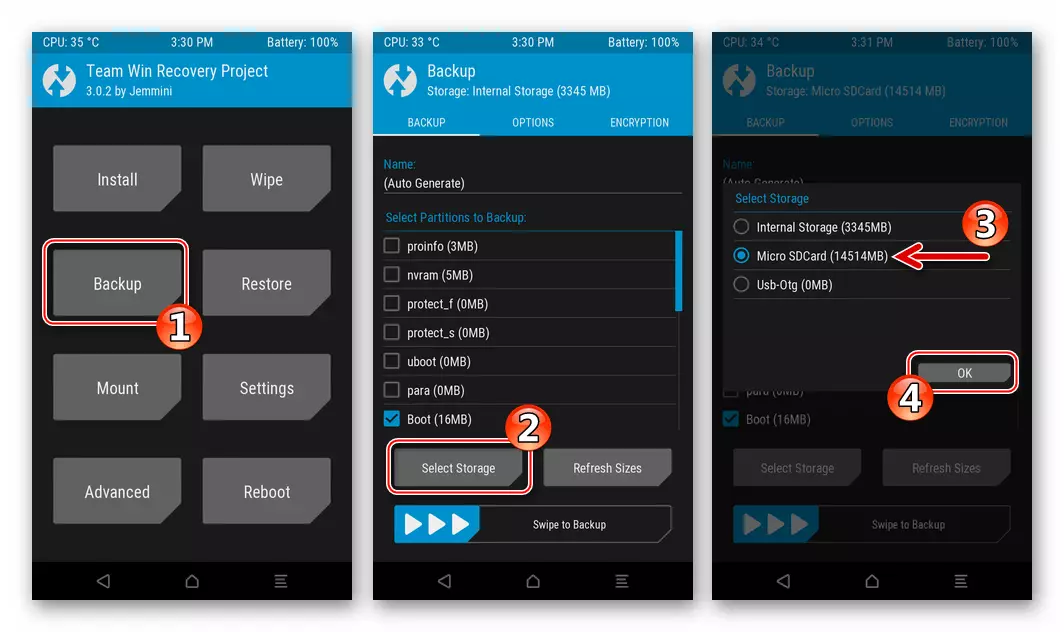
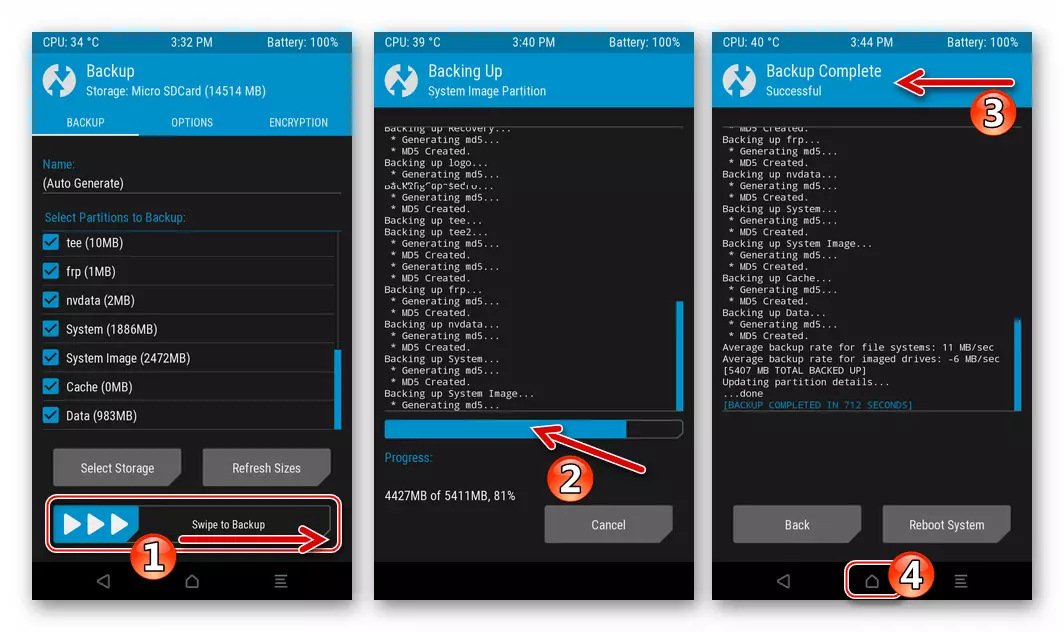
- Go to the "Backup" section, press "SELECT STORAGE" and specify Micro SDCARD as a backup save space. Confirm the choice of tap on the "OK" button.
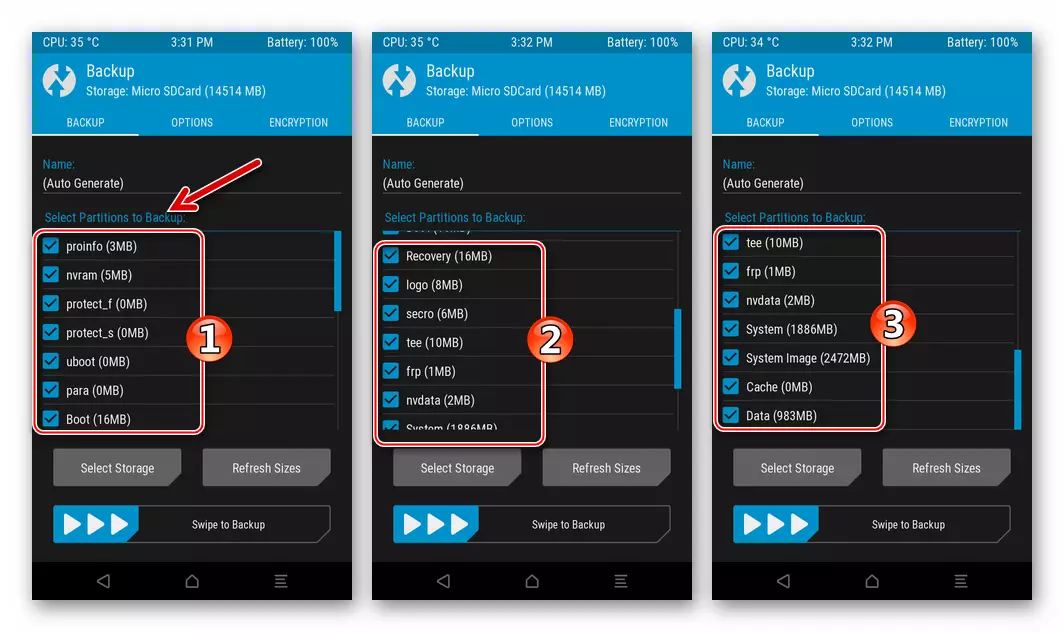
- Mark all the points list "Select Partitions to Backup".
- We move the slider "Swipe to backup" to the right and expect the end of the procedure for creating a nandroid backup. Upon completion of the process, the message "Backup Complete Successful" appears at the top. Click "Home" at the bottom to go to the main SWRP screen and perform further steps on the way to get the custom OS.
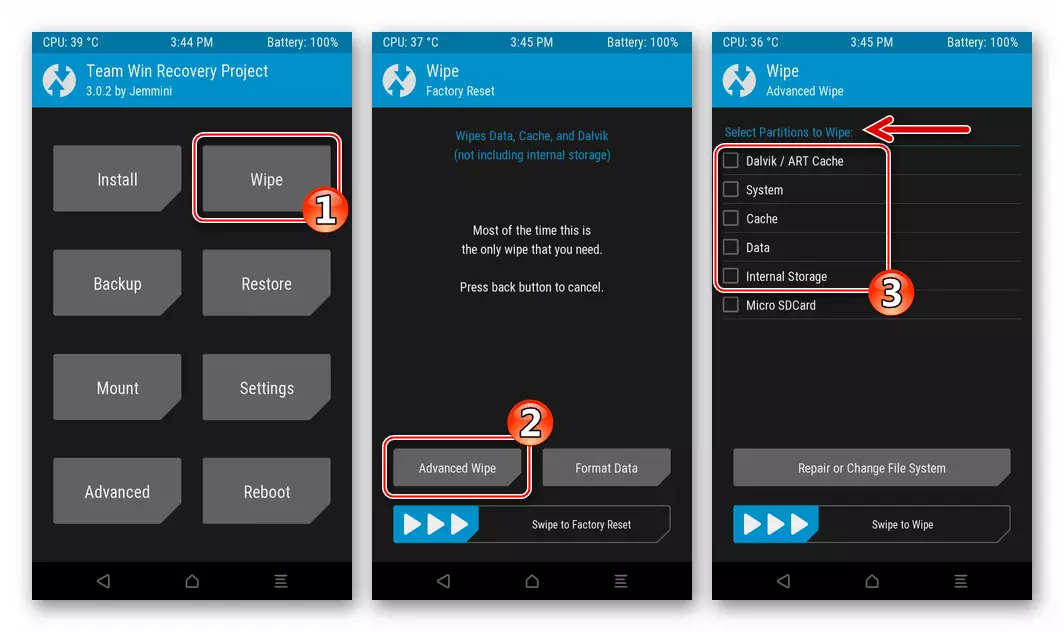
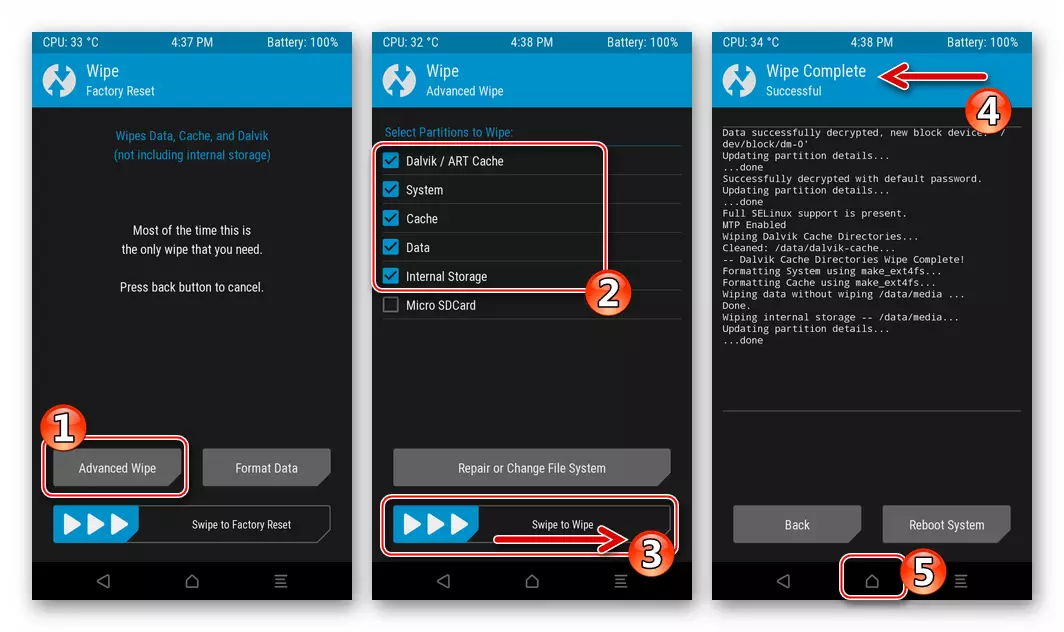
- Clean the internal device repository from the data contained in it:
- Select "WIPE" on the main environment of the medium. Next, we touch the "Advanced Wipe" and then equip all checkboxes near the items of the displayed list except Micro SDCard.
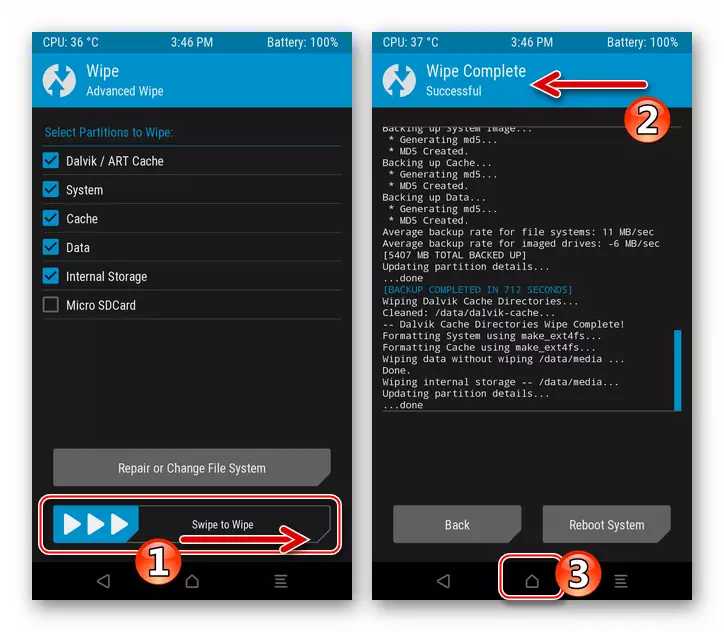
- Activate "Swipe to Wipe" and waiting for the end of the formatting procedure selected in step above the device memory areas. After receiving the "Wipe Complete Successful" message, which will appear at the top, return to the main screen of the recovery.
- After executing the above items of the instructions, the smartphone is considered to be prepared for installation of a modified OS:
- Tada on the "Install" button. Next, we switched using the "SELECT STORAGE" button on a microsphere as a storage facility with an OS package that is intended to install into the device.
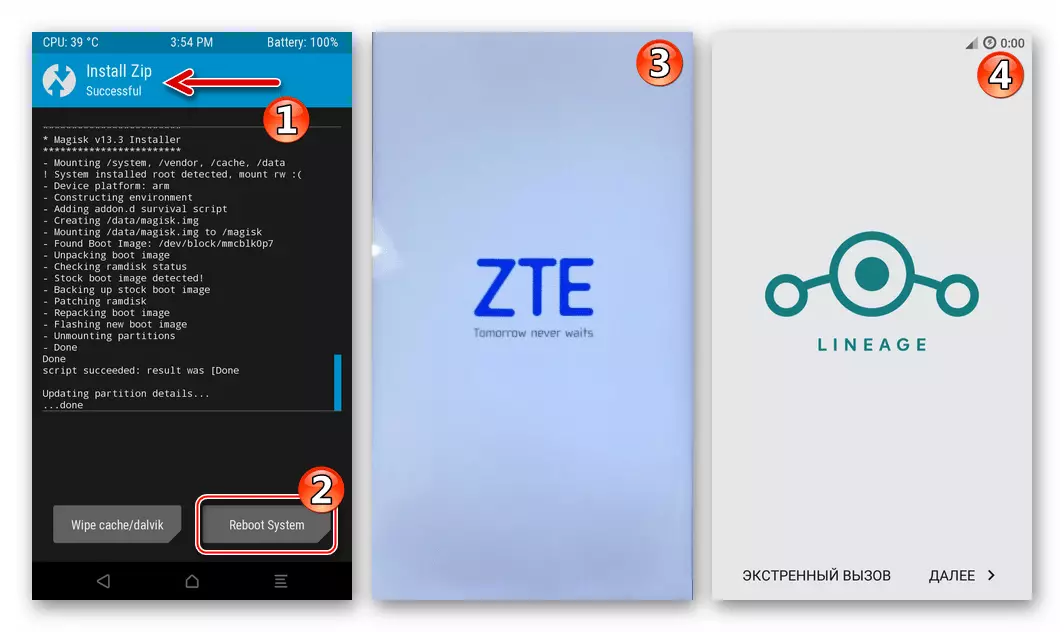
- We find in the display list of files and folders zip-package with the firmware and touch its name. The beginning of the installation of the OS is initiated by moving the runner "Swipe to Confirm Flash" to the right. Next, it remains to be expected to complete the deployment of the Custom components in the memory of the smartphone.
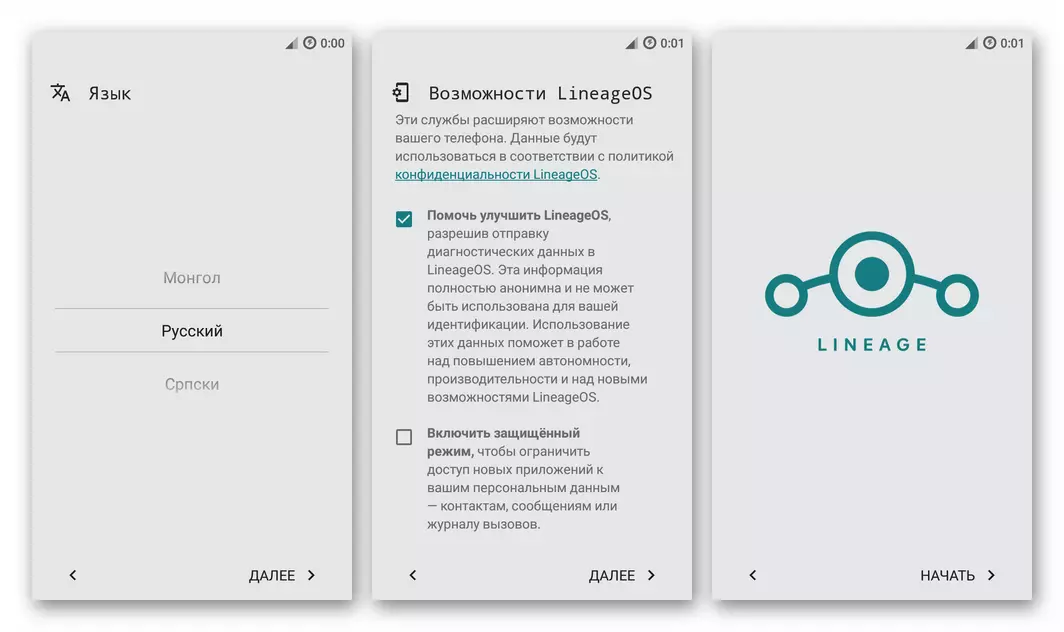
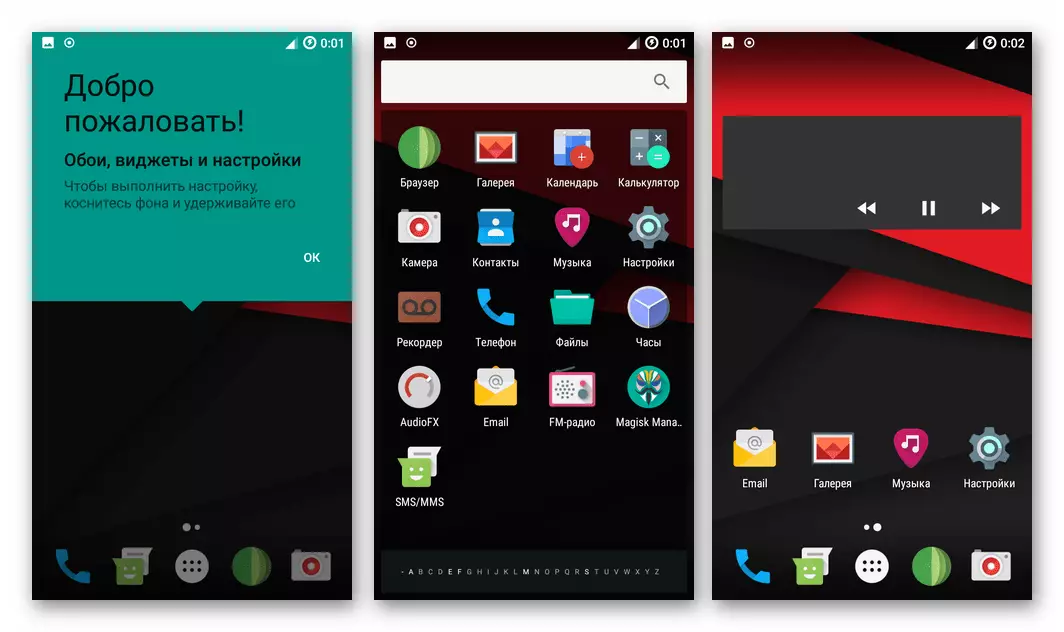
- At the end of the installation process, restart the smartphone in Android by clicking on the "Install Zip Successful" button that appeared simultaneously with the "Install ZIP SUCCESSFUL" notification. We expect all the components of the installed system are initialized, which is completed by the appearance of the screen with the caustic firmware logo.
- At this, the integration of the custom OS in ZTE Blade X3 is considered complete. It remains to choose the main parameters of the Android-shell,
and then move to data recovery
and operation of a smartphone.
Additionally. Google services
Since custom firmware most often is not equipped with the usual users of Android smartphones with Google's services and applications, their integration will have to be carried out separately.

The most rational way to receive "Corporation Corporation" in the medium of custom firmware on the telephone model under consideration is the use of TWRP capabilities to integrate in Android package distributed within the project OpenGapps. . The methodology for holding the installation of these components is described in the article on our website:
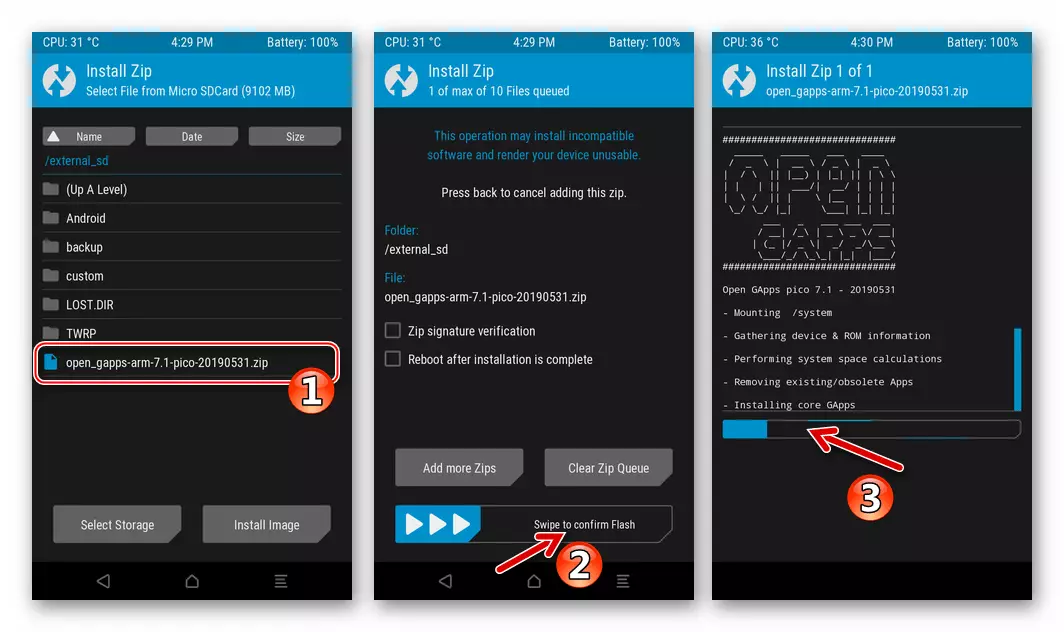
Read more: Installing Google's services in the Android Castom Firmware Environment
Return to the official firmware, data recovery
Restore the official OS on the device in the form that it was before the installation of the castoma, if you have a removable storage device, Blade X3 Nandroid backup is completely simple. After executing the TWRP procedure, it remains installed in the device.
- Loading in TVGP.
- We produce the "Full Wipe" procedure, that is, format all sections of the internal warehouse of the smartphone exactly repeating actions from paragraph 5 of the above instructions for the integration of the custom OS.
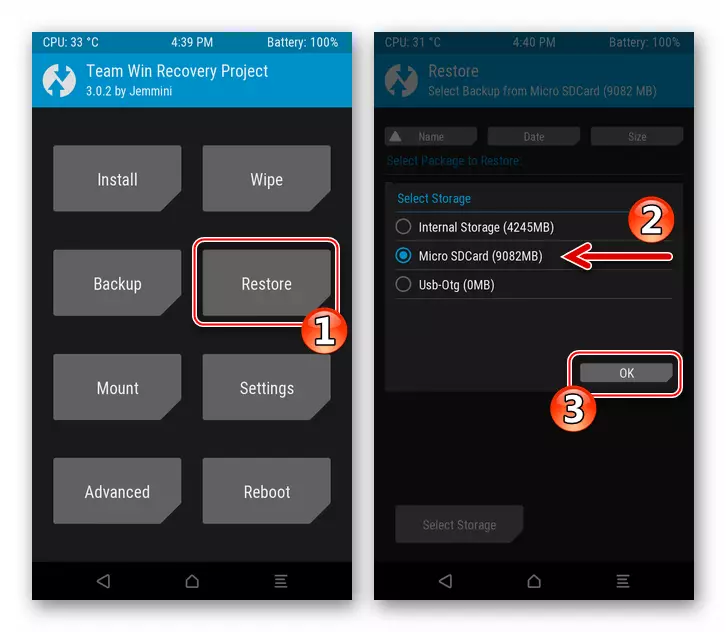
- Tabay "Restore" on the main screen of the recovery. Switching to a removable drive by using the "SELECT STORAGE" button.
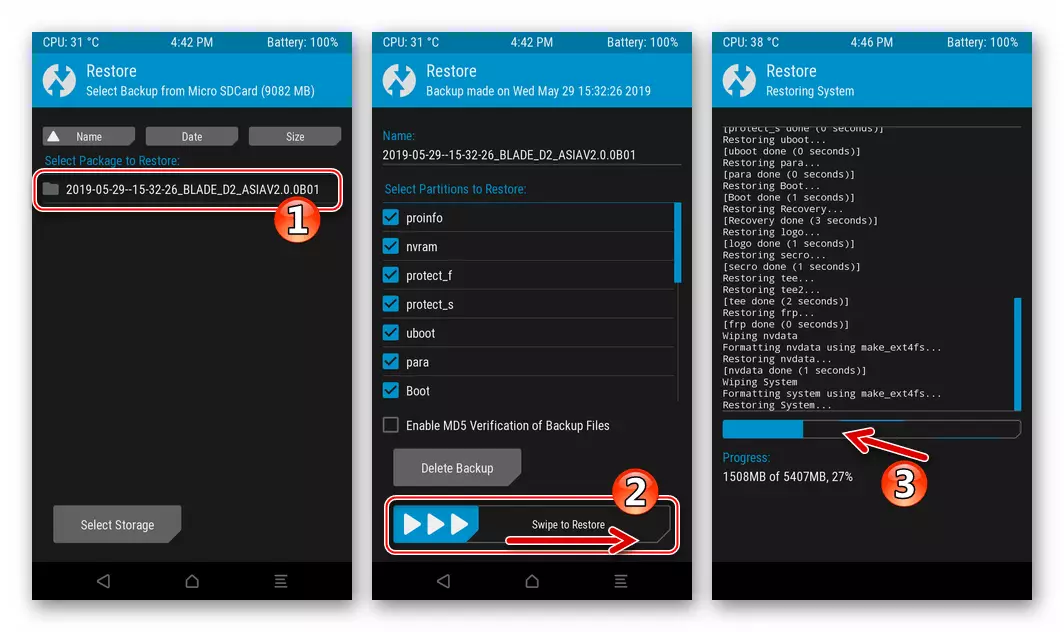
- Select a backup from those who touched the folder name in which it is saved. Using the "Swipe to Restore" element, initiate the recovery procedure, and then observe the process on the screen in the log displacement area.
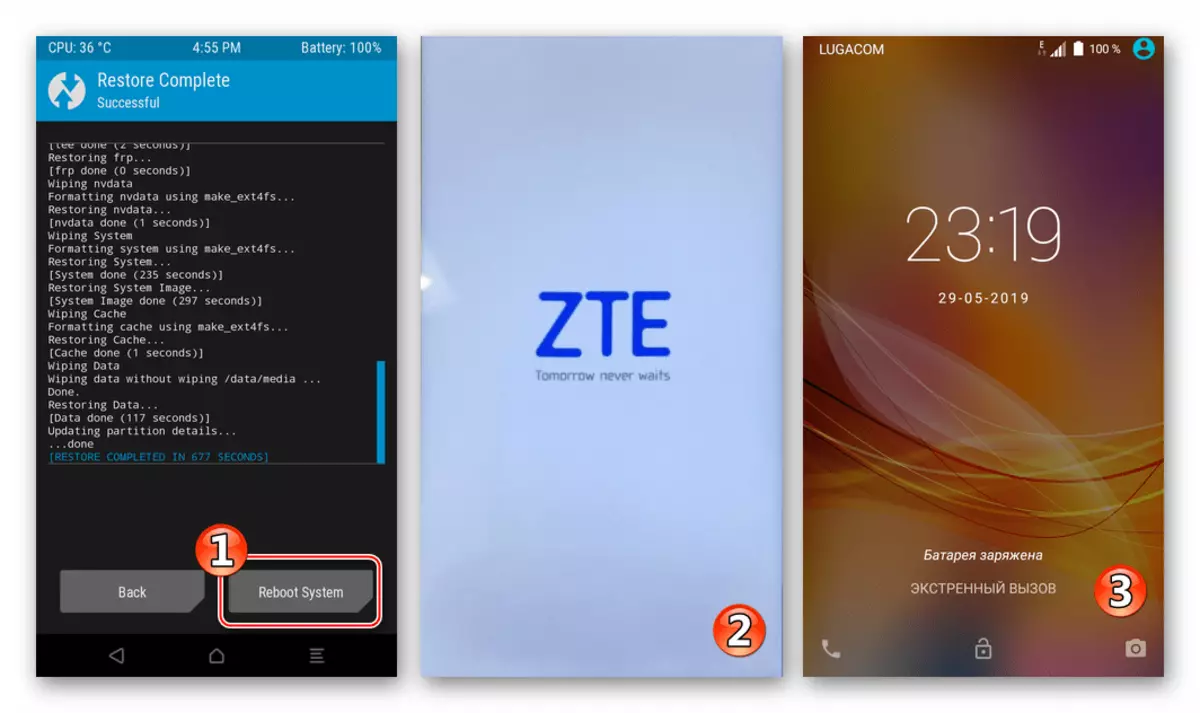
- After receiving the "Restore Complete Successful" notification at the top of the screen, click the "Reboot System" button and wait for the launch of Android.
NVRAM recovery via TWRP
In addition to the above-described restoration of the entire system from the Nandroid backup, when such is available, the modified recovery allows you to overwrite information from the backup of the individual phone memory areas, which can be used to eliminate the effects of damage "NVRAM" (recovery IMEI.).
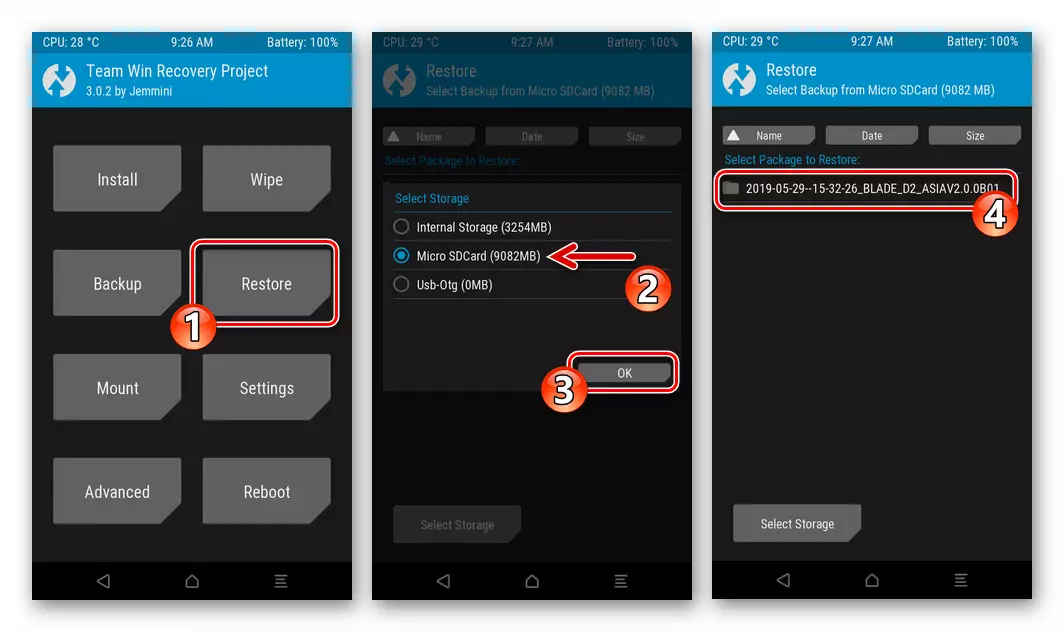
- We reboot the device in the TWRP and go to the "Restore" section of the medium. We specify the system to use a removable drive as a backup storage ("SELECT STORAGE"), and then select backup, tapping on its name.
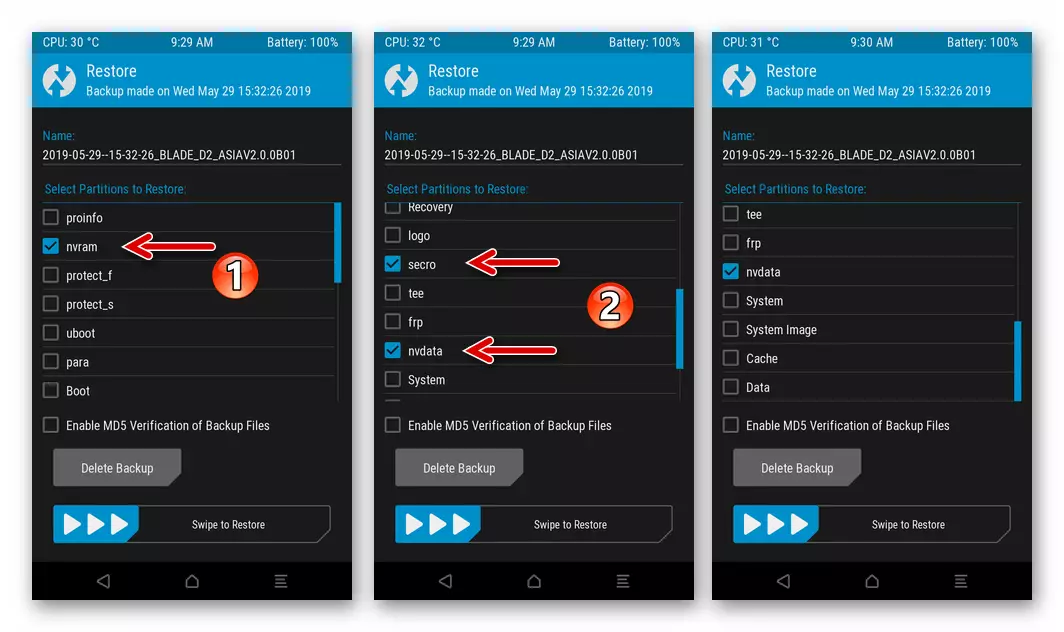
- We free from checkboxes, located next to the "Select Partitions to Restore" list items. To restore the calibration of the radio module and IMEI, you must install checkboxes only near NVRAM, NVDATA, as well as "SECRO".
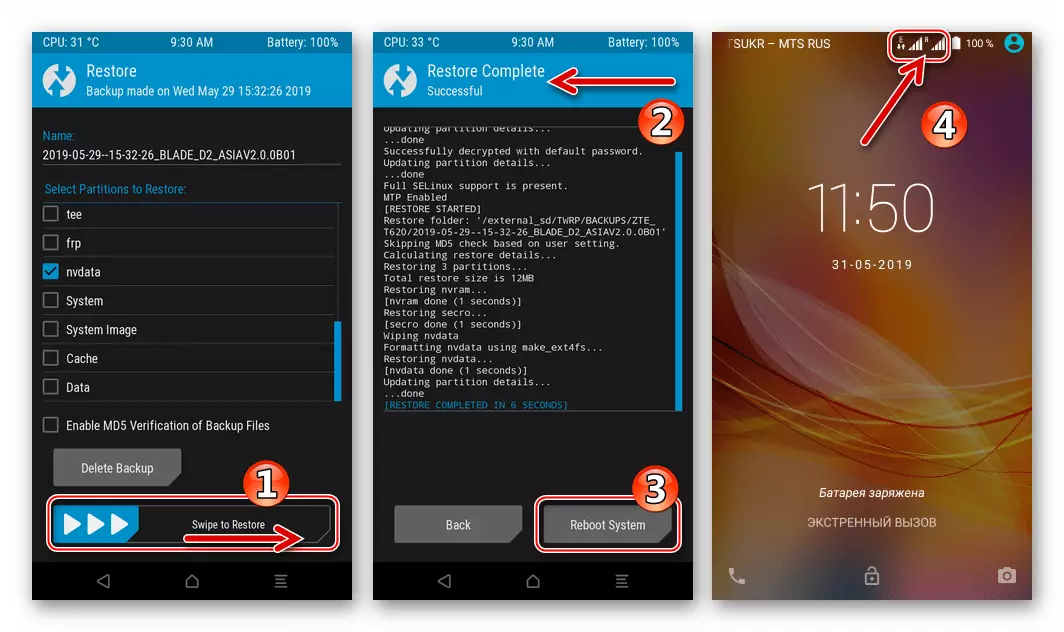
- We shift the "Swipe to Restore", we look forward to the appearance of the "Restore Complete Successful" notification, and then reboot in Android ("Reboot System") and evaluate the result of the manipulation.
Conclusion
The program tools recommended in the article with attentive consequences on their application provide ZTE Blade X3 users with any level of preparation the ability to solve the task of reinstalling the Android OS on the smartphone. As you can see, contact professionals to ensure the proper level of operability of the system-based on the device is not at all necessary, all operations can be implemented at home.