
Modern browsers and antiviruses are always trying to warn a user in advance that the virus can get to the computer. Most often, this happens when loading potentially dangerous files or visiting suspicious pages. Nevertheless, there are situations when the virus still penetrates the system. On how to identify and remove malware according to you and learn from this article.
Methods Removing the virus in Windows 10
We will look at three basic methods. All of them imply under the use of special programs for cleaning the system from viruses. You will also remain choose the most suitable and follow the proposed recommendations.Method 1: Using portable utilities
Sometimes viruses are so deeply penetrated into the system, which is striking even the antivirus installed in it. Install the new in such cases is unlikely to succeed - the virus is simply not allowed to do this. The optimal solution will be the use of one of the special utilities that do not require installation. Earlier, we wrote about them in a separate article.
Read more: Checking a computer for viruses without antivirus
As a visual example, we use the AVZ utility. To search and remove viruses with it, do the following:
- Go to the official website of the program, download the archive on your computer, and then remove all files from it into a separate folder. Next, run the utility from it.
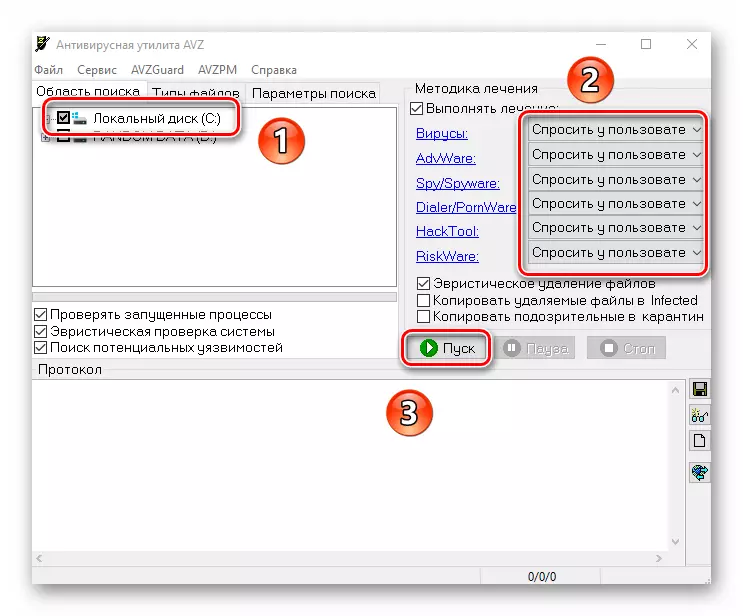
- In the left top area of the window, select a disk or folder you want to scan. If you do not know exactly where the virus can be, just specify all connected discs. In the "Treatment Methodology" section, switch all fields to "ask the user", since otherwise all the infected files found will be immediately removed. So, if you do not use the official version of OS or other programs, problems may arise with their further launch. After that, click the Start button to start scanning selected areas.
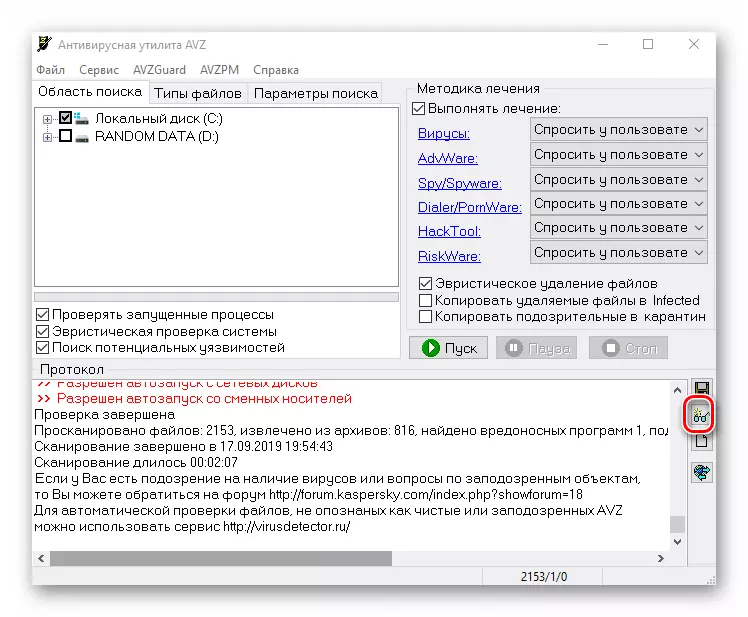
- When the check is over, you will see at the bottom of the window, in the area called "Protocol", a corresponding notification. There will also be displayed information about how many files is verified and how many threats are found. To view the threat list, press the button with the image of points on the right side of the "Protocol".
- The result will open a new window with a threat list. To remove them, check the box next to the title and click the "Delete marked files" button at the bottom of the window. Please note that the program scans very highly selected folders, so you can find modified system files. If you are not sure about their assignment, try first send files to quarantine by clicking on the same button to do. After that, click "OK".
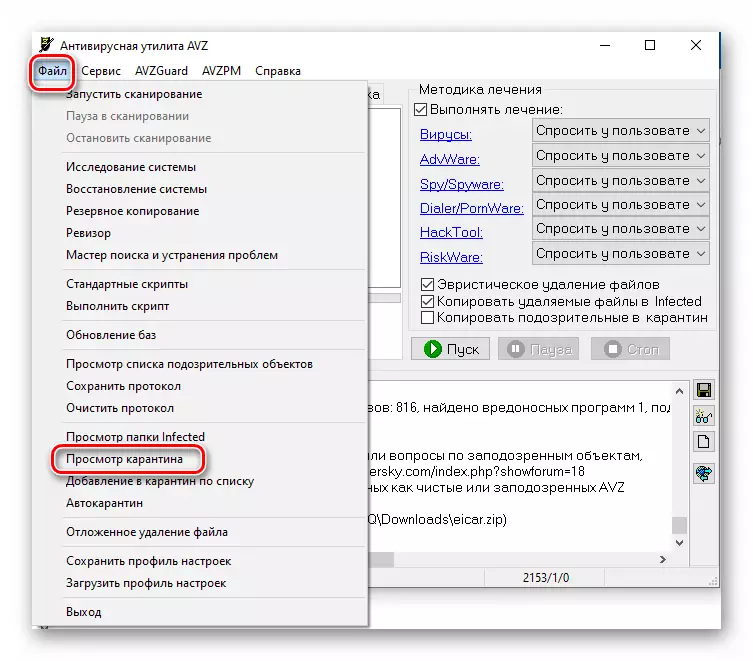
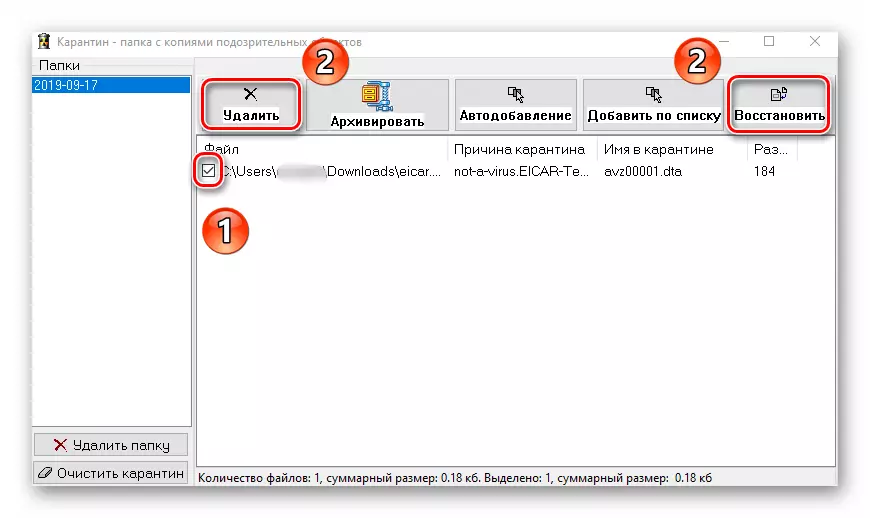
- To view the contents of quarantine in the main program window, use the File menu item, and then select the "View Quarantine" string.
- A new window will open. There will be displayed all the files that you added to quarantine. To restore them or complete deletion, check the box next to the title and click the button that matches your choice. After that, you can close the window.
- Upon completion of all operations, we strongly recommend reloading the system.

Method 2: Application of a full-fledged antivirus
Many users prefer to use third-party multifunctional antiviruses. You can find and delete malware and with the help of them. The review of the most popular and high-quality products on our site is devoted to a separate section.
Read more: Antiviruses for Windows
In this article, we use the free version of the Avast Anti-Virus. You can use it or any other solution, since the principle of operation in such programs is very similar. To search and remove the virus you need to do the following:
- Select an object for checking for viruses and click on it right-click. If necessary, you can choose all hard drives at once. In the context menu, use item "Scan Selected Areas for Viruses".
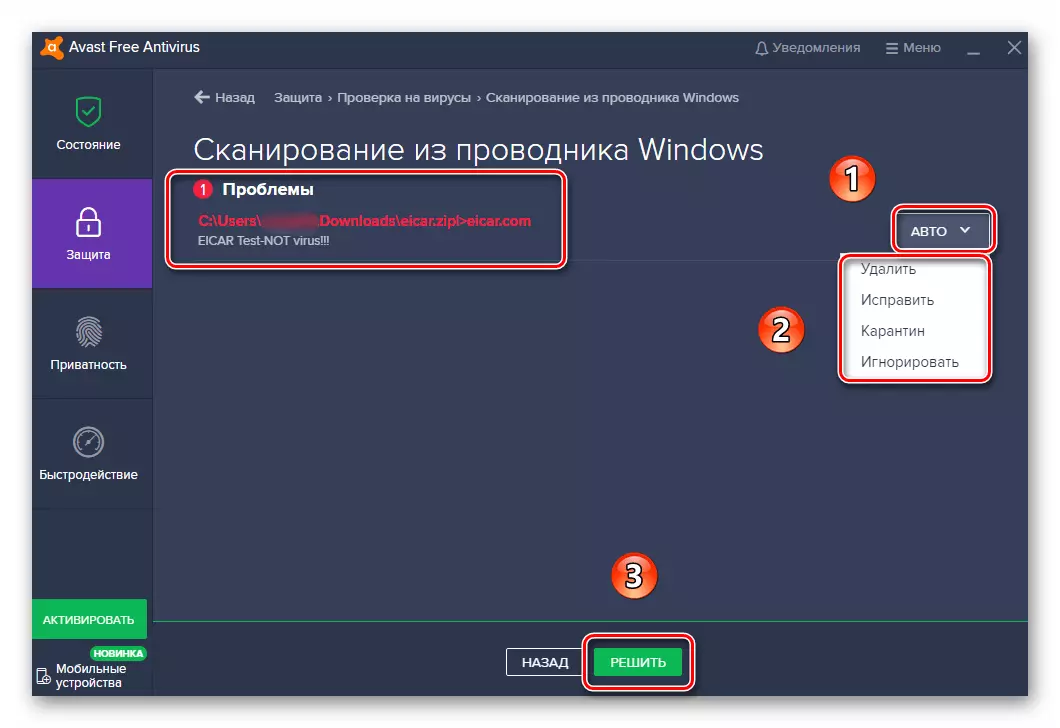
- The Anti-Virus window opens and checks the previously selected folders and files will automatically be automatically started. You need to wait until this process is completed, after which in the same window as a list will be displayed all potentially dangerous files that the antivirus found during the scan. In front of each of them there is a "Auto" button by clicking on which you can change the action applied to the file. To start cleaning, click the "Solve" button.
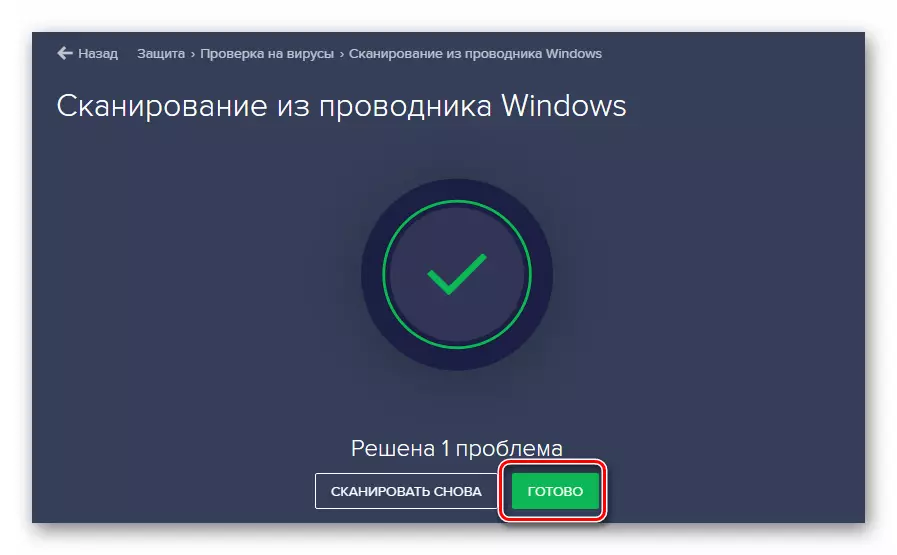
- As a result, a notification will be notified of the completion of the cleaning and the number of solven problems. Now you can close the antivirus window by pressing the "Finish" button.
- Restart the system to apply all changes. This is not a mandatory, but recommended action.

Method 3: Built-in Windows Anti-Virus
This method will suit those users who do not like to use third-party utilities and antiviruses, it is worth considering that in some builds of the Windows Defender operating system may be missing. The inspection of the built-in defender looks like this:
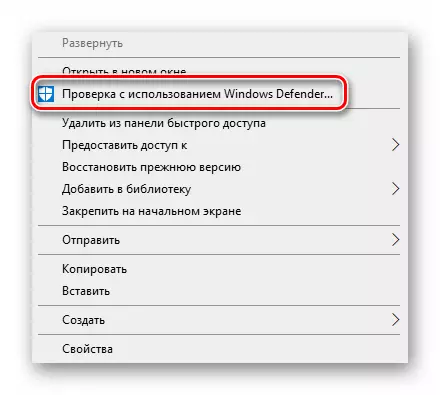
- On the folder or disk where the alleged virus is located, press PCM. The context menu will open, in which you want to select the "Verification using Windows Defender" string.
- A new window will open in which the check course will be displayed. The analysis time will depend on the size of the object being checked.
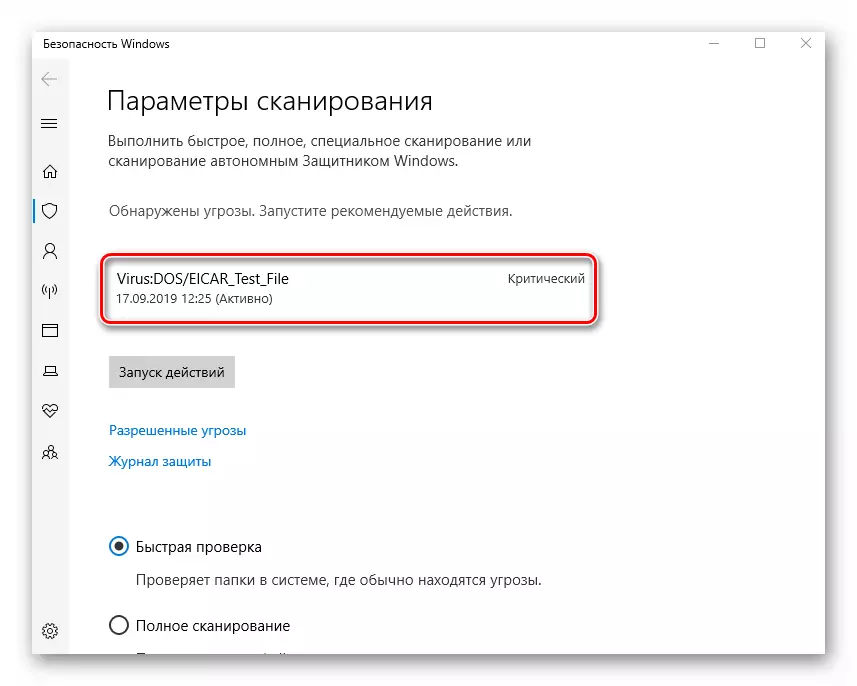
- After checking in the same window there will be a list of threats found. To select actions with respect to a specific file, click on its name.
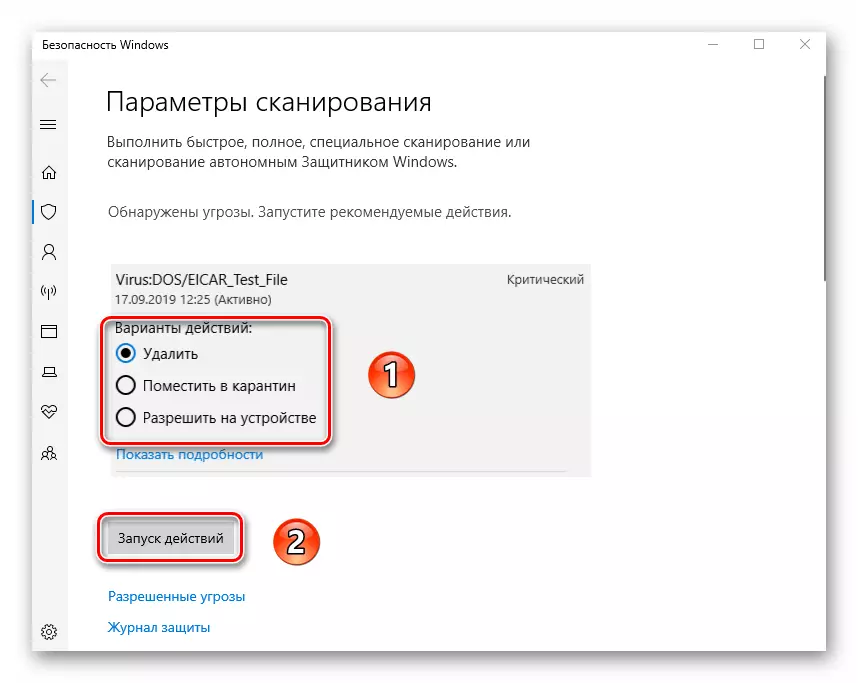
- The actions list will appear below: "Delete", "Place in quarantine" and "Allow on the device". Put the mark next to the desired field, then click the "Start actions" button.
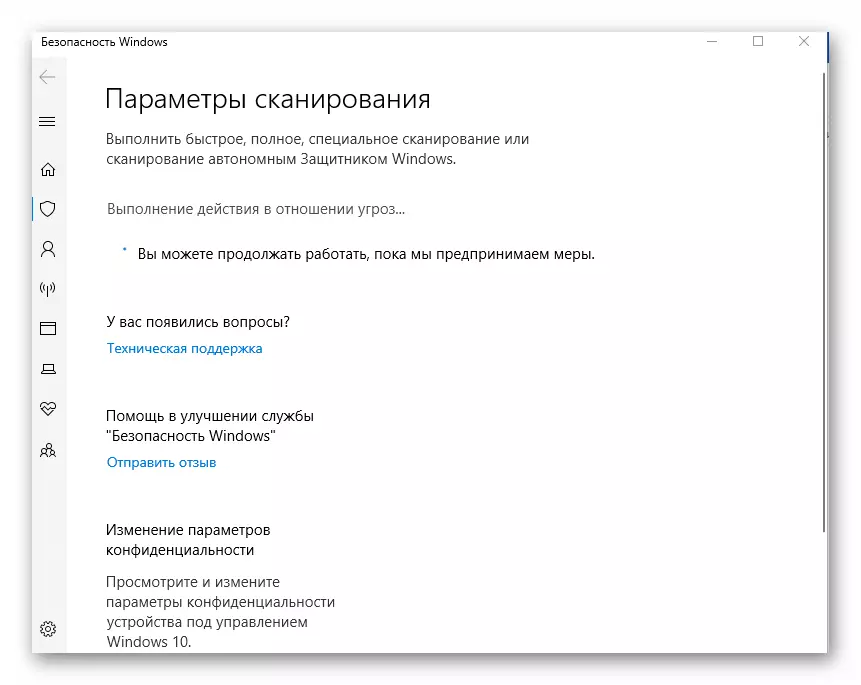
- Next, the process of treating, deleting or adding a file to exception will be started. The course of action will be displayed in the same window.
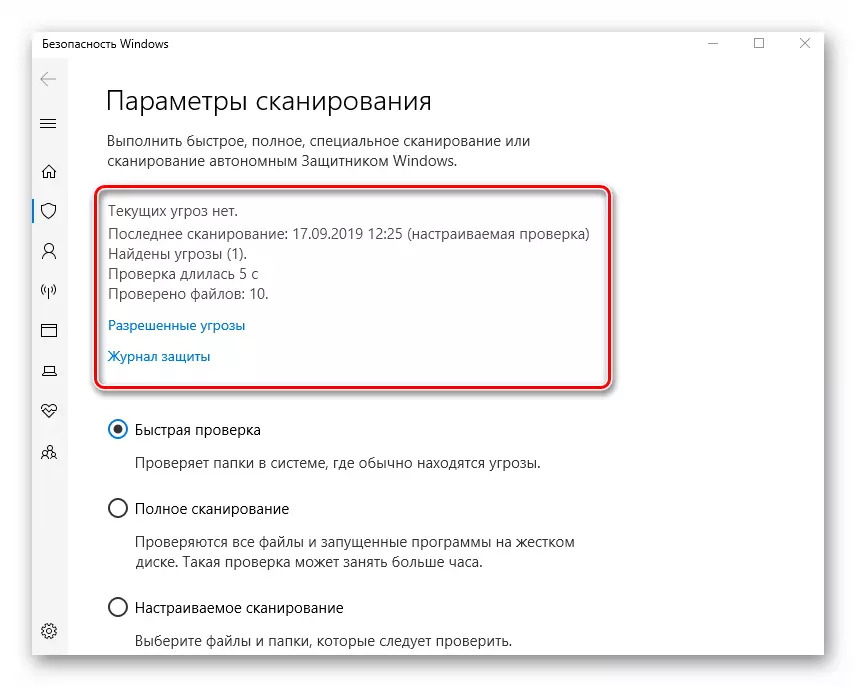
- Upon completion, you will see general information about the work done. There will immediately be referenced to the "Protection Log" and the list of allowed viruses, if any.
Taking advantage of one or several ways from this article, you will protect your computer from viruses. However, it should be remembered that there are no methods that will give 100% warranty. For example, with a "meeting" with advertising viruses, it is sometimes necessary to check vulnerable places manually.
Read more: Fighting advertising viruses