
It is difficult to challenge the fact that Viber as part of its destination provides everything necessary for effective communication and data exchange over the Internet. At the same time, some relevant users in individual situations in the messenger are not provided. In the next article, we will talk about the organization of recording voice and video calls - despite the absence of such an option in Weiber client applications, fix and save to the file generated during the VoIP call the flow of mediadens is quite possible.
How to write a conversation in viber
Depending on the device used to access the messenger, there are several different approaches to solve the task voiced in the title of the article. Next, we will tell how to organize the process of recording calls on Android devices, iPhone and Windows PC, but first warning:Regardless of the goal that you pursue a recording conversation with another person, note that in almost any country in the world such an action implemented without notifying the interlocutor and receiving permission from it to perform fixation and / or use in any way as a result of the recording, Is a violation of the law!
Android
To solve the task of recording conversations organized using Viber for Android, users of this option of the messenger application can use one of the funds created by third-party developers and in the abundance of the Google Play Market.
Method 1: Voice Calls
If the goal is to receive a record of voice calls only through the messenger, there is a mass of audio recorders that can effectively function in the "green robot" environment. Representatives of this software work according to a single principle, and one of the most simple and effective tools of this kind is called Cube Acr . The application is universal, that is, it provides the ability to record almost any calls without any problems, including VoIP calls carried out through Viber.
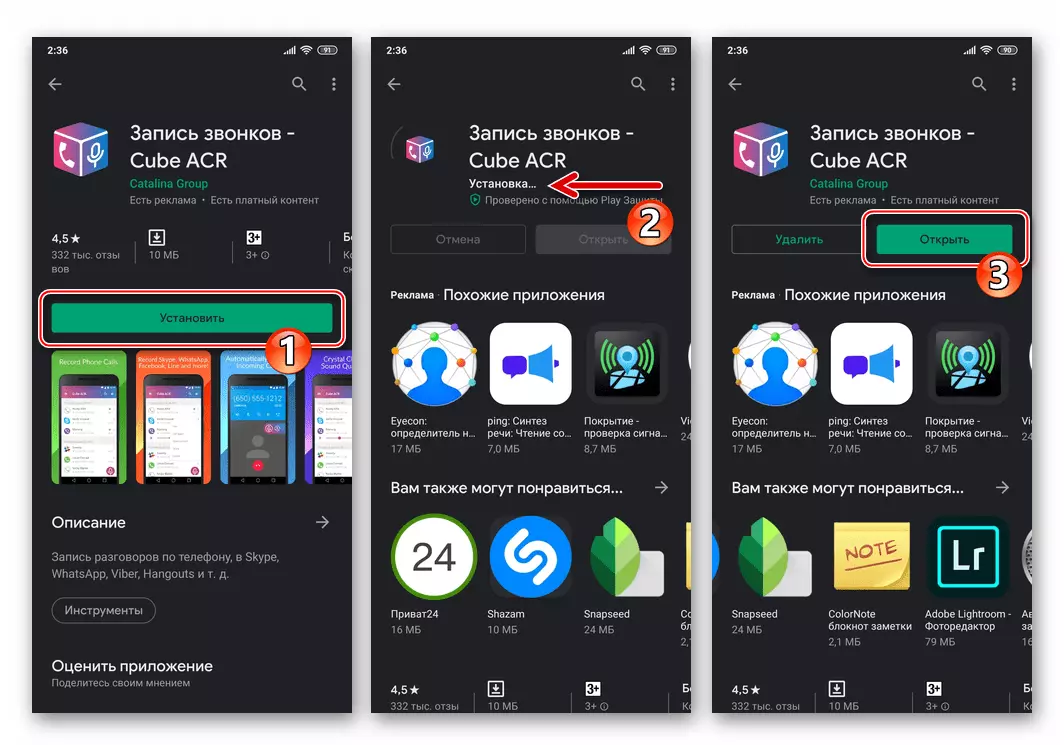
Download call recording application - Cube ACR from Google Play Market
- Install the tool from the Google Play shop by clicking on the link above.
- Run Cube ACR and configure application settings:
- Tap "Next" on the screen that opens when the screen tool is started. Now, having read the information in the window that appears, click "Accept".
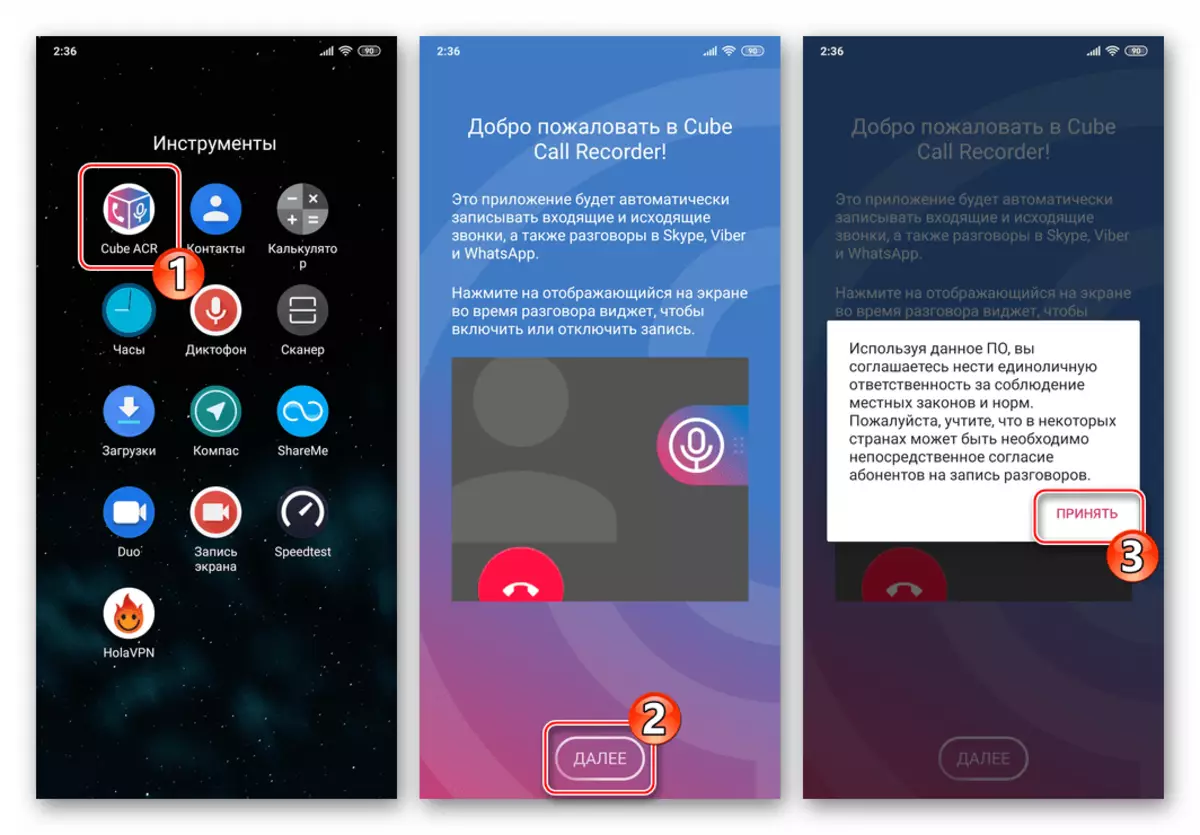
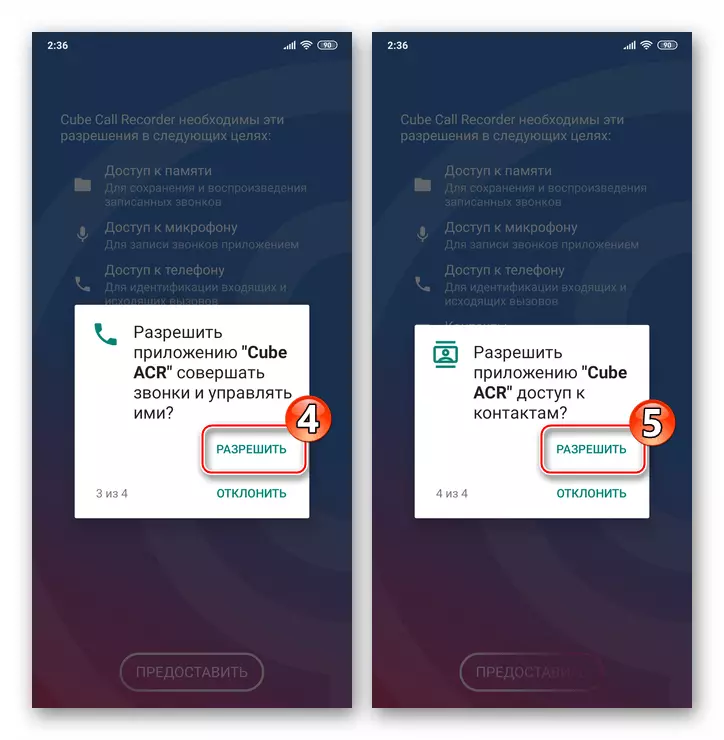
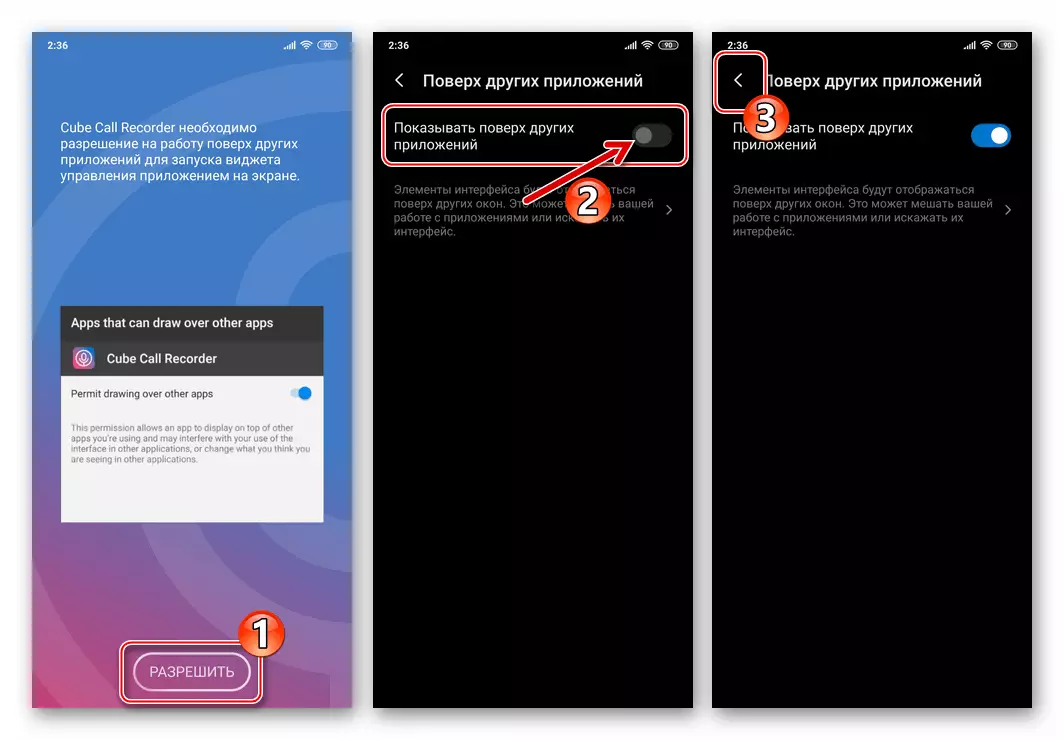
- The following screen demonstrates the list of Android modules to which the application requires access to effectively perform its functions. Tap here "provide", and then issue permissions,
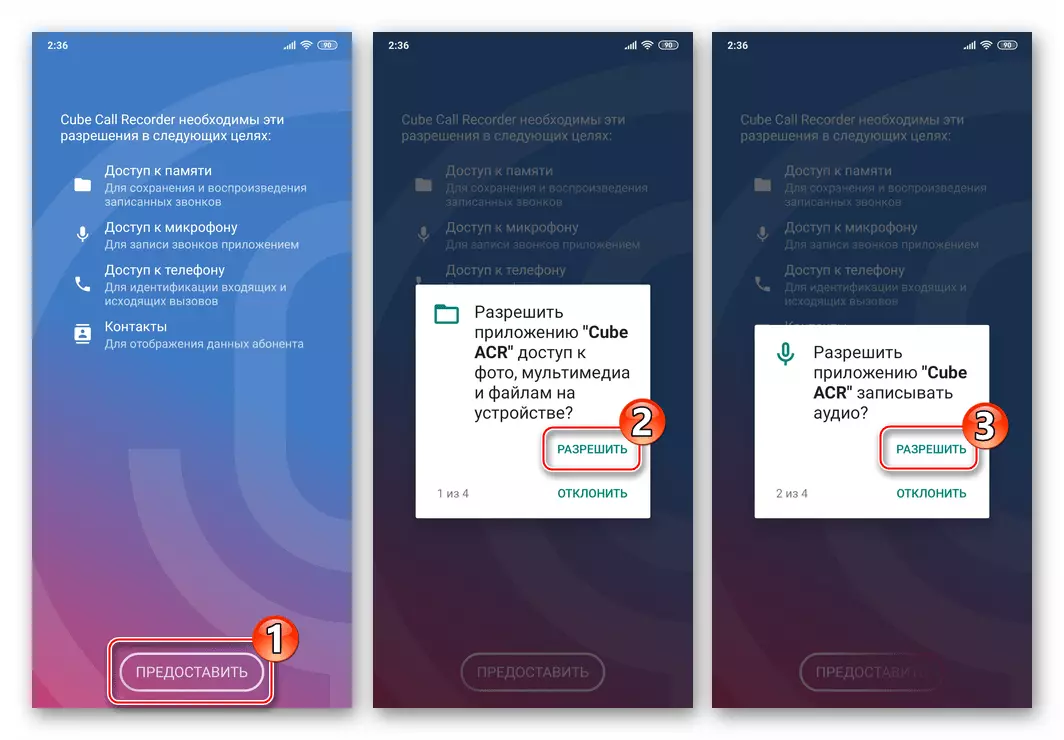
Confirming the emerging OS requests.
- Click "Allow" required to provide CUBE ACR permission to work over other applications. Next, activate the corresponding option switch on the screen that opens, and then tap "back".
- Touch "Enable App Connector". In the opened screen "Spets. Features ", in the" Downloaded Services "area, tap" more downloaded services ". Next, click "Cube Acr App Connector".
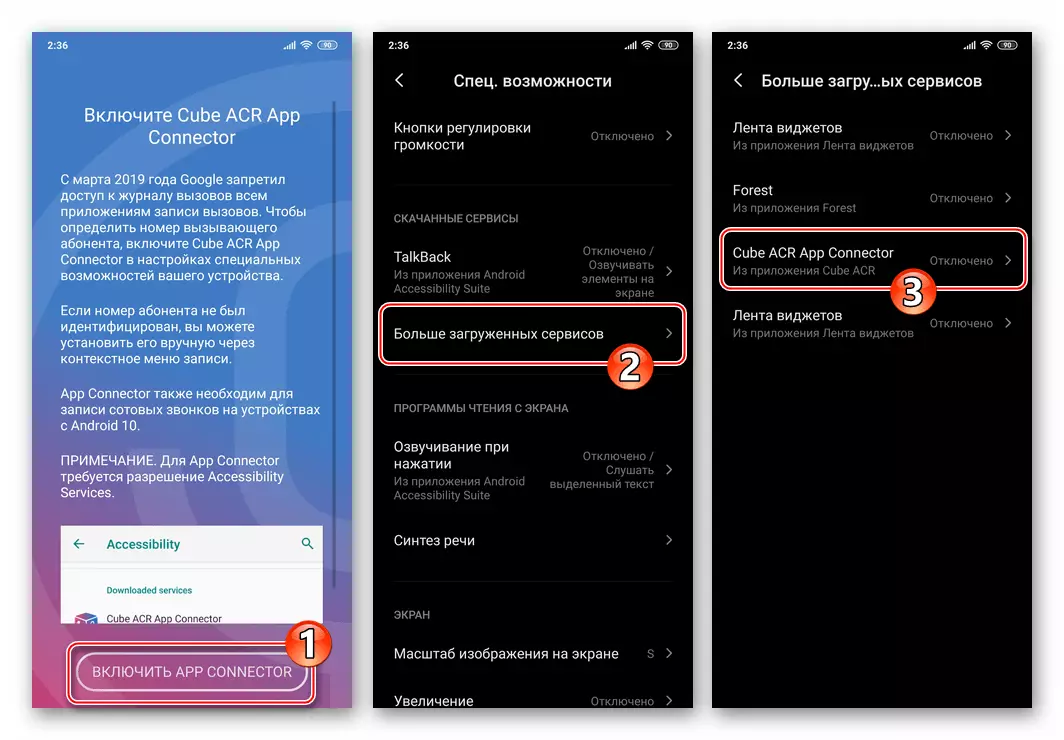
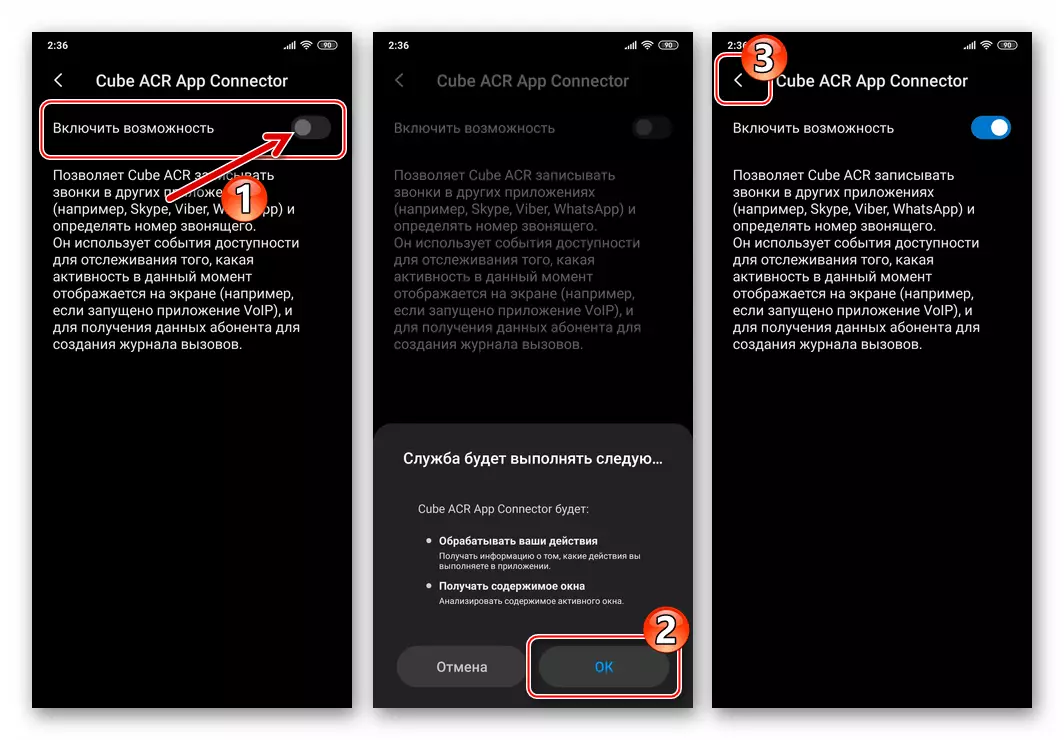
Put the "Enable Opportunity" switch to the "Activated" position. Confirm the system's request, tapping "OK". Then go back to the Cube ACR program screen, touched "back".
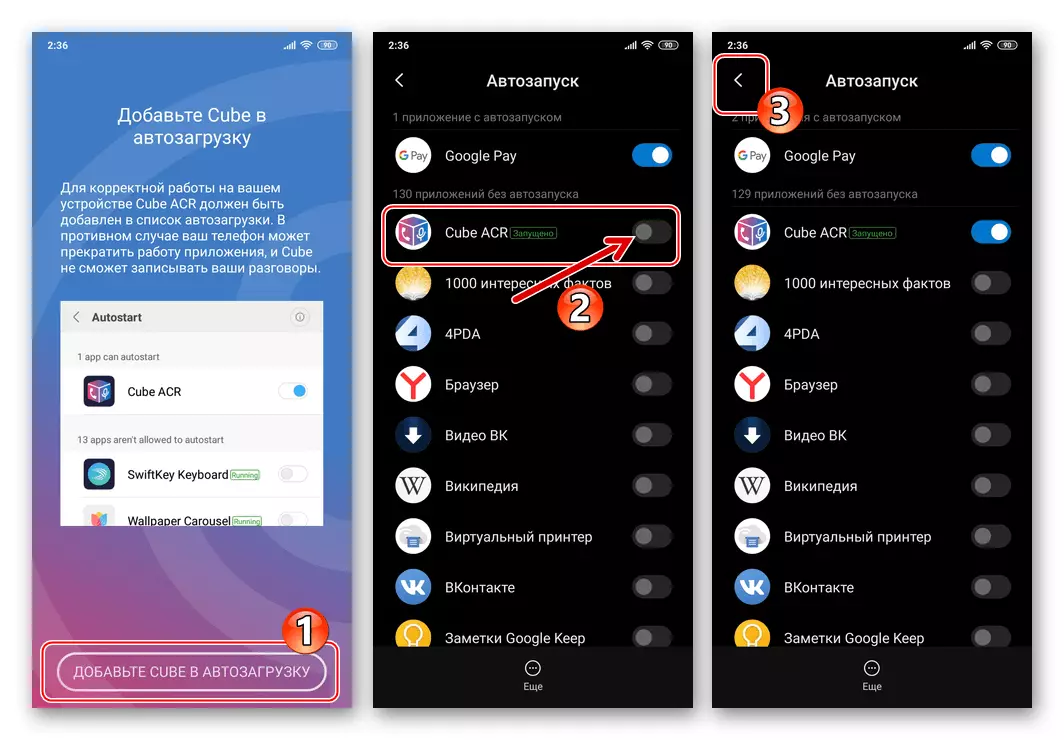
- Click "Add Cube to Startup", then, if you wish, activate this option using the application that is located next to the named list.
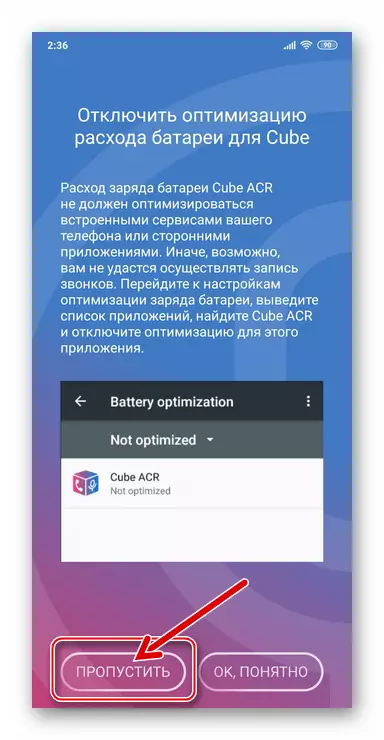
- On the next screen, it is recommended to click "Skip", but you can execute the instructions displayed on the screen, if you understand what is speech.
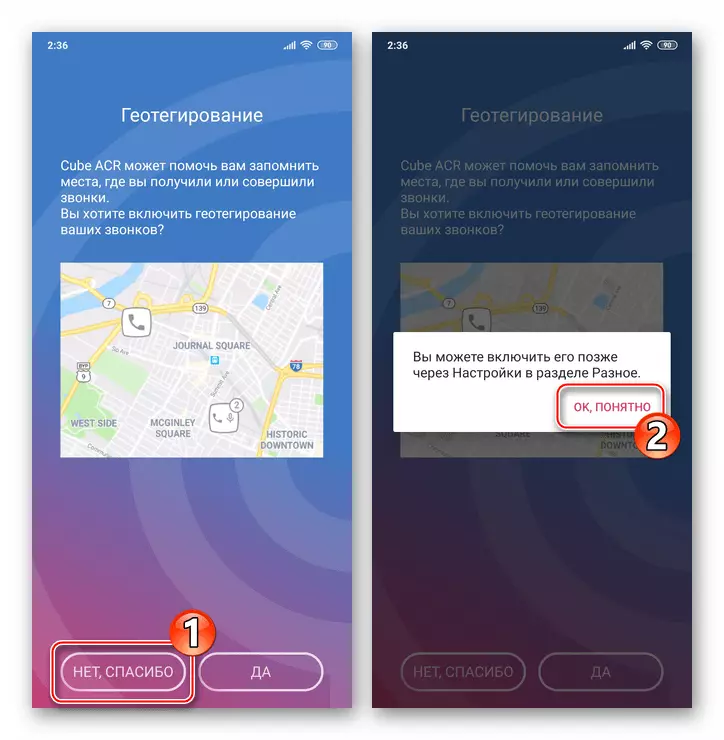
- Include "Geotargy" by clicking "Yes", or refuse the opportunities described on the screen, touched "no, thank you."
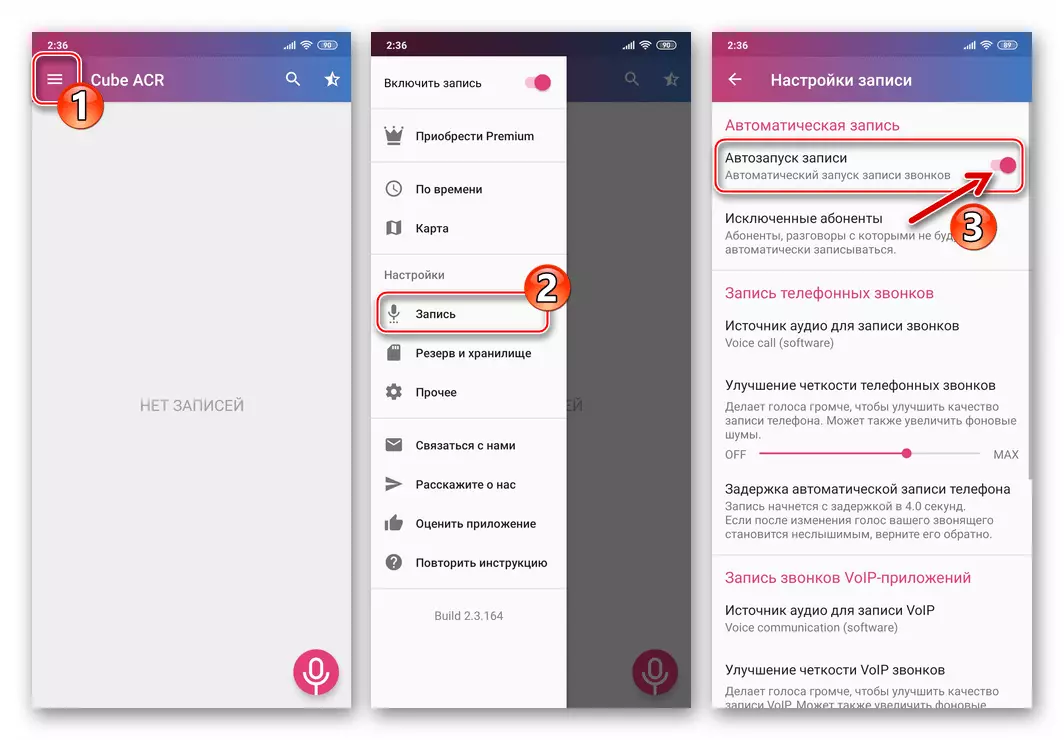
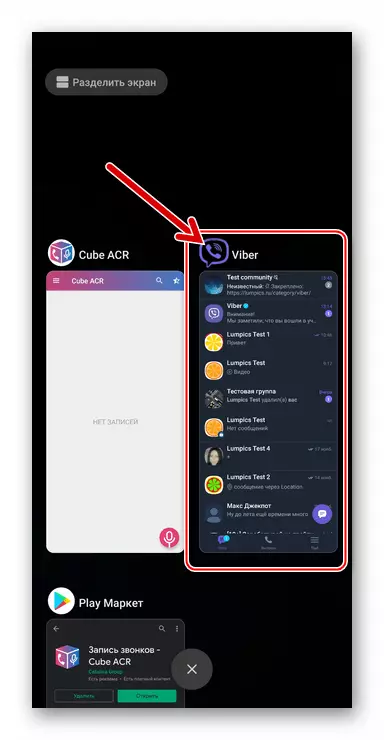
- Call the main menu of Cube ACR, tapping three Chertok at the top of the screen on the left, go to the "Record" section. Deactivate the first "Auto-timing" option for the account, unless you want absolutely all calls on the phone automatically and without your intervention.
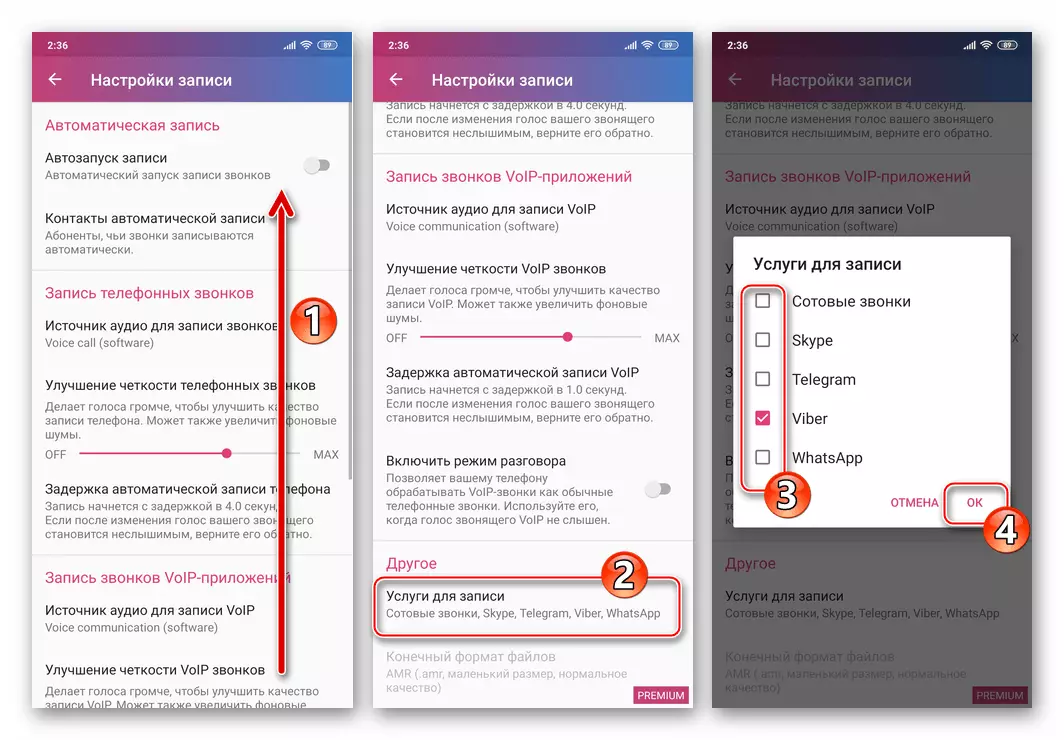
- Scroll to the "Record Setup" menu and tap "Record Services" in the "Other" section. Our material addresses the question of fixing calls carried out exclusively through Viber, so in the displayed list, remove the checkboxes near the names of other messengers and the Cell Calls item, and then tap "OK".
- This appropriate setting is complete, you can leave it and start implementing the goal.
- Tap "Next" on the screen that opens when the screen tool is started. Now, having read the information in the window that appears, click "Accept".
- Recording conversations.
- Outgoing calls:
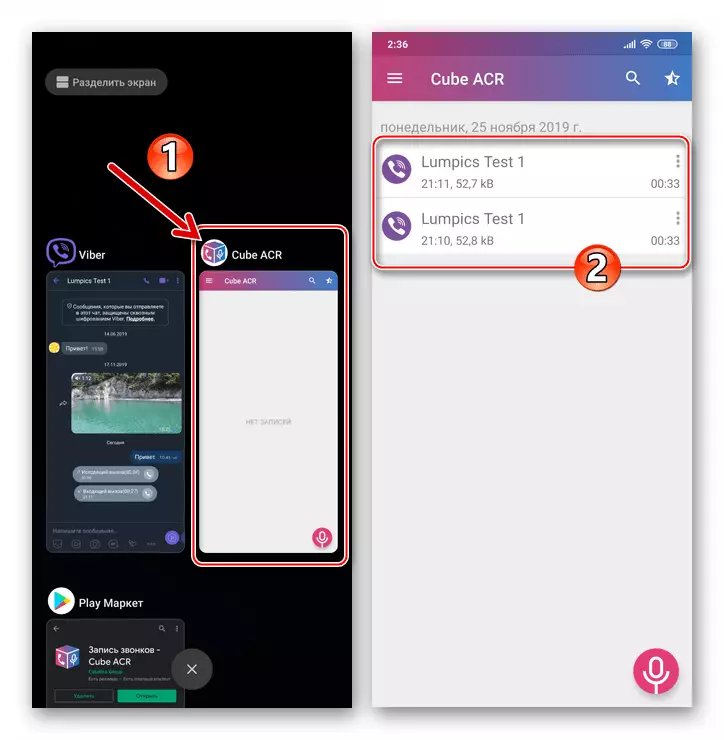
Run Viber for Android and in any familiarly initiate a call to another system participant (no matter, with video or without video).
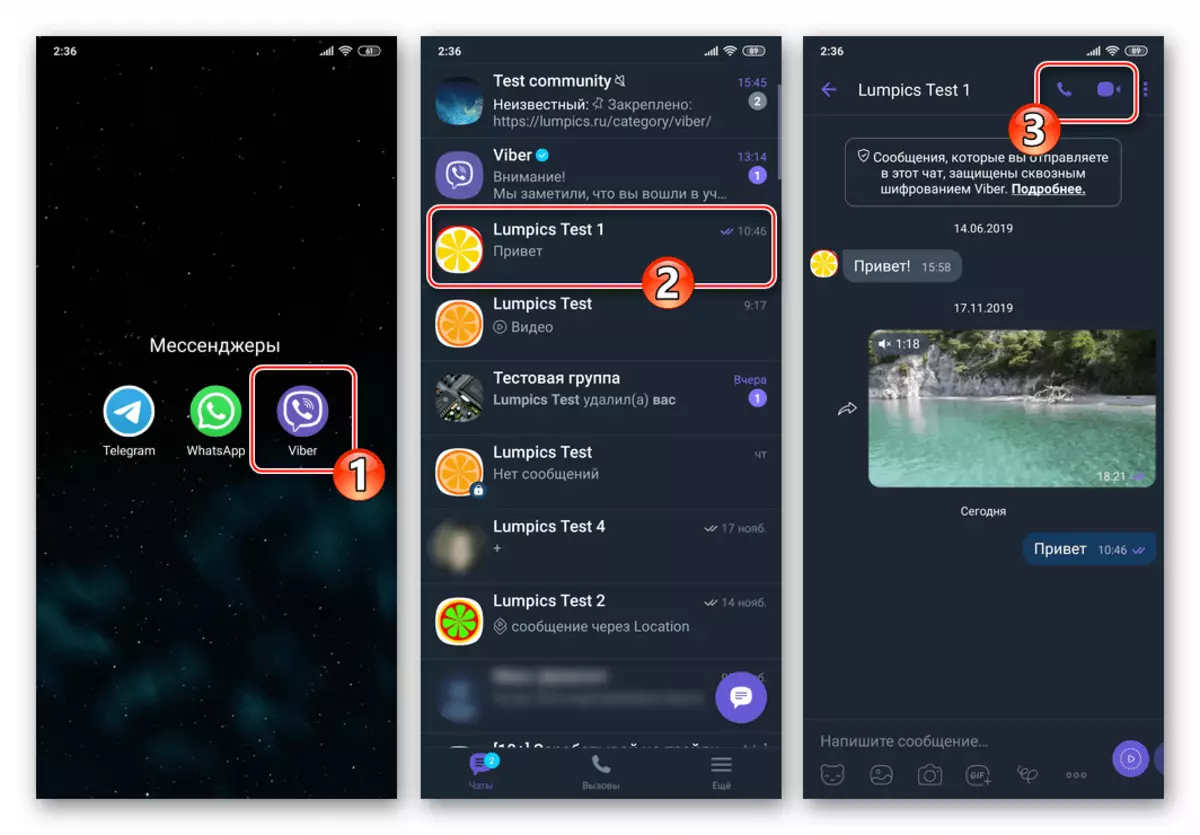
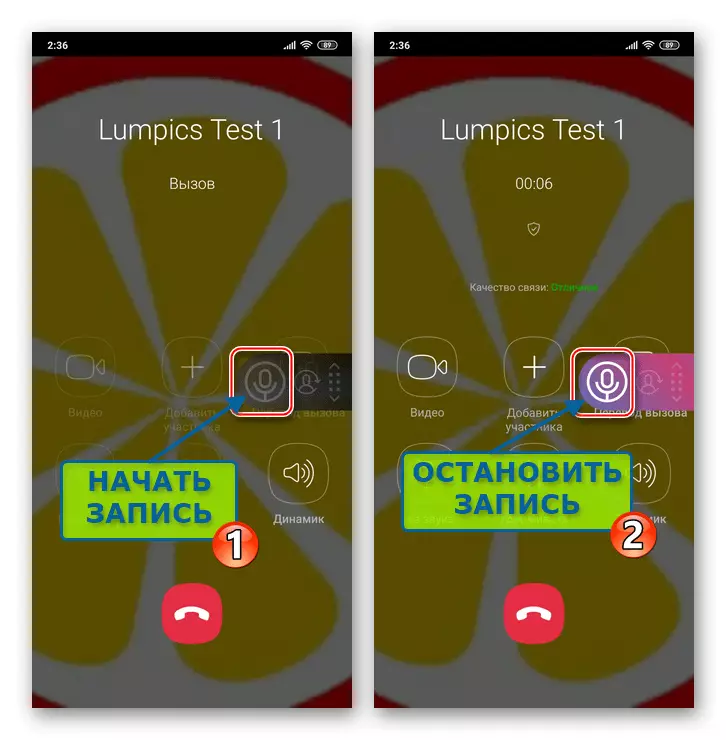
At the time of clicking on the "Call" button in the messenger, the Cube ACR widget appears on the smartphone screen - click the Microphone button, which will lead to the beginning of the audio flow of the audio device generated by the phone. By clicking on the specified button again, you stop recording.
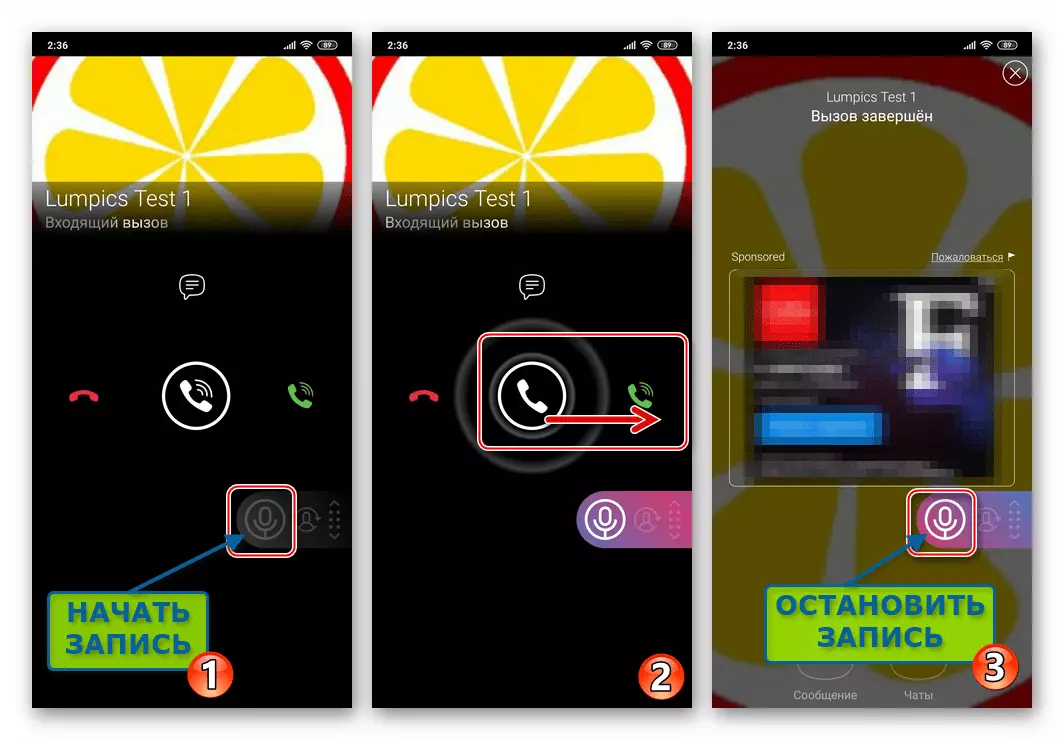
- Incoming calls:
Everything is carried out by the principle described for outgoing calls, only the "Recording" button must be pressed until you "raise the tube" - the Cube ACR application widget always appears on top of displaying the receipt of the screen call.
- Outgoing calls:
- Operations with audio recordings.
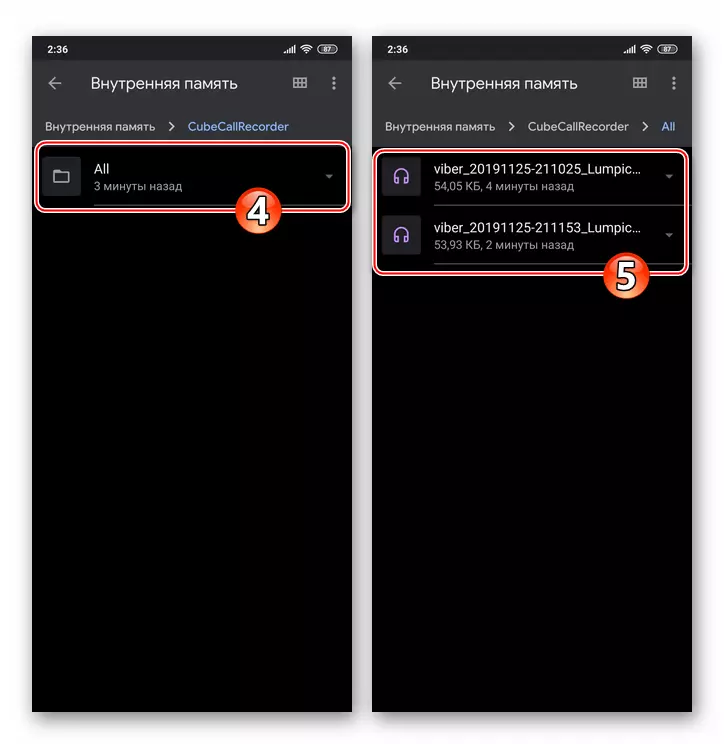
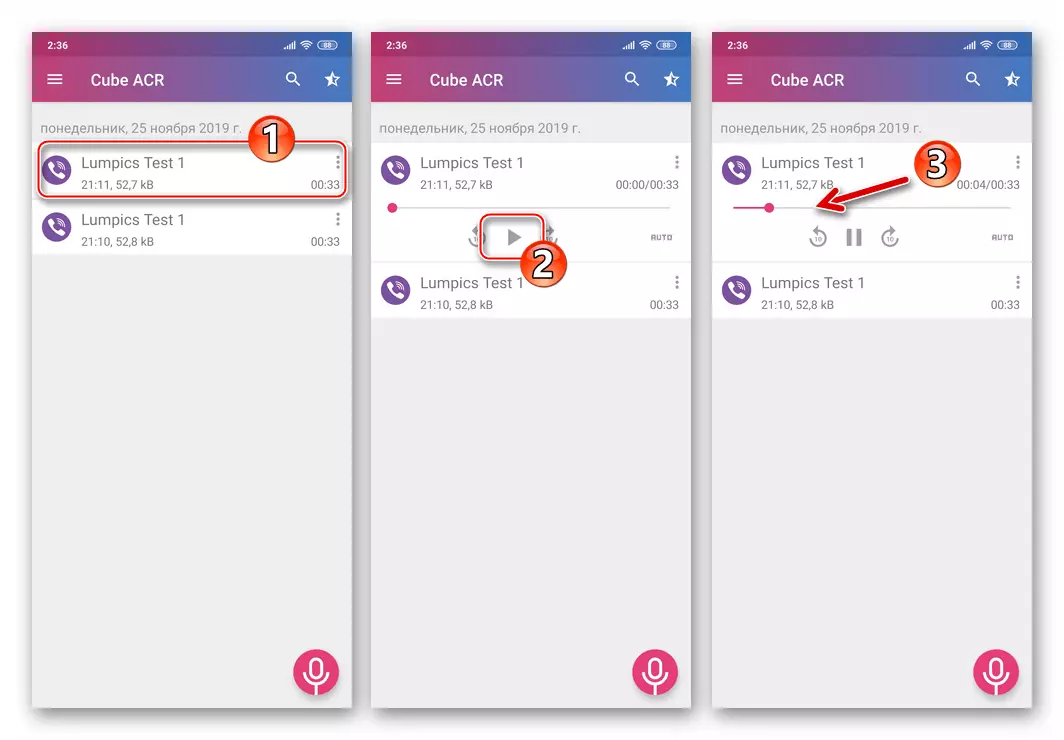
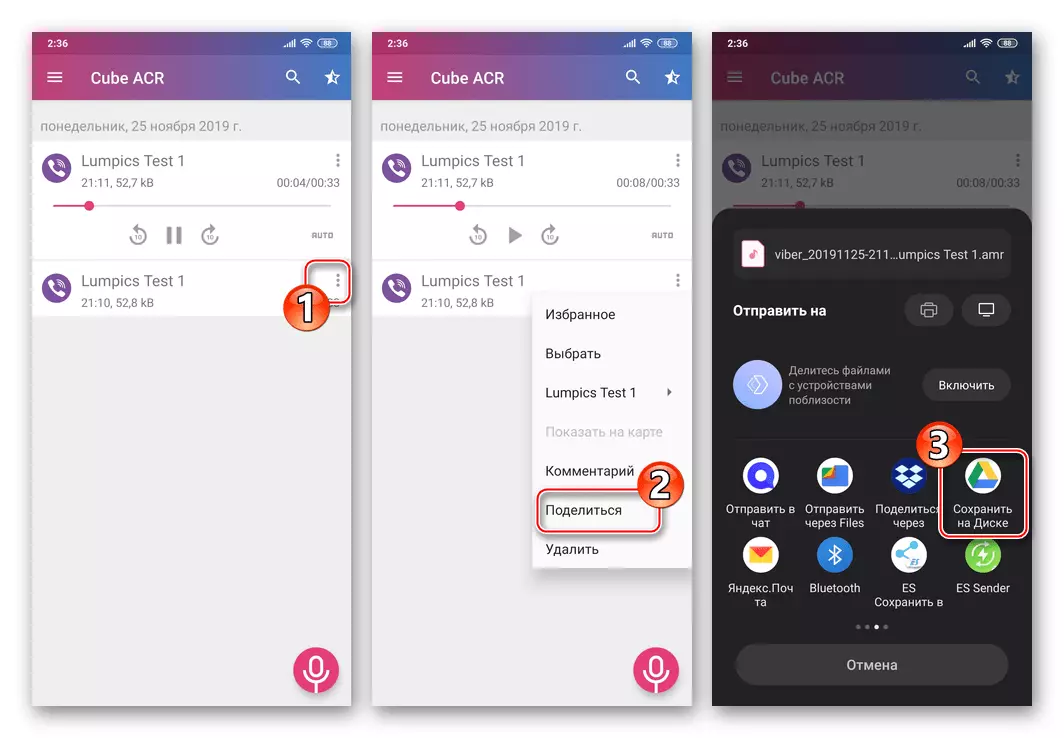
- Open Cube ACR - on the main application of the application you will find a list of all recorded calls.
- Here you can listen to the received audio recordings, taping by name any of them and then touching "Play".
- Among other things, you have access to the ability to call the action menu by pressing three vertically located points near any audio file name. Most often, it is required to use "Share" (for example, to send an entry to another user or saving it in the cloud storage) and "delete".
- In addition to the recorder's application itself, access the call files allows any file manager for Android - go through the preferred "Explorer" along CubecallRecorder / All
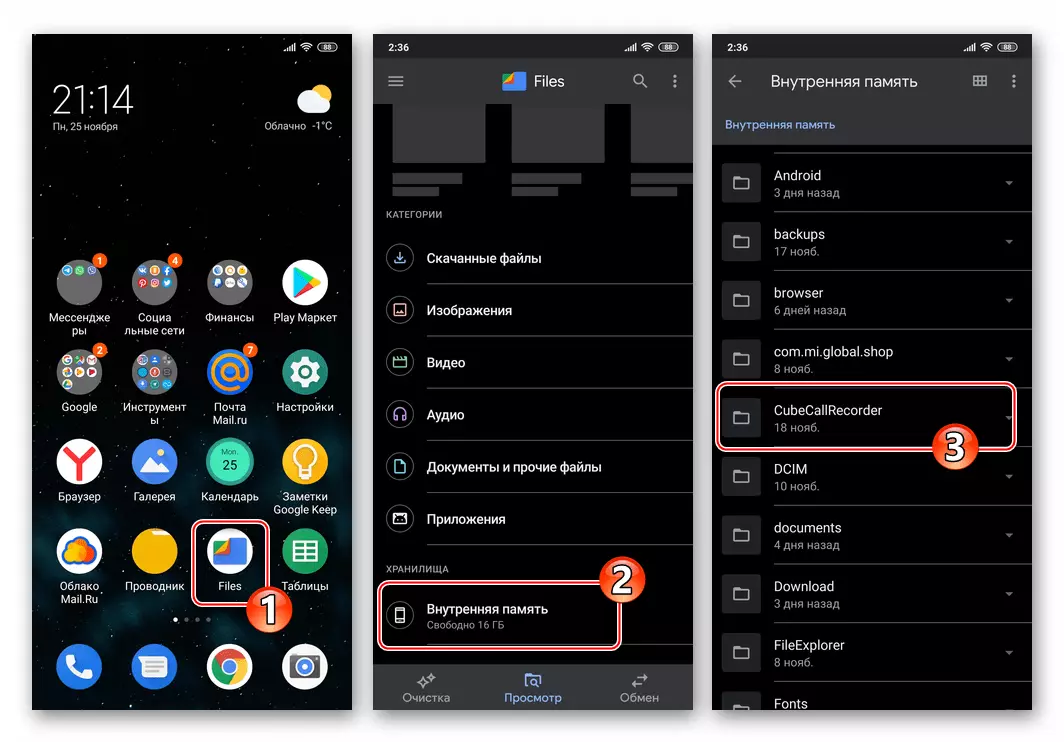
In the internal memory of the device.
Method 2: Video Soviet
As in the case of voice calls, a third-party tool from the Google Play of the Market will be required to fix via Viber Video calls through the Messenger. All allowing to solve the specified application task work on the principle of recording the information displayed on the screen and the simultaneous capture of the audio from the microphone. In other words, to record video call You can use almost any application designed to create screenwrites in the Android environment.
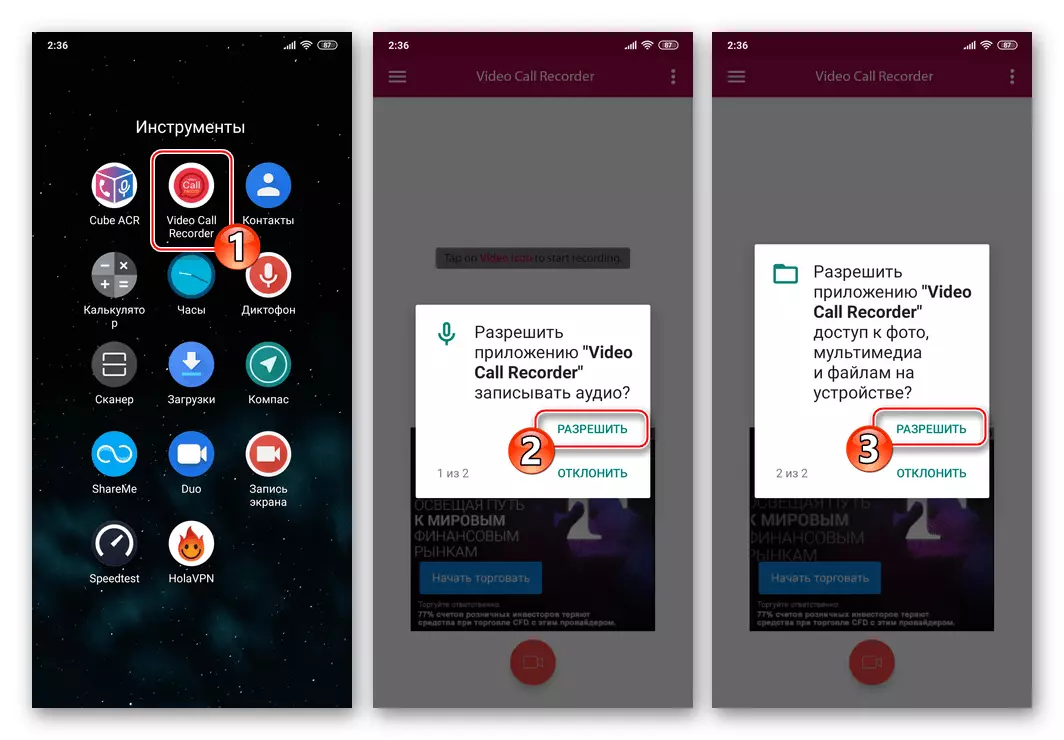
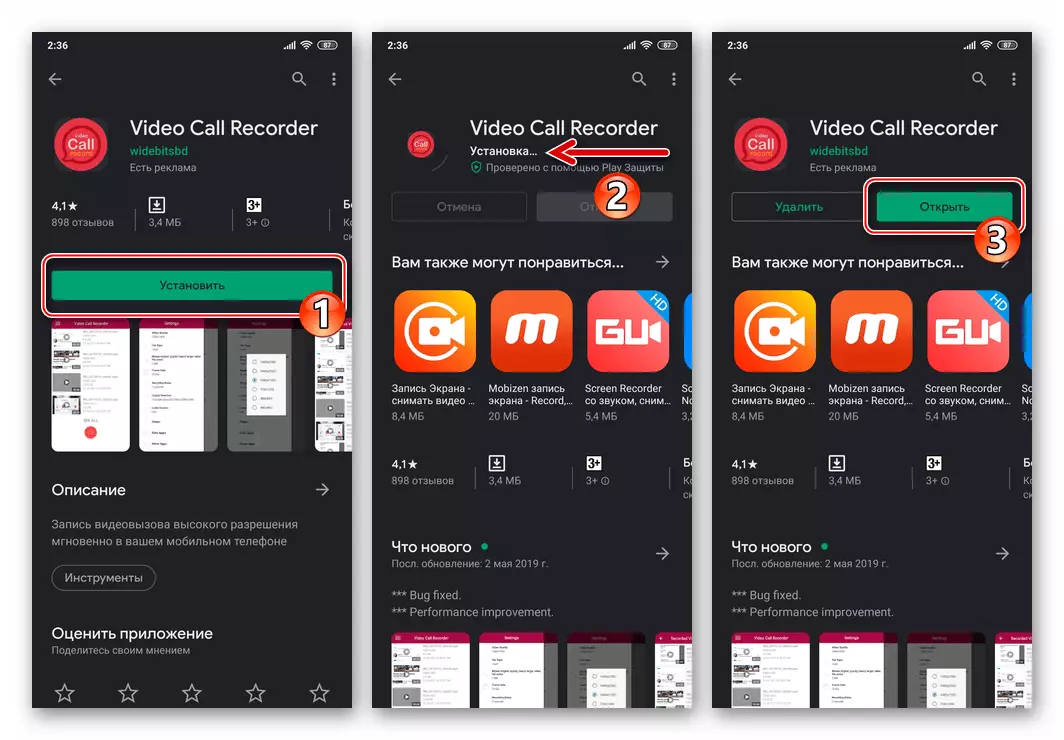
For example, we use one of the funds allocated among other similar similar to the name of our article by the title - Video Call Recorder..
Download Video Call Recorder Google Play Market
- Go to the above link and install the Video Call Recorder from the Google Play android app store.
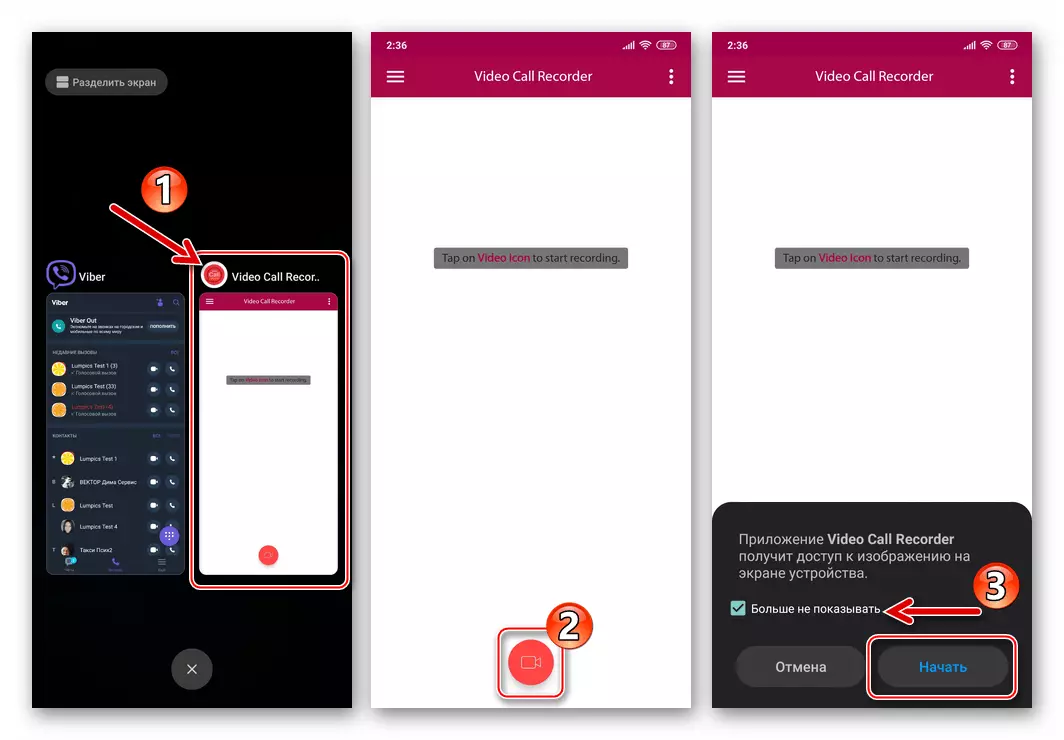
- Open the Call Video Recorder. To fully fulfill its functions, the application will need access to multiple Android modules - provide the resolution requests required in the first time when you appear.
- In fact, the program is ready to fulfill its destination. Roll the Video Call Recorder, open the Viber and go to the screen from which it is possible to initiate video call.
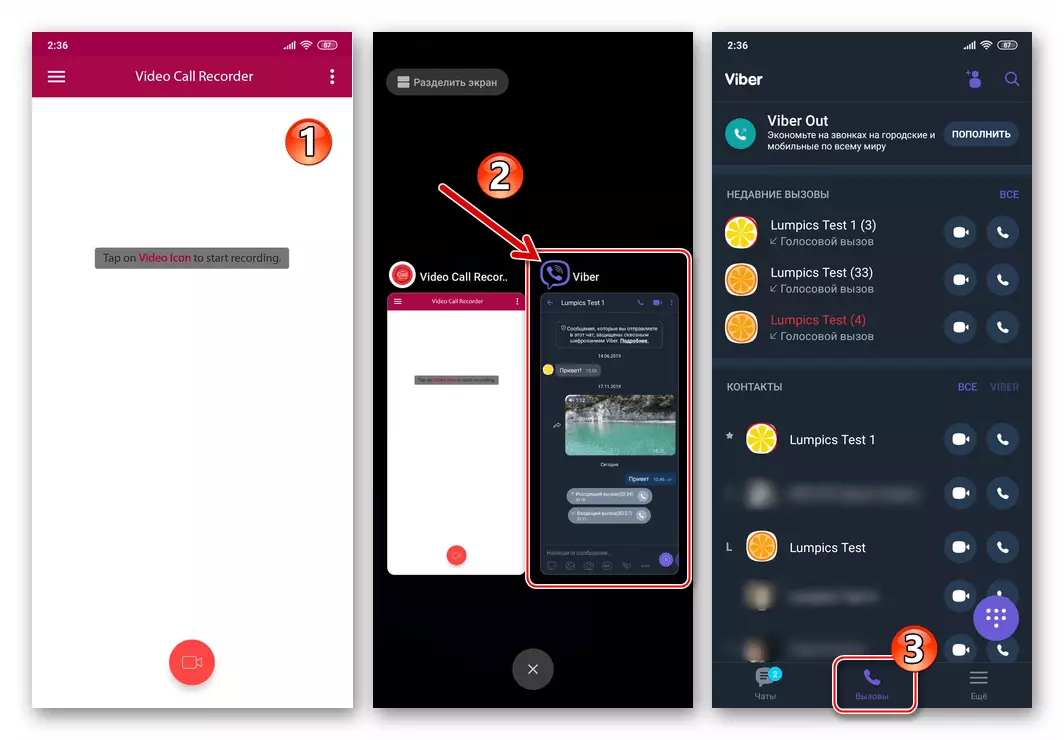
- Go to the recorder and tap the "Video Camera" button. After three seconds, the delay can be adjusted in the application settings) will begin fixing the information shown by the smartphone screen, and at the same time sound from its microphone. When you start the recording, a warning will be displayed that the software will access the image on the display, - set the checkbox "no longer show" and then tap "Start".
- Go to Messenger and move video calls.

- Upon completion of the conversation, return to the video call recorder and tap "Stop".
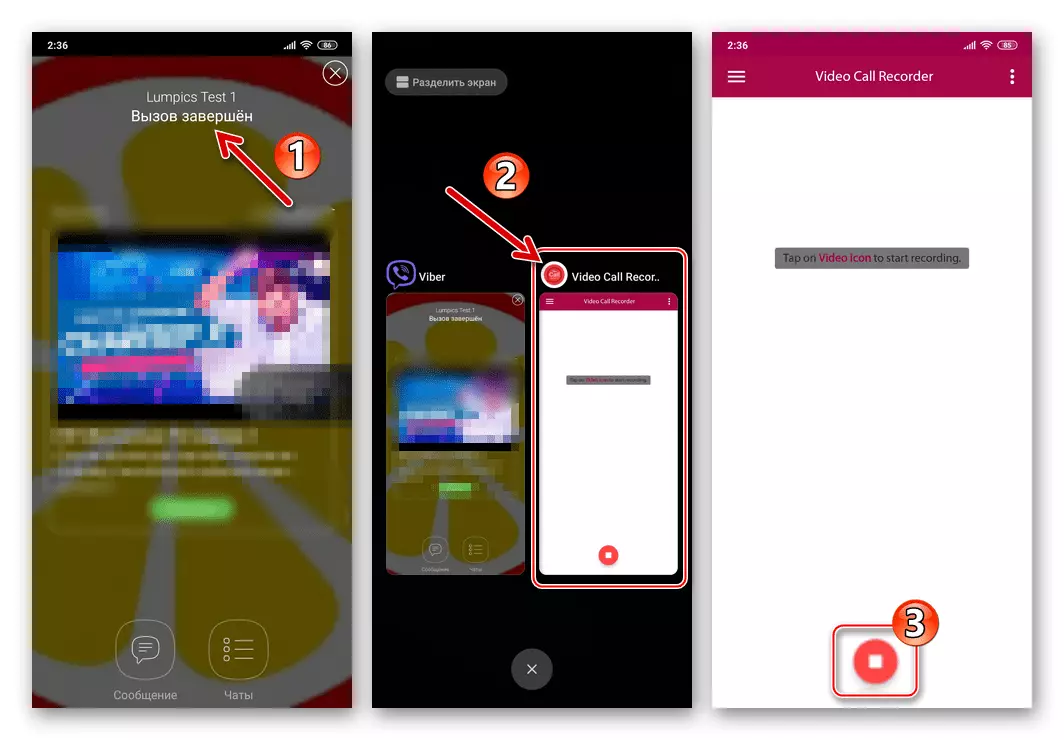
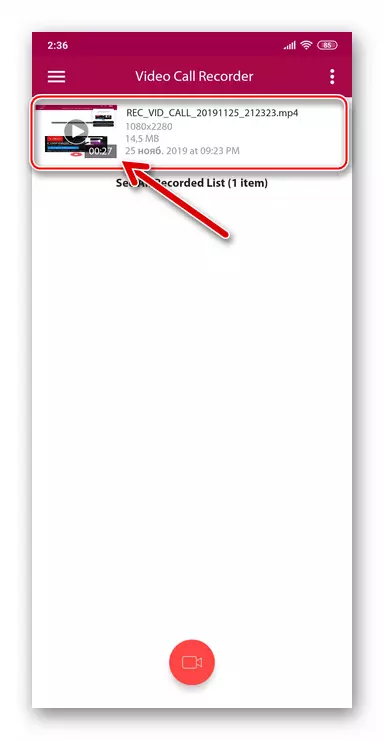
The recording created as a result will immediately appear at the top of the application screen as a preview of the name. On this task of the record of the video call carried out through the messenger, it was solved.
- Additionally, you can trim the obtained video, which is required in most cases. To do this, tap the name of the video confixation on the Video Call Recorder screen, then tap three points next to the file name, call the Action Menu and select "Edit Video" in it.
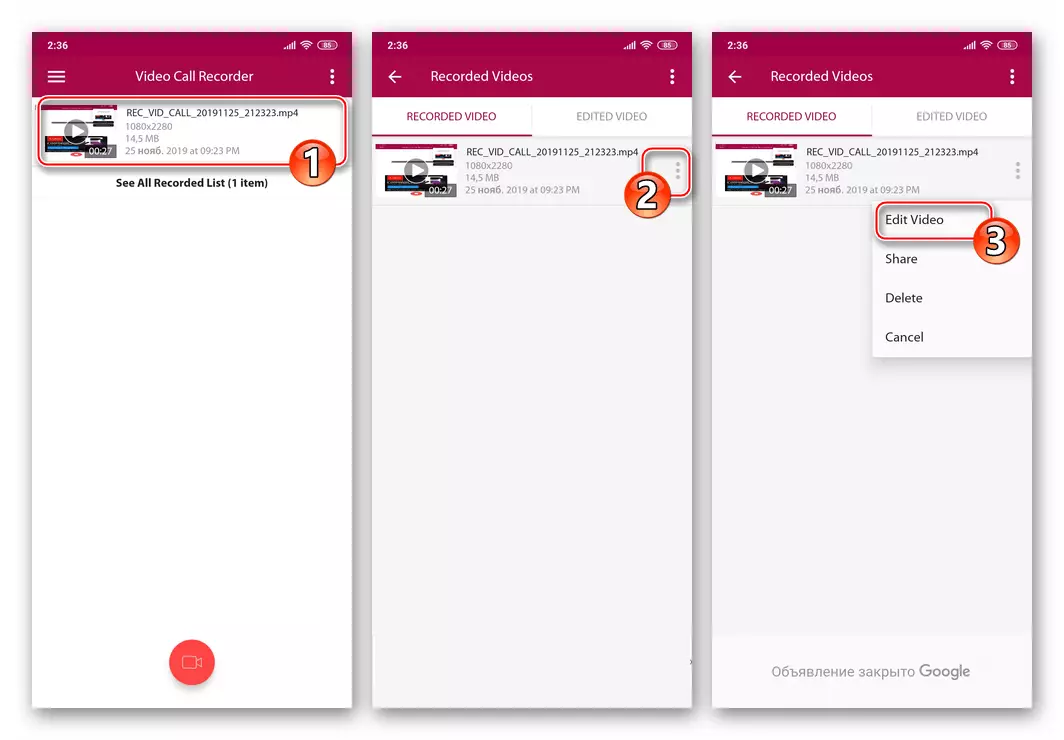
Next, slide the sliders to the right and on the left in the panel with the video sequence, thus removing extra fragments at the beginning and end of the record. After completing the editing tap Save.
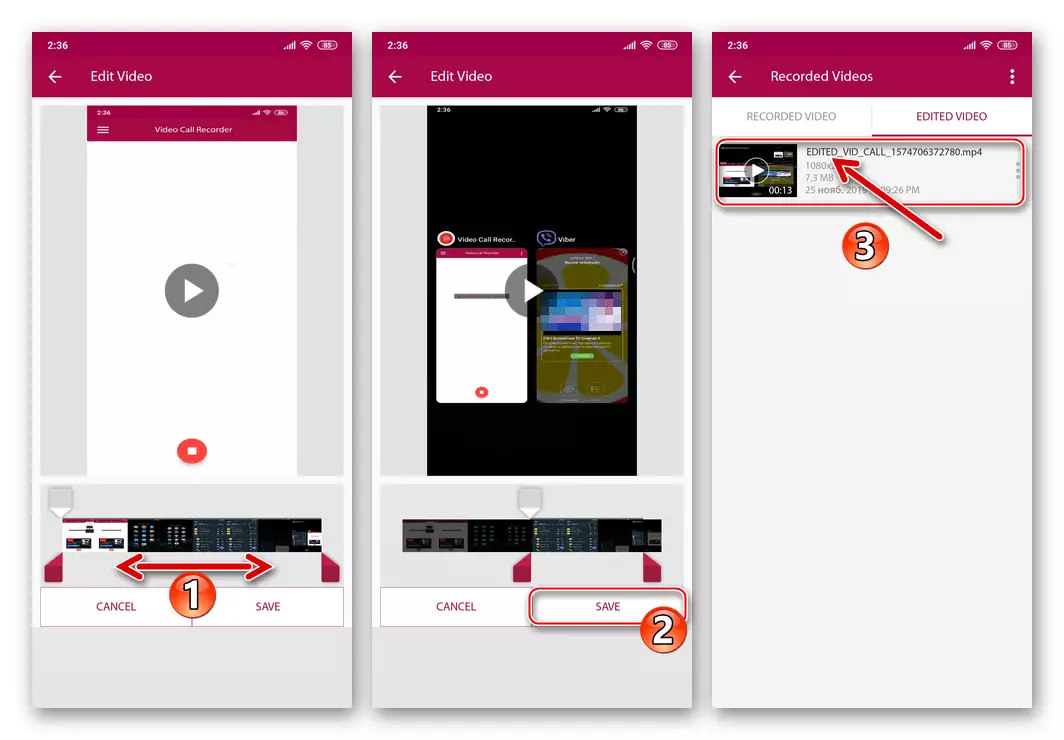
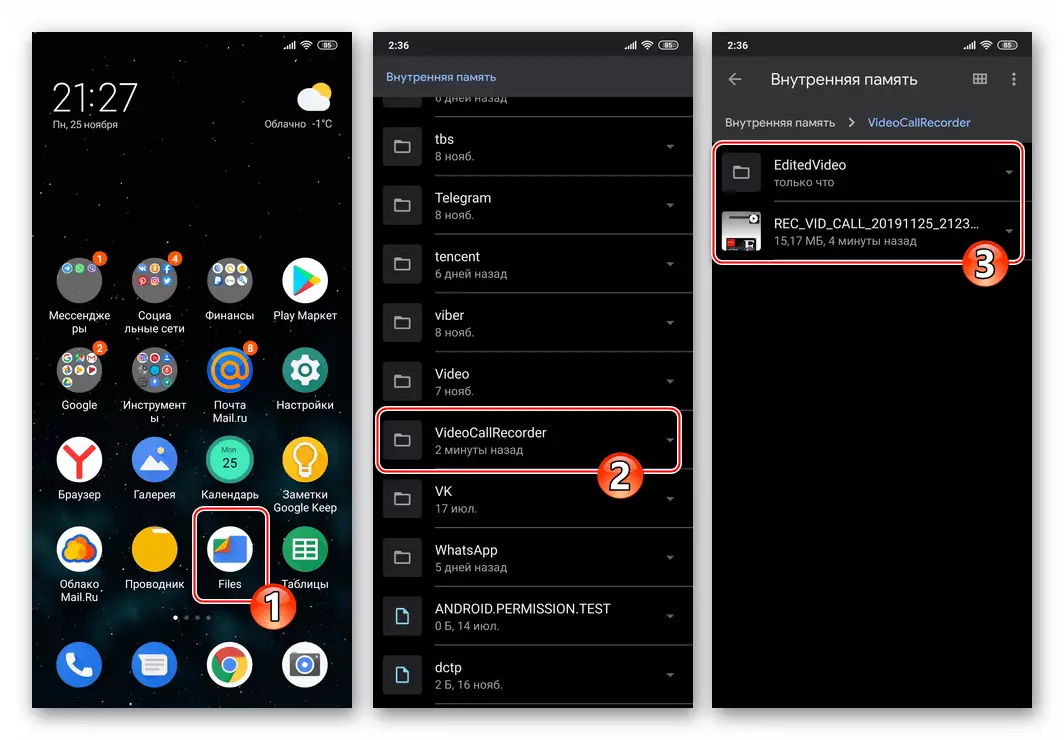
- In the future, various manipulations with the video files received as a result of the execution of the instructions can be performed directly in the recorder or opening the "VideoCallRecorder" folder located in the device repository using any "conductory" for Android.
iOS.
As for Viber for iOS, then in the aspect of recording conversations here you will have to state the lack of workable tools that make it possible to realize the intended. If you enter something like this header of this article as a search query in the App Store, you will find a lot of programs that allegedly perform the desired function, but in fact they all turn out to be, say, fake. All that can cause the download of such software is a spent time and disappointment, and in the worst case lost money, if you forget to cancel subscription to use useless software.Method 2: CallNote (Voice and Video calls)
If the capabilities provided to the Tool described above, you seem insufficient to write, for example, there is a need to record not only voice, but also vivid vivid, makes sense to refer to more functional solutions. One of the most convenient and efficient products of this kind is the software CallNote..
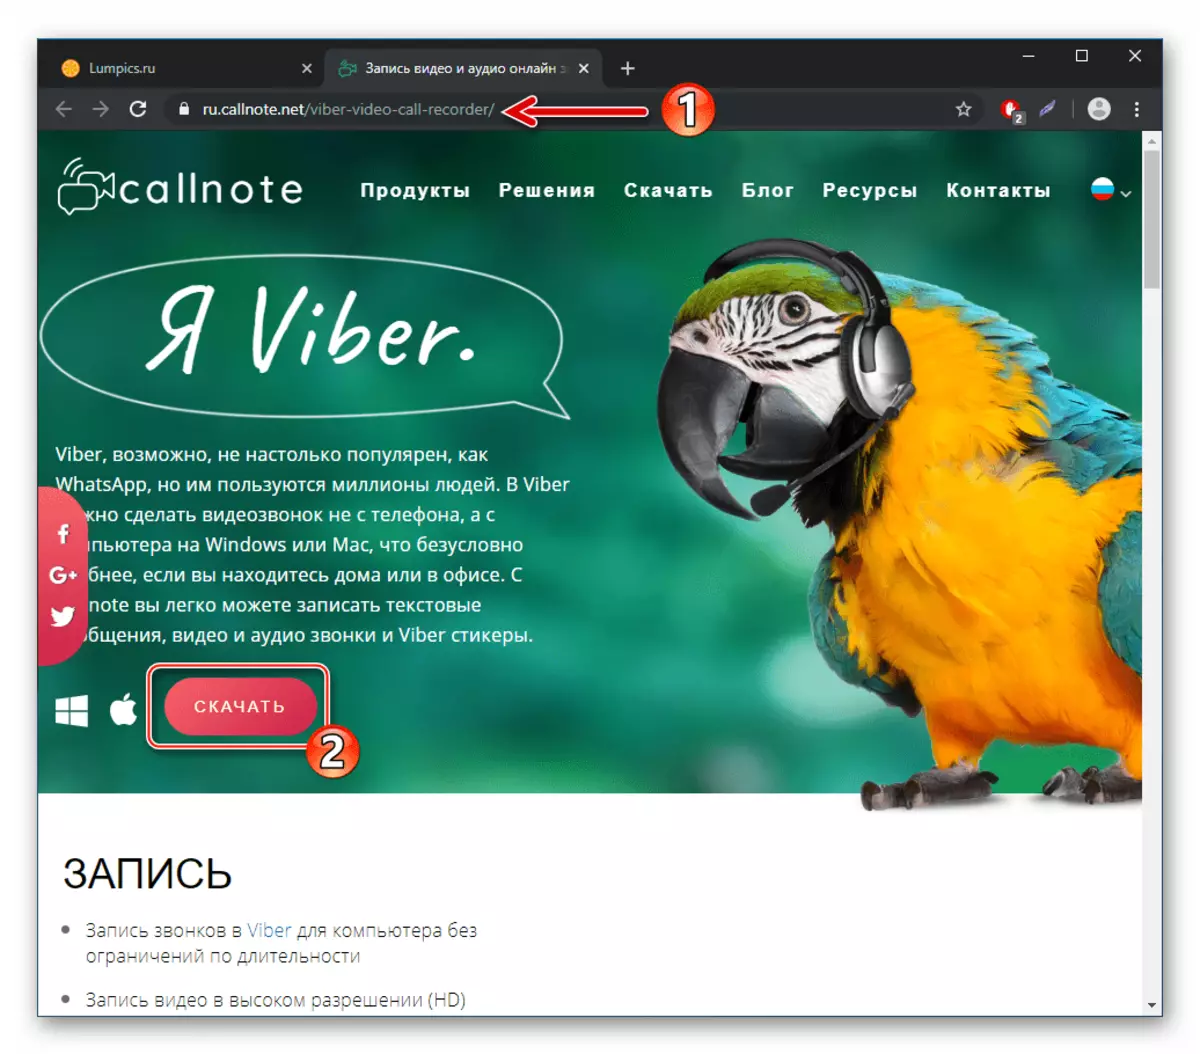
Download CallNote Viber Recorder from the official website
The following program is described conditionally free. With regard to Viber, you can fully use the Free version of CallNote, but with a restriction - 10 call records per month. Most users of this are enough, and if not, having exhausted the limit, you will need to purchase a subscription.
- Installing CallNote Viber Recorder
- Go to the Program Distribution Loading page for the link presented above and click "Download".
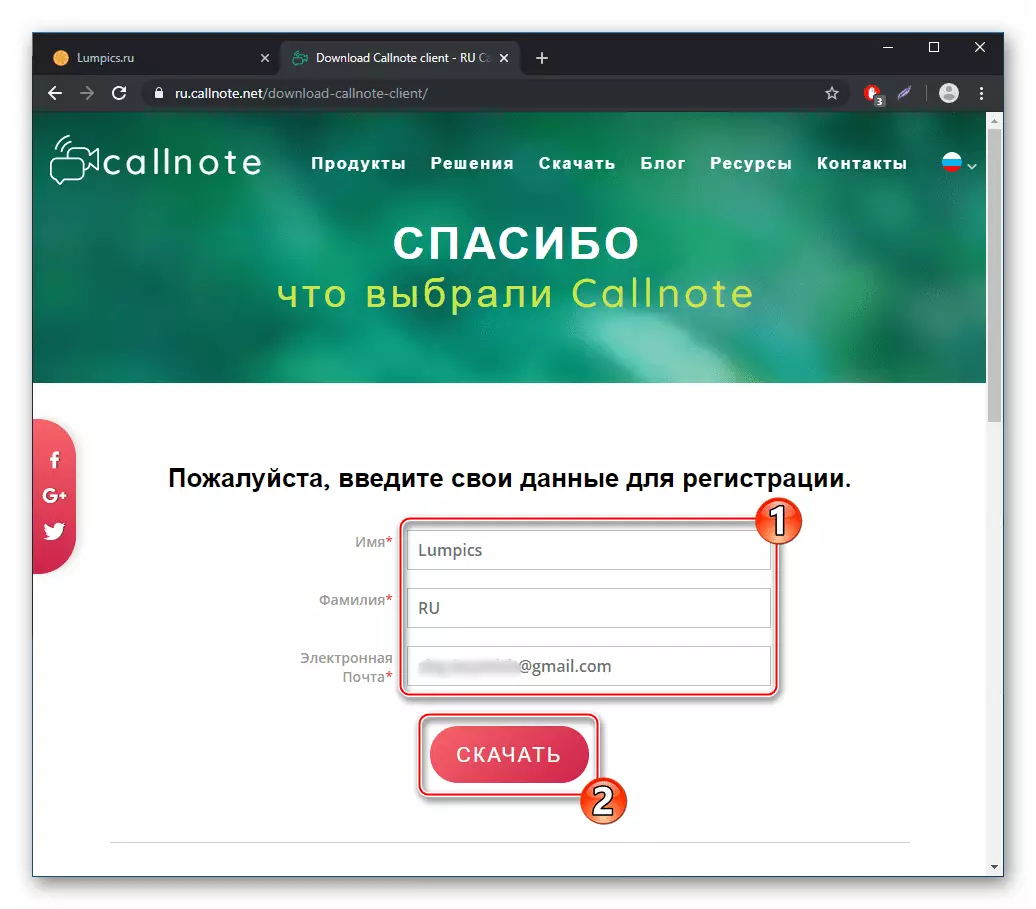
- Enter your name and email address to the appropriate fields and click "Download" again.
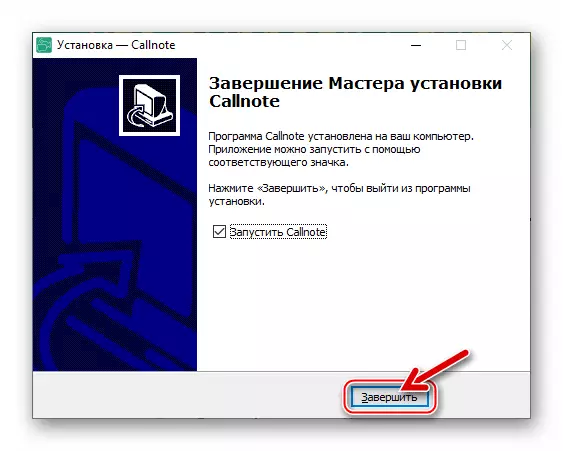
- Expect the CallNote distribution to download, then run the resulting EXE file.
- Following the recommendations of the installation wizard,
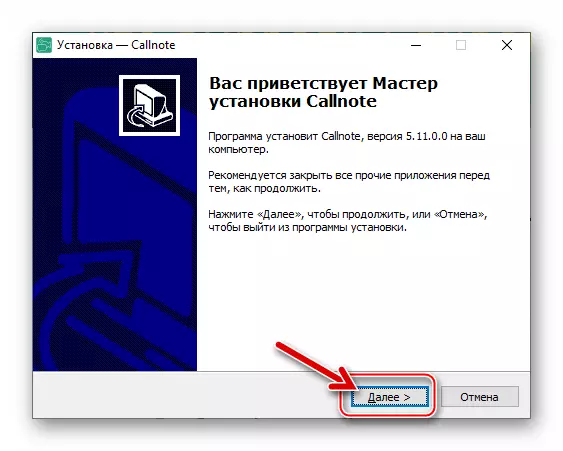
Install the tool to the computer.

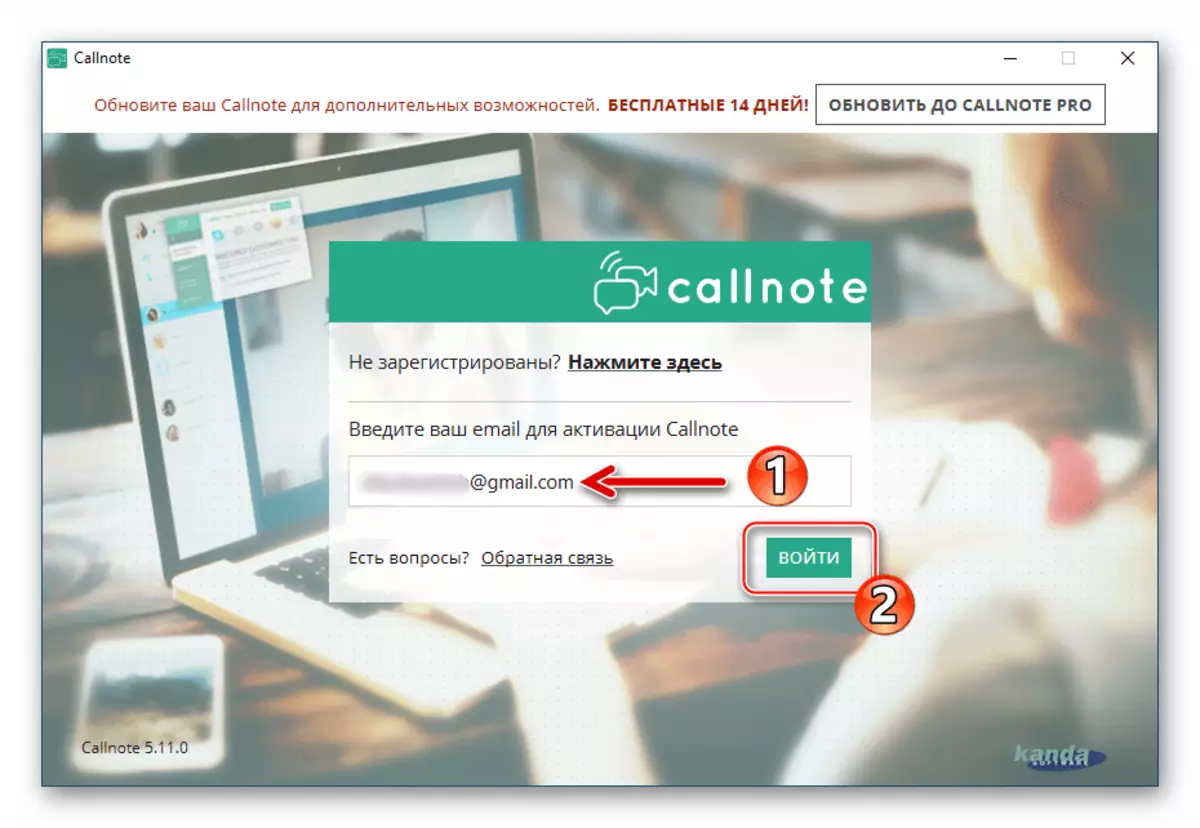
- Open CallNote. When you first start, a window will appear with the requirement to enter Email, specified before downloading the distribution on the developer's website - do it and then click "Log in".
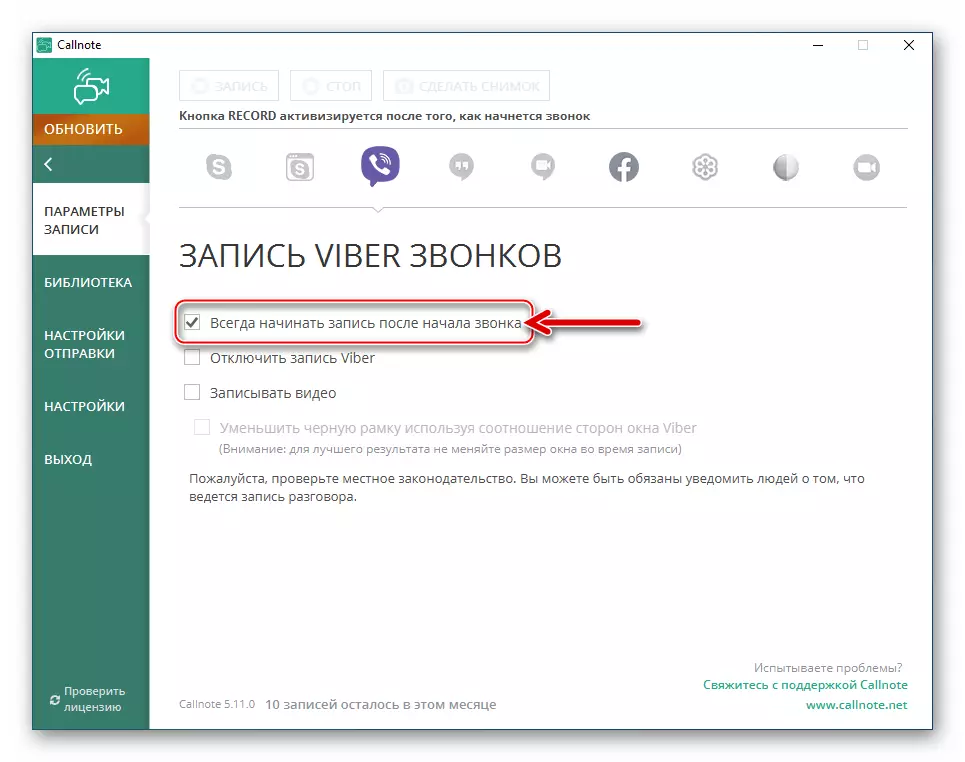
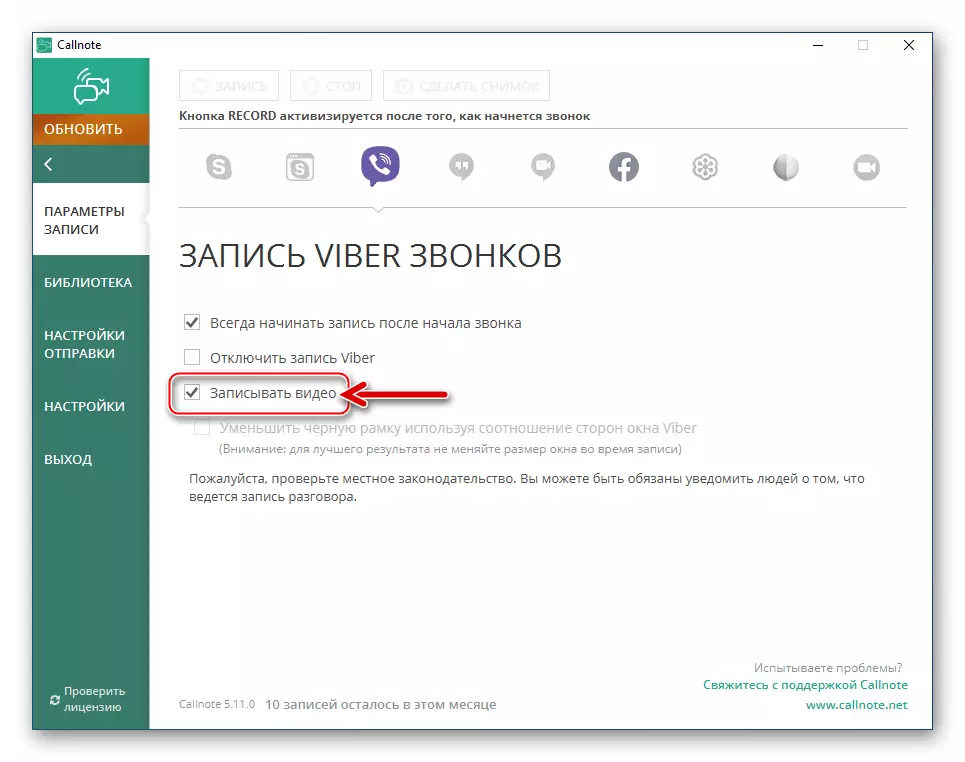
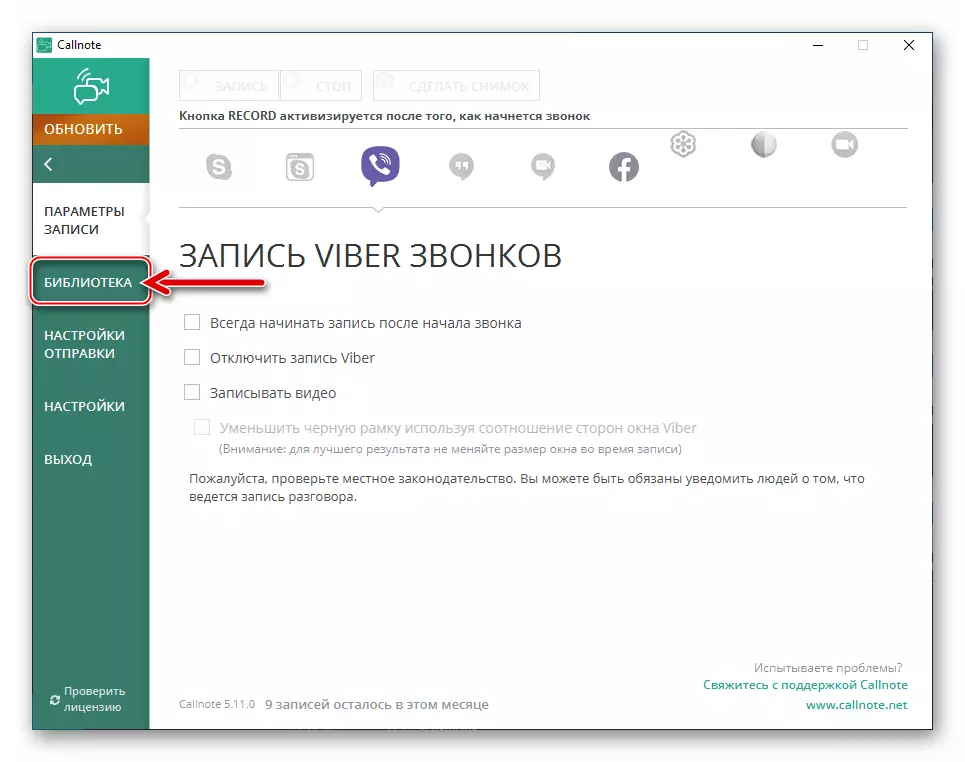
- Setting up the program . Click on the "Viber" icon in the software tool available to the tool.
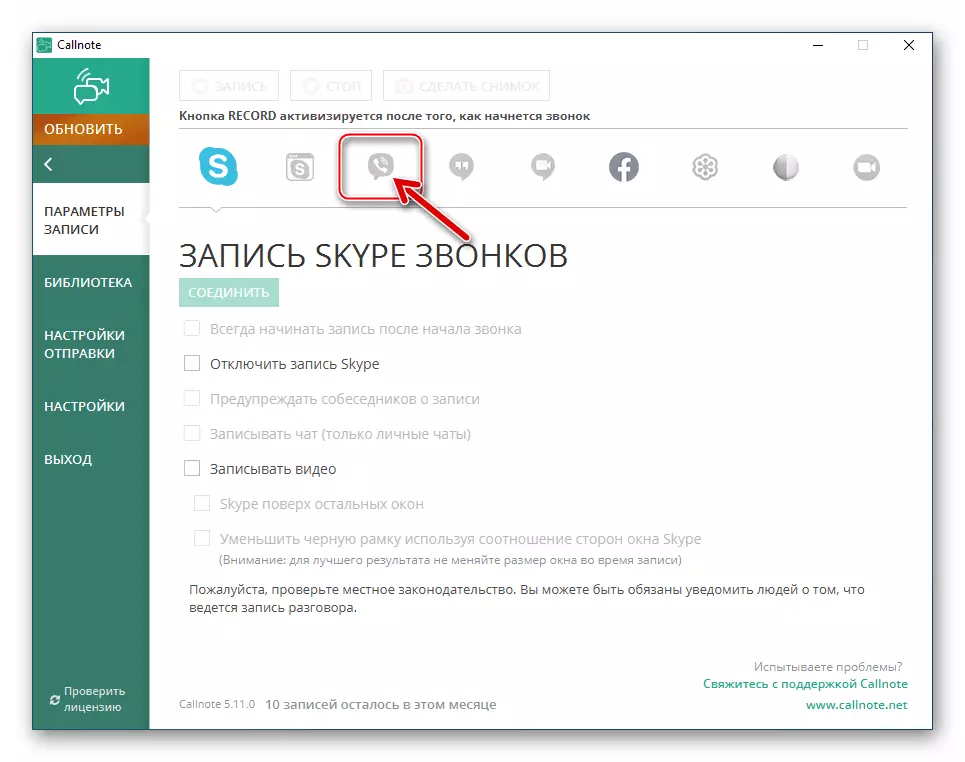
Further, depending on your own needs, set the checkboxes in checkboxes or give up such an opportunity:
- "Always start recording after the start of the call" - to automate the procedure for fixing the challenges conducted through Vaiber.
- "Record video" - if there is a need to record not only the sound, but also generated in the process of communication through the messenger video stream.
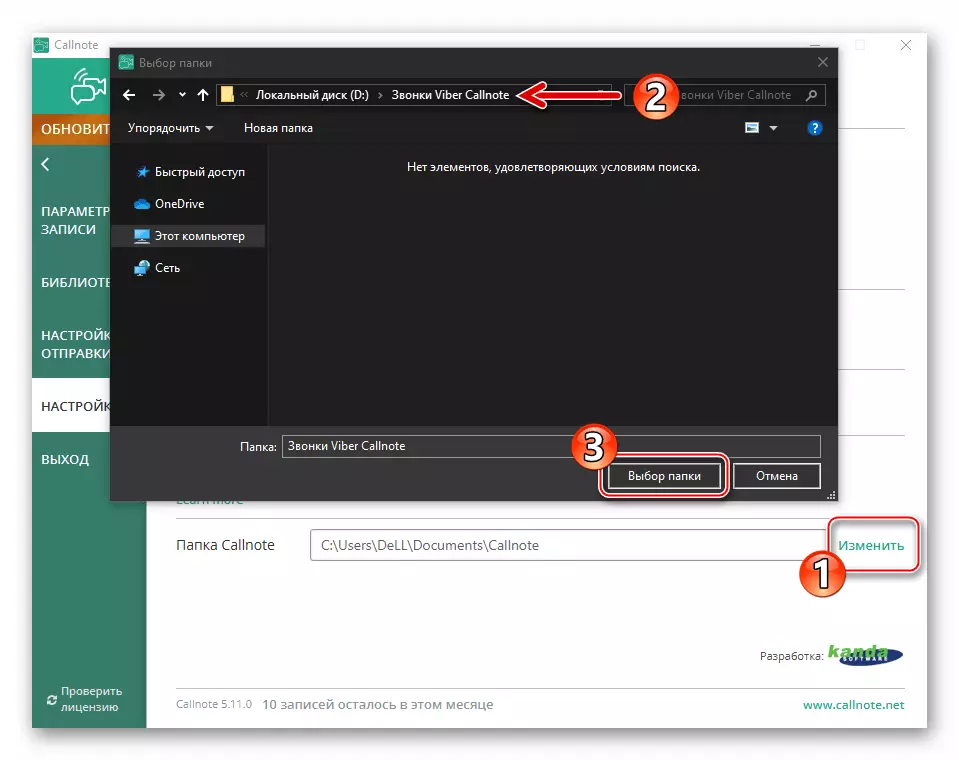
- Go to "Settings" from the menu on the left of the program window.
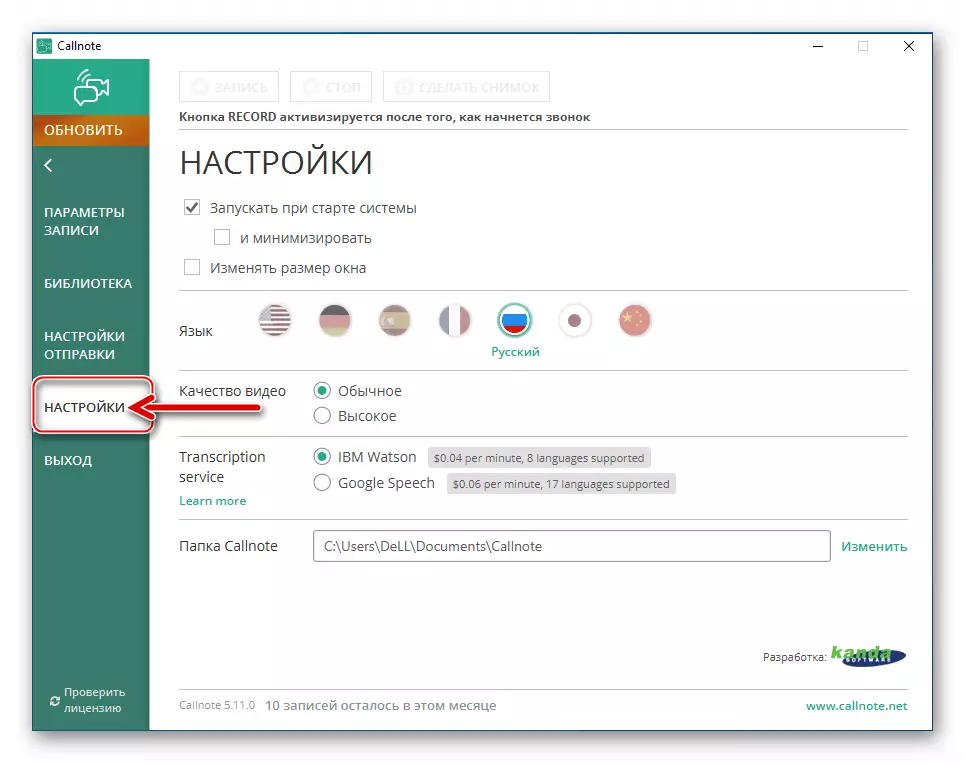
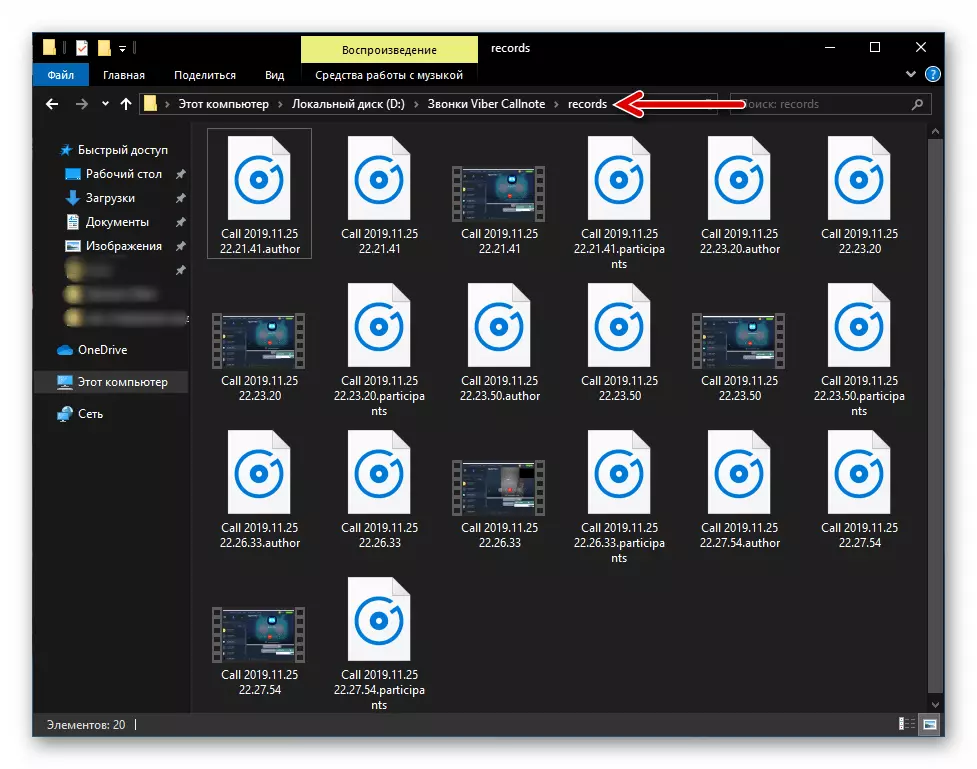
By clicking on the "Change" link next to the "CallNote folder" option, select the directory on the PC disk, where the audio and video files are saved.
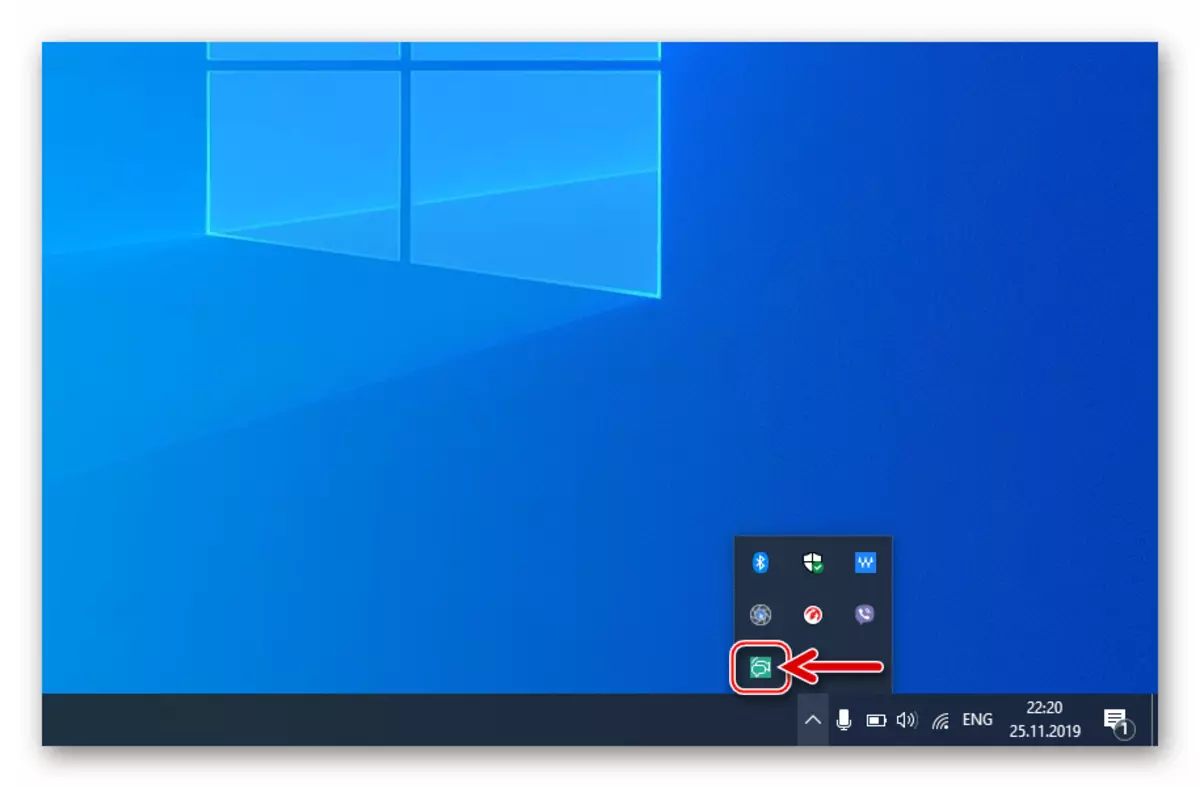
- Click on the cross in the CallNote window header.
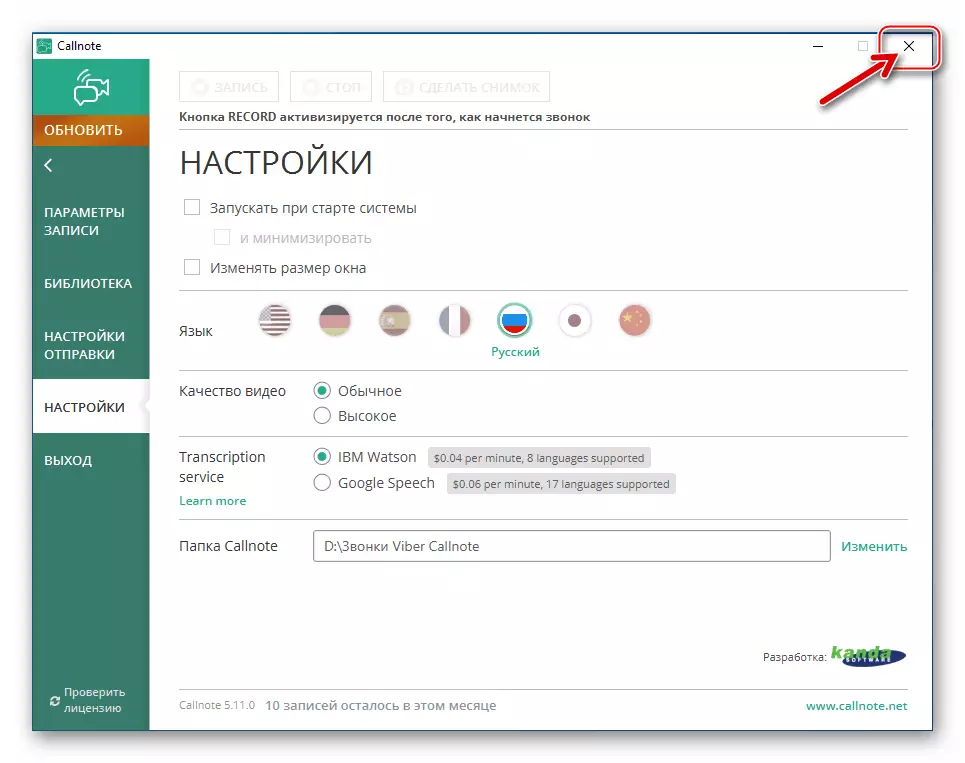
As a result, the program will drive in three Windows, while continuing its work.
- Recording process:
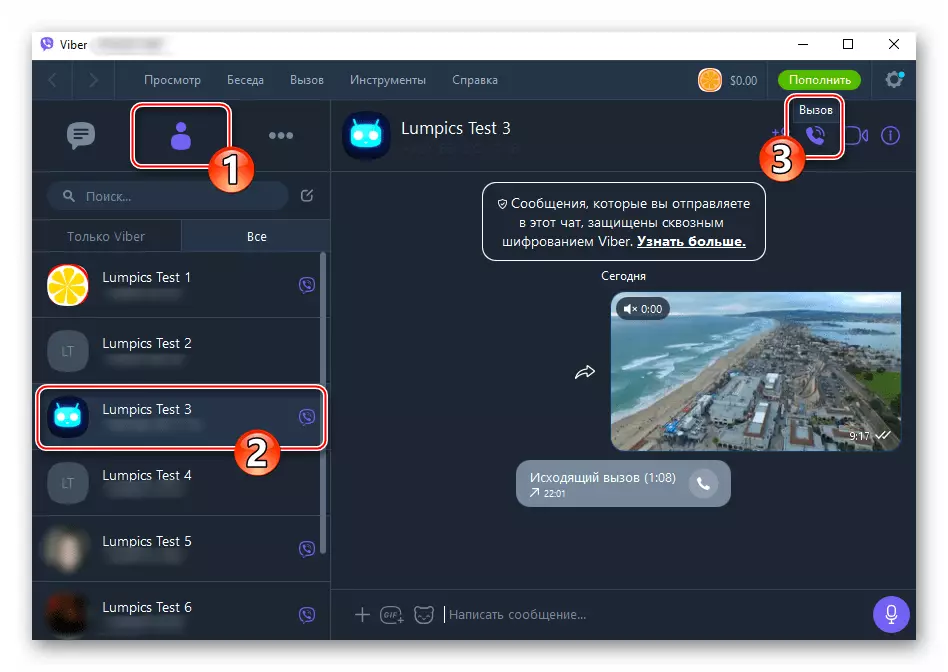
- Automatically . Provided that you activated the option "Always start recording after the start of the call" in the CallNote Viber Recorder settings, simply use the audio and video calls through the Viber as usual.
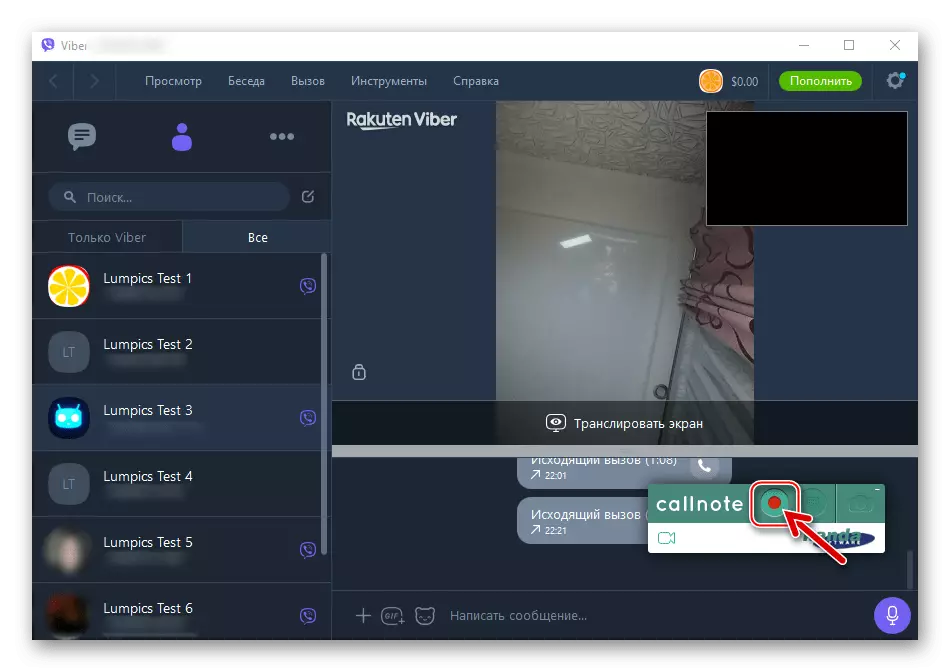
In this embodiment, all negotiations in independence on their type will be automatically recorded. The record is being recorded, says appearing on top of the desktop at the time of initiating the call or enter an incoming call from another user of the messenger widget "CallNote".
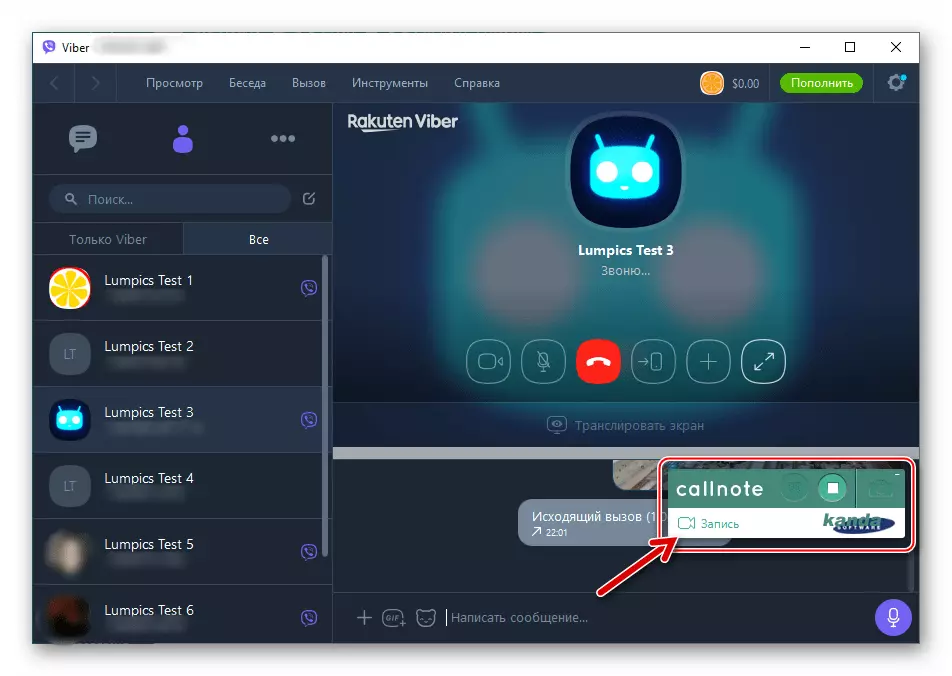
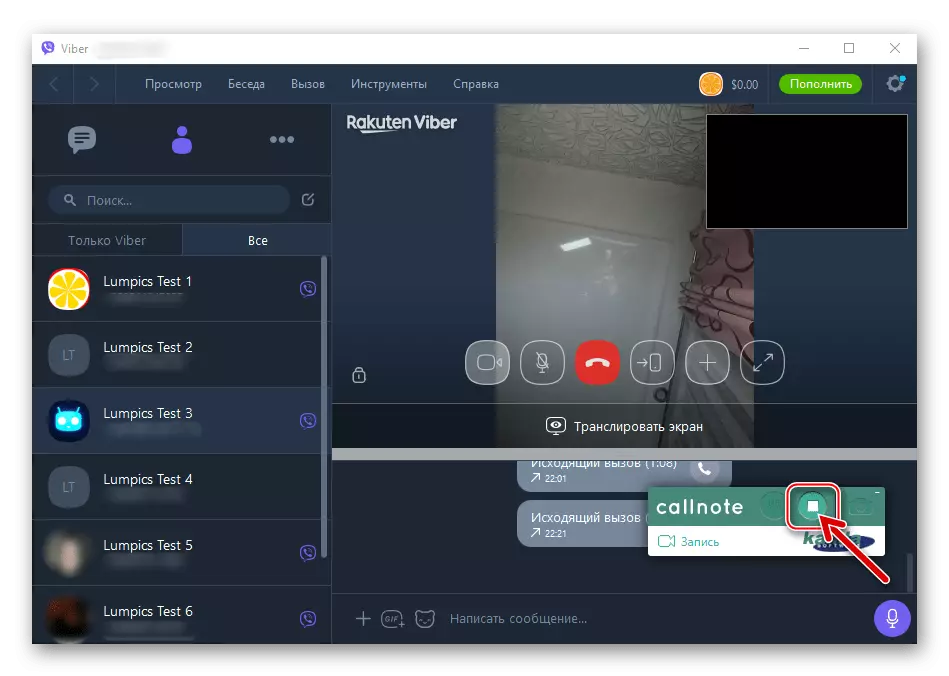
In the process of the conversation, it can be stopped using the "Stop" button on the widget and resume by clicking on "REC".
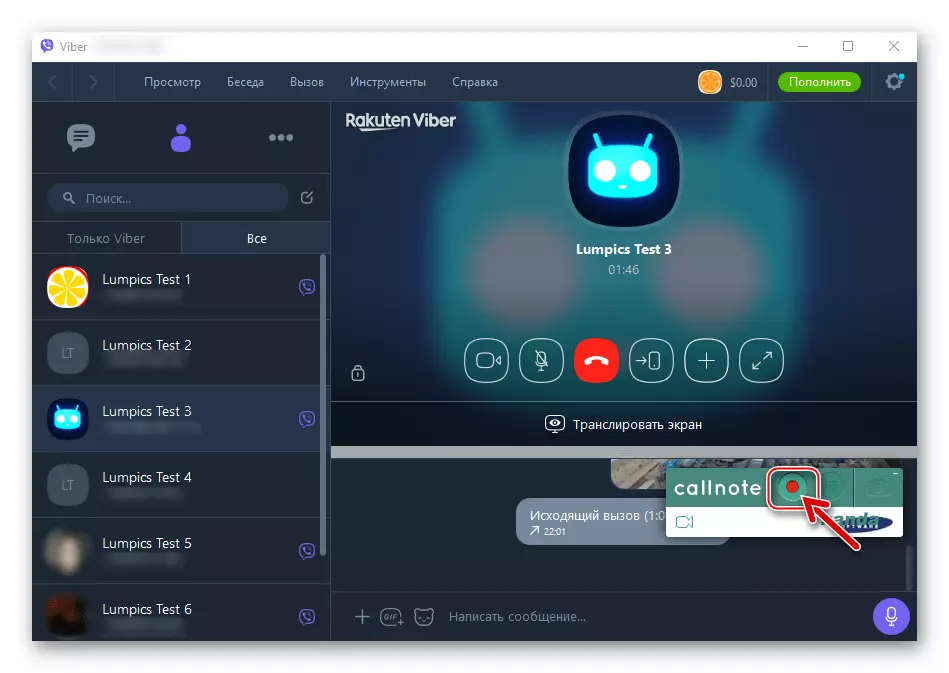
- Manually . If you did not activate the automatic lock option, the CallNote widget appears on the screen at the time you press the "Call" button in the messenger or when entering an incoming call from it to your computer. To start recording, click "REC",
And to stop "Stop".
- Automatically . Provided that you activated the option "Always start recording after the start of the call" in the CallNote Viber Recorder settings, simply use the audio and video calls through the Viber as usual.
- Work with records . As a result of the functioning of the program on the PC disk, files are created MP4. if the "Record Video" option is activated, or Mp3 When CallNote is configured to record only audio. Available to files can be obtained by going to the catalog specified to save them through the "Explorer" of Windows.
More convenient to manage records to use a recorder tools:
- Expand the CallNote window and go from the left panel to the Library tab.
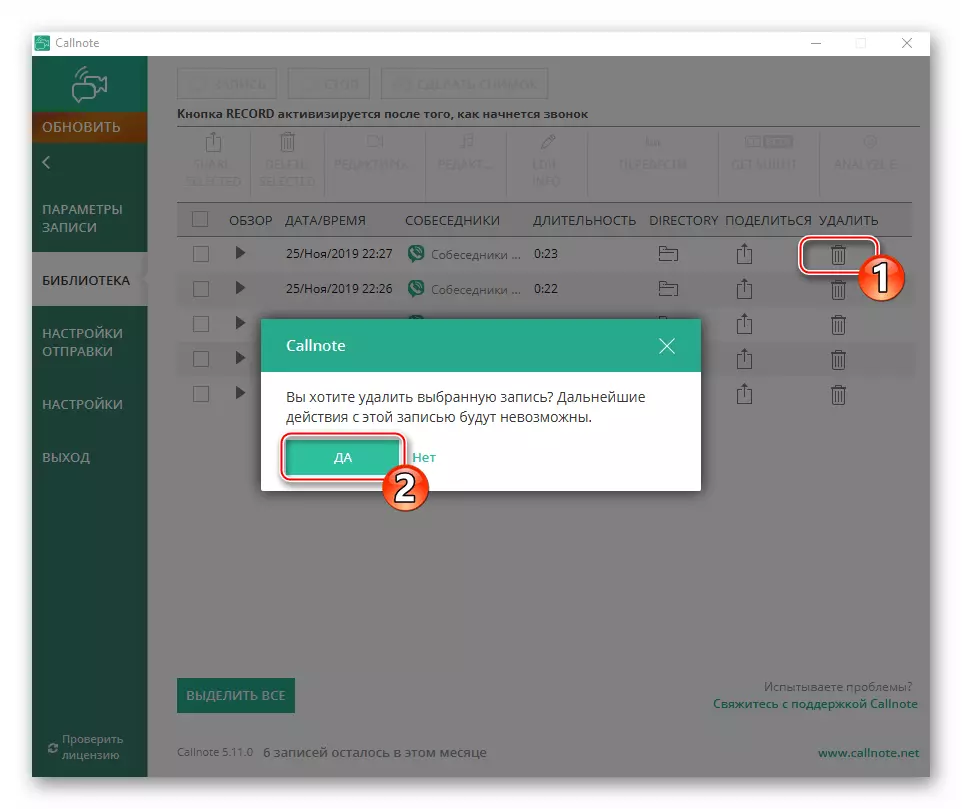
- Here is a list of all the recorded records, each of which can be reproduced immediately,
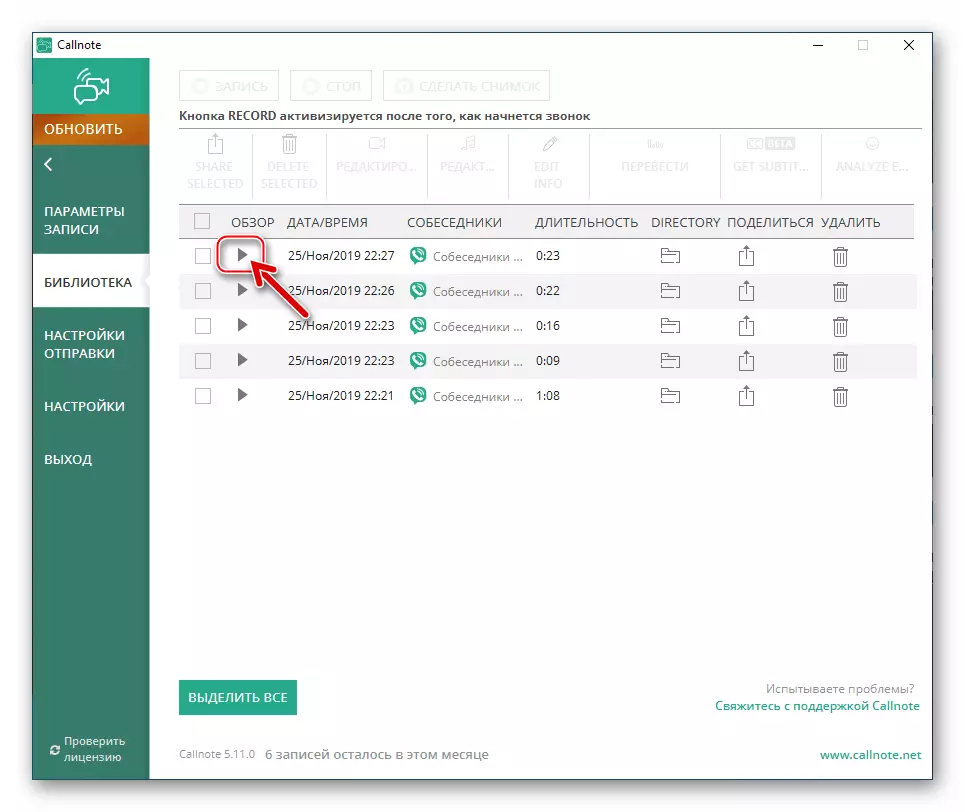
delete
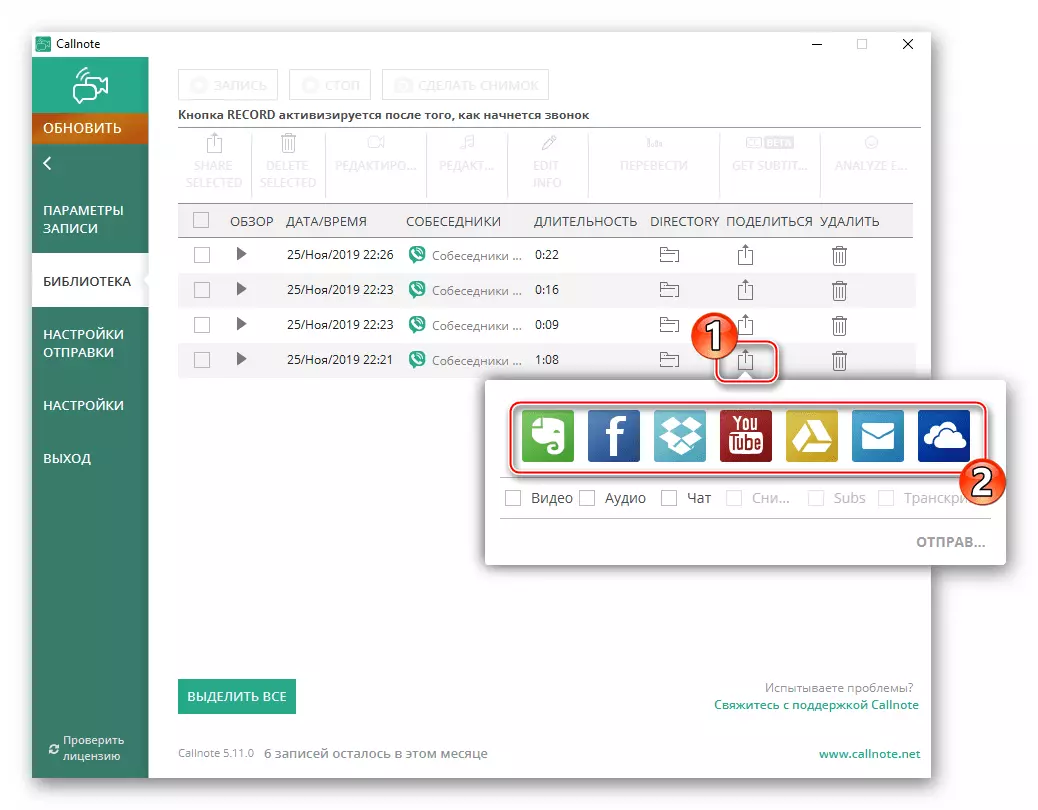
And send via the Internet, for example, in a cloud service for storage.
Conclusion
As you can see, in almost all cases, using uncomplicated techniques and accessible by all software, you can very quickly organize voice and / or video calls initiated in the Viber Messenger. We recommend using the considered opportunity only when it is really necessary, and without disturbing the confidentiality of your interlocutors.