

Now almost every computer is connected to the global network, and in many homes or apartments there are two or more PCs that are connected to one router. This allows you to create a local network by exchanging data with each equipment, including peripheral devices, such as printers. However, it is important to consider the standard security rules set by the firewall. For example, to create a home group, a "private" must be selected, otherwise the firewall will simply block this option. Additionally, other restrictions depend on the network type, so sometimes it is necessary to change this parameter, which will be discussed below.
Change network type in Windows 10
There are different methods for changing the type of network in Windows 10. For each of them, a specific algorithm for actions should be performed, but the final result will be the same. The optimal method of each user determines for itself, pushing away from personal needs, and we offer to study in detail each of the available.Method 1: Menu "Connection Properties"
The first option is to change the setting under consideration through the "Connection Properties" section, which is in the "Parameters" menu. All actions are performed literally for several clicks, but look like this:
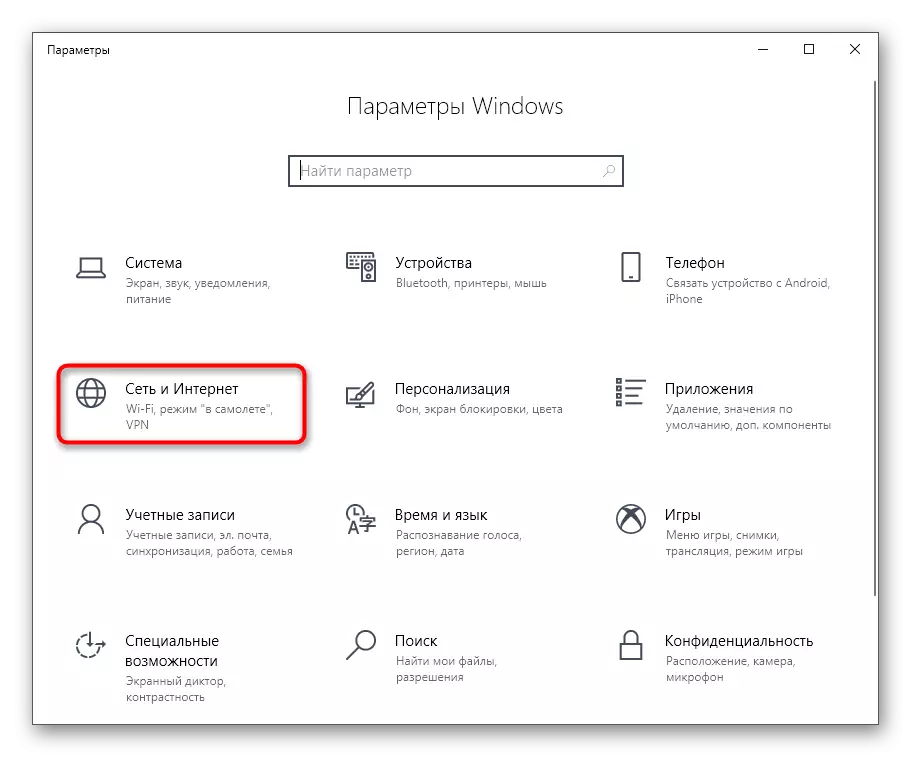
- Open "Start" and go to "Parameters".
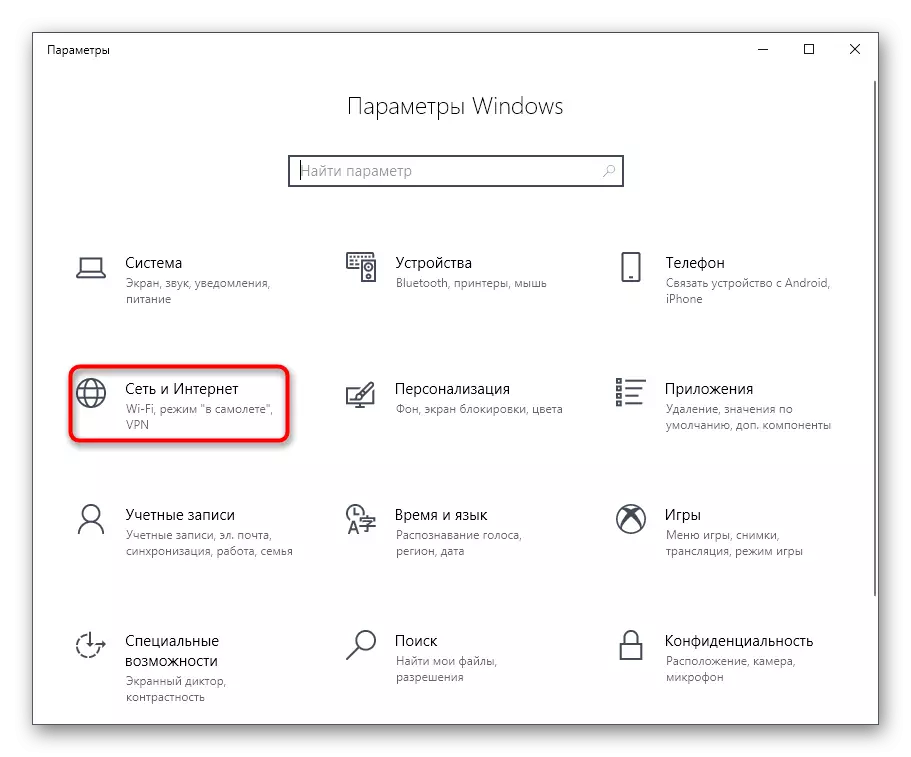
- Here, open the "Network and Internet" section.
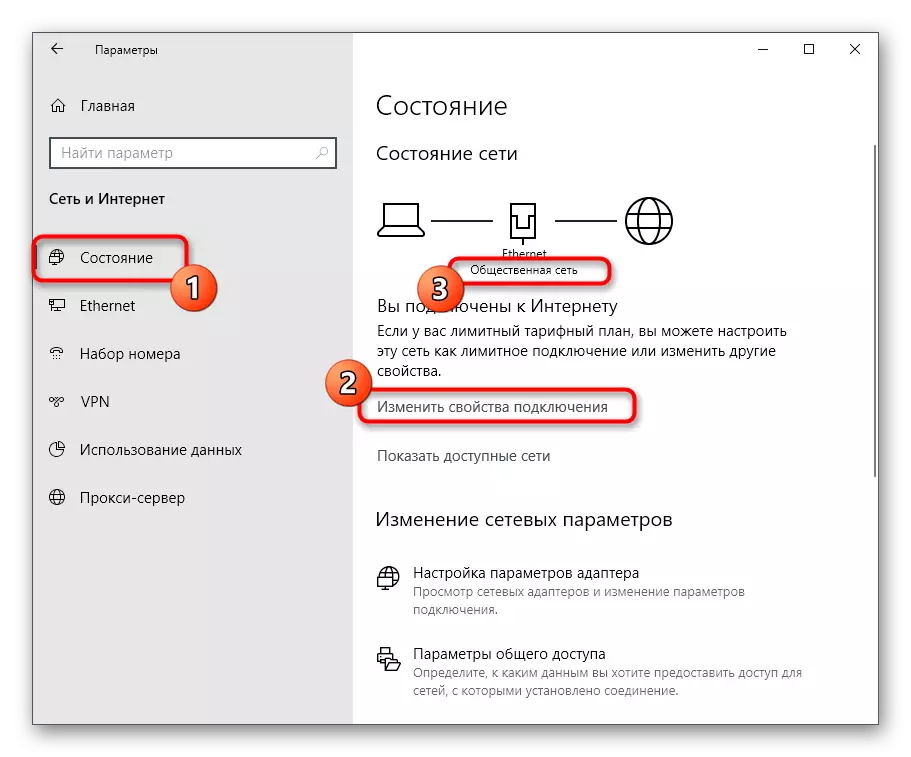
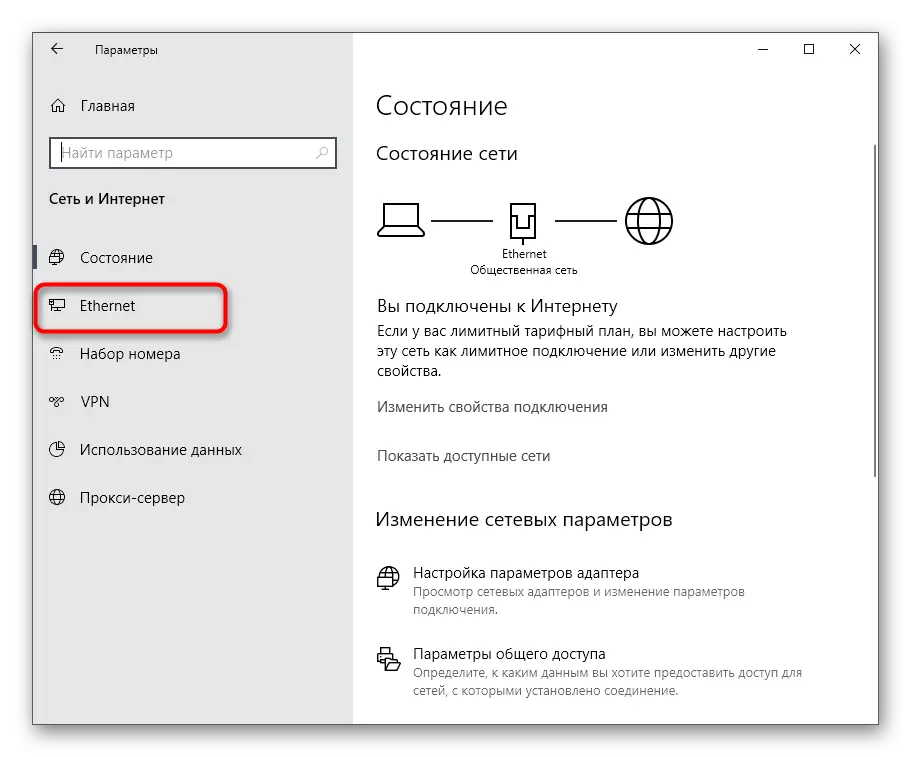
- Pay attention not to the left panel. Here you are interested in the first string "state". On the right you see the current network type. If you want to change it, click on the inscription "Change Connection Properties".
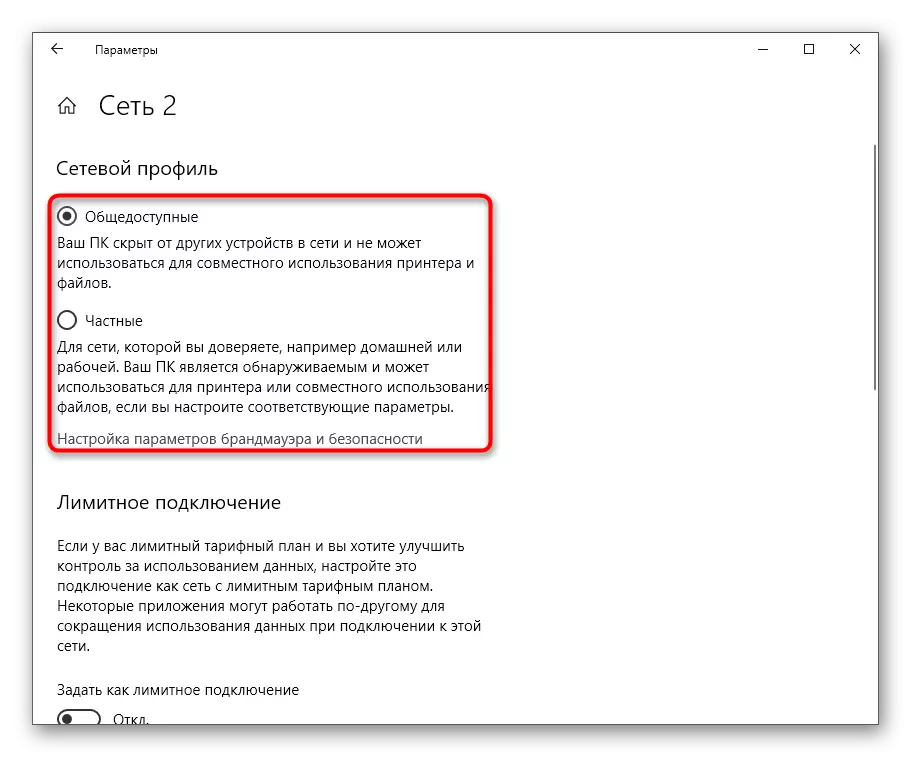
- A separate window will open, where the required parameter is selected by installing the marker opposite the corresponding item. Additionally, there is general information about each type of connection, as well as the inscription "Configuring Firewall and Security Settings". Click on it if you want to change the rules of the firewall after changing the setting.
- Source just below, where locate the category "Limit Connection". Activate this mode is only if the Internet on the computer works on a limited tariff plan and its limit cannot be exceeded.

New rules for the network will take effect immediately, but it is necessary to reconnect each device or restart the router so that there is a connection with new restrictions that were installed automatically installed.
Method 2: Section "Network Profile"
Another method associated with the "Parameters" menu. In fact, you will be taken to the same setup menu, but this will be carried out a little different method. It will be useful when there are different networks and some of them are in inactive condition, but also require changes.
- In the "Parameters" menu, go to "Network and Internet".
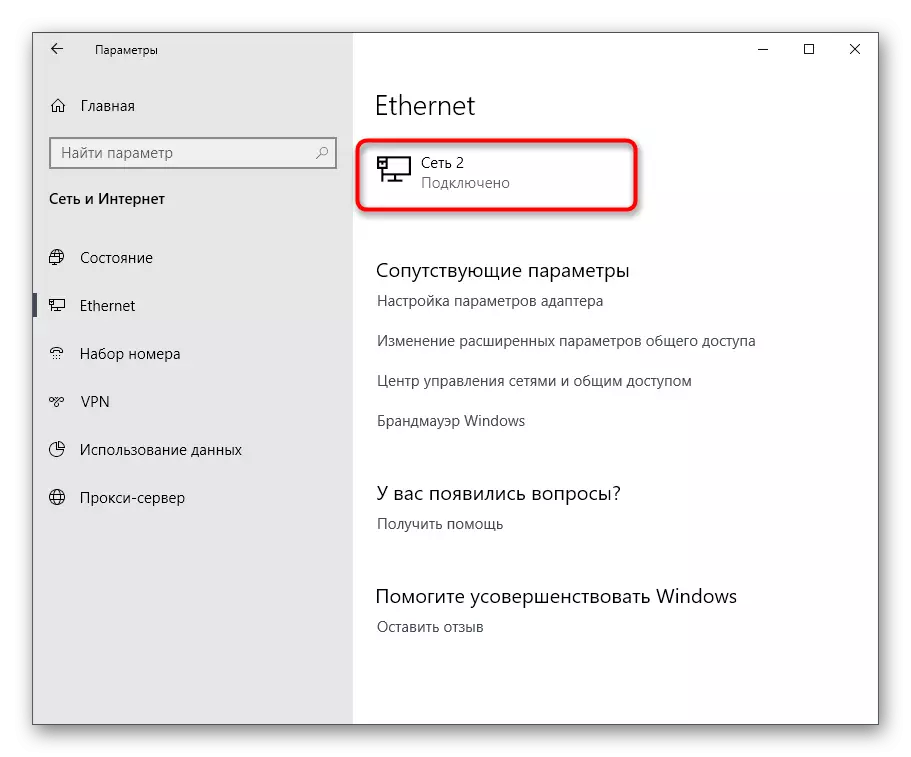
- Switch to the "Ethernet" or Wi-Fi section through the left panel.
- Here, right-click on the network you need.
- Change the position of the marker to the desired depending on the preferred profile.

Method 3: General Access Setting
Note that sometimes users imply a change in the type of network for shared access, wanting to configure each existing profile. Therefore, we decided to tell about this aspect, allocation of the configuration into a separate method, which is carried out like this:
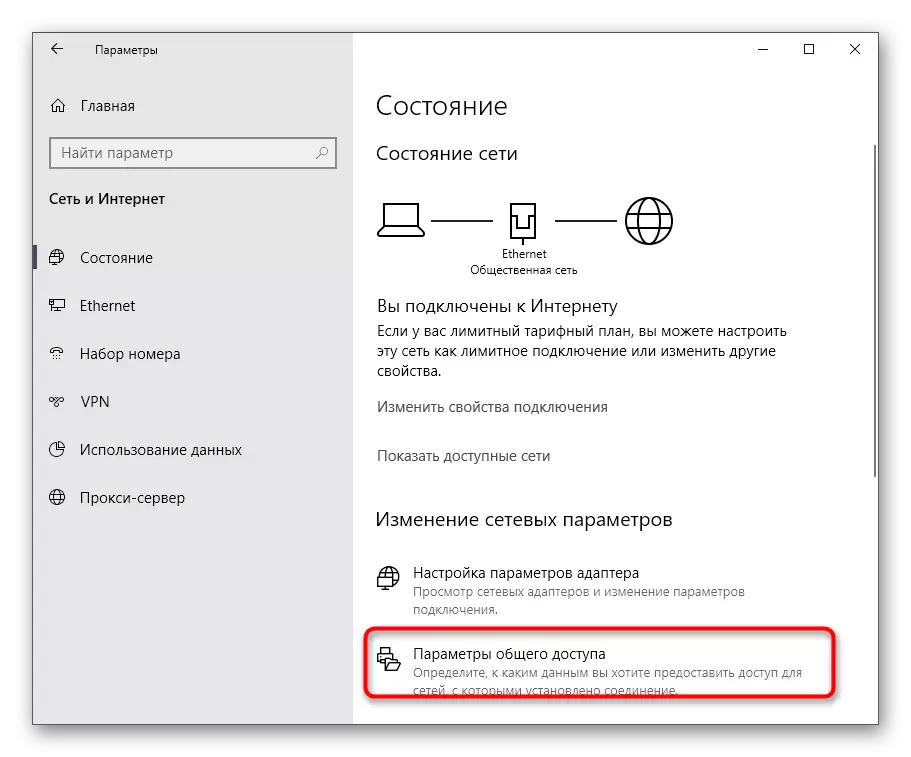
- In the same menu "Network and the Internet" in the first category "Status" click on the inscription "General Access Parameters".
- Here, find suitable profiles by expanding the form with their settings, and install the markers in front of the required items, allowing or prohibiting network detection.
- Upon completion, do not forget to click on "Save Changes" to apply new parameters.


Method 4: Reset Network
Sometimes for some reason, even after changing the type of network, its settings do not change, which entails the saving of all the same rules of the firewall. Often this problem allows you to correct the fast reset of the network, during which it will be proposed and re-set a profile.
- To do this, you will have to go to the "Network and the Internet" section.
- Here in the first category, find the "Relief" line and click on it.
- It remains only to click on the "Reset Now" button and confirm this action.


Method 5: Local security policy
The network type is directly related to the security of the computer, therefore it is obvious that the corresponding item must be in the "Local Safety Policy" snap-in that allows you to change the current profile. To do this, the user should perform such actions:
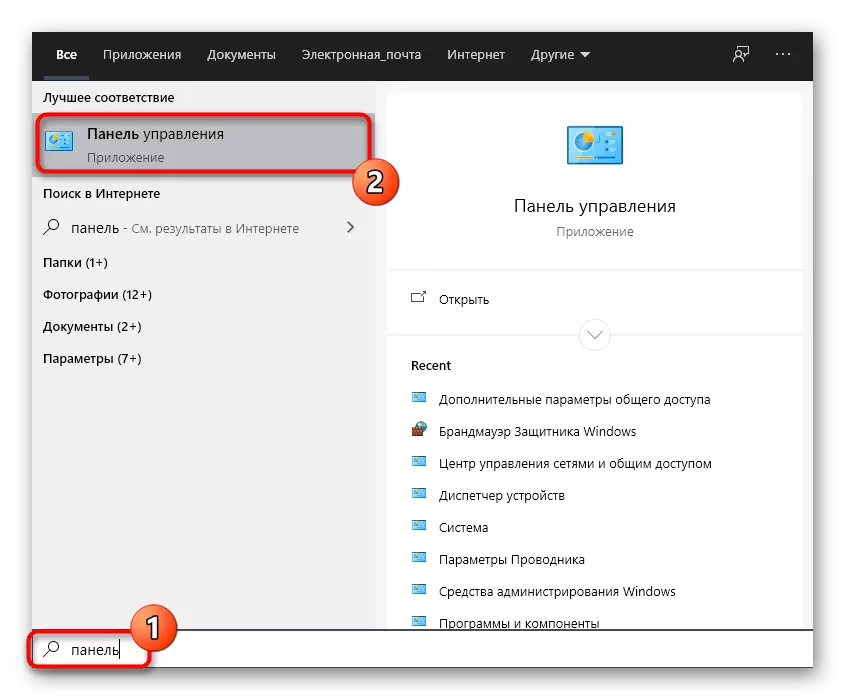
- Open the "Start" and find the "Control panel" view through the search. Run it by making the LKM clique on the icon.
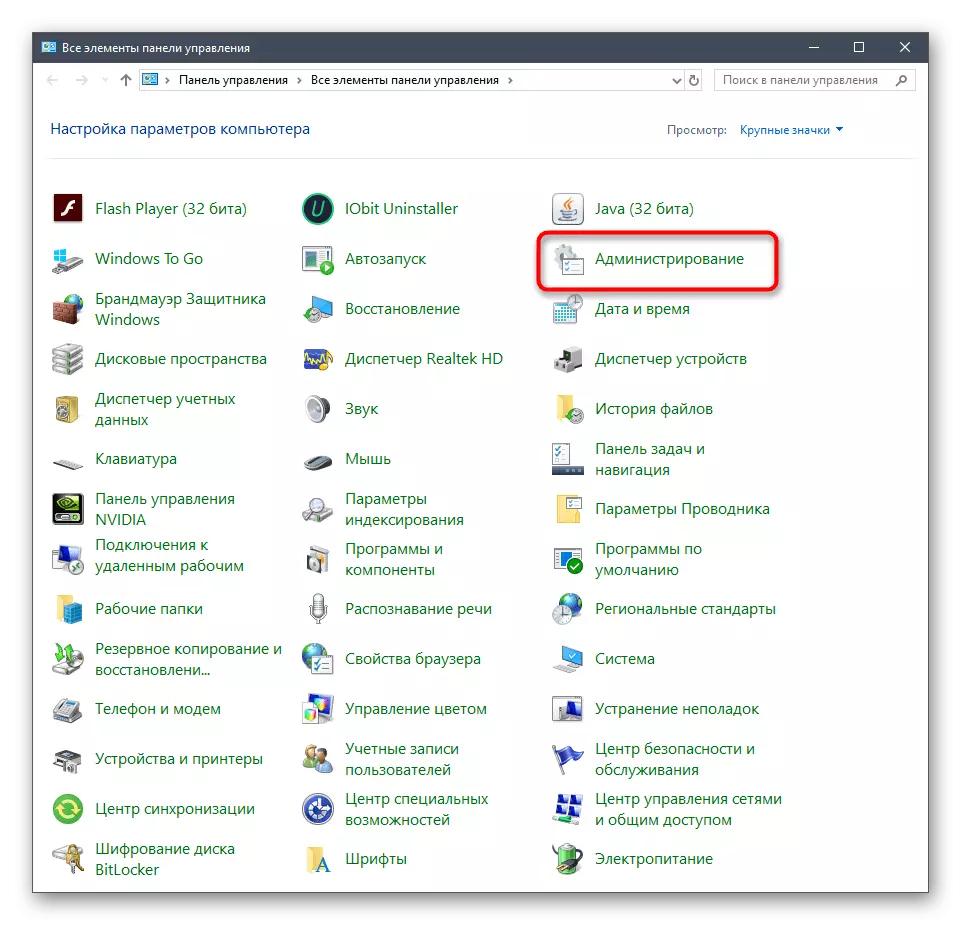
- Go to Administrative Section.
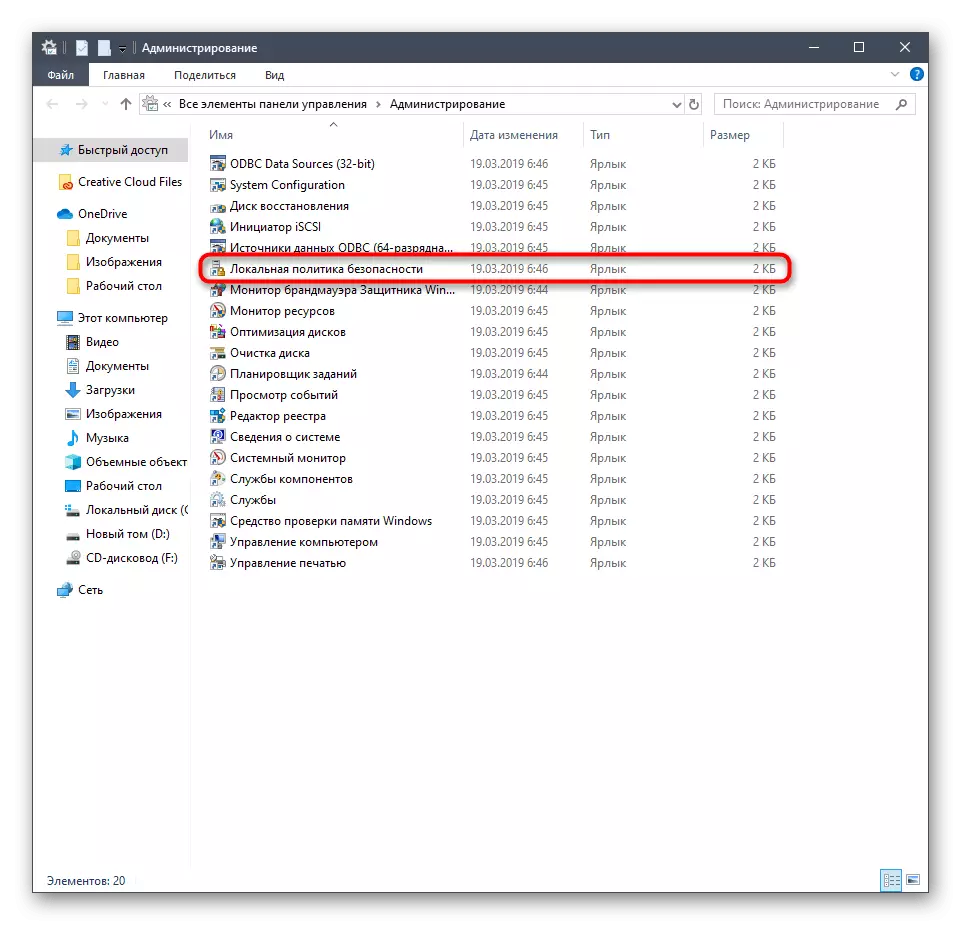
- In the list, find the necessary snap and open it.
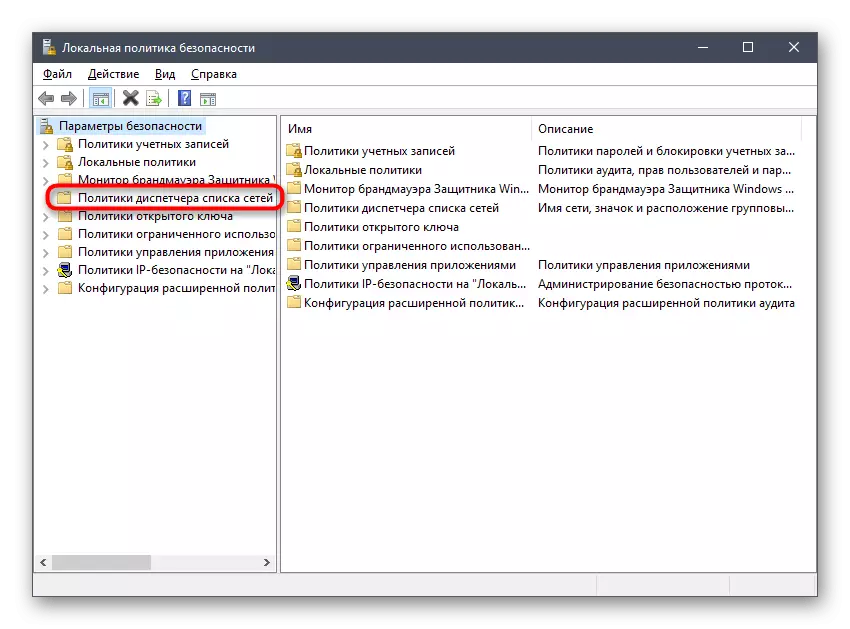
- Move to the Network Dispatcher Policies Catalog.
- Here you should find the name of the network you want to change. Make a double LKM click on it to go to the setting.
- Click the Network Location tab.
- Now you can proceed to changing the type of network location and user permissions.


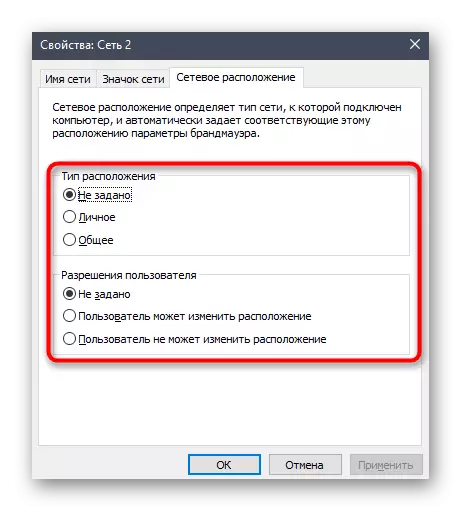
As you can see, this option allows you to change not only the type of location, but also permits for specific users, so we recommend paying special attention to it to all those administrators who have access to this computer another or more users with personal profiles.
Method 6: Registry Editor
Sometimes changes made through the graphical menu for some reason are not saved after rebooting the computer. This may be associated with failures in the registry parameters, so in such situations it is recommended to change the values on your own, which does not take much time, and even a beginner user will cope with it.
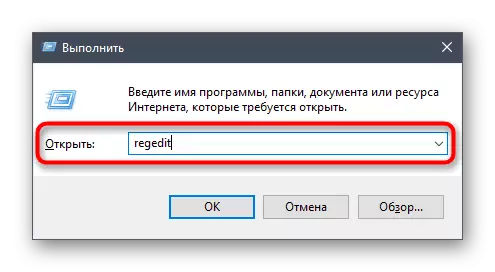
- Open the "Run" utility convenient for you, for example, through a combination of Win + R keys. In the line, enter the REGEDIT and press ENTER to activate the command.
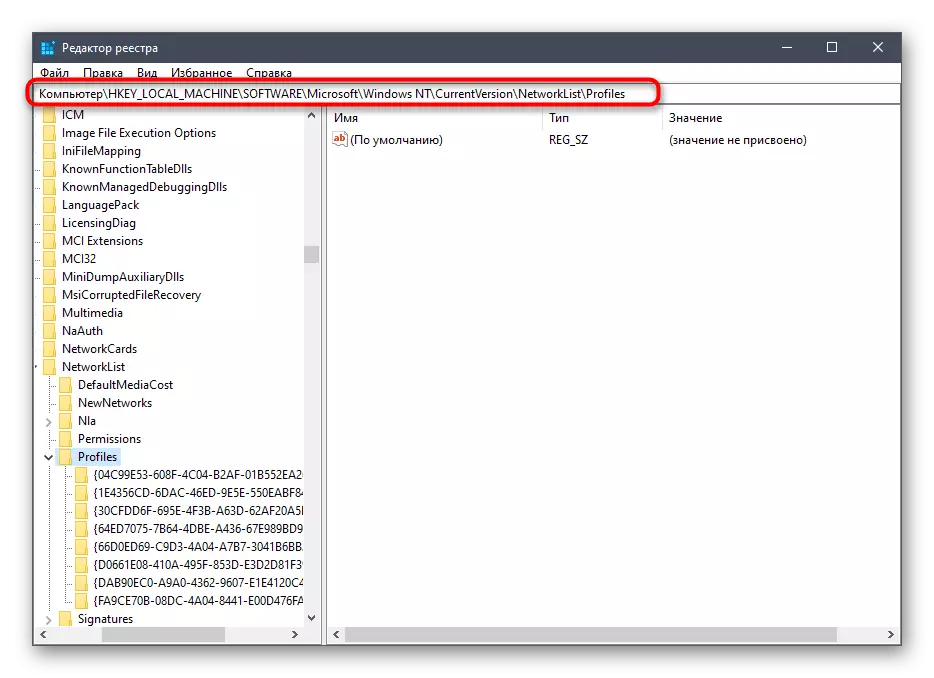
- In the window that opens, go along the path of HKLM \ Software \ Microsoft \ Windows NT \ CurrentVersion \ NetworkList \ Profiles.
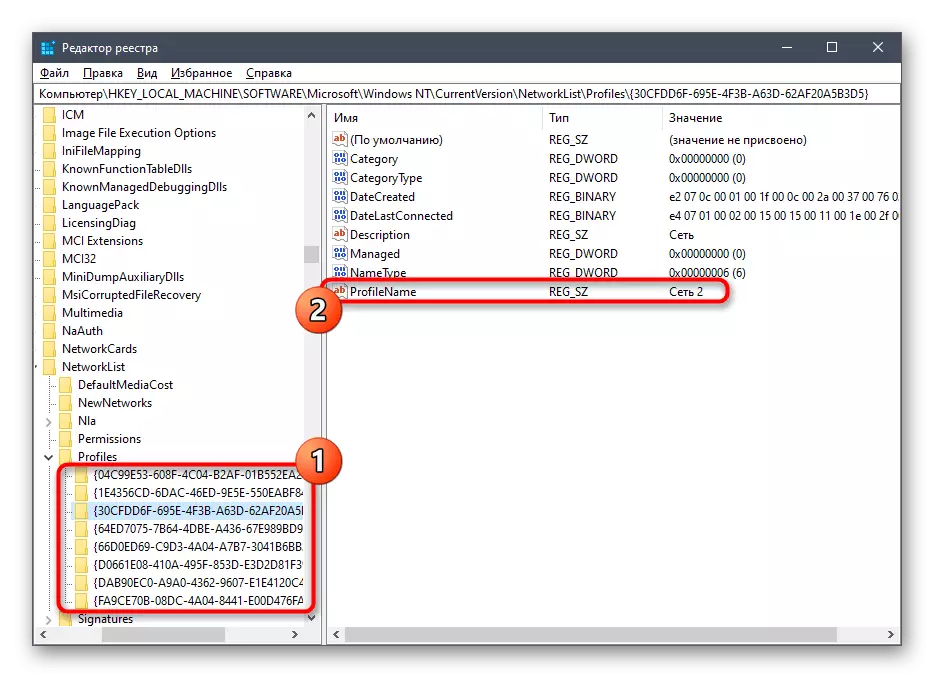
- Here you have to explore the directory present. Open each of them and pay attention to the Profile Name parameter. Each of them has a value corresponding to the name of the network. Check until the same folder is found in which the current connection data is stored.
- In it, find the lowercase parameter "Category" and double-click on it to open properties.
- It remains only to change the value by specifying the correct digit. 0 - Public Network, 1 - Private, and 2 - domain.


All changes made to the registry editor will take effect only after rebooting the computer, after which you can proceed to check the correctness of the settings installed.
Method 7: Team in PowerShell
The last method of our today's material will suit all those users who are not afraid to use the command line or snap PowerShell. Moreover, it will be extremely easy to implement such a task, because you will enter only one command.
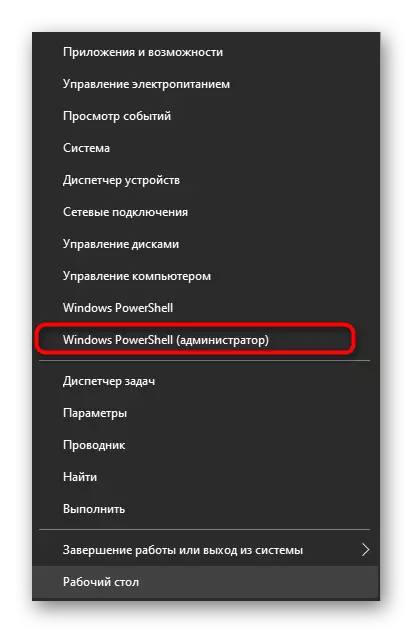
- Click on "Start" by right-click and in the context menu that appears, select the option "Windows PowerShell".
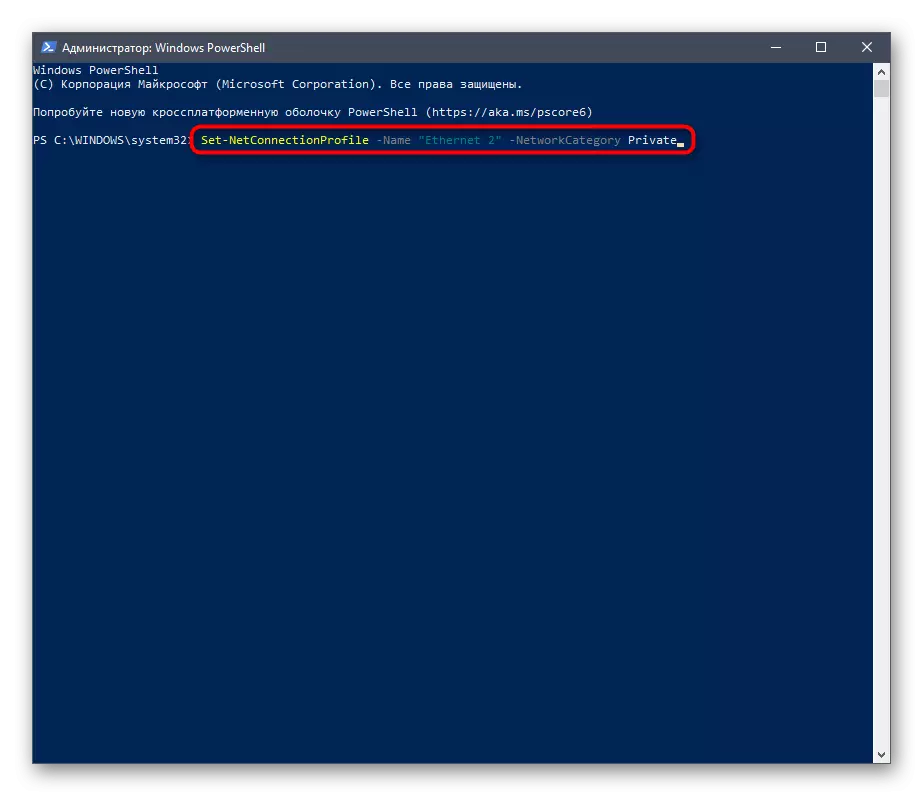
- Expect the application launch, and then insert the Set-NetConnectionProfile -Name "Ethernet 2" -Name -Name "Ethernet 2" -Name -Name "Ethernet 2", where -name "Ethernet 2" is the network name, and Private is its type (replace on Public, if you want to make it publicly available).
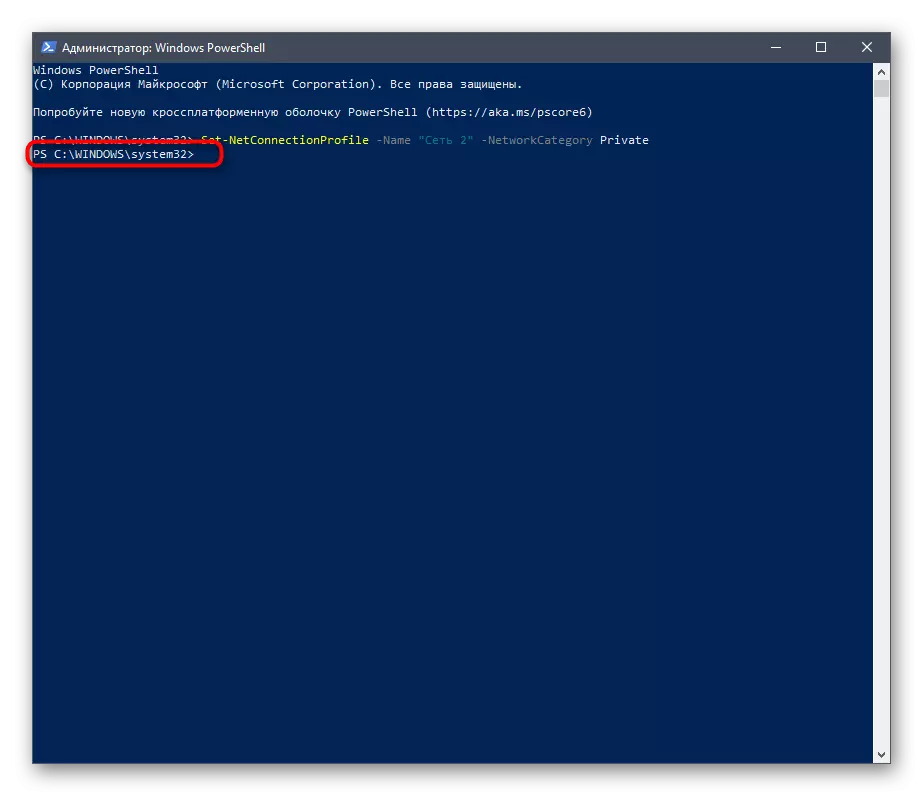
- If, after activating the command, a new input row appeared, which means that everything is entered correctly and the settings are already applied.
As you can see, there are a huge number of ways to change the type of network in Windows 10. All of them are carried out in a few minutes and do not have any particular advantages or disadvantages, so the choice of option depends only on the personal preferences of the user.