
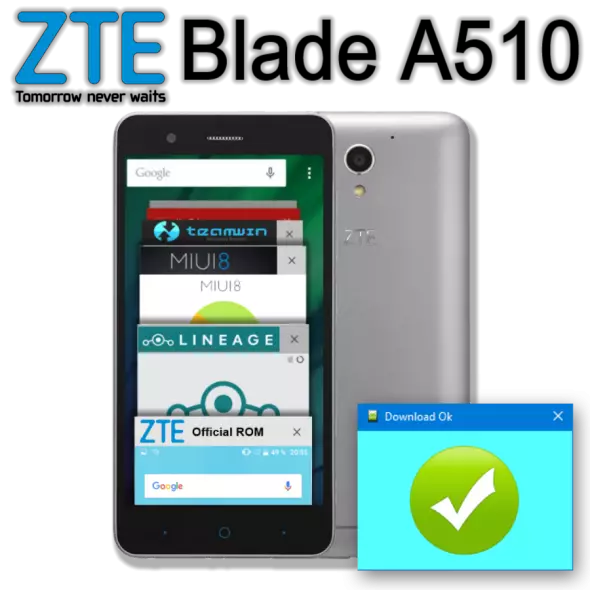
Even in modern balanced android smartphones of well-known manufacturers, there is sometimes a situation that characterizes software developers for the device with a not too good side. Quite often, even relative to the "fresh" smartphone can deliver to your owner of trouble in the form of a collapse of the Android system, which makes it impossible to further use the device. ZTE Blade A510 is a medium-level device, which, with good technical specifications, cannot, unfortunately, boast the stability and reliability of system software from the manufacturer.
Fortunately, the above-described troubles are eliminated by flashing the device, which today does not represent special difficulties even for a novice user. In the material below, it is described how to flash the ZTE Blade A510 smartphone - from a simple installation / update of the official version of the system before receiving the newest Android 7 in the apparatus.
Before switching to manipulations to the instructions below, realize the following.
Firmware procedures carry a potential danger! Only a clear execution of instructions can predetermine the idleness of the installation processes of the software. At the same time, the administration of the resource and the author of the article cannot guarantee the performance of methods for each specific apparatus! All manipulations with the device owner performs at his own risk, and the responsibility for their consequences is independently!
Preparation
Any software installation process is preceded by preparatory procedures. In any case, to reinsure, perform all the following before you start overwriting memory sections of Blade A510.
Hardware revisions
The ZTE Blade A510 model is available in two versions, the difference between which is the types of display used.
For this version of the smartphone, there are no restrictions on the use of software versions, you can install any official OS from ZTE.
In this version of the display, only official versions firmware will function properly. RU_B04., RU_B05, By_B07., By_B08..
To find out which display is used in a specific device, you can use the Android application Device Info HW, which is in the playing markete.
Download Device Info HW on Google Play

After installing and running Device Info HW, as well as the provision of root-rights application, the display version can be viewed in the "Display" line on the "General" tab of the program's main screen.
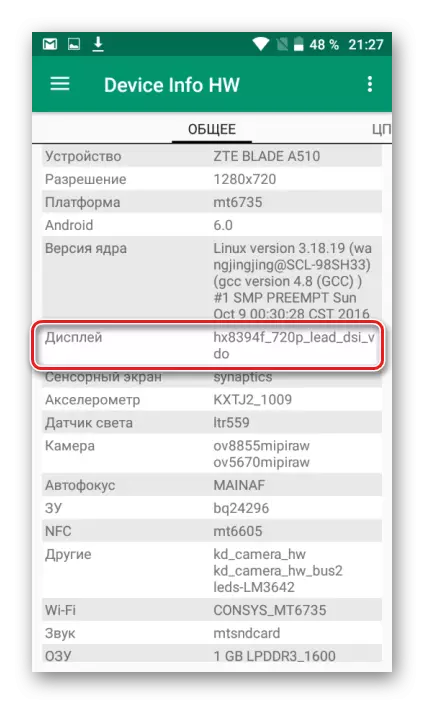
As you can see, defining the type of display in the ZTE Blade A510 and, accordingly, the device's hardware revision is a simple procedure, but requires the availability of the superuser's license device, and their receipt requires the pre-setting of the modified recovery, which is made after a series of rather complex manipulations with the software part and will Described below.

Thus, in some situations there will have to act "blindly", not knowing reliably, which type of display is used in the device. Before the audit of the smartphone is clarified, only those firmware that work with both revisions should be used, that is RU_B04., RU_B05, By_B07., By_B08..
Drivers
As in the case of other android devices, in order to conduct manipulations of the Blade A510 through Windows applications, you will need the driver installed in the system. The smartphone under review does not stand out in this matter something special. Install the drivers for mediatek devices by following the instructions from the article:
Lesson: Installing Drivers for Android Firmware

If problems or difficulties arise when installing drivers, use a specially created script to install the system components required for the correct interface of the smartphone and PC.
Download Auto Installation Drivers for ZTE Blade A510
- Unpack the archive obtained by reference and go to the received directory.
- Launch Bachik Install.bat. By clicking on it with the right mouse button and selecting the "Run from the Administrator" menu.
- Installing components starts automatically.
- Wait a bit to complete the installation process, which will tell the inscription "Driver Install Done" in the console window. Drivers BLAYD A510 have already been added to the system.


Backup Important Data
Each intervention in the software part of all android devices, and the ZTE Blade A510 is no exception here, it carries a potential danger and in most cases implies cleaning the internal memory of the device from the data contained in it, including user information. To avoid loss of personal information, make a backup copy of important information, and in the ideal case, a complete backup of the memory of the smartphone, using tips from the material:
Read more: How to make backup Android devices before firmware
The most important point to pay attention to is backing up the NVRAM section. Damage to this area during the firmware leads to the erasure of IMEI, which in turn leads to the inoperability of SIM-cards.
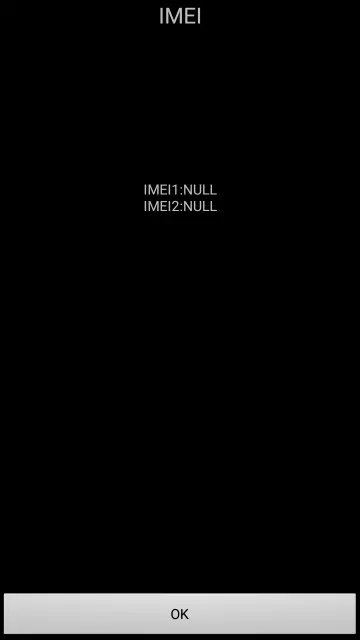
The restoration of "NVRAM" without a backup is very difficult, therefore, in the description of the methods of installing software No. 2-3, the following steps are indicated that allow you to create a dump section before interfering in the memory of the device.
Firmware
Depending on which purpose of you is set, you can use one of several ways to overwrite the ZTE Blade A510 software. Method number 1 is most often used to update the version of the official firmware, Method No. 2 is the most universal and cardinal method for reinstalling software and restore the working state of the device, and Method No. 3 implies the replacement of the system for the smartphone to solve third-party developers.

In general, it is recommended to go from the method to the method, starting from the first and stop the manipulation when the desired software version will be installed in the device.
Method 1: Factory Recovery
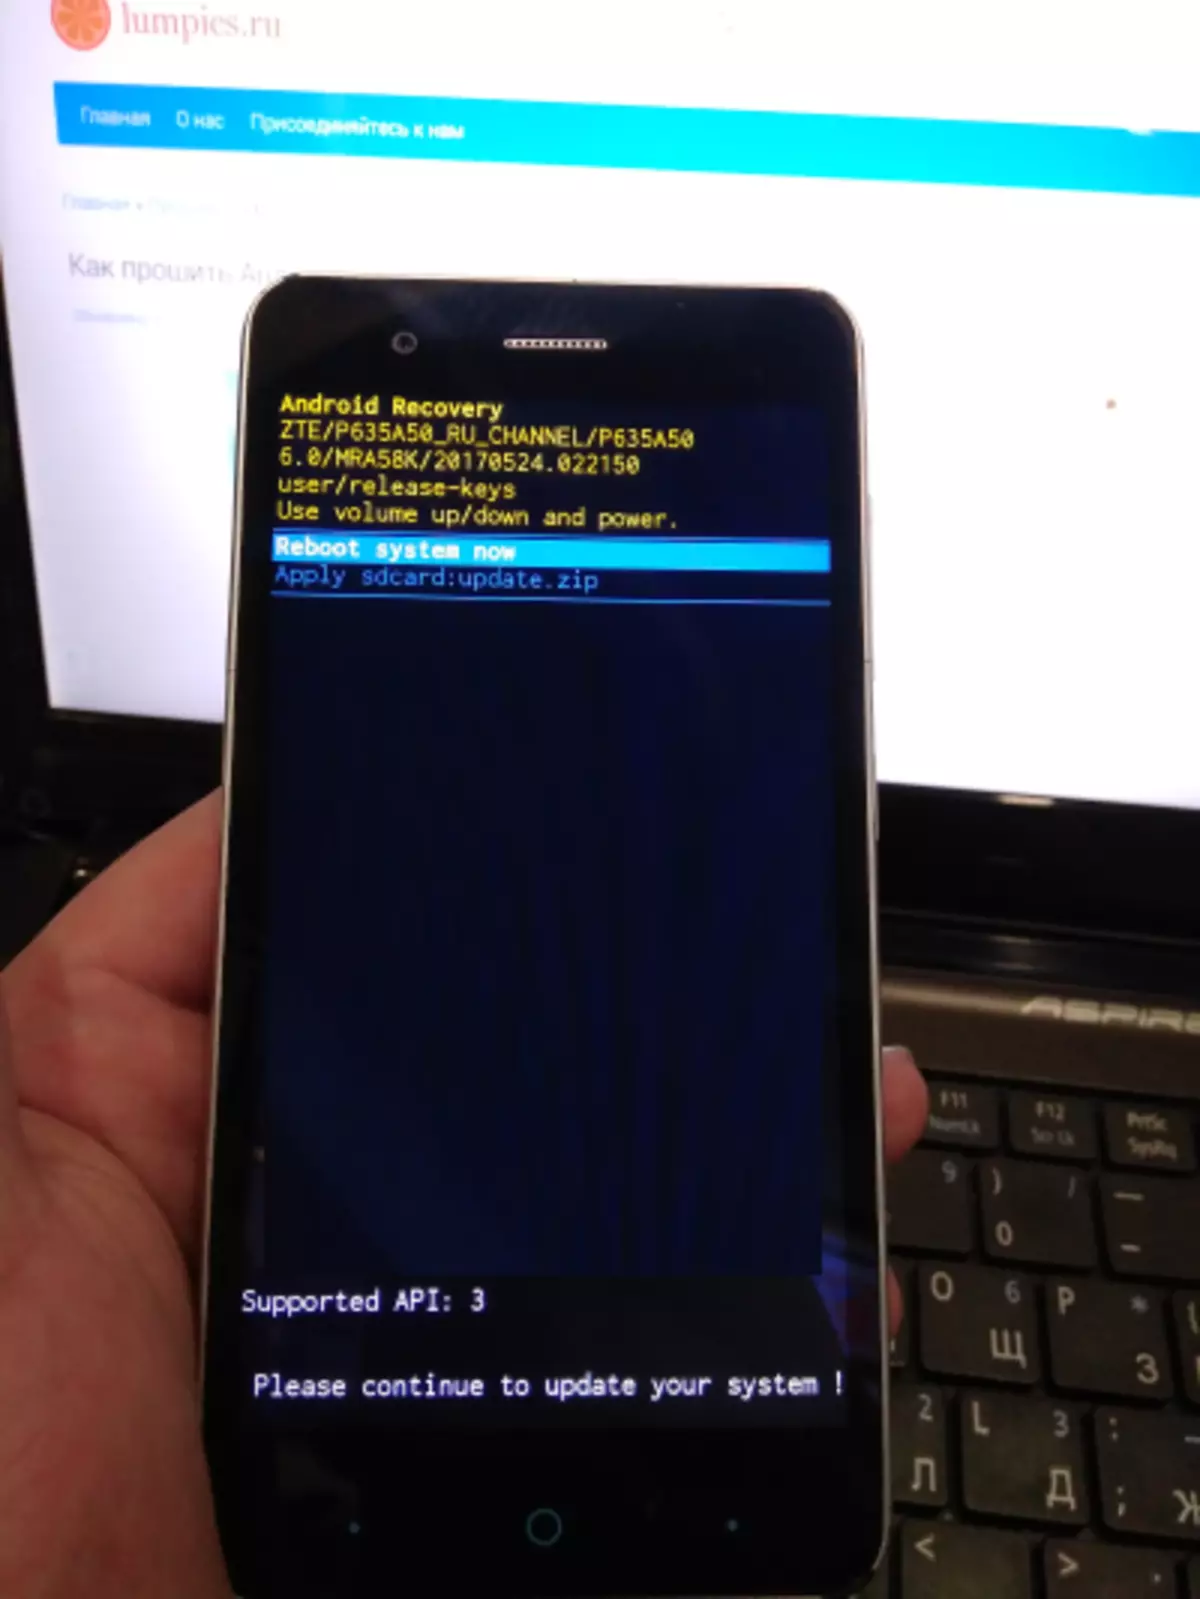
Probably the simplest way to reinstall the firmware on the ZTE Blade A510 should be considered the application of the possibilities of the device recovery environment. If the smartphone is loaded into Android, even the PC does not need to perform the following instructions, and if the device works incorrectly, the listed steps often help restore performance.

Additionally. In that case, if there are any errors in the installation process or a proposal will reboot, as in the photo below, simply repeat the procedure again starting from step 1, pre-restarting the recovery.
Method 2: SP Flash Tool
The most effective method of firmware of the ITC devices is to use MEDIATEK programmers, fortunately available and ordinary users - SP Flash Tool. As for the ZTE Blade A510, using the tool, you can not only reinstall the firmware to completely or change its version, but also restore the device that does not start, "hanging" on the boot saver, etc.
Among other things, the ability to work with SP Flash Tool will be needed to install the Custom Recovery Blue A510 and the modified OS, so you will get acquainted with the instructions, and in the ideal embodiment, it is worth it regardless of the firmware purposes. The version of the program from the example below can be downloaded by reference:
Download SP Flash Tool for the firmware ZTE Blade A510
The model under consideration is very sensitive to firmware procedures and quite often in the process of manipulations occur various malfunctions, as well as damage to the "NVRAM" section, so only a clear following instructions can guarantee the success of the installation!
Before switching to the process of installing system software in the ZTE Blade A510, it is recommended to read the article on the link below, it will help more fully understand the picture of what is happening and better to navigate in terms.
Lesson: Firmware Android devices based on MTK via SP Flashtool
Example uses firmware RU_BLADE_A510V1.0.0B05 As the most universal and fresh solution for models and the first and second hardware revisions. Package with firmware designed to install via SP Flashtool, download the link:
Download SP Flashtool Firmware for ZTE Blade A510
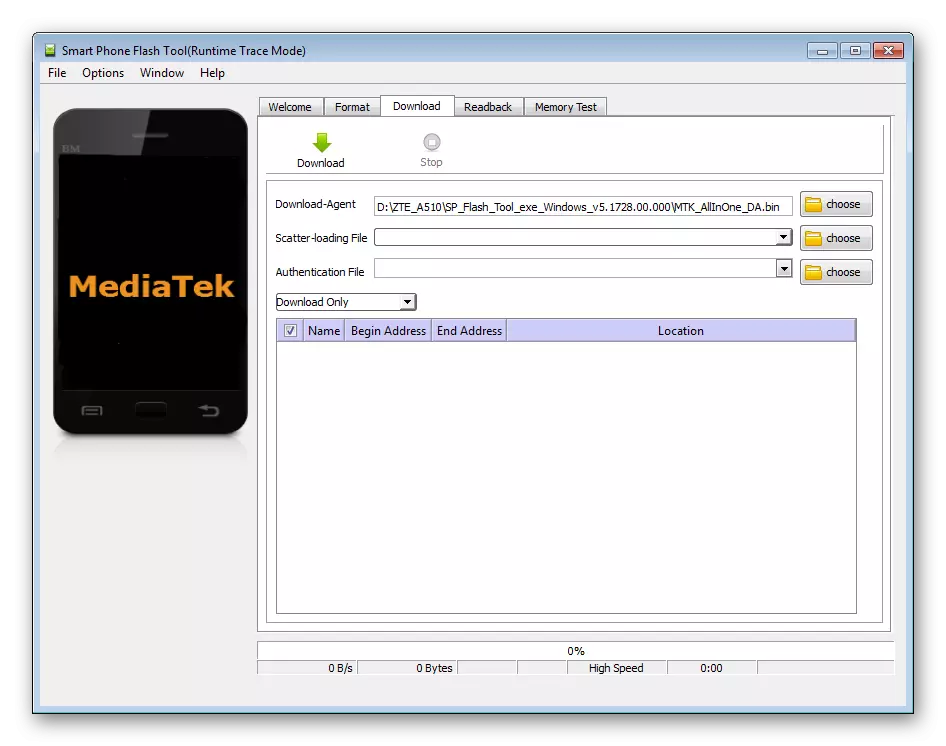
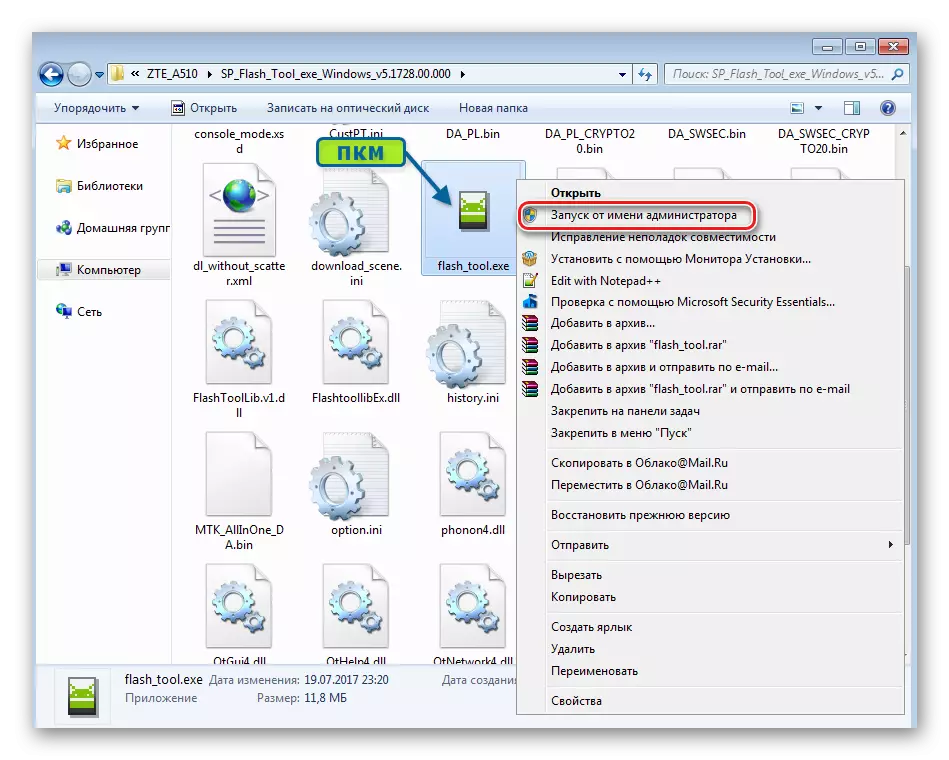
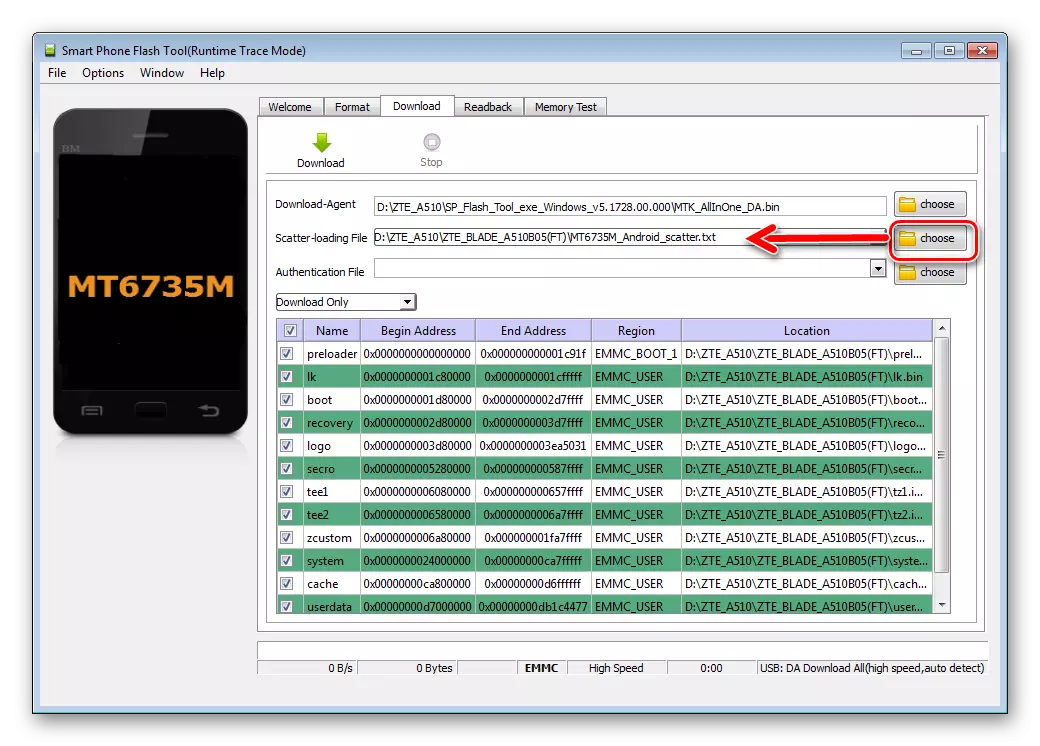
- Start Flash_Tool.exe. From the catalog, which received as a result of the archive unpacking.
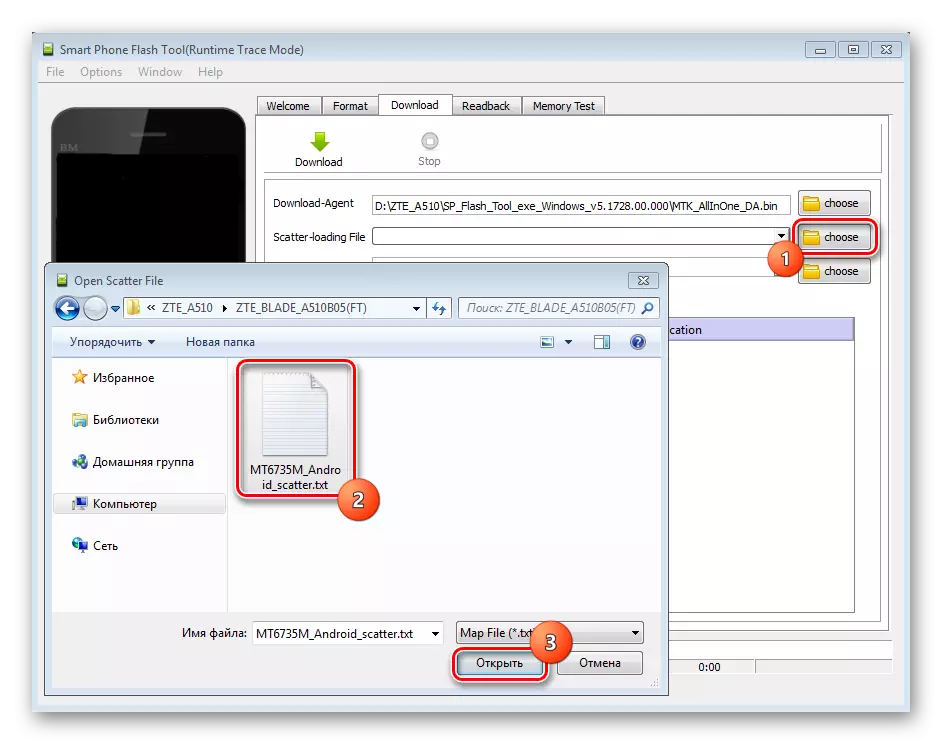
- Download the program Mt6735m_android_scatter.txt - This is a file that is present in the directory with a unpacked firmware. To add a file, the "Choose" button is served to right from the "Scatter-Loading File" field. By pressing it, determine the location of the file through the conductor and click "Open".
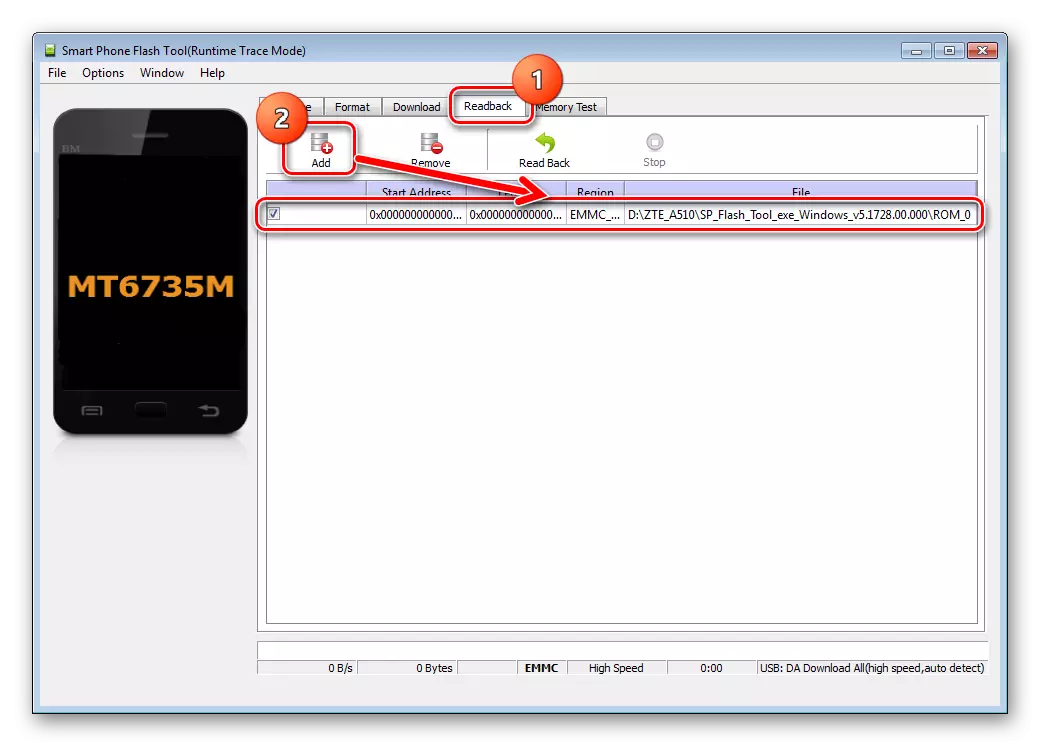
- Now you need to create a dump of the memory area that the "NVRAM" section takes. Go to the "Readback" tab and click "Add", resulting in the appearance of a line in the main window field.
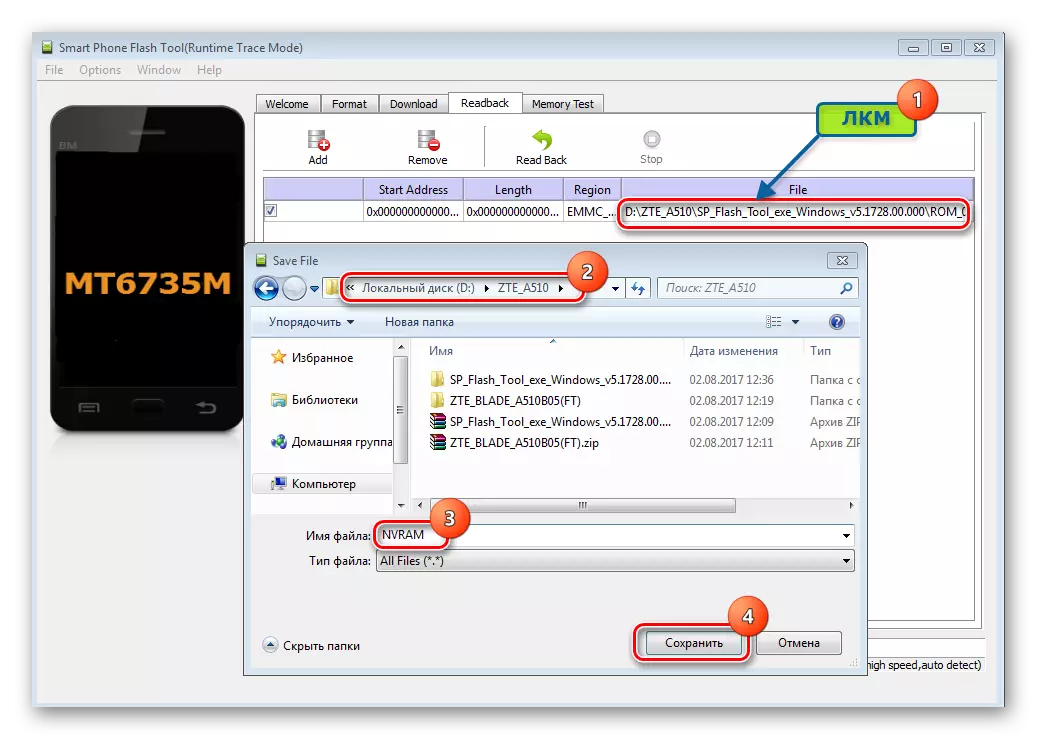
- The click of the left mouse button at the added line will open the conductor window, in which you want to specify the path where the dump will be saved, as well as its name - "NVRAM". Next click "Save".
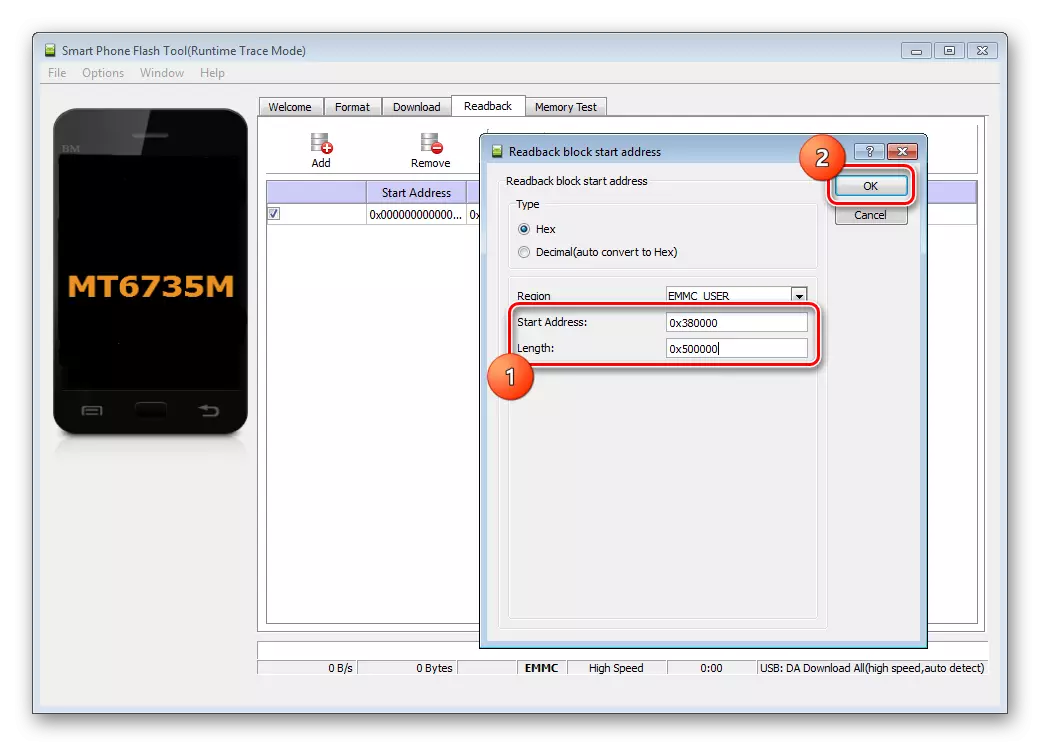
- In the "READBACK BLOCK START ADDRESS" window, which will appear after the execution of the previous steps of the instruction, enter such values:
- In the "Start ADRESS" field - 0x380000;
- In the "Length" field - the value of 0x500000.
And click "OK".
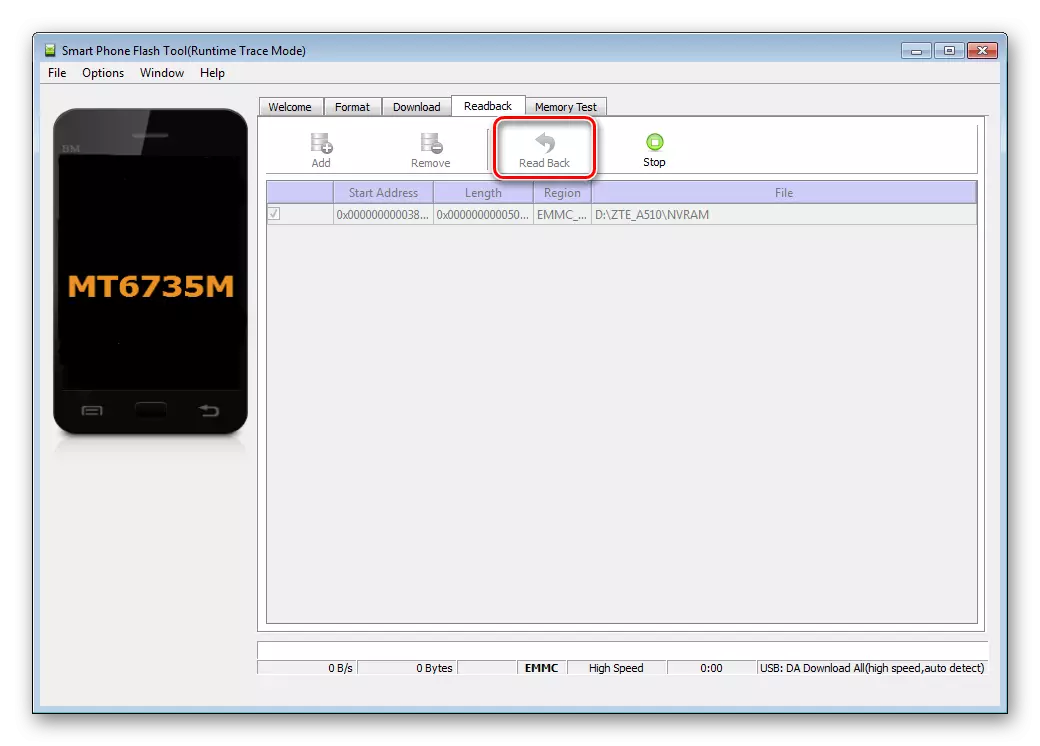
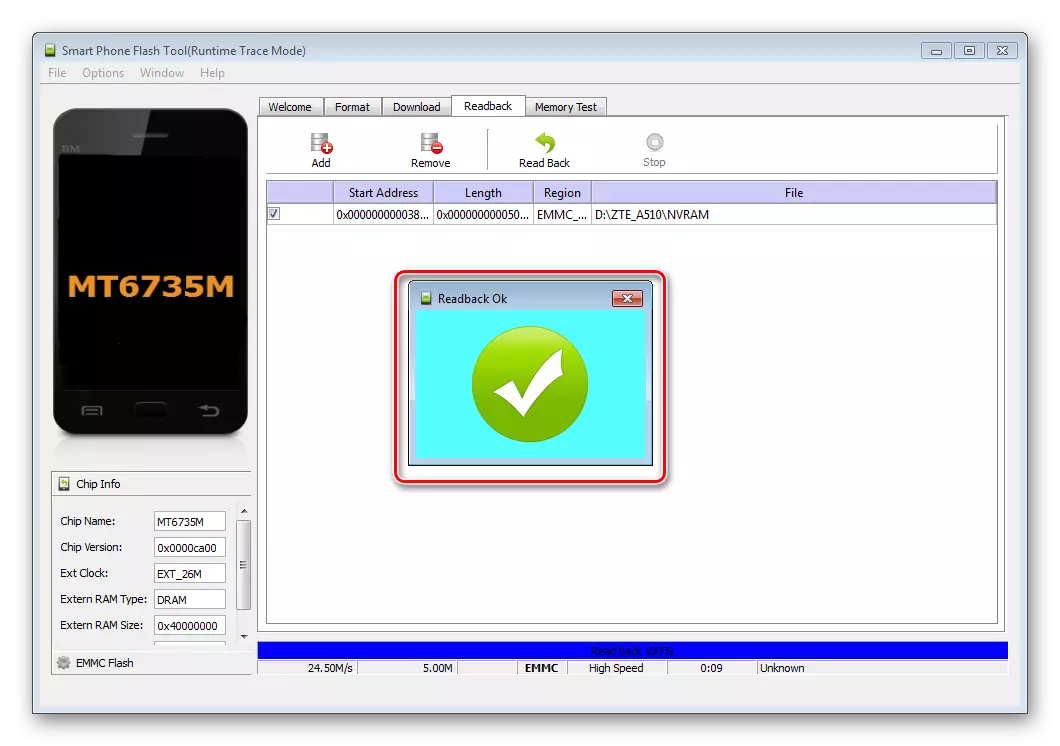
- Press the "READBACK" button. Turn off the entire smartphone, and connect the USB cable to the device.
- The process of subtracting information from the memory of the device will start automatically and will be completed very quickly by the appearance of the "Readback OK" window.
- In this way, you will have a 5MB NVRAM file backup file, which will be needed not only in the following steps of this instruction, but also in the future, if you need to restore IMEI.
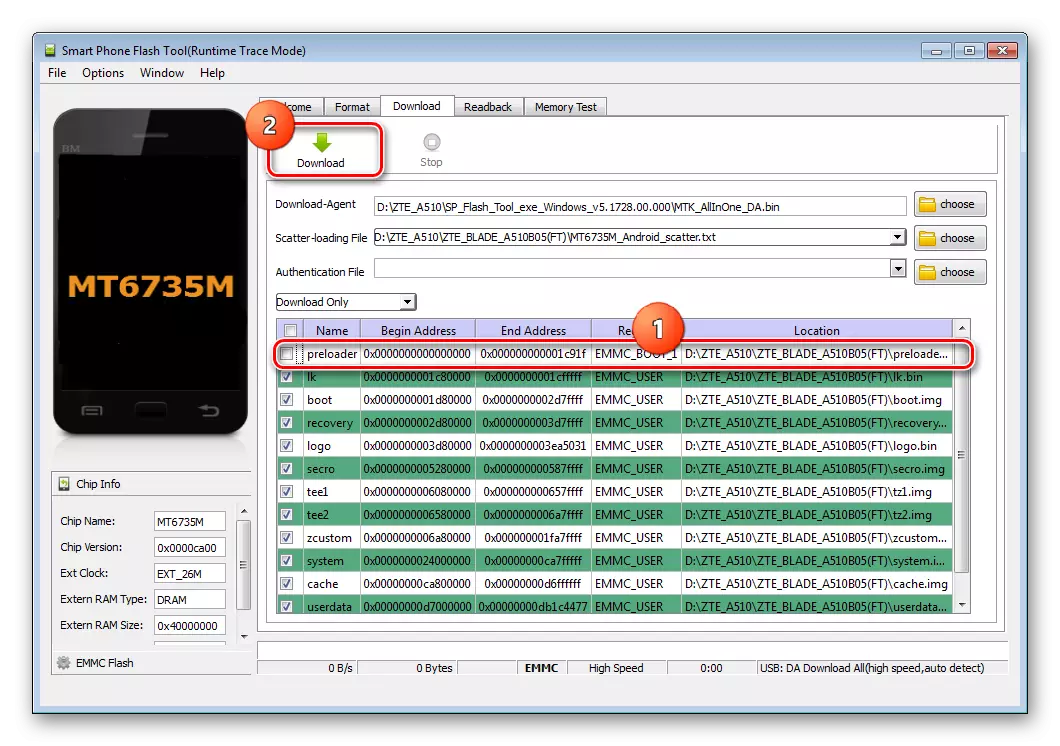
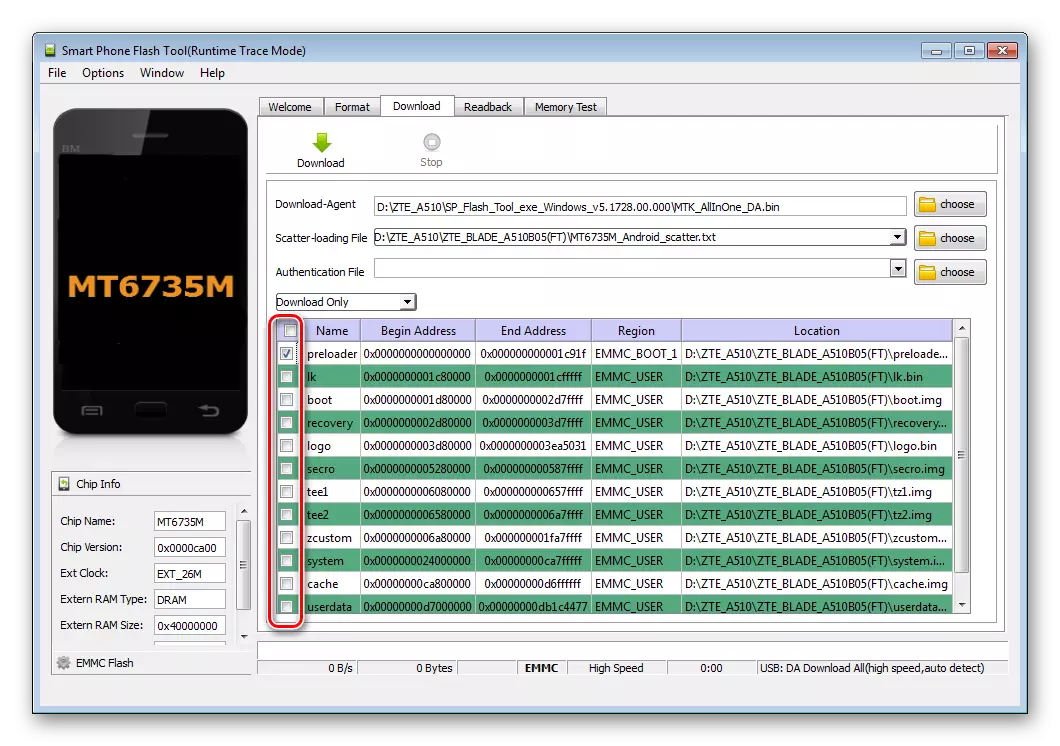
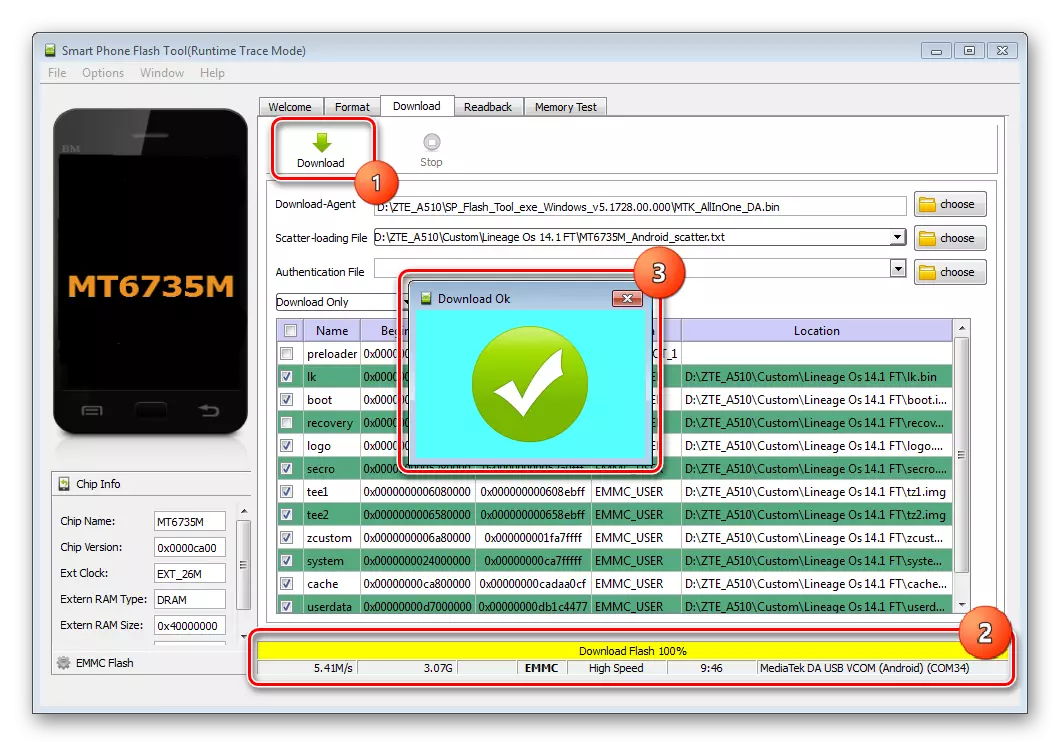
- Disconnect your phone from the port of Yusb and go to the "Download" tab. Remove the check in Chekbox next to the Preloader item and start writing the image to memory by clicking "Download".
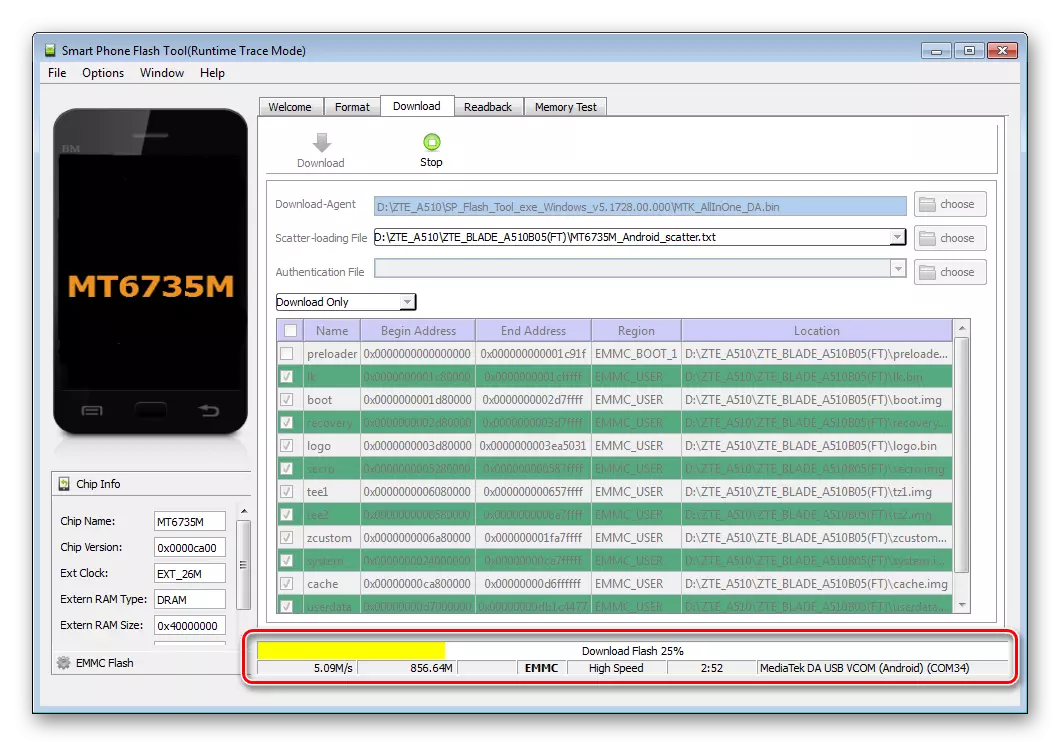
- Connect the USB cable to the smartphone. Following the definition of the device in the system, the installation of firmware in the device will automatically begin.
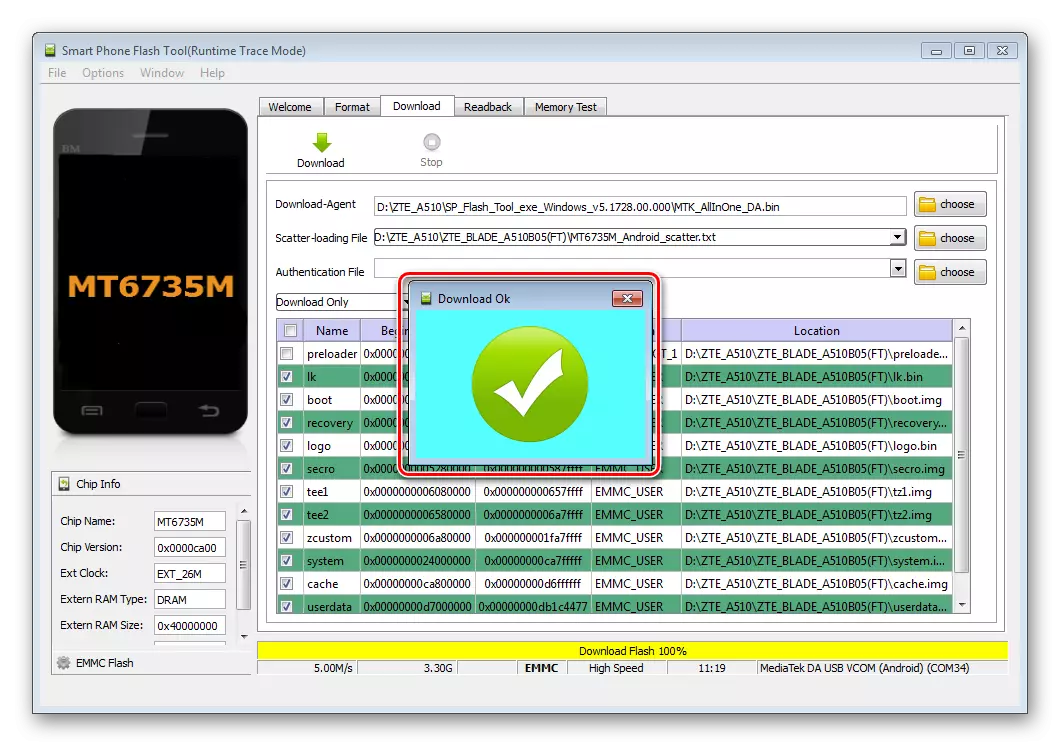
- Loading the appearance of the "Download OK" window and disconnect the ZTE Blade A510 from the computer's USB port.
- Remove the checkboxes in front of all sections, and near the "Preloader", on the contrary, install a tick.
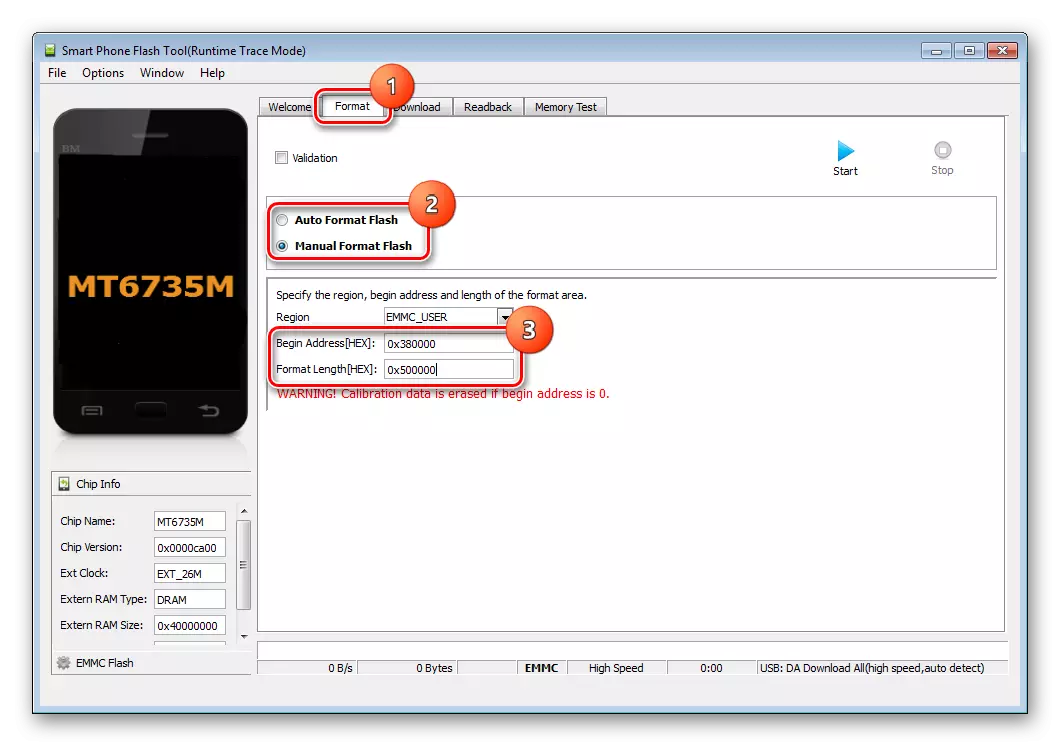
- Go to the "Format" tab, translate the formatting method switch to the "Manual Formatflash" position, and then fill the fields of the lower domain with such data:
- 0x380000 - in the "Begin Address [Hex]" field;
- 0x500000 - in the "Format Length [Hex]" field.
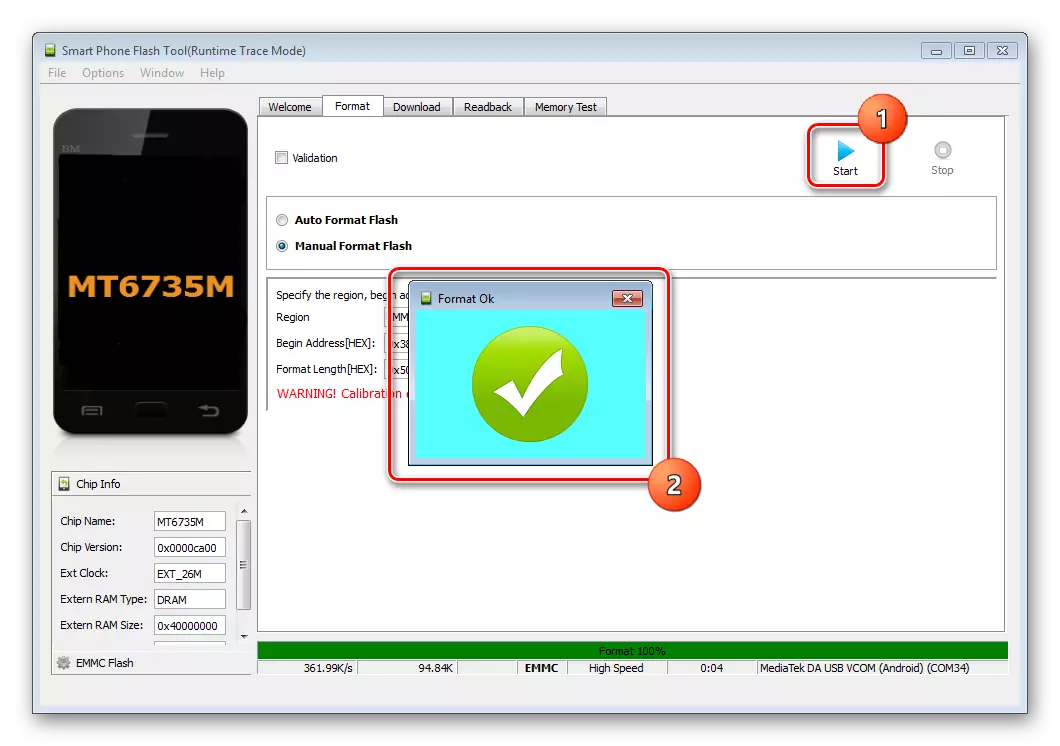
- Press "Start", connect the device in the off state to the port of YUSB and wait for the appearance of the Format OK window.
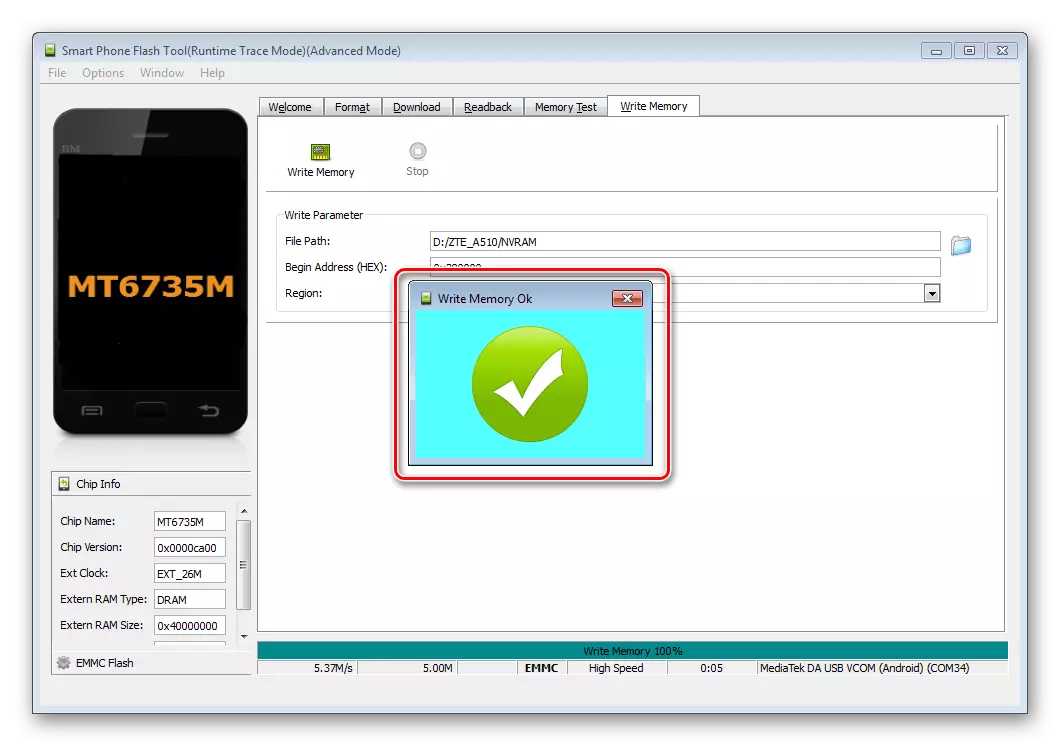
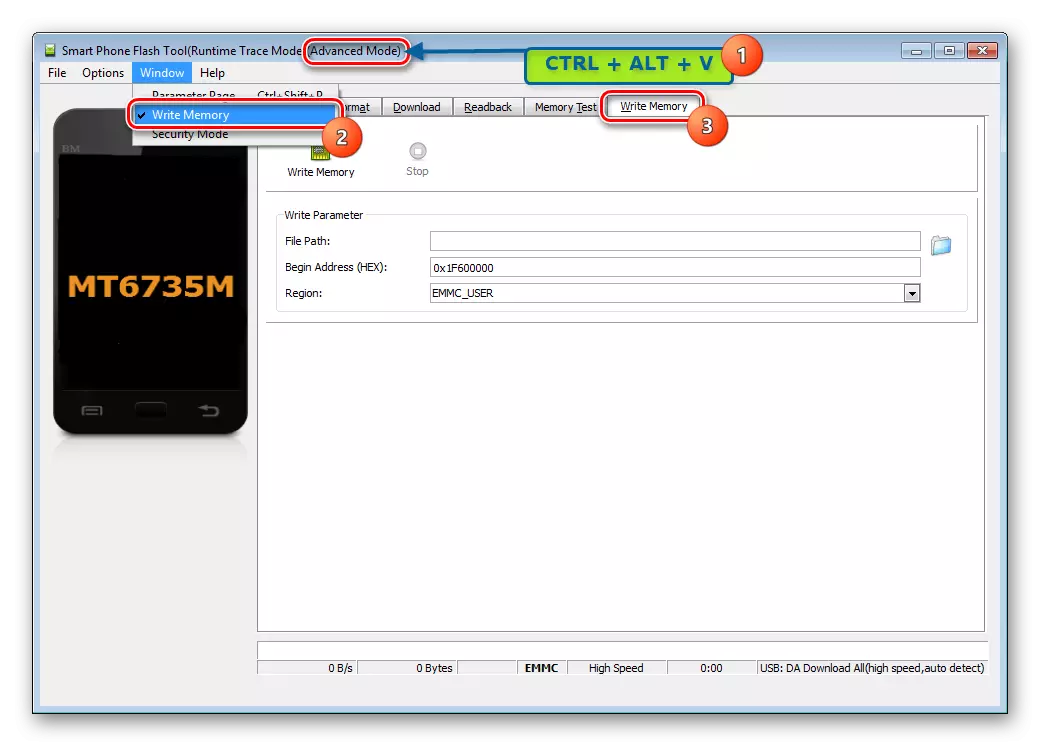
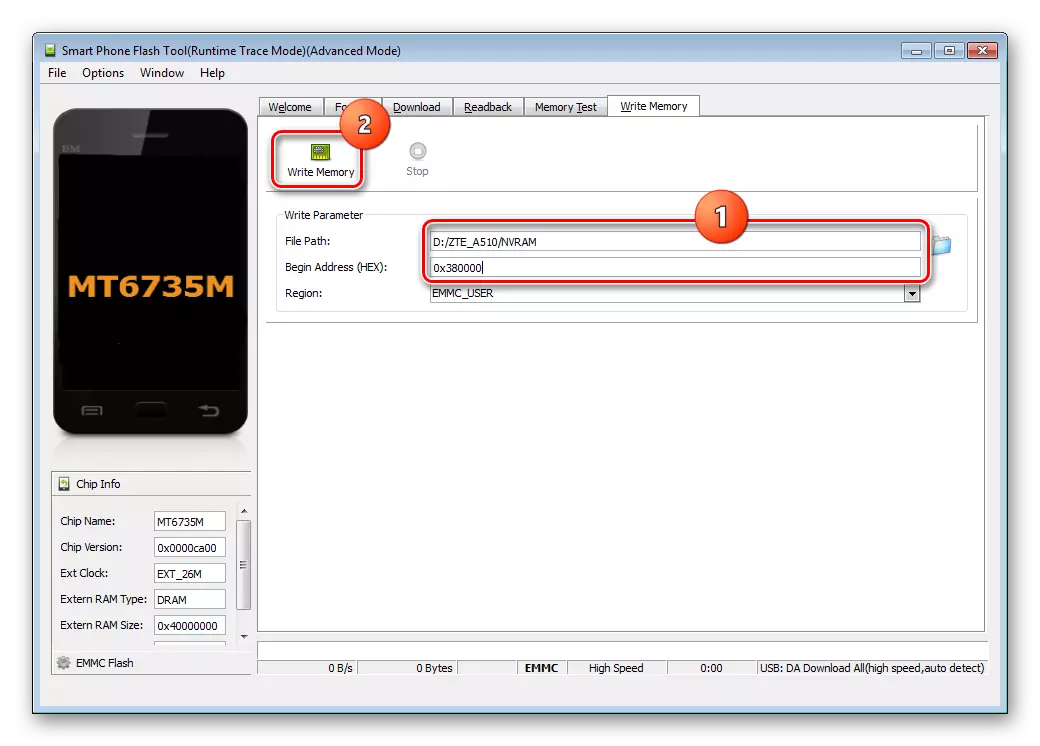
- Now you need to record a previously saved NVRAM dump in memory of Blade A510. This is done using the Write Memory tab available only in the "Advance" mode of operation SP FlashTool. To go to "Advanced Mode" you need to press the "Ctrl" + "Alt" + "V" combination on the keyboard. Then go to the "Window" menu and select "Write Memory".
- The Begin ADRESS [HEX] field on the Write Memory tab, entering 0x380000, and add the "NVRAM" file in the File Path field, obtained as a result of steps No. 3-7 of this Instruction. Press the "Write Memory" button.
- Blight A510 turned off with PCs, and then wait for the appearance of the Write Memory OK window.
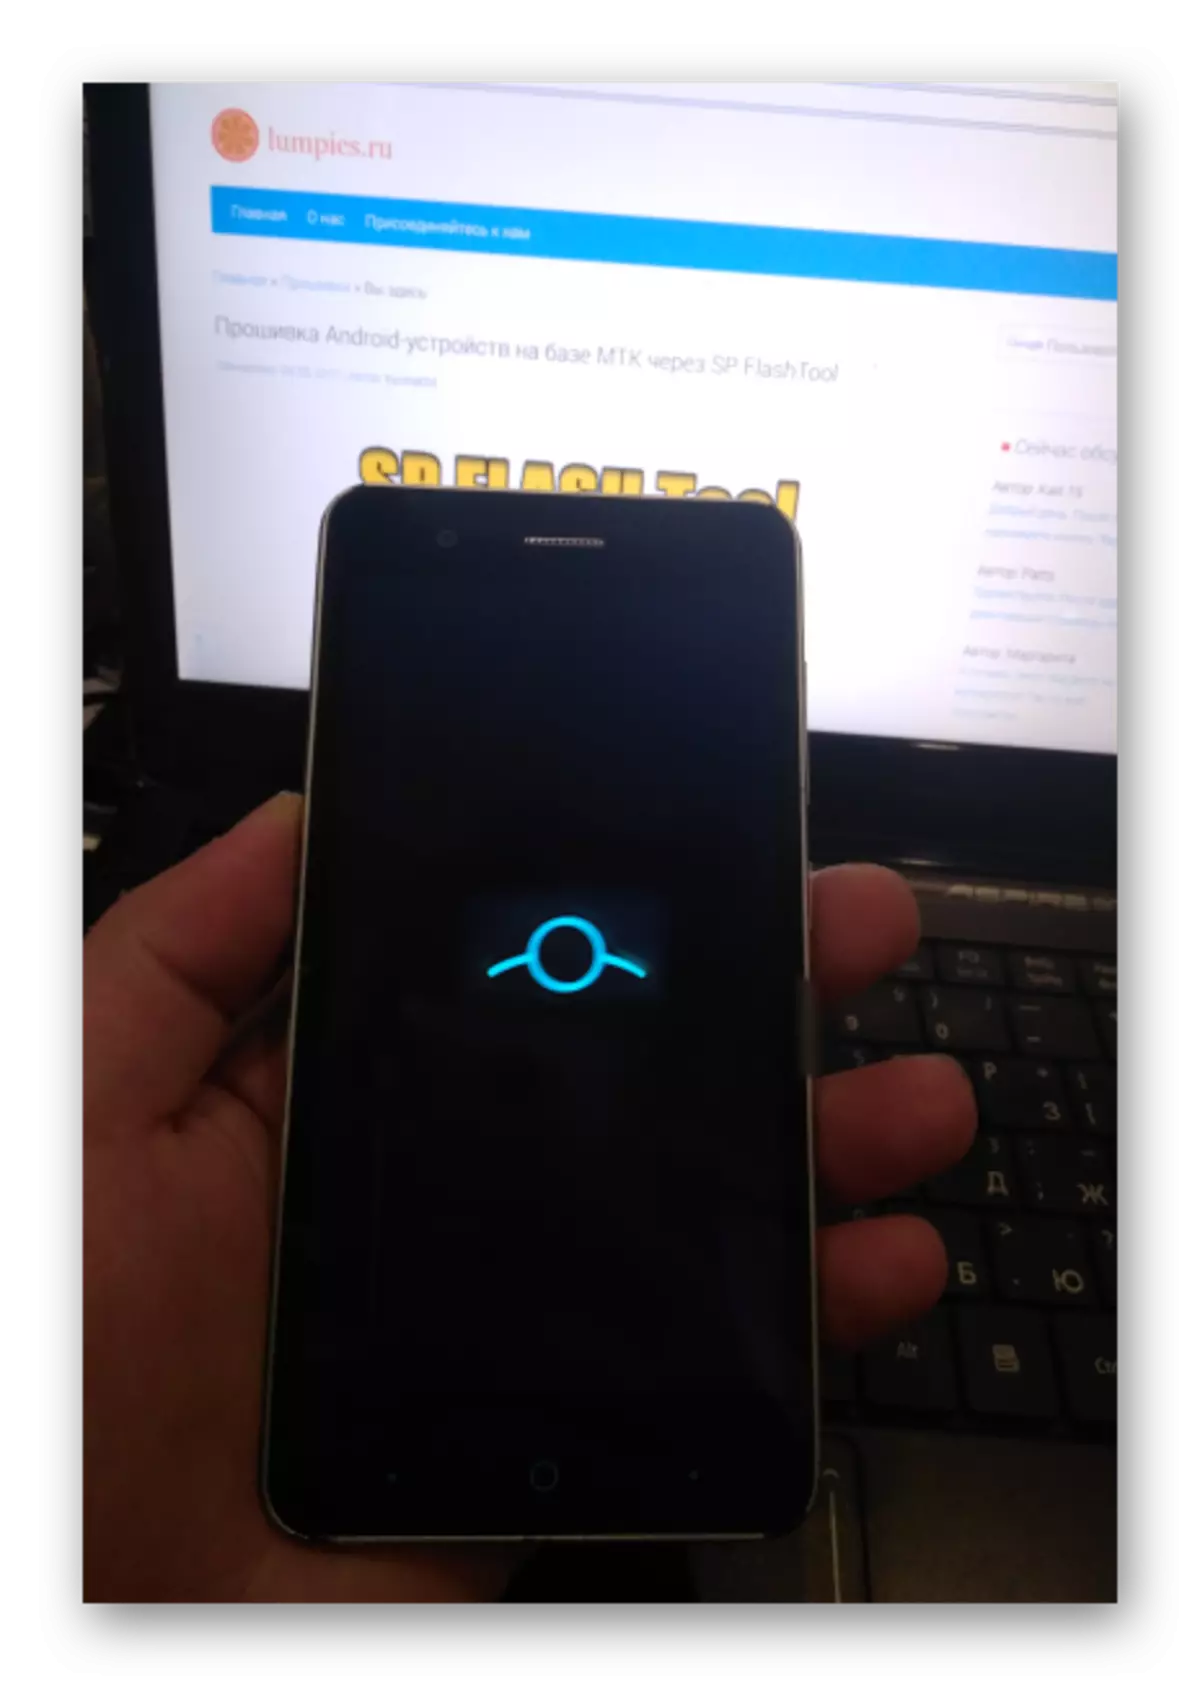
- On this installation of the OS in the Blade A510, it can be considered completed. Disconnect the device from the PC and include it with a long pressing of the "Power" key. The first time after manipulations through a flash station to wait for downloads in the Android will have about 10 minutes, take patience.
Method 3: Custom firmware
If the official firmware ZTE BLADE A510 does not suit its functional filling and capabilities, I want to try something new and interesting, you can use modified solutions. For the model under consideration, many customers were created and ported, choose any of your preferences, but it should be noted that often developers laid firmware with non-working hardware components.

The most common "disease" of modified solutions for ZTE Blade A510 is the impossibility of using a camera with a flash. In addition, we should not forget about two revisions of the smartphone and carefully read the description of the castoma, namely, for which hardware version A510 it is intended.
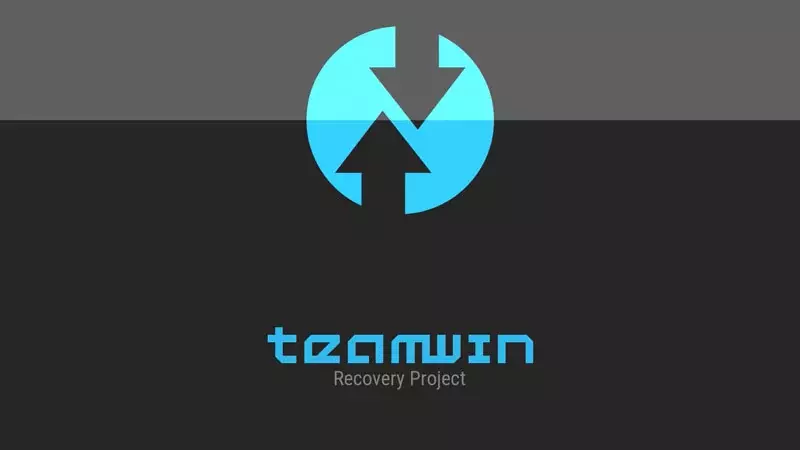
Custom firmware for A510 spreads in two types - to install via SP Flash Tool and to install via modified recovery. In general, if it is decided to switch to caste, it is recommended to operate according to this algorithm. Preem first Teamwin Recovery (TWRP), get the root right and accurately find out the hardware revision. Then install the modified OS via FlashTool without recovery environment. Subsequently, change the firmware using custom recovery.
Installation TWRP and receiving root-rights
In order for the Custom Recovery Wednesday to appear in the ZTE BLADE A510, use the installation method of the individual image using SP FlashTool.
Read more: Firmware Android devices based on MTK via SP Flashtool
File-image of modified recovery can be downloaded by reference:
Download Teamwin Recovery (TWRP) for ZTE Blade A510
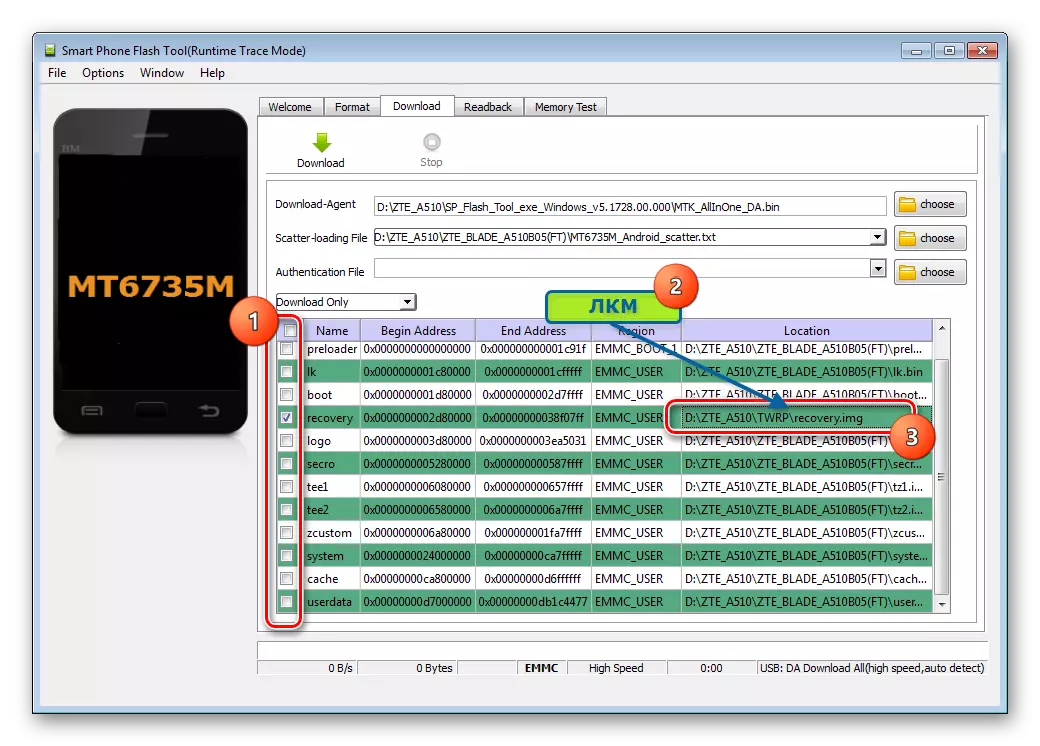
- Download the scatter from the official firmware in the SP Flashtool.
- Remove from the label in all checkboxes, with the exception of "recovery". Next, replace the "recovery.img" image in the paths field to files for partitions to such, containing TWRP and located in a folder with a unpacked archive, which is loaded above the link above. For replacement, click twice along the location path of the recovery image and select File recovery.img From the "TWRP" folder in the conductor window.
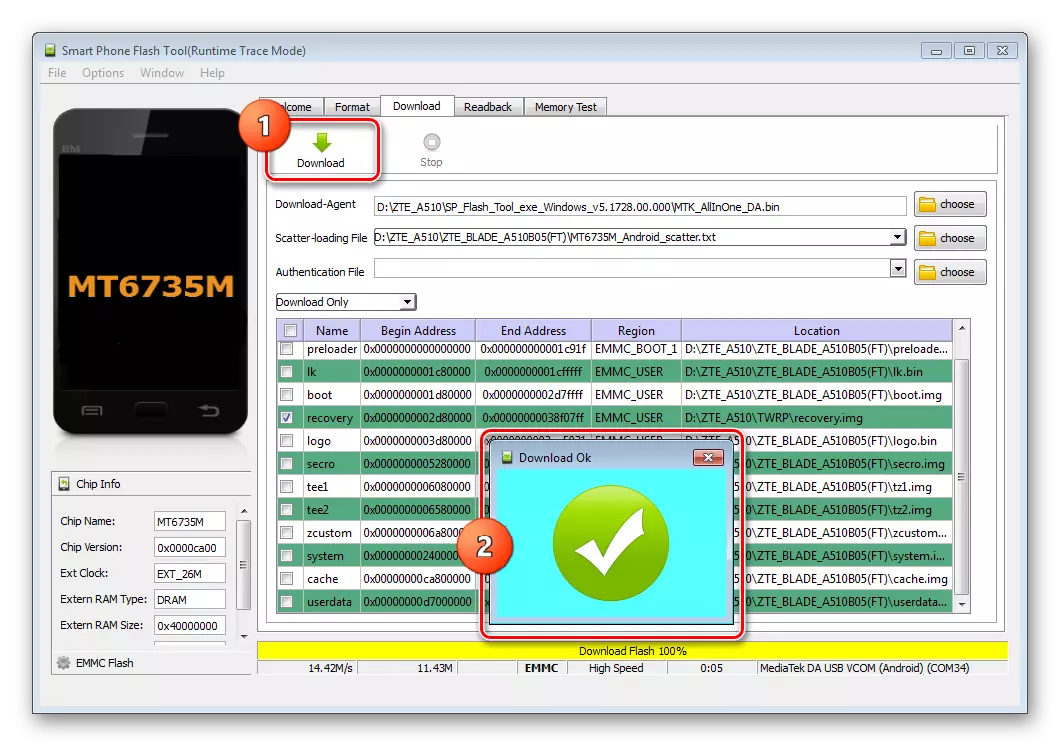
- Press the "Download" button, plug the ZTE Blade A510 in the off state to the USB port and wait for the end of the installation of the medium.
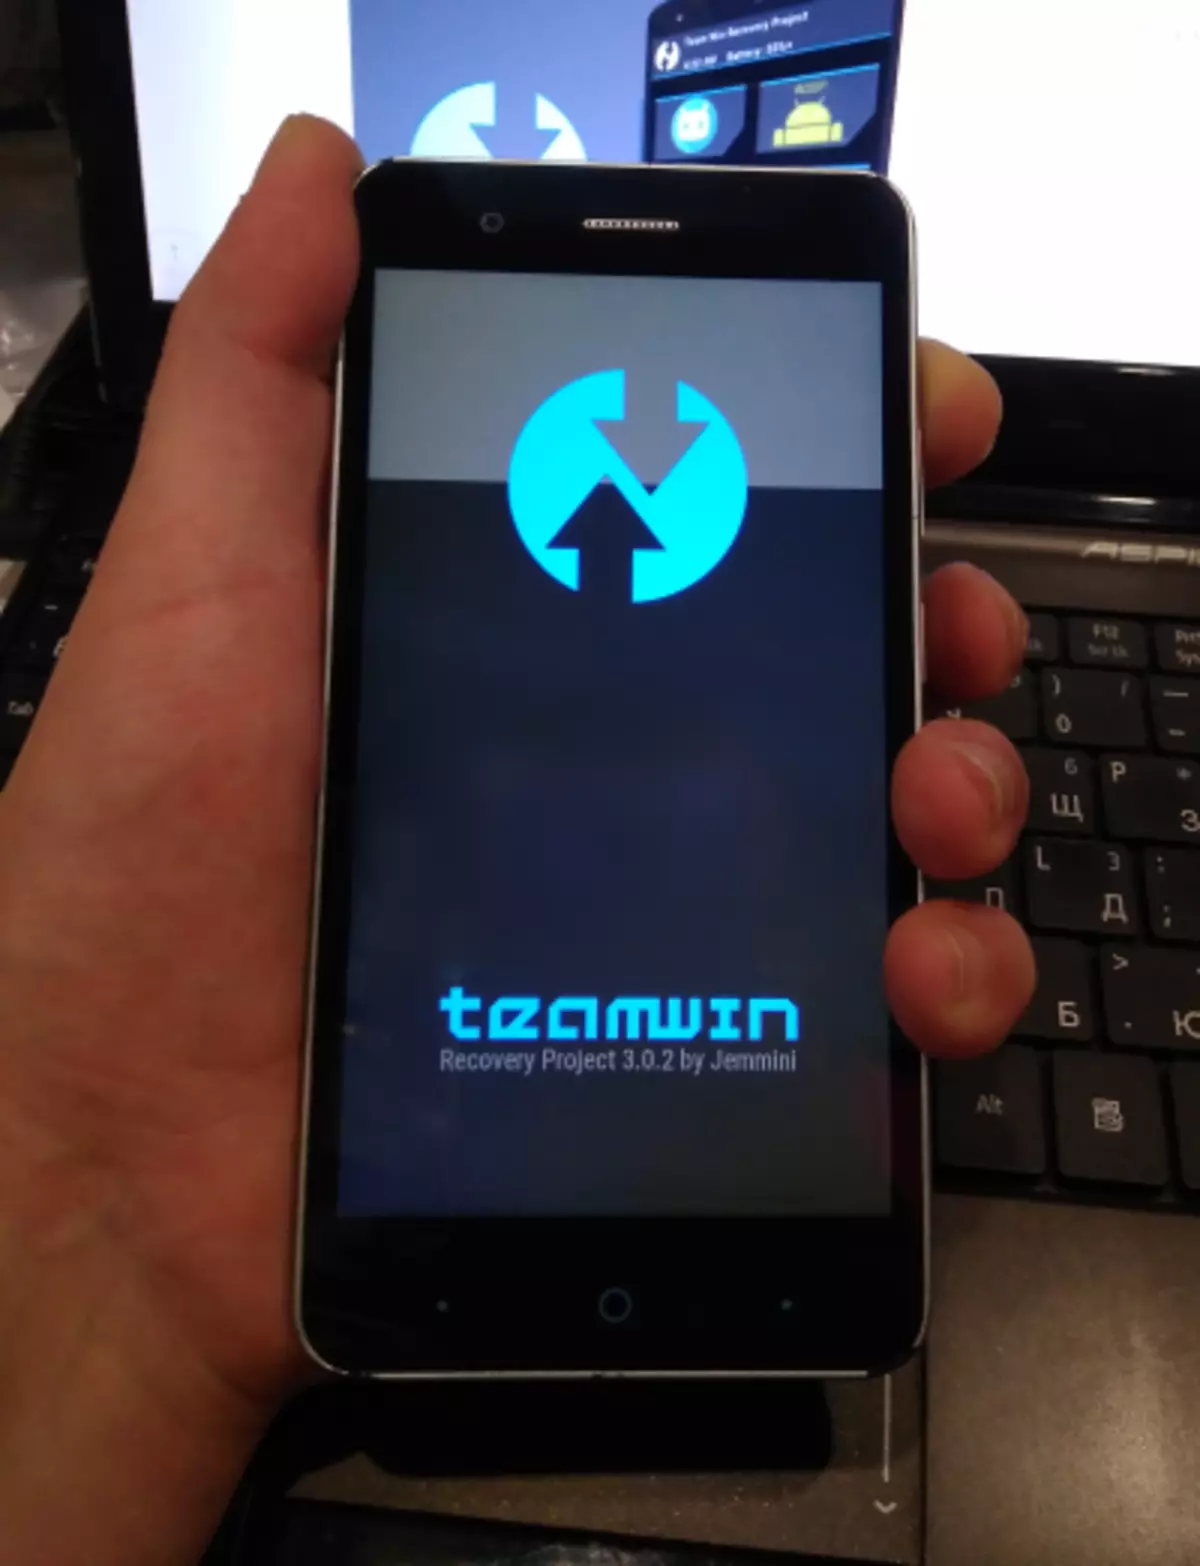
- Loading in TWRP is carried out in the same way as in the factory recovery environment. That is, press the "Volume +" and "power" button on the disabled device at the same time. When the screen is lit, release the "power" by continuing to hold the "increasing volume", and wait for the appearance of the Logo TWRP, and then the main screen of the recovery.
- After selecting the interface language, as well as moving the "Allow Change" switch to the right, the buttons will appear to implement subsequent actions in the environment.
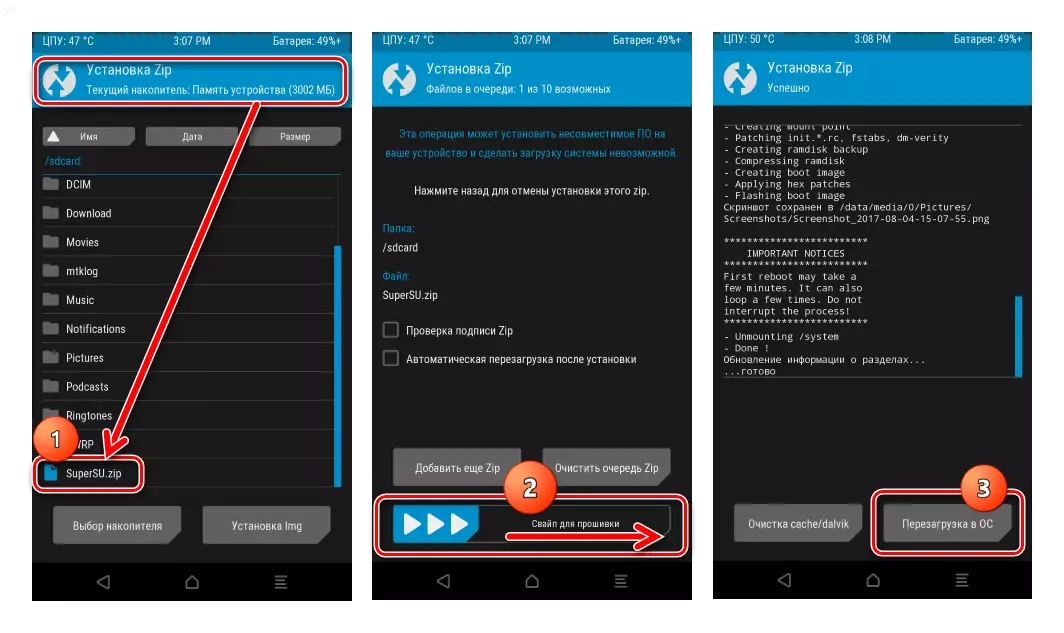
- Having a fixed modified recovery environment, get root-rights. To do this, you need to flash a zip-package SuperSu.zip. Through the "Installation" item in TWRP.
Download Package to get root rights to ZTE Blade A510
The obtained superuser rights will be able to accurately find out the hardware audit of the smartphone, the method that is described at the beginning of the article. Knowledge of this information predetermines the correctness of the choice of a package with a custom OS for the apparatus under consideration.

Read more: How to flash an Android device via TWRP
Custom installation via SP Flashtool
The installation procedure of custom firmware in general is no different from a similar process when installing an official decision. If you have been transferred to the official firmware files in Method 2 above (and it is extremely recommended to make it possible before installing the modified solution), then you already have a NVRAM backup, and therefore after installing any modified OS, if necessary, you can restore the partition.
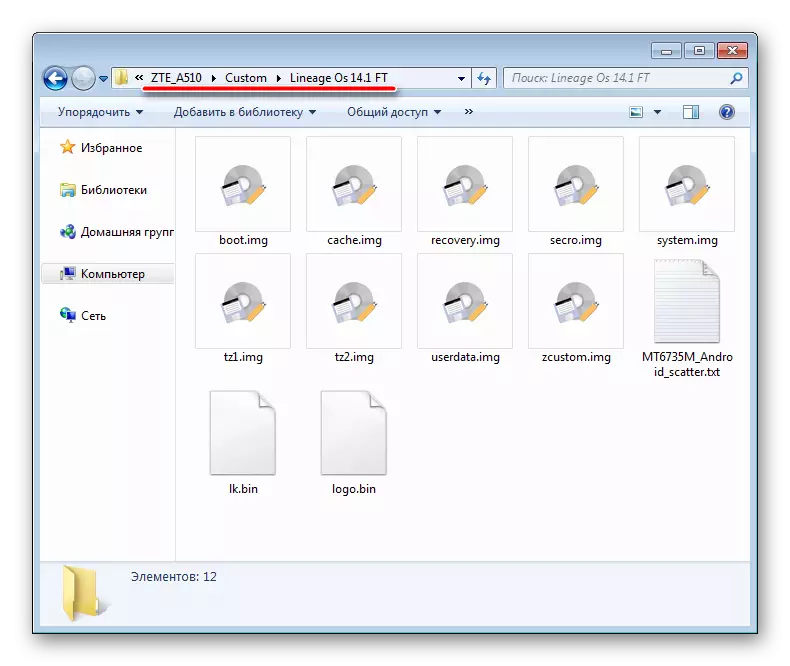
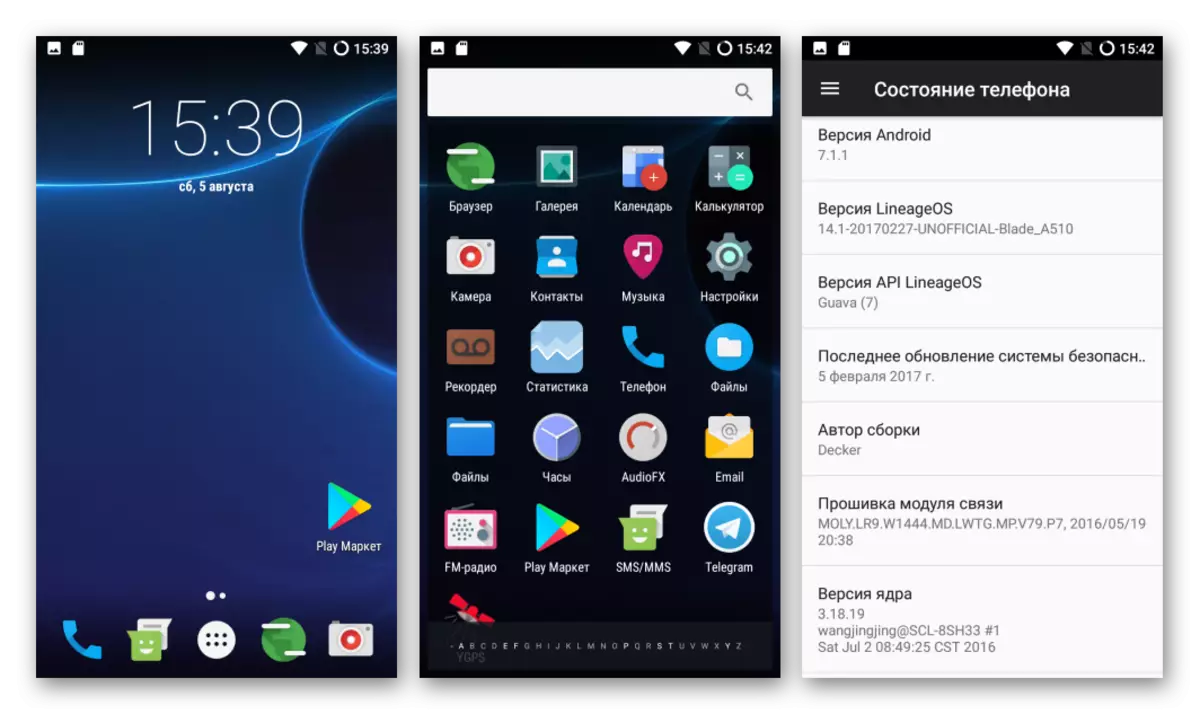
As an example, install a custom solution for the ZTE BLADE A510 Lineage OS 14.1. On the basis of Android 7.1. The disadvantages of the assembly include the periodic hang of the "camera" application, in the case of flashing. Otherwise, this is an excellent and stable solution, besides - the newest android. The package is suitable for both revisions of the device.
Download Lineage OS 14.1 for ZTE Blade A510
- Unpack the archive with the software into a separate folder.
- Run the SP FlashTool and add a scatter from the folder, resulting in unpacking the package downloaded on the link above. If the TWRP installation was previously implemented and you wish to save the medium on the machine, remove the checkbox in the Recovery checkbox.
- Press the "Download" button, connect the ZTE Blade A510 turned off to the PC, and expect the end of manipulations, that is, the appearance of the "Download OK" window.
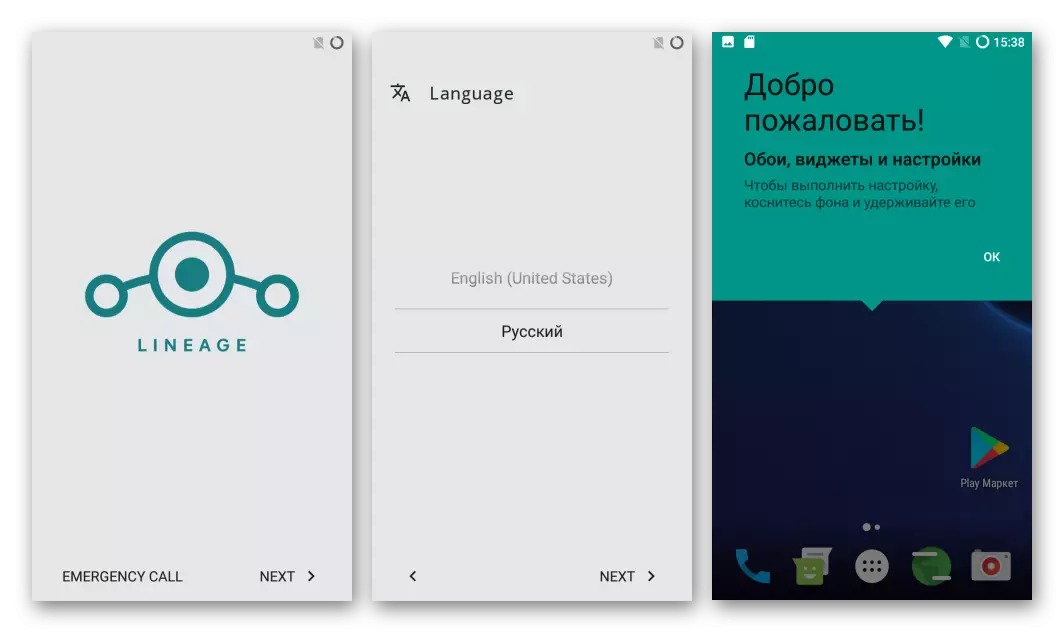
- You can disconnect the USB cable from the device and start the smartphone with a long press "Turning on" key. The first LINEAGOS load after the firmware lasts for a very long time (startup time can reach 20 minutes), you should not interrupt the initialization process, even if it seems that the caster will not start.
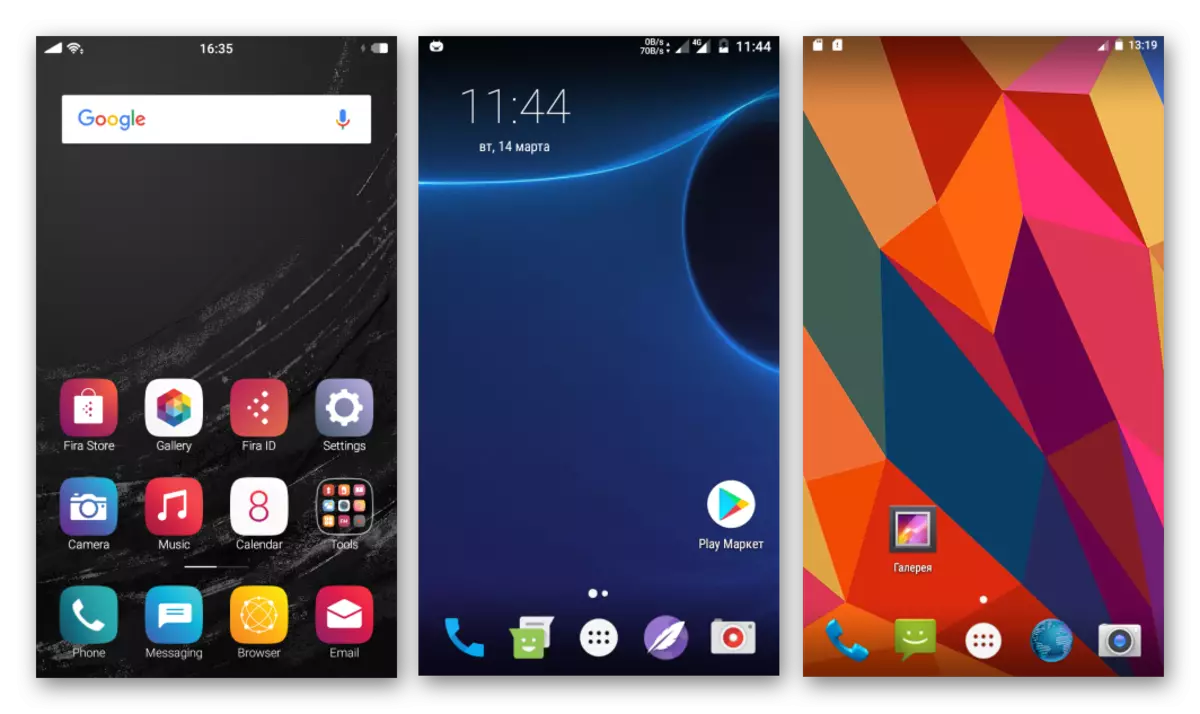
- Wait for the launch really worthwhile - ZTE Blade A510 acquires a literally "new life", working under the control of the latest version of Android,
Modified to the same specifically for the model under consideration.

Custom installation via TWRP
Install modified firmware via TWRP is very simple. The procedure is described in detail in the material below, for the BLEYD A510, there are no significant differences in the process.
Lesson: how to flash an Android device via TWRP
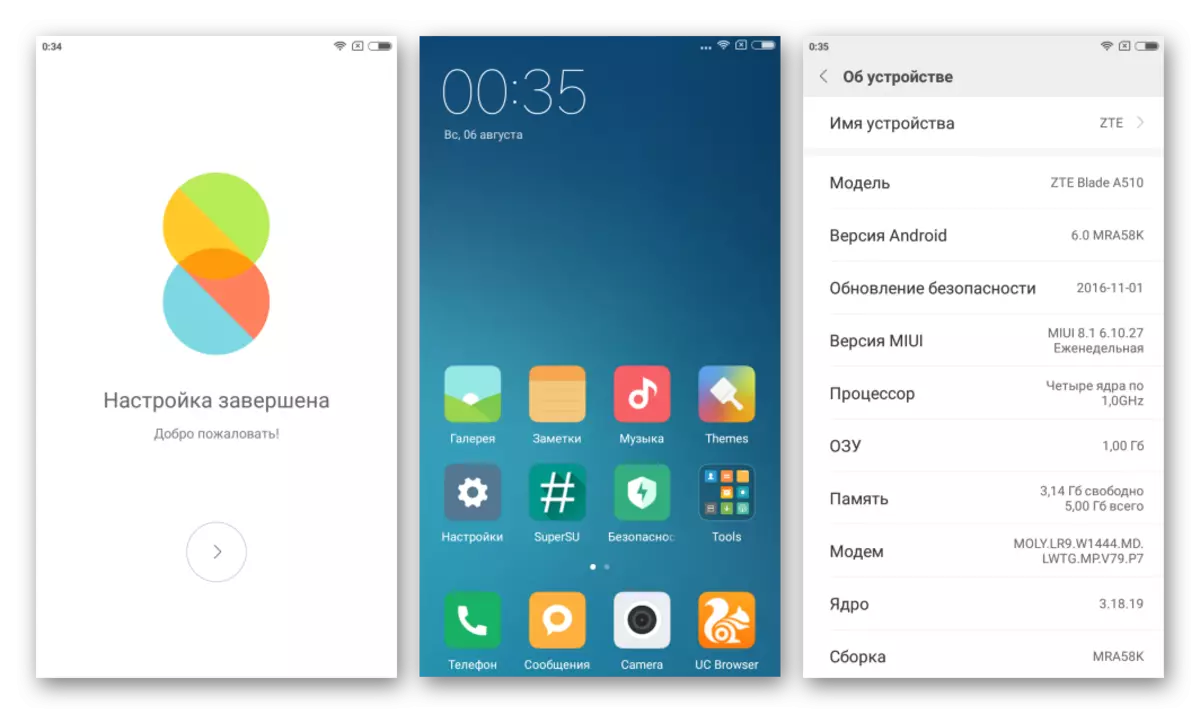
One of the interesting solutions for the apparatus under consideration is a portable OS MIUI 8, which is characterized by a cute interface, a weighing opportunity for fine-tuning system, stability and access to Xiaomi services.
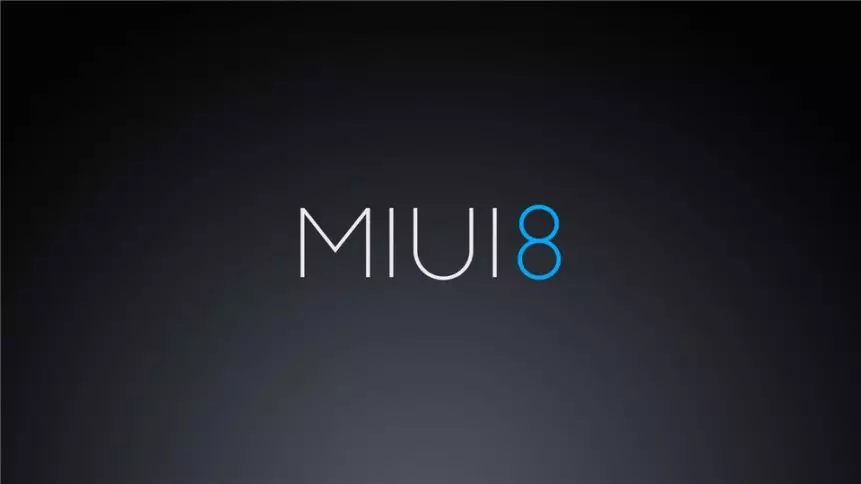
Download Package To install via TWRP from the example below, you can link below (Suitable as for Rev1. , so I. Rev2.):
Upload MIUI 8 for ZTE Blade A510
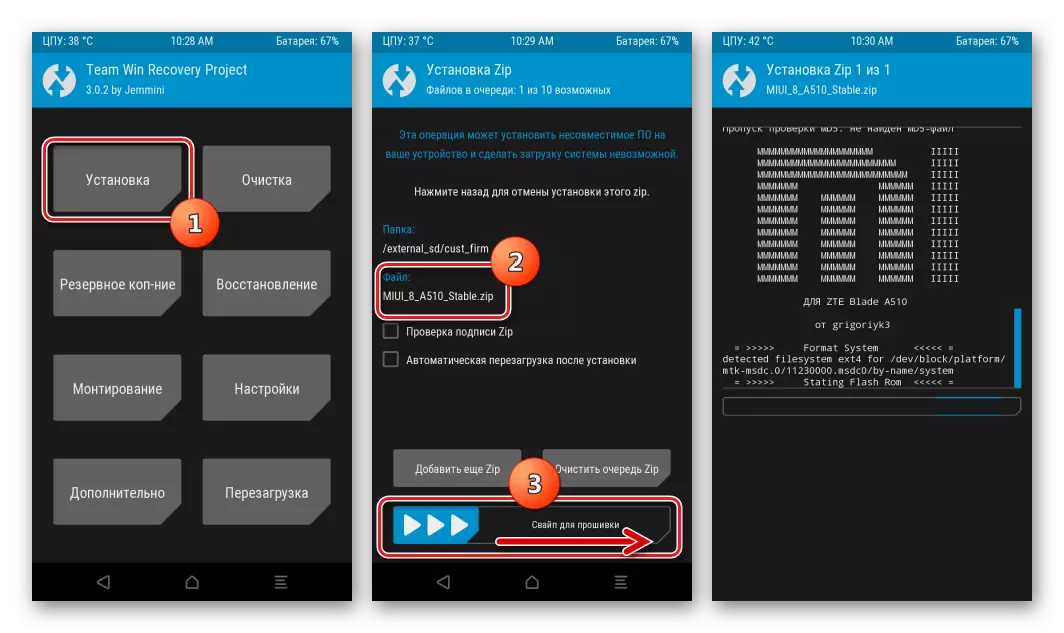
- Unpack the archive with MIUI (password - LumpicsRu. ), and then place the file received Miui_8_a510_stable.zip. In the root of the memory card installed in the apparatus.
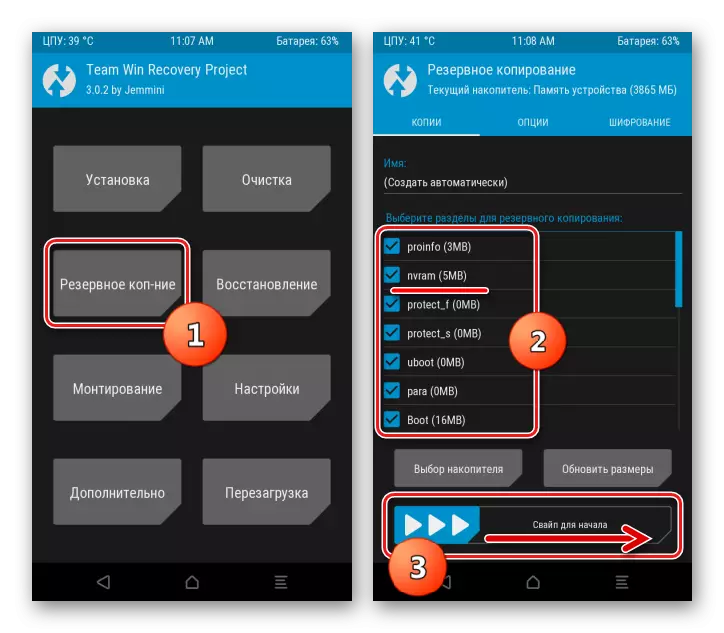
- Reboot to TWRP recovery and make a backup system by selecting the Reserve Copper item. Backup Create a backup to "Micro SDCard", since the internal memory is cleared of all data before installing the software package. When creating a backup, it is desirable to note everything without exception sections, it is mandatory "NVRAM".
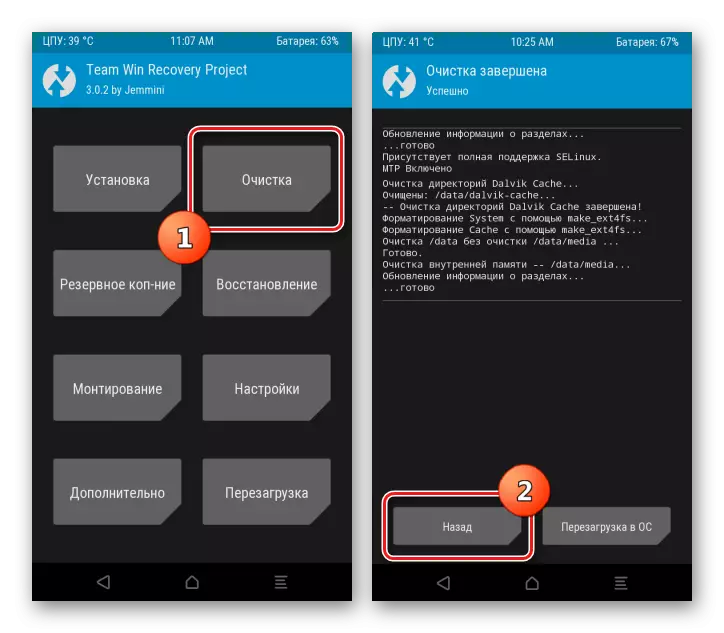
- Make "wipes" of all sections, with the exception of Micro SDCard by selecting "Cleaning" - "Selective Cleaning".
- Install the package through the Installation button.
- Reboot to MIUI 8 by selecting the "Restart in OS" button, which will appear on the TWRP screen upon completion of the installation.
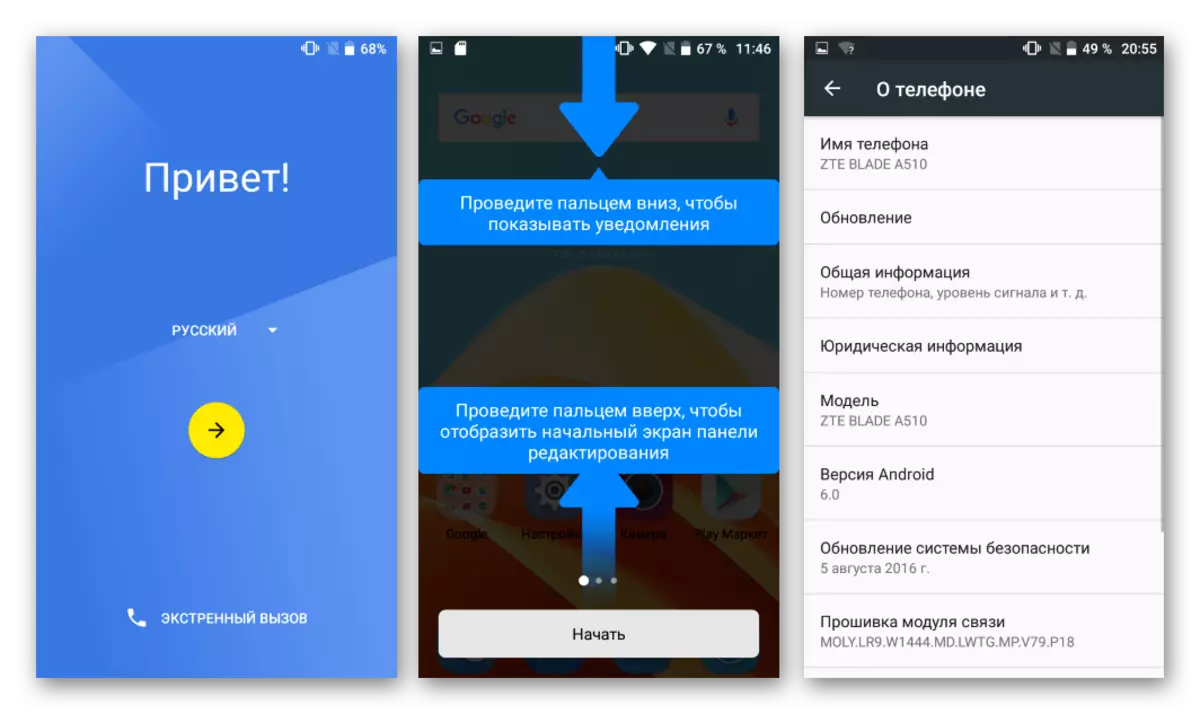
- The first launch will take a long time, you should simply wait for its completion when the MIUI 8 welcome window appears.
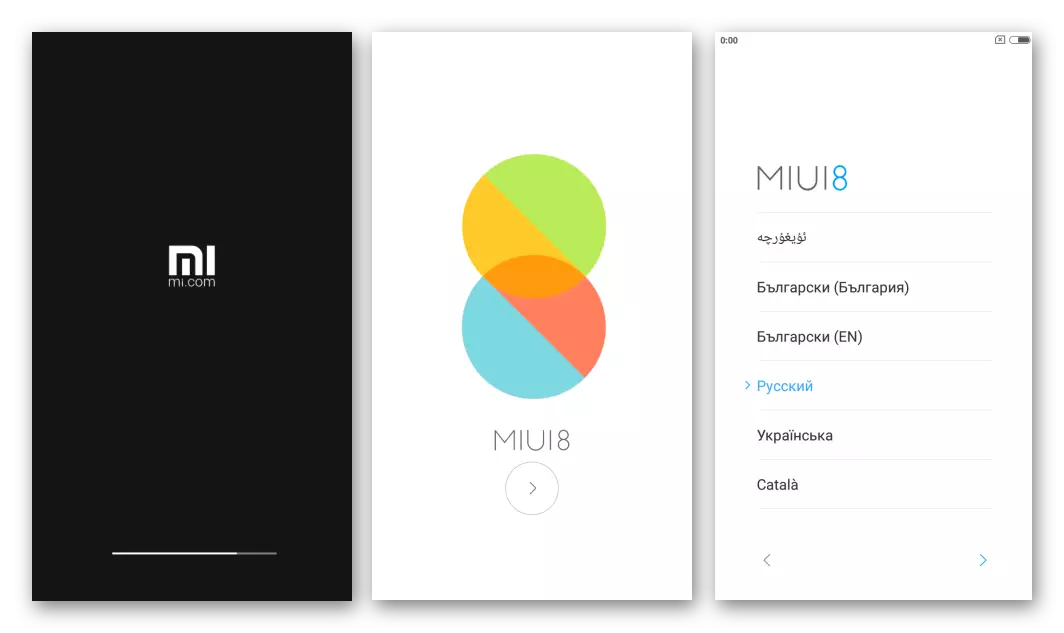
And then make an initial system setup.
Thus, for ZTE Blade A510, there are several methods for installing system software used depending on the desired result. If in the process of installing the system to the smartphone something will do something wrong, you should not worry. If there is a backup, the restoration of the smartphone in the original state through the SP Flash Tool is a 10-15 minutes.