

Windows 10 brought with him many changes that affected including at work with RAM. Today we will tell about how to configure RAM in this version of the operating system.
Step 1: BIOS Configuration
Strictly speaking, the full setting of RAM (frequency, timings, mode of operation) can be made exclusively through the system board firmware, so the first stage consists of configuration via BIOS.

Lesson: Setting RAM in BIOS
Stage 2: Optimization of consumption of RAM system
After interaction with the BIOS, go directly to the operating system setting. The first thing to be done is to optimize the consumption of "RAM".
- Press Win + R to open the "Run" window, enter the REGEDIT request and click "OK".
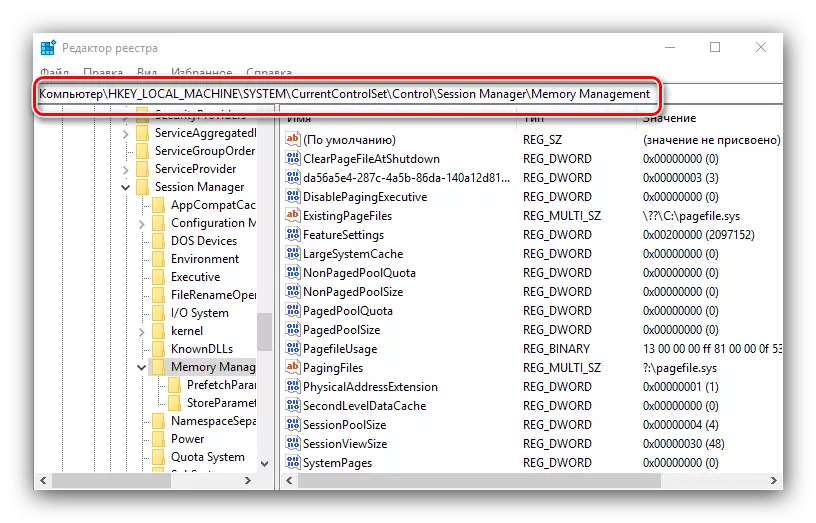
- The registry editor will start. Go to it at:
HKEY_LOCAL_MACHINE \ SYSTEM \ CURRENTCONTROLSET \ CONTROL \ SESSION MANAGER \ MEMORY MANAGEMENT
- In the last folder, we use the two parameters, the first of which is called DisablingPagingExecutive. Twice click on it with the left mouse button.
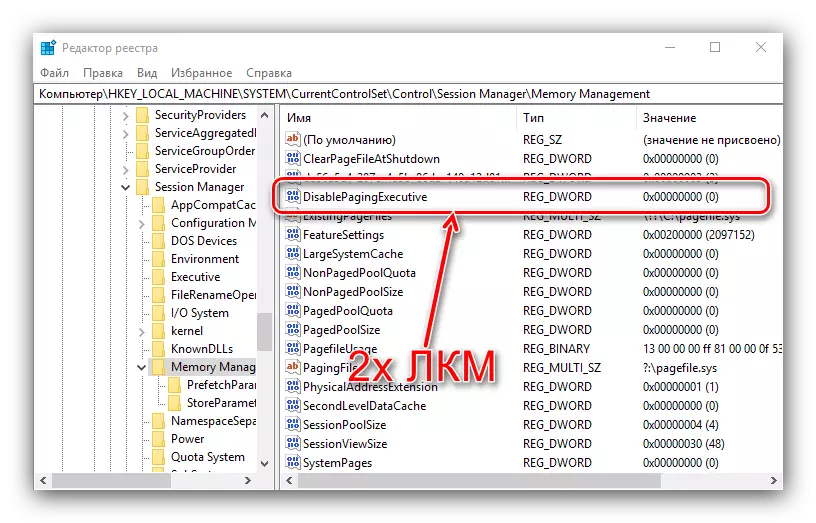
Enter the value 1 and click OK.
- The next parameter that we need to edit is called LargeSystemCache. Change it in the same way as the previous one, with the same value.
- Check the data entered, then close the registry editor and restart the computer.


Changing these parameters will allow the "dozen" more subtly to operate with RAM.
Stage 3: Setting the paging file
It is also important to configure the paging file - the interaction of the OS with RAM is depends on its operation. The use of this function is recommended for computers with a small ones for modern standards with the volume of RAM (4 GB and less).
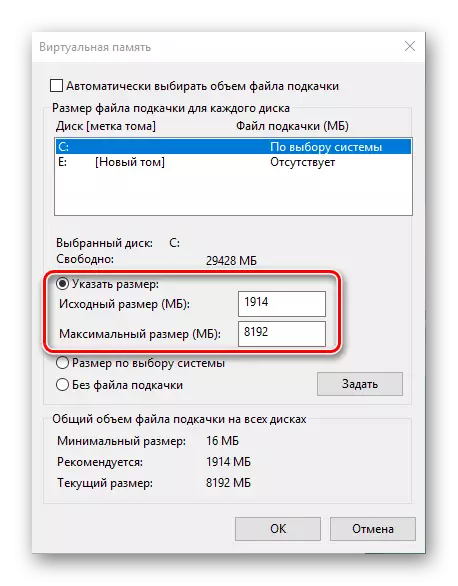
Lesson: Enabling the paging file in Windows 10
If the number of RAM is sufficient more (more than 16 GB), and SSD is used as a drive, there is no special need in the paging file, and it can be turned off at all.

Read more: Disable paging file in Windows 10
Stage 4: Configuring the caching service
In the "top ten" from previous versions of Windows moved the caching function of part of the information in RAM to speed up the launch of applications, which, although useful at first glance, however, on a PC with a small RAM volume, it may even slow down the system. For the caching process, the service with the SuperFetch title is responsible, the setting of which can be enabled or disable this feature.

Read more: Configure Superfetch in Windows 10
At this stage, the configuration of RAM in Windows 10 can be considered completed.
Solving some problems
In the process of configuring RAM in Windows 10, the user may encounter those or other problems.The system does not use all RAM
Sometimes OS determines not the entire amount of RAM. This problem occurs through a variety of reasons, for each of which one solution is available or even a few.
Lesson:
Not all RAM is used in Windows 10
Ways to disconnect the hardware memory backup in Windows 10
The "Blue Screen" appears with the text Memory_Management
After setting up RAM, you can encounter the BSOD on which the error is reported to Memory_Management. She speaks of the problems with the "RAM".
Read more: Fixing MEMORY_MANAGEMENT error in Windows 10
Thus, we have acquainted you with the principles of setting up RAM on a computer running Windows 10, and also indicated methods for solving possible problems. As you can see, the RAM setting is possible only through the BIOS, while on the side of the operating system, only software interaction can be configured.