
Immediately after purchasing a router, it needs to be connected to a computer and set up to provide a correct connection to the Internet. This also applies to the TP-LINK TL-WR840N device, so we would like to demonstrate a visual manual for its configuration in both automatic and manual mode.
Preliminary work
Now I would like to briefly tell about all the preparatory actions that you need to fulfill the usual user before going to the direct configuration of the TP-LINK TL-WR840N router. Of course, the first priority is the choice of the location of the device in an apartment or house. You must provide a high-quality Wi-Fi signal anywhere and make sure that the network wires are getting to target devices. After that, install the equipment, connect to the network and connect the remaining cable. On our site there is a separate instruction in which you will find a detailed description of this process.

Read more: Connecting the TP-LINK router to a computer
Do not forget that the router must be connected to the computer from which configuration will be configured via the LAN cable or the default wireless access point. Only after the correct connection, proceed to the further reading of the material.
Before opening the web interface, we advise you to check one setting up the operating system, opening the "Network Adapter" section. There you are interested in the method of obtaining DNS and IP addresses. The values of each of these parameters must be able to "receive automatically". If it is not, change the positions of markers and apply the changes.
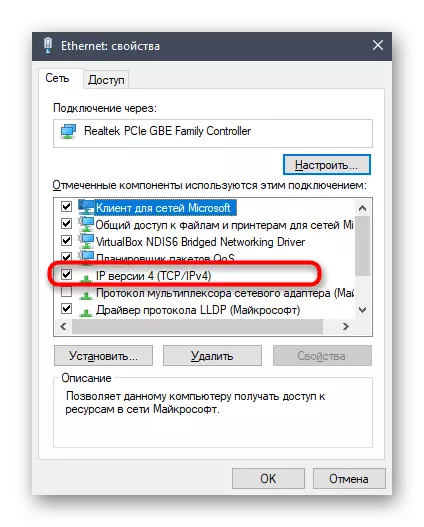
Read more: Windows network settings
Login to the web interface
The next stage lies in the entrance to the router's Internet center. All the following steps described in today's material will be made through this settings menu, so authorization is a mandatory step. On our site there is a separate manual on this topic, so if you do not know how to implement the right entry, we advise you to familiarize yourself with it and perform these actions.
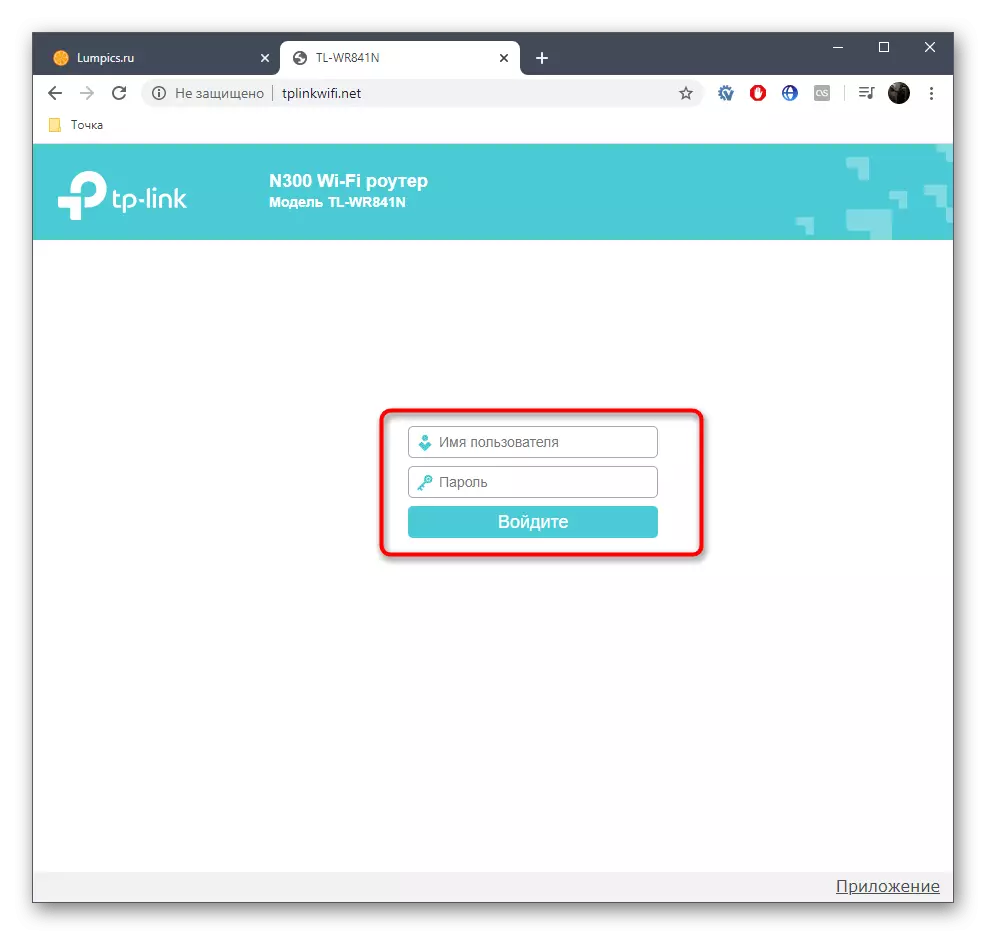
Read more: Login to TP-LINK routers web interface
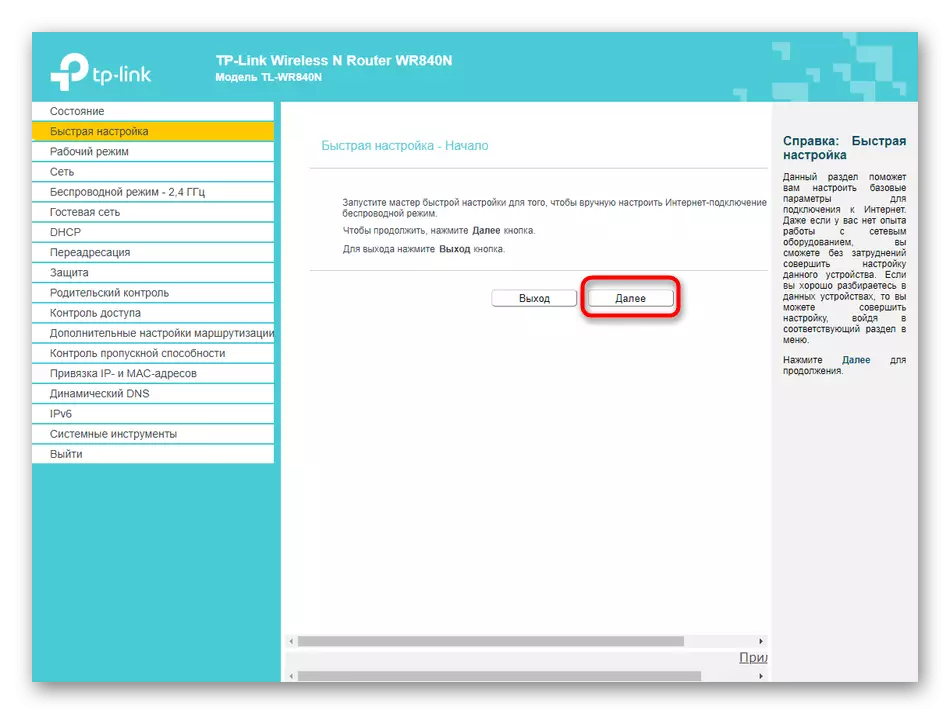
Fast setting
The web interface section called "Fast Settings" is designed to set the TP-LINK TL-WR840N configuration in semi-automatic mode, and from the user you need to choose only the most basic parameters. Most suitable exactly such a mode, so let's consider each action.
- After successful authorization in the Internet Center, open the "Fast Setup" section by using the menu on the left.
- Turn out the basic description and click on "Next".
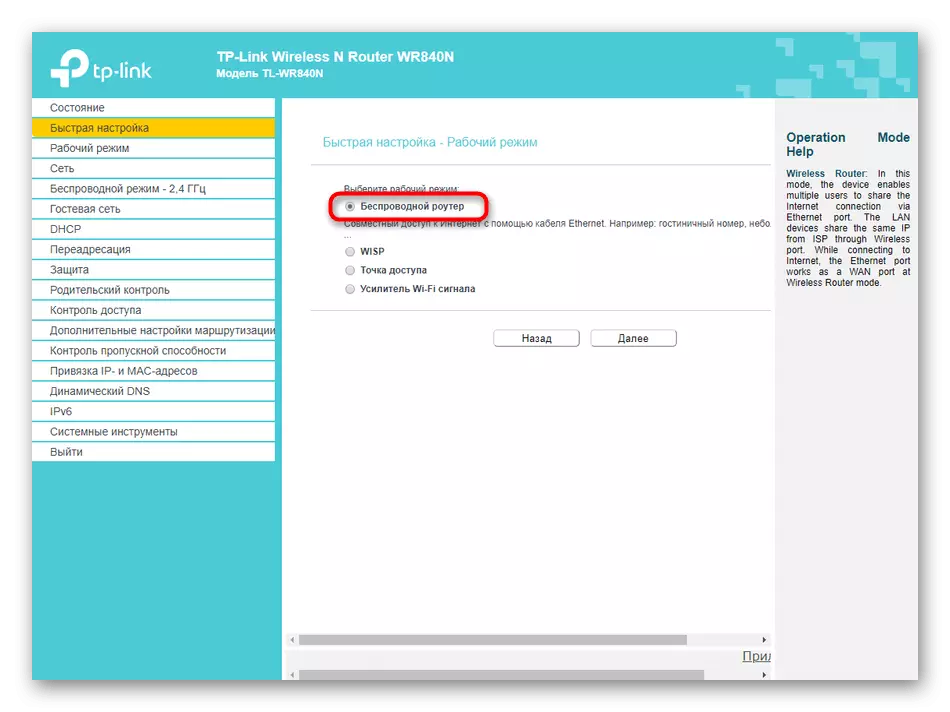
- As a mode of operation, select "Wireless Router", marking the relevant item.
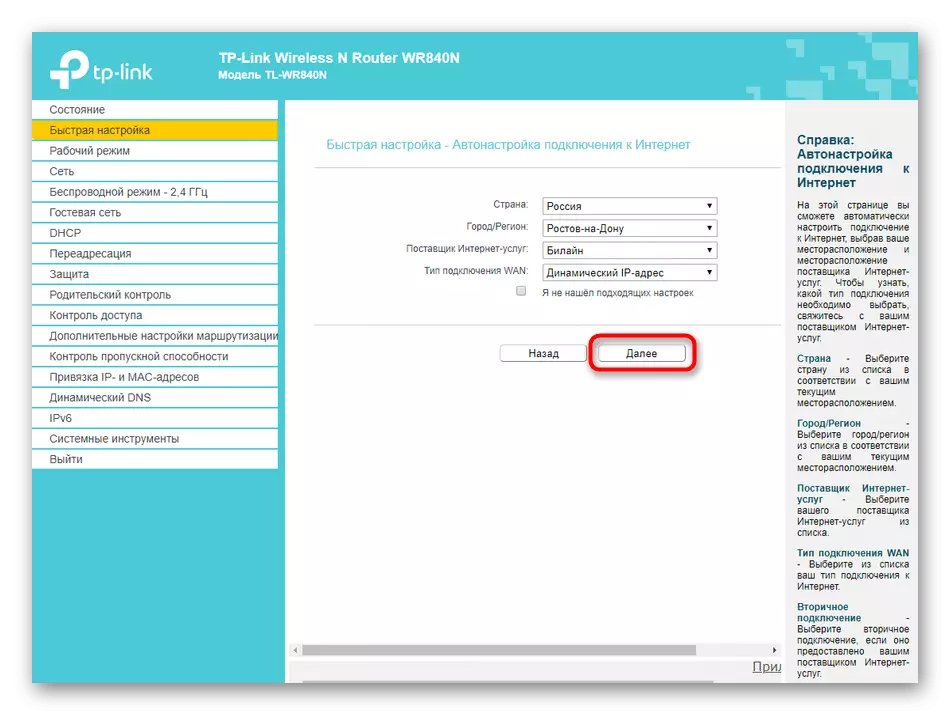
- Now fill out the table in accordance with the available document from the Internet service provider. Here you will need to specify the country, the city, the provider and the type of connection to the WAN.
- Now in most cases a version of the connection "Dynamic IP address" is provided, therefore, in this window, no additional manipulations have to produce. You only need to fill in the table itself and click on the "Next" button.
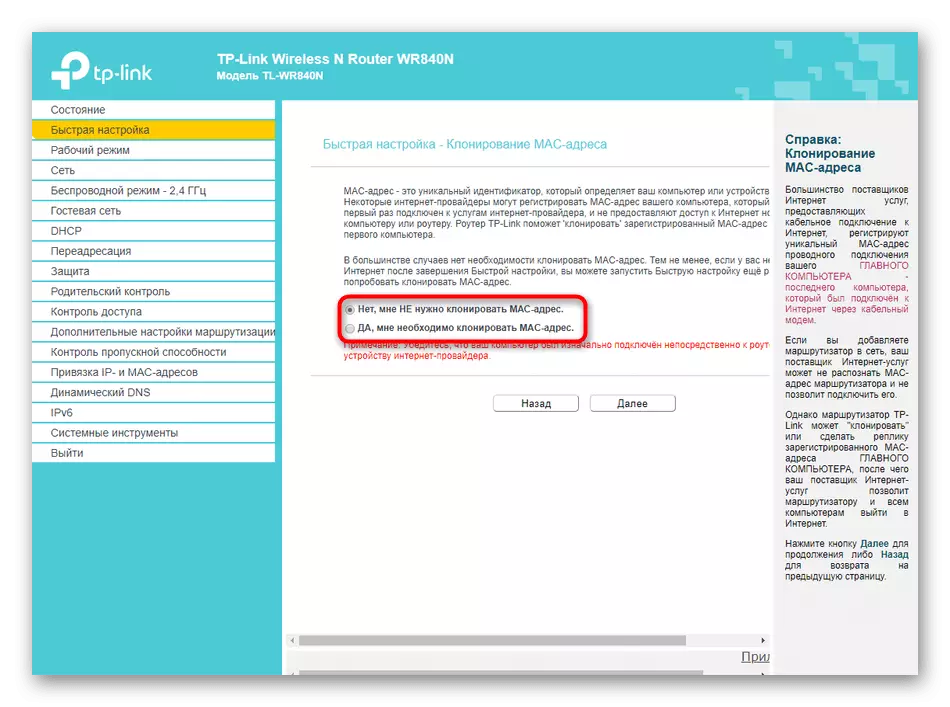
- In the next window, the setup wizard will propose to clone the MAC address. In more detail about all this, the developers of TP-LINK wrote in the same menu, and therefore we will not be repeated. The usual user is unlikely to be cloning the MAC address, because the default value is left and goes to the next window.
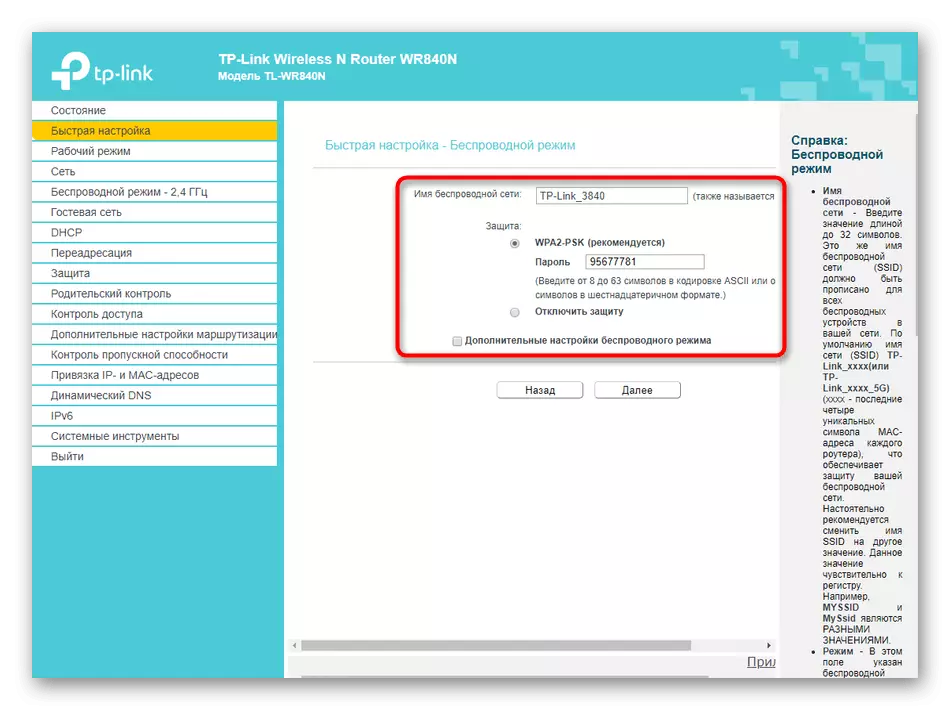
- The wireless network setting starts that mobile devices and laptops can connect to the Internet via Wi-Fi. Select any network name (SSID) with which it will be displayed in the list of available connections. Then set the recommended protection and come up with a reliable password consisting of a minimum of eight characters. If you wish, protection can be disabled at all, but then access to the wireless network will have anyone.
- It remains only to make sure that all parameters are selected correctly. If necessary, you can always return to the previous stages and change any values. If everything suits you, click "Save" to apply all changes and start using the Internet.


As you can see, the quick setting mode just implies what a beginner user will use it, so there are no extra options here, and the whole process will take literally a few minutes. If any of the items of interest for editing, you have not seen here or this mode simply does not suit you, go to the following instructions.
Manual TP-LINK TL-WR840N
Now we suggest pay attention to the fully manual configuration mode of the router under consideration. The main stages do not take much time even in inexperienced users, but the editing of certain items related, for example, with security or additional options, will have to pay a little longer. However, let's figure it out with all this by structuring content in steps.Step 1: Set WAN Parameters
When setting up any router, the network parameters are set primarily to make the device to receive a network from the provider. Today we will focus on the usual functioning mode, lowering the bridge mode or amplifier, but in any of these cases the WAN parameters are selected the same.
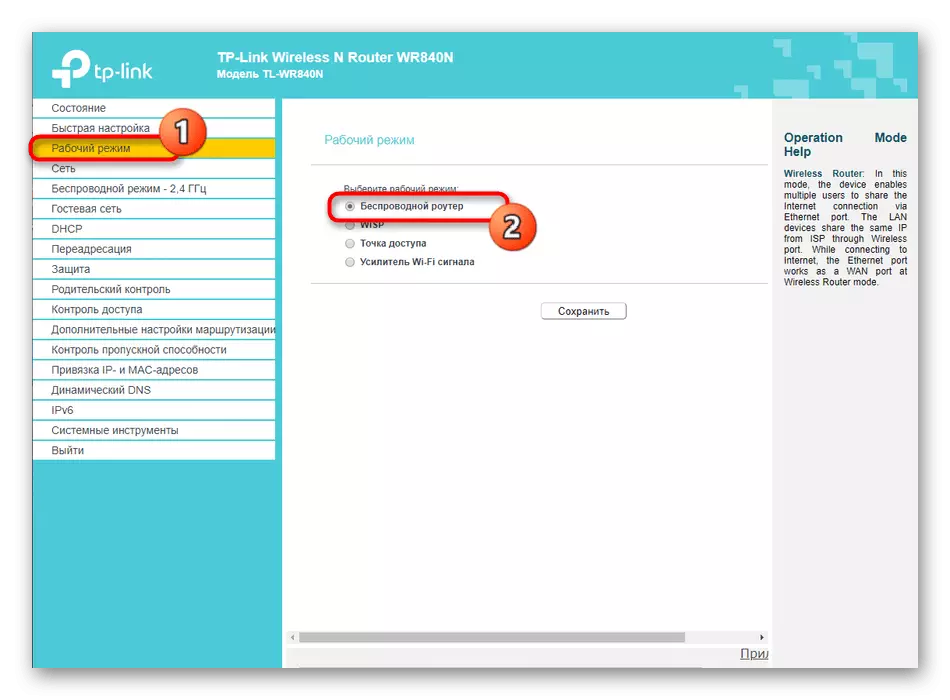
- To begin with, open the "Operating Mode" section and mark the "Wireless Router" paragraph, then save the changes.
- Next, deploy the "Network" and select the first category "WAN". Here you need to specify the type of connection by turning the pop-up list. For a static IP address, the address, subnet mask, gateway and DNS server issued are set.
- If we are talking about a dynamic IP address, then all parameters will be obtained automatically.
- Less frequently providers provide PPPoE. The table of configuration table is the biggest, since it will require you to specify authorization data, connection mode and authentication type.


We will specify that all data for the static IP address or PPPOE provides the provider itself and they are unique. You should detect them by reading the contract or contacting technical support. After that, the table is already filling. Carefully check each item to accidentally prevent errors, otherwise access to the Internet does not appear.
Step 2: LAN Parameters
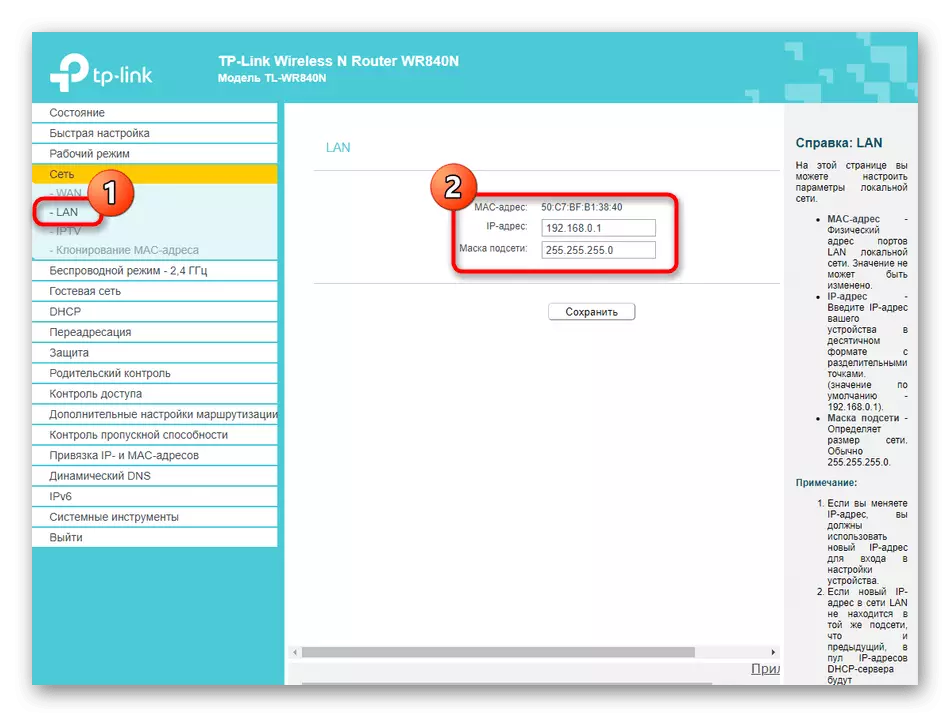
If you are going to connect computers or laptops to the router using the LAN cable, and also consider the option of using IPTV, you must specify the standard parameters of the local network so that you do not have any conflicts when organizing several connections. To start, pay attention to the category "LAN". Here, specify the IP address of the current device and install the subnet mask. In most cases, this parameter is left in the default state, but if you find empty fields, set IP 192.168.0.1, and the subnet mask is 255.255.255.0. When DHCP is enabled (what will happen a little later), other equipment connected to the router will automatically receive unique addresses from 192.168.0.2 to 192.168.0.64. The restriction on the last address is selected by the user itself.
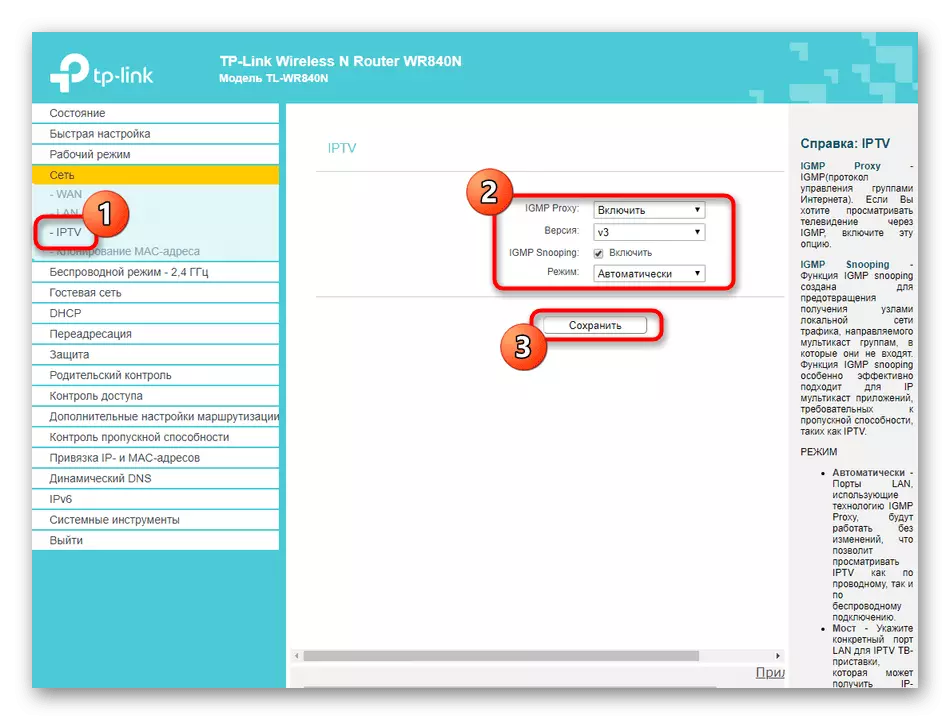
Next, move to IPTV. This technology is responsible for watching television via the Internet. It will be enough for you to install automatic mode and save it all. However, if the provider provides special settings, refer to the contract or ask a support service issue to understand whether to include IGMP Proxy and IGMP Snooping.
When parsing with automatic connection setup, we have already talked about cloning MAC address. In the "Network" section you can do the same yourself, moving to the corresponding category. Additionally, there is an option that allows you to restore the factory MAC address if its cloning passed unsuccessfully.

Step 3: Customize Wireless Mode
Go to another important step that is associated with the configuration of the wireless mode to connect via Wi-Fi. In most cases of the parameters present in the "Fast Settings" block, it is sufficient to ensure the normal performance of the access point, but if this option did not suit you, refer to the next instruction.
- Open the "Wireless mode - 2.4 GHz" section. TP-LINK TL-WR840N operates only in one mode of access point mode, so the configurable SSID will be only one. In this section, select the first category "Basic Settings". Here, set the Wireless Activation Maker to the "Enable" state, then specify the name with which it will be displayed in the list of available connections. "Mode", "Channel" and "Channel Width" remain in the default state. However, all those who want to configure the bridge or the repeater mode will need to select any free channel, and not the "automatically" setting.
- Following the "WPS". This technology allows you to quickly connect to the router without the need to enter the installed password protection. You can enable this option by selecting a PIN or manually adding trusted devices and disable it, restricting access to the rapid connection.
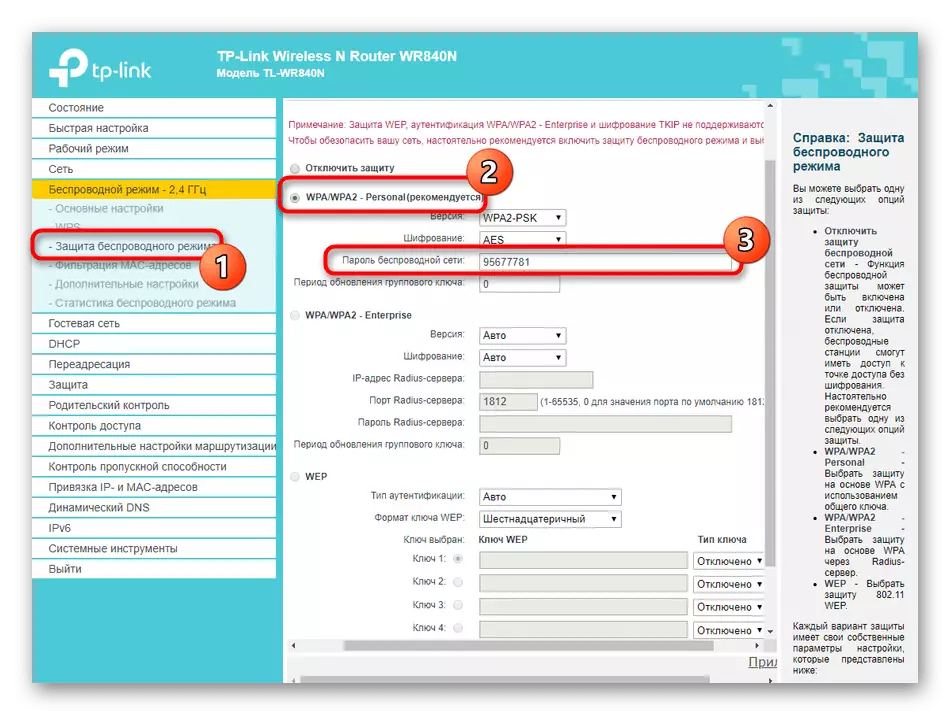
- After moving to the "Wireless Protection" section. Set the recommended parameter and change the items of its settings only "Wireless Password" if required. So you can set your own password to access Wi-Fi, but at the same time consider that it should consist of at least eight characters.
- The "Filtering MAC addresses" is set to the surface security configuration. Here the list of devices connected to the wireless point is displayed, and there is also a "Add" button. You create a table from the required number of laptops, smartphones, tablets and other devices using the current Wi-Fi network, and then you can set the rules for them, for example, allowing Internet access or forbid it.
- We will skip the section with additional settings, because there are no parameters that could be useful to the usual user. In conclusion, we want to mention the "Wireless Statistics". Here you can view the MAC addresses of each connected equipment and find out how much traffic every participant consumes and sent. In most cases, this menu is used to just define the very addresses and set the filtering rules or parental control.


Do not forget to apply all changes after completing the configuration by pressing the appropriate button and restarting the router when necessary. Only then proceed to view the list of available wireless networks and make a trial connection to just created.
Step 4: Checking additional behavior parameters
All the settings we want to tell within the framework of this stage are in different sections, but they are united by what they all are responsible for the behavior of the router within the same network. Therefore, we decided to touch each item in turn, describing the most important information.
- First there is a category called "Guest Network". Here you can connect the second SSID, which is considered more customizable than the main, and also intended exclusively for guests, that is, by default, the connected devices will not have access to shared folders and other local network privileges. In the category, activate the Guest Network when necessary, set the name for it, the maximum number of connections and protection. The main focus of developers here is made on the schedule access time.
- It is offered to manually fill the calendar to determine the start time and completion of the provision of access to the Internet. Even a novice user will be able to deal with the principle of installing the graphics, so we will not stop in detail at this step.
- Next is the more important parameter called DHCP, which is responsible for automatically obtaining unique IP addresses for each hardware connected. You will sufficiently make sure that the DHCP server itself is enabled, as well as the address range corresponds to 192.168.0.2 - 192.168.0.64 or any other free, where among all numbers changes only last.
- The list of all clients of the local network will be displayed in another category. It is used exclusively to determine the basic information and viewing of customer names on MAC addresses or unique identifiers.
- If necessary, you can reserve a specific address for a specific device. This is necessary in those situations where the equipment itself cannot get a new IP or for some other reasons only functions on a static value. The table is quite simple, where the device itself is determined by the MAC address.


Step 5: Editing Protection Parameters
This stage is often skipped by users only because many of them are simply not interested in installing additional protection parameters for their router. However, there is a category of users, establishing traffic restrictions or parental control for other local network participants, so let's briefly run through all the rules of the firewall in TP-Link TL-WR840N.
- Open the "Protection" category and select the first item "Configuring basic protection". Here it will be enough to simply turn on the firewall and, if necessary, set the parameters of VPN and ALG. The latter are required only advanced users who know about the purpose of such technologies, so we will miss their analysis.
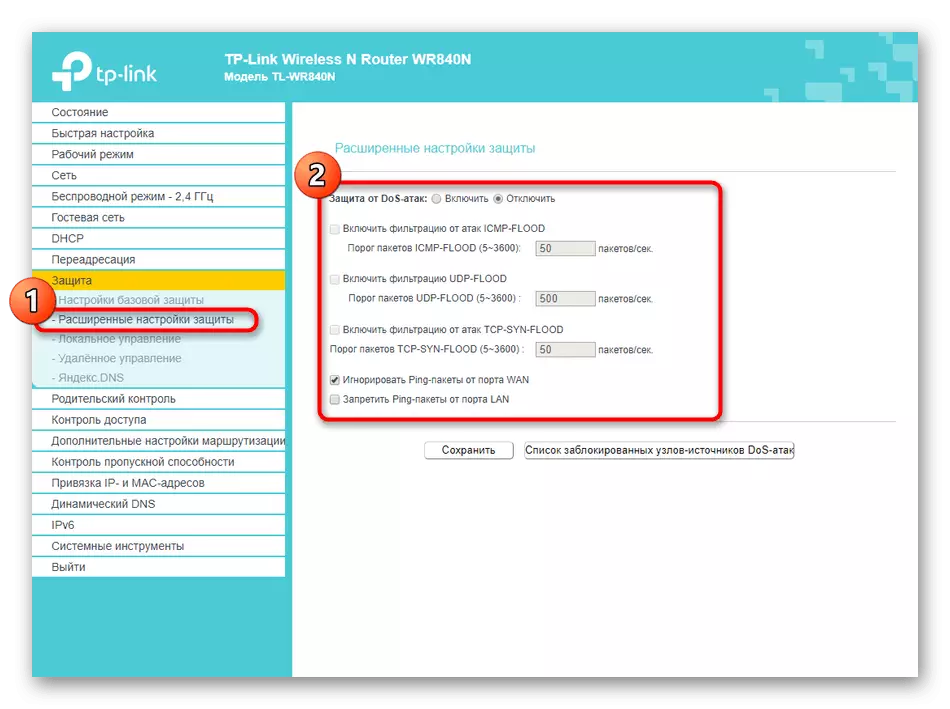
- Next go "Advanced Protection Settings". They are responsible for basic rules that prevent DOS attacks. The TP-LINK TL-WR840N parameters have several different technologies responsible for filtering packets. The user only needs to enable the necessary and assign a limit to the maximum number of packets taken per second.
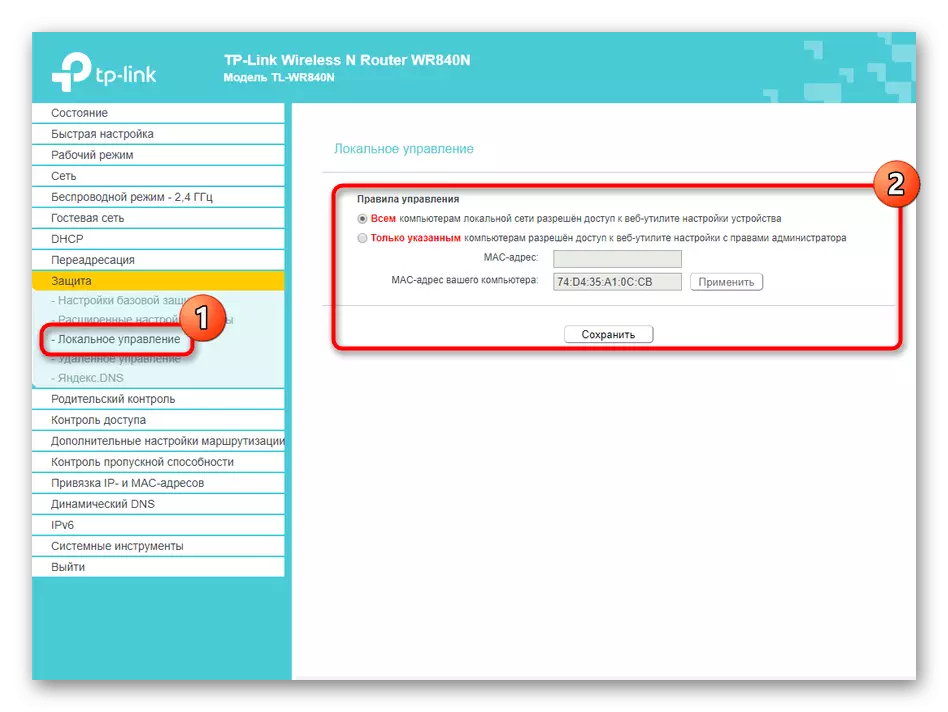
- In the "Local Management" section, the administrator selects who can access the web interface to configure the router. By default, authorization is available to any user who knows the entry data. If you want, disconnect this option at all or select only specific devices for their MAC addresses.
- At the beginning of the article, we talked about the fact that before entering the web interface in the operating system, the rules for receiving IP addresses and DNS are set to "receive automatically". This was done in order to configure DNS from Yandex when necessary in the TP-LINK TL-WR840N Internet Center. You can simply enable this parameter responsible for indexing pages on the Internet to check whether the speed of transition to sites will change. If desired, this option can be disconnected at any time.
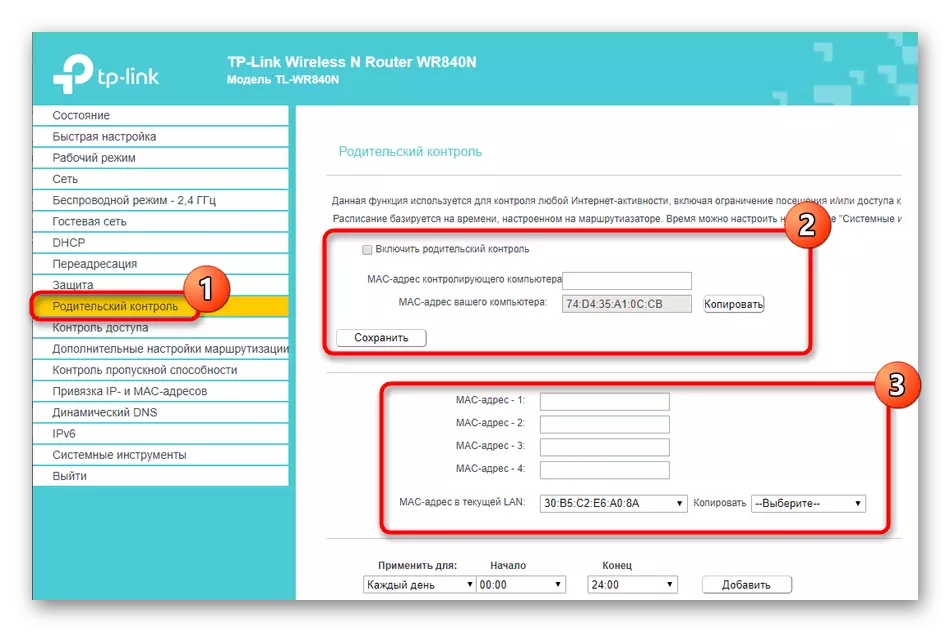
- Go to the "Parental Control" section. There is a restriction of Internet access for certain MAC addresses at a specific time. This technology will help limit the stay on the network for children in automatic mode. You only need to mark the checkbox "Enable Parental Control", set the address of your computer as controlling and prescribe targeted MAC addresses to limit.
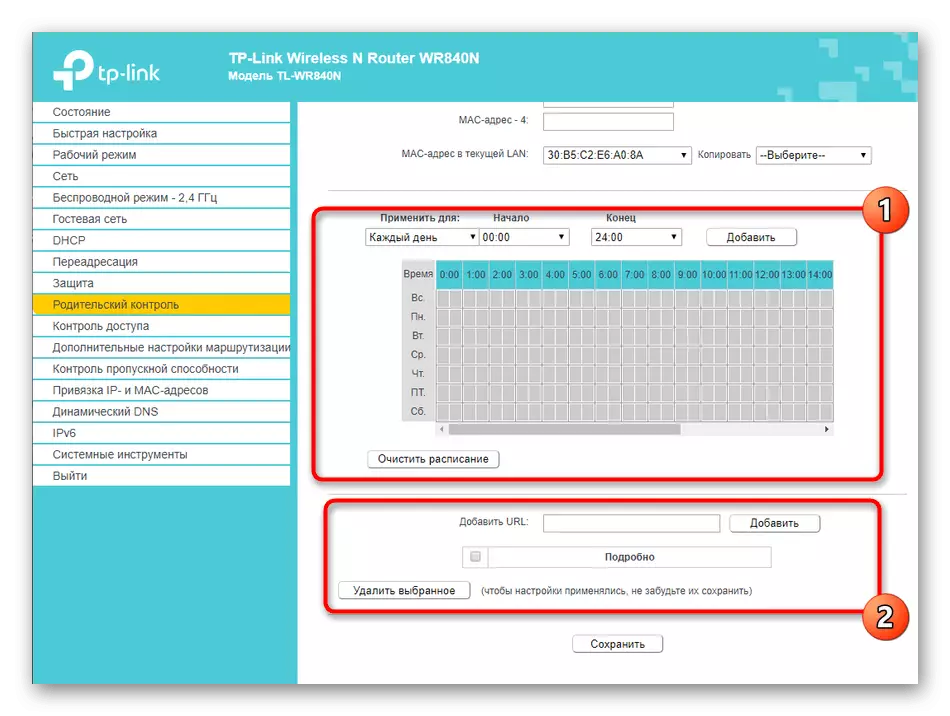
- At the bottom, the full schedule of control is configured by manually filling the calendar, and you can also create a list with forbidden sites, access to which will be limited at any time.
- Next is the section "Access Control", in which there are several different categories interconnected. The first one is called "Rule". Here you include controlling Internet access control and you can prohibit or solve specific devices connecting to the global network.
- The "Node" menu item is selected, which is the installed rule to operate for which local network. Usually users use only one network, so you do not need to change any parameters.
- The target is indicated by physical computers. Filling the table occurs by clicking on the "Add" button.
- Here, only the user is required to select the functioning mode, for example, an IP address or Mac, and add a unique number, port and a brief description itself, if necessary.
- As for the schedule, you can choose both permanent rule, and edit a weekly calendar for your needs.


Step 6: Editing system parameters
At the end of today's material, we will pass through the remaining TP-LINK TL-WR840N web interface points that are related to the editing system parameters. All changes are made through one section and are not mandatory, but we still recommend paying attention to them.
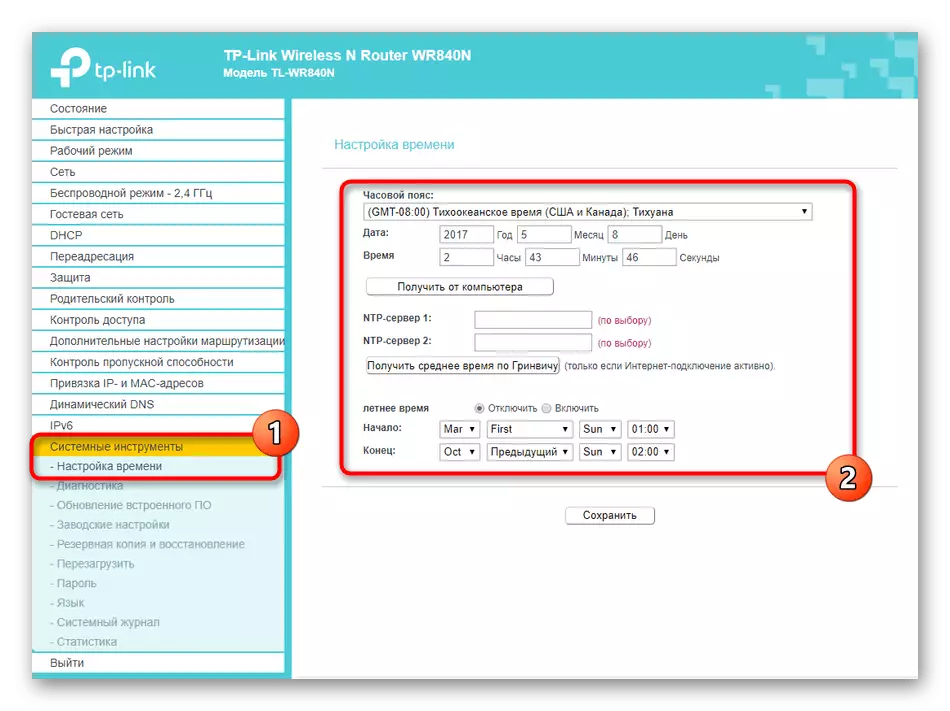
- Open "System Tools" and select "Time Setup". It is recommended to specify the correct date and time to obtain only correct information when tracking the network statistics.
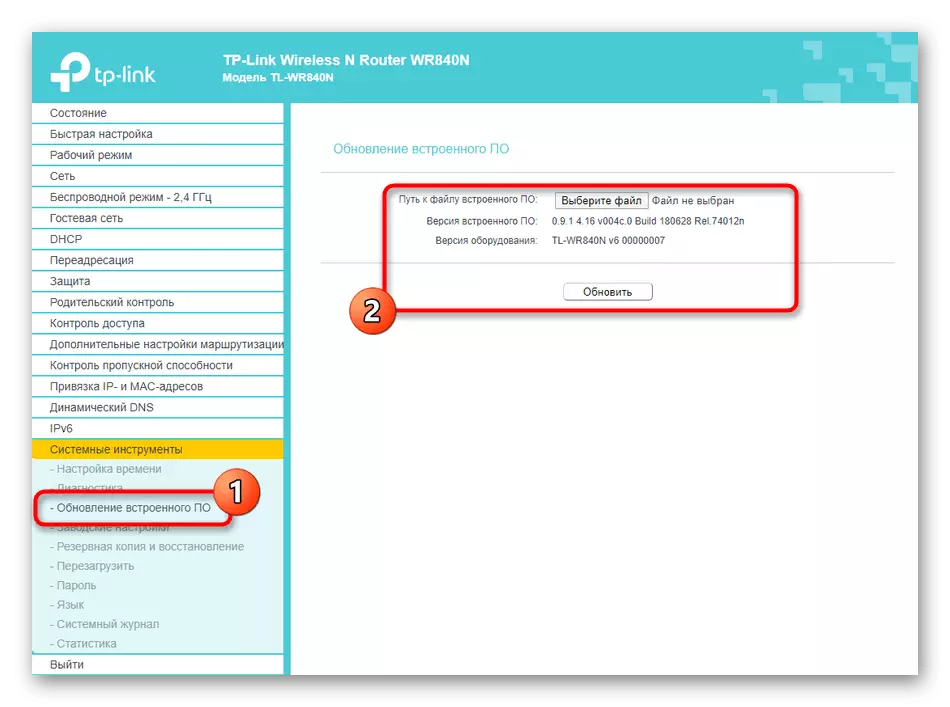
- Through the "Updating Built-in By" you can upload updates for the web interface firmware found on the official TP-LINK website, but this is for the future, because now you are most likely using the latest software version.
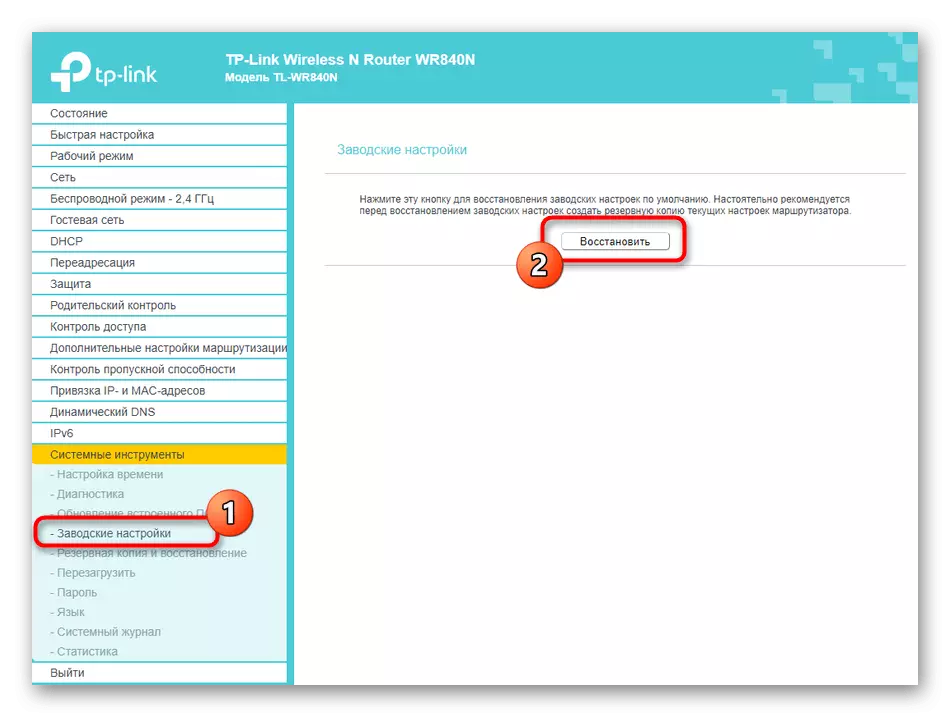
- Reset to the factory settings is required in cases where any errors were allowed when configuring. Do not forget that this is done not only by clicking on the button on the router, but also through the category "Factory Settings" in the web interface.
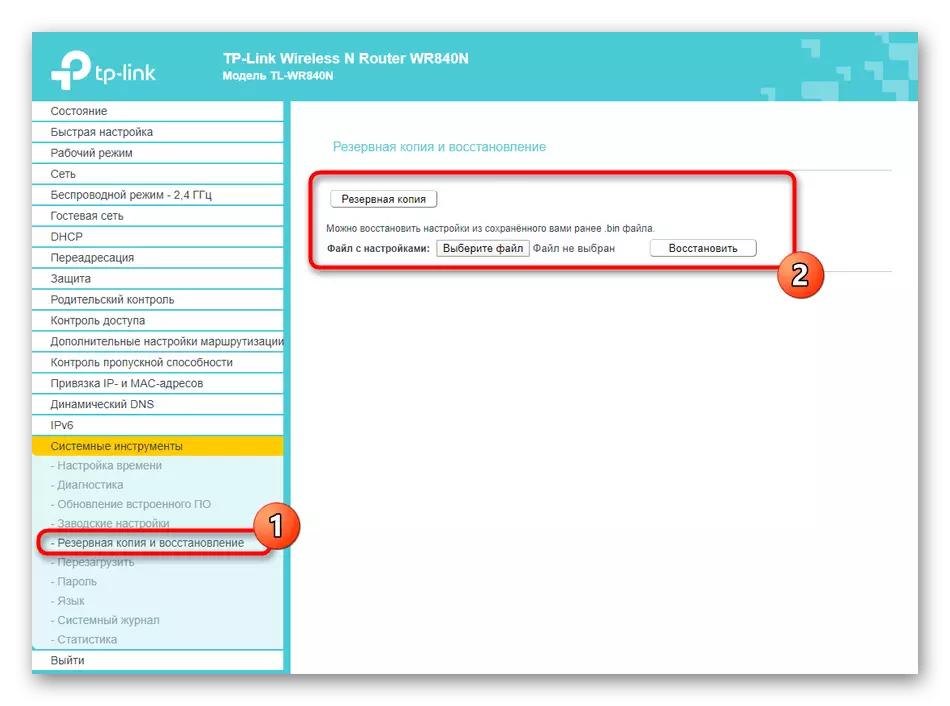
- If you are afraid that for some reason, the settings will drop and all have to be renovated, save the backup to the file and, if necessary, download it through the appropriate menu in the Internet center.
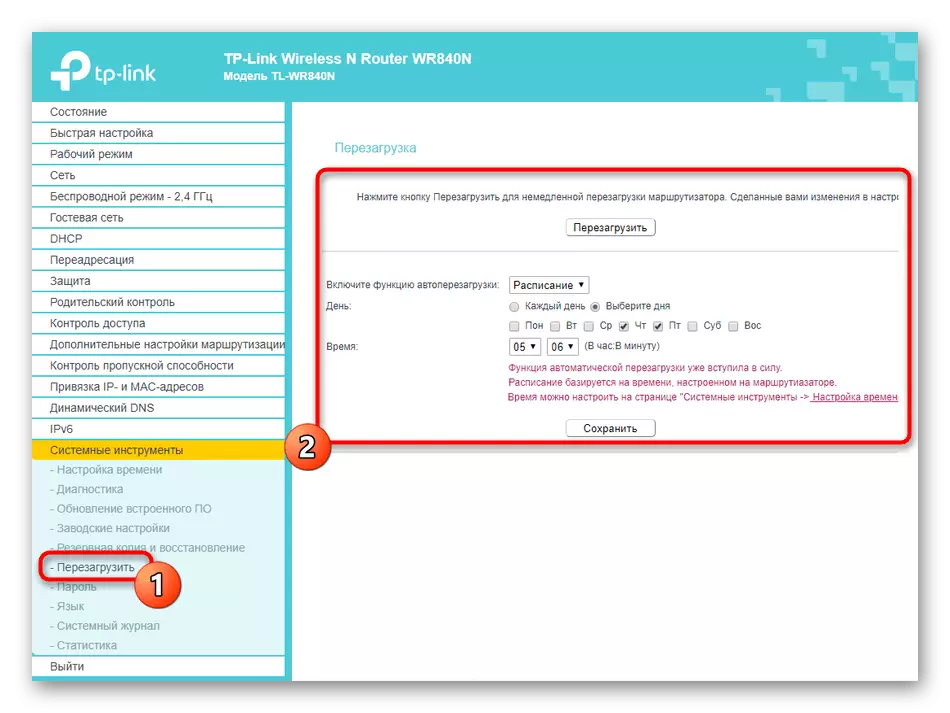
- In the next tab, "Restart" is performed not only the instantaneous restart of the device, but also accession is available on which the router will restart automatically. Place the optimal parameters and save them if required.
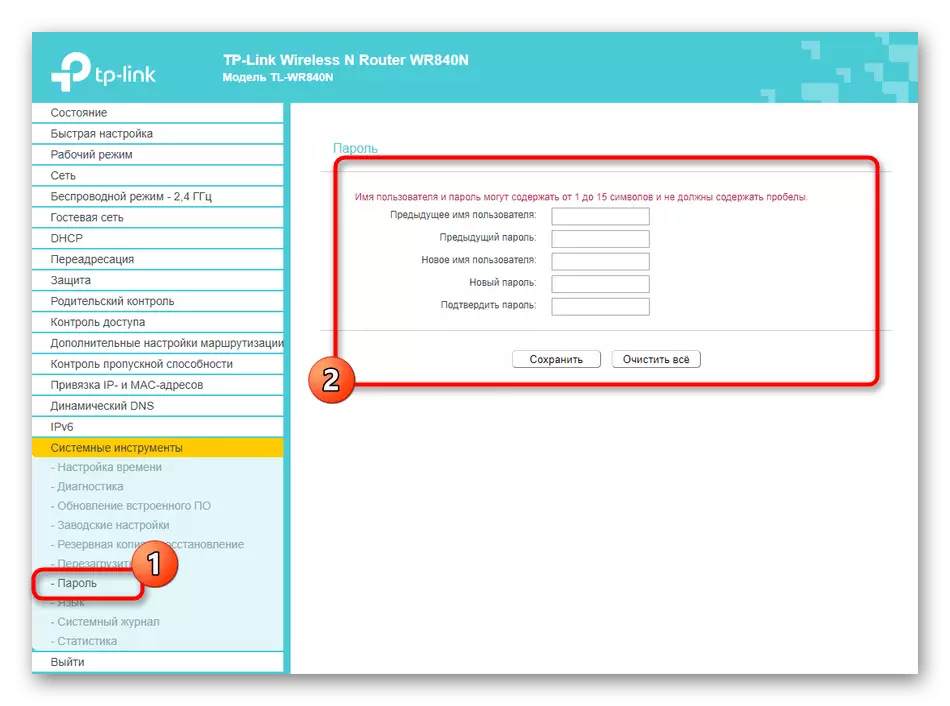
- Before going out of the web interface, we advise you to change the login and password for authorization to limit unauthorized access.
On this configuration, TP-LINK TL-WR840N is considered completed. After restarting the device, you can switch to direct connection to the global network in a convenient way and check how the transition to different sites occurs. If you need to change any parameters, you simply go to the web interface again, make the setting and save everything.