
Before you familiarize with the following ways, we note that some users may encounter a non-working button. "Expand Tom" If it comes to performing the procedure through the graphical menu of the operating system. Additionally, errors appear when using the command line. There are different reasons that interfere with correctly expand the partition of the hard disk, and we propose about their solutions to read in the article below.
Read more: Solving problems with the activity of the option "Expand Tom" in Windows 7
Method 1: "Disk Management" menu
The easiest way is to expand the already existing partition of the hard disk in Windows 7 through the system graphic menu. This method is suitable for novice users and those who do not accept third-party software or does not want to deal with the interaction with the command line.
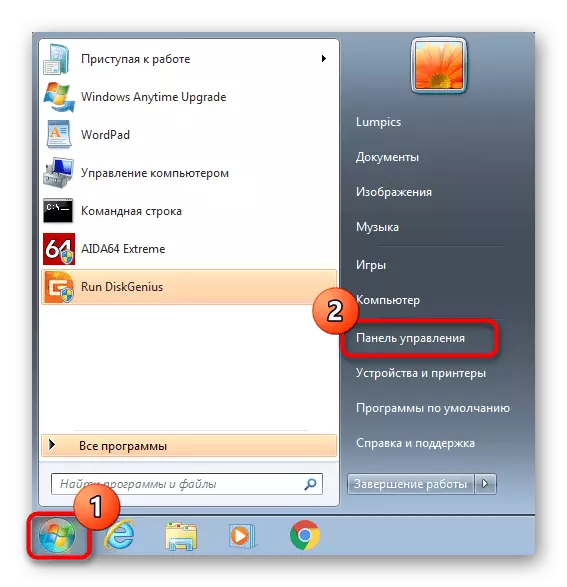
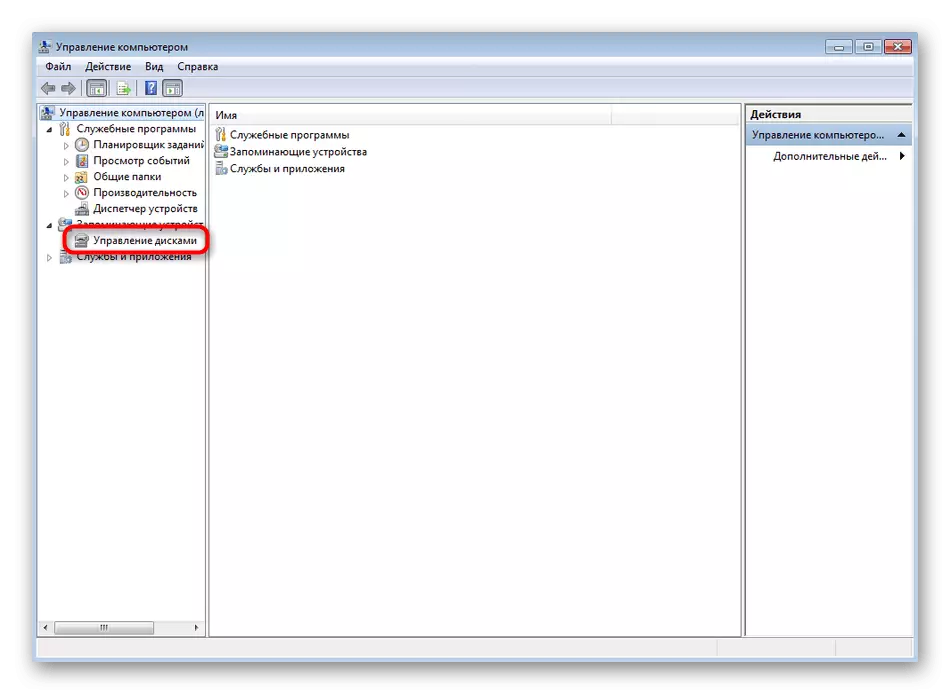
- First open "Start" and go to the "Control Panel" menu.
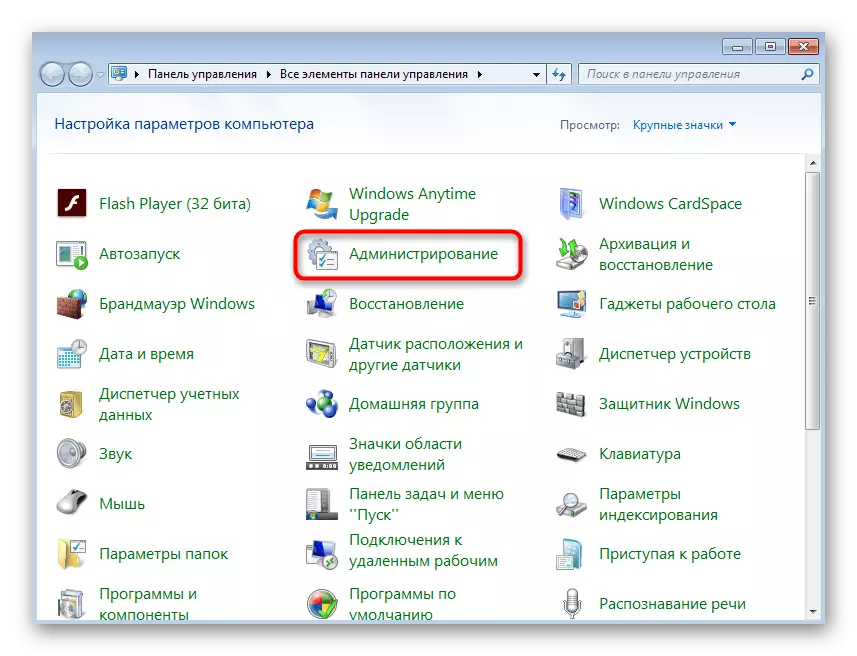
- There, select the "Administration" section.
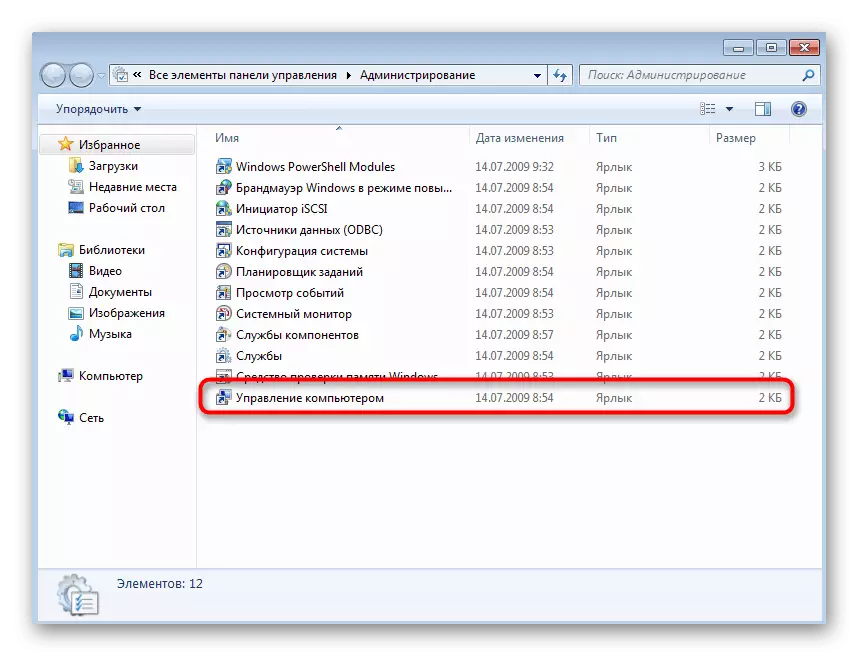
- Go to the latest category from the list called "Computer Management".
- Through the left panel, move to "Disk Management".
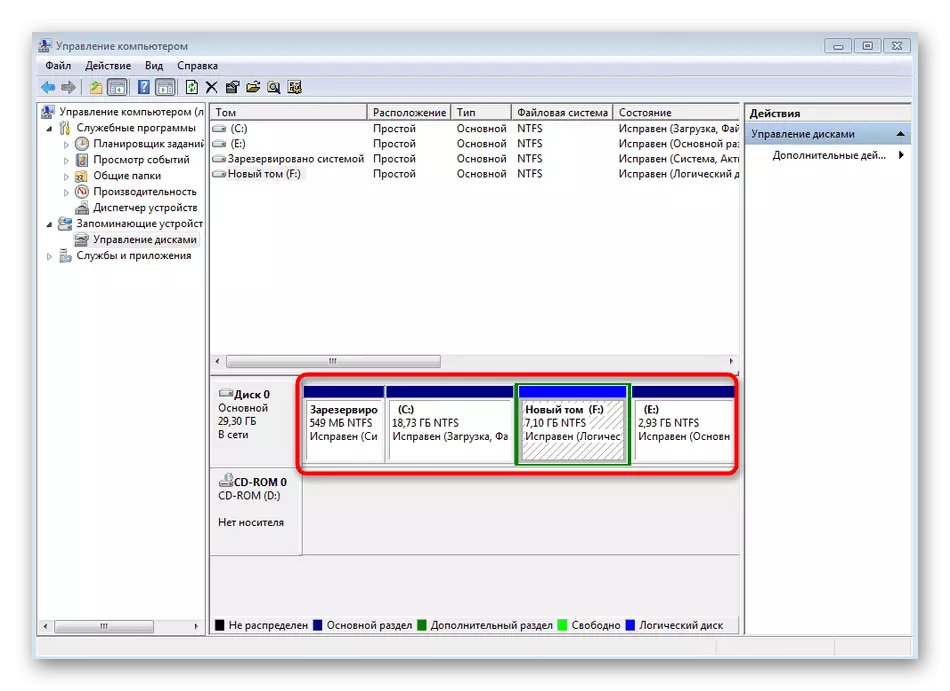
- If you already have a free or unallocated space, you can immediately start expanding the volume, but we first wanted to demonstrate the compression of another section to highlight the most necessary volume. To do this, decide which of the existing volumes now the volumes can be compressed.
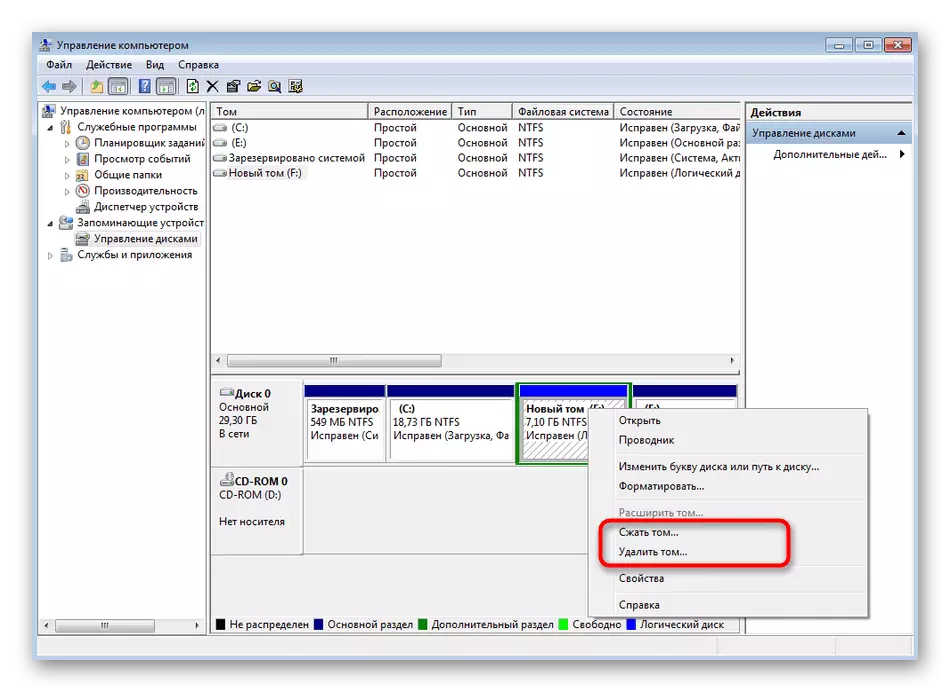
- Right-click on it and select "Squeeze Tom". If he is simply not needed to you, and there is no important data there, it can be deleted by clicking on a specially designated string.
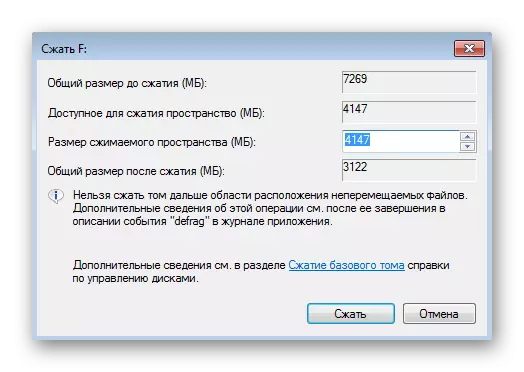
- When compressed, you should only specify how much space you want to separate. After that, it remains only to click on "compress".
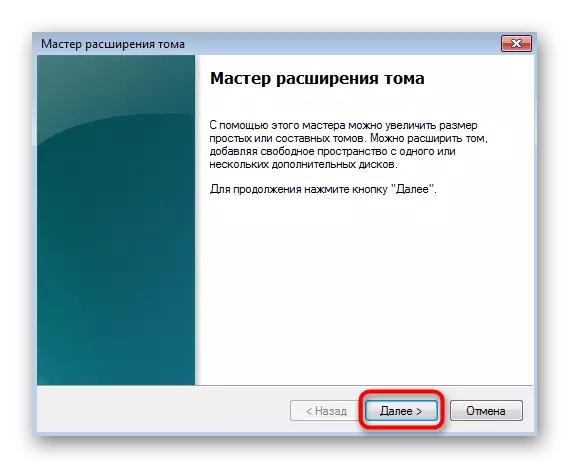
- Exit from the wizard will occur automatically. In the same menu, "Disk Management" Now press PCM by the one you want to expand, and find the appropriate item in the context menu.
- In the volume wizard window that appears, the volume expansion wizard immediately go to the next step.
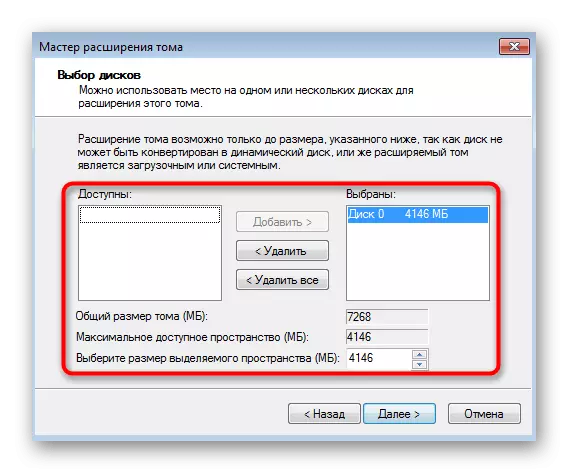
- The table displays the table. It contains an affordable expansion space. If such a unit is only one, it will be automatically selected. Additionally, the user indicates the size of the volume allocated, if necessary.
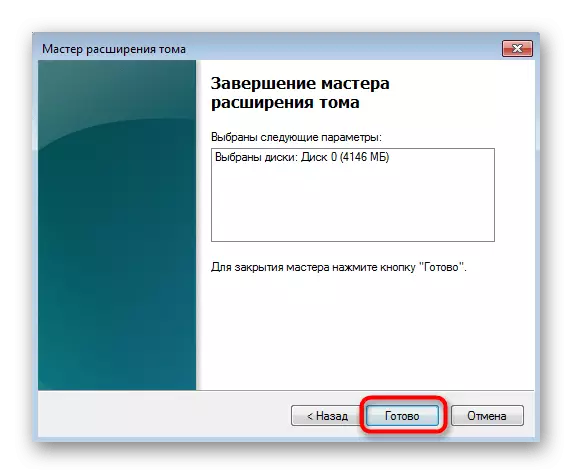
- You will be notified of the successful expansion of the hard disk partition, after which it will remain click on "ready."

If in the "My Computer" menu, the size of the logical volume is still the previous one, it will be necessary to simply reboot the operating system so that the changes entered into force.
Method 2: Using the command line
The advantage of this method is that the command line can be used as directly in the operating system, simply by running the application and when loading from the flash drive, selecting the appropriate option in the recovery mode. This will allow an absolutely any user to expand the partition of the hard disk in Windows 7, even if the operation fails to be performed in an already running OS session.
Interested in using the command line in recovery mode or through a safe mode, you will need to create a bootable flash drive from which it will be launched. Read more about this in the instructions below.
Read more:
We enter the "Safe Mode" in Windows 7
Loading windows 7 from flash drive
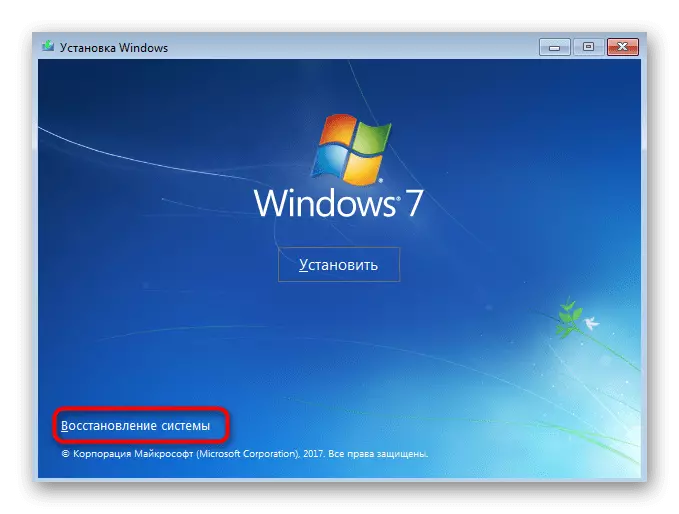
- In this manual, we will focus on first boot into recovery mode, since the OS is required just to run the console, and you can immediately go to Step 4. If you start working with flash drives, select the installed language and click "Next".
- Click on the inscription on the left "system restoration".
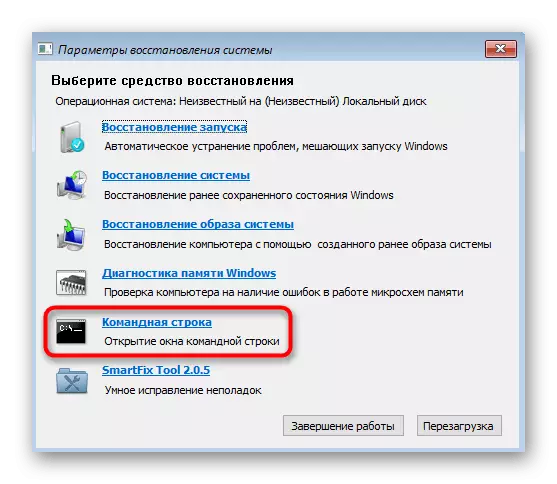
- In the list of options, find the "Command Line" item and click on it with the left mouse button.
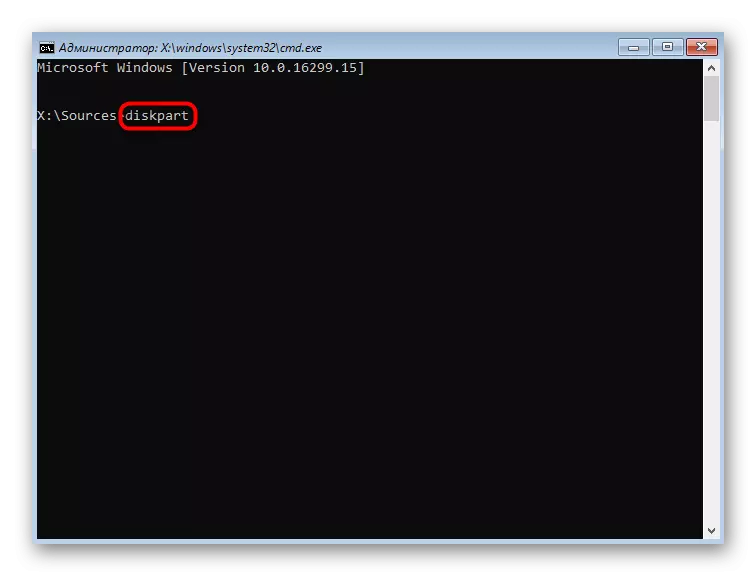
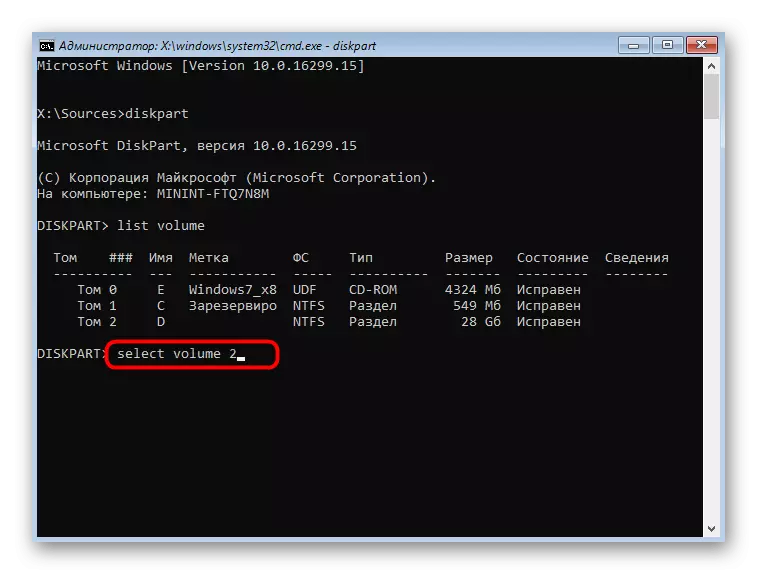
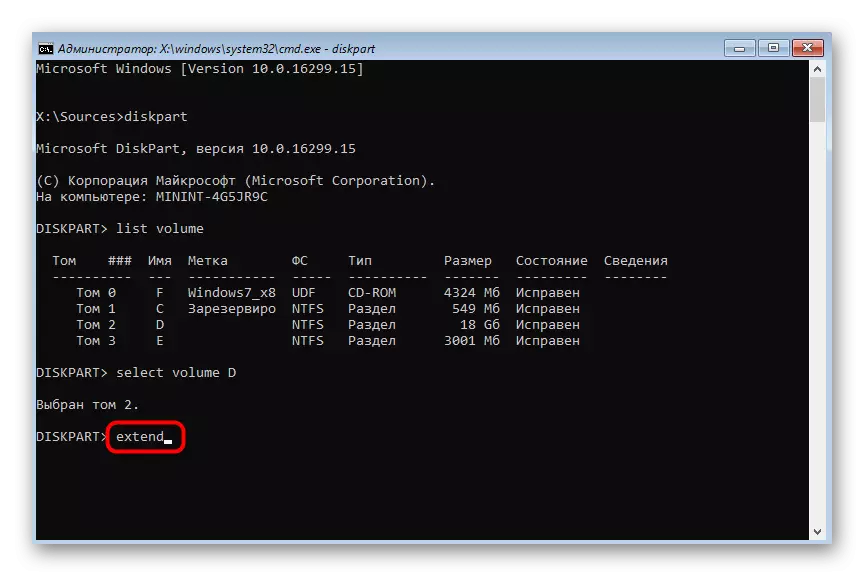
- The interaction with disks occurs through the standard console utility. It starts by entering the DiskPart command. Activate it by clicking the Enter key.
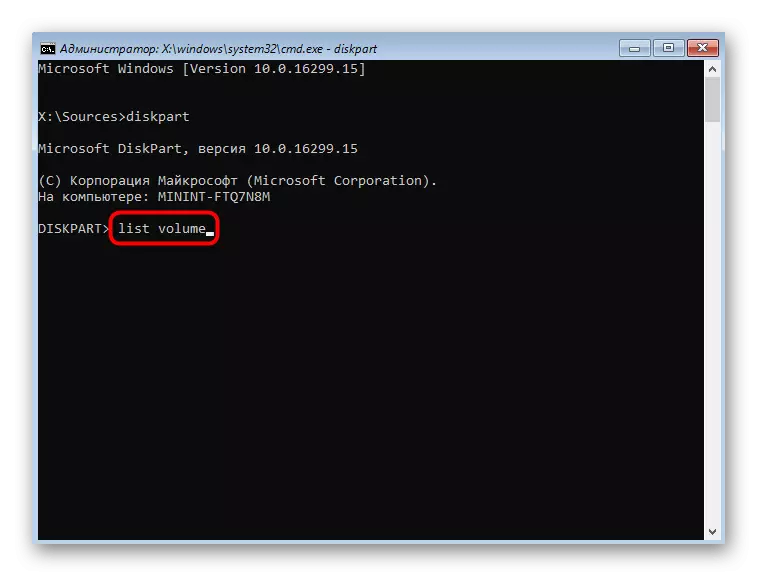
- In the method 1, we talked about how to squeeze one of the existing sections to separate the free space. Now, too, let's start with this: browse the list of available logical volumes through List Volume.
- Remember the number or letter of the section you want to compress.
- Enter SELECT VOLUME X to select where X is a previously defined number or letter.
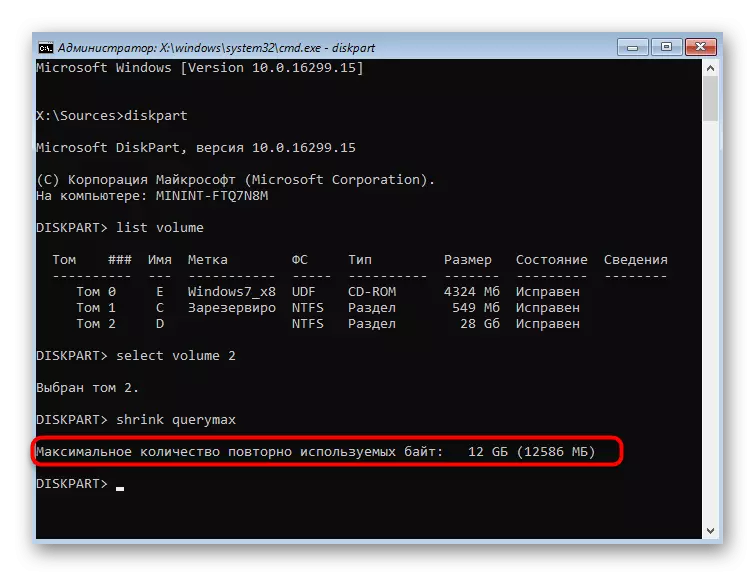
- Browse what the maximum amount of free space can be separated by entering and activating the Shrink Querymax command.
- The new line will displays the volume of interest.
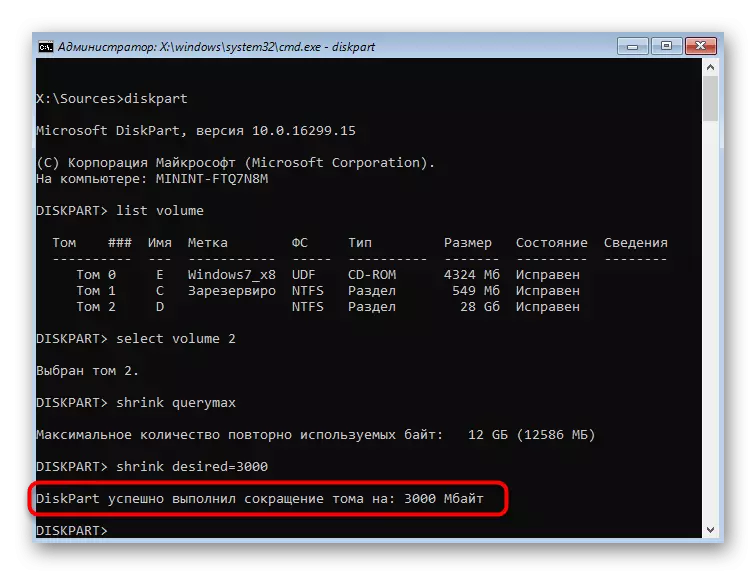
- Next, use SHRINK desired = x to compress the disk on the number of megabytes specified in X.
- After a few seconds, a new line will appear on the screen indicating a successful reduction in volume.
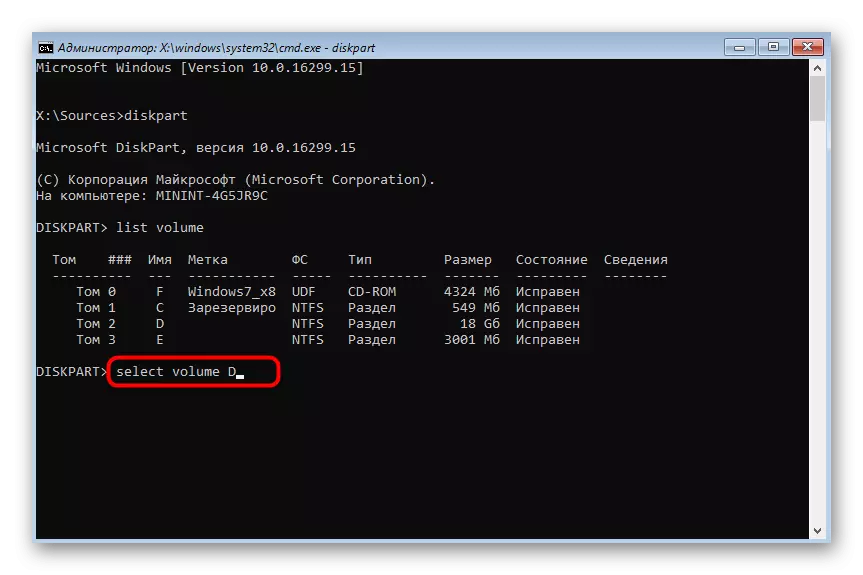
- It remains only to expand Tom. To do this, enter SELECT VOLUME X by selecting a section with which you need to perform this procedure.
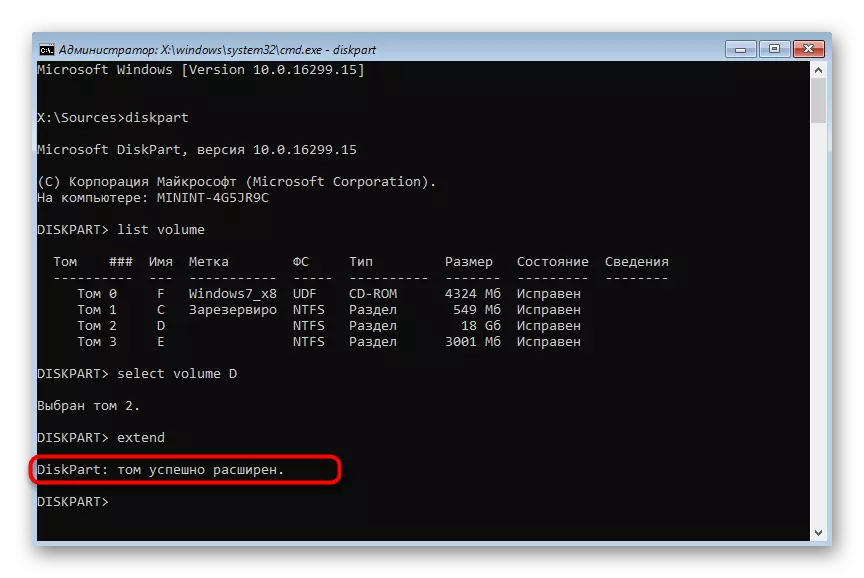
- Use the Extend command to use all available space for expansion. Complete the size size = x if you want to specify a specific volume. Then the team will find the form of Extend Size = x, where X is the required amount of volume in megabytes.
- You will be notified of the successful expansion of Tom.
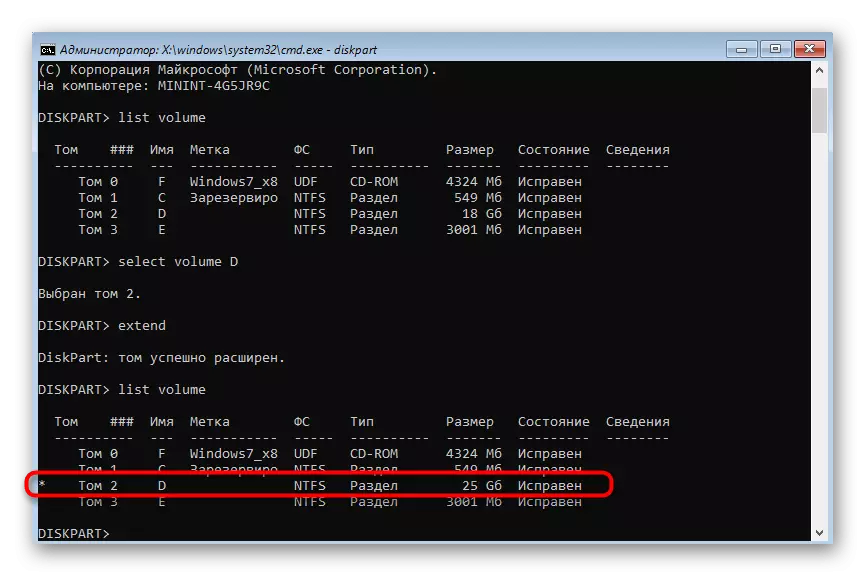
- Immediately in the "Command line" you can check the result by entering the List Volume and viewing the "Size" column in the table that appears.


If you want to further interact with the recovery tool or command prompt, enter the exit to leave the DiskPart utility. All changes will be automatically saved, so when you next authorization in the operating system, you will see an extended logical volume.
Method 3: third-party programs
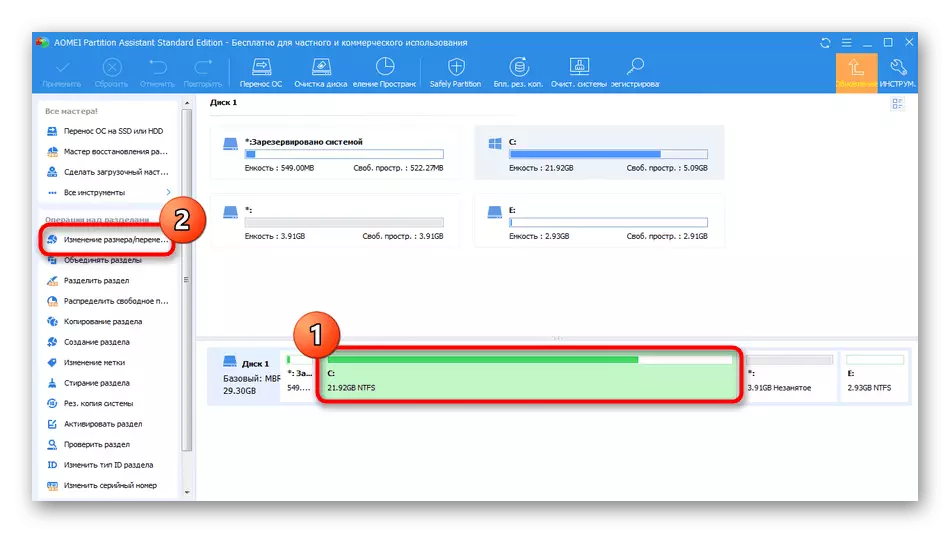
Some beginners, as well as experienced users prefer third-party software from independent developers, referring to the convenience of interface implementation and intuitive management with additional functionality. In particular, because of this, we decided to talk about expanding the hard disk partition in Windows 7 using such software, taking as an example of Aomei Partition Assistant.
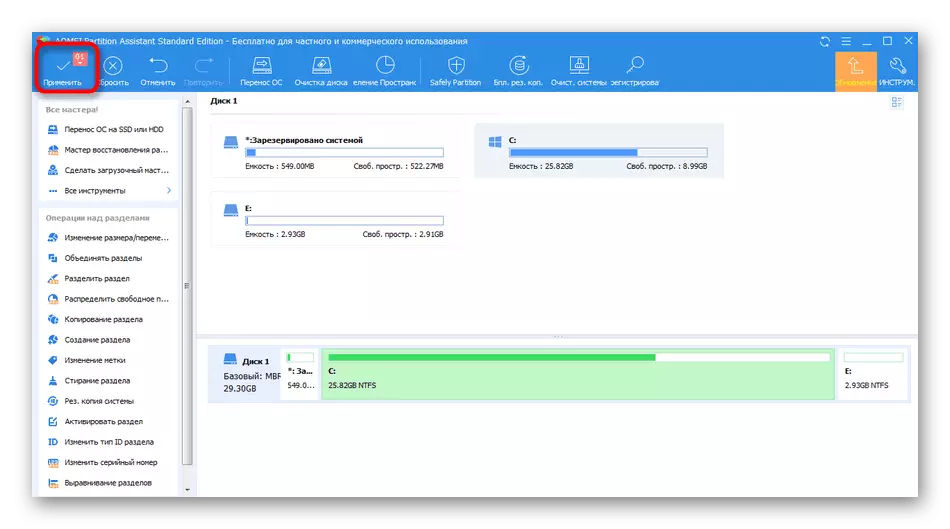
- This program is distributed free for home use, so download it from the official site, install and run to start work. Here you can select an existing hard disk section and specify the "Change size" operation by using the menu on the left.
- Drag and drop the slider to the right to choose a new suitable volume. Instead, you can specify the number of gigabytes and independently by entering the number in a specially designated field.
- After the left at the top, click on the "Apply" button.
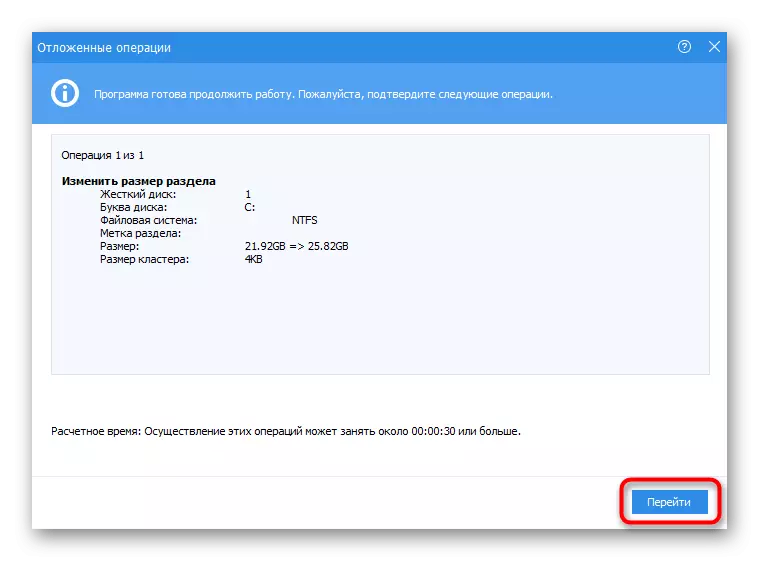
- Confirm the changes made and run the volume expansion operation.
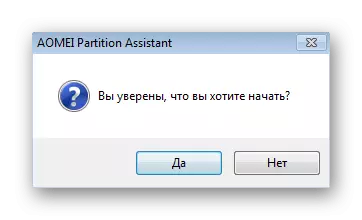
- In the new pop-up window, reaffirm your intentions.
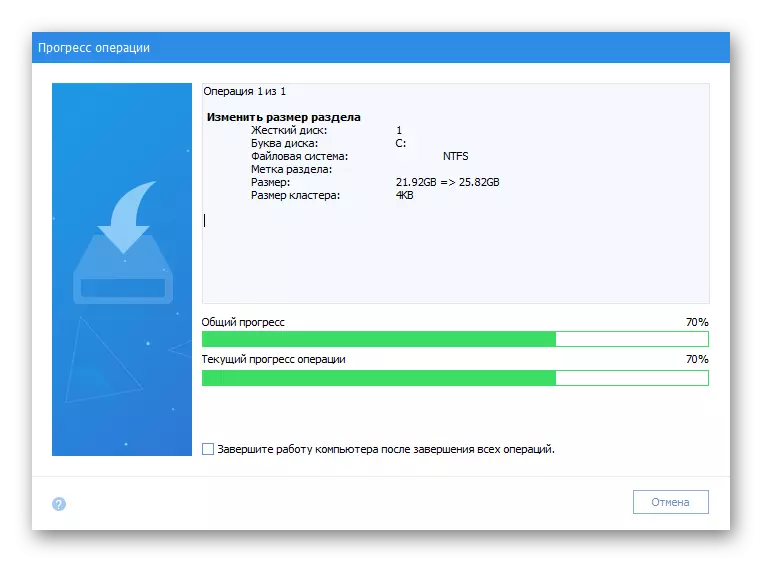
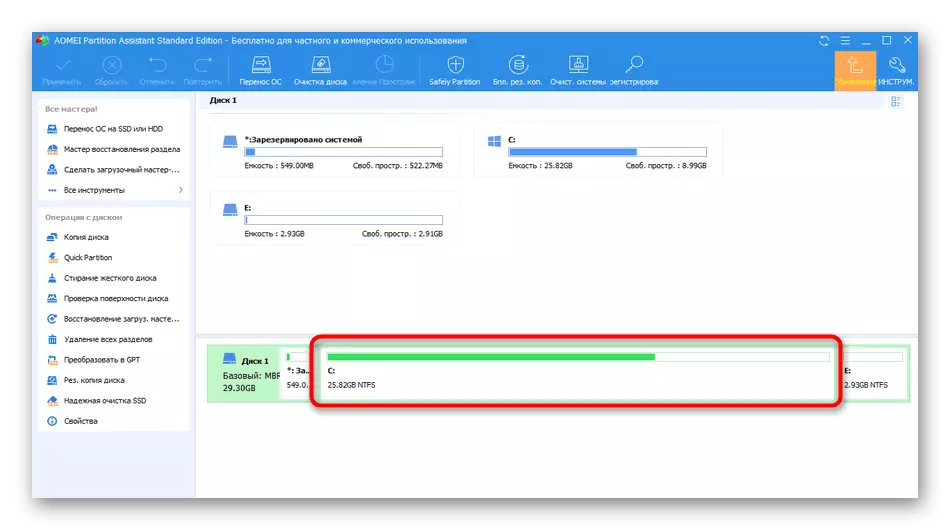
- Expect the end of the process. Watch out for its progress in a separate menu that appears.
- Now you can make sure that all changes have passed successfully and are already applied.

Aomei Partition Assistant has many both free and paid analogues. All of them provide options to expand sections and their preliminary compression, if free space is not originally absent. If you did not come up with the considered program you just need, select the best option, reading the separate thematic instruction on the link below.
Read more: Programs for working with hard disk sections