Connecting MGTS GPON to a computer
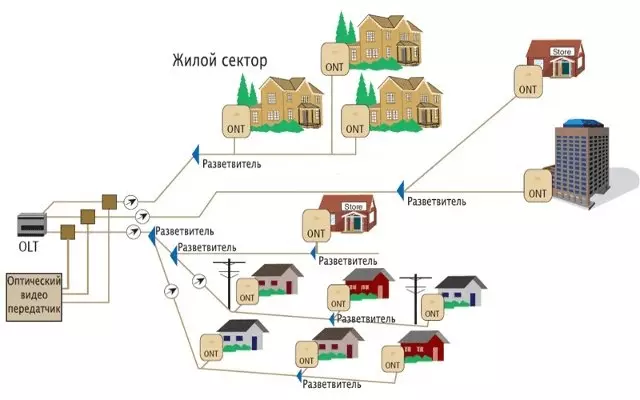
We will specify that GPON is not a model of a particular device and not even their series, but the technology of feeding the Internet to the client. Prefix G denotes that the maximum connection speed of such technology reaches one gigabit per second. With this type of connection of the wire from the provider, it is summed directly to the client in its apartment or a house, and not a single system, as implemented with ADSL. So the client itself is less likely facing the lines failures, and also does not suffer from network workload.
GPON is the type of routers from absolutely different manufacturers supporting this technology. They are equipped with more powerful components that provide fast packet transmission and cope with the load, having a good processor and a sufficient amount of internal memory. This type of equipment is connected to the computer in the same way as the usual router, since externally models do not differ in any way. Universal guidance on this issue in the material on the link below.
Read more: Connecting a router to a computer

Another additional stage when connected - check the operating system settings. You should make sure that one of the network adapter parameters has the desired value. To do this, in properties, open the IPv4 and check the type of obtaining IP addresses and DNS servers. The two of these protocols must be "obtaining automatically". Especially current configuration will be for those users who later via the router web interface will select the type of PPPOE or Static IP connection, since there IP address and DNS servers are entered manually. Read more about such a stage of configuration in Windows below.
Read more: Windows network settings

Login to the web interface
MGTS supplies specialized models of devices called ONT from different manufacturers that are equipped with the same firmware that makes their setting the same. The same applies to the entrance to the Internet center, which must be done at mandatory, because the further configuration procedure is made through the web interface. You will find thematic instructions for authorization in another article on our site by clicking on the following header.
Read more: Login to the web interface routers from MGTS

The appearance of the ONT models interfaces can be slightly different, which depends on the firmware version installed by the manufacturer. We take as an example most popular and standardized view of the menu, describing the following steps of configuration through it. You will only need to get acquainted with the instructions in detail and find the necessary items in your web interface, given the features of its appearance.
Fast setting
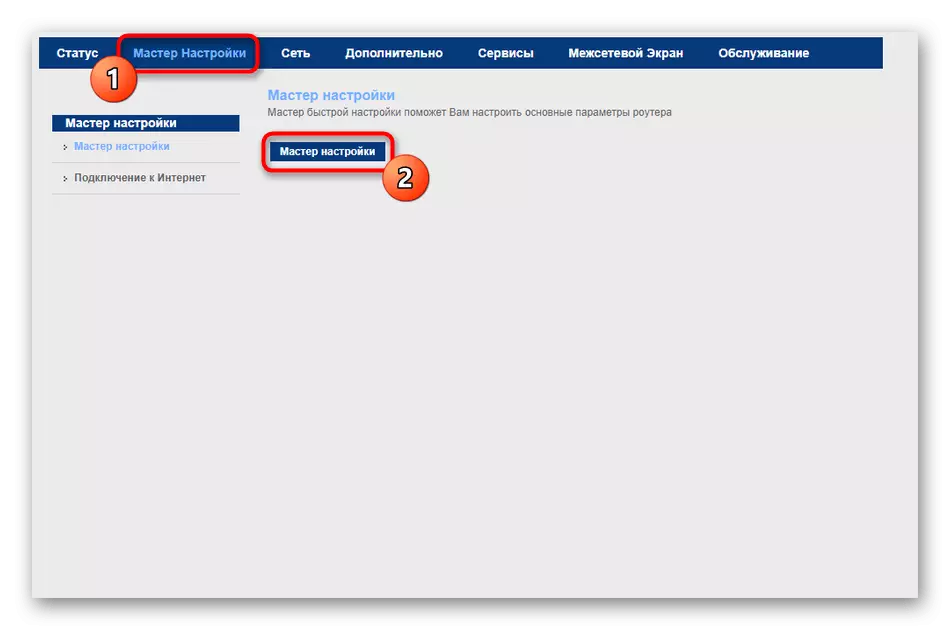
Briefly affect the topic of quick network configuration, since the master present in the settings is exactly useful for novice users and those who are not interested in manually changing the parameters, making them searching in the web interface. To start a quick configuration, open the "Settings" section and run it by clicking on the button specifically for this.
Follow the instructions displayed on the screen by selecting your region and the Internet service provider. If the provider was successfully determined, which happens in most cases, no additional actions will be performed. It remains to move to the "Internet Connection" section to enter authorization data there when using the PPPOE protocol.
If the provider provides STATIC IP, the IP address, subnet mask and additional parameters are specified instead. The form is filled in accordance with the recommendations from the provider itself, so we do not give accurate recommendations on this. If you do not know what information to enter into the fields, view the documentation, instructions from the company or contact the technical support service for the receipt of recommendation.

Unfortunately, the current latest firmware version allows the setup wizard to provide only a wired connection, that is, the access point will still be unavailable, as well as the parameters of the local network will remain in the default state. If you need to additionally configure and these technologies, go to familiarize with individual hand-made steps.
Manual setup MGTS GPON
Not to all users are suitable for using the setup wizard, because sometimes it is not possible to find the required parameters that recommend specifying the provider. Often also need to change the state of the local network and Wi-Fi, which also occurs in manual mode. We divided interaction with each partition to the steps, and you can immediately go to the required and start setting.Step 1: WAN Parameters
First we will analyze the WAN parameters, which will be useful for those who could not configure them when performing previous recommendations. Here there are a number of auxiliary options, which will also be discussed.
- To start in the web interface, move to the "Network" section by clicking on this inscription on the top panel.
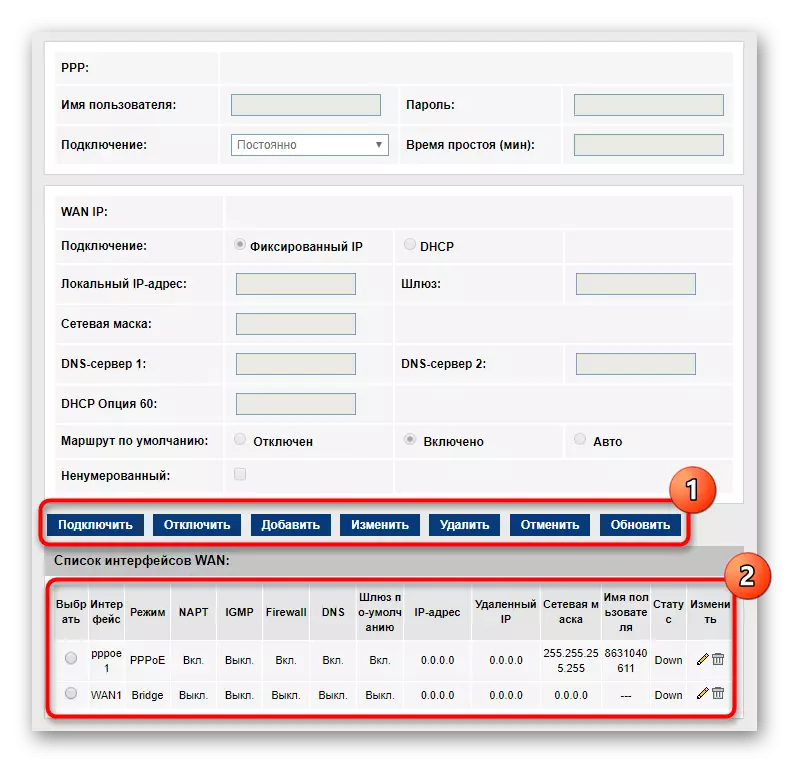
- There, select the first category "WAN" and go to the setup. First, set the default route to the "specified" state to select the parameters of the protocol used. Specify the "interface type" "PPPOE" or "IPOE", thereby replacing the standard "bridge" value, depending on the instructions of the provider. VLAN is included only by personal preferences of experienced users who know why a virtual local network is needed. The PPP unit is activated if the PPPoE protocol first was selected. Enter the username, password and activate the constant connection. Static IP values should be inserted in the WAN IP block by activating the "Fixed IP" mode. If you get a dynamic IP address from the provider, simply mark the "DHCP" marker and save the changes.
- At the bottom of the current tab, the control buttons are located. Using them, choose whether to add the current settings to the table with connections or it is worth completely cleaning the entire form. If you saved several different interface options, switch between them as needed by markers the corresponding items in this table itself.
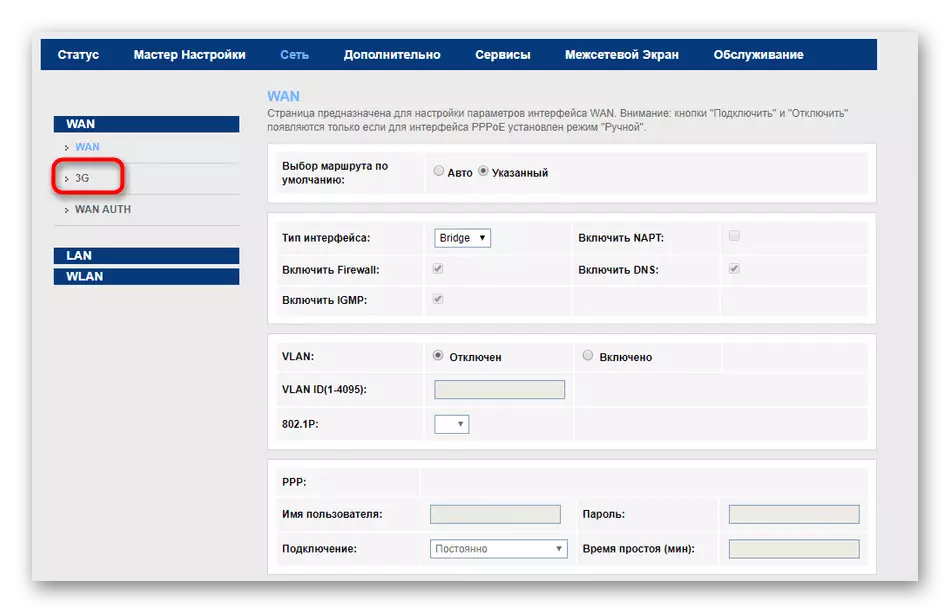
- Sometimes a 3G-modem is connected to the router or a transition to the mobile tariff plan from MGTS is carried out. Therefore, then the router supporting GPON loses its relevance, but this does not cancel the fact that 3G itself can be configured through the category of the same name.
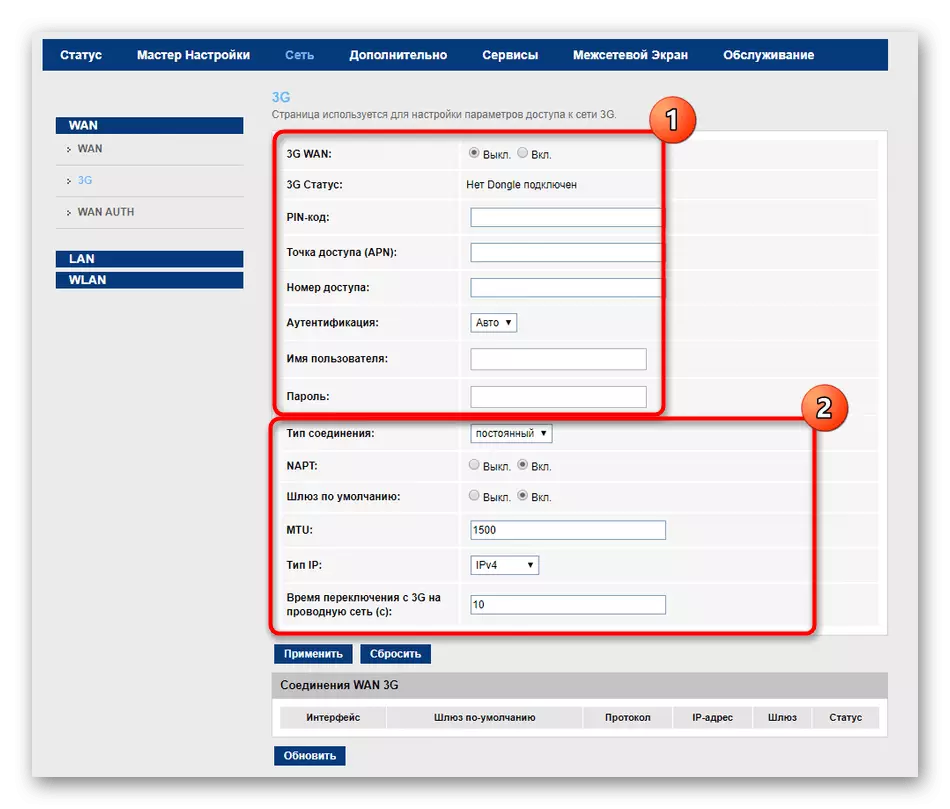
- By turning to the "3G" menu, activate this protocol, enter the PIN code for access and install additional values that the Internet service provider should have had to tell you when providing such a tariff plan.


These were all the parameters responsible for the WAN connection. Now you are recommended to make sure that the Internet is available when the computer is connected to the router via the local network cable. To do this, first look at the status of the "Network" icon in the taskbar, and then open any browser and go to different web pages to see how fast they will be loaded.
Step 2: Local Network Settings
The local network setting step is particularly important when connecting to the router by the LAN cable at once several devices and activating the wireless access point. There is nothing complicated in configuring LAN, because in most cases you just need to check the default settings, making sure that they are set correctly.
- In the same section "Network" Move to the category "LAN" to be in the main menu. Make sure that the IP address of the router is 192.168.1.1 or 192.168.0.1, and the subnet mask is 255.255.255.0. If you want to clone the MAC address using the computer data, specify this in the next block, after selecting the connector to which the PC is connected.
- The following menu is "DHCP" - the name of the technology automatically assigning a free IP address to the connected clients so that no conflicts arise when using the network. If the provider's tariff plan requires the activation of DHCP, select the "DHCP Server" mode, specify all active interfaces and set the range of IP addresses if this has not been done automatically. At the same time, consider that the IP address of the router should not in any way fall into this range, since it is always fixed precisely behind this equipment.
- In the category "Static DHCP" you have the ability to attach a specific IP address to the device by Mac. Often it is required to further configure the firewall or other purposes. Reservation occurs by filling out only two fields. Specify the IP itself first, and then lend a target to it by the MAC address. Add rule to the table and you can switch to creating the following if necessary.
- The last section is called "LAN IPv6", and its configuration is required only if the user has decided to go to the IPv6 protocol. Often, this is done only by experienced users, knowing which parameters will be required in the future, so we will not stop in this procedure in detail.


Step 3: Wi-Fi Parameters
Go to the wireless network configuration process. Most models MGTS routers GPON access point is initially enabled, however, the user may need to change the name Wi-Fi or enter a new access key. In such cases, we recommend reading the following instructions.
- In the same section "Network", go to the category "WLAN".
- The first menu is called "Basic Settings". Here by installing the tick on the opposite item, it turns on or disabling the Wi-Fi interface. If the router supports a dual standard 2.4 and 5 GHz, you are available to select a second option that translates to a freer frequency and delivering from difficulties with the stability of the network. Leave the width and the side strip in the default state. The channel number is also determined automatically, so it is not necessary to change it. Make sure that the transmitter power is installed in 100% mode, and you can also specify the maximum number of customers that will simultaneously be connected to the wireless network.
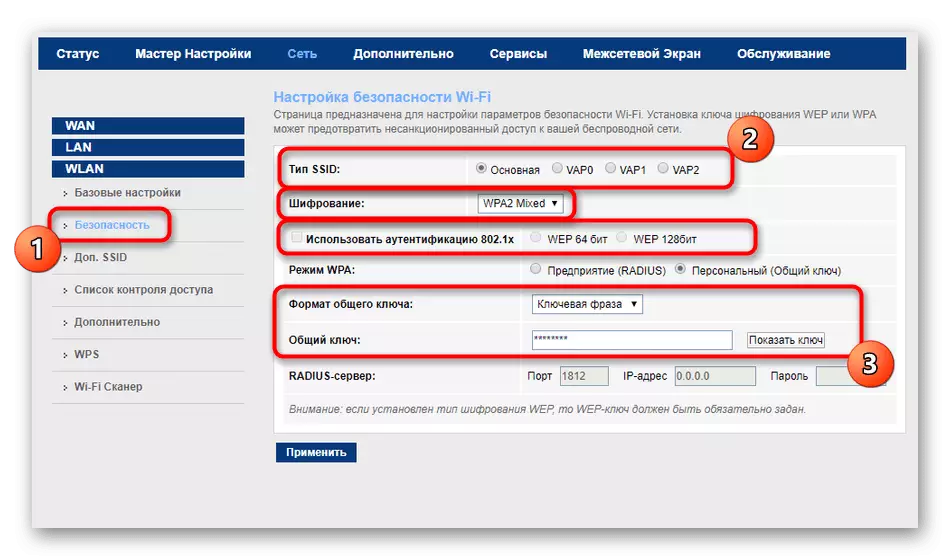
- Next important section - "Security". Here, check the "Basic" paragraph for the "SSID Type" parameter and move below. Encryption type It is recommended to choose the last of the list, that is, the most modern and protected. Using Authentication 802.1 is disabled by default. Standard general key format is a "key phrase". Next, in the General Key field, set a password to access Wi-Fi, consisting at least eight characters. This is the standard Wi-Fi security configuration procedure. Before moving to the next stage, do not forget to click on "Apply".
- Three virtual access points can be created as additional SSID. Often they are involved for customers of different levels or protect the guest network from home. Activate the required number of virtual networks by checking the corresponding items, and specify the standard Wi-Fi settings for them, which we have already spoken above.
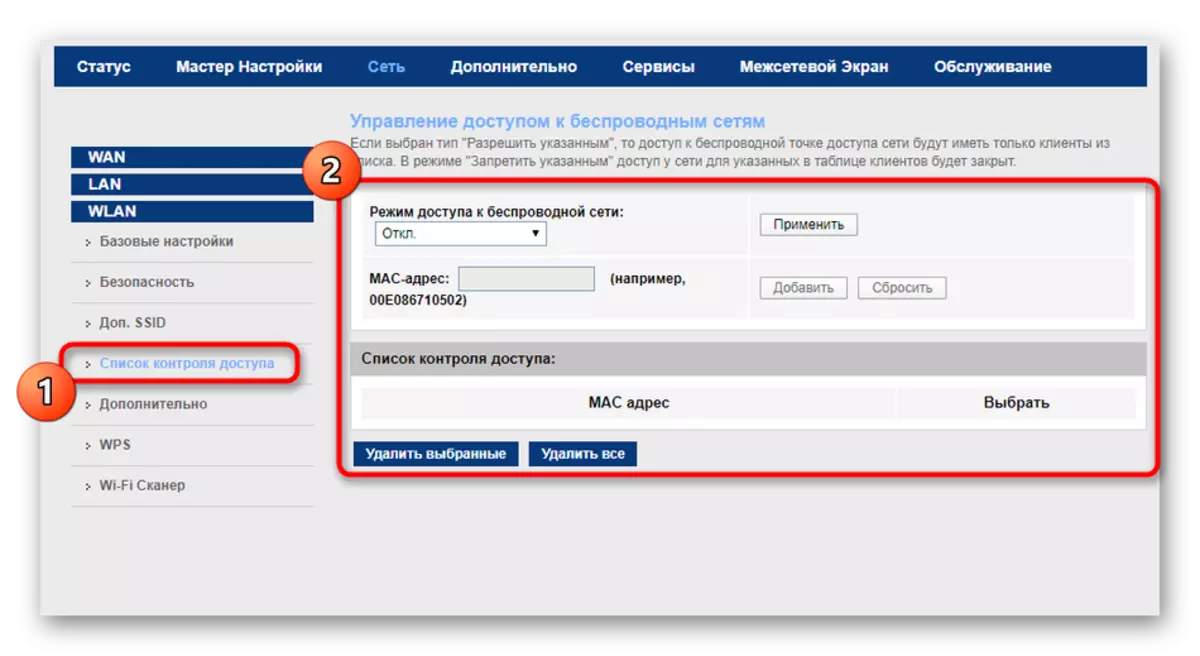
- If you prefer to make a wireless network open, but you do not want third-party users to connect to it, go to the "Access Control List". Here you can choose the mode of behavior of the rules allowing the connection only for the device added to the list. Naturally, the list must be formed on your own. To do this, determine the MAC address of the goals and add them to the table. Similarly, this technology is also working in the opposite direction, that is, the prohibitive rule is set and certain computers or mobile devices are made in the blacklist.
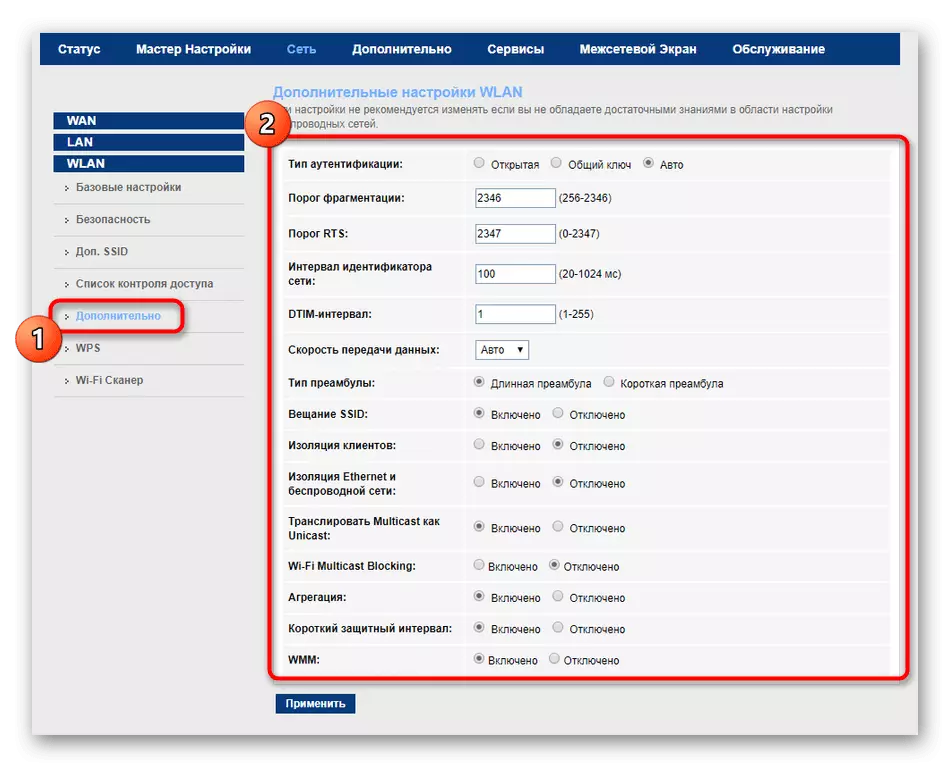
- Contact the category "Advanced" is recommended only to experienced users. If you do not have sufficient knowledge in the meaning of all the items present here, leave all the default values and simply go to the next step.
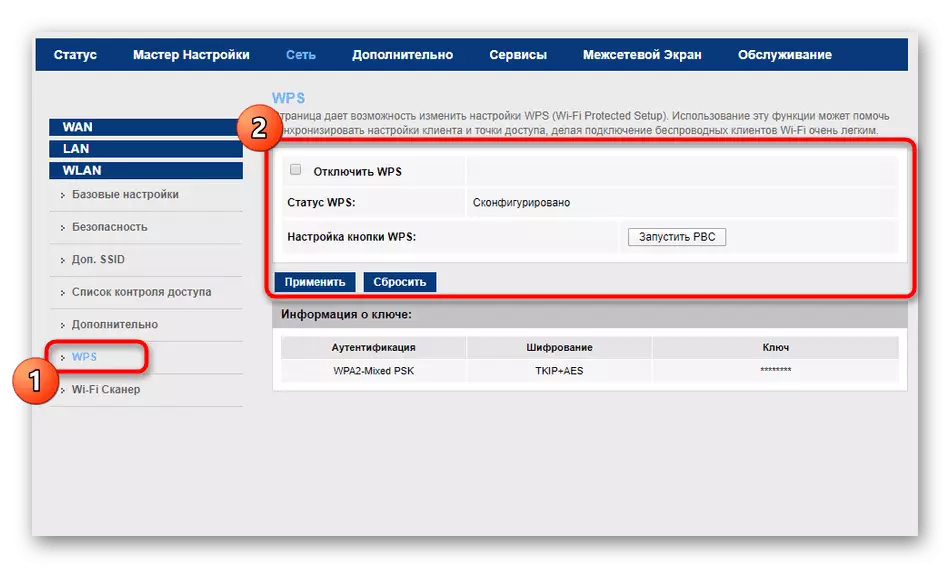
- The option for quickly connecting to a wireless network ("WPS") is also activated by default. You can change it or immediately through this menu to connect with any mobile device or, for example, with a laptop.
- The last menu Wi-Fi scanner scanning free channels, among which is selected suitable for use. This process occurs in automatic mode, which allows the router to switch to optimal channels, increasing this network stability.


All changes must enter into force immediately after saving settings, but if this has not happened, restart the router, and then go to Wi-Fi testing.
Step 4: Additional Parameters
In most MGTS Routers web interfaces, additional parameters are displayed in a separate section so as not to create panels in the main menu and do not complicate the process of understanding the items to the user. Sometimes the editing of the settings located there is required and the usual user, so let's briefly consider how it happens.
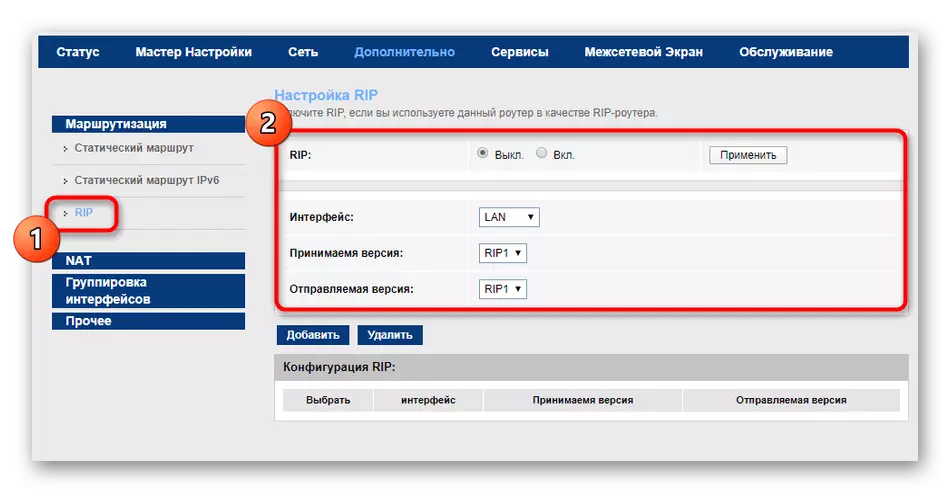
- Go to the "Advanced" section and open the category "Routing". This technology is used to add a static route when optimizing the receipt of packets from a specific web service or server. As understandable to the description, only experienced users are facing such rules.
- A simple and primitive principle of traffic routing is called RIP (ROUTING INFORMATION PROTOCOL). It applies only in small networks and is configured by system administrators separately, respectively, in the usual realities, the user should only be convinced of the fact that this protocol is disabled to avoid conflicts with the usual surfing of the Internet.
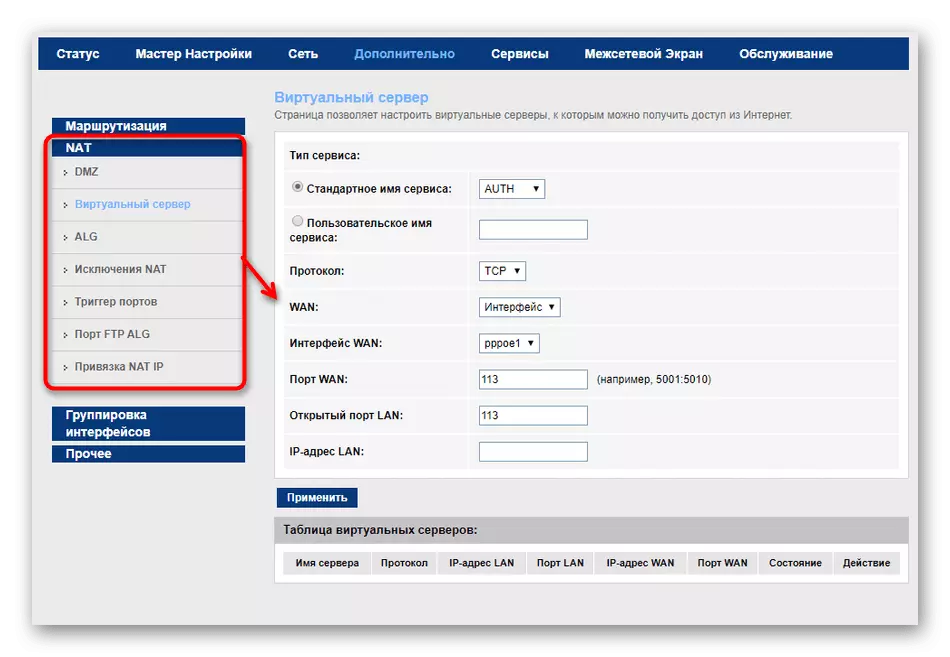
- In NAT settings, all parameters also change exclusively by experienced users. A virtual server is created here, NAT is attached to IP, exceptions are added and the parameters are configured when using a router in a demilitarized zone.
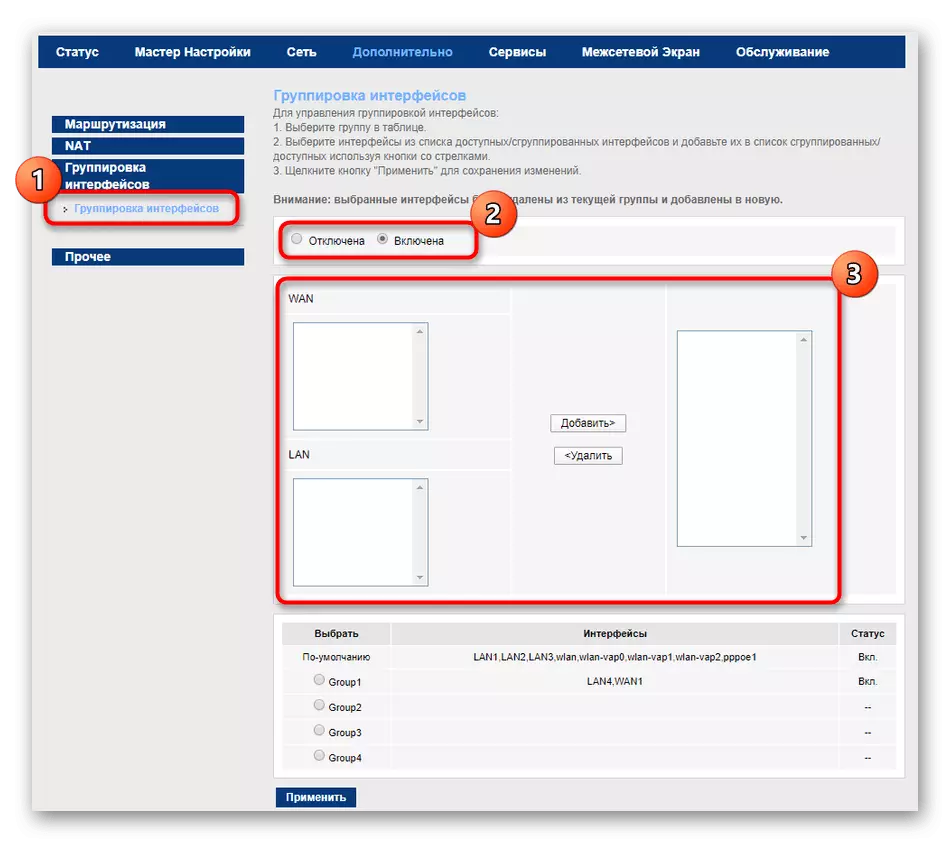
- If you use different WAN and LAN settings for specific interfaces, create groups to simplify configuration editing. Just adjust existing ports by moving them into a table, initially activating the group itself.
- In the category "Other", it makes sense to edit only the item "Restricting the number of customers". You can independently ask what the maximum number of users connected to the router will receive simultaneous access to the Internet. Sometimes it helps to distribute traffic without losing the connection speed.


Step 5: Use of Services
The firmware of the type of routers under consideration today provide additional functions as customizable servers. The novice user is unlikely to like such opportunities, however, they may be interested.
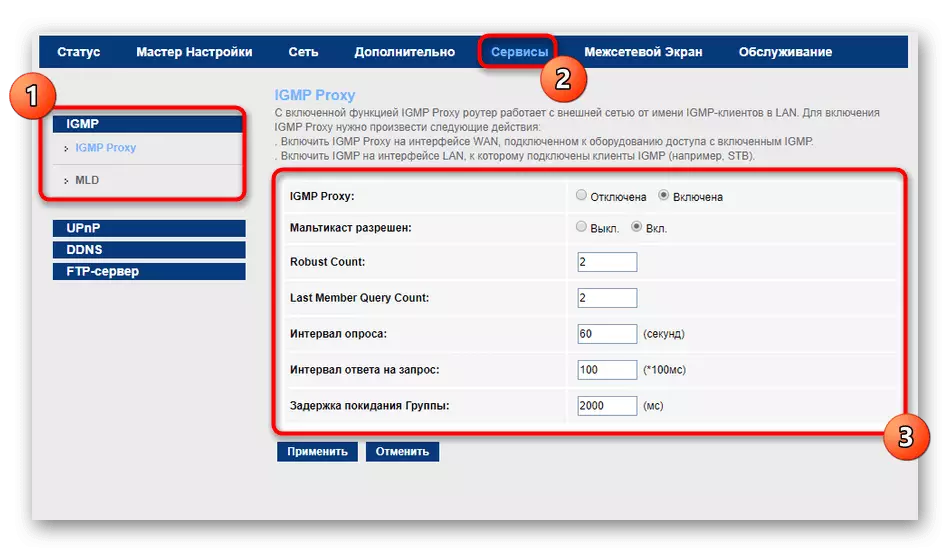
- Go to "Services", where to select the first category "IGMP". The activation of IGMP Proxy technology allows the system administrator of the network device to track the flow of information processed by each client. If you want to monitor traffic, activate this option and assign suitable parameters for it.
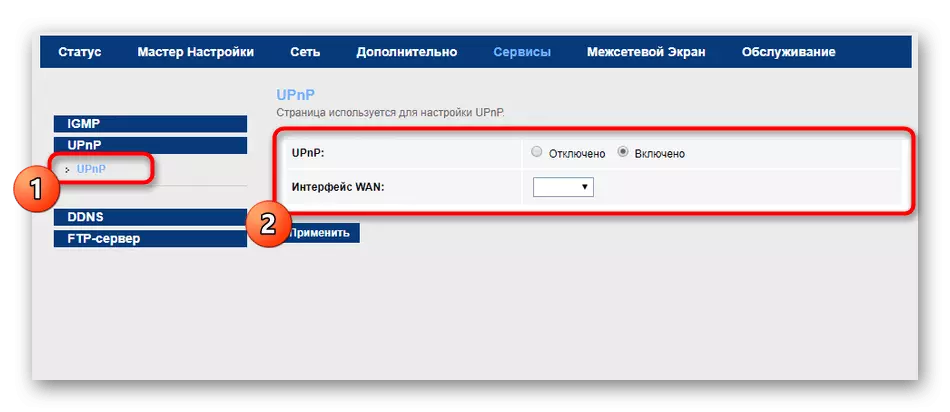
- Initially, the UPNP protocol is activated, which allows smart devices located within an apartment or at home, connect to the router wireless network to exchange data with the user application or receiving information from the servers. If in this way some kind of device is connected via LAN, be sure to specify this in the corresponding category of the web interface to provide him with traffic.
- All owners of dynamic DNS purchased from a separate provider will need to configure this technology in a separate menu. Here, specify your service provider, host name, select the interface and log in in the existing profile, following the instructions from the official site.
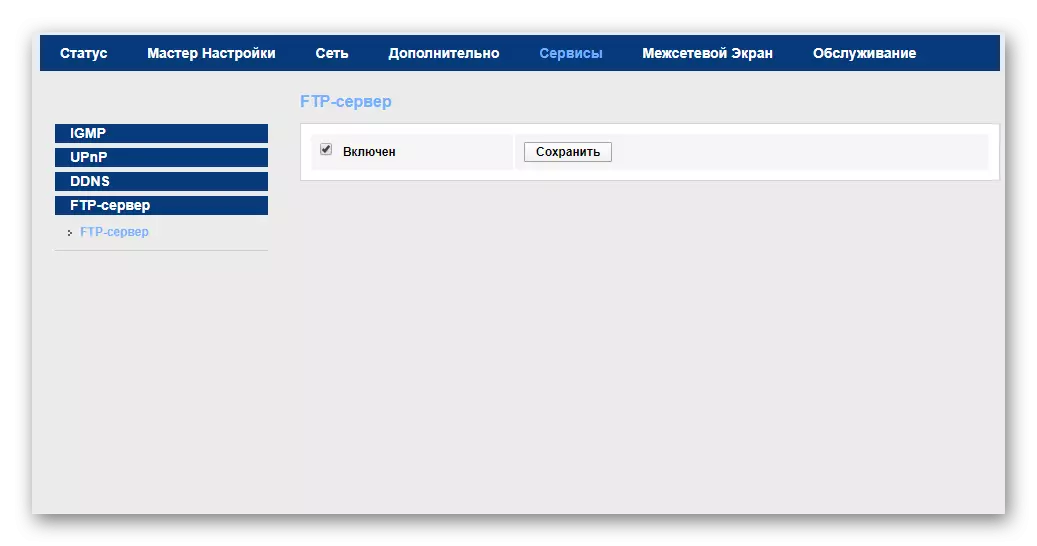
- With the help of MGTS GPON routers, you can send files via the network using the FTP server. Activate this option in one of the categories "Services" menu, and then go to the configuration of the server itself. This feature will be useful for exceptionally to experienced users who have their own servers.

Step 6: Setting the firewall
The penultimate step associated with the configuration of the router is to configure its safety by editing the embedded firewall parameters. The attention of this instruction should be given to those users who are interested in installing traffic filtering rules, blocking URLs and the inclusion of parental control.
- Go to the "Firewall" section, where to select the first "Mac filtering" category. To install restrictions or permissions of packets in physical addresses, first set the behavior of the policy itself, and then set the direction and add MAC addresses. All existing rules are immediately stored in the table. They are available for editing or removing.
- According to the similar scheme, filtering on IP addresses and ports is functions, but instead of physical addresses for policies, the mentioned data mentioned just the data are introduced, and then adding them to the table.
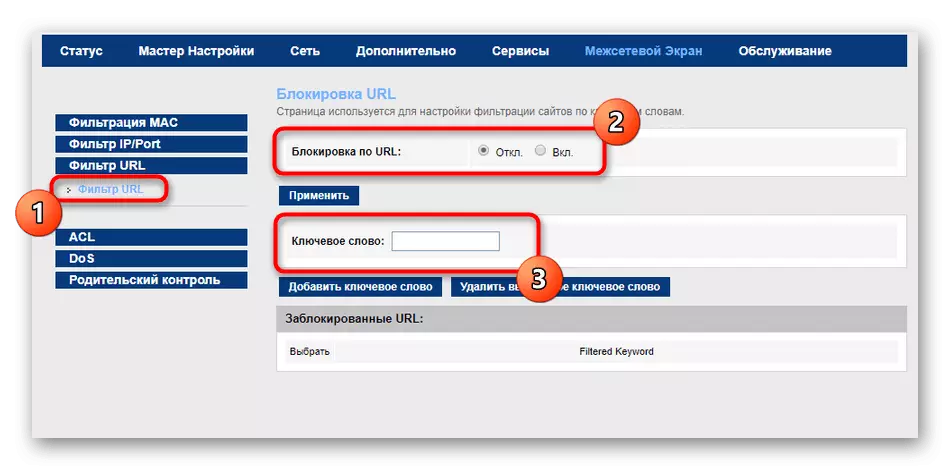
- The URL filter is one of the standard options of the firewall of different routers. When it is assisted, you can block sites by keywords or full addresses so that none of the clients can access certain web resources.
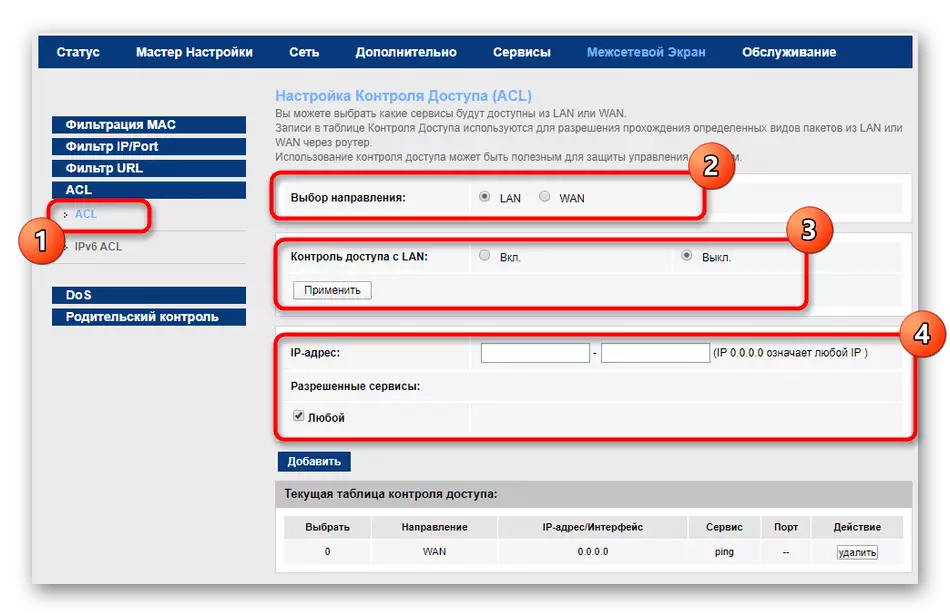
- Approximately the same thing is performed in the "ACL" menu, but here the restrictions are exhibited by IP addresses. If you want to block specific IP, select Direction, set the control and enter the address.
- By default, all items are activated responsible for protection against DOS attacks. In a separate menu, experienced users can independently establish a limit on the number of transmitted packets or to disable specific rules at all, but it is recommended only in those situations when there is an understanding of the functioning of technologies.
- The last section is called "Parental Control", and its purpose is understandable to everyone. You can enable control, configure the Internet access schedule and set the physical target address to create a limit. This supports work with the table, which means that for each client is allowed to establish its schedule. Please note that at the same time the system time must be configured correctly, which we will talk about in the final step.


Step 7: Service
It remains only to deal with several parameters of the router, after which its configuration should be considered completed. In this stage we will talk about the system settings.
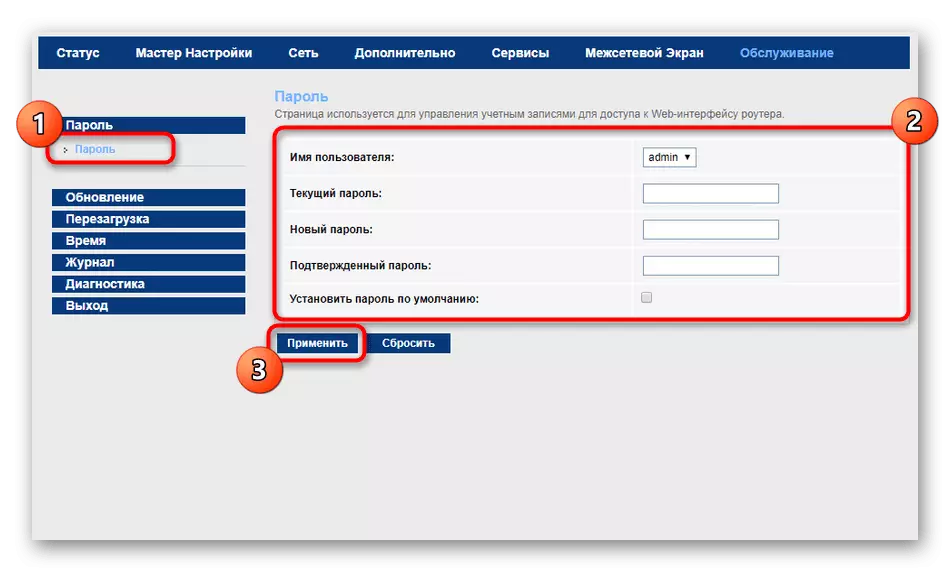
- Go to the "Service" section. In it, the first menu is called "password", where the user can change authorization data to limit access to the web interface to other network clients.
- In the "Update" category, the official firmware is loaded to update the router, previously downloaded from the official site. There is also a "Saving / Recovery" subcategory. Use these options to help create a backup of the router settings as a file and, if necessary, restore all the parameters literally in several clicks.
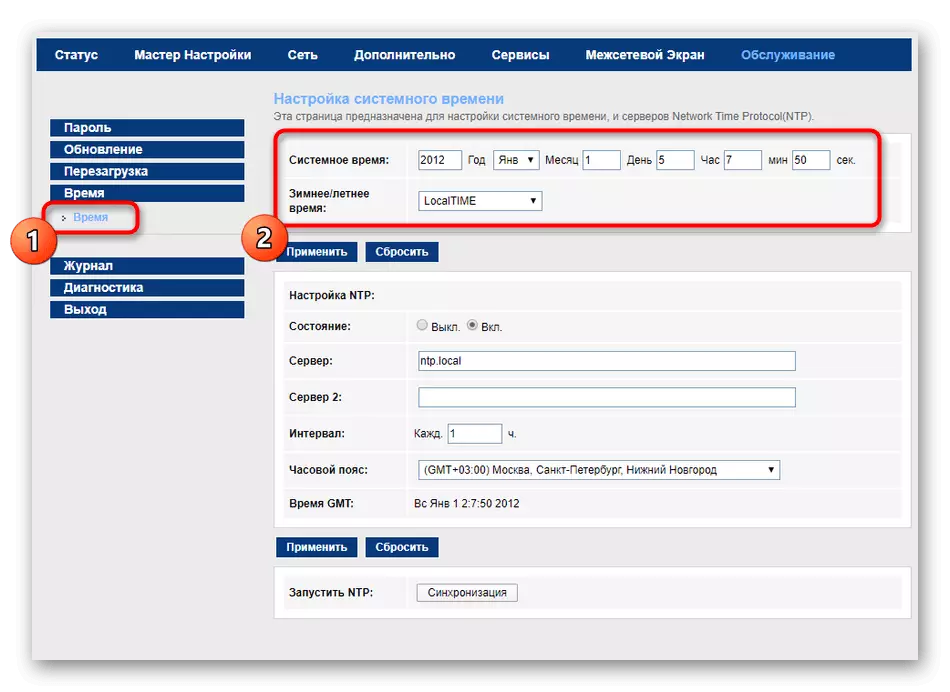
- We have already said that time needs to be configured so that access control with the parental control enabled functioned correctly. Manually enter each value, as well as specify the parameters of the winter and summer time (there is no transition in Russia). Then click on "Apply".
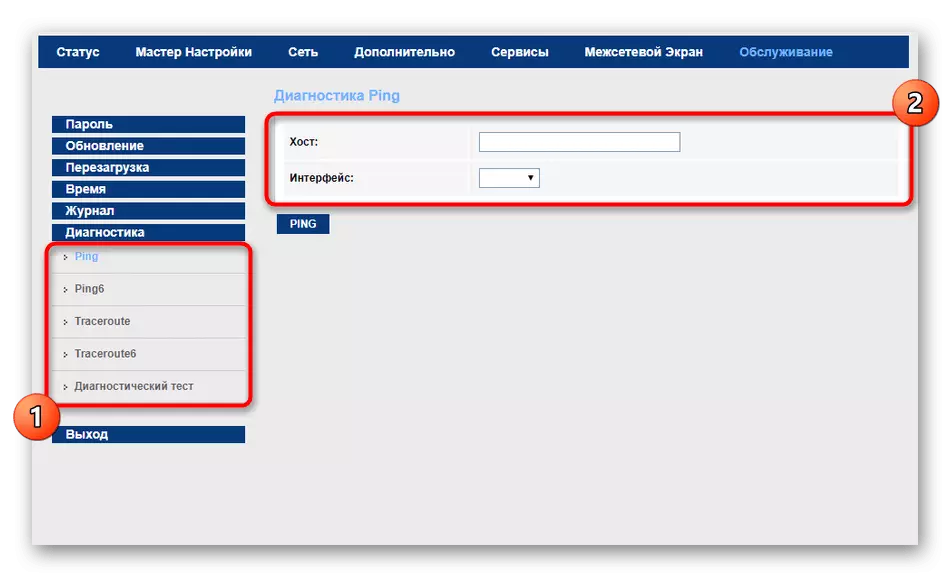
- Through "Diagnostics", the operation of the router and the availability of network access is carried out. For example, set the interface and enter www.google.com to check whether the device will be able to exchange data with this site.
- Upon completion of the setup, it remains only to restart the device that can be done and through a separate menu in the web interface. There is also a button to restore the factory settings, which is sometimes required to produce if initially the configuration is set incorrectly.