

Also, to restore the storage of components, they are resorted when when restoring the integrity of system files using SFC / SCANNOW, the command reports that "Windows resource protection program has detected corrupt files, but cannot restore some of them."
Simple recovery
First, about the "standard" method of restoring the Windows 10 component storage, which works in cases where there are some serious damage to system files, and the OS itself starts. With a high probability, it helps in situations "component store is subject to restoration", "Error 14098. component repository is damaged" or when recovery errors using SFC / SCANNOW.
For recovery, follow these simple steps.
- Run the command prompt on behalf of the administrator (for this in Windows 10, you can start typing "Command Line" in the search for the taskbar, then right-click on the result in the result and select "Run from the administrator name").
- In the command prompt, enter the following command:
- DISM / ONLINE / CLEANUP-Image / SCANHEALTH
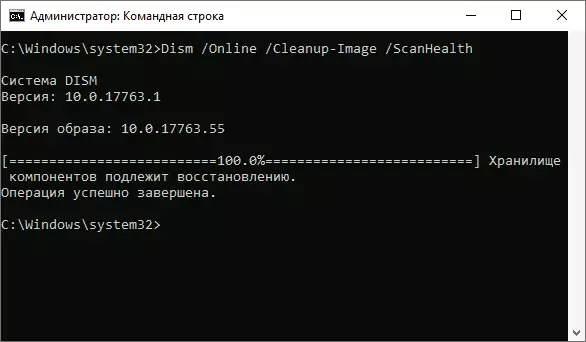
- Command execution may take long time. After execution, if you receive a message that the component store is subject to recovery, run the following command.
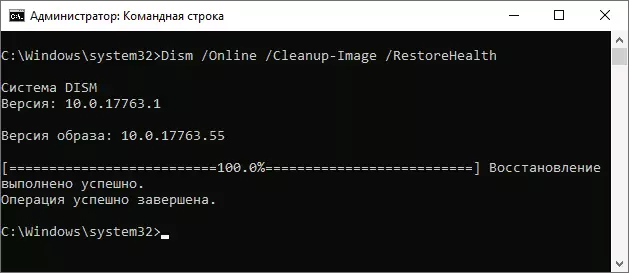
- DISM / ONLINE / CLEANUP-Image / RESTOREHEALTH
- If everything went smoothly, then at the end of the process (it can "hang", but strongly recommend to wait for the end) you will receive a message "Recovery is successful. The operation is successfully completed. "
If, in the end, you received a successful recovery message, then all the further methods described in this manual will not be useful to you - everything worked properly. However, it does not always happen.
Restoration of the storage of components using the image of Windows 10
Next Method - Using the image of Windows 10 to use system files from it to restore the storage, which can be useful, for example, when the error "failed to find the source files".
You will need: ISO image with the same Windows 10 (bit, version), which is installed on your computer or disk / flash drive with it. In the event that the image is used, connect it (right click on the ISO file - connect). Just in case: how to download Windows 10 ISO from Microsoft site.
The restoration steps will be as follows (if something is not clear from the text description of the command, pay attention to the screenshot with the execution of the described command):
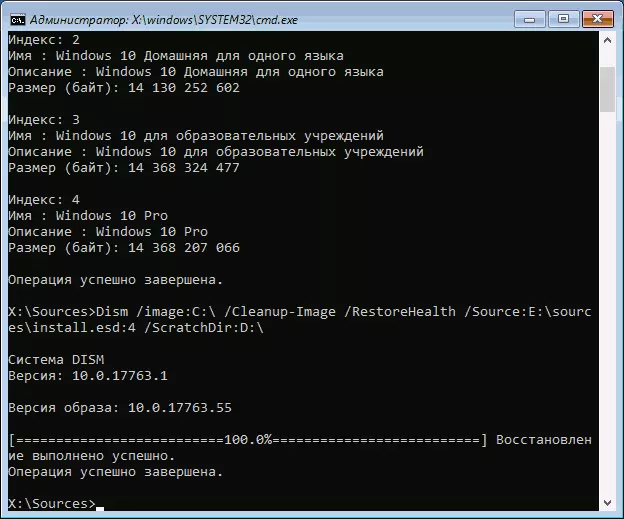
- In the connected image or on a flash drive (disk), go to the Sources folder and pay attention to the file being located there with the name Install (the largest in volume). We will need to know its exact name, two options are possible: install.esd or install.wim
- Run the command line on behalf of the administrator and use the following commands.
- DISM / Get-Wiminfo /Wimfile: Full_Put_K_Fyle_install.esd_Ili_Install.wim
- As a result of the execution of the command, you will see a list of indexes and editions of Windows 10 in the image file. Remember the index for your edition of the system.

- DISM / ONLINE / CLEANUP-Image / RestoreHealth / Source: Path_Fail_install: index / limitaccess

Wait until the recovery operation is completed, which may be successful this time.
Fixing the storage of components in the recovery environment
If for one reason or another, the recovery of the component storage cannot be executed in the running Windows 10 (for example, you get the message "DISM failure. Operation is not executed"), this can be done in the recovery environment. I will describe the method using the boot flash drive or disk.
- Load the computer for the bootloader or disk from Windows 10 in the same bit and the version that is installed on a computer or laptop. See Creating a bootable USB flash drive.
- On the screen after selecting a language at the bottom of the left, click "Restore System".

- Go to "Fault Correction" - "Command Line".
- In the command line, use in order 3 commands: DiskPart, List Volume, EXIT. This will allow you to learn the current letters of partitions of discs that may differ from those to which are used in the running Windows 10. Next, use commands.

- DISM / GET-WIMINFO /WIMFILE: Full_Put_F_File_install.esdIli Install.wim, the file is located in the SOURCES folder on the flash drive from which you boot. In this team, we will learn the index of the necessary edition of Windows 10.
- DISM / Image: C: \ / / CleanUp-image / restoreHealth /Source: Full_Put_F_Fyl_Install.esd: Indexed in / Image: C: \ The letter of the disk is indicated from the installed Windows if there is a separate partition on the disk for user data, for example, D, I also recommend Specify the / scratchdir: d parameter: \ as on the screenshot to use this disk for temporary files.
As usual, waiting for the end of the recovery, with great probability this time it will be successful.
Recovery from a unpacked image on a virtual disk
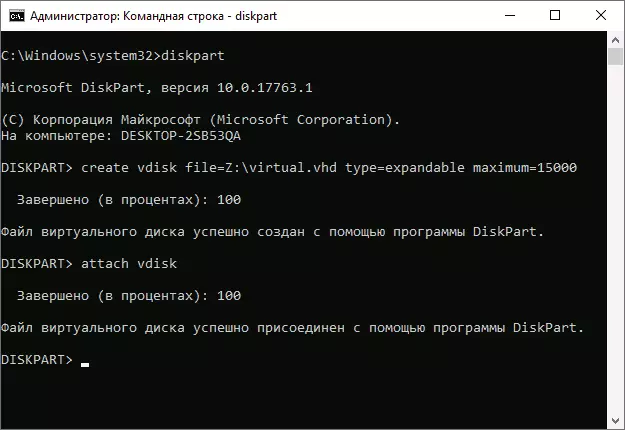
And one more method, more complicated, but also capable of useful. You can use it both in the Windows 10 recovery environment and in the running system. When using the method, it is necessary to have free space in the amount of about 15-20 GB on any section of the disc.
In my example, letters will be used: C - disk with the installed system, D is the loading flash drive (or connected ISO image), Z is a disc on which a virtual disk will be created, E is the letter of the virtual disk that will be assigned to it.
- Run the command prompt on behalf of the administrator (or run it in the Windows 10 recovery environment), use commands.
- diskpart.
- CREATE VDISK File = Z: \ Virtual.vhd Type = Expandable Maximum = 20000
- Attach vdisk
- CREATE PARTITION PRIMARY.
- Format FS = NTFS Quick
- Assign Letter = E
- EXIT.

- DISM / GET-WIMINFO /WIMFILE ::\Sources\Install.esd (or Wim, in the team we look at the image index we need).
- DISM / APPLY-image /ImageFile :SD / INDEX: Drawing Index / Applydir: E: \
- DISM / Image: C: \ / CleanUp-image / RestoreHealth / Source: E: \ Windows / Scratchdir: Z: (If recovery is performed on the running system, then instead of / image: C: \ Use / Online)
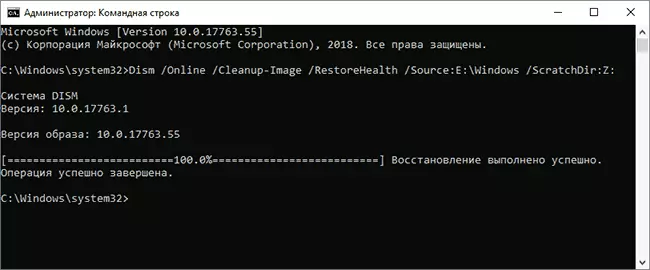
And we expect in the hope that this time we will receive the message "Recovery is fulfilled successful." After recovery, you can unmount the virtual disk (in the running system running the right click on it - disable) and delete the corresponding file (in my case - z: \ virtual.vhd).
Additional Information
If a message is that the component store is damaged during the setting .NET Framework, and its restoration of the methods described does not affect the situation, try to enter the control panel - programs and components - switching on or disabling Windows components, disable all .NET Framework components , restart the computer, and then repeat the installation.