Option 1: Cloud Service
The easiest way in terms of the required tools and devices is the way to create backup information from any Android device, and all Xiaomi smartphones here are no exception, is unloading copies of data into one or several cloud services. Next, we consider the two most accessible users of the manufacturer's devices of the implementation of this approach.Method 1: Xiaomi Cloud
The implementation of many operations in MIUI is best implemented when the services included in the ecosystem created by the developers created by the developers. Therefore, to solve the problem of cloud backup data, the cloud proposed by the creators of the smartphone cloud will be attracted to the creators of the cloud Xiaomi Cloud..
Access to the cloud storage of Xiaomi is provided only to those users who registered in the manufacturer's ecosystem and authorized in it using their device. Thus, before performing the following two instructions, it is necessary to create a Mi-account and make this account to the smartphone!
Read more: Creating a MI account and entrance to it on Xiaomi smartphone

Photos, video, contacts and other
Backups of the most important information for most users of smartphones Siaomi types of information in the general case is realized in real time by synchronization with the Miklaud cloud. To activate this feature and / or perform data copying forcibly, do the following:
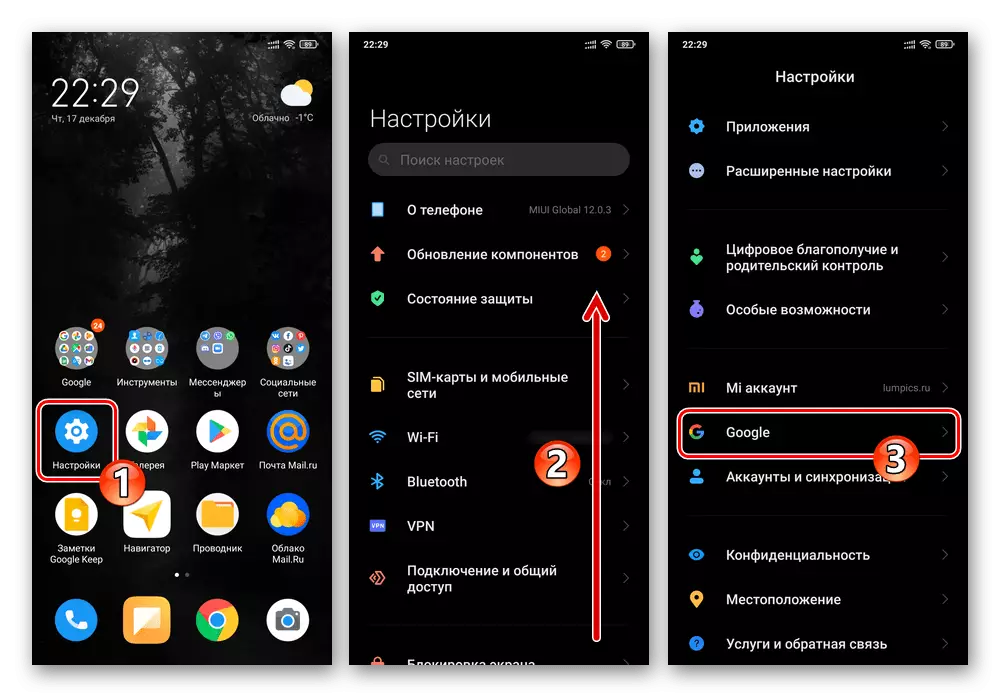
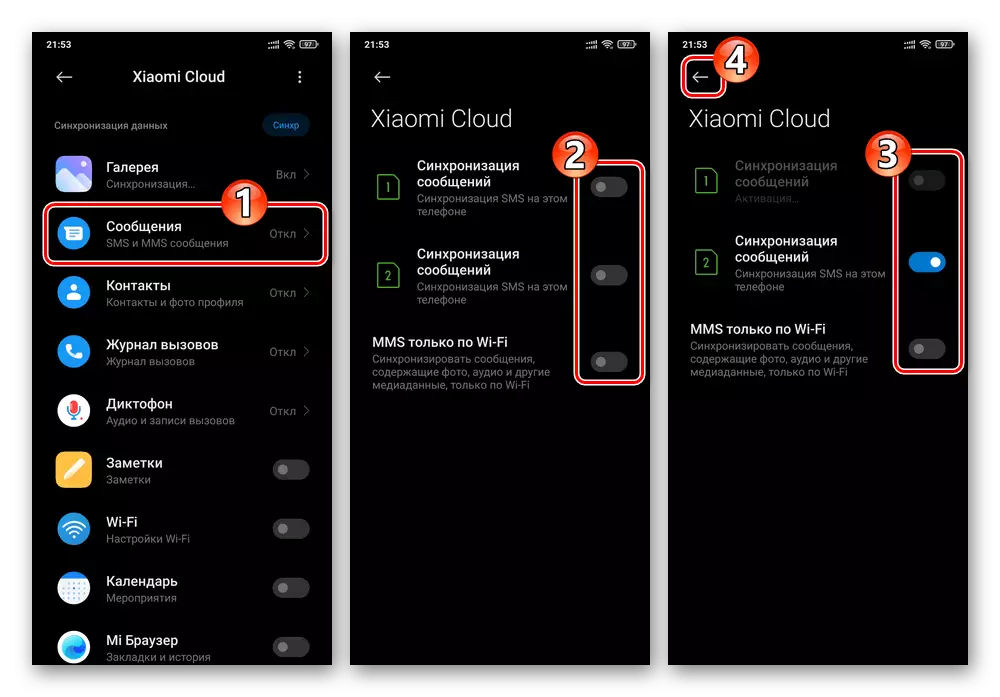
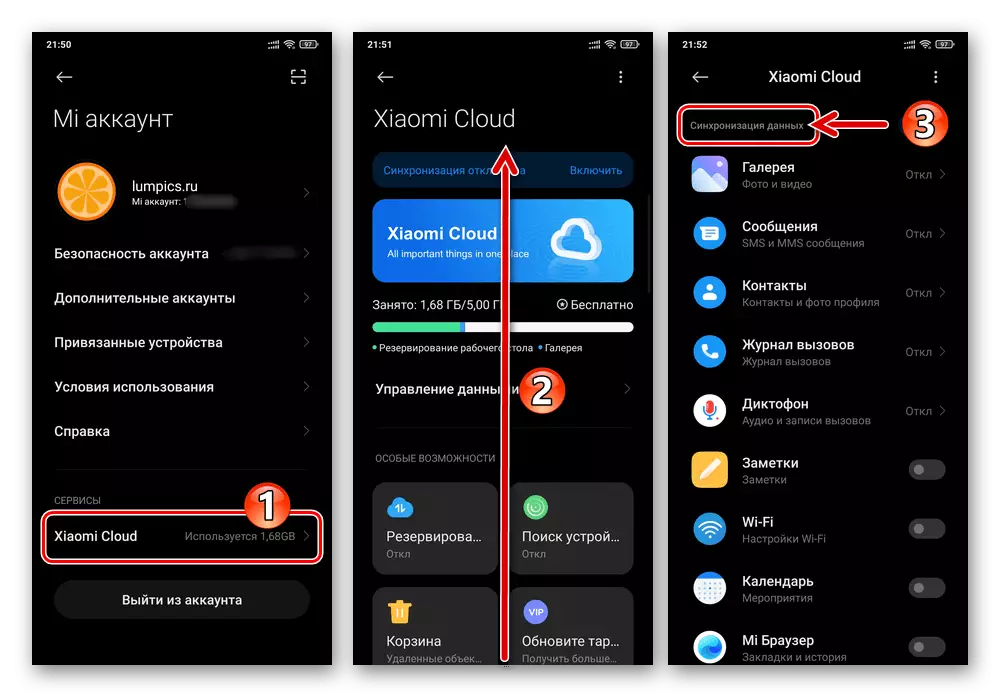
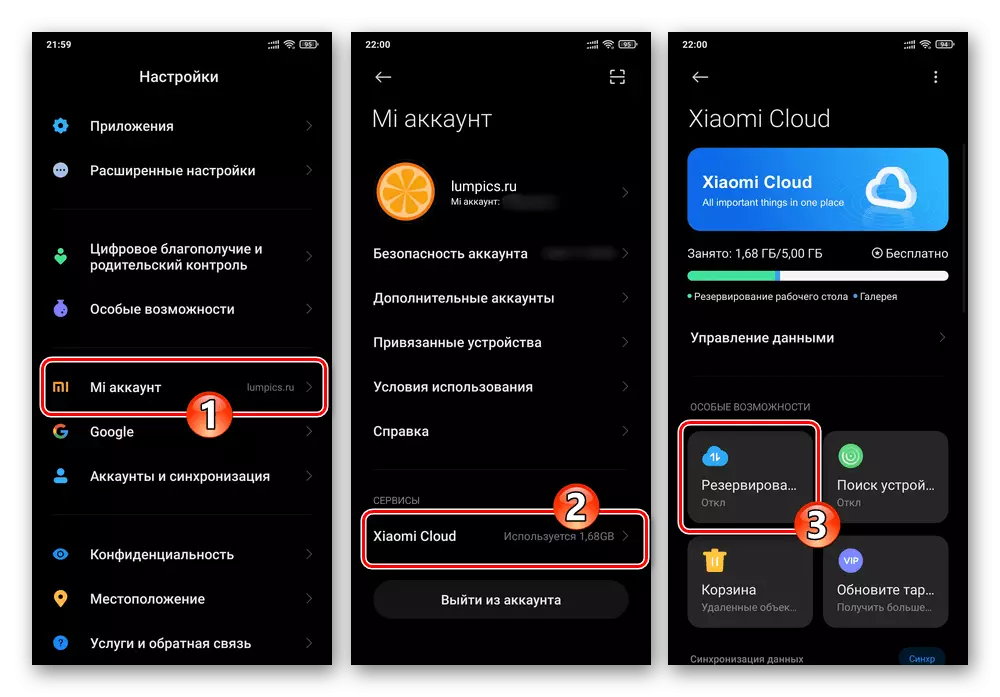
- Open the "Settings" MIUI, scroll their list and go to the "Mi Account" section.
- From the opened screen of the "Services" area below, go to Xiaomi Cloud. Scroll through the information to display the "Data Synchronization" list.
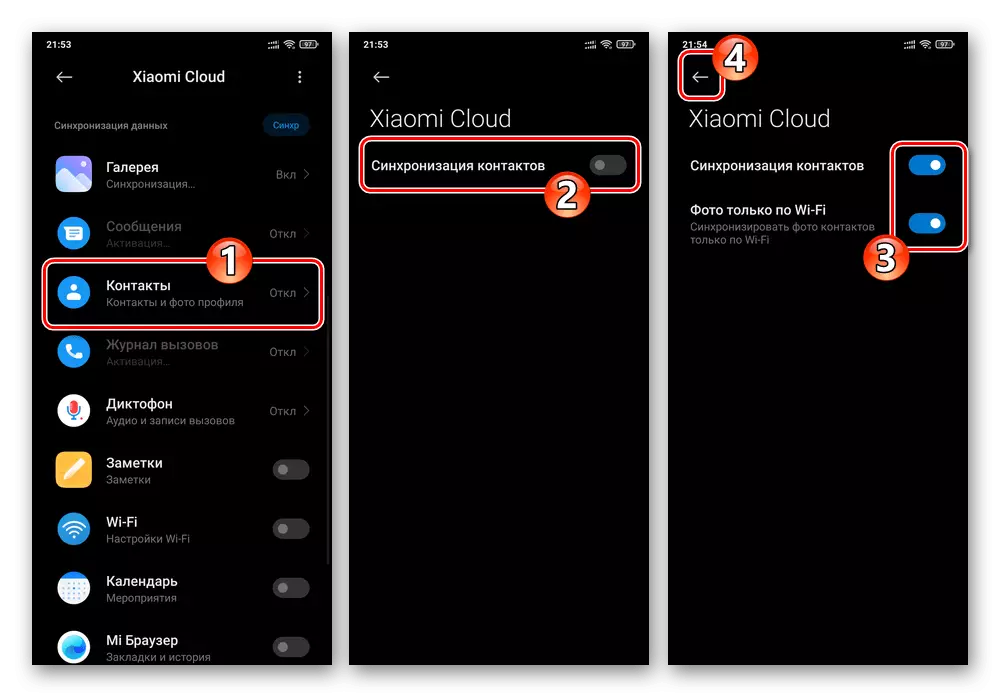
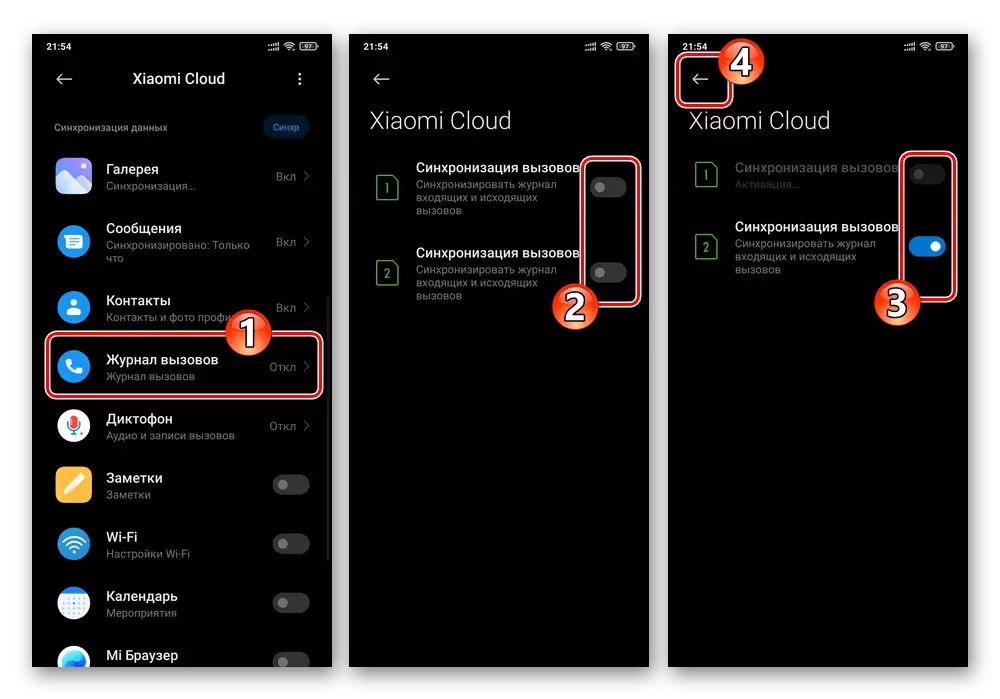
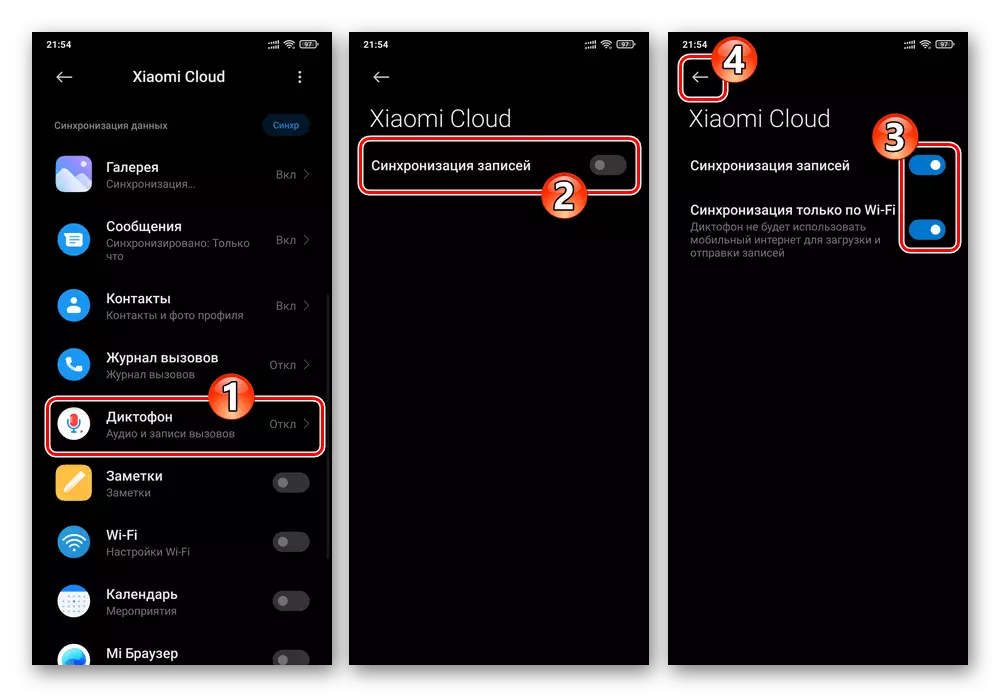
- Alternately taping on the appropriate names and then activating / deactivating options on opening screens, configure the copying process to the Siaomi cloud:
- "Galleries";
- "Messages";
- "Contacts";
- "Challenge magazine";
- Records "Dictaphon".
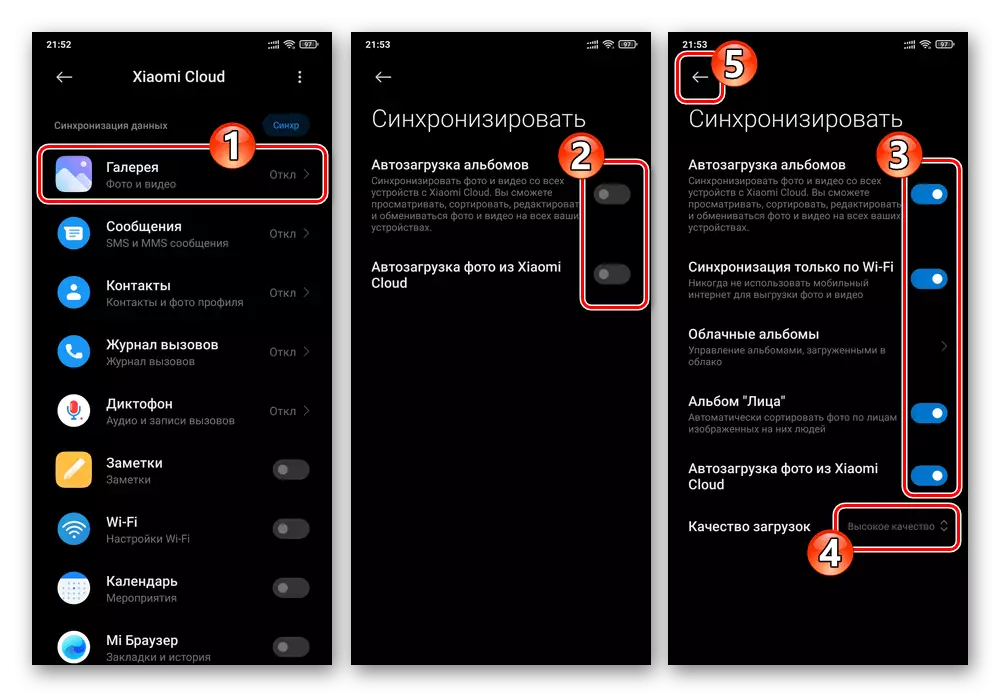
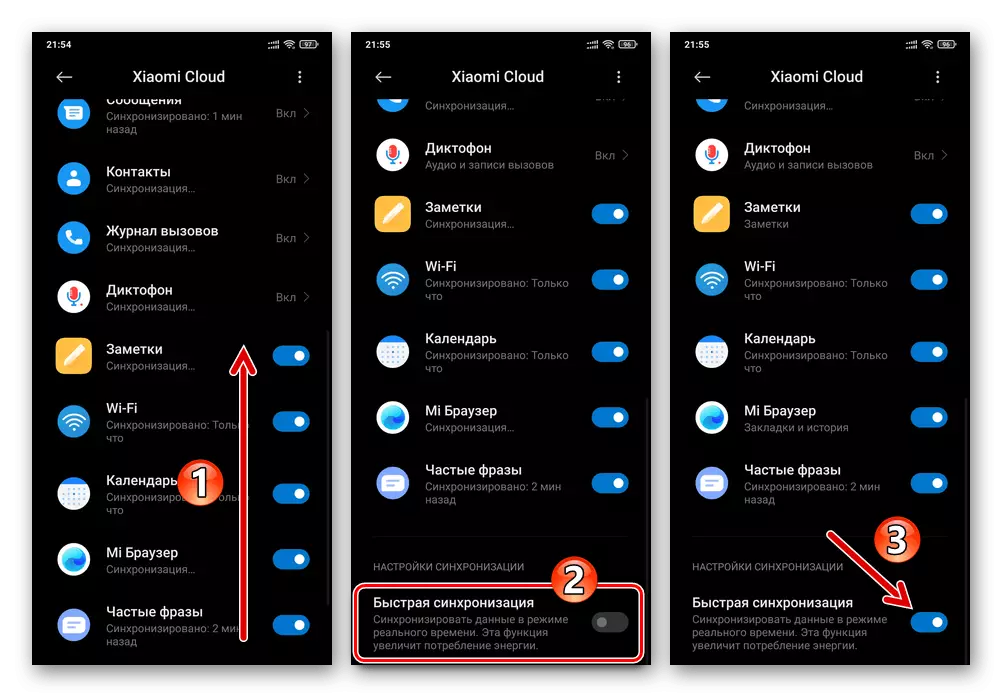
- If desired, by transferring the corresponding switches to the "Included" position, ensure that you reserve "notes", the settings "Wi-Fi", "calendar", "Mi browser", as well as "frequent phrases" that you entered during the process with the phone.
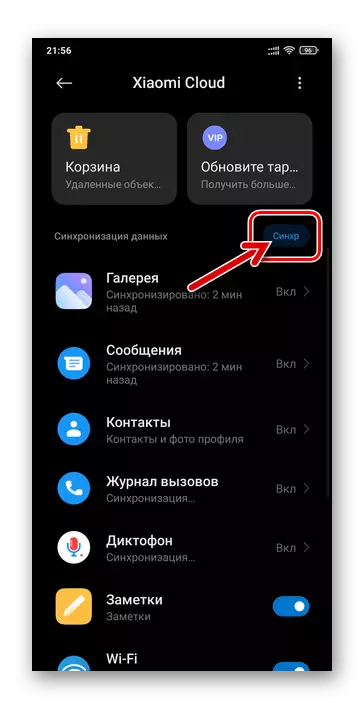
- To ensure the highest level of the relevance of the cloud formable and available for deploying on the device at any time backup of the data, enable the "Fast Sync" option.
- For compulsory copying in Micloud Parying on the smartphone and selected when executing items No. 3-4 of this instruction of objects, which can be relevant to the previously reset the device settings or the initiation of its flashing moment:
- Press the Sync button on the right side of the "Data Synchronization" header.
- Wait for the discharge of information - in the circle, the "Synchronized" will appear on the screen. After that, you can exit MIUI "settings" and implement the scheduled for the device (including assuming the removal of the above data from its memory) operations.


MIUI Desk, Applications and Settings
To get the opportunity to return the operating system on the Siaomi smartphone to the statute status-related status, you must back up the configurations of the settings of various software modules and functioning in the application environment. To implement such an operation in MIUUA, a special means is provided.
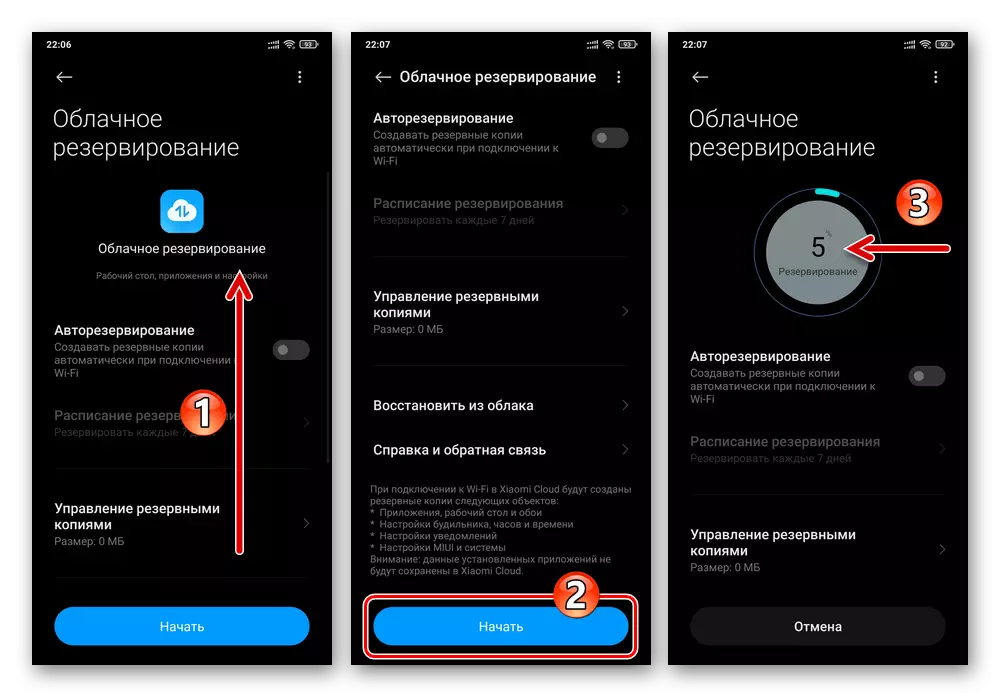
- On the smartphone, go along the path "Settings" - "Mi Account" - "Xiaomi Cloud". On the screening screen in the "Special Features" area, tap on the "Reservation" block.
- To immediately proceed to creating and unloading to the backups of the objects listed at the bottom of the operating screen, click on the "Start" button. As a result, the system will automatically hold an initiated operation.
- During the backup process, you can continue to use the phone to solve any other tasks. Control the process of copying data to the cloud. It is possible that returns to the "Cloud Reservation" screen by tap on the appropriate notification in the system curtain.
- When the backup creation is completed, the above notification will report that "backup is completed", and from the cloud reservation screen will be possible to make sure the effectiveness of the procedure is effective - go to "Backup Management", where new entry is now available.
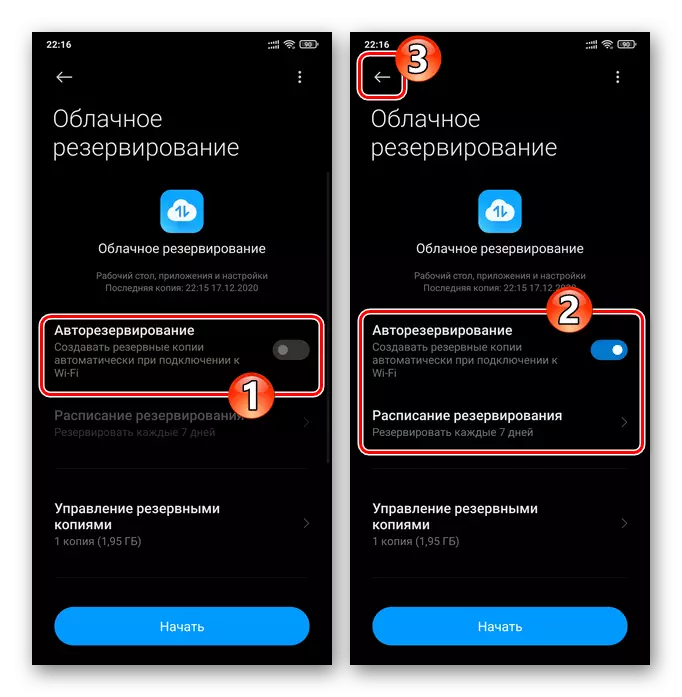
- Additionally, in order to ensure the continued availability of a more or less actual backup of the objects under consideration in Xiaomi Claud, activate the "Autores" option.


Method 2: Google Disc
In addition to the tools from Xiaomi, on all the manufacturer's smartphones to ensure the safety of information, by synchronization with the cloud, you can additionally or separately use the means developed by Google. The advantage of this approach is that the received backups can be deployed not only in the MIUI environment, but also in any other version of Android (for example, on a different smartphone or after switching to custom firmware). The condition for the effective implementation of the following instruction is the entrance to the Corporation "Corporation".
Read more: How to enter Google account on an Android smartphone

Synchronization and backup of data from Android-devices to the Google Cloudy Storage for a general case are described in detail in the material already published on our website and the material below. Next, briefly demonstrate the execution of the procedure for creating a backup type under the Xiaomi smartphone, given the features of the MIUI OS interface (12).
Read more: Synchronization with Google cloud and backup data on Android devices
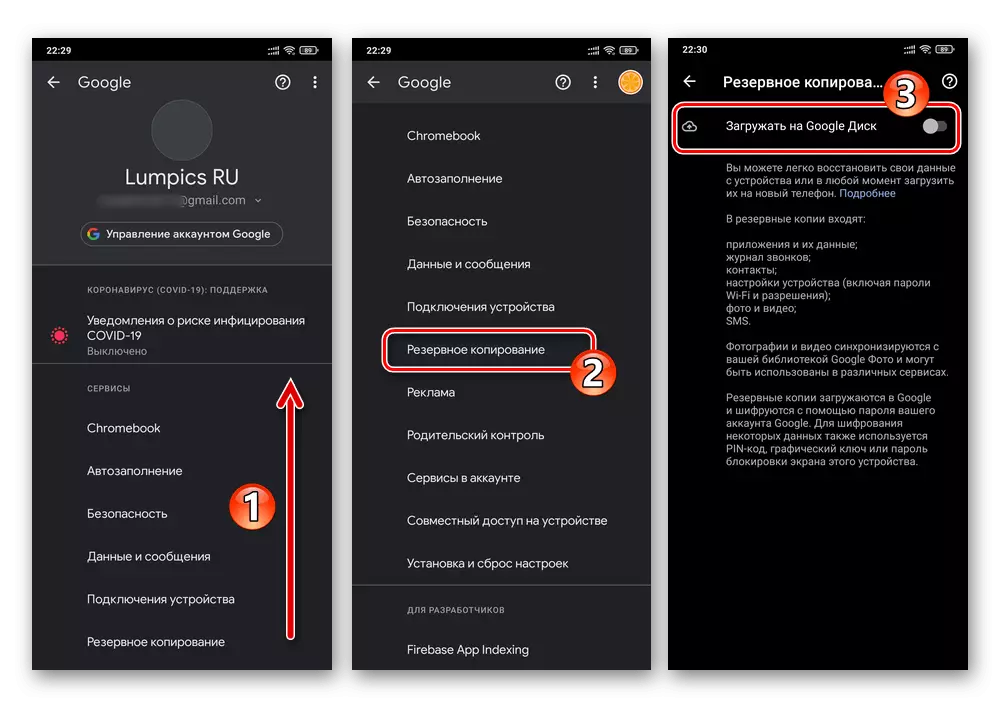
- Go to the "Settings" of the Miuai Os, scroll their list and open the "Google" section.
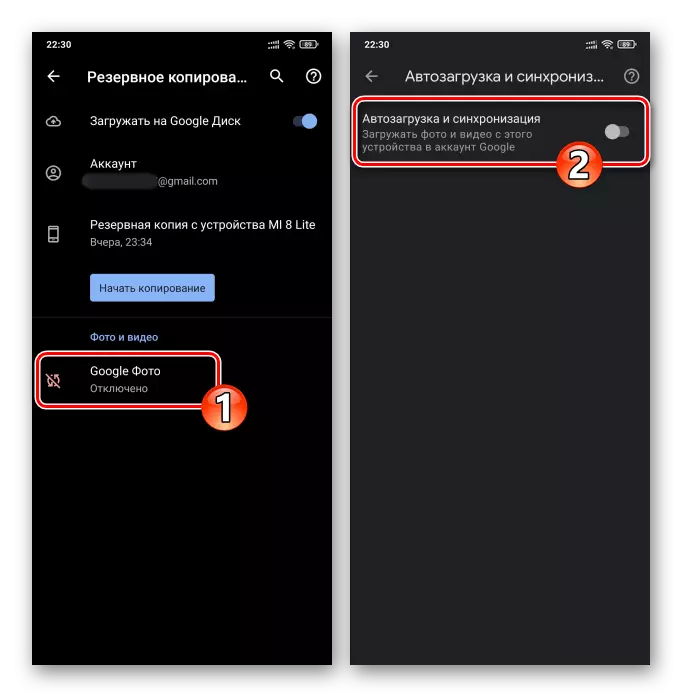
- In the list "Services" on the displayed screen, select "Backup". Activate the "Download on Google Disk" option.
- If you need to save in the cloud including those in the image and video device, and at the same time, the synchronization of these objects with the Google photo service was not involved:
- Tap "Google Photo", activate the "Auto load and synchronization" option.
Option 2: Physical media
The following approach to solving the task of receiving backup copies of information from Android devices Xiaomi involves the use of any device-drive data as a storage of backups. Such a storage can be installed in the smartphone memory card and / or disc available to you / laptop:
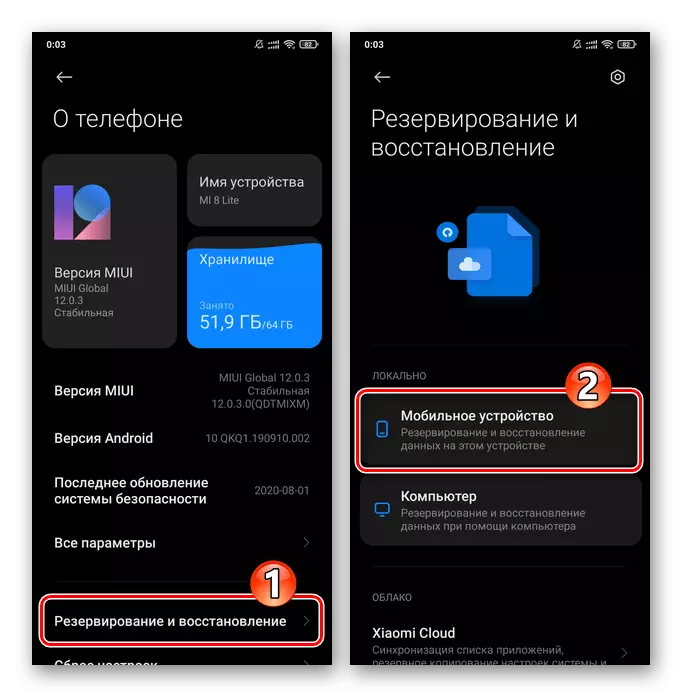
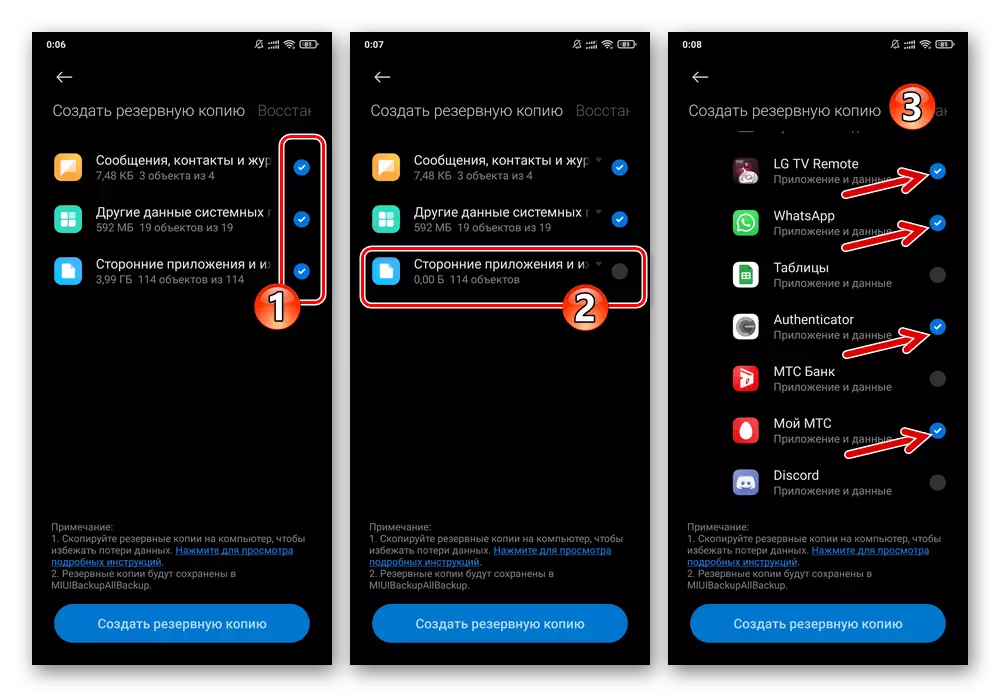
- Go to "Settings" OS, open the "On Phone" section.
- Click "Reservation and Restore", enter the screen unlock password. In the "locally" area that opened the screen, click Mobile Device.
- The starting tool provides the ability to select the types of information that is placed in a backup - Make it by installing / removing the checkboxes in checkboxes opposite the list displayed on the phone screen. Every category here can be deployed and configured individually, removing the marks near the data designations that you do not need.
- After completing the selection of information copied to "Archive", click on the "Create Backup" button. Please note (!) To the request received from the system and confirm it. Next, expect the completion of the reservation - during the procedure, you can continue to operate the smartphone in the usual mode.
- After receipt of the Notification "Reservation Completed", return if you moved to "create a backup" screen and click on the "Complete" button. On this, the direct formation of the backup of the previously selected data is completed, exit MIUI settings.
- The next step is to copy the received backup and, if necessary, not included in it files to external media. Here most users are available two main options:
- If a memory card is elected as a backup repository, install it in your smartphone and configure as a "removable drive" ("To transfer photos and other files").
Read more: Set up a memory card in Android

Open the "Explorer" preset, switch to the file system viewing mode, move to the "Internal Command".
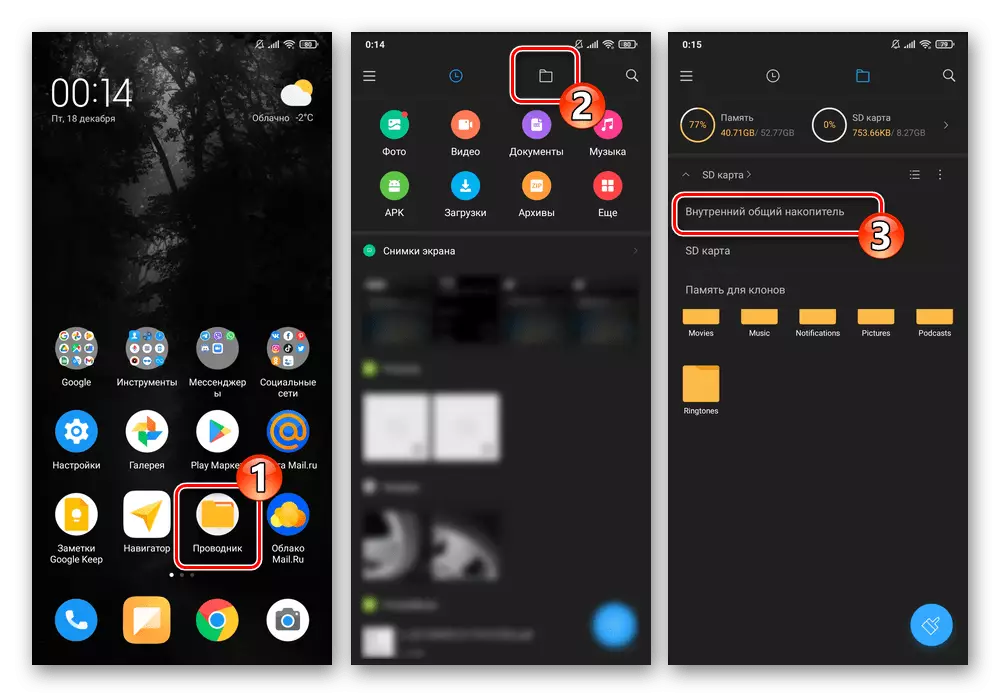
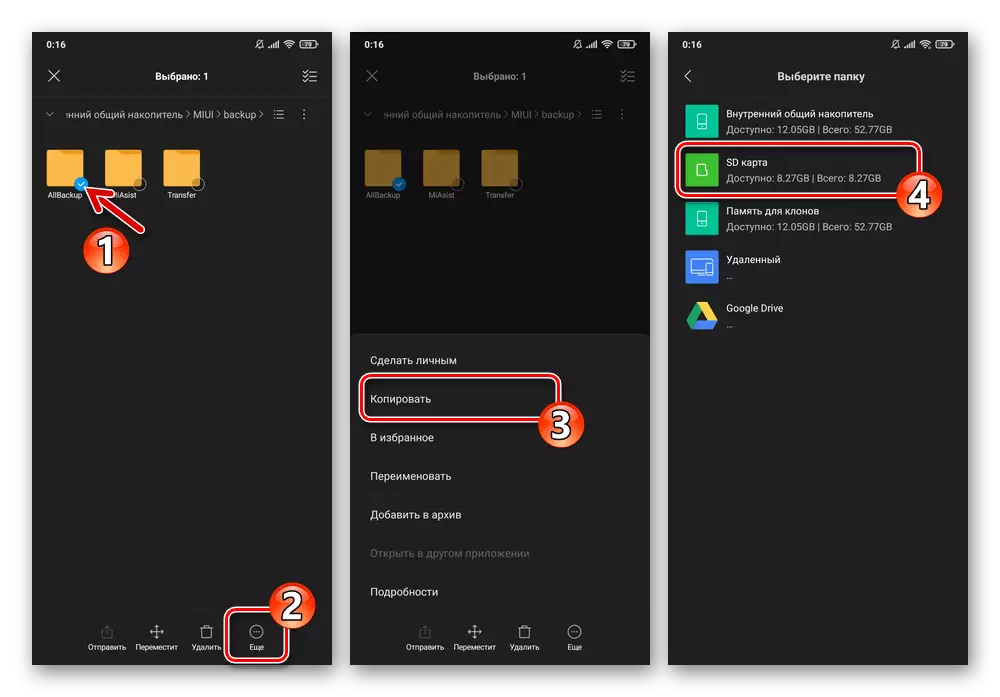
Go along the path "Miui" - "Backup", long-term by clicking on the name "ALLBACKUP" highlight it.

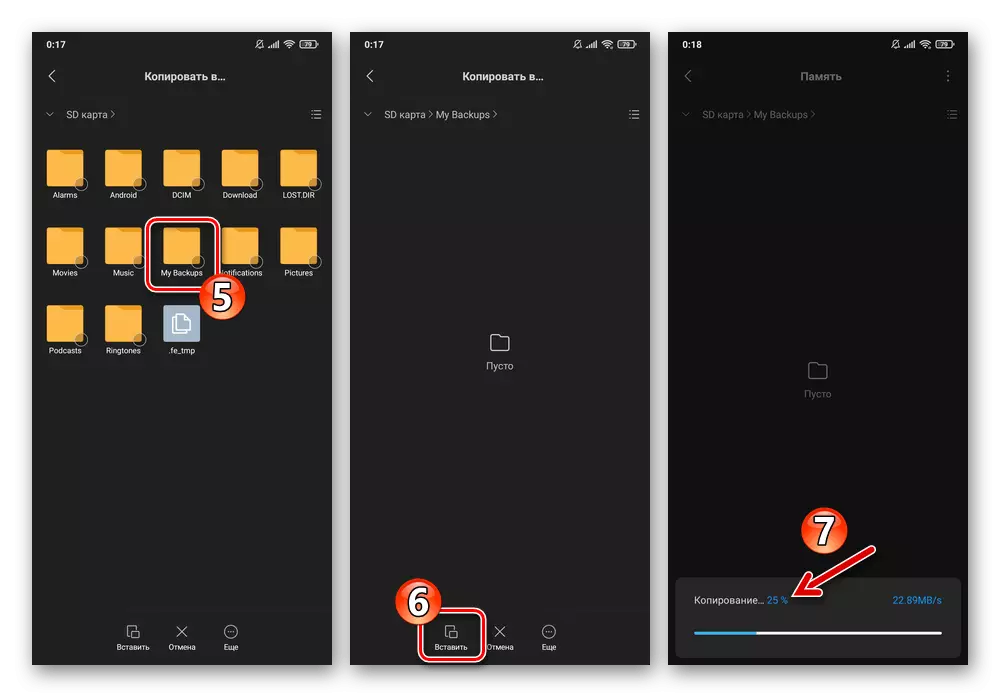
Tap "More" in the lower dock of the means of the conductor, then click "Copy" in the menu that appears. Next, open the "SD card" storage,
Go to the storage of backups directory (or create a new one), click "Paste" in the toolbar at the bottom of the screen.
Option 3: Windows PC
Very effective ways to create data backups from Android-devices memory becomes available when specialized Windows-software is activated - managers to work with smartphones. In the case of Xiaomi devices for backup and solving other tasks, it is recommended to use the MI PHONE ASSISTANT (MI PC Suite) manufacturer.
It should be noted that the official assemblies of the assistant background are supplied exclusively with Chinese localization, which makes them almost unsuitable for the operation of Russian-speaking users. However, there are translated modifications of the software under consideration - one of these solutions (version 4.0.529) will be involved in the following example and is available for downloading from the following link:
Download Mi Phone Assistant 4.0.529 (Russian-speaking interface)
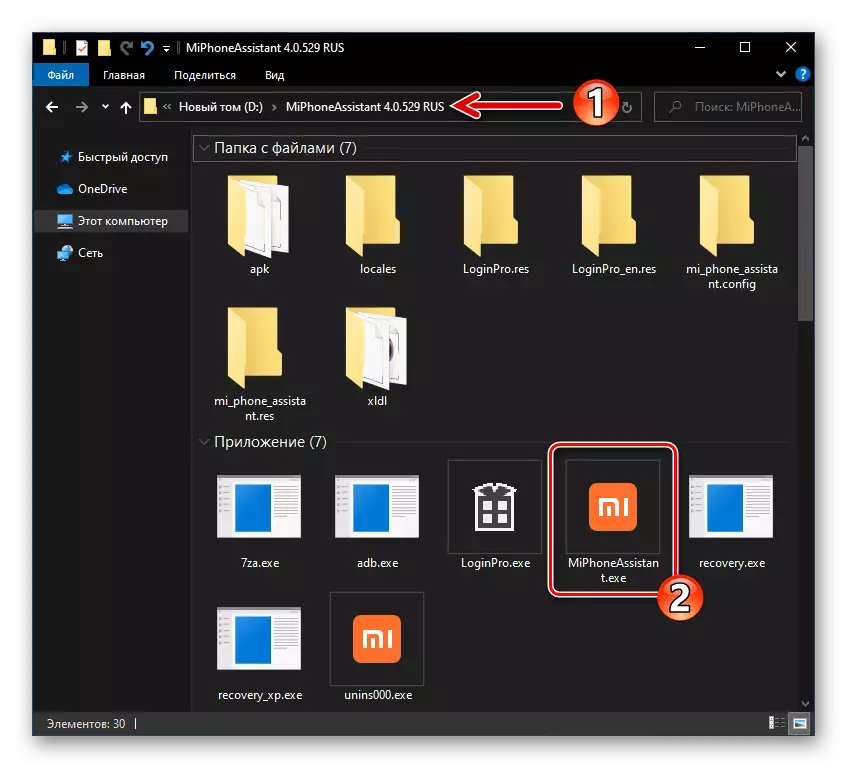
- Load the archive with the computer's disk and unpack it - so you prepare a manager to work with Xiaomi smartphones to launch.
- Go to the directorial directory resulting from the previous paragraph, open the file Miphoneassistant.exe..
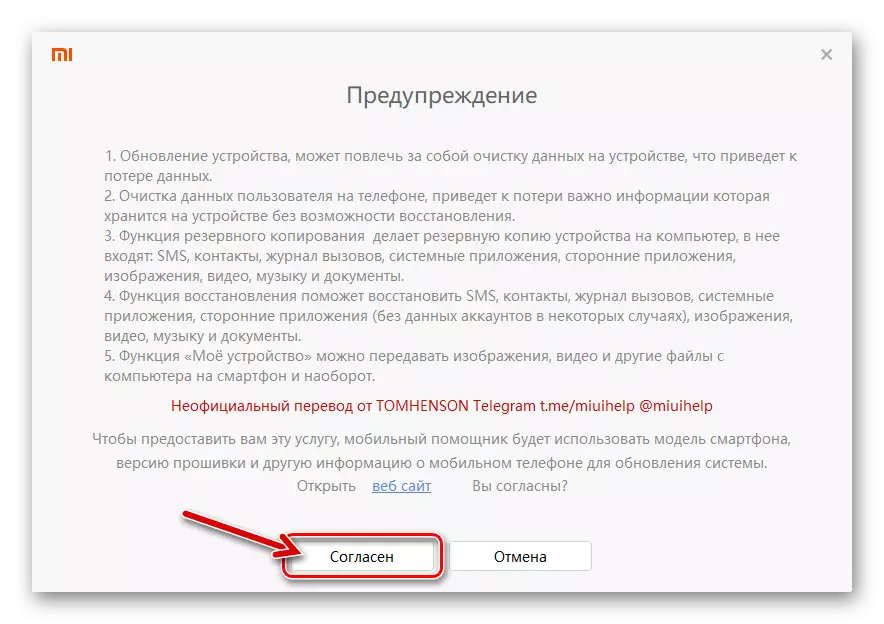
- Familiarize yourself with the text "Warnings" in the first after launching the program window, click on the "Agree" button to start working with a background as a assistant.
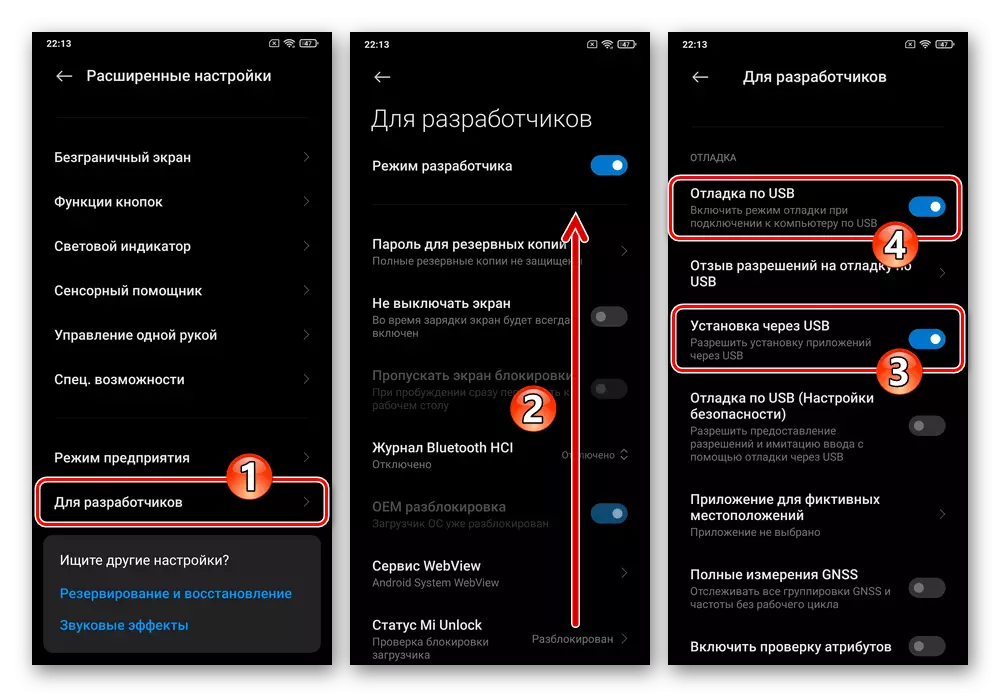
- On the smartphone, activate the "Debug on USB" and "Install via USB" options.
Read more: How to enable the USB Debug Mode on Xiaomi Smartphone
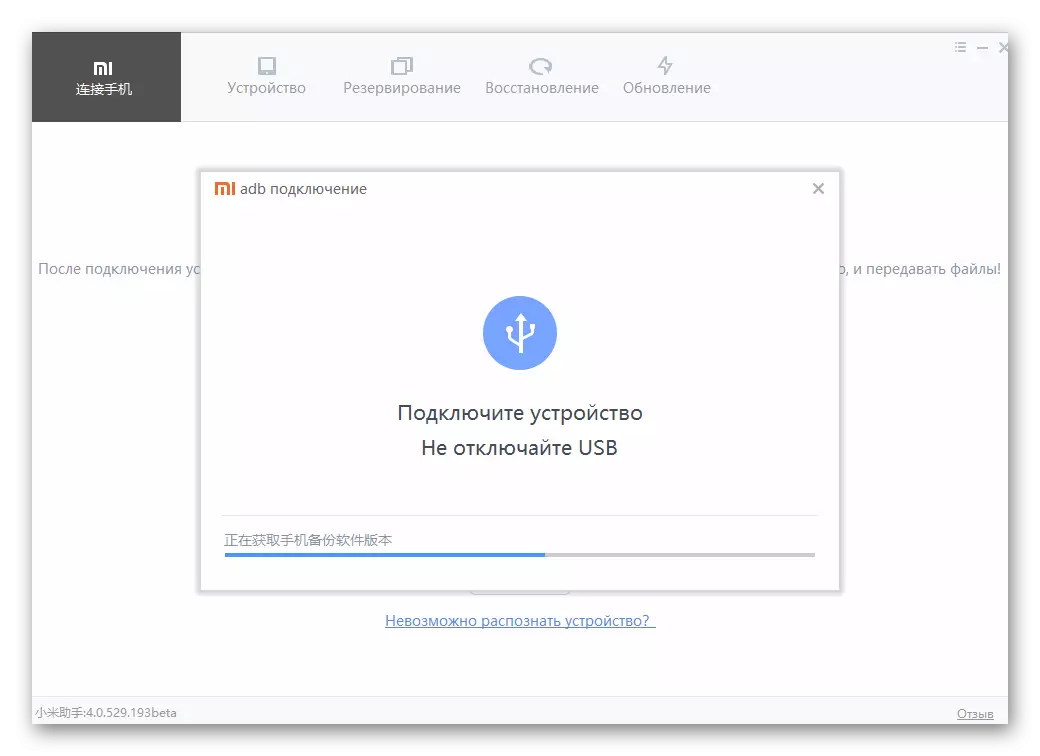
- Connect the mobile device to the USB port of the computer, click "Update" in the Manager window.
- Wait a bit until the Windows software define the connected phone and starts to integrate the Mitunes and the next operation of the Android application.
- Under the smartphone that appears on the screen, the requests alternately press: "Set", "Allow", "Agree".
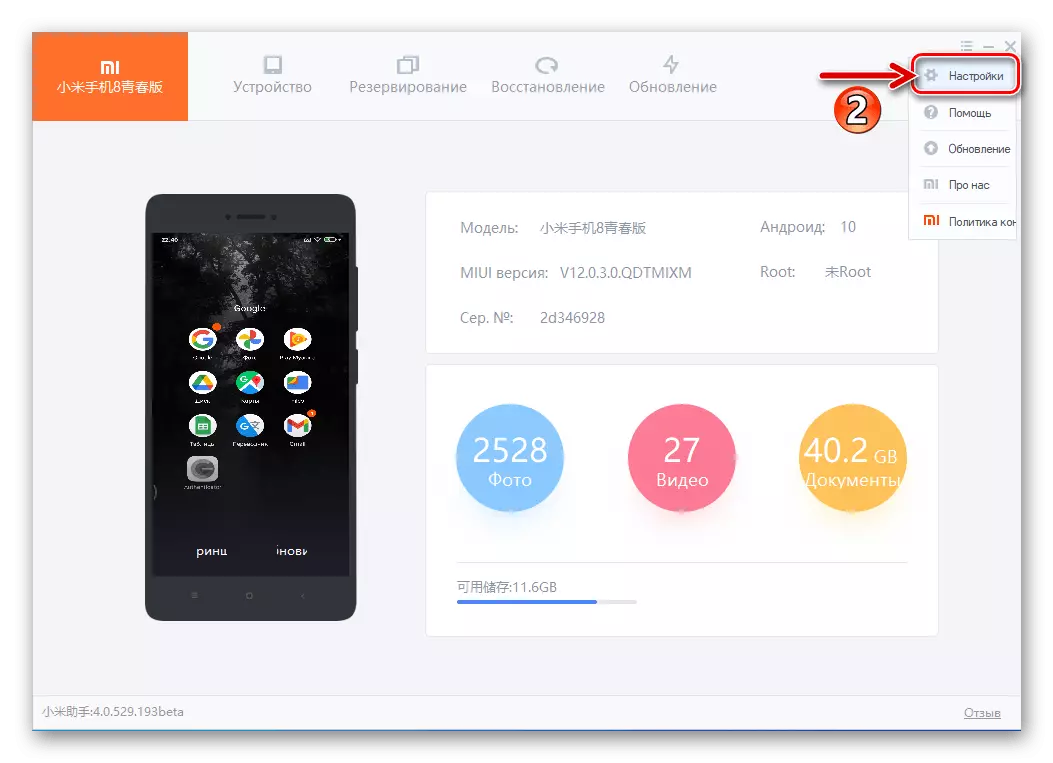
- After a successful pairing of a smartphone with Mi Phone Assistant, you need to determine the path on the PC disk, which will be saved in the following backup data backups:
- Click on three chests in the header of the program window on the right.

Go to "Settings" from the opened menu;
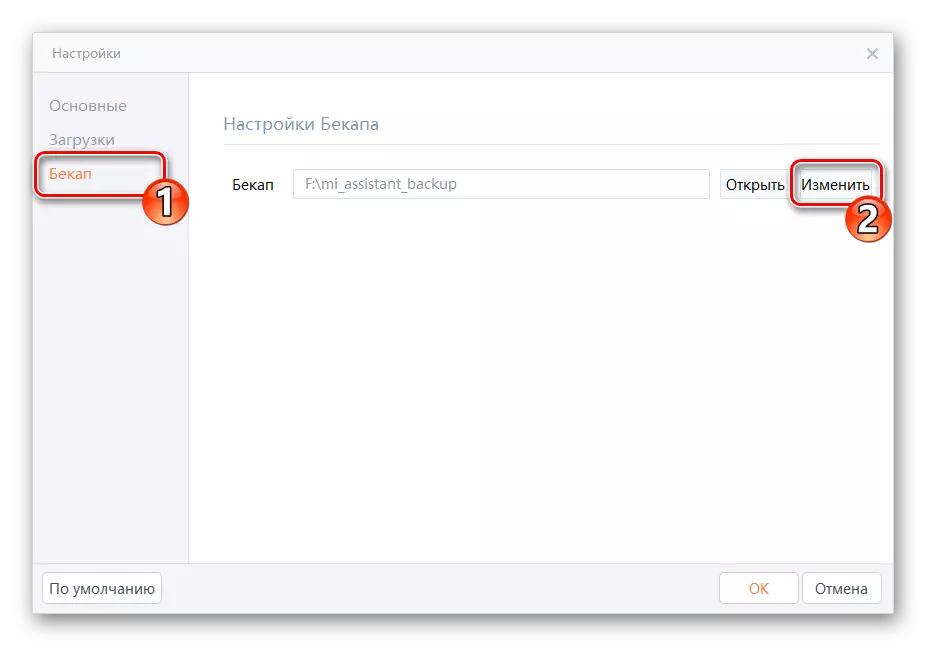
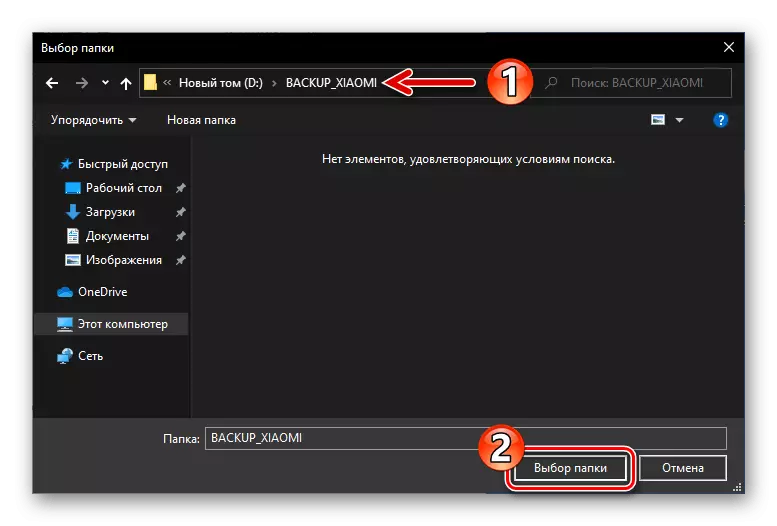
- From the list on the left of the "Settings" windows, move to the "Backup" section, then click the "Edit" button next to the field where the backup save path is specified.
- Open the directory where the information received in the future will be stored, click "Folder Selecting".
- Click "OK" in the Settings window to save the changes made to the Change Manager.

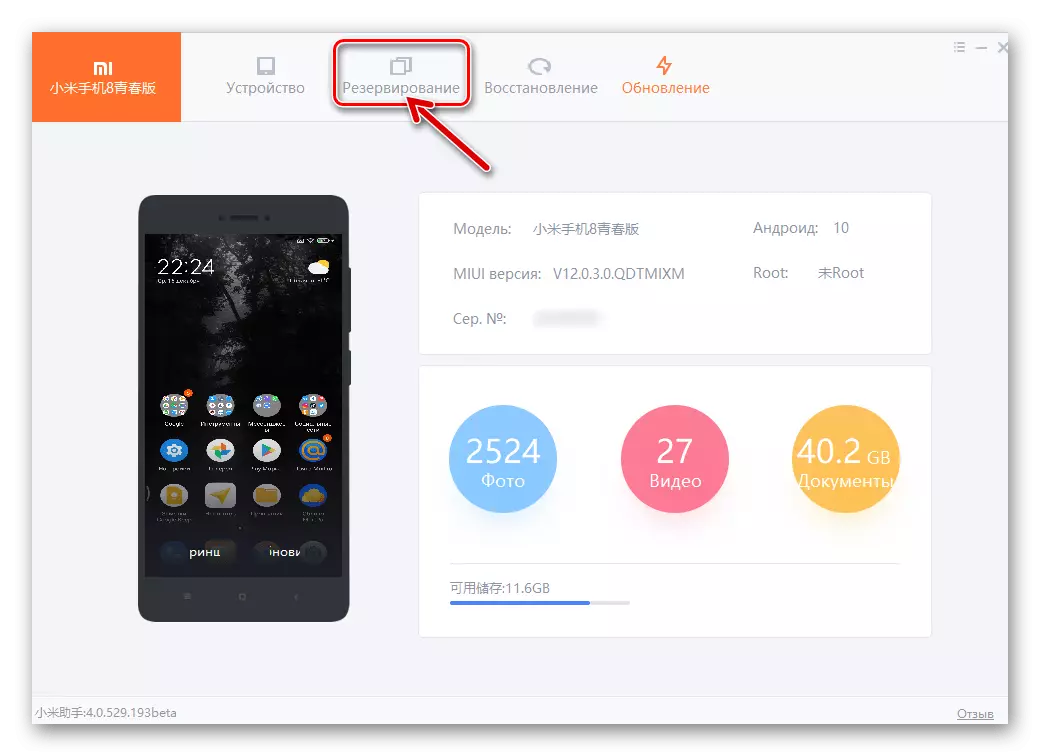
- Click on three chests in the header of the program window on the right.
- Click "Reservation" in the above window of the section panel program.
- Click on the New Backup button,

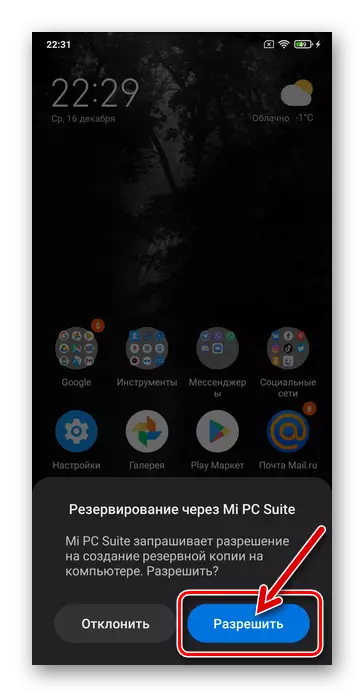
As a result, the "Reservation via MI PC Suite" request will be displayed on the smartphone - tap below it "Allow".
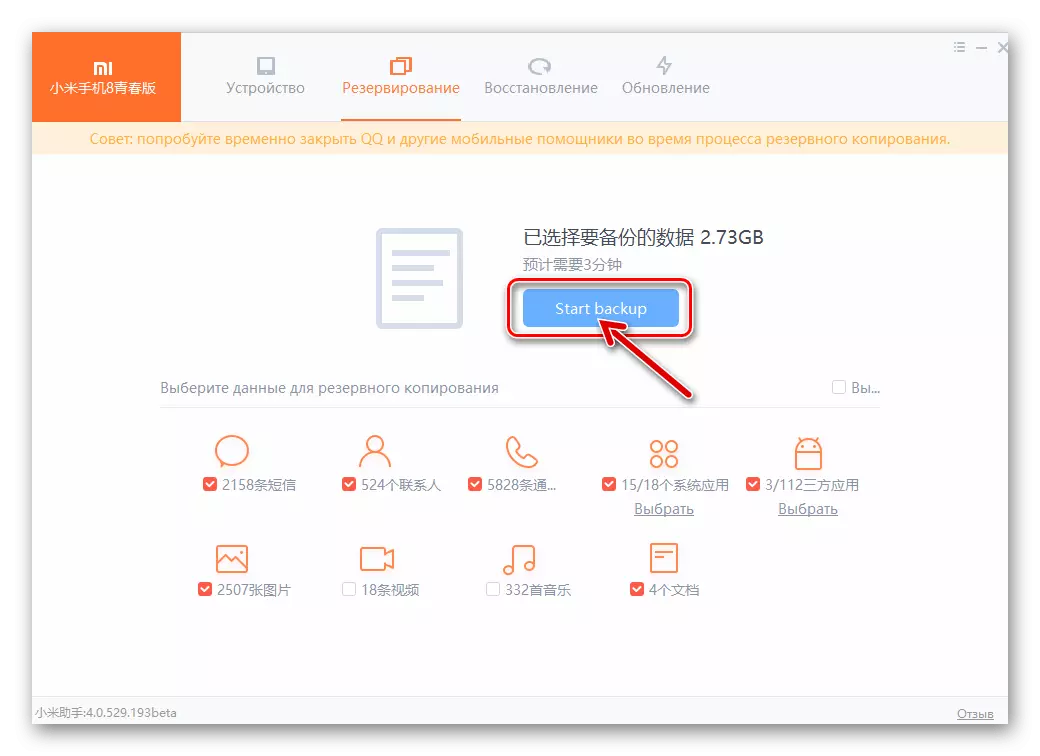
- Set checkboxes under the types of data indicated in the data backup icons. In order, these icons are interpreted as follows: "Messages", "Contacts", "Call Magazine", "System Applications", "Side Applications", "Photos", "Video", "Music", "Documents".
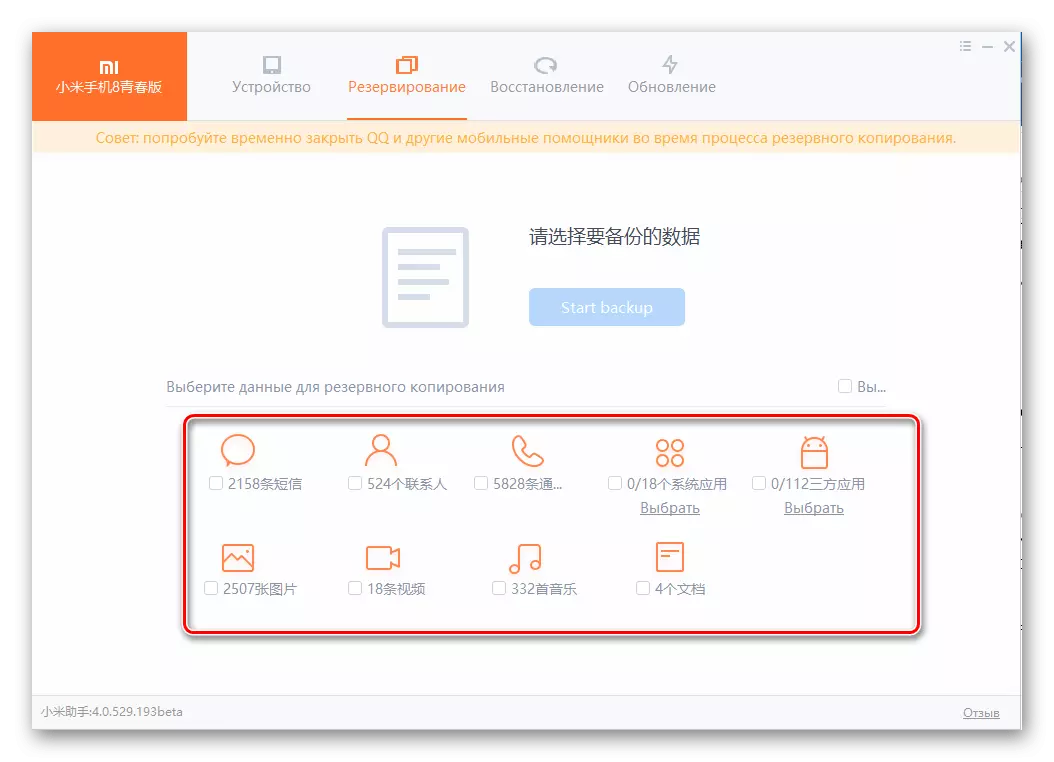
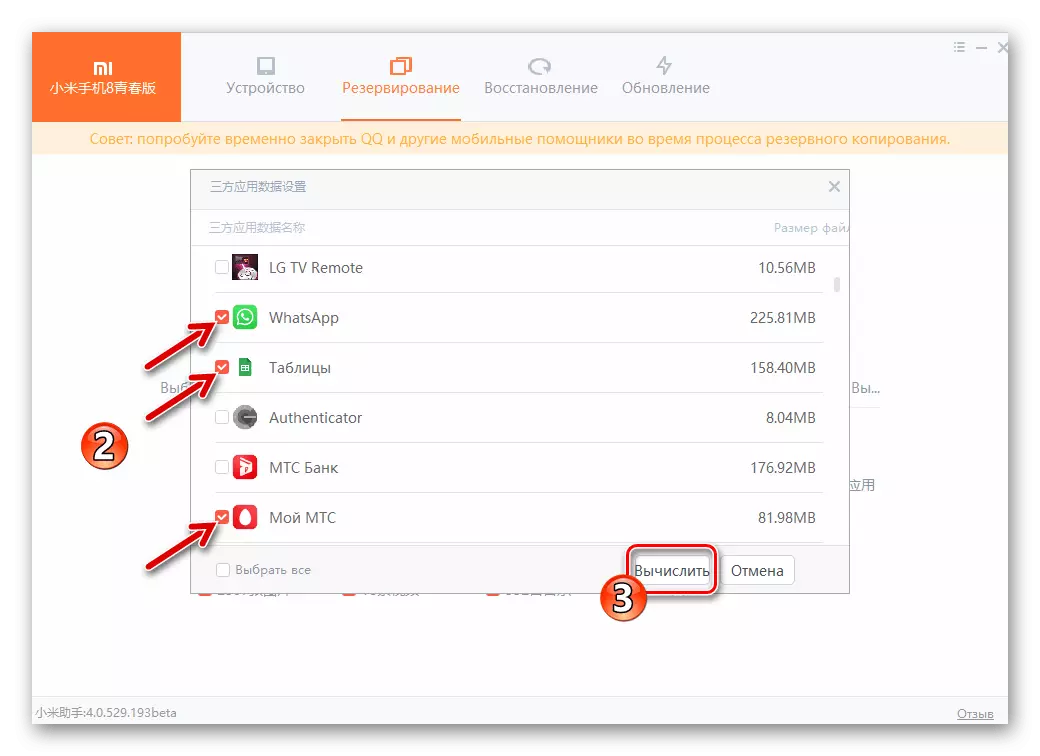
It should be noted that applications on the phone can be "backing" selectively. To do this, click "Choose" under the consulting icon,
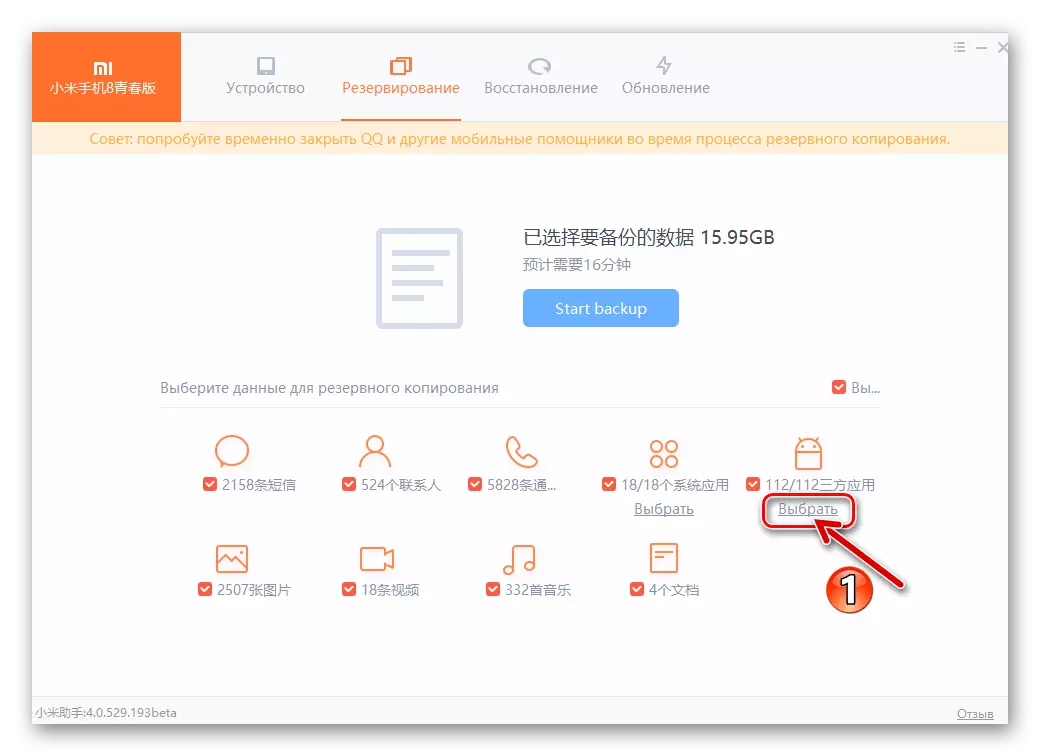
In the list that opens, tick the checkboxes only the software that you really need and then click "Calculate".
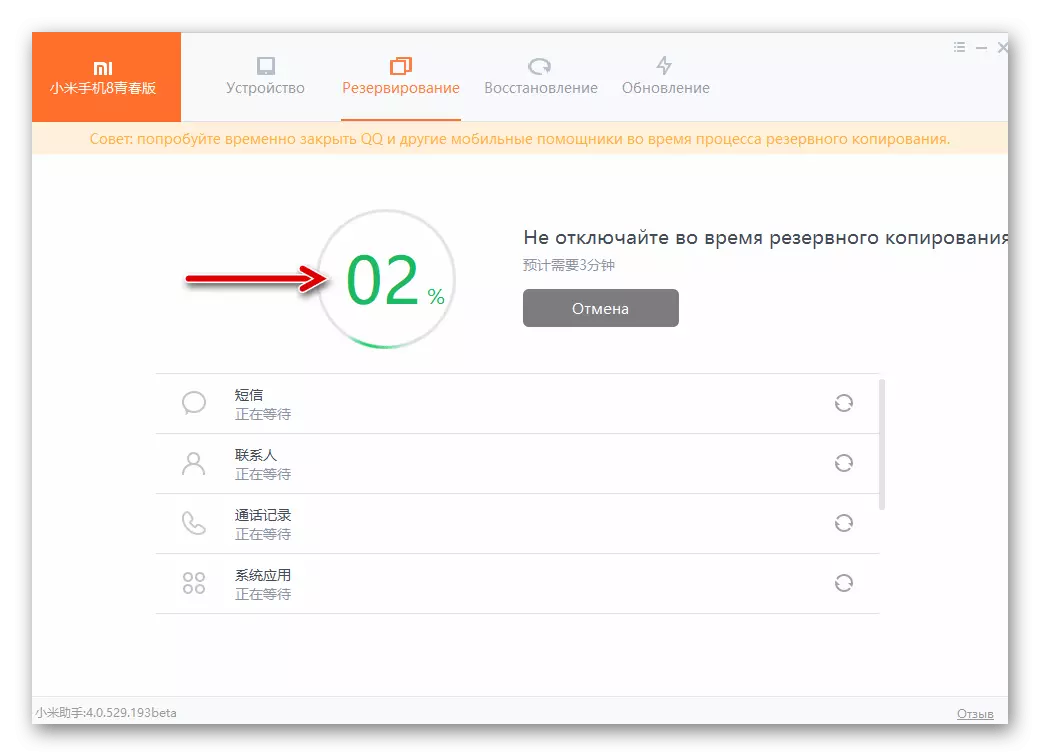
- After completing the selection of the information copied from the smartphone, click "Start Backup" in the MIPHONEASSISTANT window.
- Expect the backup procedure. The best solution will not be used in any way mobile device and computer in the process of work of the assistant.
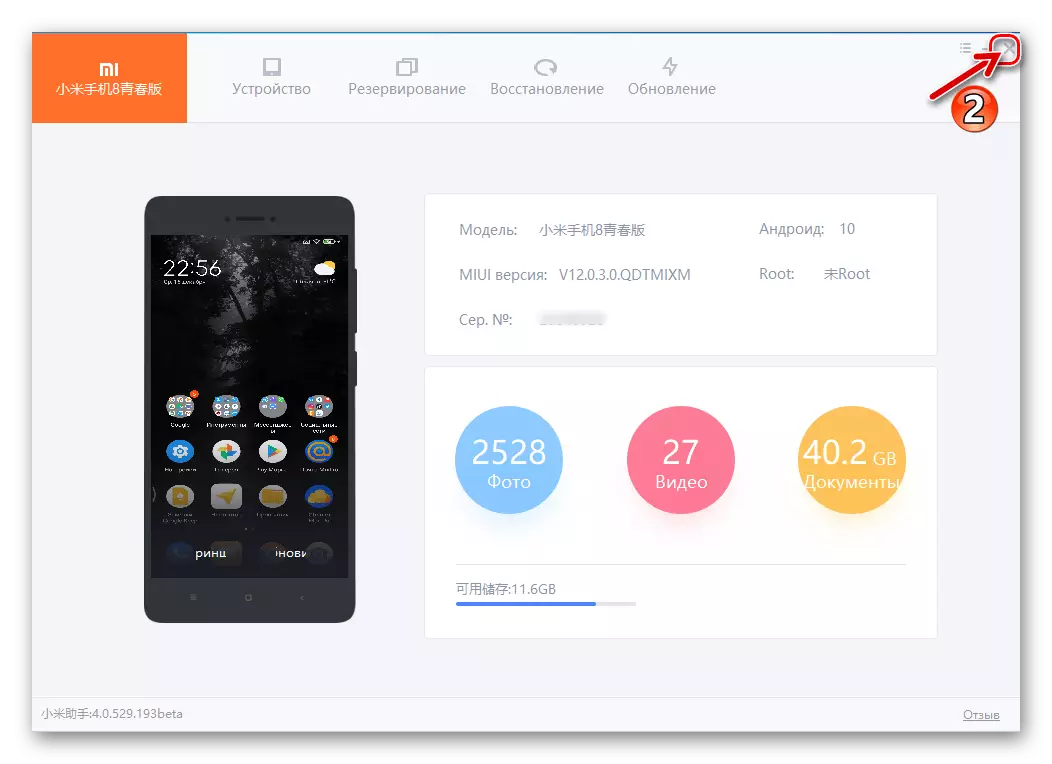
- After the program completes its work on the formation of a backup, a notification in the form of a green tick appears in its window. Click on the "Complete" button,
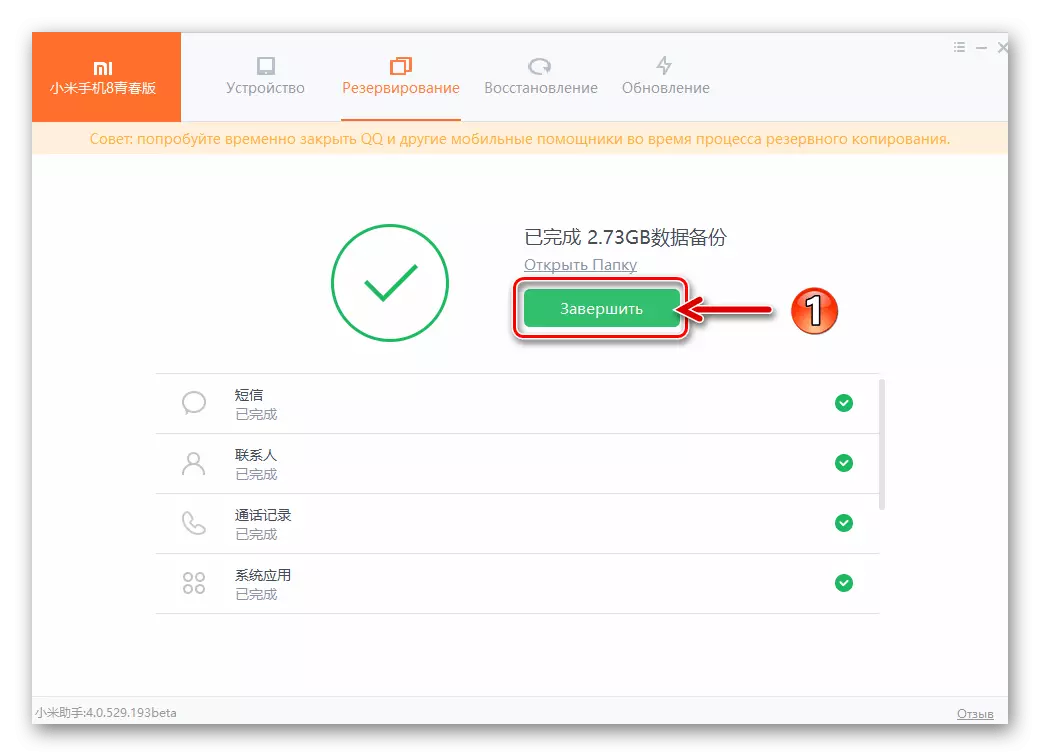
After that, you can disconnect the phone from the desktop and close the Mi Phone Assistant.
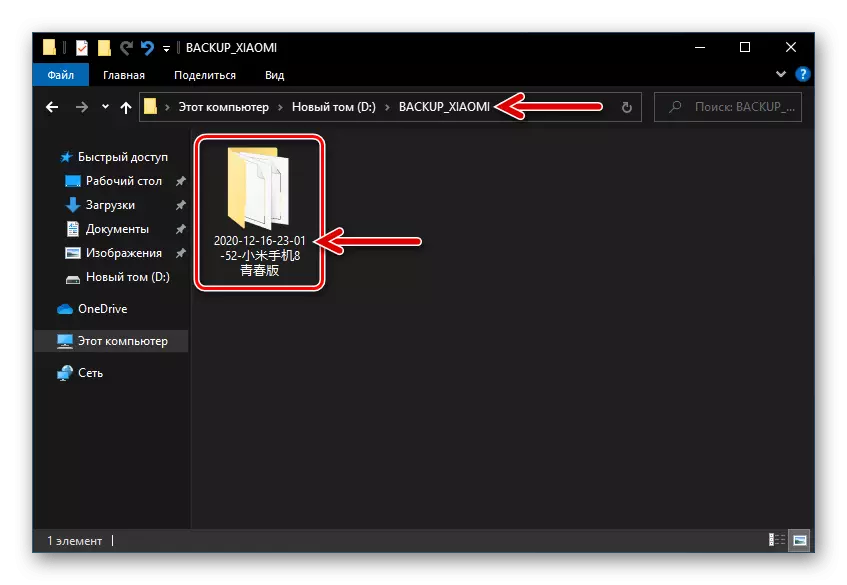
- To make sure the effectiveness of the operation performed, open the directory in Windows Explorer in the Windows Explorer, now it is in it containing backup copies of files from a smartphone folder.


- If a memory card is elected as a backup repository, install it in your smartphone and configure as a "removable drive" ("To transfer photos and other files").


- Tap "Google Photo", activate the "Auto load and synchronization" option.