Frequently, users face such a problem that when trying to copy some information from removable media an error appears. It indicates that the "disk is protected from recording." This message may appear when formatting, deleting or performing other operations. Accordingly, the flash drive is not formatted, is not overwritten and in general it turns out absolutely useless.
But there are several ways that allow you to solve this problem and unblock the drive. It is worth saying that on the Internet you can find more similar methods, but they will not work. We only took the methods proven in practice.
How to remove protection from writing from a flash drive
To disable protection, you can use the standard Windows operating system tools or special programs. If you have another OS, better go to a friend with Windows and do this operation. As for special programs, it is known, almost every company has its own software. Many specialized utilities allow you to format, restore the flash drive and remove protection from it.Method 1: Physical Disable Protection
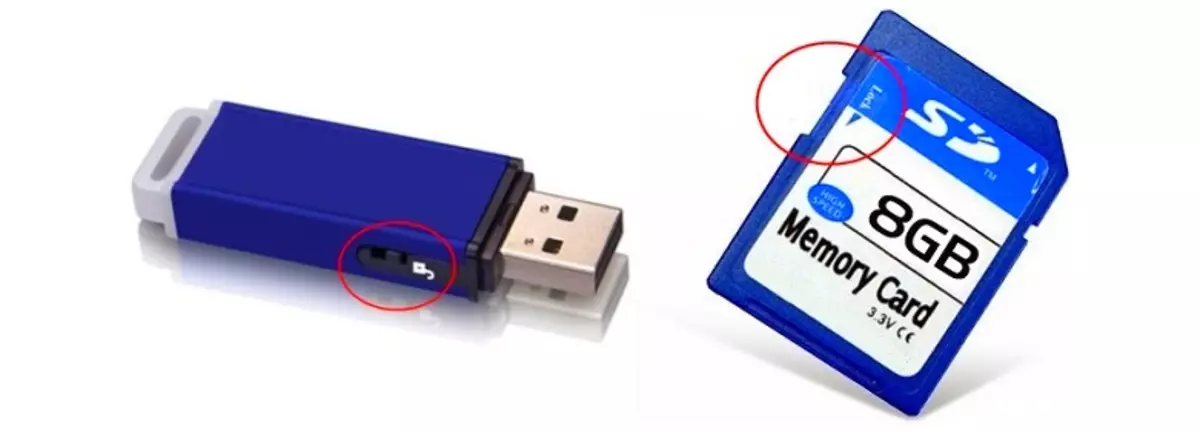
The fact is that on some removable media there is a physical switch that is responsible for recording protection. If you put it in the "Enabled" position, it turns out that no file will be deleted or recorded by the drive itself is virtually useless. The contents of the flash drive can only be viewed, but not edit. Therefore, first check if this switch is not enabled.
Method 2: Special programs
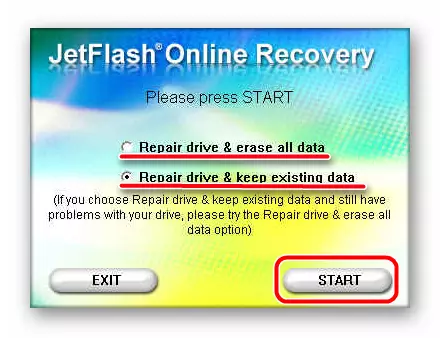
In this section, we will consider the branded software that manufactures the manufacturer and with which you can remove the protection from the recording. For example, for Transcend there is a branded program Jetflash Online Recovery. You can read more about it in the article on the restoration of the drives of this company (method 2).
Lesson: How to restore the transcend flash drive
After downloading and running this program, select the option "Repair Drive and Keep All Data" and click on the "Start" button. After that, there will be a recovery of removable media.
As for A-DATA flash drives, the optimal option will be using USB Flash Drive Online Recovery. It is written in more detail in the lesson about the devices of this company.
Lesson: Restoring flash drives A-DATA
For Verbatim, also exists its own software for formatting disks. Read this in the article to restore USB drives.
Lesson: How to restore Verbatim flash drive
SanDisk has SanDisk RescuePro, also branded software that allows you to restore removable media.
Lesson: Restoring flash drives SanDisk
As for Silicon Power devices, there is a Silicon Power Recover Tool. In the lesson in the formatting of technology of this company in the first method, the process of using this program is described.
Lesson: How to restore the Silicon Power flash drive
Kingston users will best use Kingston Format Utility. In the lesson about the carriers of this company, it is also described how to format the device with a standard Windows tool (method 6).
Lesson: Restoring flash drives Kingston
Try to use one of the specialized utilities. If there is no firm that you use the drives, find the desired program using the FlashBoot IFLASH service. How to do this is also described in the lesson on working with Kingston devices (method 5).
Method 3: Use the Windows Command Line
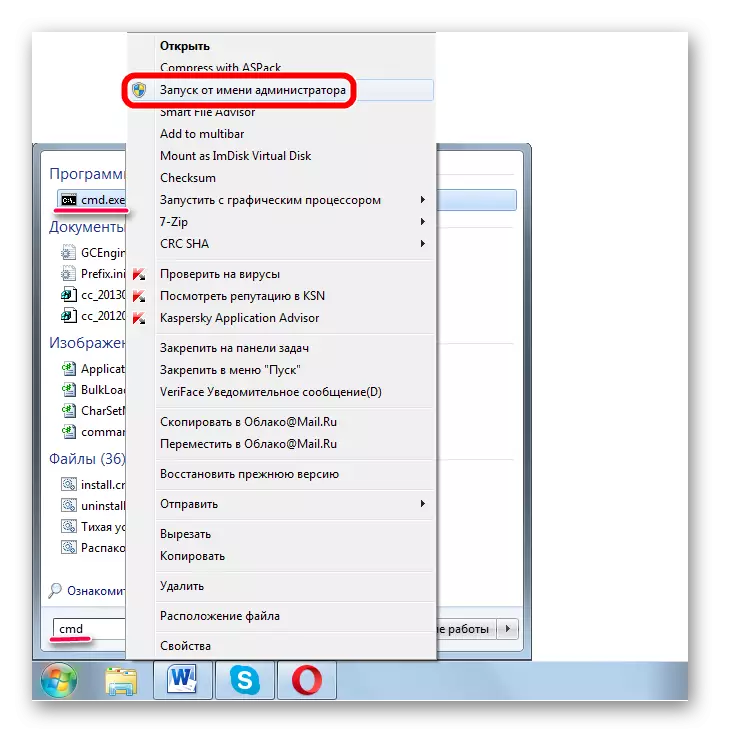
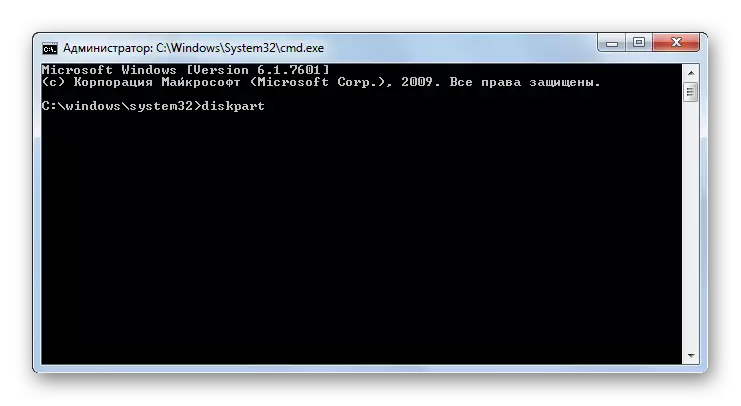
- Run the command line. In Windows 7, this is done by searching in the "Start" menu of the program with the name "CMD" and launch it on the name of the administrator. To do this, click on the program found right-click and select the appropriate item. In Windows 8 and 10, you just need to press the Win and X key simultaneously.
- Enter the word diskpart on the command prompt. It can be copied directly from here. Press ENTER on the keyboard. The same thing will have to do after entering each next command.
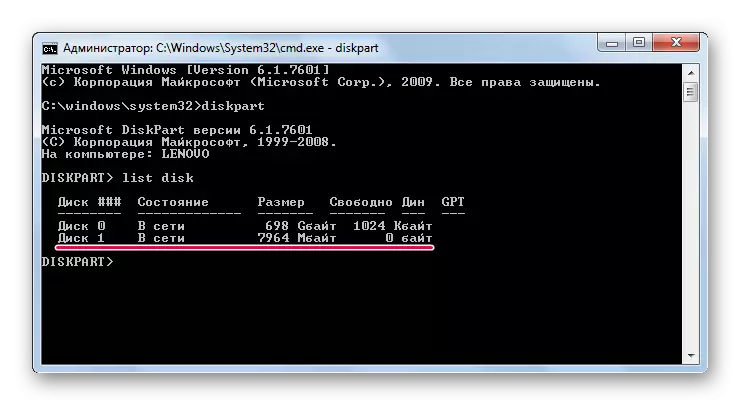
- After that, write List Disk to see the list of available disks. A list of all storage devices connected to a computer will be displayed. You need to remember the number of the inserted flash drive. You can find it in size. In our example, the removable media is indicated as "disk 1", since the disk 0 size is 698 GB (this is a hard disk).
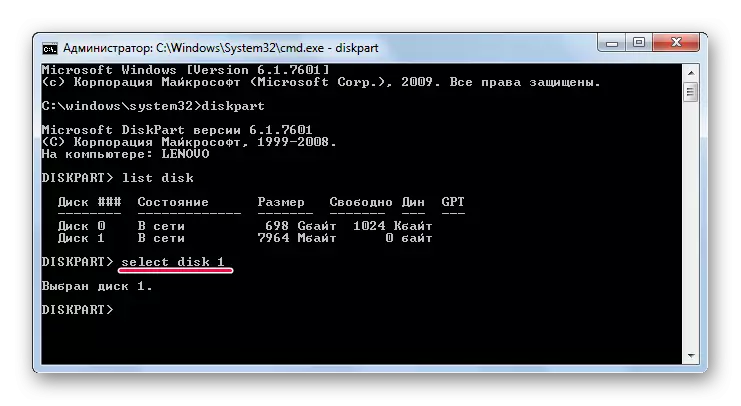
- Further select the desired medium using the SELECT DISK [Number] command. In our example, as we talked above, number 1, so you need to enter SELECT DISK 1.
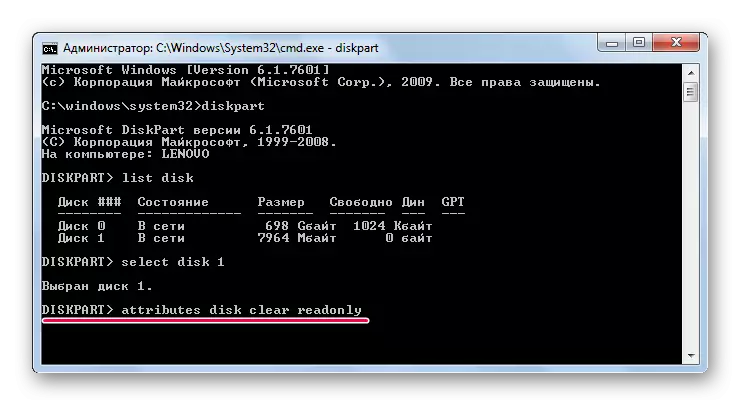
- At the end, enter the ATTRIBUTES DISK Clear Readonly command, wait for the protection process to end and enter EXIT.
Method 4: Registry Editor
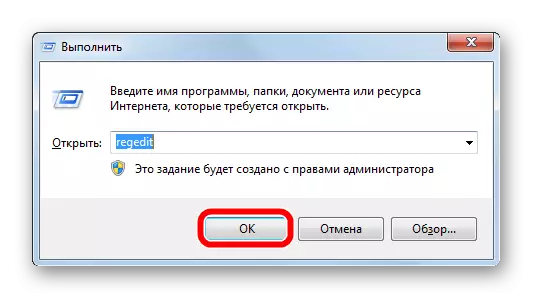
- Run this service by entering the "Regedit" command entered in the program startup window. To open it, press the Win and R keys simultaneously. Next click on the "OK" button or ENTER on the keyboard.
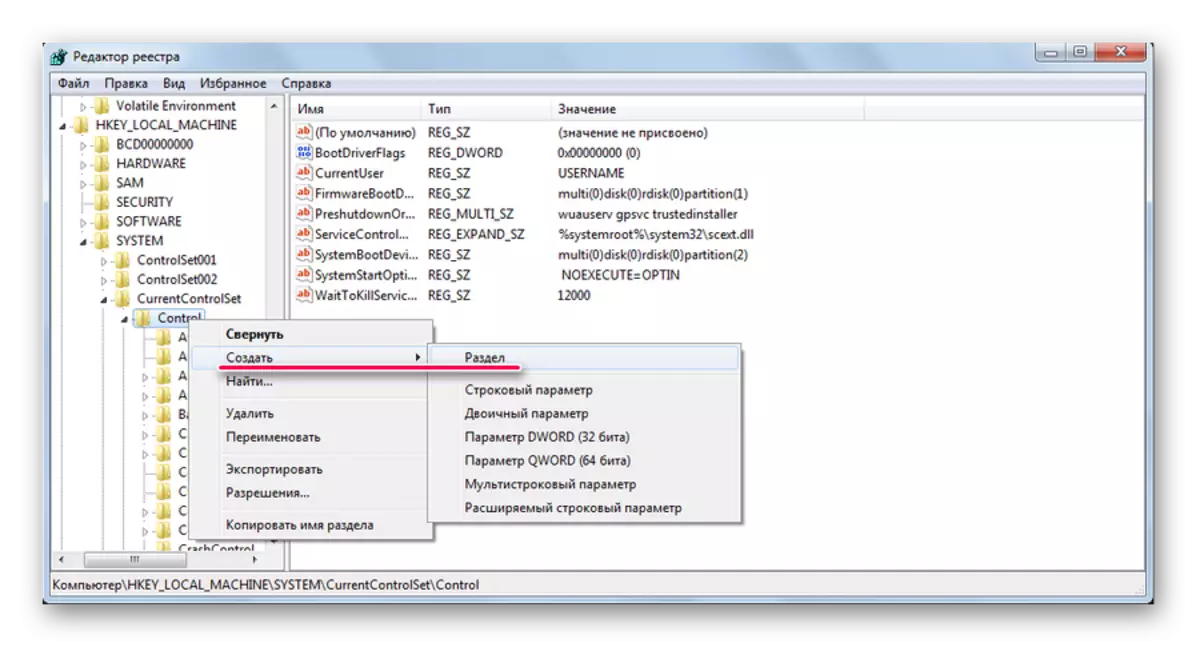
- After that, using the sections tree, pass in stages on the next way:
HKEY_LOCAL_MACHINE / SYSTEM / CURRENTCONTROLSET / CONTROL
On the last click right-click and select the "Create" item in the drop-down list, and then "section".
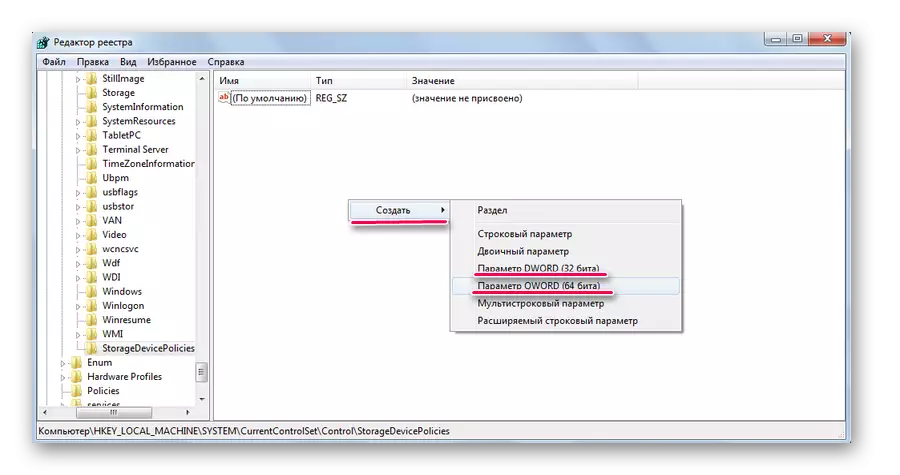
- In the title of the new section, specify "StorageDevicePolicies". Open it and in the right field, right-click. In the drop-down menu, select "Create" and the "DWORD parameter (32 bits" item or "QWORD parameter (64 bits)" depending on the system's bit.
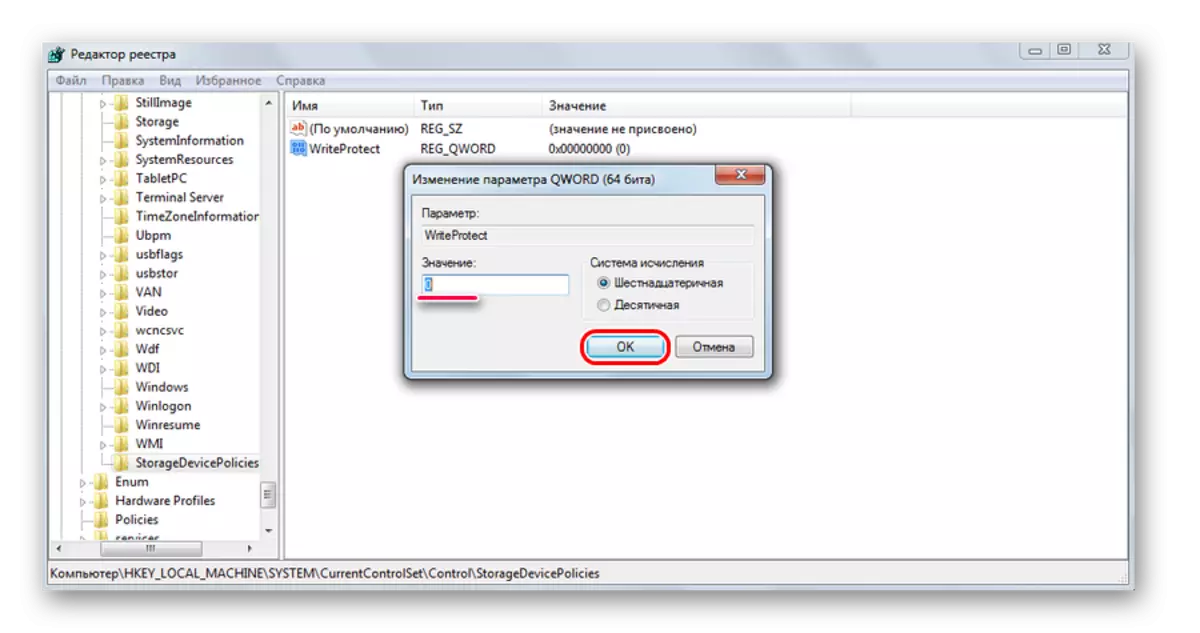
- In the title of the new parameter, enter "WriteProtect". Check that its value is equal to 0. To do this, click on the left mouse button twice and left 0. Press "OK".
- If this folder was initially in the "Control" folder and it immediately had a parameter with the name "WriteProtect", simply open it and enter a value of 0. This should be checked initially.
- Further reboot the computer and try to use your flash drive again. Most likely, she will work as before. If not, go to the next way.
Method 5: Local Group Policy Editor
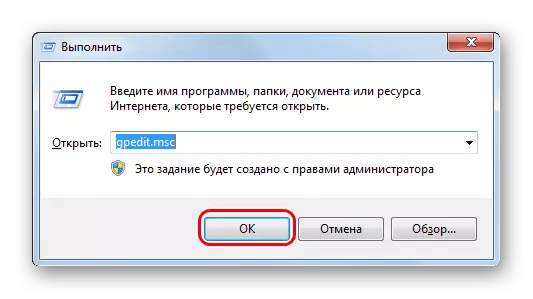
Using the program launch window, run "gpedit.msc". To do this, enter the appropriate command to the only field and click the OK button.
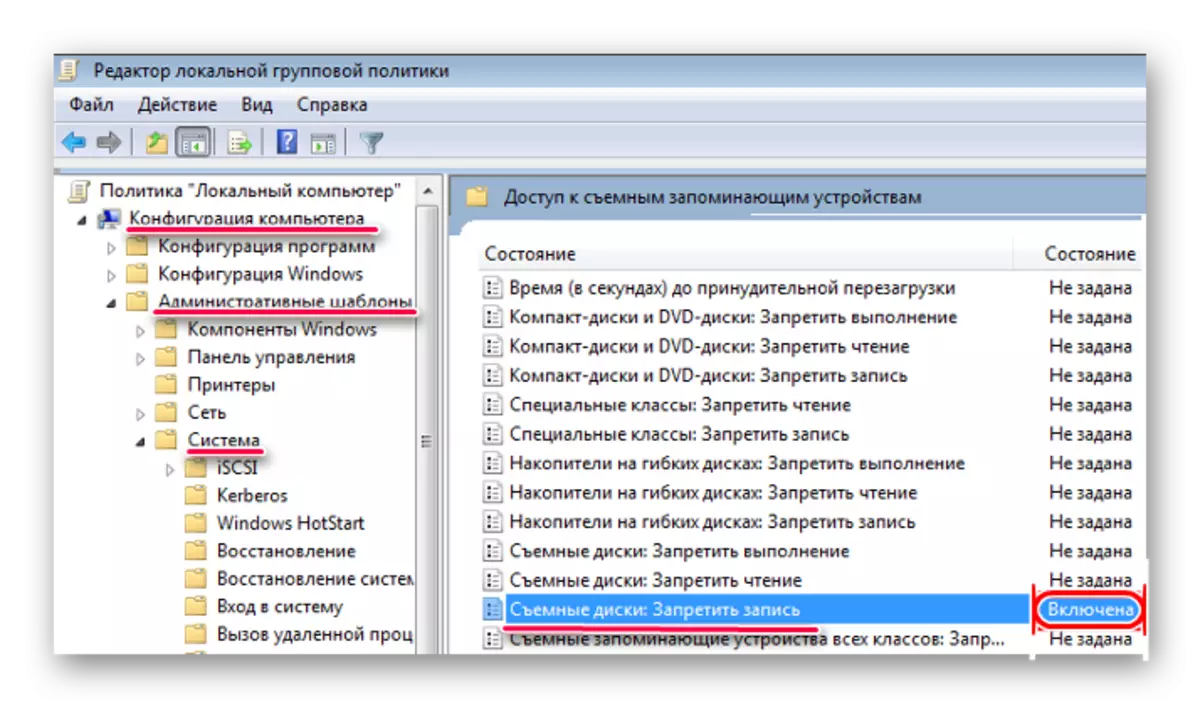
Further, step by step on the next way:
Computer Configuration / Administrative Templates / System
It is done in the left pane. Find the parameter called "Removable Discs: Prohibit Record". Click on it with the left mouse button twice.
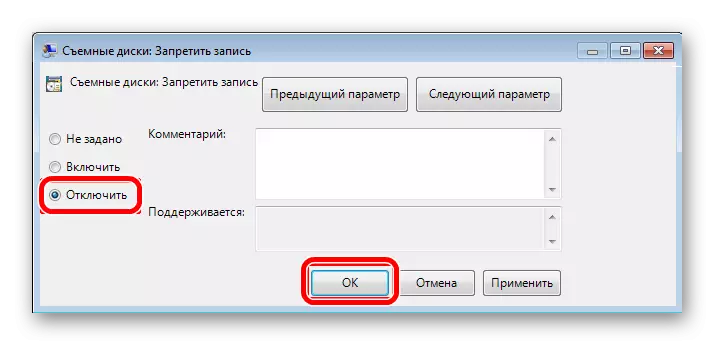
In the window that opens, check the mark in front of the "Disable" item. Click "OK" at the bottom, exit the Group Policy Editor.
Restart your computer and try to use your removable media again.
One of these ways should accurately help restore the working capacity of the flash drive. If still does not help anything, although it is unlikely, you will have to buy a new removable medium.
