

In some cases, users have the need to record any file in ISO format. In general, this is a disk image format that is written to ordinary DVD Dawks. But in some cases it is necessary to record data in such a USB drive format. And then you have to use some unusual methods that we will talk about.
How to burn an image on a flash drive
Usually, ISO format stored images of operating systems. And the flash drive on which this very image is stored is called the boot. From it later and the installation of the OS. There are special programs that allow you to create a boot drive. You can read this in more detail in our lesson.Lesson: How to create a bootable flash drive on windows
But in this case, we are dealing with another situation when the ISO format does not store the operating system, but some other information. Then you have to use the same programs as in the lesson above, but with some adjustments, or in general other utilities. We will analyze the three ways to perform the task.
Method 1: Ultraiso
This program is most often used to work with ISO. And to burn an image to a removable information medium, perform such simple instructions:
- Run Ultraiso (if you do not have such a utility, download and install it). Further, select the "File" menu and in the drop-down menu, click on the Open item.
- A standard file selection dialog will appear. Specify where the desired image is located, and click on it. After that, ISO will appear in the left pane of the program.
- The above actions led to the fact that the necessary information is listed in Ultraiso. Now it is actually necessary to transfer to the USB flash drive. To do this, select the "Summary" menu at the top of the program window. In the drop-down list, click on the item "Write an image of a hard disk ...".
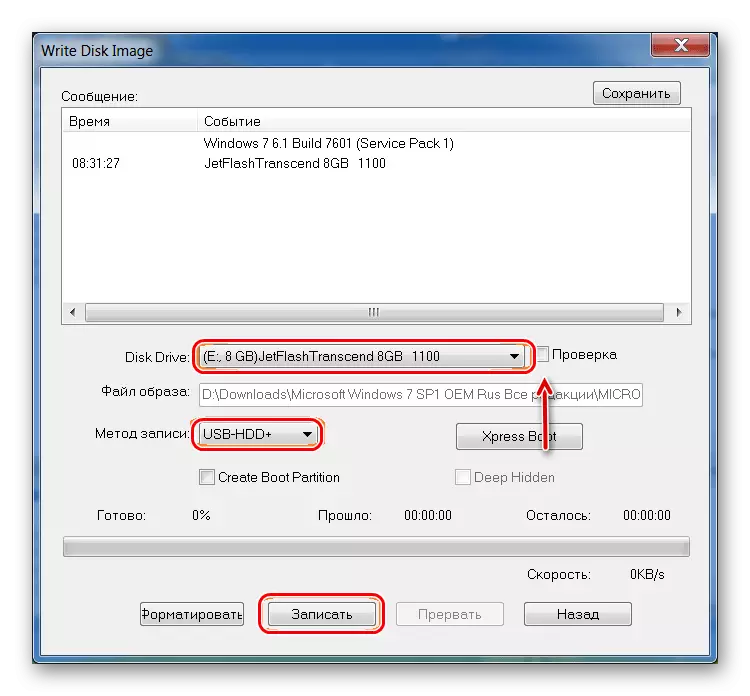
- Now choose where the selected information will be entered. In the usual case, we select the drive and write the image to the DVD. But we need to put it on a flash drive, so in the field near the inscription "Disk Drive" will choose your flash drive. Optionally, you can put a mark near the checkpoint. In the field near the inscription "Record Method" select "USB HDD". Although you can optionally choose another option, it is not fundamentally. And if you understand the recording methods, as they say, cards in hand. After that, click on the "Write" button.
- A warning will appear that all data from the selected media will be erased. Unfortunately, we have no other option, so click "Yes" to continue.
- The recording process begins. Wait for his end.


As you can see, the whole difference between the ISO image transfer process to the disk and the USB flash drive using Ultraiso is that different media are indicated.
See also: How to return deleted files from a flash drive
Method 2: ISO to USB
ISO to USB is a unique specialized utility that performs one single task. It is to record images for removable media. In this case, as part of the implementation of this task, it has quite wide. So the user has the ability to specify a new drive name and format it to another file system.
Download ISO to USB program
To use ISO to USB, do the following:
- Click the "Browse" button to select the source file. A standard window will open in which it will also be necessary to indicate where the image is located.
- In the "USB Drive" block, in the DRIVE subsection, you will choose your flash drive. You can find it on the letter assigned to her. If your media is not displayed in the program, click the "Refresh" button and try again. And if it does not help, restart the program.
- Optionally, you can change the file system in the File System field. Then the drive will be formatted. Also, if necessary, you can change the name of the USB media, to do this enter a new name in the field under the inscription "Volume Label".
- Click the "Burn" button to start recording.
- Wait until this process is completed. Immediately after that, the flash drive can be used.

See also: What if the drive is not formatted
Method 3: WinsetUpFromusB
This is a specialized program designed to create loading media. But sometimes it copes well with other ISO images, and not just with those on which the operating system is recorded. Immediately it is worth saying that this method is quite adventurous and it is quite possible that it will not work in your case. But trying exactly.
In this case, the use of WinsetupFromusB is as follows:
- First select the desired medium in the field under the inscription "USB DISK SELECTION AND FORMAT". The principle is the same as in the program above.
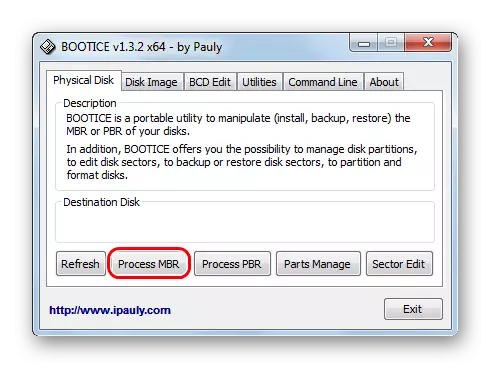
- Continue Create the boot sector. Without this, all information will be contained on a flash drive as an image (that is, it will simply be an ISO file), and not as a full-fledged disk. To execute this task, click on the Bootice button.
- In the window that opens, click on the "Process MBR" button.
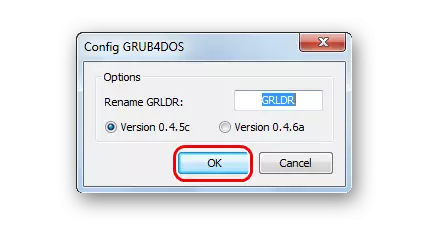
- Next, put the mark near the "Grub4dos ..." paragraph. Click on the "Install / Config" button.
- After that, simply click on the "Save to Disk" button. The process of creating the boot sector will begin.
- Wait until it is over, then open the Bootice startup window (it is shown in the photo below). Click on the "Process PBR" button.
- In the next window, select the option "Grub4dos ..." again and click the "Install / Config" button.
- Then just click "OK", without changing anything.
- Close Bootice. And now the most interesting. This program, as we talked above, is intended to create bootable flash drives. And usually further specifies the type of operating system, which will be recorded on removable media. But in this case, we are not dealing with the OS, but with the usual ISO file. Therefore, at this stage, we, as it were, try to deceive the program. Try to put a tick opposite the system that you already use. Then press the button in the form of a three-way and in the window that opens select the desired record image. If it does not work, try other options (checkboxes).
- Next click "GO" and wait until the recording is over. It is convenient that in WinsetUpFromUSB you can clearly see this process.


One of these methods should accurately work and in your case. Write in the comments on how you managed to use the above instructions. If you have any problems, we will try to help you.