

Any user will not give up the presence of a good multi-load flash drive, which could provide all the distributions you need. Modern software allows you to store several images of operating systems and useful programs on a single bootable USB carrier.
How to create a multi-load flash drive
To create a multi-load flash drive, you will need:- USB drive, a volume of at least 8 GB (preferably, but not necessarily);
- A program that will create such a drive;
- Images of distributions of operating systems;
- A set of useful programs: Antiviruses, diagnostic utilities, backup tools (also desirable, but optionally).
ISO images of Windows and Linux operating systems can be prepared and open with Alcohol 120%, Ultraiso or CloneCD utilities. Information on how to create an ISO into alcohol, read in our lesson.
Lesson: How to create a virtual disk in Alcohol 120%
Before you start working with the Software below, insert your USB drive into a computer.
Method 1: RmpRepusb
To create a multi-load flash drive, it will be needed in addition to the Easy2Boot archive. It contains the necessary file structure for recording.
Download Easy2Boot program
- If the RMPRepusB program is not installed on the computer, then install it. It is free and can be downloaded on the official website or as part of the archive with another WinsetupFromusB utility. Install the RMPRepusB utility by performing all the steps in this case. At the end of the installation, the program will suggest run it.
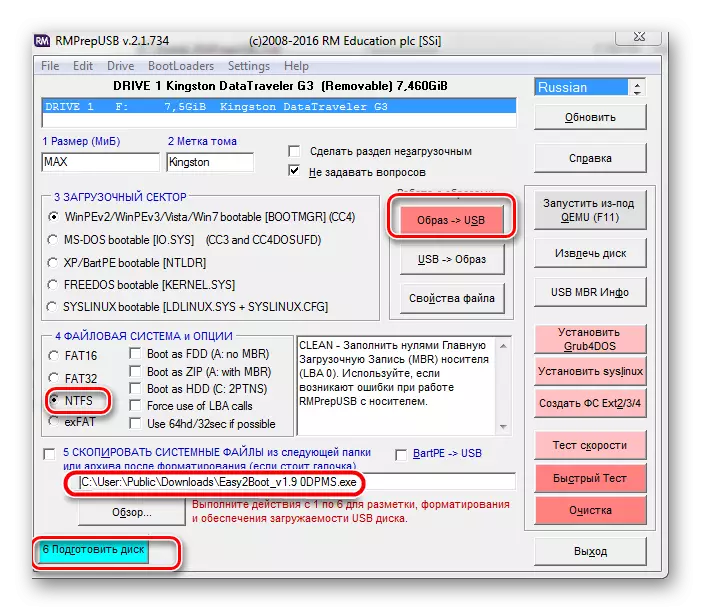
A multifunctional window appears with the program. For further work, you need to properly install all the switches and fill in all fields:
- Install the checkbox opposite the field "Not to ask questions";
- In the "Working with Images" menu, select the "Image -> USB" mode;
- When selecting a file system, check the NTFS system;
- In the bottom field, press the "Overview" key and select the path to the loaded Easy2Boot utility.
Further simply click on the "Prepare Disk" item.
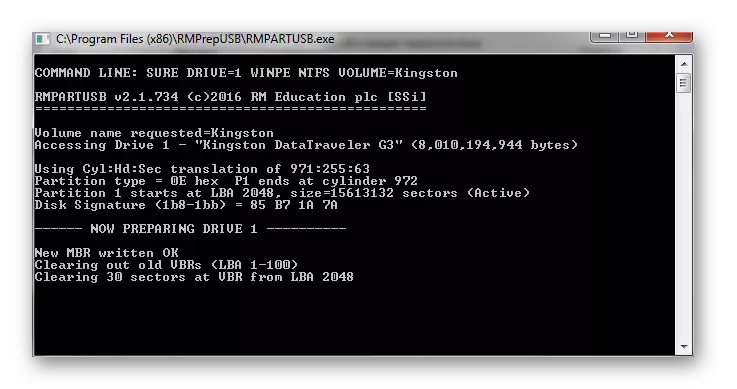
- A window appears showing the process of preparing the flash drive.
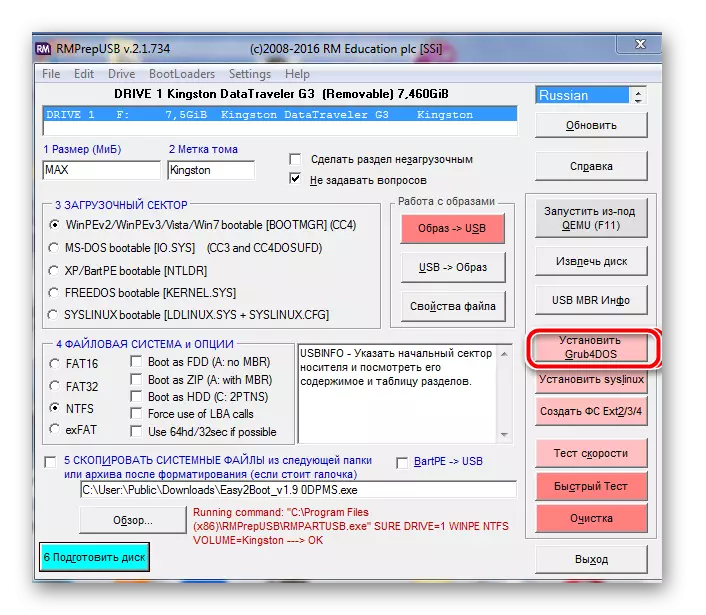
- Upon completion, click on the Install Grub4DOS button.
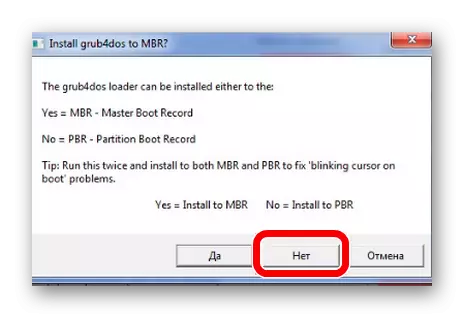
- In the window that appears, click No.
- Go to the USB flash drive and write down the prepared ISO images into the appropriate folders:
- For Windows 7 in the "_iso \ windows \ win7" folder;
- For Windows 8 to the "_ISO \ Windows \ Win8" folder;
- For Windows 10 in "_iso \ windows \ win10".
Upon completion of the entry, press the "Ctrl" and "F2" key simultaneously.
- Wait for a message about the successful file entry. Your multi-load flash drive is ready!
You can check its performance using the RMPRepusB emulator. To start it, press the "F11" key.
See also: How to create a bootable flash drive on windows
Method 2: Bootice
This is a multifunction utility, the main task of which is to create bootable flash drives.
You can download Bootice with WinsetUpfromusB. Only in the main menu will need to click on the button "Bootice".
Using this utility is as follows:
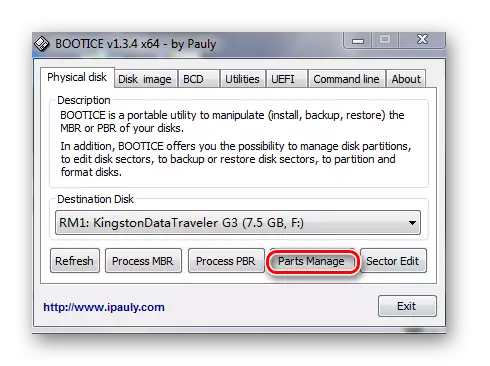
- Run the program. A multifunction window appears. Check that the default in the "Destination Disk" field is the necessary flash drive.
- Press the "PARTS MANAGE" button.
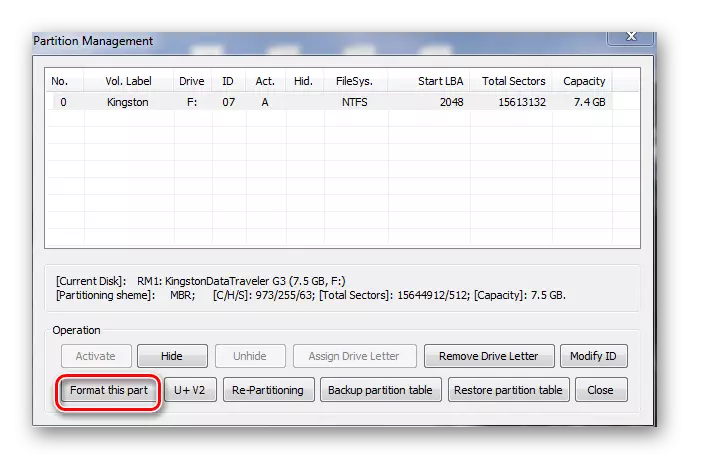
- Next, check that the "ACTIVATE" button is not active, as shown in the photo below. Select the "Format This Part" item.
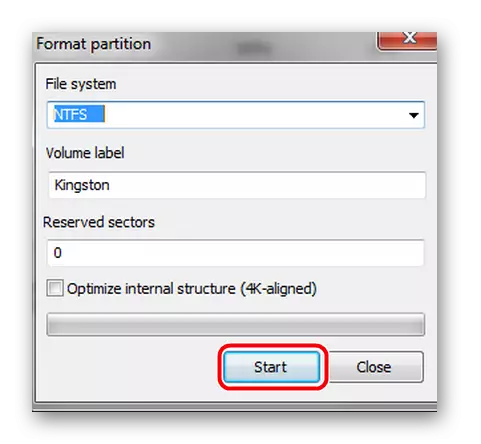
- In the pop-up window, select the type of "NTFS" file system, set the volume label in the Volume Label field. Click "Start".
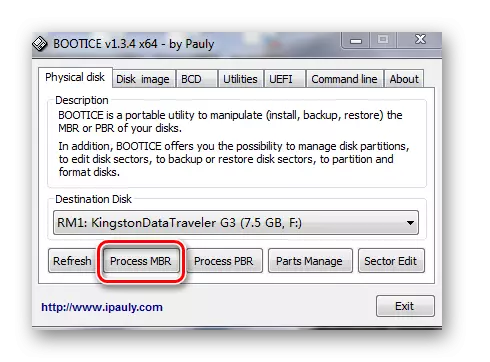
- At the end of the operation, to go to the main menu, click "OK" and "Close". To add a boot record to the USB flash drive, select "Process MBR".
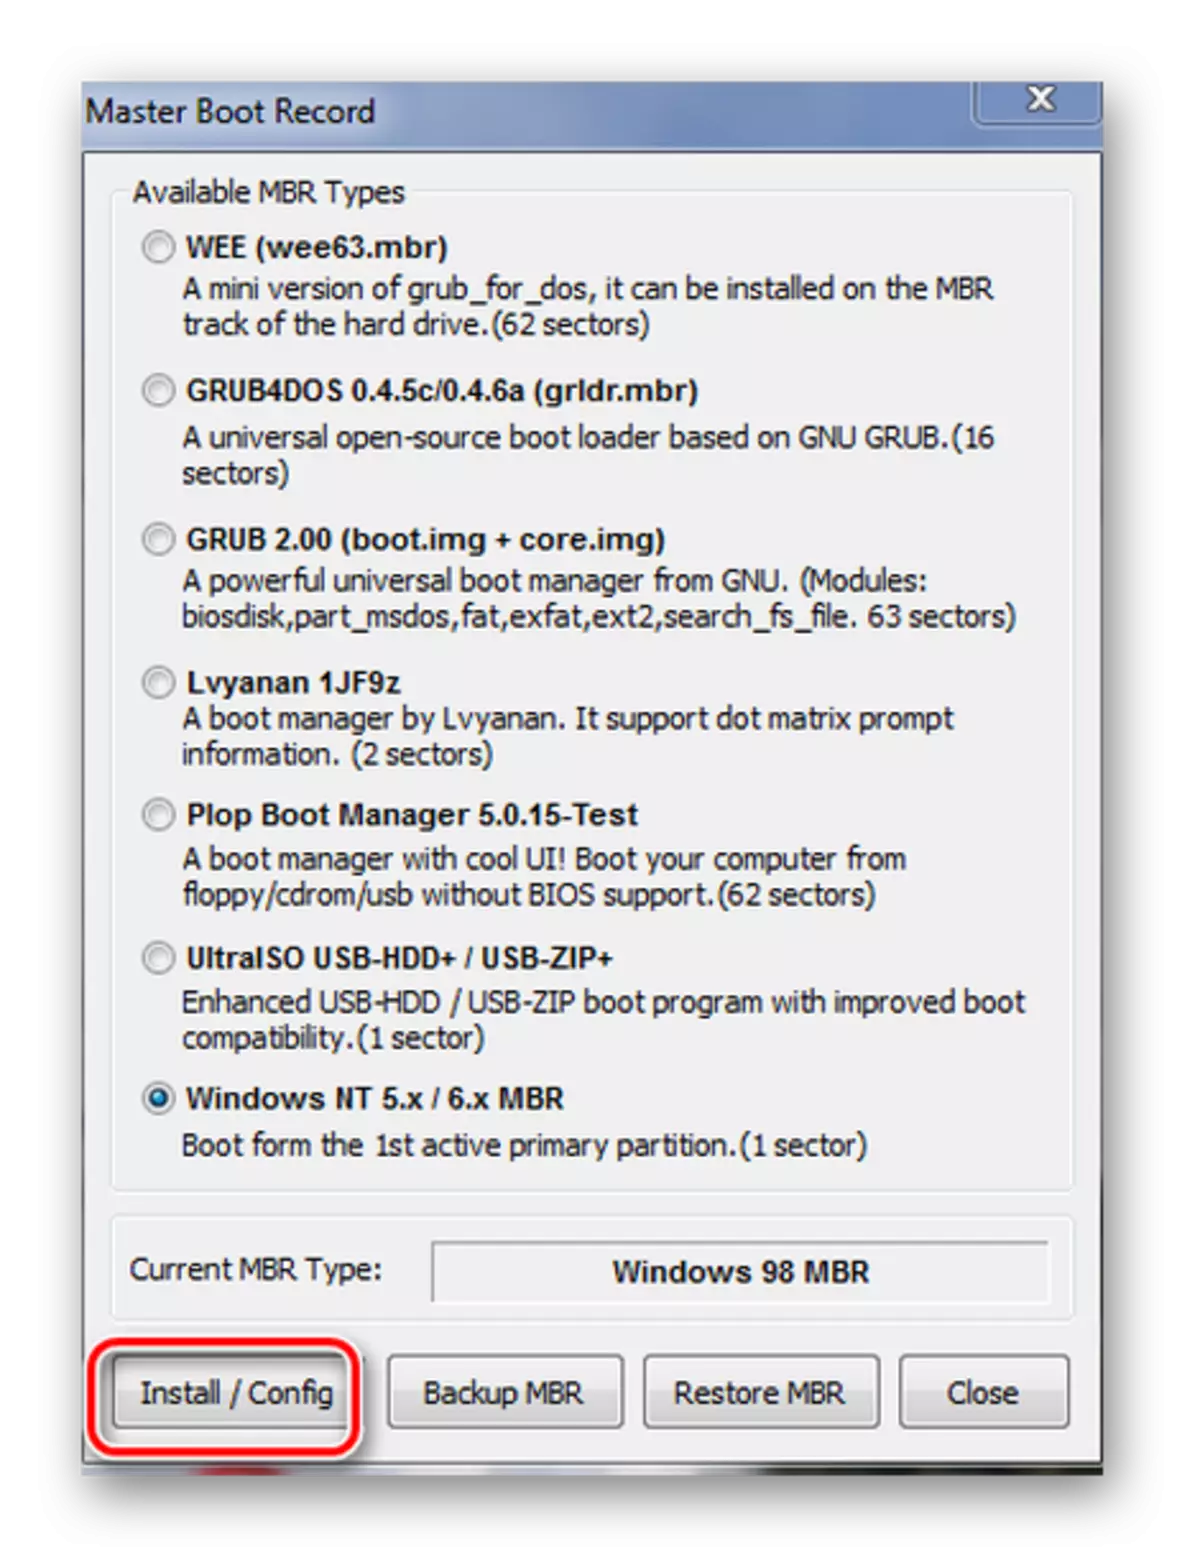
- In a new window, select the last point of the MBR type "Windows NT 5.x / 6.x MBR" and click "Instal / Config".
- In the next query, select "Windows NT 6.x MBR". Next, to return to the main window, click "Close".
- Start a new process. Click on the "Process PBR" item.
- In the window that appears, check the type "Grub4dos" and click "Instal / Config". In a new window, confirm with the "OK" button.
- To return to the main program window, click Close.

That's all. Now the flash drive has been recorded for boot information for the Windows operating system.
Method 3: WinsetUpFromusB
As we talked above, there are several built-in utilities in this program that help to fulfill the task. But she herself can also do it, without auxiliary means. In this case, do this:
- Run the utility.
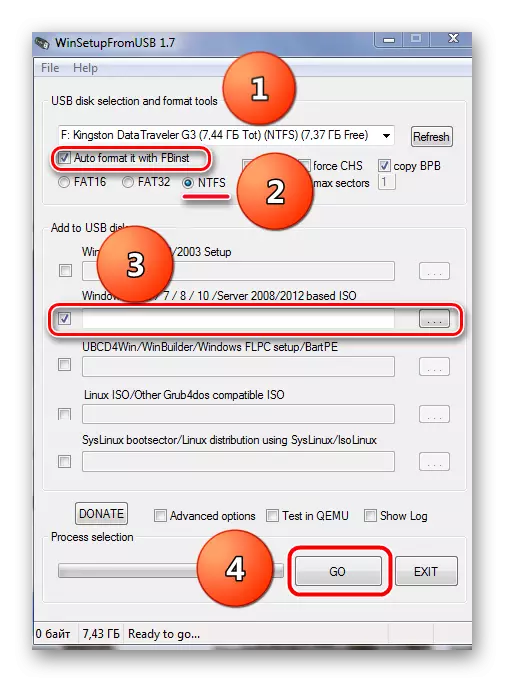
- In the main utility window in the top field, select a flash drive.
- Put a tick near the "AutoFormat IT WITH FBINST" item. This clause means that when starting the program, the flash drive is formatted automatically according to the specified criteria. It needs to be chosen only at the first image recording. If the loading flash drive is already inserted and you need to add another image to it, then formatting is not done and the check mark is not installed.
- Below, check the file system to which your USB drive will be formatted. The photo below "NTFS" is selected.
- Next, choose which distributions will be set. Put these strings with checkmarks in the Add to USB Disk block. In the empty field, specify the path to the ISO files to record or press the button in the form of a three-way and select the images manually.
- Press the "GO" button.
- Two warnings respond to affirmatively and wait for the completion of the process. Performance progress is visible on the green scale in the "Process Selection" field.
Method 4: XBoot
This is one of the easiest in circulation utilities to create bootable flash drives. For correct operation, the utility on the computer must be installed .NET Framework 4th version.
Download xboot from the official site
Further perform a number of simple actions:
- Run the utility. Drag your ISO images to the program window using the mouse cursor. The utility itself will extract all the necessary information to download.
- If you need to write data to the boot flash drive, click on the Create USB item. The "CREATE ISO" item is intended to combine selected images. Select the desired option and click on the appropriate button.

Actually, that's all you need to do. The recording process starts on.
See also: Manual in case the computer does not see a flash drive
Method 5: Yumi MultiBoot USB Creator
This utility has a wide range of destination and one of its main directions is the creation of multi-load flash drives with multiple operating systems.
Download yumi from the official site
- Download and run the utility.
- Make the following settings:
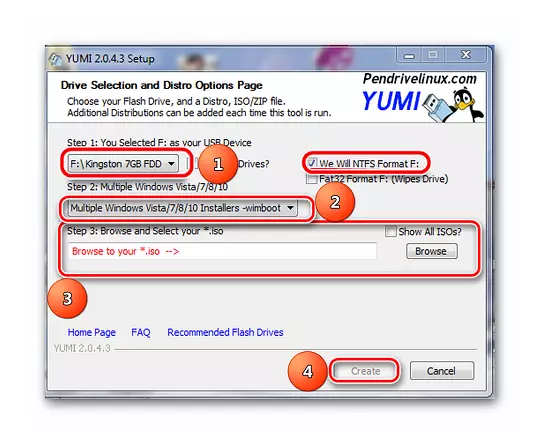
- Fill in the information under the STEP 1 item. Below select a flash drive that will be multizable.
- To the right of the same line to select the type of file system and check the box.
- Select the distribution installed. To do this, click the button under the STEP 2 item.
To the right of the Step 3 item, click the "Browse" button and specify the path to the distribution path.
- Run the program using the Create item.
- At the end of the process, the selected image was successfully switched on the USB flash drive, a window appears with a request to add another distribution. In the event of your confirmation, the program returns to the original window.
Most users agree that this utility can take pleasure when used.
See also: How to perform low-level formatting flash drive
Method 6: Firadisk_integrator
The program (script) Firadisk_integrator successfully integrates the distribution of any Windows OS on the USB flash drive.
Download firadisk_integrator
- Download the script. Some antivirus programs block its installation and work. Therefore, if you have such problems, you suspend the operation of the antivirus during the execution time of this action.
- Create in the root directory on the computer (most likely, on the disk with :) folder named "Firadisk" and write the necessary ISO images there.
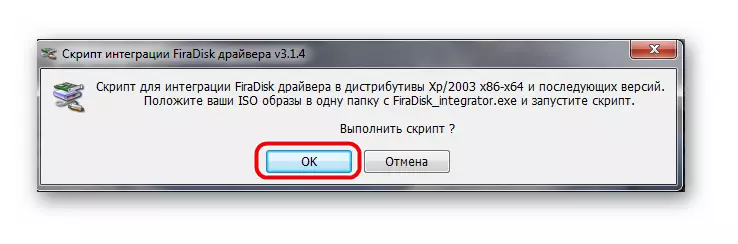
- Run the utility (it is advisable to do this on behalf of the administrator - to do this, click on the right mouse button label and press the appropriate item in the drop-down list).
- A window appears with a reminder of paragraph 2 of this list. Click OK.
- Firadisk integration will begin, as shown in the photo below.
- Upon completion of the process, the message "The script completed its work" appears.
- In the Firadisk folder, after the script is completed, files will appear with new images. These will be duplicates from the formats "[Image name] -firadisk.iso". For example, a Windows_7_ultimatum-Firadisk.iso appears for the image of Windows_7_ultimatum.iso.
- Copy the resulting images on the USB flash drive, in the "Windows" folder.
- Be sure to do disk defragmentation. How to do this, read in our instructions. The integration of the Windows Distribution into the Multi-load flash drive is completed.
- But for convenience in working with such a carrier, you still need to create a boot menu. This can be done in the MENU.LST file. In order for the multi-loading flash drive to boot under the BIOS, you need to install a flash drive in it to load a Flash drive.

Thanks to the described methods, you can very quickly create a multi-load flash drive.