

On modern computers and laptops, relatively large data warehouses are installed, which contain all the files necessary for work and entertainment. Regardless of the type of media and the method of using the computer, keep one large section on it is very inconvenient. This creates a large chaos in the file system, runs at risk multimedia files and critical data when impaired system performance and physical damage to the hard disk sectors.
To maximize free space optimization on the computer, a mechanism for separating all memory into individual parts was developed. Moreover, the larger amount of media, the more urgent the separation will be. The first section is usually prepared for the installation of the operating system itself and programs in it, the remaining partitions are created based on the purpose of the computer and the stored data.
We divide the hard disk into several sections
Due to the fact that this topic is quite relevant, in the operating system Windows 7 there is a fairly convenient tool for controlling discs. But with the modern development of the software industry, this tool is sufficiently outdated, a simpler and functional third-party solutions have come to shift, capable of showing the real potential of the section mechanism, while remaining understandable and accessible to ordinary users.Method 1: Aomei Partition Assistant
This program is considered one of the best in its sphere. First of all, Aomei Partition Assistant is distinguished by reliability and reliability - the developers presented exactly the product that satisfies the most demanding user, while the program is intuitive "from the box". It has a competent Russian translation, stylish design, the interface resembles a standard Windows tool, but in practice it greatly exceeds it.
Download Aomei Partition Assistant
The program has many paid versions created for different needs, however, there is a free option for home non-commercial use - it is more and no need to break the discs to the sections.
- From the official site of the developer, you download the installation file, which, after downloading, you need to run a double click. Follow a very simple installation wizard, run the program or from the last wizard window, or from the desktop shortcut.
- After a short screensaver and checking the integrity, the program immediately shows the main window in which all actions will occur.
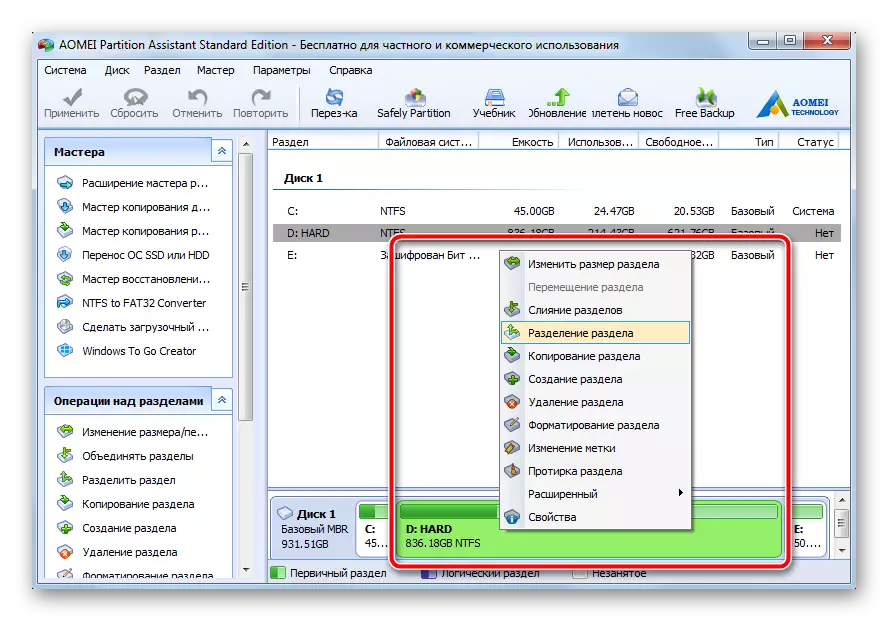
- The process of creating a new section will be shown on the example of the already existing one. For a new disk, which consists of one solid piece, the methodology will not differ in absolutely nothing. On a free place to be divided by pressing the right mouse button to call the context menu. In it, we will be interested in the item called "Section Section".
- In the window that opens, you need to manually set the dimensions that we need. You can do this in two ways - either drag the slider, which provides a quick, but not exact setting parameters, or immediately set specific values in the "New section" field. The old section cannot be left less space than at the moment there are files there. Consider it immediately, because in the breakdown process there may be an error that puts the data at risk.
- After the necessary parameters are specified, you need to click on the "OK" button. The tool closes. The main program window will again be displayed, only now, new, new one will appear in the list of sections. It will also be shown at the bottom of the program. But as long as it is only a preliminary action that allows only theoretically evaluate the changes made. In order to start separation, you need to click on the "Apply" button in the upper left corner.

Before that, you can also immediately ask the name of the future section and letter. To do this, on the piece that appears, right-click on the "Advanced" section, select "Change the Disc Letter" section. Specify the name, again by pressing the PCM on the section and selecting the "Tag Change" item.
- A window will open in which the user will show the previously created separation operation. Check all the numbers before start. Although it is not written here, but know: the new section will be created, formatted in NTFS, after which it will be assigned an available in the system (or previously specified by the user) letter. In order to start execution, click on the "Go button".
- The program will verify the correctness of the parameters entered. If everything is true, it will offer several options for performing the operation we need. This is due to the fact that the section you want to "cut" is most likely used at the moment. The program will propose to unmount this section from the system to perform an action. However, this is not the best option for those who have a lot of programs from there (for example, portable). The most secure way will be separated by partitions outside the system.
By clicking on the "Restart Now" button, the program will create a small module called Preos and introduces it to autoload. After that, Windows will restart (save all important files before that). Thanks to this module, the division will be done before loading the system, so it will not hurt anything. The operation may take a long time, because The program will check the disks and the file system for integrity to avoid damage to sections and data.
- Prior to the completion of the operation, the participation of the user is completely not required. In the process of executing separation, the computer can reboot several times, displaying the Preos module on the screen. When the work is completed, the computer will turn on in the usual way, but only in the "My Computer" menu will now hang a fresh formatted section, immediately ready to work.


Thus, all that you need to make the user is just to specify the desired sizes of sections, then the program will do everything itself by issuing fully operational sections as a result. Note that before pressing the "Apply" button, the newly created section can be divided into another two. Windows 7 is based on media with a MBR table that supports partitions to 4 partitions maximum. For a home computer it will be plentifully.
Method 2: System Disk Management Tool
The same can be done without the use of third-party software. The minus of this method is that the automatism of the tasks performed is completely absent. Each operation is performed immediately after setting the parameters. Plus, the separation occurs right in the current session of the operating system, it is not necessary to reboot. However, between the execution of various actions in the process of following the instructions, the system constantly collects current debug data, so in the general case the time is spent at no less than in the previous method.
- On the "My Computer" label, right-click, select "Management".
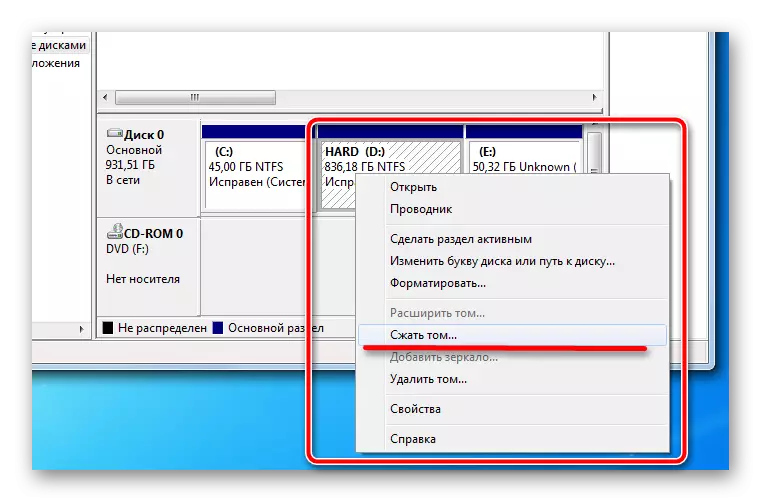
- In the window that opens in the left menu, select "Disk Management". After a short pause, while the tool gave all the necessary system data, a familiar interface will appear to the user's eyes. In the bottom area of the window, select the section that must be divided into parts. On it, press the right mouse button and select the "Squeeze Tom" item in the context menu that appears.
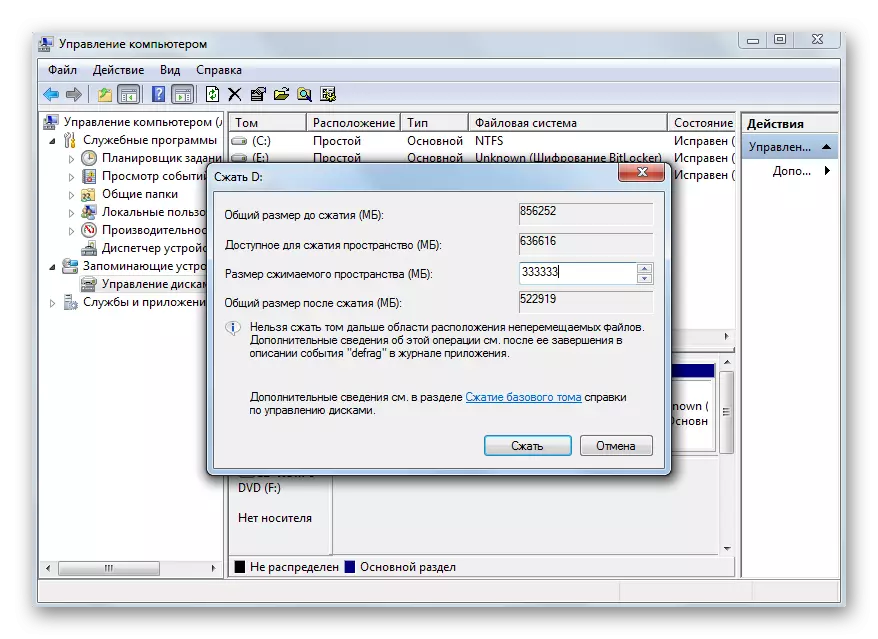
- A new window will open in which there will be the only field available for editing. In it, specify the size of the future partition. Note that this number should not be greater than the value in the "Available space available for compression (MB)". Consider the specified size, based on the parameters 1 GB = 1024 MB (another inconvenience, in Aomei Partition Assistant, the size can be immediately set in GB). Click the "Compress" button.
- After a short separation, a list of sections will appear at the bottom of the window where the black piece is added. It is called "not distributed" - the future blank. Click on this fragment with the right mouse button, select "Create a simple volume ..."
- The "Wizard of creating simple volumes" starts, in which you need to click the "Next" button.

In the next window, confirm the size of the generated partition, then press "Next" again.

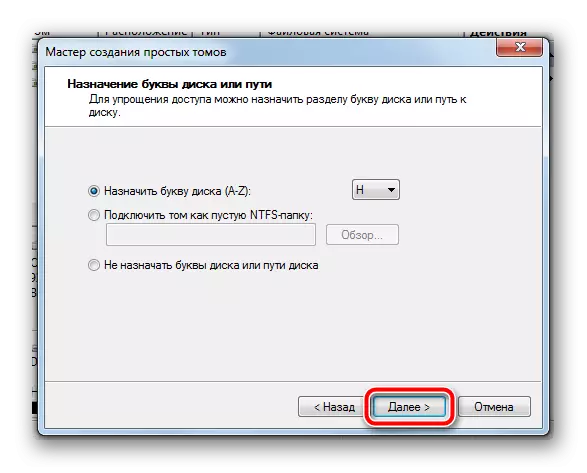
Now assign the necessary letter by selecting anyone you like from the drop-down list, go to the next step.
Select the file system format, set the name for a new section (desirable to use the Latin, without spaces).

In the last window, recheck all the previously specified parameters, then click Finish.


On this operations are finished, after a few seconds a new section will appear in the system, ready to work. It is not necessary to reboot at the same time, everything will be produced in the current session.
Built-in tool Provides all the necessary settings for the section being created, they are enough for an ordinary user. But here every step is done manually, and between them just sit and wait for a certain time while the system collects the necessary data. And the data collection can be quite delayed on weak computers. Therefore, the use of third-party software will be the most optimal option for quick and high-quality rigid disk to the desired number of pieces.
Be careful before performing any data transactions, be sure to reserve and recheck the parameters set by manually. Creating multiple partitions on a computer will help to clearly organize the file system structure and divide the files used by different places for safe storage.