

One of the most popular gadgets that are used by users in Windows 7 is weather informant. His demand is related to the fact that, unlike most such applications, it is most useful and practical. Indeed, weather information is important for many users. Let's find out how to install the specified gadget on Windows desktop 7, as well as find out the main nuances of setting up and working with it.
Weather gadget
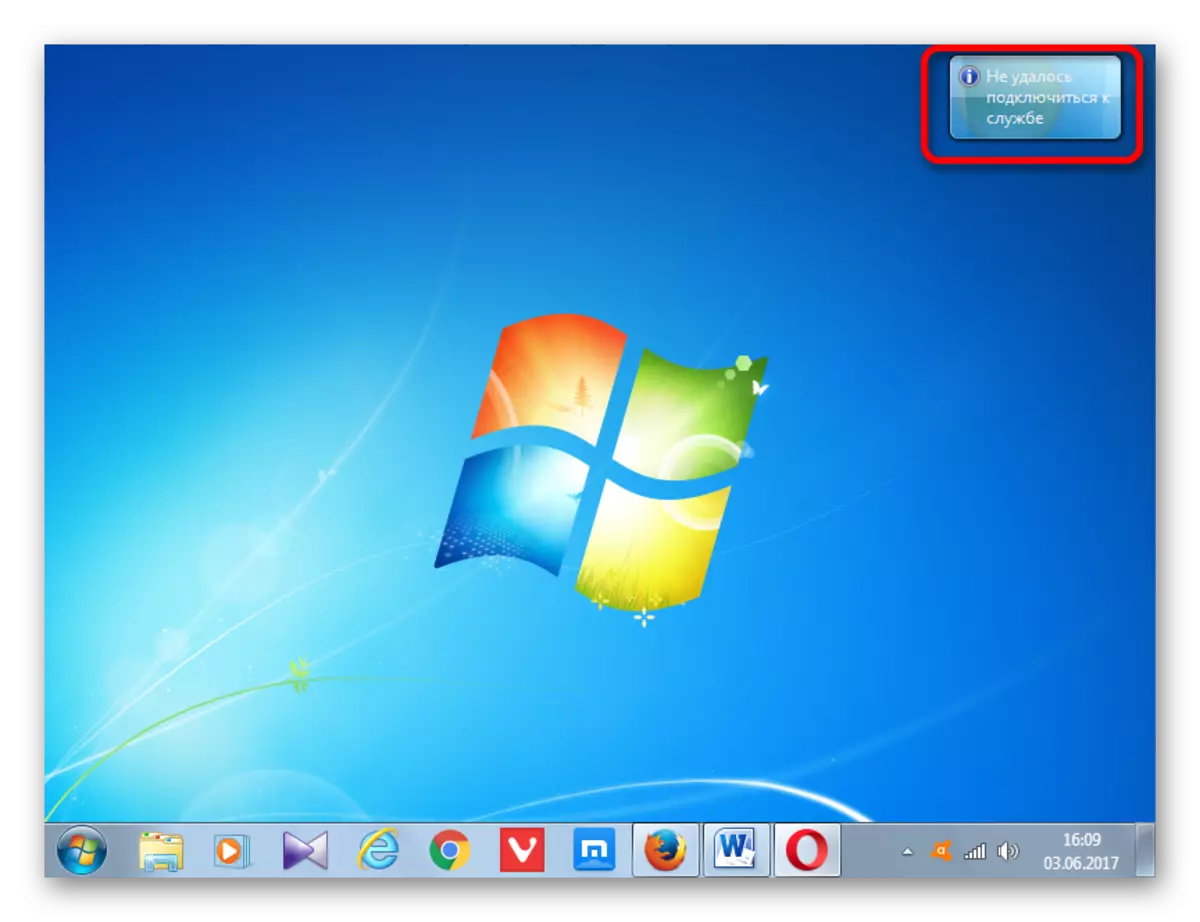
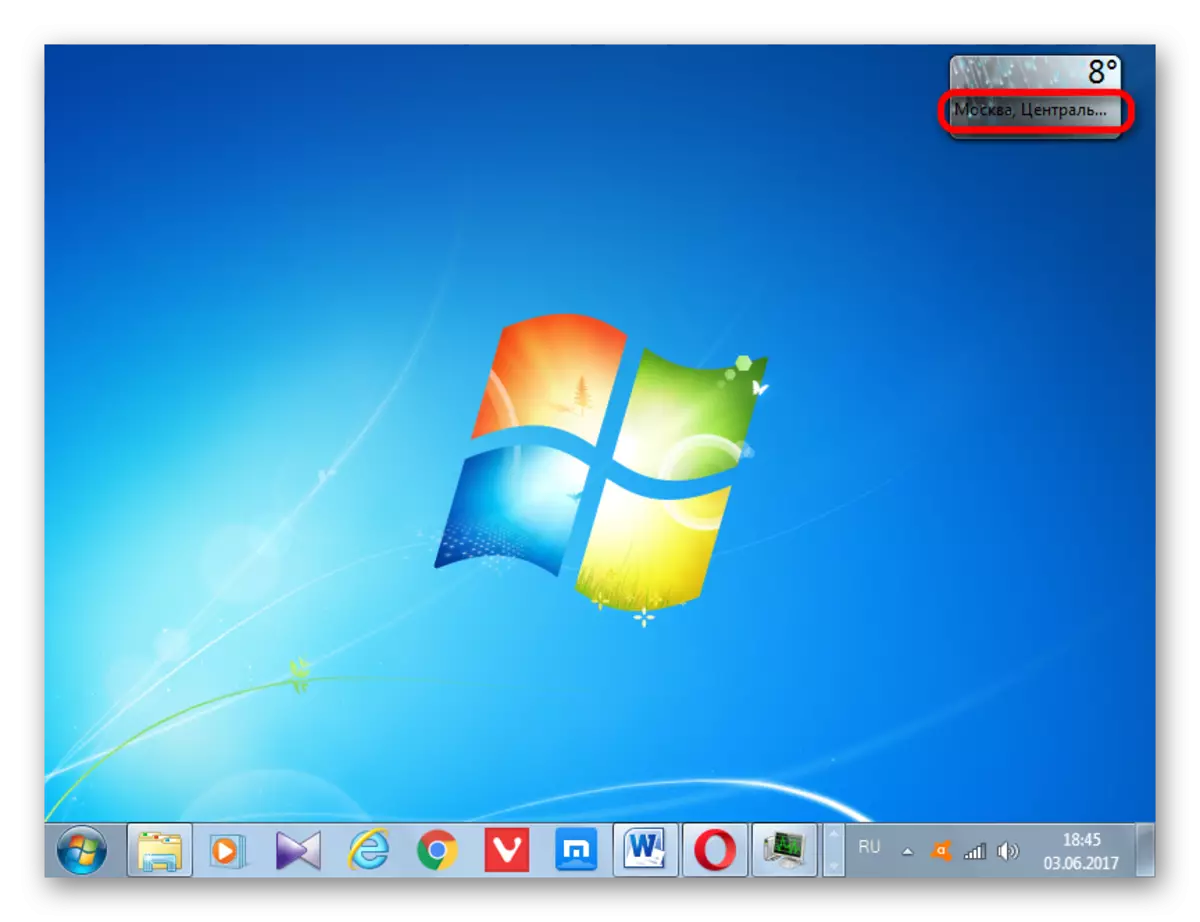
For experienced users is not a secret that small standard applications are used in Windows 7, which are called gadgets. They have a narrow functionality limited to one or two possibilities. This is the element of the system and is the "weather". Applying it, you can learn the weather at the site of finding a user and around the world.True, due to the termination of support by the developer, when the standard gadget starts, there are often problems that expressed in the fact that the inscription "failed to connect to the service" appears, and in other inconveniences. But first things first.
Turning on
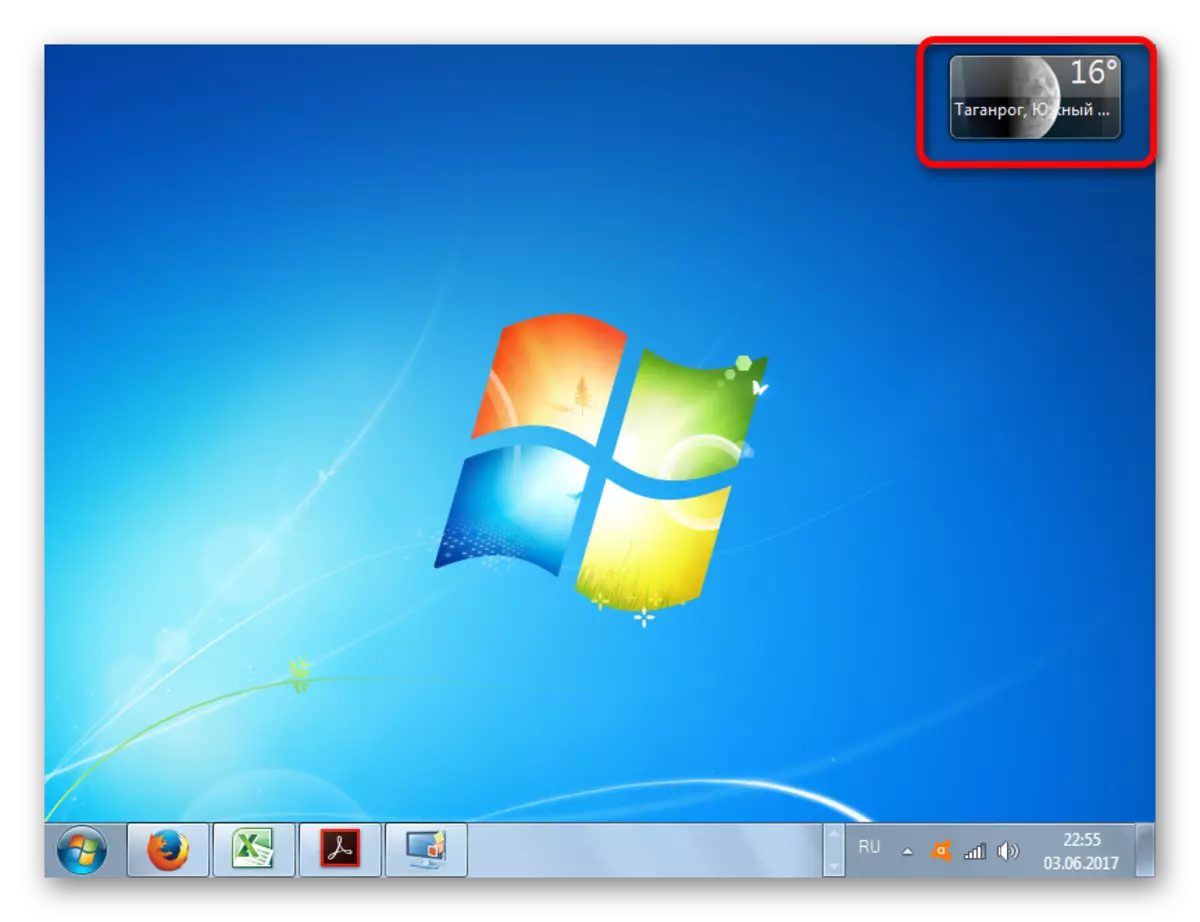
First, find out exactly how to include a standard weather application so that it is displayed on the desktop.
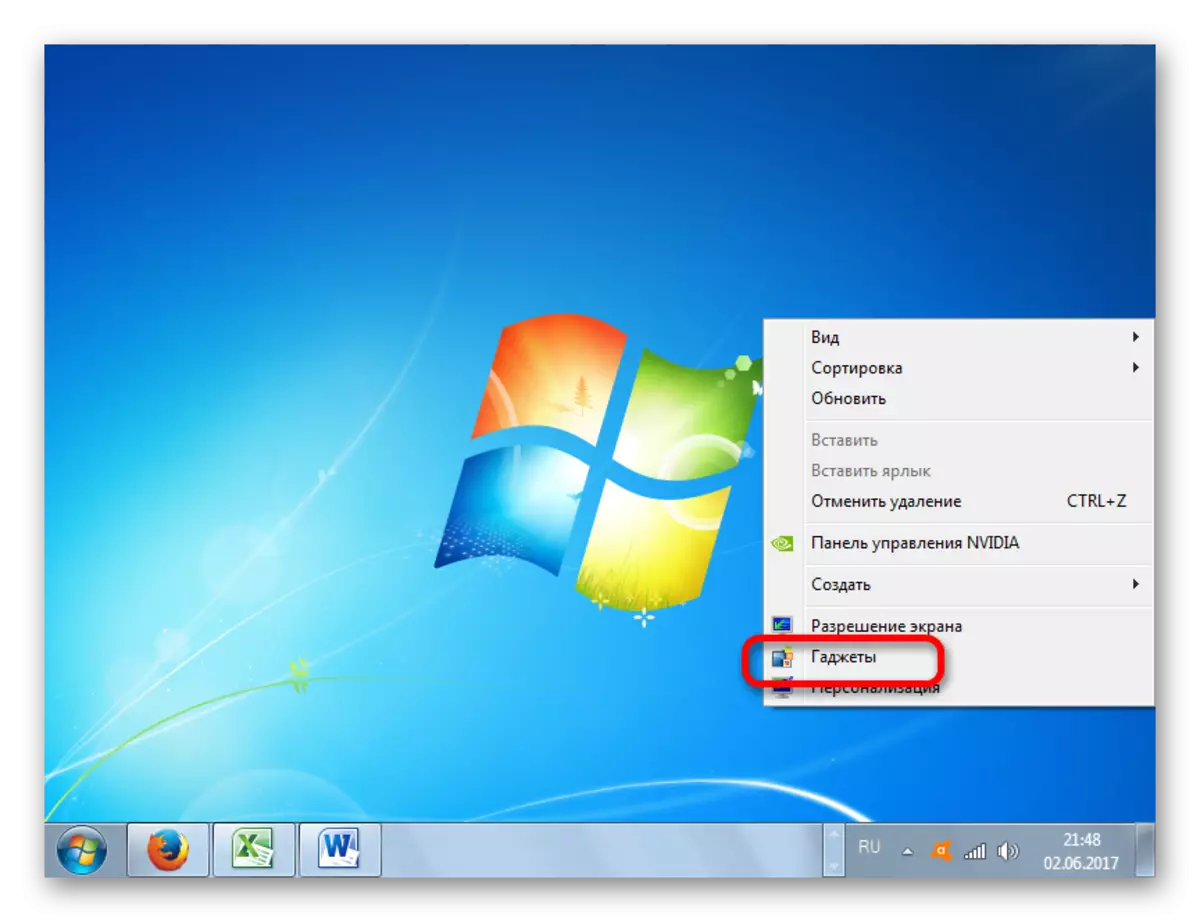
- Click right-click on an empty place on the desktop and choose the "Gadgets" option.
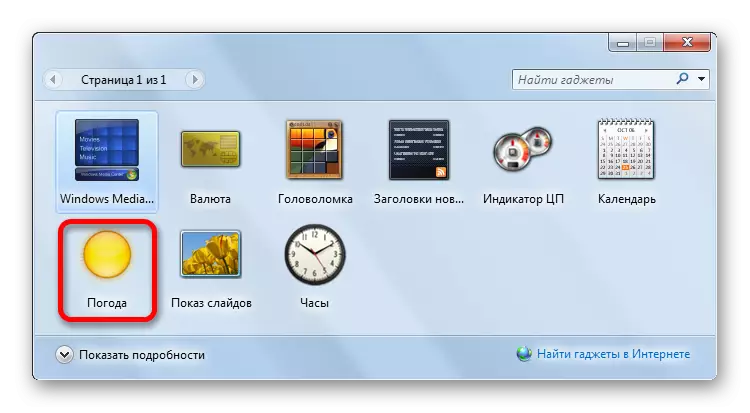
- The window opens with the list of gadgets. We choose the "weather" option, which is represented as an image of the sun by clicking on it twice the left mouse button.
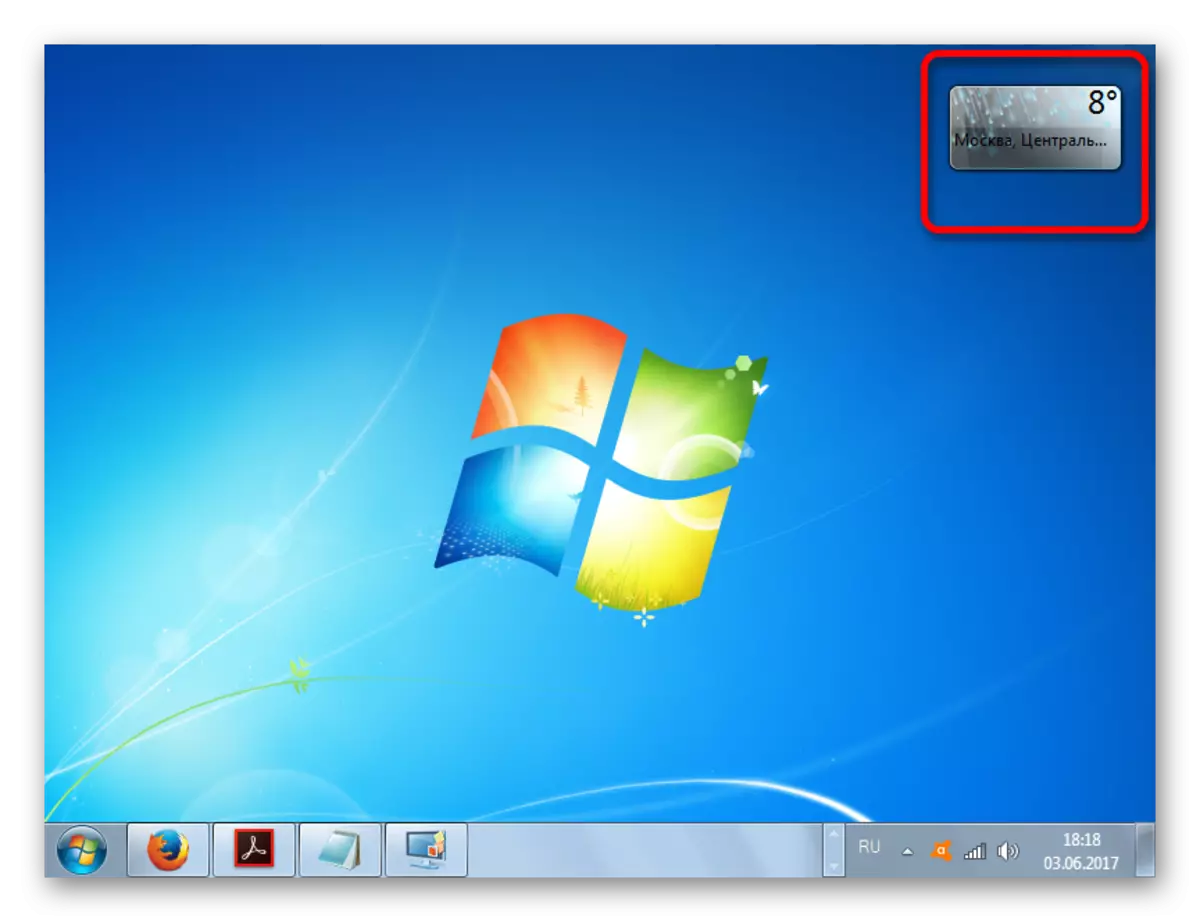
- After the specified action, the weather window should be launched.
Solving problems with the launch
But, as already mentioned above, after launching the user may encounter a situation when the inscription "failed to connect to the service" appears on the desktop in the desktop. We will understand how to solve this problem.
- Close the gadget if it is open. If you do not know how to do this, the mechanism will be described below in the section on deleting this application. Go using Windows Explorer, Total Commander or other file manager on the next way:
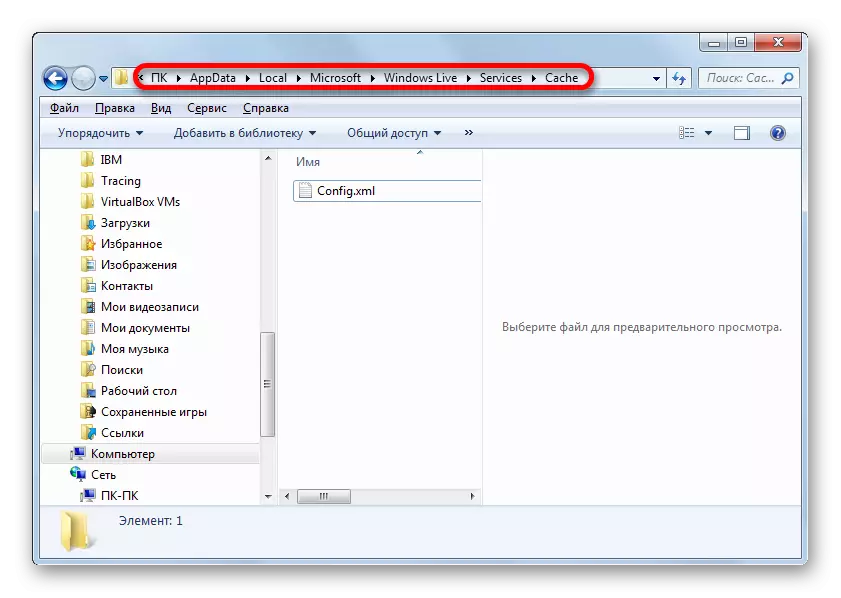
C: \ Users \ Custom_Profor \ APPDATA \ LOCAL \ Microsoft \ Windows Live \ Services \ Cache
Instead of the value "Custom_Fort" in this address, specify the name of the profile (account), through which you work on the PC. If you do not know the name of the account, then find out it is quite simple. Click on the "Start" button, placed in the lower left corner of the screen. The menu opens. At the top of its right part and will be the desired name. Just insert it instead of the words "custom_fil" in the address specified above.

To go to the desired location if you act using Windows Explorer, you can copy the resulting address to the address bar and click the Enter key.
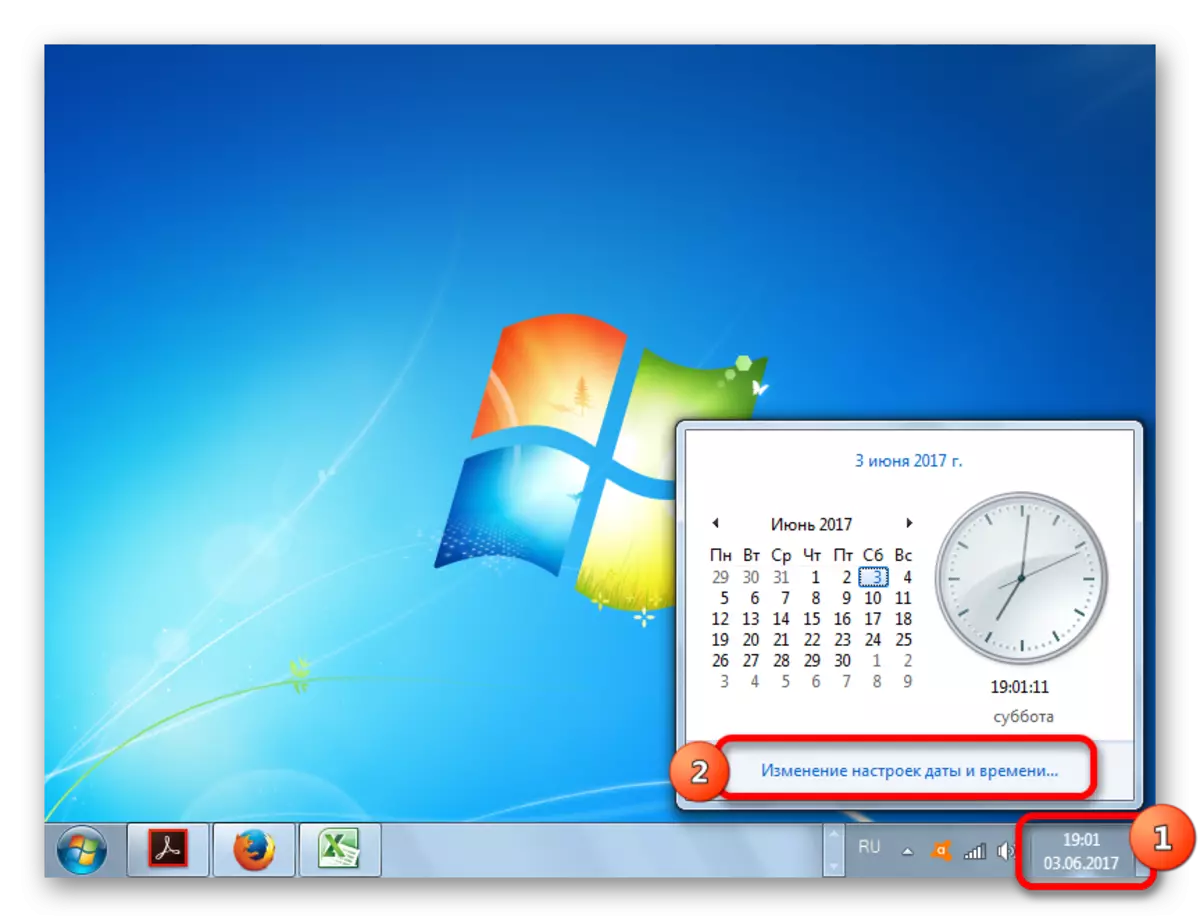
- Then change the system date for a few years ahead (the more, the better).
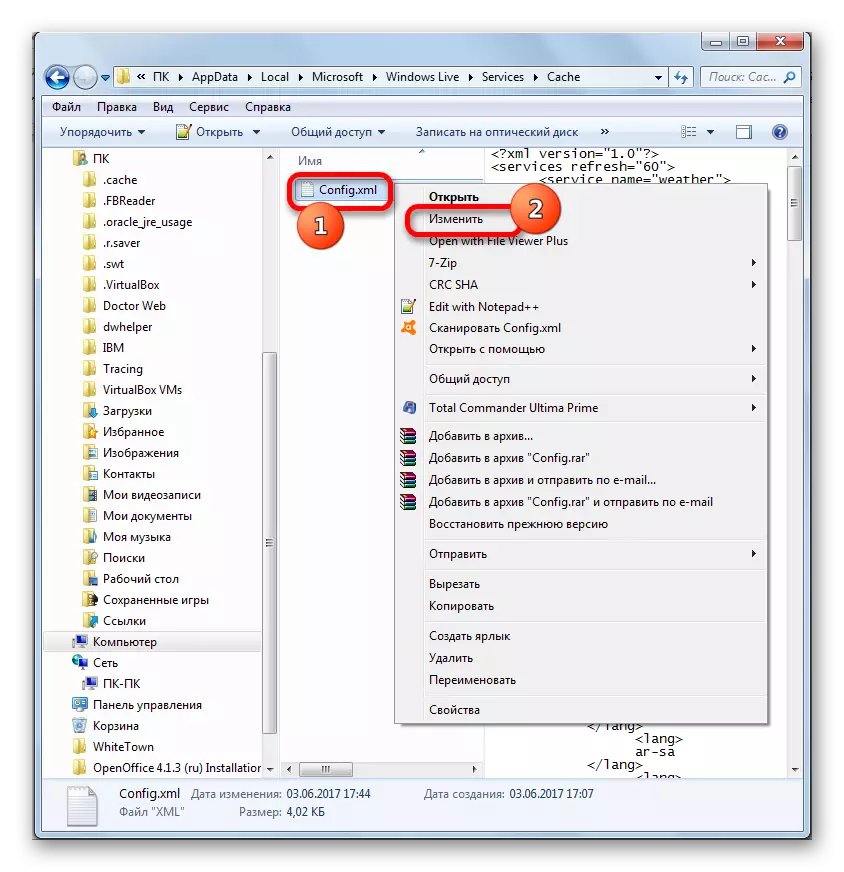
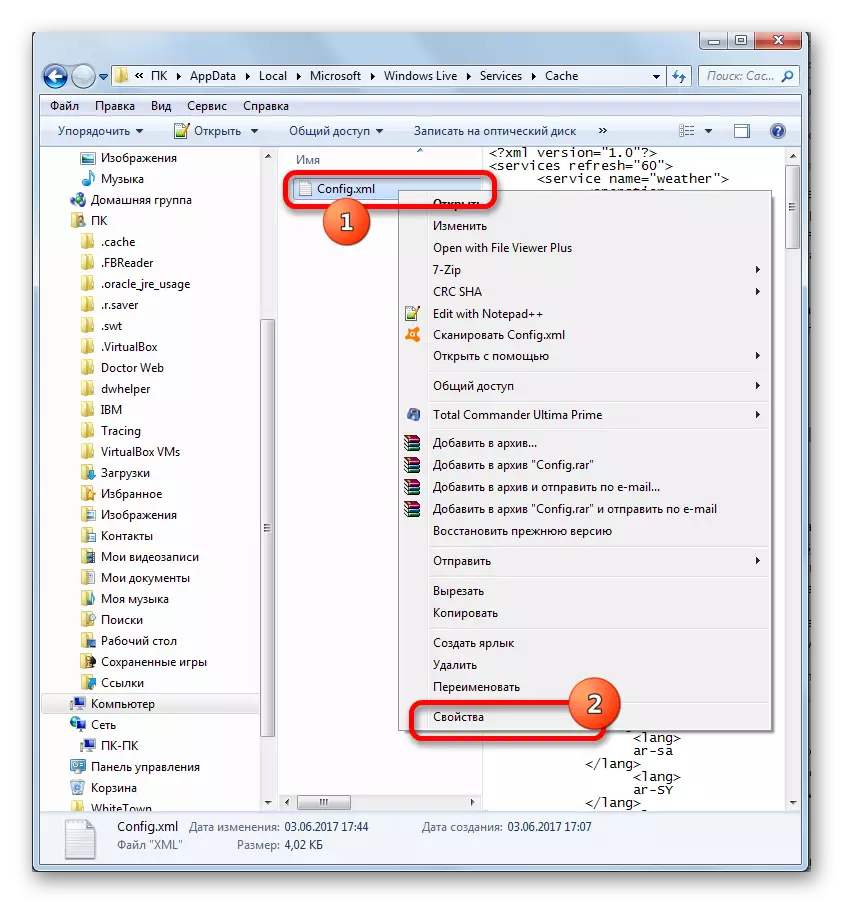
- We will return to the folder wearing the name "Cache". It will be located a file named "config.xml". If the extension display is not included in the system, it will be called simply "Config". Click on the specified name right mouse button. The context list is launched. Select the item "Change" in it.
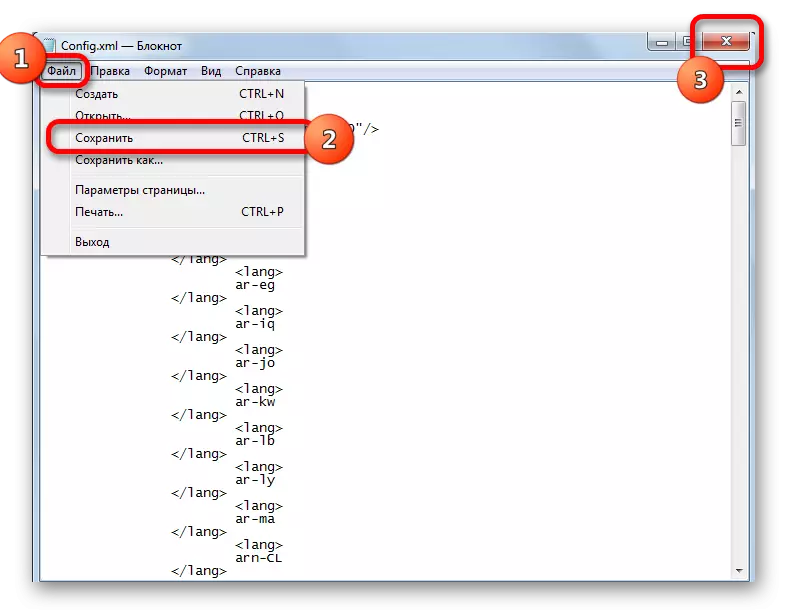
- The Config file opens using a standard notepad. It does not need to make any changes. Just go to the "File" vertical menu item and in the list that opens, click on the "Save" option. This action can also be replaced by a set of CTRL + S keys. After that, you can close the notepad window by clicking on the standard closing icon on its right upper edge. Then return the current date value on the computer.
- After that, you can launch the weather application through the gadgets window in the way that we have considered earlier. This time, errors with connection to the service should not be. Install the location. How to do this See below in the settings descriptions.
- Next in Windows Explorer, again click on the config file with the right mouse button. A context list is launched, in which you select the "Properties" parameter.
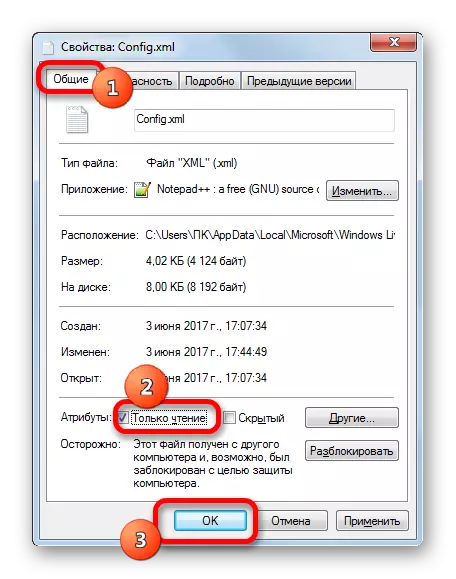
- The Config File Properties window starts. Move into the General tab. In the "Attributes" block near the "read only" parameter, we set a tick. We click on "OK".
On this setting to troubleshoot the problem with the launch is completed.
But for many users, when opening the Cache folder, the config.xml file does not turn out. In this case, you need to download it on the link below, remove from the archive and place it in the specified folder, and then make all those manipulations with the Notepad program, which was discussed above.
Download Config.xml file
Setting
After starting the gadget, you can configure its settings.
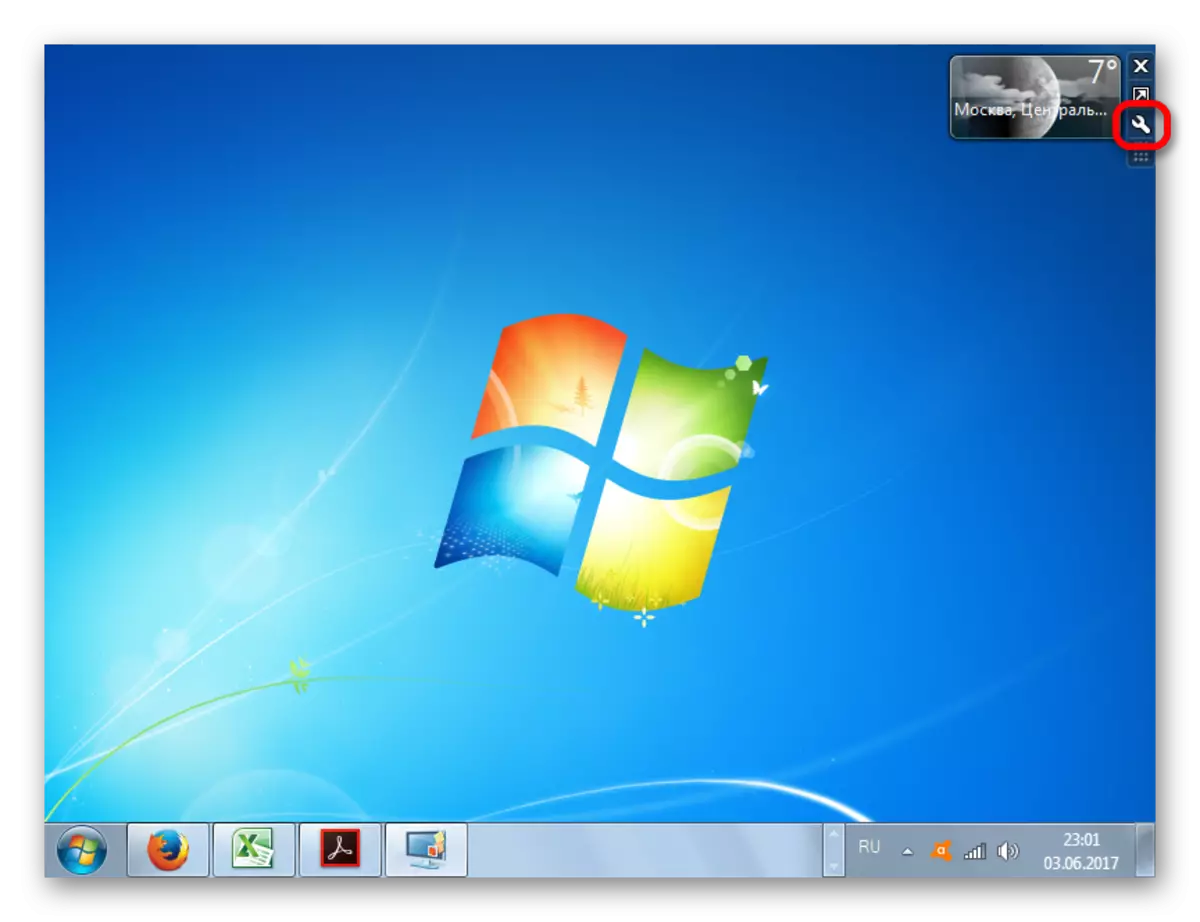
- We bring the cursor to the icon of the Weather application. The icon block is displayed to the right. Click on the "Parameters" icon in the form of a key.
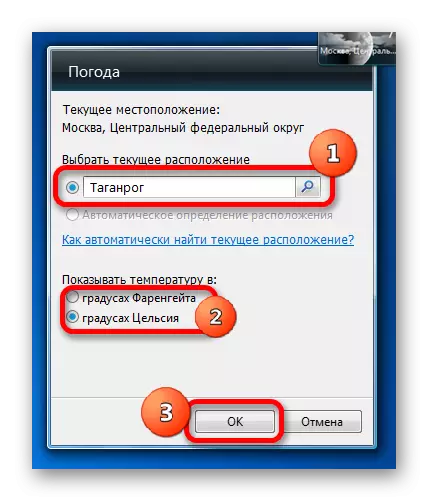
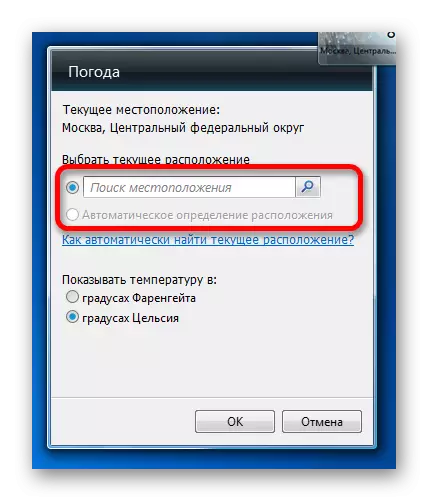
- The settings window opens. In the "Choose current location" field, we prescribe the locality, the weather in which we want to observe. Also in the settings block "Show temperature in" can be determined by rearranging the switch, in which units want to display the temperature: in degrees Celsius or Fahrenheit.
After the specified settings are made, click on the "OK" button at the bottom of the window.
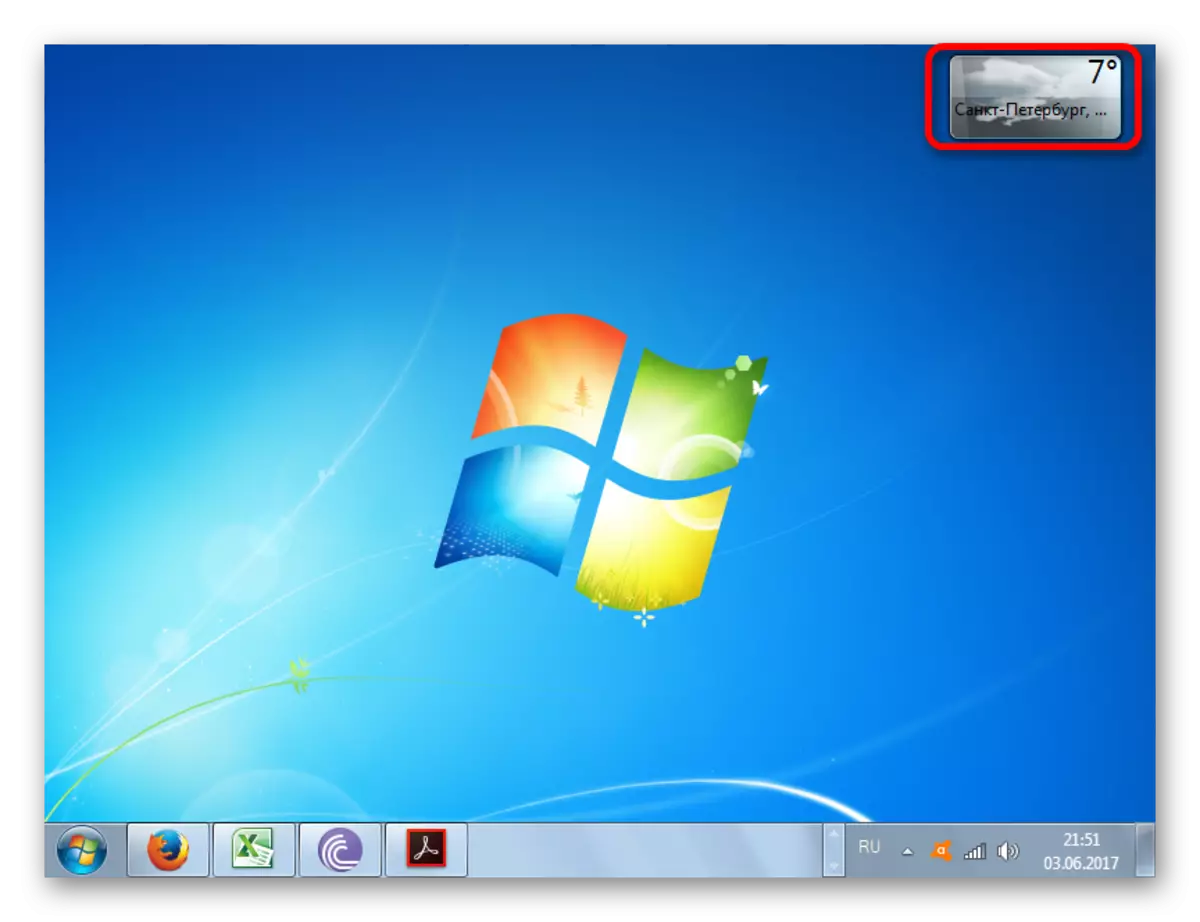
- The current air temperature in the specified settlement in the selected unit of measurement is displayed. In addition, the level of cloudiness is shown immediately as an image.
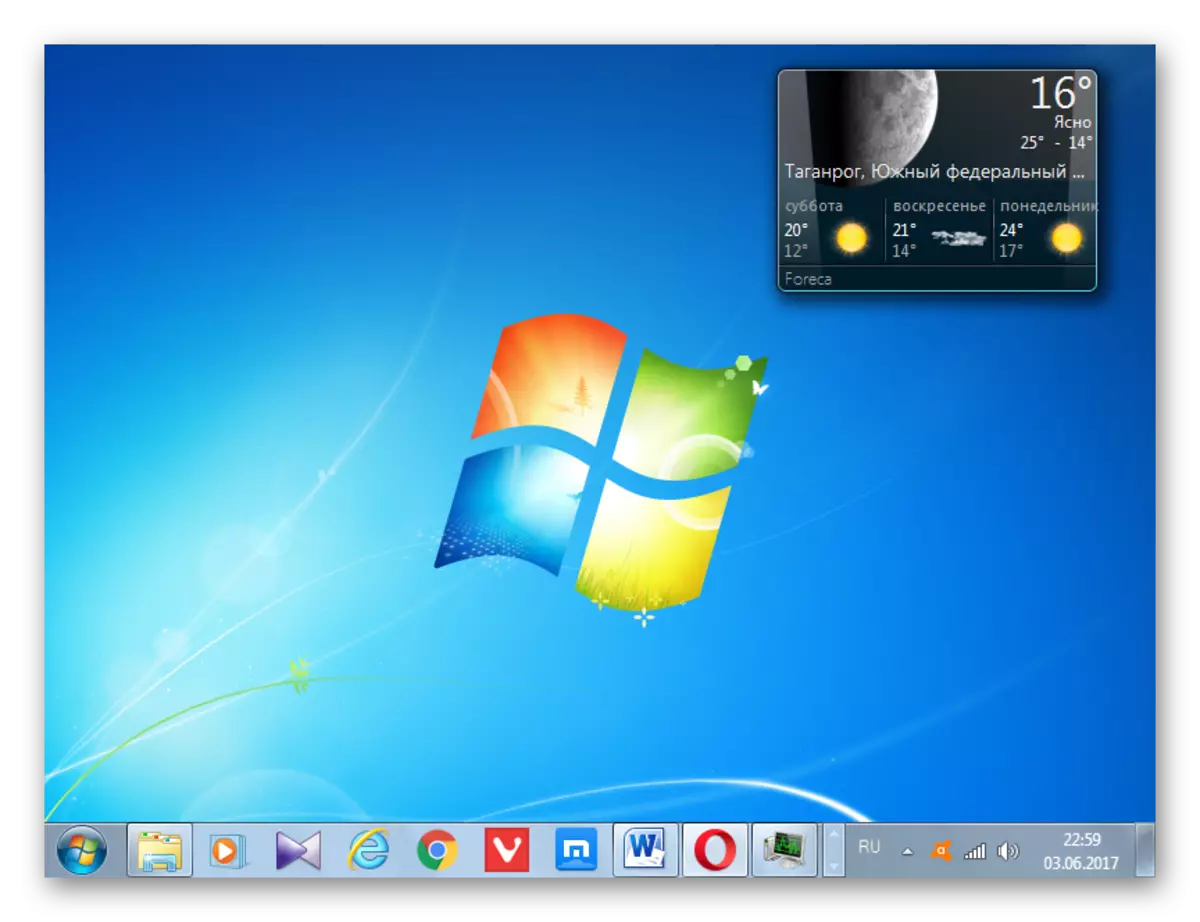
- If the user needs more weather information in the selected settlement, then this should increase the application window. We carry the cursor to the small gadget window and in the toolbox that appears, select an arrow icon ("larger"), which is located above the "Parameters" icon.
- After that, the window increases. In it, we see not only the current temperature and the level of cloudiness, but also their forecast for the next day with a breakdown on the day and night.
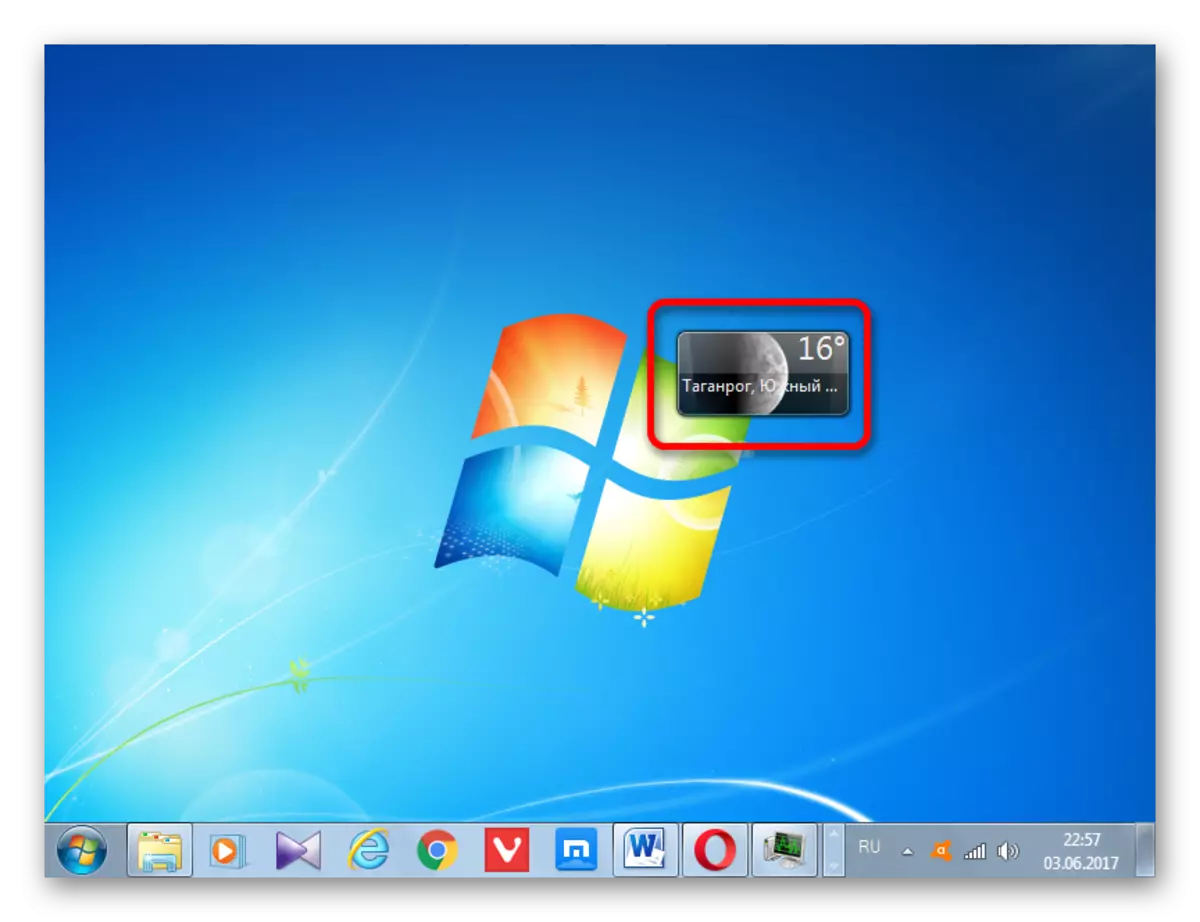
- In order to return the window former compact design to the window, again you need to click on the same icon with the arrow. This time it has the name "smaller".
- If you want to drag the gadget window to another desktop location, then for this you should click on any of its area or by the button to move ("drag the gadget"), which is placed on the right of the window in the toolbar. After that, clamp the left mouse button and make a movement procedure to any screen area.
- The application window will be moved.


Solving a location problem
But the problem with the launch of the service connection is not the only one with which the user may encounter when working with the specified application. Another problem may be the impossibility of changing location. That is, the gadget will be launched, but "Moscow, Central Federal District" will be indicated in it as a location (or other name of the settlement in various localizations of Windows).
Any attempts to change the location in the application settings in the "Location" field will be ignored by the program, and the "Automatic Definition" parameter will be inactive, that is, the switch cannot be rearranged into this position. How to solve the specified problem?
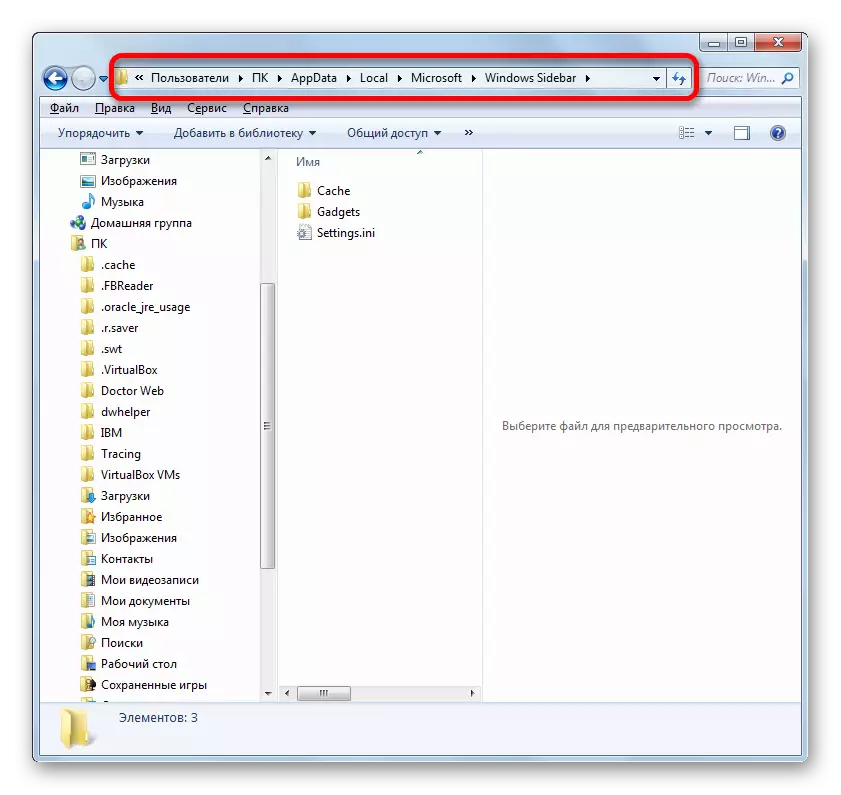
- Run the gadget if it is closed and using Windows Explorer move to the following directory:
C: \ Users \ Custom_Proof \ APPDATA \ Local \ Microsoft \ Windows Sidebar
As before, instead of the "Custom_Fort" value, you need to insert a specific name of the user profile. About how to find out his speech above.
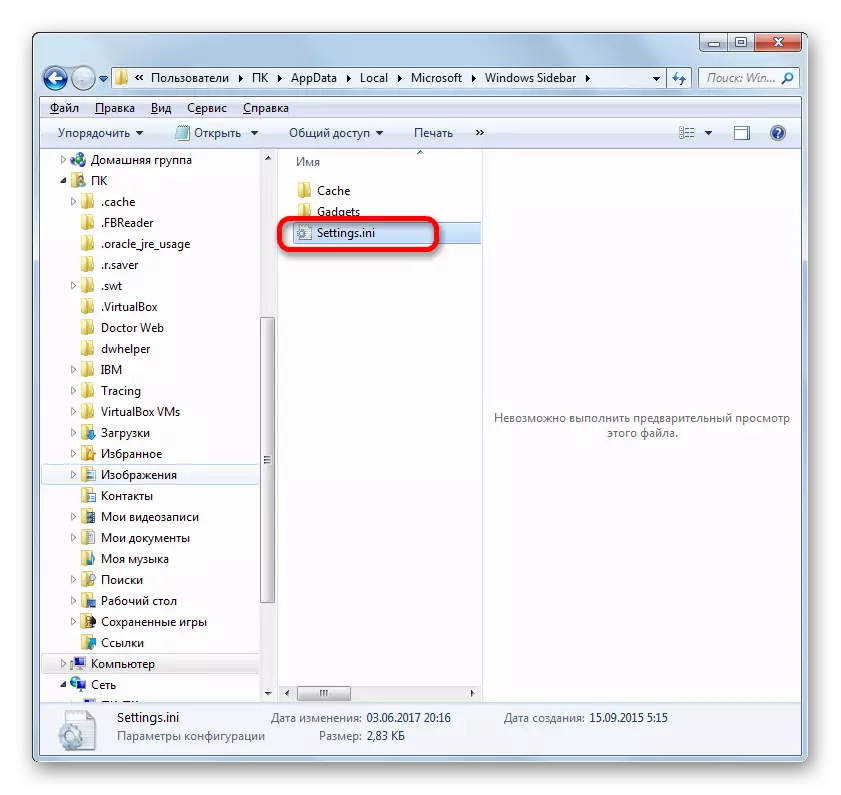
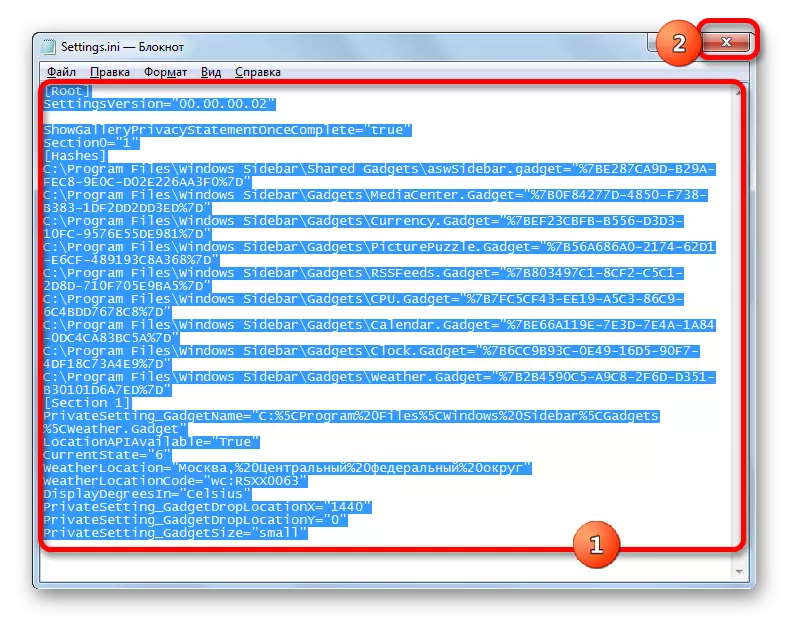
- Open the "settings.ini" file ("settings" in systems with a disabled extension display) double clicking on it with the left mouse button.
- The settings file is launched in a standard notepad or in another text editor. Highlight and copy the entire contents of the file. This can be done, sequentially applying the Ctrl + A and Ctrl + C key combination. After that, this setup file can be closed by clicking on the standard closing icon in the upper right corner of the window.
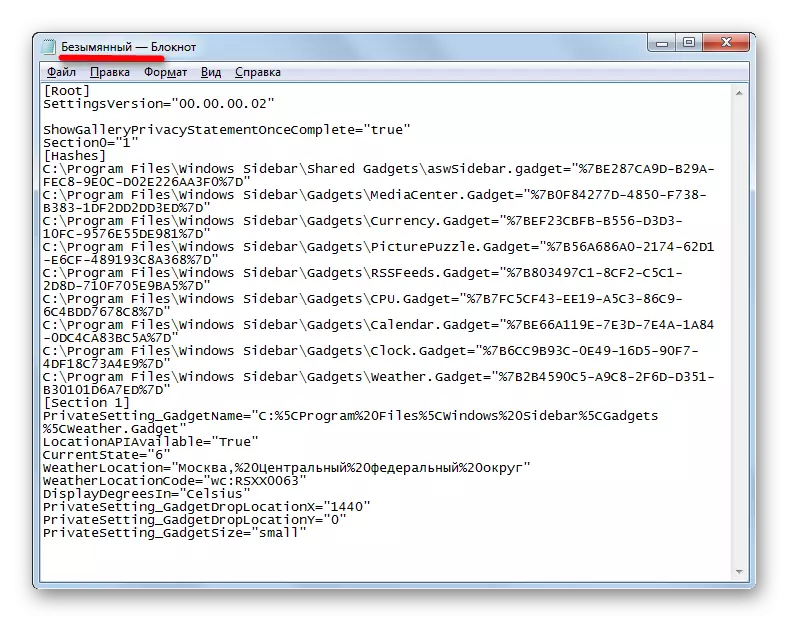
- Then launch an empty text document in a notepad program and, applying the Ctrl + V key combination, insert the previously copied contents.
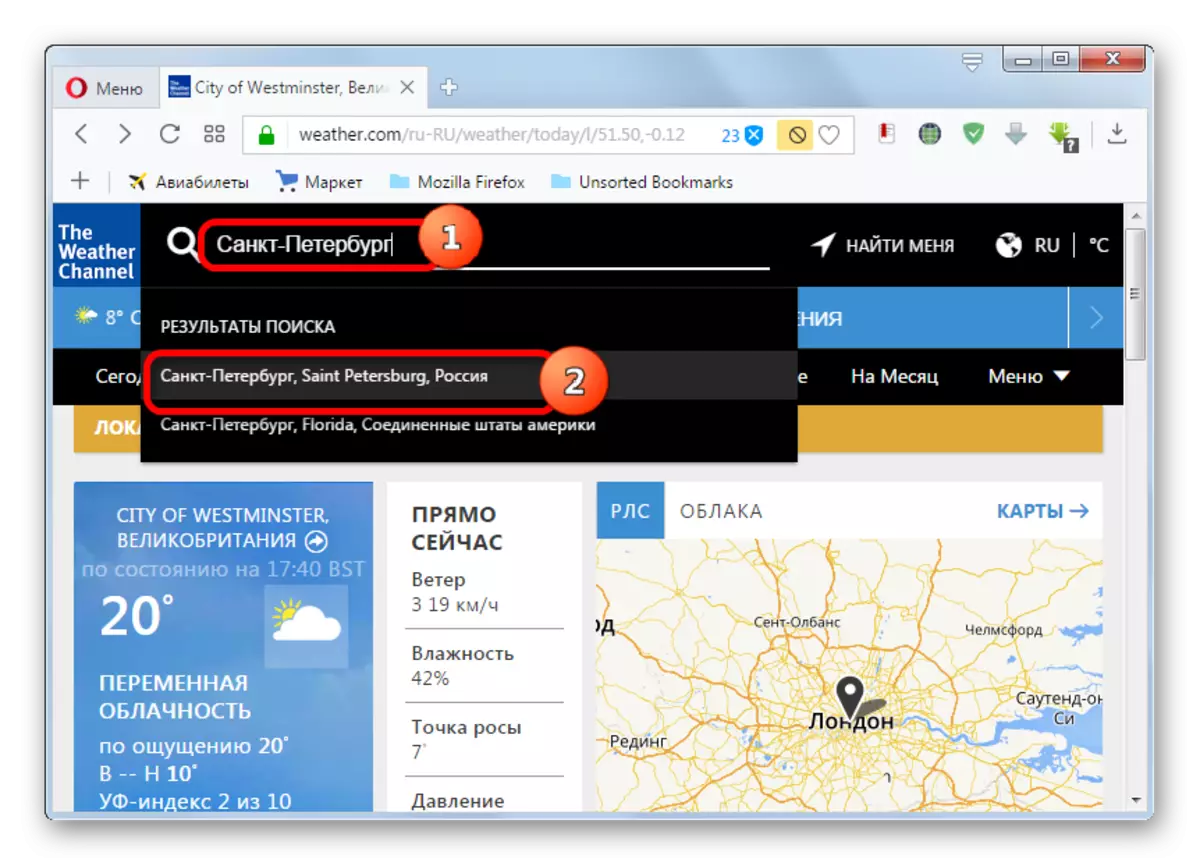
- With the help of any browser, go to Weather.com. This is the resource from where the application takes information about the weather. In the search bar, we introduce the name of the settlement, the weather in which we want to see. At the same time, interactive prompts appear at the bottom. There may be several of them if there is not one settlement with the specified name. Among the tips, choose the option that meets the wishes of the user.
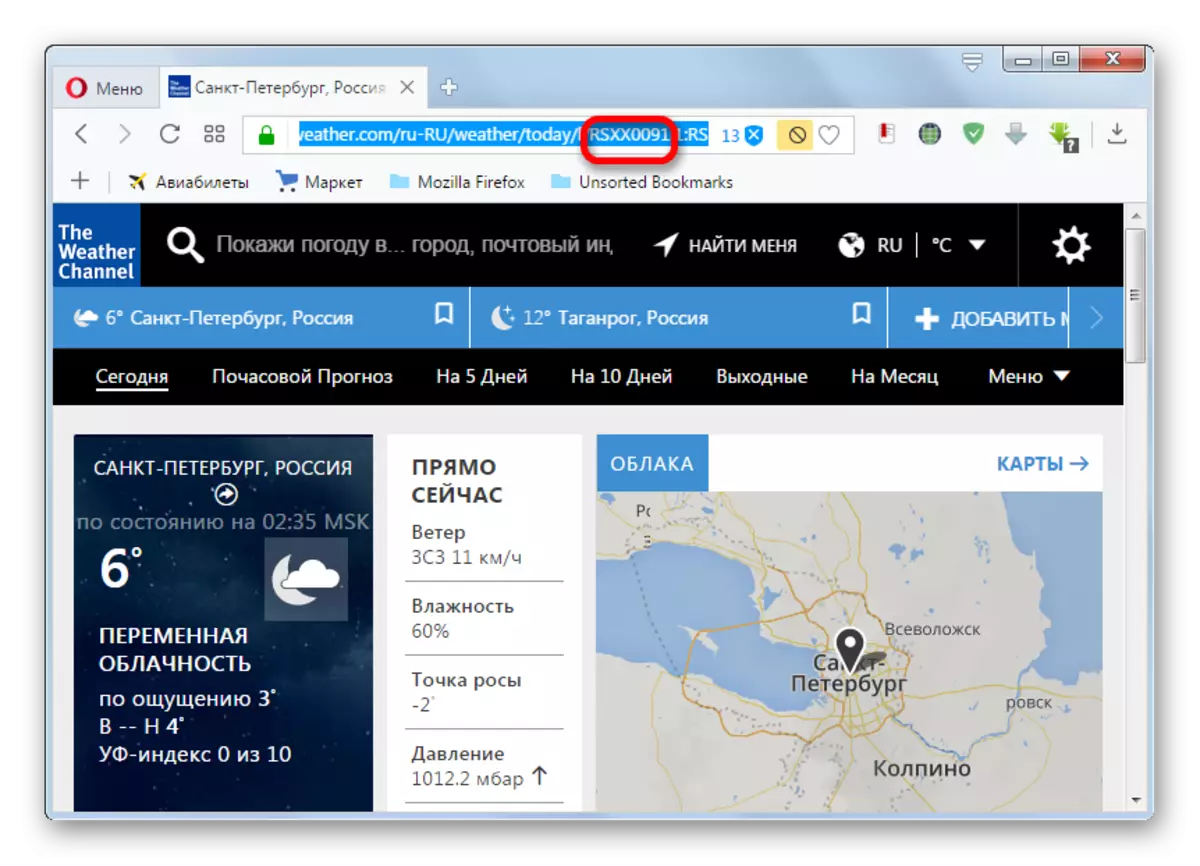
- After that, the browser redirects you to the page where the weather of the selected settlement is displayed. Actually, in this case, the weather itself will not be interested, but will be interested in the code that is located in the address bar of the browser. We need an expression that is located immediately following the oblique line after the letter "L", but before the colon. For example, as we see in the image below, for St. Petersburg, this code will look like this:
RSXX0091
Copy this expression.
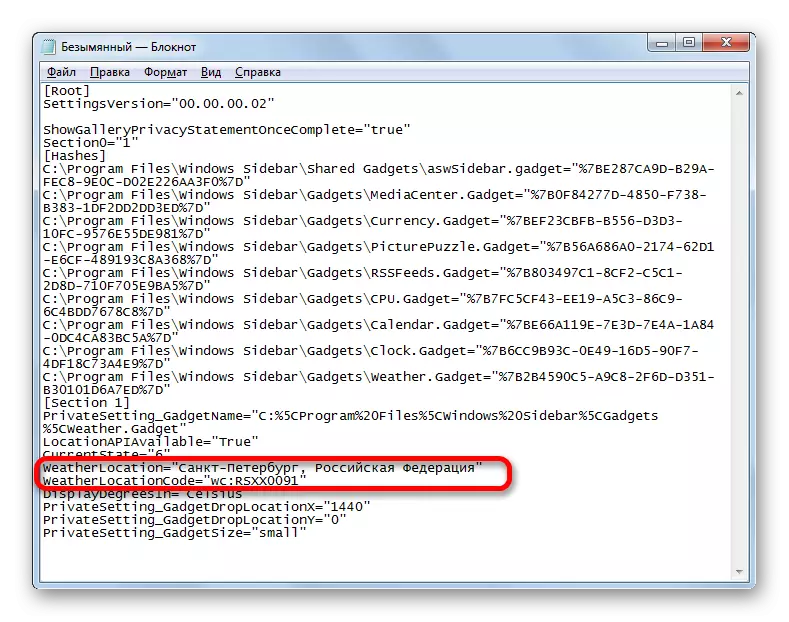
- Then return to the text file with the parameters running in the notebook. In the text we are looking for the lines "WeatherLocation" and "WeatherLocationCode". If you can't find them, it means that the contents from the settings.ini file was copied when the weather application was closed, which contradicts the recommendations that were given above.
In the "WeatherLocation" line after the sign "=" in quotes, it is necessary to indicate the name of the settlement and the country (republic, regions, the federal district, etc.). This name is absolutely arbitrary. Therefore, write in the format that you are more convenient. The main thing is that you yourself understand what kind of settlement are we talking about. We write down the following expression on the example of St. Petersburg:
WeatherLocation = "St. Petersburg, Russian Federation"
In the "WeatherLocationCode" string after the "=" sign in quotes immediately after the expression "WC:" insert the code of the settlement, which we have previously copied from the browser's address bar. For St. Petersburg, the string takes the following form:
WeatherLocationCode = "WC: RSXX0091"
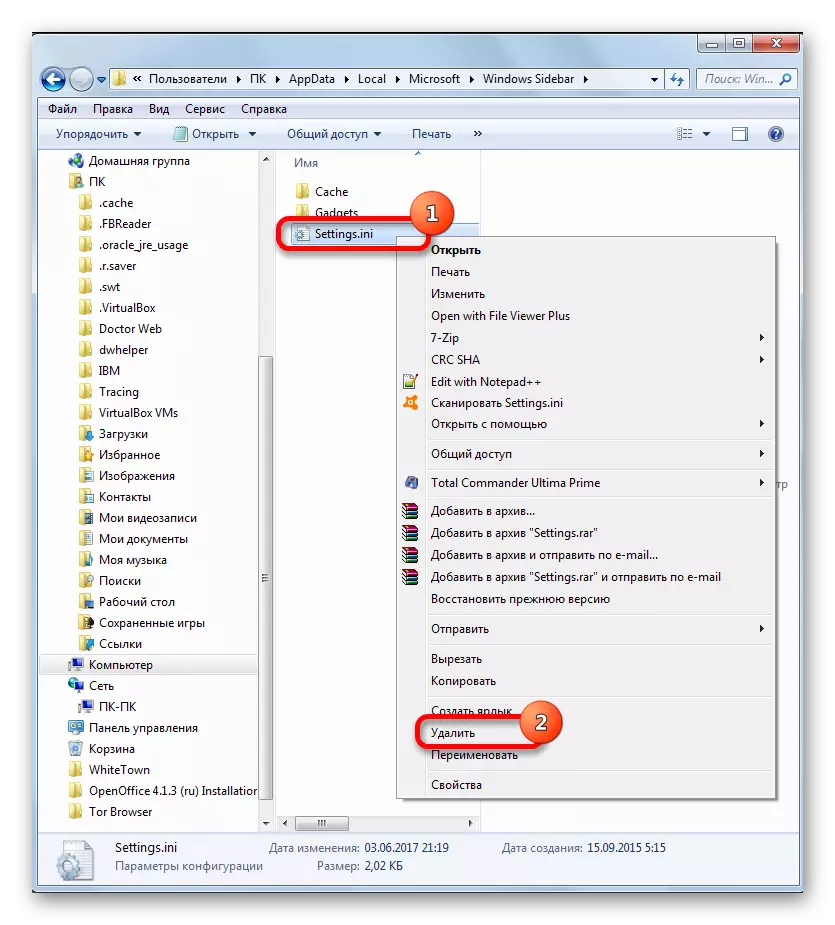
- Then we produce the closure of the weather gadget. Returning in the Explorer window to the Windows Sidebar directory. Click right-click on the name of the settings.ini file. In the context list, select "Delete".
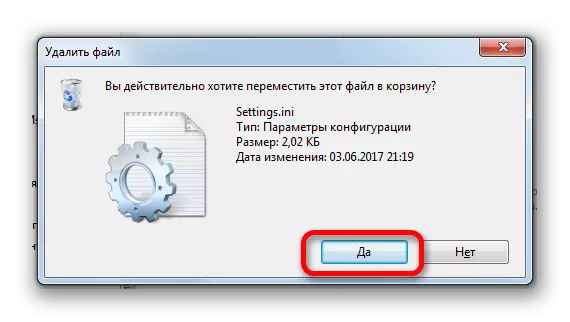
- The dialog box is launched, where you should confirm the desire to delete settings.ini. Click on the button "Yes".
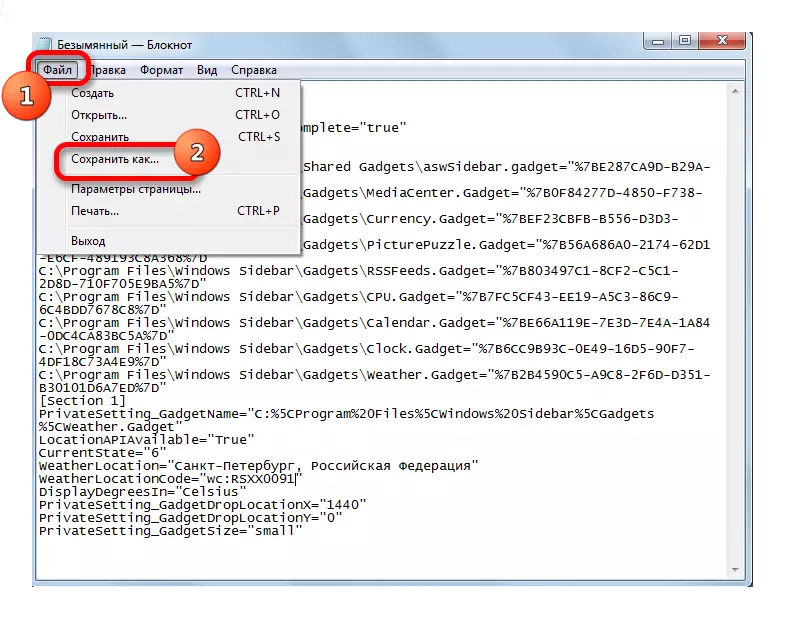
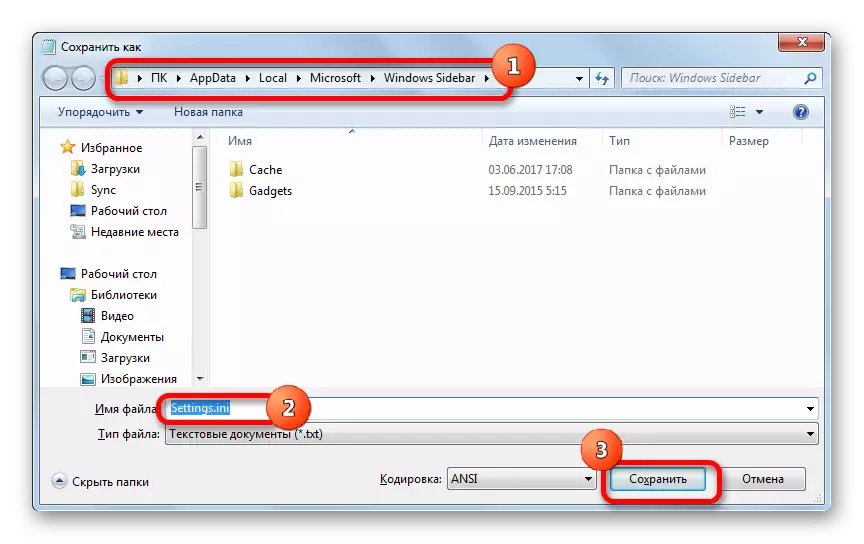
- Then we return to a notebook with text parameters edited earlier. Now we have to save them as a file in the place of the Winchester, where settings.ini was removed. Click in the horizontal menu of notepad by name "File". In the drop-down list, select the option "Save As ...".
- The window saves the file starts. Go to it to the folder "Windows Sidebar". You can simply drive into the address bar the following expression, replacing the "user_name" to the current value, and click on Enter:
C: \ Users \ Custom_Proof \ APPDATA \ Local \ Microsoft \ Windows Sidebar
In the "File Name" field, write "settings.ini". Click on "Save".
- After that, close the notebook and launch the weather gadget. As you can see, the settlement in it was changed to the one that we have previously specified in the settings.
Of course, if you constantly browse the weather status in various places on the globe, this method is extremely inconvenient, but it can be used if you need to receive weather information from one settlement, for example, from where the user itself is.
Disconnection and deletion
Now let's look at how to disable the weather gadget or, if necessary, completely delete.
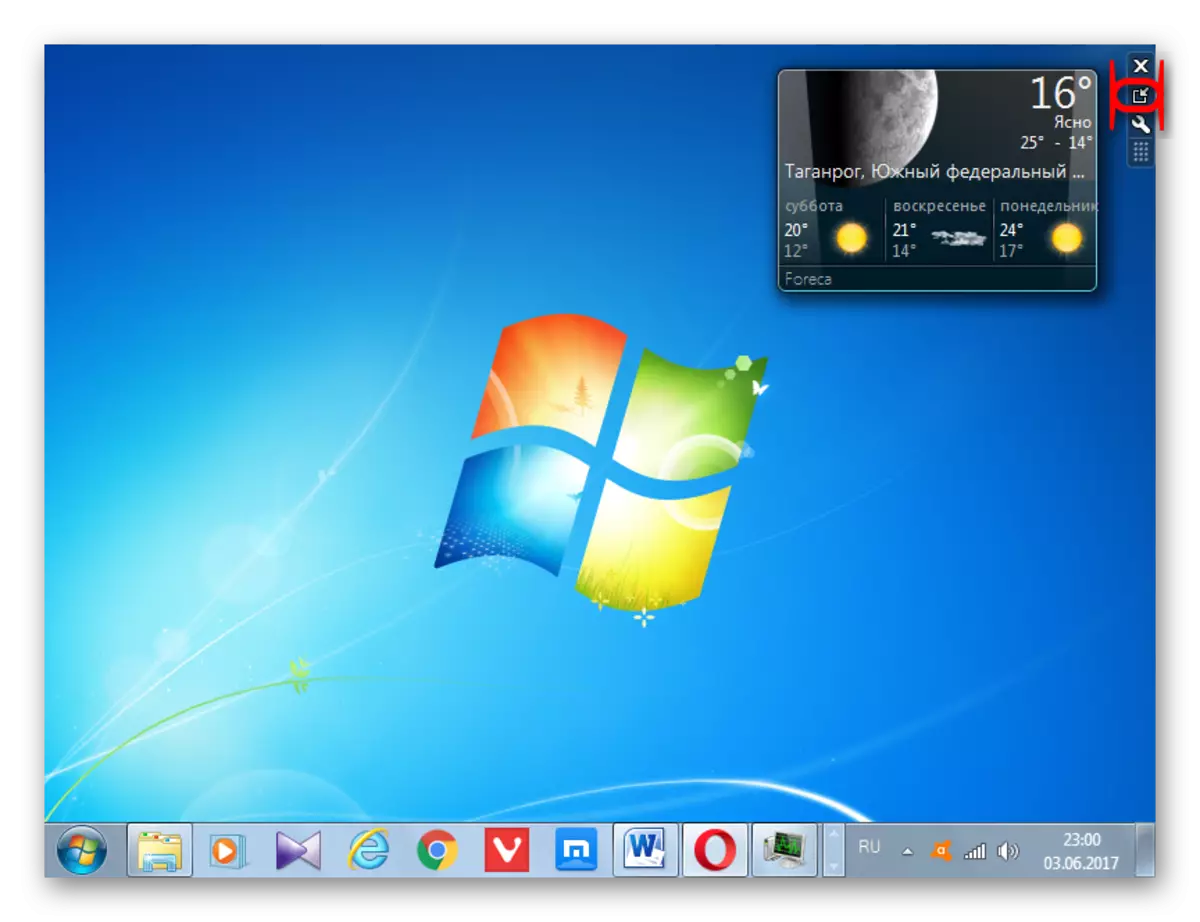
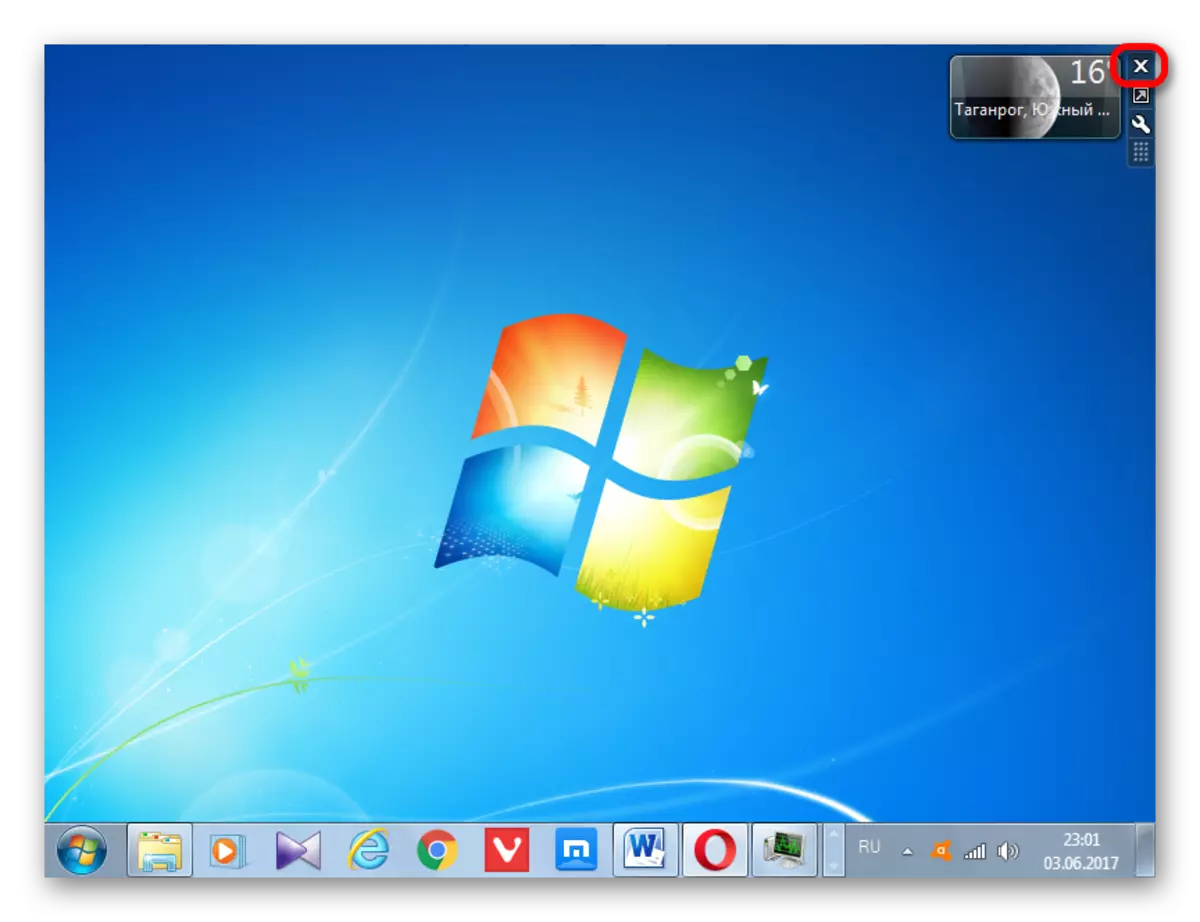
- In order to disable the application, send the cursor to its window. In the group of tools that appeared on the right, click on the upper icon in the form of a cross - "close".
- After executing the specified manipulation, the application will be closed.
Some users wish to remove the gadget from the computer at all. This may be due to various reasons, for example, with the desire to remove them, as a source of PC vulnerability.
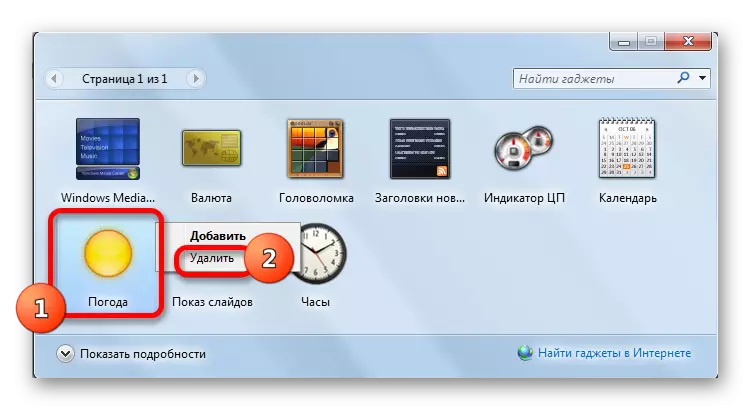
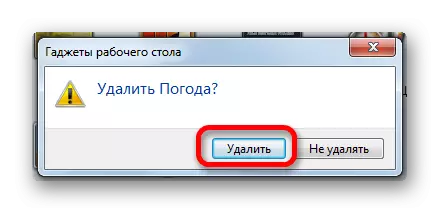
- In order to delete the specified application after its closure, go to the gadget window. We send the cursor to the weather icon. Click on it right mouse button. In the list running list, select the "Delete" option.
- The dialog box will start, where the question will be asked if the user is confident in the actions undertaken. If he really wants to delete, then click on the "Delete" button.
- The gadget will be completely removed from the operating system.
It is important to note that if you wish to restore it, it will be extremely difficult, since on the official website of Microsoft, due to the failure of support for working with gadgets, these applications are not available for download. We'll have to look for them on third-party sites, which may be unsafe for the computer. Therefore, you need to think well before initiating the removal procedure.
As you can see, due to the termination of the support of gadgets, Microsoft Corporation is currently configuring the weather application in Windows 7 associated with a number of difficulties. And even his holding, according to the recommendations described above, does not yet guarantee the return of full functionality, since it will have to change the parameters in the settings files every time the application is started. It is possible to establish more functional analogs on third-party sites, but it should be remembered that the gadgets themselves are a source of vulnerabilities, and their unofficial versions increase the danger repeatedly.