

The RAW disk format is a kind of "lack of format", or rather the file system on the disk: it happens with new or defective hard drives, and in situations, when there is a RAW format raw format from any system failure , incorrectly shutting down a computer or power supply problems, and in the latter case information on the disk is usually remained in retaining. Important note: Sometimes the disk is displayed as RAW if the file system is not supported in the current OS, in this case the actions should be taken to open the partition in the OS, which can work with this file system. In this manual, it is detailed how to fix the Disk with the RAW file system in different situations: when it has data, a system and you need to restore the former file system from RAW, or when any important data on HDD or SSD is missing and formatting Disk is not a problem.
- Fixed file system errors on disk
- Simple formatting of the section
- Restoring NTFS from RAW in DMDE (Suitable for FAT32)
- RAW Disc Fix in TestDisk
- How to restore disk from RAW on the system disk
- Video instruction
Checking the disk on errors and correct file system errors
This option is the first to try in all cases of the appearance of the section or RAW disk. It does not always work, but is safe and applied as in cases where the problem arose with a disk or section with data, and if the RAW disk is a system disk with Windows and the OS is not loaded.
In case the operating system works, simply follow these steps:
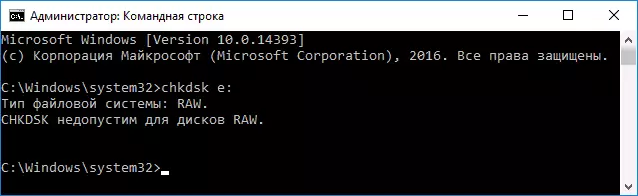
- Run the command prompt on behalf of the administrator. In Windows 10, this is easiest to use the search in the taskbar: enter "Command Line", press the right button on the result found, select the "Startup on behalf of the administrator" item. Other ways to run the command prompt on behalf of the administrator.
- Enter the command CHKDSK D: / F And press ENTER (in this command D: - This is the RAW disk letter to be corrected). If there is no disc letter, you can assign it to "Disk Management" through the disk context menu (shown in the video below).
After that, two options for developing events are possible: if the disk has become RAW due to a simple file system failure, checking and with a high probability you will see your disc in the desired format (usually NTFS) at its end. If it's more serious, the team will give "CHKDSK to invalid for RAW disks." This means that this method is not suitable for recovering the disc.
In those situations where the operating system does not start, you can use the Windows 10, 8 or Windows 7 recovery disk or distribution with the operating system, for example, the loading flash drive (I will give an example for the second case):
- Loading from the distribution (its discharge must coincide with the discharge of the installed OS).
- Next, either on the screen after selecting the language at the bottom of the left, select "Restore System", and then open the command line, or simply press SHIFT + F10 to open it (on some SHIFT + FN + F10 laptops).
- In the command line in order we use teams
- diskpart.
- List Volume (as a result of the execution of this command, we look at what letter is currently a problem disk, or, more precisely, the section, since this letter may differ from the one that was in the working system).
- EXIT.
- CHKDSK D: / F (where D: - The letter of the problem disk, which we learned in paragraph 5).
Here, the possible scenarios are the same as previously described: either everything will be fixed and after rebooting the system will start in the usual way, or you will see a message that you cannot use CHKDSK with a Disk Raw, then we look at the following ways.
Simple formatting of the disk or section RAW in the absence of important data on it
The first case is the easiest: it is suitable in those situations where the RAW file system you only have a purchased disk (this is normal) or if the existing disk or partition on it has this file system, but does not have important data, that is, restore the previous The disk format is not required.
In such a scenario, we can simply format this disk or by standard Windows tools (in fact, you can simply agree to the formatting offer in the conductor "To use the disk, first format it):
- Run the Windows Drive Utility. To do this, press Win + R keys on the keyboard and enter diskmgmt.msc, then press ENTER.
- The disk management utility opens. Right-click on the RAW section or disk, then select "Format". If the action is inactive, and we are talking about a new disk, then right-click on its name (left) and select "Initialize Disk", and after initialization, format the RAW section.

- When formatting, you will only need to set the volume label and the desired file system, usually - NTFS.
If for some reason it fails to format the disc in this way, try also, by right clicking on the section (disk) RAW first "Delete Tom", and then click on the area of the disk, which is not distributed and "Create a simple Tom". The volume creation wizard will invite you to set the drive letter and format it in the desired file system.
Note: In all ways to restore partition or disk RAW, the partition structure depicted on the screenshot is below: the GPT system disk with Windows 10, booting EFI, the recovery environment, the system partition and section E:, which is defined as having the RAW file system (this information I guess, it will help to better understand the steps presented below).

Restoring NTFS section from RAW in DMDE
Much more unpleasant if the disk who became RAW was important data and is required not to simultane, but return the section with these data.
In this situation, I recommend to try a free program for recovering data and lost partitions (and not just) DMDE, the official website of which is DMDE.ru (this manual uses the version of the GUI program for Windows). Details on the use of the program: Data recovery in DMDE.
The recovery process of the RAW section in the program will generally consist of the following steps:
- Select the physical disk on which the RAW section is located (Show Section "mark. Leave the included).

- If the lost section is displayed in the DMDE partition list (you can define the file system, size and cropping on the icon), select it and click "Open Tom". If it is not displayed - run full scan to search it.
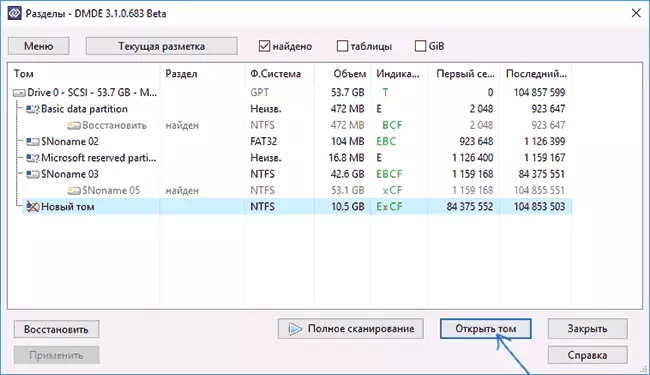
- Check the contents of the partition, whether it is needed. If yes, click the "Show sections" button in the program menu (at the top of the screenshot).

- Make sure the desired section is highlighted and click "Restore". Confirm the restoration of the boot sector, and then click the "Apply" button at the bottom and save the data to roll back to the file at a convenient location.

- After a short time, the changes will be applied, and the RAW disk will again be available and have the desired file system. You can exit the program.
- Some other nuances of using the program, for example, in the absence of the Restore button, are shown in the video instructions below.
Note: In my experiments, when correcting the RAW disk in Windows 10 (UEFI + GPT) using DMDE, immediately after the procedure, the system reported on disk errors (where the problem disk was available and contained all the data on it before) and offered to restart Computer to eliminate them. After reboot, everything worked fine.
In case you use a DMDE to correct the system disk (for example, by connecting it to another computer), consider that the following script is possible: the RAW disk will return the original file system, but when it is connected to a "native" computer or laptop, OS Will not boot. In this case, make a bootloader recovery, see Windows 10 bootload recovery, Windows 7 boot recovery.
RAW Disc Restore in TestDisk
Another way to efficiently search and restore the disk partition from RAW is a free TestDisk program. It is more difficult to use than the previous version, but sometimes it turns out to be more efficient.
Attention: You will be able to be described below only if you understand what you are doing and even in this case be prepared for what something goes wrong. Save important data on a physical disk, other than which actions are made. Also, go to the Windows Recovery Disk or distribution with the OS (possibly it will be necessary to restore the bootloader, the instructions for which I led above, especially if the GPT disk, even in cases where the system partition is restored).
- Load the TestDisk program from the official site http://www.cgsecurity.org/wiki/testdisk_download (the archive will be downloaded, including TestDisk and a program to recover PHOTOREC, unpack this archive at a convenient place).
- Start TestDisk (TestDisk_Win.exe file).
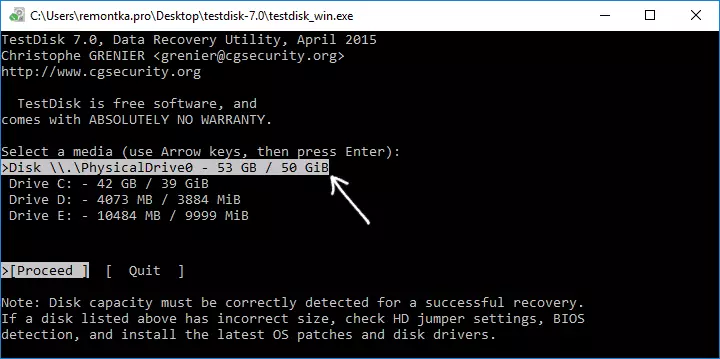
- Select "Create", and on the second screen, select the disk that has become RAW or has a section in such a format (choose exactly the disk, and not the section itself).
- On the next screen you need to select the style of the disk partitions. It is usually determined automatically - Intel (for MBR) or EFI GPT (for GPT disks).
- Select Analyze and press ENTER. On the next screen, press ENTER (with the selected Quick Search item) again. Wait until the disk is analyzed.
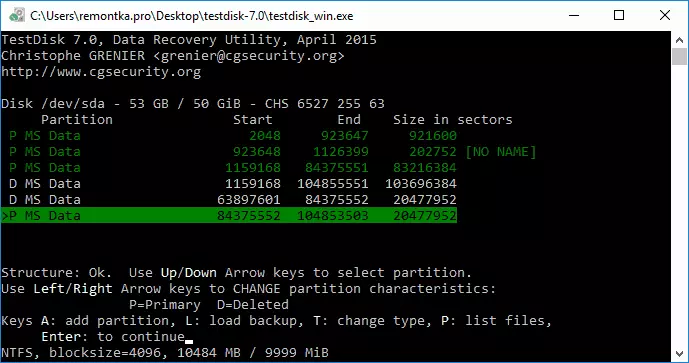
- Testdisk will find several sections, including the one that has turned into RAW. It can be determined by size and file system (size in megabytes is displayed at the bottom of the window when the corresponding partition is selected). You can also view the contents of the partition by pressing the Latin P, to exit the viewing mode, press Q. Sections with P (Green) will be restored and recorded, with the mark D - will not. To change the mark, use the "Left-Right" keys. If it fails to change, it means that the restoration of this section will violate the disk structure (and probably it is not the part that you need). It may turn out that currently present system partitions are defined by deletion (D) - change to (P) using the arrows. Press Enter to continue when the disk structure will correspond to the one that should be.
- Make sure that the partition table on the disk table is correct (that is, such as it should be, including the sections with the loader, EFI, the recovery environment). If you have doubts (you do not understand what is displayed), it is better not to do anything. If there is no doubt, select "Write" and press ENTER, and then Y to confirm. After that, you can close TestDisk and restart the computer, and then check whether the RAW section was restored.

- If the disk structure does not match what should be, then select "Deeper Search" to "deep search" sections. And just like in paragraphs 6-7, try to restore the correct partition structure (if you are not sure what you are doing, it is better not to continue, you can get a non-launched OS).
- More detailed instructions for the program: Restoring disk partitions in TestDisk.
If everything went successfully, the correct partition structure will be recorded, and after rebooting the computer, the disk will be available as before. However, as mentioned above, you may need to restore the bootloader, the automatic recovery is working in Windows 10 when loading in the recovery environment.
RAW file system on a Windows system section
In cases where the problem with the file system appeared on the section with Windows 10, 8 or Windows 7, and the simple CHKDSK does not work in the recovery environment, you can either connect this disk to another computer with the running system and correct the problem on it or use LiveCD with means to restore partitions on disks.
- LiveCD list containing TestDisk is available here: http://www.cgsecurity.org/wiki/testDisk_LiveCD
- To restore from RAW using DMDE, you can extract the program files to the boot flash drive based on WinPE and, booting from it, start the executable program file. The official website of the program also has instructions for creating DOS boot drives.
There is also third-party LiveCD specifically designed to restore sections. However, in my tests, only a paid Active Partition Recovery Boot Disk was workable in my tests, all the rest allow only those sections that were deleted (retained disk space), ignoring the RAW sections (the Partition function works so Recovery in the boot version of Minitool Partition Wizard).
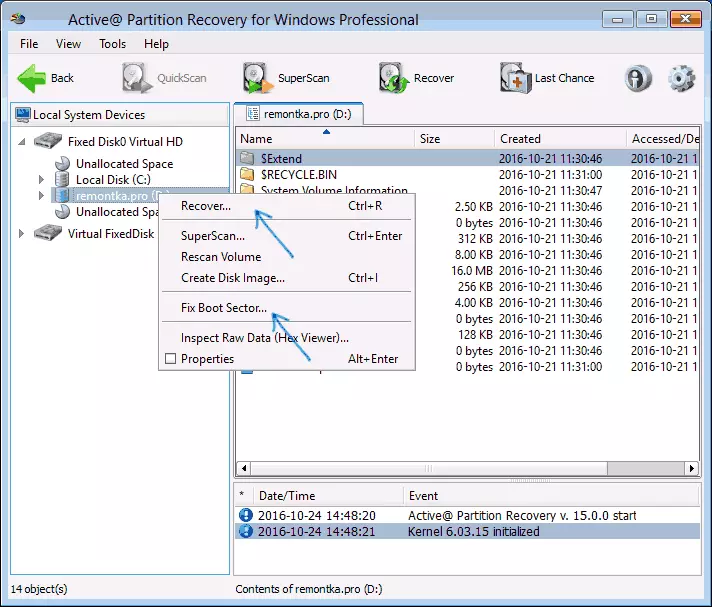
At the same time, the Active Partition Recovery boot disk (if you decide to use), can work with some features:
- Sometimes it shows the RAW drive as ordinary NTFS, displaying all the files on it, and refuses to restore it (the RECOVER menu item), reporting that the section and so is present on the disk.
- If it does not occur in the first paragraph, then after recovery using the specified menu item, the disk is displayed as NTFS in Partition Recovery, but remains RAW in Windows.
Solves another menu item - Fix Boot Sector, even if we are not talking about the system section (in the next window, after selecting this item, it is usually no need to perform any actions). In this case, the file system of the section begins to be perceived by the OS, but there are problems with the bootloader (solved by standard Windows recovery tools), as well as the forced launch of the disk check by the system at the first start.
Restoring a disk or flash drive Raw - video instruction
Finally, if it happened so that none of the ways could help you, or the proposed options seem frighteningly complex, almost always it is possible to simply restore important data from the RAW sections and discs, free programs for data recovery will help.